Audio Physic Virgo 25 plus User manual

Owner´s Manual
VIRGO 25plus
Reference Series

English Deutsch Reference Series
Contents
Included in the Delivery page 3
Welcome page 12
General Tips page 13
Unpacking and Assembly page 14-15
Connecng the Loudspeakers / Bi-Wiring Operaon page 16
Seng Up the Loudspeakers page 17-18
Technical Specicaons page 19
2

Reference Series
English
Included in the Delivery
Your new loudspeakers are delivered in two separate boxes. One box contains one loudspeaker
and the accessory pack “1“, as well as your “Welcome to the Audio Physic Family“ package
containing this Owner‘s Manual and the Final Inspecon Cercate. In the second box you will
nd the other loudspeaker and a further accessory pack (number “2“).
Box “A“ • “Welcome to the Family“ with spirit level to opmise setup
•Accessory Pack (“1“): 1x front grille
2x metal stands
4x decorave caps for the loudspeaker feet
1x mounng set with 4x spikes
4x nuts
4x ange bolts
4x plasc washer
1x Allen key
Box “B“ •Accessory Pack (“2“): 1x front grille
2x metal stands
4x decorave caps for the loudspeaker feet
1x mounng set with 4x spikes
4x nuts
4x ange bolts
4x plasc washer
1x Allen key
3

English Reference Series
Welcome
Dear music lover,
We would like to thank you for pung your trust in our products and welcome you to the family
of audiophile friends of AUDIO PHYSIC.
You have chosen a top-class product that has been developed in Germany. We would like to
congratulate you on this choice and wish you a lot of fun and enjoyment with your product.
In order to earn your trust, we only use the latest technical experse and top-quality components
when manufacturing our loudspeakers and we produce them in accordance with strict quality
criteria. These criteria enable us to provide original owners with a 10 year warranty for our
loudspeakers (2 years for the subwoofer electronics and 10 years for the drivers), starng on the
date of purchase of the product by the original owner, which is far longer than the legally
prescribed warranty periods. In order to secure this addional service, please ll out the warranty
card enclosed with your loudspeakers and send this and a copy of your proof of purchase to your
AUDIO PHYSIC distributor.
Only aer several electronic and acousc test runs, which our quality assurance sta conrm by
signing the enclosed cercate, are our loudspeakers allowed to leave the factory in secure
packaging. These measures help to ensure that you can enjoy the full experience of the high-quality
materials, producon and sound of AUDIO PHYSIC loudspeakers in the comfort of your own home.
As a rule, your competent AUDIO PHYSIC dealer will deliver and install your loudspeakers. If you
would rather install your product yourself, the following pages provide you with detailed ps and
steps to follow in order to safely set up your loudspeakers. Have fun with your VIRGO 25plus!
No loss of ne detail: If you want a close-up
rst-hand experience of exactly what your
new AUDIO PHYSIC loudspeakers can do,
we recommend that you try out our
Anniversary Sampler CD. These 16 pieces
of classical music with awless quality are
bound to put a smile on your face.
12

Reference Series English
General Tips
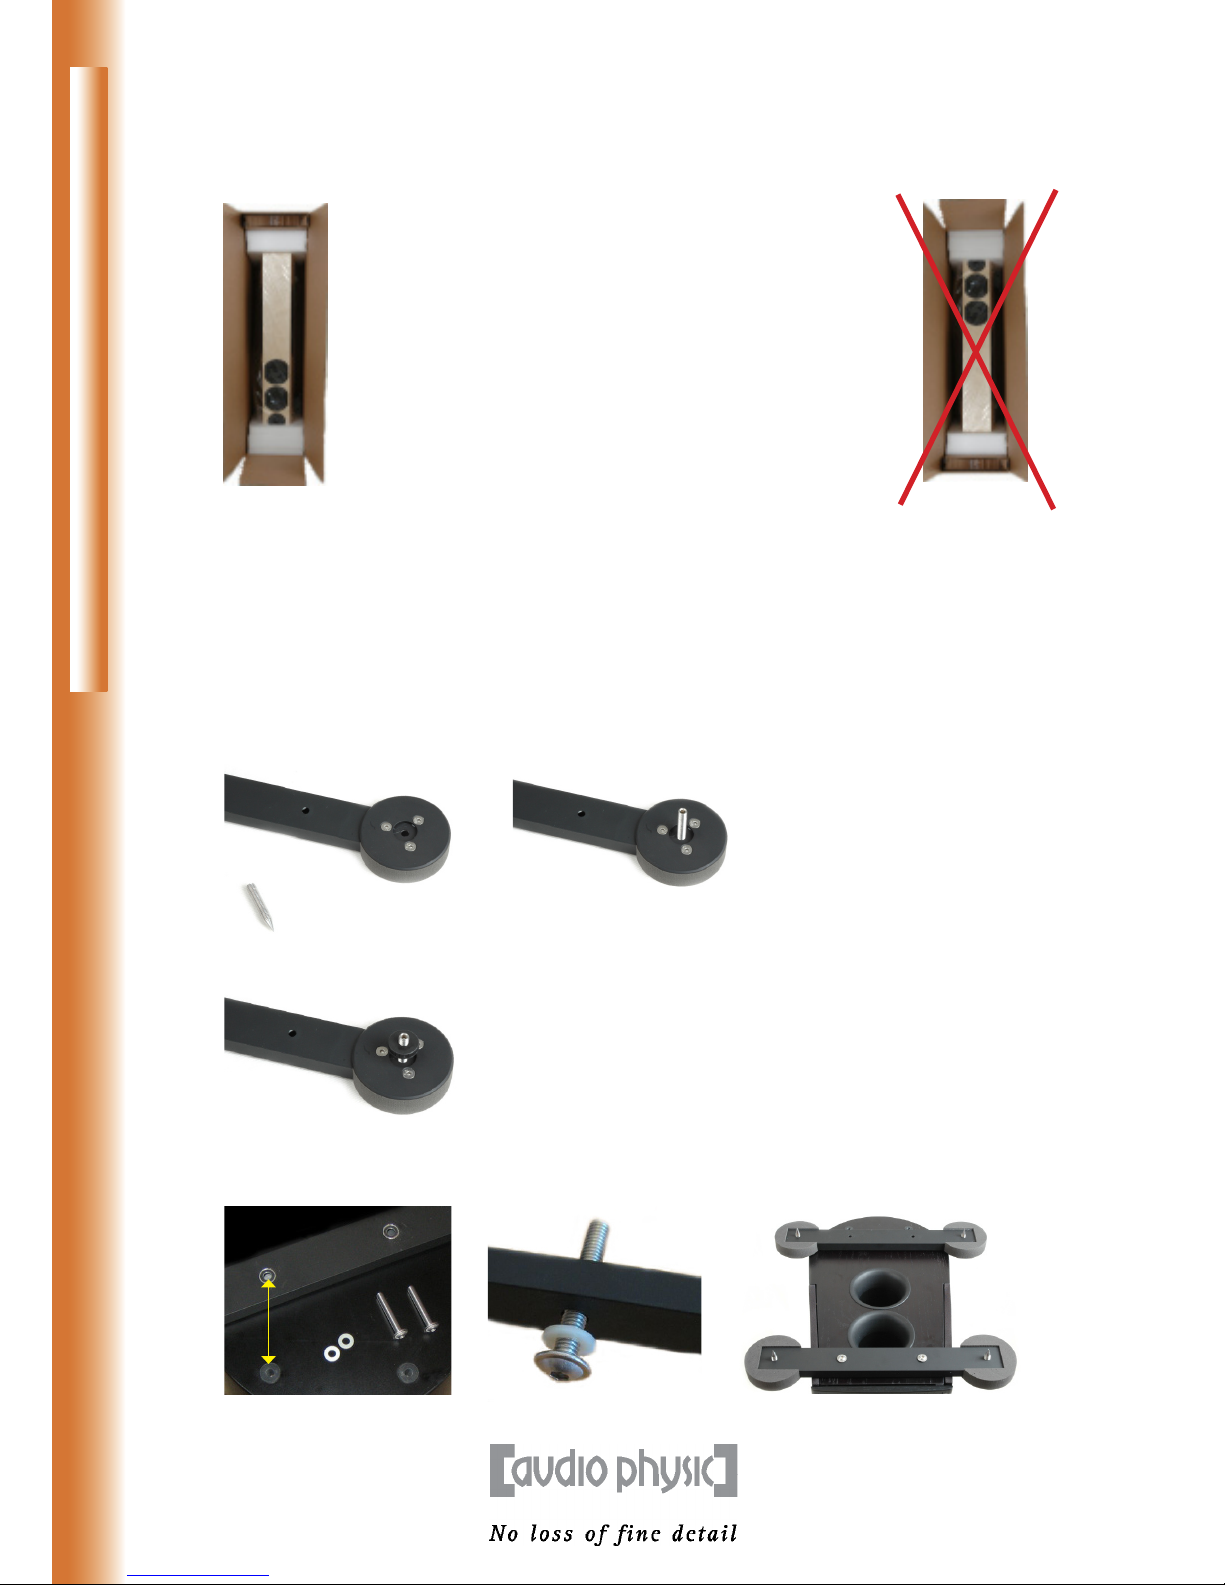
Depending on the size of your loudspeakers, it is a good idea for two people to unpack them. The
ideal way to do so is to put the boxes on the oor, making sure that the product labels are facing
up. Open the packaging carefully and remove the accessory packs from the box. Then work together
to aach the foot construcon as described in the chapter “Unpacking and Assembly“.
The loudspeakers should reach a temperature that is approximately equivalent to room
temperature before you connect them to the HiFi system and/or operate them. This instrucon
predominately refers to the winter months in case the loudspeakers were previously stored in
a cold room.
Maintenance
Our loudspeakers are coated in high-quality veneers or high-gloss lacquers. You should avoid using
chemical cleaning agents because these can aack the loudspeaker surfaces and make them go
ma. As a rule, a ne, so and damp cloth is all that you need to clean the surfaces. If a cleaning
agent is required, use this to dampen the cloth and do not directly apply it to the surface. It is best
if you test the suitability of the cleaning agent on a less visible part of the cabinet.
The drivers do not normally need to be cleaned. Dust parcles fall o quickly when the loudspeakers
are operated. You can, however, carefully clean the drivers with a so brush. When doing so, please
only lightly brush over the surface and do not put any pressure on it. Please never use any cleaning
agents on the drivers. Do not expose the loudspeakers to direct sunlight. Anodised
surfaces are sensive to acids and alkalis and to ultraviolet light and may fade.
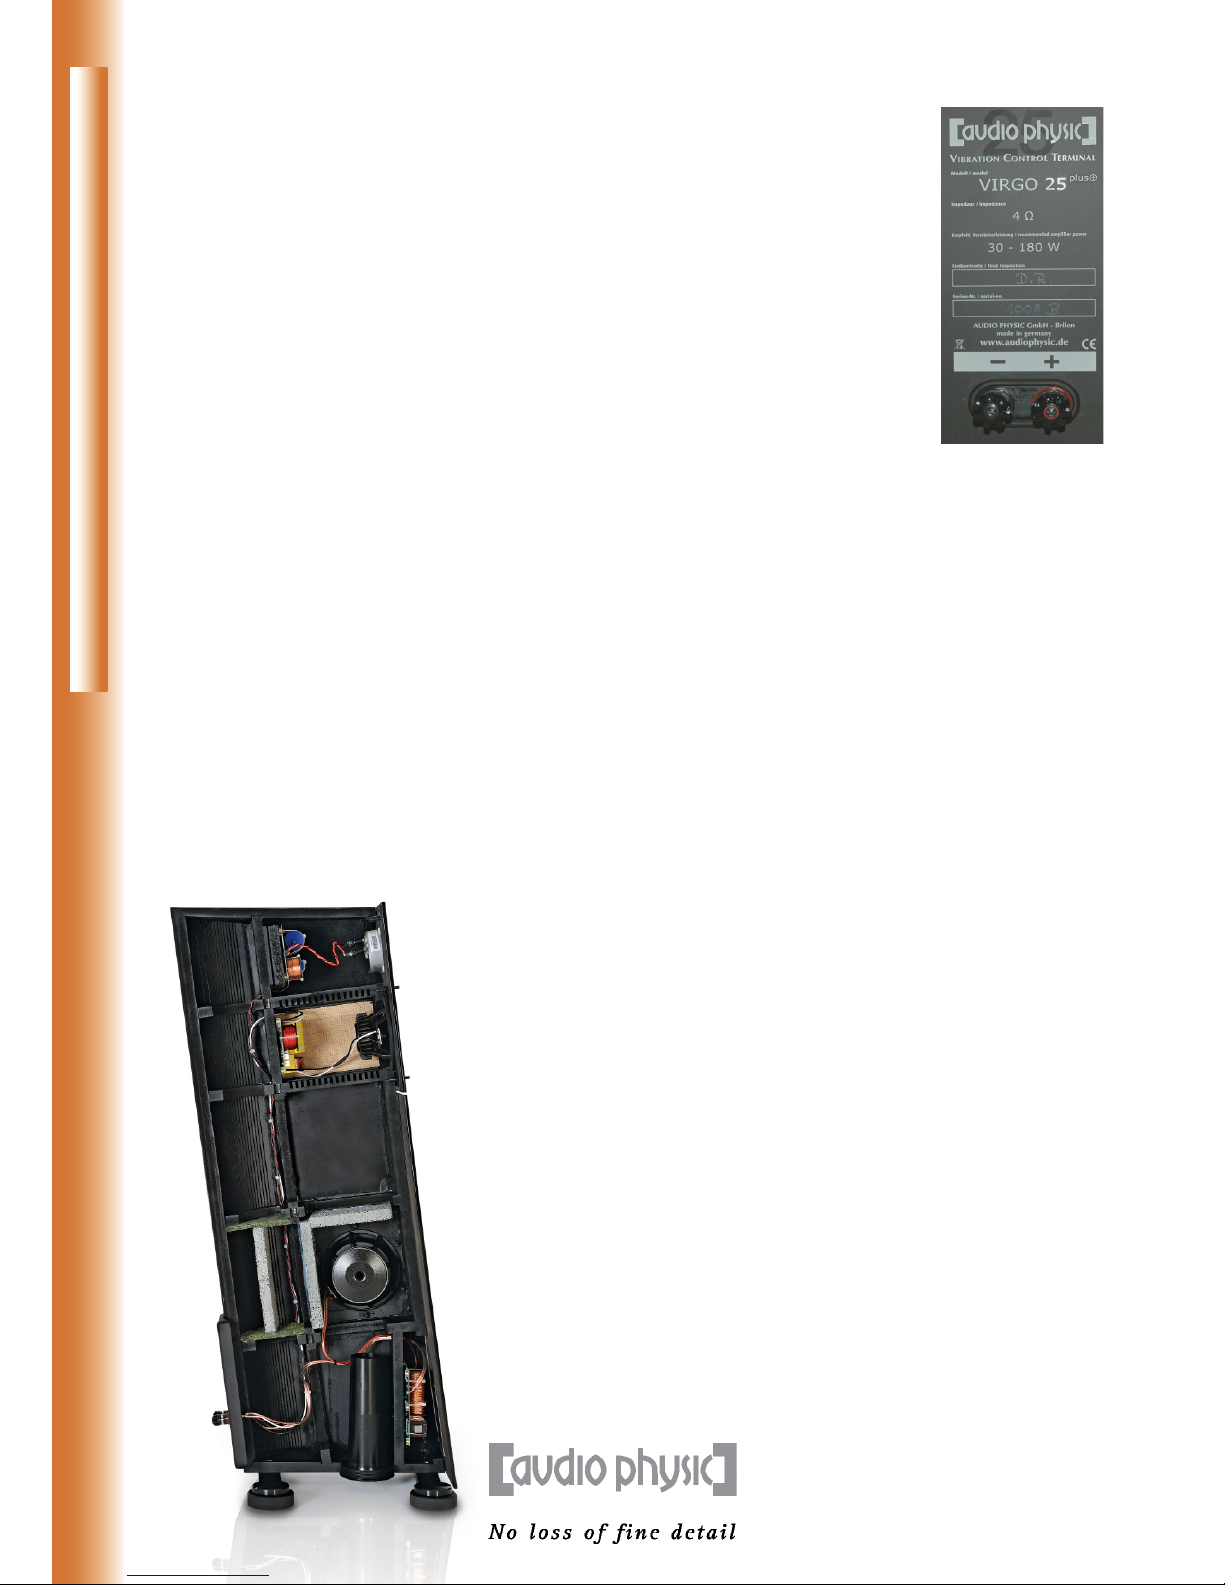
The drivers in this range of AUDIO PHYSIC loudspeakers use a unique mounng technique. Rather
than directly mounng the drivers onto the cabinet of the loudspeaker, the drill holes contain
special neoprene plugs. These neoprene plugs ghten in the mounng hole when the screws are
ed, creang a permanently elasc connecon between the driver and the cabinet that reduces
resonance. You do not need to ghten these screws. Re-ghtening the screws may damage the
plugs and have a negave eect on the sound.
Burning in the Loudspeakers
The loudspeakers rst reach their full sound potenal aer a specic burn-in period. We burn in the
drivers at our factory prior to assembly, meaning that they normally only need a burn-in period of
a few hours at a normal room volume and with music that has a range of frequencies that is as wide
as possible, for example orchestral pieces. Recordings containing ’white or pink noise’ such as those
available on many so-called Test CDs are also ideal. For safety reasons, these pieces should never
be played at high volumes.
Stray Magnec Fields
The magnec eld created by the individual driver magnets may to some extent have an eect
outside of the loudspeaker. This stray magnec eld may interfere with other devices, parcularly
televisions and monitors with cathode ray tubes (not LCD or plasma televisions), for example by
causing changes in colour in the picture. We recommend that you place the loudspeakers
approximately half a metre away from such devices (and also from magnet tapes, video cassees,
credit cards with magnec stripes, etc.).
Where possible, please retain the loudspeaker packaging. You can then securely transport your
loudspeakers if you move house.
13

English Reference Series
14
Unpacking and Assembly
1. Place the boxes on the oor, making sure that the product labels are facing up. Carefully
open the packaging on the long side where it has been taped up, as shown in the illustraons
below (illustraon similar), preferably using a pocket knife or kitchen knife.
2. Remove the accessory packs from the boxes.
3. Carefully remove the loudspeakers, together with their protecve foam pads, from the
upright box. It is ideal if two people carry out this step. Make sure that you do not touch the
drivers when removing and handling the loudspeakers as this may cause irreparable damage
to the drivers.
4. Now remove the foam cover from the top and carefully pull down the foil, so that you can
easily aach the foot construcon.
5. Remove the metal stands from the accessory pack and screw the spikes into the designated
inserts.
6. Tighten the lock nuts onto the spikes from above.
7. Now lay the metal stands with the aached spikes on the loudspeaker and adjust the stands
so that their screw inserts are aligned with the inserts in the loudspeaker base.
Correct: In order to correctly
unpack the loudspeaker, the top of
the loudspeaker should be facing
down. This means that you will
easily be able to hold on to the
bottom of the loudspeakers when
carefully pulling them out of
the box and also enables you to
attach the foot construction
without difculty.
False: If the top of the
loudspeaker is facing up,
you will have to turn the
loudspeaker upside down
once you have removed it
from the box in order to
attach the foot
construction.

Reference Series English
15
8. Place the plasc washers included in the delivery onto the bore holes of the stands from
above and insert the provided ange bolts into the holes. Tighten the ange bolts rmly.
The bolts need about seven turns for opmum grip.
9. Now turn over the loudspeakers so that the metal feet are in stable contact with the oor.
Two people should also carry out this step where possible. Make sure that you do not hurt
yourself on the ps of the spikes.
10. Place the loudspeakers in their intended posions and nely adjust the spikes so
that the loudspeakers do not wobble. If you do not place the loudspeakers in a
secure and stable posion and they therefore wobble, this will have a major eect
on the sound. When the boxes are standing level and upright, you have set them up
perfectly. The enclosed spirit level will help you to nely adjust the loudspeakers
(they are level when the bubble remains in the inner circle). Use the lock nuts to
again ghten the spikes. Roughly hand-ghtening the nuts is sucient.
11. Aach the foot end caps to the feet. The small foam ring secures the decorave cap and
ensures that the cap does not resonate when the loudspeaker is operated. Simply li up the
foot end caps to remove them.
You can now start to opmally align your new VIRGO 25plus to the listening posion. You can nd
ps regarding this process in the following chapter on “Setup” and can access parcularly detailed
informaon on the AUDIO PHYSIC website.
If you want to increase the sound quality even more in terms of precision and bass
response, try out our high-quality VC feet (for example VCF II Double M8 in the image
on the right) on your loudspeakers. The “Vibraon Control“ feet are not only an
alternave to spikes for high-quality ooring, but also reduce the transmission of
vibraons between the loudspeakers and the oor. This results in an audible
improvement to the level of detail and realisc sound reproducon. For more
informaon and advice, please contact your dealer.
(illustration similar)

English Reference Series
Connecng the Loudspeakers
1. Please switch o all equipment in your HiFi system before you begin to
connect your loudspeakers.
2. Aach the loudspeaker cable to the connectors on the loudspeakers.
When doing so, please make sure that you have the right polarity.
As a rule, loudspeaker cables are accordingly labelled, either by a
permanent marking on one of the two conductors of the cable or by
plus “+” and “-“ markings on the cable ends.
3. Now connect the cable to your loudspeaker and make sure that you also
have the right polarity here.
4. The VIRGO`s connectors, which are shown in the image on the right,
accept both spades and banana plugs. Loose cable strands oxidise easily
and are not suitable for a permanently high-quality listening experience.
“Bi Wiring“ Operaon
If your loudspeaker is ed with a bi-wiring terminal and you would like to use this opon, please
connect the loudspeaker cable from the amplier for the le loudspeaker to the upper two
connectors on the le loudspeaker in order to control its midrange area and tweeter system and
a further cable to the connectors underneath in order to control the woofer system. Carry out the
same steps on the loudspeaker to the right of the listening posion. Please remove and retain the
respecve bi-wire bridges on the loudspeaker terminals before connecng the cables.
16
A glance into the interior of the
Virgo 25plus shows the complex
design of the loudspeaker and the
ceramic elements (grey) for added
rigidity.

Reference Series English
Seng Up the Loudspeakers
1. The ideal placement of your loudspeakers in your room involves posioning them in an
isosceles triangle arrangement including your listening seat, creang equal spacing between
each loudspeaker and the listening posion.
2. The distance between the loudspeakers should be around 0.8 - 1.2 mes as much as the distance
between the loudspeakers and the listening posion. The closer you sit to the loudspeakers,
the more direct and dry your sound experience will be. As you move further away from the
loudspeakers, the bass response will normally increase and the spaal imaging will seem
more generous.
3. Where possible, the loudspeakers should be posioned half a metre away from the
surrounding walls. The larger the space between the loudspeakers and back wall, the more
precise the sound reproducon, parcularly
where bass frequencies are concerned.
4. The closer the loudspeakers come to the back wall (and/or side wall), the more powerful the
broadband reproducon of the low frequencies will be resulng in stronger bass tones.
This bass boost can, however, also result in a sound
reproducon that is undierenated and lacking
in detail, depending on how close the loudspeakers
are to the walls.
5. This eect can be made even more intense when the loudspeakers are placed in a corner. Low
tones become around 6 decibels (or more) louder and have a major eect on the sound
reproducon. Where possible, you should not
place your new loudspeakers in a corner because
the acousc condions in this posion do not allow
them to display their full range of sound
reproducon possibilies, instead they will stay far
below their actual sound potenal.
Setup close to the wall: Low frequencies are
broadly reinforced by around +3 and +6
decibels when the loudspeakers are positioned
close to the wall.
Setup away from the wall: The loudspeakers
are positioned at least 50 centimetres away
from the surrounding walls.
> 50 cm
> 50 cm
Setup in the corners of the room: Low tones
become signicantly louder and overlap into
the midrange frequencies. This results in a
washed-out and lethargic sound reproduction.
Bass boost of + 3 to + 6 dB
Bass boost > 6 dB
17

English Reference Series
6. Alongside the strength of the bass response, the distance from the side walls also parcularly
aects the localisaon of sound events and therefore the precision of the spaal imaging. As the
distance from the walls increases, the localisaon will become more precise and the sound will
be more balanced. When the loudspeakers are extremely close to the side walls, this will result
in early acousc reecons, leading to both reduced spaal percepon and a rather nervous
sound reproducon. Curtains or shelves or similar at the sides reduce this eect.
Posioning the Loudspeakers
1. Once the loudspeakers are posioned parallel to the side walls, turn them inwards unl an
imaginary line is poinng from the tweeter of each loudspeaker towards your preferred
listening posion. If you prefer to listen to music alone, these imaginary lines coming from
the loudspeakers should ‘intersect‘ at your listening posion. This will result in excellent
localisaon and spaal imaging. If you would rather listen to music in a group, turn the
loudspeakers further inwards so that the imaginary lines cross in front of the listening posion.
2. If you prefer a wider soundstage and more generous spaal imaging, posion the loudspeakers
at less of an angle so that the imaginary lines cross just behind the listening posion. Once a
specic angle has been reached, the spaal image in the centre between the loudspeakers will
begin to lose structure and precision. You can easily idenfy the ideal angle by using a mono
recording. When the voice of the arst sounds clear again and comes directly from the middle
between the loudspeakers, you have found the ideal posion.
You can nd an abundance of further ps concerning seng up your speakers and background
informaon on the topic of listening in the technical area of our website at: www.audiophysic.de
Second Step: Experiment with the angle.
When it comes to positioning your loudspea-
kers, your listening taste plays an important
role. To nd the ideal position, mono recor-
dings are extremely useful, particularly those
with a singing voice and few instruments.
First Step: Angle the loudspeakers so
that an imaginary line is in place between
the tweeters and your listening position.
18

Reference Series English
Technical Specicaons VIRGO 25plus
Height
Width
Depth
Required Space: Width x Depth
Weight
Recommended amplier power
Impedance
Frequency range
Sensivity
41.5“
9.1“
15.7“
14.7“ x 18.5“
71 lbs. each
30 - 180 watts
4 Ohm
30 Hz - 40 kHz
89 dB
Loudspeaker systems
Woofer 2 x 7“
Midrange 1 x 5.9“ / HHCM
Tweeter 1 x 1.75“ / HHCT-II
19

AUDIO PHYSIC GmbH
Almerfeldweg 38
59929 Brilon / Deutschland
Germany
Tel. +49(0)2961/9617-0; Fax +49(0)2961/51640
inf[email protected] / www.audiophysic.de
Reference Series
Distributed in North America by:
VANA, Ltd.
2845 Middle Country Road Lake
Grove, NY 11755 (631)
246-4412.
www.vanaltd.com
Table of contents
Other Audio Physic Speakers manuals

Audio Physic
Audio Physic CLASSIC Compact User manual

Audio Physic
Audio Physic OREA User manual

Audio Physic
Audio Physic CLASSIC On-Wall User manual

Audio Physic
Audio Physic CARDEAS 30 User manual

Audio Physic
Audio Physic STEP plus User manual

Audio Physic
Audio Physic TEMPO plus User manual

Audio Physic
Audio Physic AVANTI User manual

Audio Physic
Audio Physic AVANTI User manual

Audio Physic
Audio Physic VIRGO III User manual