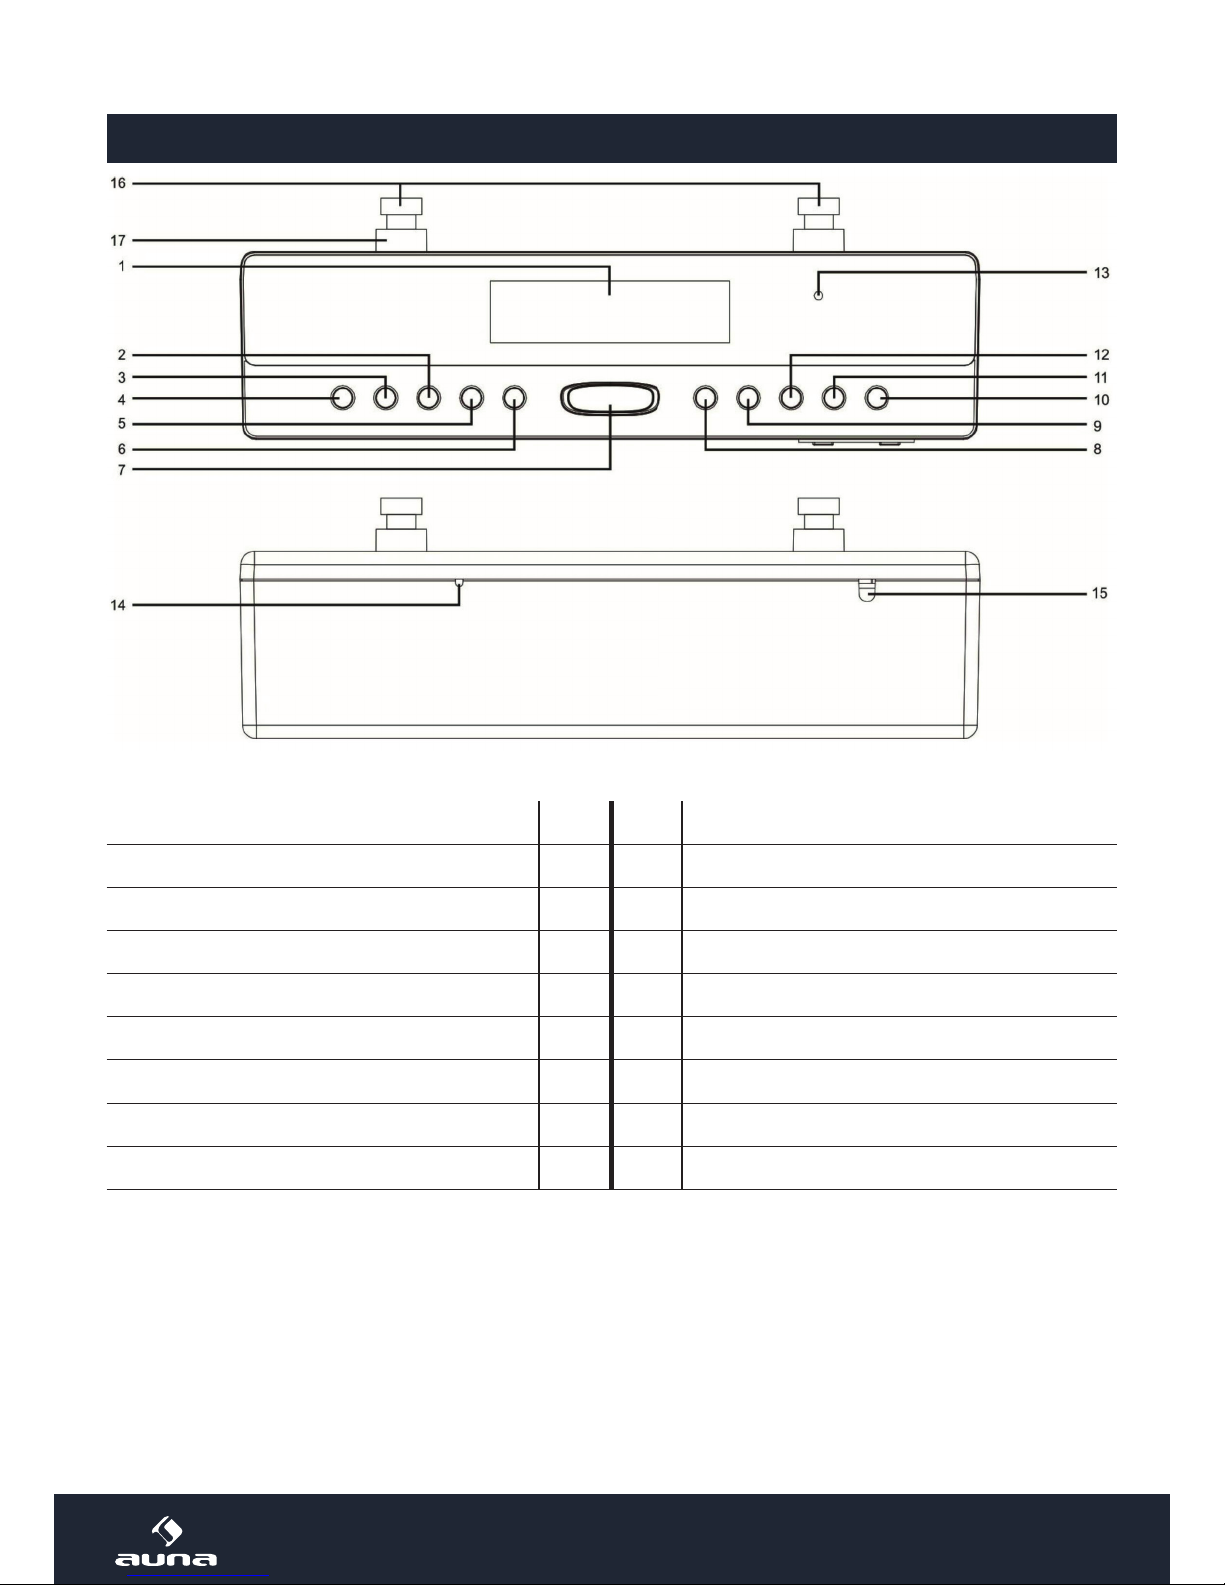
auna KR-100 User manual

www.auna.de
10030745 10030746
Küchen-Unterbauradio: DAB+, FM, BT, Koch-Timer
KR-100

2
www.auna.de
Sehr geehrter Kunde,
wir gratulieren Ihnen zum Erwerb Ihres Gerätes. Lesen Sie die folgenden Hinweise sorgfältig durch und
befolgen Sie diese, um möglichen Schäden vorzubeugen. Für Schäden, die durch Missachtung der Hin-
weise und unsachgemäßen Gebrauch entstehen, übernehmen wir keine Haftung.
Sicherheitshinweise
• Diese Bedienungsanleitung dient dazu, Sie mit der Funktionsweise dieses Produktes vertraut zu ma-
chen. Bewahren Sie diese Anleitung daher stets gut auf, damit Sie jederzeit darauf zugreifen können.
• Sie erhalten bei Kauf dieses Produktes zwei Jahre Gewährleistung auf Defekt bei sachgemäßem
Gebrauch.
• Bitte verwenden Sie das Produkt nur in seiner bestimmungsgemäßen Art und Weise. Eine ander-
weitige Verwendung führt eventuell zu Beschädigungen am Produkt oder in der Umgebung des Pro-
duktes.
• Önen Sie das Produkt niemals eigenmächtig und führen Sie Reparaturen nie selber aus!
• Behandeln Sie das Produkt sorgfältig. Es kann durch Stöße, Schläge oder den Fall aus bereits gerin-
ger Höhe beschädigt werden.
• Halten Sie das Produkt fern von Feuchtigkeit und extremer Hitze.
• Lassen Sie keine Gegenstände aus Metall in dieses Gerät fallen.
• Stellen Sie keine schweren Gegenstände auf dieses Gerät.
• Reinigen Sie das Gerät nur mit einem trockenen Tuch.
Kleine Objekte/Verpackungsteile (Plastikbeutel, Karton, etc.):
Bewahren Sie kleine Objekte (z.B. Schrauben und anderes Montagematerial, Speicherkarten) und Ver-
packungsteile außerhalb der Reichweite von Kindern auf, damit sie nicht von diesen verschluckt werden
können. Lassen Sie kleine Kinder nicht mit Folie spielen. Es besteht Erstickungsgefahr!
Transport des Gerätes:
Bitte bewahren Sie die Originalverpackung auf. Um ausreichenden Schutz beim Transport des Gerätes
zu erreichen, verpacken Sie das Gerät in der Originalverpackung.
Reinigung der äußeren Oberäche:
Verwenden Sie keine üchtigen Flüssigkeiten, wie Insektensprays. Durch zu starken Druck beim Abwi-
schen können die Oberächen beschädigt werden. Gummi- oder Plastikteile sollten nicht über einen
längeren Zeitraum mit dem Gerät in Kontakt sein. Nutzen Sie ein trockenes Tuch.

3
www.auna.de
Übersicht und erste Schritte
Display 1 10 PLAY/PAUSE/SCAN/SELECT
INFO 2 11 SKIP +
SLEEP/TIMER 3 12 SKIP -
MODE/PHONE 4 13 Integriertes Mikrofon für Freisprechen
MEMORY 5 14 FM-Antenne
ALARM/SNOOZE 6 15 Netzkabel
STANDBY 7 16 Schrauben für Schrank-Unterbau
VOL - 8 17 Fassungen für Unterbaumontage
VOL + 9

4
www.auna.de
Inbetriebnahme
Verbinden Sie das Gerät mit einer Steckdose und schalten Sie es mit STANBY ein. Nach dem ersten
Einschalten, schaltet das Gerät zunächst automatisch in den DAB-Modus und führt einen vollständigen
Sendersuchlauf durch. Eine Progress-Anzeige wird auf dem Display angezeigt.
Systemeinstellungen und Menüführung
Sie erreichen die Systemeinstellungen sowohl aus dem DAB- als auch vom FM-Modus aus: Halten Sie
INFO/MENU gedrückt, um das Einstellungsmenü aufzurufen.
In allen Menüs und Untermenüs fungieren die Pfeiltasten zum Blättern/Wählen der jeweils Angezeigten
Optionen oder Unter-Menüs. Drücken Sie jeweils PLAY/PAUSE, um die gewählte Option zu bestätigen.
Ein „*“ zeigt jeweils die aktuell gewählte Option/Einstellung an. Mit Druck auf INFO/MENU springen
Sie zurück in die vorige Menü-Ebene.
Im SYSTEM-Menü haben Sie Zugri auf die Untermenüs ZEIT (Time), BELEUCHTUNG (Backlight),
STANDBY WENN INAKTIV (Inactive Standby), SPRACHE (Language), WERKSZUSTAND ZURÜCKSET-
ZEN (Factory Reset), SW VERSION (SW version).
Zeit (Time)
• Uhrzeit/Datum: Einstellen der Uhrzeit / Einstellen des Datums / Speichern
• Auto update: Update automatisch / Update von DAB / Update von FM / Kein Update
• 12/24h: Uhrzeitanzeigeformat (12h / 24std wählen)
• Datumsformat: TT-MM-JJJJ / MM-TT-JJJJ
Beleuchtung
• Timeout: Immer an / nach 10 s / nach 20 s / nach 30 s / 45 s / 60 s / 90 s / 120 s / 180 s
• On Level: High > Medium > Low
• Dim Level: High > Medium > Low
• Erläuterung: Sobald das Radio in den Standby-Modus geschaltet wird, dimmt das Display herun-
ter (Dim Level). Auf Tastendruck wird das Display wieder beleuchtet (für eine Zeitspanne bis zum
Timeout - zum „On Level“).
• Inactive Standby: Stellen Sie hier die Zeitspanne ein, nach der sich das Radio automatisch abschal-
tet, wenn es nicht in Benutzung ist (Aus > 2 std. > 4 std. > 5 std. > 6 std.)
• Sprache: English / Dansk / Nederlands / Francais / Deutsch / Norsk
• Werkszustand: Setzen Sie hier Ihr Radio in den Werkszustand zurück. Wählen Sie JA mit den Pfeiltasten
aus und bestätigen Sie mit PLAY/PAUSE. Achtung: Alle gespeicherten Einstellungen und Radiosen-
der werden gelöscht. Das Gerät startet neu und führt wieder einen DAB-Sendersuchlauf durch.
• SW Version: Anzeige der Software-Version.

5
www.auna.de
Radio: DAB
Vollständiger Sendersuchlauf
• Drücken Sie PLAY/PAUSE für einen vollständigen Sendersuchlauf. Auf dem Display wird der Progress
angezeigt.
• Nach dem Suchlauf werden die gefundenen Sender automatisch in alphanumerischer Reihenfolge
abgespeichert. Sie können die Sender mit den Pfeiltasten durchschalten. Drücken Sie PLAY/PAUSE,
um den aktuell angezeigten Sender zu hören.
• Sie können den Sendersuchlauf auch über das Menü ansteuern.
Manualle Sendersuche
Halten Sie INFO/MENU gedrückt, um das manuelle Suchen zu aktivieren. Auf dem Display werden die
DAB-Kanäle 5A bis 13F mit ihren jeweils assoziierten Frequenzen angezeigt. Nutzen Sie die Pfeiltasten,
um das DAB-Band zu durchsuchen. Drücken Sie PLAY/PAUSE, um die jeweils angezeigte Sender-Gruppe
(Ensemble/Multiplex) zu önen. Drücken Sie erneut PLAY/PAUSE, um den jeweils gewählten Sender zu
hören.
Secondary Services
In einigen Fällen wird ein „>“ neben dem Sendername angezeigt. Dies bedeutet, dass der Sender wei-
tere Inhalte auf der Frequenz sendet. Dies können weiterführende Kommentare zum laufenden Pro-
gramm ein oder ähnliches. Um diese Inhalte zu hören, drücken Sie PLAY/PAUSE.
DRC (Dynamic Range Control)
Wenn Sie in einer Umgebung mit Lärmbelastung Musik mit einem großen Dynamik-Bereich hören, kann
es sinnvoll sein, diesen Bereich zu komprimieren. Das macht leise Klänge lauter und laute Klänge leiser.
Die Optionen bei der Kompression sind Aus, Niedrig oder Hoch.
Prune
Wählen Sie über das Menü die Option PRUNE, um Sender, die inaktiv sind, oder die nicht (mehr) zu
empfangen sind, aus der Senderliste zu entfernen.
Anzeigemodus
Drücken Sie mehrfach INFO/MENU, um weitere (Text-)Informationen anzuzeigen, die durch den Sen-
der auf der Frequenz übertragen werden (DLS > Signalstärke > Programm Typ > Ensemble/Multiplex
(Group name) > Frequenz > Signal error > Bit Rate > Uhrzeit > Datum > DLS > …)
• DLS: Vom Radioanbieter mitgesendeter Lauftext, meist mit Informationen zur aktuellen Sendung.

6
www.auna.de
• Signalstärke: Anzeige der Signalqualität
• Programm Typ: Beschreibt das Genre des gesendeten Programms (falls vorhanden).
• Ensemble/Multiplex (Group name)
• Frequenz
• Signal error: Hier wird die Empfangsfehlerrate als Zahl zwischen 0-99 angezeigt. Bei Werten über
30 ist zufriedenstellende Empfangsqualität nicht mehr geboten. Versuchen Sie, die Antenne oder das
Gerät neu auszurichten oder suchen Sie nach einer anderen Senderfrequenz.
• Audio bit rate
• Uhrzeit/Datum: Beide Werte werden beim Empfang von DAB oder FM automatisch eingestellt (falls
dies in den Einstellungen nicht geändert wurde).
Radio: FM
• Drücken Sie MODE mehrfach, bis das Display „FM“ anzeigt.
• Halten Sie INFO/MENU gedrückt, um die Einstellungen „Scan setting” (beim Suchlauf nur starke Sen-
der nden / alle Sender nden) und „Audio setting” (Stereo wenn möglich / immer Mono) zu errei-
chen. Stellen Sie mt den Pfeiltasten und PLAY/PAUSE nach Ihren Wünschen ein.
• Drücken Sie PLAY/PAUSE für einen automatischen Sendersuchlauf bis zum nächsten gefundenen
Sender.
DAB / FM: Senderspeicher
In beiden Radio-Modi können Sie jeweils 20 Sender für den künftigen Schnellzugri auf eigenen User-
Speicherplätzen ablegen.
Wählen Sie den gewünschten Sender aus und halten Sie MEMORY gedrückt. Wählen Sie nun mit den
Pfeiltasten den gewünschten Speicherplatz aus und drücken Sie PLAY/PAUSE, um den Sender auf dem
gewählten Platz abzulegen.
Zum Aufrufen eines gespeicherten Senders, drücken Sie MEMORY kurz und wählen Sie den gewünsch-
ten Sender mit den Pfeiltasten. Bestätigen Sie mit PLAY/PAUSE.
BT
• Drücken Sie MODE, um den BT-Modus auszuwählen. Aktivieren Sie BT auch auf Ihrem Smartphone/
Tablet und platzieren Sie dieses in der direkten Nähe zum Radio (max. 10m).
• Wählen Sie das aus der Liste der gefundenen Geräte in Reichweite und verbinden Sie damit.
• Tippen Sie „0000” oder „8888” ein, falls Sie zur Eingabe eines Passworts aufgefordert werden.
• Drücken Sie MODE, um Anrufe anzunehmen oder zu beenden. Halten Sie MODE für zwei Sekunden
gedrückt, um einen eingehenden Anruf abzulehnen.
• Achtung: Manche Smartphones könnten die BT-Verbindung trennen, sobald ein Anruf eingeht. Dies
ist keine Fehlfunktion des KR-100DAB .

7
www.auna.de
Weitere Funktionen
Timer (Eieruhr)
• Drücken Sie SLEEP/TIMER, um den Timer zu aktivieren.
• Nutzen SIe die Pfeiltasten, um die Timer-Dauer (1-99min) einzustellen. Drücken Sie PLAY/PAUSE, um
den Wert zu übernehmen und den Timer zu starten.
• Der Countdown wird einen Moment lang angezeigt, bevor zum zuvor genutzen Modus (FM/DAB)
zurückgekehrt wird.
• Nach Ablauf der eingestellten Zeitspanne, ertönt der Timer-Signalton.
• Zum Stoppen des Signaltons, drücken Sie ALARM/SNOOZE, oder schalten Sie das Radio mit STANDBY
aus.
• Drücken Sie während der Laufzeit SLEEP/TIMER, um den aktuellen Timer-Zeitpunkt anzuzeigen.
• Zum Abbrechen oder Neu-Einstellung des Timers, drücken Sie SLEEP/TIMER und ändern Sie die Zeit-
spanne mit den Pfeiltasten. Drücken Sie dann PLAY/PAUSE zum Bestätigen und Fortfahren mit dem
geänderten Wert.
SLEEP
• Halten Sie SLEEP/TIMER gedrückt, um den Sleep-Timer zu aktivieren.
• Stellen Sie die Sleep-Zeit (Sleep aus > 15 > 30 > 45 > 60 > 90 > Sleep aus) mit den Pfeiltasten ein und
bestätigen Sie mit PLAY/PAUSE. Ein entsprechendes Icon wird bei aktiviertem Sleep-Timer angezeigt.
• Nach Ablauf der eingestellten Zeitspanne schaltet sich das Radio automatisch ab (Standby).
• Zum Abbrechen oder Neu-Einstellung des Sleep-Timers, halten Sie SLEEP/TIMER gedrückt und än-
dern Sie die Zeitspanne mit den Pfeiltasten. Drücken Sie dann PLAY/PAUSE zum Bestätigen und
Fortfahren mit dem geänderten Wert.
Alarm (Wecker)
Sie können zwei voneinander unabhängige Wecker mit verschiedenen Einstellungen und Zeiten ein-
stellen:
• Drücken Sie ALARM/SNOOZE, um ALARM 1 einzustellen. Gedrückt für die ALARM 2 Einstellung.
• Drücken Sie PLAY/PAUSE und stellen Sie die ON TIME ein: Nutzen Sie auch hier die Pfeiltasten für die
Einstellung (der Uhrzeit) selbst und bestätigen Sie mit PLAY/PAUSE.
• Stellen Sie in den nächsten Schritten (wie immer mit Pfeiltasten und PLAY/PAUSE) ein:
Alarm-Dauer (15/30/45/60/90/120 min)
Alarm-Quelle (Buzzer/DAB/FM)
Alarm-Interval (täglich/einmalig/am Wochenende/an Wochentagen)
Alarm-Lautstärke
Alarm ein/aus

8
www.auna.de
Nach der Einstellung aller Punkte und Bestätigung mit PLAY/PAUSE, wird „Alarm Saved“ eingestellt und
der Einstellungsmodus verlassen. Ein Alarm-Icon wird bei aktiviertem Alarm auf dem Display angezeigt.
• Zum Aktivieren des Alarms im Standby-Modus halten Sie ALARM/SNOOZE gedrückt, bis der Status
von Alarm 1 / 2 auf dem Display angezeigt wird.
• Nutzen Sie die Pfeiltasten (gedrückt halten), um Alarm 1 und Alarm 2 ein-/auszuschalten. Lassen Sie
los, sobald der gewünschte Alarm-Modus auf dem Display angezeigt wird.
• Zur eingestellten Uhrzeit werden Sie vom Alarm geweckt. Stoppen Sie den Wecker, indem Sie das
Gerät mit STANDBY ausschalten. Verschieben Sie den Wecker durch Drücken von SNOOZE um 5
Minuten.
Hinweise zur Entsorgung
Be ndet sich die linke Abbildung (durchgestrichene Mülltonne auf Rädern) auf dem
Produkt, gilt die Europäische Richtlinie 2012/19/EU. Diese Produkte dürfen nicht mit
dem normalen Hausmüll entsorgt werden. Informieren Sie sich über die örtlichen Re-
gelungen zur getrennten Sammlung elektrischer und elektronischer Gerätschaften.
Richten Sie sich nach den örtlichen Regelungen und entsorgen Sie Altgeräte nicht über
den Hausmüll. Durch die regelkonforme Entsorgung der Altgeräte werden Umwelt und
die Gesundheit Ihrer Mitmenschen vor möglichen negativen Konsequenzen geschützt.
Materialrecycling hilft, den Verbrauch von Rohsto en zu verringern.
Konformitätserklärung
Hersteller: Chal-Tec GmbH, Wallstraße 16, 10179 Berlin, Deutschland.
Dieses Produkt entspricht den folgenden Europäischen Richtlinien:
2011/65/EU (RoHS)
2014/53/EU (RED)

9
www.auna.de
Dear Customer,
Congratulations on purchasing this product. Please read and follow these instructions, in order to avoid
damaging the item. We do not cover any damages that may arise from improper use of the item or the
disregard of the safety instructions.
Important Safety Advice
• Read all instructions before using.
• To protect against a re, electric shock or personal injury, do not immerse cord, electric plugs or device
in water or other liquids.
• Do not expose the appliance to extreme temperatures. The appliance shall be used in moderate cli-
mates.
• The use of attachments that are not recommended by the appliance manufacturer may result in re,
electric shock or personal injury.
• Do not open the unit by removing any cover parts. Do not attempt to repair the unit. Any repairs or
servicing should be done by qualied personell only.
• Only qualied persons may perform technical work on the product. The product may not be ope-
ned or changed. The components cannot be serviced by the user. The manufacturer is not responsible
for any radio or TV interference caused by unauthorized modications.
• The appliance is not a toy. Do not let children play with it. Never let children insert foreign objects into
the appliance.
• Never clean the surface of the device with solvents, paint thinners, cleansers or other chemical pro-
ducts. Instead, use a soft, dry cloth or soft brush.
• Save these instructions.
Small objects: Keep small objects (i.e. screws, mounting material, memory cards etc.) and packaging out of
the range of children. Do not let Children play with foil. Choking hazard!
Transporting the device: Please keep the original packaging. To gain suicient protection of the device
while shipment or transportation, make sure to put it back in its original packaging.
Cleaning the surface: Do not use any volatile liquids, detergents or the like. Use a clean dry cloth.

10
www.auna.de
Übersicht
DISPLAY 1 10 PLAY/PAUSE/SCAN/SELECT
INFO 2 11 SKIP +
SLEEP/TIMER 3 12 SKIP -
MODE/PHONE 4 13 MIC
MEMORY 5 14 FM ANTENNA
ALARM/SNOOZE 6 15 AC POWER CORD
STANDBY 7 16 SCREW
VOL - 8 17 DRILL CAPSULES
VOL + 9

11
www.auna.de
Initial Use
When the radio is connected to the AC power for the rst time, it will be in standby mode. The display will
show “Time is not set” together with the ashing clock. Press the Standby button once to turn the radio on,
it will then automatically enter into the DAB mode and perform the auto scan for stations.
System Set-Up
During operation, you can enter the system menu from the DAB or FM mode. Press and hold INFO/MENU
to enter into the main menu, then repeatedly press the arrow buttons to cycle though the sub menues. Press
PLAY/PAUSE to select “System”.
Via the “System” menu, you have access to the sub menus Time, Backlight, Inactive Standby, Language,
Factory Reset, SW version. An "*" will be displayed to indicate the current setting.
All menues and sub-menues can be entered with the arrow buttons and PLAY/PAUSE (=select). Press INFO/
MENU to step back to the last menu layer.
• Time
• Set Time/Date: Set time > Set date > Time Saved
• Auto update: Update from Any / Update from DAB / Update from FM / No update
• Set 12/24 hour: Set 12 hour / Set 24 hour
• Set date format: DD-MM-YYYY / MM-DD-YYYY
• Backlight
• Timeout: On / 10 sec / 20 sec / 30 sec / 45 sec / 60 sec / 90 sec / 120sec / 180sec
• On level: High > Medium > Low
• Dim level: High > Medium > Low
• When the radio is switched to standby, the backlight will automatically go to dim, and it will be
turned on again to full brightness for 10 seconds on every key press.
• Inactive Standby: Set the timespan after which the radio shall shut down automatically when not in
use (O > 2 hour > 4 hour > 5 hour > 6 hour)
• Language: English / Danish / Dutch / French / German / Norwegian
• Factory Reset: You can reset your radio and restore all of the original factory settings. To perform fac-
tory reset, select <Yes> inside the “Factory Reset” menu, the display will show ”Restarting...” and after
the reset is completed, the radio will go to standby. Note: All of your stored DAB & FM presets will be
deleted once the reset has taken place.
• SW Version: The SW version will be displayed.

12
www.auna.de
Radio: DAB
If the radio is switched on for the rst time, it will automatically enter into the DAB mode and perform an
auto scan. During the scan the display will show “Scanning…” together with a slide bar that indicates the
scan progress and the amount of stations that have been found.
Once the scan has nished, the radio will select the rst (alphanumerically) found station. You can now use
the arrow buttons to cycle through the found stations. Press PLAY/PAUSE to tune in the station currently
displayed.
Full Scan
The full scan will search for the entire DAB Band III channels. After the scan has nished, the rst alphanu-
merically found station will be automatically selected.
• To activate full scan, press PLAY/PAUSE. The display will show “Scanning…” and a progress bar.
• All stations that have been found will be stored automatically. to explore the stations that have been
found. Use the arrow buttons to cycle through the found stations. Press PLAY/PAUSE to tune in the
station currently displayed.
• You can also select the full scan function from within the menu
Manual Tune
To activate manual tune, press and hold the INFO/MENU button Then, select manual tuning with the arrow
buttons and press PLAY/PAUSE to conrm this selection.
The display will show “5A” to “13F” and their associated frequencies. Use the arrow buttons to move through
the DAB channels. When your desired frequency appears in the display, press PLAY/PAUSE to conrm. The
name of the station group (ensemble/multiplex) will be displayed. Press PLAY/PAUSE again, to tune in.
Secondary Services
On some occasions you will see a “>” directly after the name of the station. This indicates secondary services
associated to that station. These secondary services contain extra services that relate to the primary station.
E.g. a sports station may want to add extra commentaries. The secondary services are inserted directly after
the primary station. To select the secondary station, press PLAY/PAUSE.
DRC
DRC stands for Dynamic Range Control. The dynamic range for each radio programme is set by the broad-
caster for each radio station and may be dierent for the types of programme broadcast, such as pop or
classical music or a chat show.
The dynamic range control signal is transmitted in parallel with the audio signal for each programme.

13
www.auna.de
With your radio, you can use this control signal to expand or compress the dynamic range (the dierence
between the loudest and quietaet sounds) of the reproduced audio signal.
Changing the dynamic range can aect the ‘loudness’ and/or ‘quality of sound’ of the programme that
you hear so that it will be more suited to your listening conditions and your own personal listening
requirements. E.g. In a noisy environment, where quiet sounds might be swamped, setting the compression
to maximum will ‘boost’ the quiet sounds, whilst keeping the loudest sounds at their original level.
There are 3 levels of compression: DRC o (no compression, this is the default setting), DRC high (maximum
compression) and DRC low (medium compression).
To adjust DRC, press and hold INFO/MENU to enter the menu, scroll to DRC and enter the sub menu with
PLAY/PAUSE.
Prune
You can remove the DAB stations in the station list that cannot be received in your area. These are listed
with a ‘?’ prex. Enter the menu (press and hold INFO/MENU) and scroll down to PRUNE.
Display Modes
During DAB operation, every time you press the INFO/MENU button, the display will cycle through the
following display modes: DLS > Signal strength > Programme Type > Ensemble/Multiplex (Group name) >
Frequency > Signal error > Audio Bit Rate > Time > Date > DLS > …:
• DLS: Dynamic Label Segment is a scrolling message that the broadcaster may include in their trans-
missions. The message usually includes information such as programme details etc.
• Signal strength: The display will show a slide bar to indicate the signal strength.
• Programme type: Describes the style of the currently received programme. If the information is not
available, the display will show “<Programme Type>”.
• Ensemble/Multiplex (Group name): Collection of radio stations that are bundled and transmitted
together in a single frequency. There are national and local multiplexes, local ones contain stations
that are specic to that area.
• Frequency: The frequency of the present station will be displayed.
• Signal error: This is displayed as a number between 0-99. It would not be satisfactorily to listen to a
radio station with a signal error rate of 30 or above. Try adjusting the antenna or relocating your radio
to improve reception.
• Audio bit rate: The display will show the digital audio bit rate being received.
• Time and date: The time and date will be automatically updated by the broadcasted information; it is
not needed to set the clock manually.

14
www.auna.de
Radio: FM
• Press MODE repeatedly, until the display shows “FM”.
• Press and hold the INFO/MENU button to enter the menu to select “Scan setting” and “Audio setting”.
Enter the scan settings to adjust the scan sensitivity (nd strong stations only, or nd all stations).
Enter the audio settings to toggle “Stereo allowed” and “forced mono”.
• Use the arrow buttons, for manual tuning.
• Press PLAY/PAUSE for an automatic scan for stations.
Radio: Station Memory
In either DAB or FM mode, you can store up to 20 stations into the favourite presets; this will enable you to
get direct access to your favourite stations.
To store a preset, rst tune to your desired station, then press and hold the MEMORY button, the display will
show “#: (Empty)”. Press the arrow buttons to select your desired preset number and press the PLAY/PAUSE
to conrm your selection and store the current station to the selected preset number.
To recall a preset station, rst press the MEMORY button once, cycle through the presets with the arrow
buttons and press PLAY/PAUSE to listen to the selected station.
BT
• Repeatedly press the MODE button to select BT mode
• Make sure BT is activated on your mobile phone. Place it near the radio.
• Pair with the KR-100.
• In case that you are prompted for a passkey, enter either “0000” or “8888”.
• To answer and end incoming phone calls during playback, press MODE.
• To reject an incoming phone call during play, press and hold MODE for two seconds.
• Please note: Some mobile phones may connect or disconnect as you make and end calls. This is not
an indication of a problem with your unit.

15
www.auna.de
Additional Functions
Timer (egg timer)
• Press SLEEP/TIMER to activate the timer function.
• Use the arrow buttons to set the timer duration (01-99 minutes). Press PLAY/PAUSE to start the timer.
• The countdown will be shown for a short moment on the display as the timer is activated. After the set
time, the beeper will sound.
• To stop the beeper sound and resume the normal operation, press ALARM/SNOOZE or press the
standby button to switch the radio to standby.
• To check the remaining time during timer on, press SLEEP/TIMER.
• To reset or cancel the timer, press the SLEEP/TIMER button once, then adjust the timer with the arrow
buttons. Press PLAY/PAUSE to conrm your settings.
SLEEP
• Press and hold SLEEP/TIMER to activate the timer function.
• Use the arrow buttons to adjust the sleep time (Sleep o > 15 > 30 > 45 > 60 > 90 > Sleep o). Press
PLAY/PAUSE to conrm. The sleep icon will appear on the display to indicate the active sleep function.
• After set time, the device switches to standby automatically.
• To reset or cancel the timer, press and hold SLEEP/TIMER, and when the display shows “Set sleep
time”, repeatedly press the arrow buttons followed by pressing PLAY/PAUSE to reset and conrm the
sleep time again.
Alarm
You can set two individual alarm timers.
• Press ALARM/SNOOZE to enter alarm 1 setup menu. Press and hold ALARM/SNOOZE for alarm 2 setup.
• Press PLAY/PAUSE and set the ON TIME rst: Use the arrow buttons and PLAY/PAUSE to set the time
your alarm shall ring. Conrm by pressing PLAY/PAUSE.
• After the time is set, continue with the alarm settings, all to be set via arrow buttons and PLAY/PAUSE:
• Alarm duration (15/30/45/60/90/120 minutes)
• Alarm source (buzzer/DAB/FM)
• Alarm interval (daily/once/weekends/weekdays)
• Alarm volume level
• Alarm on/o

16
www.auna.de
When the above alarm settings are all gone through, the display will show “Alarm Saved”.
If the alarm is set to On, the associated alarm icon will be displayed.
• To activate the alarms during radio standby, press and hold the ALARM/SNOOZE button until the
display shows the Alarm 1 & 2 status.
• Use the arrow buttons to select Alarm 1 on/o and Alarm 2 on/o . When your desired alarm status
appears in the display, release the button, and the displayed alarm status is activated.
• At the selected wake-up time, the selected wake-up mode will be turned on and the associated alarm
will be displayed. To stop the alarm sooner, press STANDBY.
• During alarm, press the ALARM/SNOOZE button will temporary switch o the alarm for 5 minutes.
The display will show “Snooze”.
Environment Concerns
According to the European waste regulation 2012/19/EU this symbol on the product or on
its packaging indicates that this product may not be treated as household waste. Instead
it should be taken to the appropriate collection point for the recycling of electrical and
electronic equipment. By ensuring this product is disposed of correctly, you will help
prevent potential negative consequences for the environment and human health, which
could otherwise be caused by inappropriate waste handling of this product. For more
detailed information about recycling of this product, please contact your local council or
your household waste disposal service.
Declaration of Conformity
Producer: Chal-Tec GmbH, Wallstraße 16, 10179 Berlin, Germany
This product is conform to the following European directives:
2011/65/EU (RoHS)
2014/53/EU (RED)

17
www.auna.de
Chère cliente, cher client,
Toutes nos félicitations pour l’acquisition de ce nouvel appareil. Veuillez lire attentivement et respecter les
instructions de ce mode d’emploi an d’éviter d’éventuels dommages. Nous ne saurions être tenus pour
responsables des dommages dus au non-respect des consignes et à la mauvaise utilisation de l’appareil.
Consignes de sécurité
• Ce mode d’emploi a pour but de vous familiariser avec les fonctionnalités du produit. Conservez-le
soigneusement an de pouvoir vous y référer ultérieurement.
• L’achat de ce produit vous donne droit à deux ans de garantie sur les pannes et défauts en condi-
tions d’utilisation normale.
• Utilisez le produit exclusivement aux ns prévues. Une utilisation diérente pourrait causer des
dommages au produit ou dans son environnement.
• N’ouvrez jamais le produit de votre propre chef et n’eectuez jamais les réparations vous-même !
• Manipulez le produit avec précaution. Les coups et chocs ainsi que les chutes, même d’une faible
hauteur, peuvent l‘endommager.
• Tenez le produit éloigné des sources d’humidité et de forte chaleur.
• Ne laissez aucun objet métallique pénétrer dans cet appareil.
• Ne posez aucun objet lourd sur cet appareil.
• Nettoyez l’appareil uniquement avec un chion sec.
Petits éléments / éléments d’emballage (sacs en plastique, cartons, etc.):
Conservez les petits éléments (par exemple vis, matériel de montage) et éléments d’emballage hors
de portée des enfants pour éviter les risques d’étouement. Ne pas laisser les enfants jouer avec les
emballages plastiques, il y a risque d‘étouement !
Transport de l‘appareil :
Veuillez conserver l’emballage d’origine. Pour garantir la meilleure protection de l’appareil lors de son
transport, veuillez le remettre dans son emballage d’origine.
Nettoyage des surfaces externes :
Ne pas utiliser de liquides volatils tels que le spray insecticide. Une pression trop forte lors de l’essuyage
peut endommager les surfaces. Les matières en plastique ou en caoutchouc ne doivent pas rester en
contact avec l’appareil pendant une période prolongée. Utilisez un chion sec.

18
www.auna.de
Aperçu et premiers pas
Écran 1 10 PLAY/PAUSE/SCAN/SELECT
INFO 2 11 SKIP +
SLEEP/TIMER 3 12 SKIP -
MODE/PHONE 4 13 Micro intégré pour utilisation mains libres
MEMORY 5 14 Antenne FM
ALARM/SNOOZE 6 15 Câble secteur
STANDBY 7 16 Vis pour le montage sous un élément de
cuisine
VOL - 8 17 Douilles pour le montage suspendu
VOL + 9

19
www.auna.de
Mise en service
• Branchez l‘appareil sur une prise et allumez-le en appuyant sur STANBY. Au premier démarrage,
l‘appareil passe automatiquement en mode DAB et procède à une recherche complète des stations.
La progression de la recherche est aichée à l‘écran.
• Réglages système et menus de navigation
• Vous accédez aux réglages système par le mode DAB comme par le mode FM : maintenez la touche
INFO/ MENU pour appeler le menu des réglages.
• Dans tous les menus et sous-menus, les touches échées servent à tourner les pages et à choisir les
options aichées ou les sous-menus. Appuyez chaque fois sur PLAY/PAUSE pour conrmer le choix
de l‘option. Un „*“ indique l‘option/réglage sélectionné. En appuyant sur INFO/MENU, vous remon-
tez au niveau de menu précédent.
• Depuis le menu SYSTEM, vous avez accès aux sous-menus HEURE (Time), ECLAIRAGE (Backlight),
STANDBY SI INACTIF (Inactive Standby), LANGUE (Language), RETOUR A L‘ETAT USINE (Factory Re-
set), VERSION SW (SW version).
Heure (Time)
• Heure/date : réglage de l‘heure / réglage de la date / sauvegarde
• Auto update : Update automatique / Update par DAB / Update par FM / pas d‘update
• 12/24h : format d‘aichage de l‘heure (choisir 12h / 24h)
• Format de date : JJ-MM-AAAA / MM-JJ-AAAA
Eclairage
• Timeout : toujours allumé / après 10 s / après 20 s / après 30 s / 45 s / 60 s / 90 s / 120 s / 180s
• On Level: High > Medium > Low
• Dim Level: High > Medium > Low
• Explication : dès que la radio est placée en mode Standby, le rétroéclairage de l‘écran diminue
(Dim Level). Si vous appuyez sur une touche le rétroéclairage redevient normal (pour une durée
allant jusqu‘au Timeout – „On Level“).
• Standby inactif : réglez ici la durée au bout de laquelle la radio s‘éteint automatiquement lorsqu‘elle
n‘est pas utilisée (o > 2 h > 4 h > 5 h > 6 h)
• Langue : English / Dansk / Nederlands / Français / Deutsch / Norsk
• Etat usine : pour remettre votre radio en état usine. Choisissez OUI avec les touches échées et
conrmez avec PLAY/PAUSE. Attention : tous les réglages mémorisés et les stations de radio seront
eacés. L‘appareil redémarre comme neuf et exécute une recherche de stations DAB.
• Version SW : aichage de la version de Software.

20
www.auna.de
Radio : DAB
Recherche complète des stations
• Appuyez sur PLAY/PAUSE pour une recherche complète des stations. L‘écran aiche la progression
de la recherche.
• A la n de la recherche, les stations trouvées sont automatiquement mémorisées par ordre alpha-
numérique. Vous pouvez parcourir les stations avec les touches échées. Appuyez sur PLAY/PAUSE
pour écouter la station à l‘aichage.
• Vous pouvez piloter la recherche des stations depuis le menu.
Recherche manuelle des stations
Maintenez INFO/MENU pour activer la recherche manuelle des stations. L‘écran aiche les canaux DAB
5A à 13F avec leurs fréquences associées. Utilisez les touches échées pour parcourir la bande DAB.
Appuyez sur PLAY/PAUSE pour ouvrir chacun des groupes de stations aichés (Ensemble/Multiplex).
Appuyez de nouveau sur PLAY/PAUSE, pour écouter chacune des stations sélectionnées.
Services secondaires
Dans certains cas, un „>“ sera aiché à côté du nom de la station. Cela signie que la station émet du
contenu supplémentaire sur la fréquence. Cela peut consister en des commentaires sur le programme
en cours ou équivalent. Pour écouter ces contenus, appuyez sur PLAY/PAUSE.
DRC (Dynamic Range Control)
Lorsque vous écoutez de la musique avec une grande plage dynamique dans un environnement bru-
yant, il peut être utile de comprimer cette plage. Cela augmente les sons faibles et diminue les sons
puissants. Les options de compression sont sans, faible et haute.
Prune
Choisissez l‘option PRUNE du menu pour éliminer de votre liste les stations inactives ou que vous ne
captez pas ou plus.
Mode d‘aichage
Appuyez plusieurs fois sur INFO/MENU pour aicher des informations texte supplémentaires retrans-
mises sur la fréquence par l‘émetteur (DLS > force du signal > type de programme > Ensemble/Multi-
plex (nom de groupe) > Fréquence > Erreur de signal > Bit Rate > Heure > Date > DLS > ...)
• DLS: texte déroulant envoyé par l‘émetteur, le plus souvent des informations concernant l‘émission
en cours.
This manual suits for next models
2
Table of contents
Languages:
Other auna Radio manuals

auna
auna DigiPlug UP User manual

auna
auna KR-140 User manual

auna
auna Harmonica User manual

auna
auna Virginia User manual

auna
auna Glastonbury Go User manual

auna
auna SOUNDBLASTER M User manual

auna
auna Soundchef MKII User manual

auna
auna Worldwide Mini 10031919 User manual

auna
auna 10032299 User manual

auna
auna 10032295 User manual

auna
auna Elton User manual

auna
auna Worldwide User manual

auna
auna IR 130 User manual

auna
auna KR-190 User manual

auna
auna Weimar 10026418 User manual

auna
auna iAdapt User manual

auna
auna Connect 150 MKII User manual

auna
auna Silver Star 10033125 User manual

auna
auna Silver Star Mini User manual

auna
auna IR-160 SE User manual