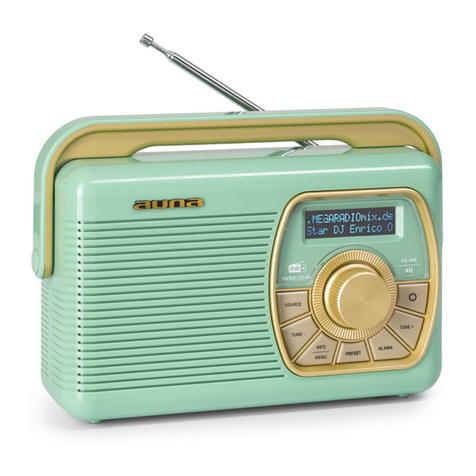
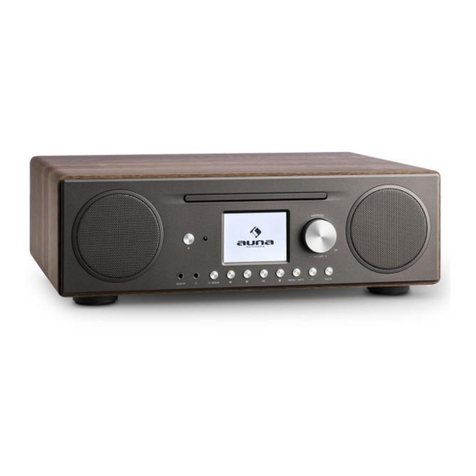
auna Harmonica User manual

www.auna-multimedia.com
Harmonica
DAB Radio
Radio DAB
10031499 10031500


3
DE
English 11
Français 19
Español
Italiano
Sehr geehrter Kunde,
wir gratulieren Ihnen zum Erwerb Ihres Gerätes. Lesen Sie die folgenden
Hinweise sorgfältig durch und befolgen Sie diese, um möglichen Schäden
vorzubeugen. Für Schäden, die durch Missachtung der Hinweise und
unsachgemäßen Gebrauch entstehen, übernehmen wir keine Haftung.
INHALTSVERZEICHNIS
Sicherheitshinweise 4
Gerätebeübersicht 5
Bedienung 6
DAB-Radio 6
UKW-Radio 7
Alarmeinstellungen 8
Anschlüsse und weitere Einstellungen 9
Hinweise zur Entsorgung 10
TECHNISCHE DATEN
Artikelnummer 10031499, 10031500
Stromversorgung 220-240 V ~ 50-60 Hz

4
DE
SICHERHEITSHINWEISE
• Stellen Sie das Gerät nicht in engen Räumen auf wie Einbauregalen,
Bücherregalen usw. Lassen Sie Lu zur oenen Seite hin. Die
Luzirkulaon darf nicht durch Abdecken der Lüungsönungen durch
Gegenstände wie Zeitungen, Tischdecken, Gardinen usw. behindert
werden.
• Verwenden Sie ausschließlich Zubehör und Anbauteile, die vom Hersteller
geliefert oder empfohlen werden (wie z. B. Netzkabel).
• Zur Vermeidung von Bränden oder Stromschlägen das Gerät nicht
dem Regen oder großer Feuchgkeit aussetzen. Das Gerät darf keinen
Wassertropfen und -spritzern ausgesetzt werden.
• Das Netzkabel wird zur Trennung von der Stromversorgung genutzt. Sie
müssen jederzeit darauf zugreifen können.
Erklärung der Symbole auf dem Gerät
Warnung: Gefahr eines Stromschlags: Entfernen
Sie nicht die Gehäuseabdeckung. Das Gerät
enthält keine Teile, die durch den Benutzer
einzustellen oder zu warten sind.
Das Blitzsymbol mit Pfeilspitze in einem gleichseitigen Dreieck
weist den Benutzer auf das Vorhandensein einer nicht isolierten
gefährlichen elektrischen Spannung innerhalb des Systemgehäuses
hin, so dass die Gefahr von Stromschlägen besteht.
Das Ausrufezeichen in einem gleichschenkligen Dreieck weist
den Anwender auf wichtige Anweisungen zum Betrieb und zur
Instandhaltung (Wartung) in der Dokumentation hin.
Dieses Gerät hat die Schutzklasse II bzw. den Schutz durch
doppelte oder verstärkte Isolierung. Es benötigt durch seine
Konstruktion keinen Schutzleiter mit Erdungsanschluss.

5
DE
1 Lautsprecher
2 Lautstärkeregler
Tasten
3 Bereitschaftmodus
4 Moduswahl: DAB/FM/
AUX
5 Scannen
6 Einstellungen
7 Menü
8 Equalizer
9 Info
10 Schlaf
11 Alarm
12 Stumm
13 Drehknopf für
Senderwahl
14 LCD-Anzeige
15 DC-Eingang
16 Kopfhörereingang
17 AUX-Eingang
18 Antenne
GERÄTEBEÜBERSICHT

6
DE
BEDIENUNG
Stromversorgung
Schließen Sie ein Ende des Netzkabels an den 9-V-Anschluss auf der
Rückseite des Gerätes und das andere an eine Steckdose an. Bei der
Erstbenutzung muss das Netzkabel fest in die Steckdose gedrückt werden.
Stellen Sie sicher, dass das Netzkabel fest angeschlossen ist.
Einschalten
Zum Einschalten den die Taste STANDBY drücken.
DAB-RADIO
DAB-Modus einschalten: Drücken Sie die Taste DAB/FM/AUX.
Automatische Sendersuche: Drücken Sie die Taste SCAN. In der Anzeige
erscheint „AUTOTUNE FULL SCAN“. Die Anzahl der gefundenen DAB-
Radiostationen erscheint rechts oben und der erste Sender
wird automatisch wiedergegeben.
Manuelle Sendersuche: Drehen Sie den Drehkopf TUNE/SELECT, bis das
Symbol für „Manuelle Sendereinstellung“ erscheint. Suchen Sie dann den
gewünschten Sender mittel Drehknopf TUNE/SELECT.
Hinweis: Die Wahl eines neuen Senders nimmt evtl. etwas Zeit in
Anspruch.
DAB-Radio-Sendereinstellungen
• Um die gewünschte DAB-Radiostation zu einzustellen, halten Sie die
Taste PRESET gedrückt. In der Anzeige erscheint „Empty P1“ (wobei P1
die aktuelle Senderspeichernummer ist). „P1“ blinkt.
• Drehen Sie den Drehknopf TUNE/SELECT, um die gewünschte Nummer
des Programmspeichers (1-20) einzustellen, auf der der Sender
gespeichert werden soll.
• Wiederholen Sie die Schritte bis alle gewünschten Radiosender in der
Programmliste gespeichert sind.
• Rufen Sie die gespeicherte Programmnummer auf, indem Sie die Taste
PRESET drücken und am Regler TUNE/SELECT drehen.

7
DE
UKW-RADIO
Mit der Taste DAB/FM/AUX/BT das UKW-Radio einschalten. Drücken Sie
die Taste SCAN. Wenn ein Sender gefunden wurde, bleibt die angezeigte
Senderfrequenz auf der Anzeige stehen und der Sender wird gespielt. Wenn der
Empfang schlecht ist, drehen Sie am Regler TUNE/SELECT, um den Empfang
einzustellen. Die Senderprogrammierung funktioniert wie beim DAB-Radio.
DAB-Infos
Das DAB-Radio gibt in der Anzeige unten DAB-Informationen wieder.
Drücken Sie die INFO-Taste, um die verfügbaren Informationen anzuzeigen:
1 Programmsparte: Anzeige der Sendersparte (z. B. Klassik, Pop,
Nachrichten).
2 Senderfrequenz: Anzeige der DAB-Senderfrequenz (z. B. „13F 239.200 MHz“)
3 Audio-Bitrate: Anzeige der Datenrate in kB/s und des Audiomodus (z. B.
Stereo)
4 Name des Senders: Zeigt den Namen des Multiplex-Kanals
(Frequenzblocks) an.
5 Signalstärke: Zeigt die Signalstärke für den aktuell eingestellten Sender an.
6 Zeit/Datum: Zeigt die aktuelle Zeit und das Datum an. Zur Anzeige kein
Empfang notwendig.
7 DLS (Dynamic Link Segment): Blättern Sie durch den Text mit
Informationen wie Interpret, Titelname, Telefonnummern,
Programmdetails usw.
UKW-Informationen
Das Gerät hat im UKW-Empfang 6 Informationskategorien, die in der Zeile
unten angezeigt werden. Drücken Sie kurz INFO/SETUP, um die verfügbaren
Kategorien anzuzeigen.
1 Programmsparte (PTY- program type) – Zeigt die Programmsparte an,
um die verfügbaren Typen anzuzeigen.
2 Signalstärke: Zeigt die Signalstärke für den aktuell eingestellten Sender
an.
3 Zeit/Datum: Zeigt die aktuelle Zeit und das Datum an. Zur Anzeige kein
Empfang notwendig.
4 Name des Senders: Zeigt den Namen des Multiplex-Kanals
(Frequenzblocks) an.
5 Audiomodus: Anzeige des Audiomodus (z. B. Stereo oder Mono)
6 Radiotext: Lauftext, der Informationen wie Interpret, Titelname,
Telefonnummern, Programmdetails usw.

8
DE
ALARMEINSTELLUNGEN
Einstellen von Alarm 1
1 Drücken Sie im Standbybetrieb die Taste ALARM, bis das Alarmmenü
angezeigt wird.
2 Drehen und drücken Sie den Regler TUNE/SELECT, um Alarm 1 und
Alarm 2 zu aktivieren und deaktivieren.
3 Den Regler TUNE/SELECT drehen und drücken, um die Stunde und
Minute einzustellen.
4 Wählen Sie nun die Alarmquelle (Summer, DAB- oder UKW-Radio).
5 Stellen Sie mit dem Regler TUNE/SELECT den gewünschten
Alarmmodus ein. Den Regler drücken, um die Einstellung zu
bestätigen und die Einstellungen zu verlassen.
Einstellen von Alarm 2
Bei eingeschaltetem Gerät oder im Standby-Modus die ALARM-Taste
zweimal drücken, bis das Menü für „Alarm 2“ erscheint. Die Einstellungen
lassen sich vornehmen wie bei „Alarm 2“.
Alarm abstellen
Um den Alarm auszuschalten, einfach dem Alarmknopf während des Alarms
noch einmal drücken. Sonst geht der Alarm nach 59 Minuten von selbst aus.
Alarm deaktivieren
Zum vollständigen Deaktivieren des Alams, einfach den ALARM-Knopf
drücken. Drehen und drücken Sie den Regler TUNE/SELECT, um Alarm 1
oder Alarm 2 zu deaktivieren.

9
DE
ANSCHLÜSSE UND WEITERE EINSTELLUNGEN
Anschluss von externen Wiedergabegeräten
Schließen Sie ein AUX-Kabel (nicht im Lieferumfang enthalten) an, um ein
Abspielgerät (z. B. MP3-Player) an den AUX-Eingang anzuschließen. Drücken
Sie die Taste DAB/FM/AUX-Taste und wählen Sie den AUX-Modus.
Starten Sie auf dem Abspielgerät die Wiedergabe. Stellen Sie die Lautstärke
auf die gewünschte Stufe ein.
Menü
Halten Sie die MENU-Taste im Standby-Modus 3 Sekunden lang gedrückt.
1 Einstellung der Uhr: Den Senderregler drehen und drücken.
2 Firmware-Version: Zeigt die aktuelle Software-Version an.
3 Energiesparfunktion (ErP): Nach der Deaktivierung der
Energiesparfunktion schaltet das Gerät sich nicht aus. Geeignet für
lange Wiedergabe.
Equalizer
Mit der EQ-Taste können Sie 4 EQ-Soundmuster ansteuern: Pop, Rock,
Klassik, Flat
Schlaf (Sleeptimer)
Einstellung der Schlafzeitschaltuhr (Sleeptimers) in folgenden Schritten:
120, 90, 60, 30 Minuten, AUS
Stummschaltung
Drücken Sie MUTE, um das Gerät stummzuschalten.
Das DAB-Radio zurücksetzen
Im DAB-Modus die Info-Taste gedrückt halten. In der Anzeige erscheint eine
Au orderung ENTER zu drücken, um das Gerät zurückzusetzen. Die Taste
TUNE/SELECT drücken, um das Gerät zurückzusetzen.
Hinweis: Alle Einstellungen werden gelöscht!

10
DE
HINWEISE ZUR ENTSORGUNG
Bendet sich die linke Abbildung (durchgestrichene
Mülltonne auf Rädern) auf dem Produkt, gilt die
Europäische Richtlinie 2012/19/EU. Diese Produkte
dürfen nicht mit dem normalen Hausmüll entsorgt
werden. Informieren Sie sich über die örtlichen
Regelungen zur getrennten Sammlung elektrischer
und elektronischer Gerätschaften. Richten Sie sich
nach den örtlichen Regelungen und entsorgen
Sie Altgeräte nicht über den Hausmüll. Durch die
regelkonforme Entsorgung der Altgeräte werden
Umwelt und die Gesundheit ihrer Mitmenschen
vor möglichen negativen Konsequenzen geschützt.
Materialrecycling hilft, den Verbrauch von Rohstoen
zu verringern.

11
EN
Dear Customer,
Congratulations on purchasing this equipment. Please read this manual
carefully and take care of the following hints to avoid damages. Any failure
caused by ignoring the mentioned items and cautions mentioned in the
instruction manual are not covered by our warranty and any liability.
CONTENT
Safety Instrucons 12
Product descripon 13
Operaon 14
DAB Mode 14
FM Radio 15
Alarm Sengs 16
Connecons and Other Sengs 17
Hints on Disposal 18
TECHNICAL DATA
Item number 10031499, 10031500
Power supply 220-240 V ~ 50-60 Hz

12
EN
SAFETY INSTRUCTIONS
• Do not install this equipment in a conned or building-in space such as a
book case or similar unit and remain a well venlaon condions at open
site. The venlaon should not be impeded by covering the venlaon
openings with items such as newspaper, table-cloths, curtains etc.
• Only use aachments/accessories specied or provided by the
manufacturer (such as the exclusive supply adaptor).
• To reduce the risk of re or electric shock, do not expose this apparatus
to rain or moisture. The apparatus shall not be exposed to dripping or
splashing and that objects lled with liquids such as vases, shall not be
placed on apparatus.
• The direct plug-in adapter is used as disconnect device, the disconnect
device shall remain readily operable.
Information on the symbols on the device
Warning: To reduce the risk of electric shock,do
not remove the cover (or back).There are no user
serviceable parts inside the unit.
The lightning ash with arrowhead symbol, within an equilateral
triangle, is intended to alert the user to the presence of uninsulated
“dangerous voltage” within the product‘s enclosure that may be of
suicient magnitude to constitute a risk of electric shock to persons.
The exclamation point within an equilateral triangle is
intended to alert the user to the presence of important
operating and maintenance (servicing) instructions in the
literature accompanying the appliance.
This equipment is a Class II or double insulated electrical
appliance. It has been designed in such a way that it does not
require a safety connection to electrical earth.

13
EN
1 Speaker
2 Volume increase/
decrease knob
Buttons
3 Standby button
4 DAB/FM/AUX mode
selection
5 Scan button
6 Preset button
7 Menu button
8 EQ button
9 Info button
10 Sleep button
11 Alarm button
12 Mute button
13 Tuning knob
14 LCD display
15 DC jack
16 Headphone jack
17 AUX in jack
18 Antenna
PRODUCT DESCRIPTION

14
EN
OPERATION
Power supply
Operang the unit on AC power Insert one end at the supplied power cord
to the DC 9V IN Jack located at the rear of the unit and the other end into
the Wall outlet. When the First me used the cord has to be rmly pushed
into the socket if does not work on AC, to try again to be sure for a posive
connecon.
Power on
Press the Standby buon to turn the unit.
DAB MODE
Press the DAB/FM/AUX button to select DAB radio mode
Auto select : Press the SCAN button, “AUTOTUNE FULL SCAN” will show
on the display, and the number of DAB station will shown on the upper
right corner, and it will automatically play the rst station. Tune the TUNE/
SELECT knob to choose the next or previous station.
Manual select: Press and hold the TUNE/SELECT knob until the “MANUAL
TUNE” icon shown on the display, then tune the TUNE/SELECT knob to
choose the station.
Note : you many have to wait for the unit to tune in to the new channel.
DAB radio stations presetting
• To receive the desired DAB station, press and hold the PRESET button,
“Empty P1” (P1 is the current program number) will appear on the
display, the current program number „P1“ is ashing on the display.
• Tune the TUNE/SELECT knob to choose your desired program number
(1-20) you want stored to. Then press TUNE/SELECT knob to store it.
• Repeat the same procedures until all the desired radio stations were
stored into the program list.
• Recall the memory, press PRESET button and tune the TUNE/SELECT
knob to select the stored radio station as desired. Press the TUNE/
SELECT knob to conrm.

15
EN
FM RADIO
Press the DAB/FM/AUX/BT button to select FM radio mode, press the SCAN
button, when a radio is found, the frequency on display will stop running and
start playback automatically. If reception is no good, tune the TUNE/SELECT
knob to ne tune. FM radio presetting is same as DAB radio presetting.
INFO Button
The UNIT has DAB information modes which are shown on the bottom line
of the display. Short press the INFO key to see the available types:
1 Program type: Displays the type of station content being broadcast e.g.
Classic, Pop, News, etc.
2 Ensemble Freq.: Displays the DAB station frequency such as 13F
239.200MHz.
3 Audio Bit Rate: Displays the data rate in kilo Bits per second and the
audio mode e.g.Stereo.
4 Ensemble name: Displays the name of the multiplex to which the
Digital1 Network current station belongs.
5 Signal strength: Displays the signal strength for the station being
listened to.
6 Time/Date: Displays current time and date, received o-air.
7 DLS (Dynamic Link Segment):Scrolling text which includes messages
such as Artist and track name, phone numbers, program details, etc.
FM information modes
The UNIT has six FM information modes which are shown on the bottom
line of the display. Short press the INFO/SETUP button to see the available
types.
1 PTY (program type): Displays the type of station content being
broadcast e.g. Classic, Pop, News, etc.
2 Signal strength: Displays the signal strength for the station being
listened to.
3 Time and Date: Displays current time and date, received o-air.
4 Station frequency: Displays the frequency of the station being listened to.
5 Audio mode: Displays the current audio mode setting i.e. Auto(Stereo)
or Mono.
6 Radio Text: Scrolling text which includes messages such as Artist and
track name, phone numbers, program details, etc.

16
EN
ALARM SETTINGS
Set Alarm 1
1 With the UNIT is in Standby mode, press the ALARM buon unl the
Alarm menu is shown.
2 Tune and press TUNE/SELECT knob to choose ALARM 1 or ALARM 2
and ON or OFF state of the alarm.
3 Tune and press TUNE/SELECT knob to set up the alarm Hour and alarm
Minute.
4 Alarm source (Buzzer, DAB or FM).
5 Tune the TUNE/SELECT knob to choose the desire alarm mode, press
TUNE/SELECT knob to conrm to save the seng and exit.
Set Alarm 2
With the UNIT switched ON, or in Standby mode, press the ALARM buon 2
mes unl the Alarm2 menu is shown. (other seng is same as ALARM 1)
Shut o alarm
To shut o the alarm, simply press “Alarm” buon again while alarming. OR
the Alarm will automacally switch o aer 59 minutes unless cancelled or
switched o manually.
To turn o the alarm completely
To cancel the Alarm when it has acvated. Press the Alarm buon. Tune and
press TUNE/SELECT knob to choose ALARM 1 or ALARM 2 you would like
the cancel, then select the Alarm State to OFF.

17
EN
CONNECTIONS AND OTHER SETTINGS
Using the aux input
Connect the AUX connect wire (not included) from the out jack of your
Personal Player such as portable MP3 player to the AUX input jack.
Press the DAB/FM/AUX buon to select AUX mode, Turn on your Personal
Player to begin playing, adjust the volume to desire listening level.
Menu
During the Standby mode, press and hold the MENU buon for 3 seconds.
1 Set Clock: Tune the tuner knob and press to manual seng the clock
2 MCU version: This showing the version of this model’s soware
3 Setup the ErP: Tune the tuner knob and press to enable and disable
the ErP funcon. Aer having enabled the ErP funcon, the unit will be
turned o in 15 minutes when the speaker is playing no sound. Aer
disabling the ErP funcon, the unit will not be turned o and long me
playing.
EQ
There are 4 EQ sound for your choosing by pressing EQ buon: Pop, Rock,
Classic, Flat Sleep.
Sleep Timer
You may setup a sleep mer by pressing Sleep buon: 120, 90, 60, 30, o
E.g. If you choose 120, means the unit will be o automacally aer playing
120 minutes.
Mute
Press MUTE buon to mute the unit.
To RESET the product
Press and hold the INFO buon while in DAB mode, then you will see “Press
Enter key to reset”. Press “Tune/Select” to reset the radio.
Note: All settings will be deleted!

18
EN
HINTS ON DISPOSAL
According to the European waste regulation 2012/19/EU
this symbol on the product or on its packaging indicates
that this product may not be treated as household
waste. Instead it should be taken to the appropriate
collection point for the recycling of electrical and
electronic equipment. By ensuring this product is
disposed of correctly, you will help prevent potential
negative consequences for the environment and
human health, which could otherwise be caused by
inappropriate waste handling of this product. For more
detailed information about recycling of this product,
please contact your local council or your household
waste disposal service.

19
FR
Cher client,
Toutes nos félicitations pour l’acquisition de ce nouvel appareil. Veuillez
lire attentivement les instructions suivantes de branchement et d’utilisation
an d’éviter d’éventuels dommages. Le fabricant ne saurait être tenu pour
responsable des dommages dus au non-respect des consignes de sécurité et
à la mauvaise utilisation de l’appareil.
SOMMAIRE
Consignes de sécurité 20
Aperçu de l‘appareil 21
Fonctionnement 22
Radio dab 22
Radio fm 23
Réglages de l‘alarme 24
Branchements et autres réglages 25
Conseils pour le recyclage 26
FICHE TECHNIQUE
Numéro d’article 10031499, 10031500
Alimentation 220-240 V ~ 50-60 Hz

20
FR
CONSIGNES DE SÉCURITÉ
Ne placez pas l‘appareil dans des espaces connés tels que des étagères
intégrées, une bibliothèque, etc. Laissez passer l‘air par le côté ouvert.
N‘entravez pas la circulation de l‘air en couvrant les ouvertures de
ventilation avec des objets tels que des journaux, des nappes, des rideaux,
etc.
• Ulisez uniquement les pièces et accessoires fournis ou recommandés
par le fabricant (tels que les cordons d‘alimentaon).
• Pour éviter un incendie ou une électrocuon, n‘exposez pas l‘appareil à
la pluie ou à l‘humidité. L‘appareil ne doit pas être exposé à l‘eau ou aux
éclaboussures.
• Le câble d‘alimentaon est ulisé pour déconnecter l‘alimentaon. Vous
devez pouvoir y accéder à tout moment.
Explication des icônes sur l‘appareil
Avertissement : risque d‘électrocution : ne
retirez pas le couvercle du boîtier. L‘appareil ne
contient aucune pièce à installer ou à entretenir
par l‘utilisateur.
L‘icône éclair avec une pointe de èche dans un triangle équilatéral
indique la présence d‘une tension électrique dangereuse non isolée
dans l‘enceinte du système, ce qui peut entraîner une électrocution.
Le point d‘exclamation dans un triangle isocèle signale à
l‘utilisateur des instructions importantes pour le
fonctionnement et la maintenance dans la documentation.
Cet appareil appartient à la classe de protection II ou à la
classe de protection par isolation double ou renforcée. En
raison de sa construction, il ne nécessite pas de câble protégé
par une mise à la terre.
Table of contents
Languages:
Other auna Radio manuals

auna
auna 10008632 User manual

auna
auna 10031854 User manual

auna
auna Connect Soundchef Series User manual

auna
auna 10031949 User manual

auna
auna Weimar 10026418 User manual

auna
auna 10032299 User manual

auna
auna US-10028155 User manual

auna
auna IR-160 SE User manual

auna
auna 10035328 User manual

auna
auna iTuner 320 User manual

auna
auna Akkord 10029895 User manual

auna
auna Belle Epoque 1906 User manual

auna
auna iTuner 320 BT User manual

auna
auna Intelligence User manual

auna
auna Worldwide User manual

auna
auna iAdapt User manual

auna
auna 10028699 User manual

auna
auna Connect Link User manual

auna
auna Weimar User manual

auna
auna iTuner 320 ME User manual