auto maskin DCU 305 R2 User manual

Rudolf R2
User’s Manual
DCU 305 R2 Control Unit configuration tool


Rudolf R2 User's Manual 0BIntroduction - 4BImportant information •i
Contents
1Introduction....................................................................................4
1.1 Important information 4
1.2 System requirements 4
1.2.1 Minimum PC requirements 5
1.3 Installation of Rudolf R2 5
1.3.1 Uninstall previous installations 5
1.3.2 Installation 6
2Menu Overview ..............................................................................7
2.1 File 7
2.1.1 New 7
2.1.2 Open 8
2.1.3 Save 8
2.1.4 Save As… 8
2.1.5 Close 8
2.1.6 Export as Text 8
2.1.7 E-mail… 9
2.1.8 Print… 9
2.1.9 Exit 9
2.2 Communication 9
2.2.1 Load from control unit… 9
2.2.2 Transmit to control unit… 10
2.2.3 Retrieve log… 12
2.3 Settings 13
2.3.1 Backup System Settings… 13
2.3.2 Control unit Clock 14
2.3.3 Service 14
2.3.4 Options… 15
3Buttons...........................................................................................17
4Configuration Sections .................................................................18
4.1 Main 19
4.1.1 Main Operation Mode 19
4.1.2 Control Unit Language 21
4.1.3 Port P3 Functionality 21
4.1.4 Display Backlight Delay 22
4.1.5 Inverting LCD on Alarm 22
4.1.6 Warning Requires Acknowledge 22
4.1.7 Classifiable Project
Feil! Bokmerke er ikke definert.
4.1.8 J1939/CAN & J1708/J1587 support 22
4.2 Switch 23
4.2.1 Input Channel 24
4.2.2 Terminal 24
4.2.3 Active 24
4.2.4 Description 24
4.2.5 Action Type 24

ii •0BIntroduction - 4BImportant information Rudolf R2 User's Manual
4.2.6 Switch type 24
4.2.7 Warning/Alarm/Shutdown on RUN only 25
4.2.8 Initial delay 25
4.2.9 Broken Wire Detection 25
4.2.10 Delay before alarm/shutdown 25
4.2.11 Additional Switch Inputs 26
4.3 Analog In 27
4.3.1 Add a new sensor 27
4.3.2 Active 28
4.3.3 Input Type 28
4.3.4 Description 28
4.3.5 Sensor Range 28
4.3.6 Units 28
4.3.7 Limit 28
4.3.8 Action Type 29
4.3.9 Double Scale 29
4.3.10 Above or below limit 30
4.3.11 Action on RUN only 30
4.3.12 Initial delay 30
4.3.13 Delay before Warning/Alarm/Shutdown 30
4.4 Standby operation 31
4.4.1 Initial Start Delay (Preheat timer) 31
4.4.2 Cranking Time 32
4.4.3 Delay between Start Attempts 32
4.4.4 Number of Start Attempts 32
4.4.5 Delay before disconnecting Gen. Breaker 32
4.4.6 Cooling time 32
4.5 Start/Fuel 33
4.5.1 Initial Start Delay 33
4.5.2 Cranking Time 33
4.6 Speed sensor 34
4.6.1 Pickup Information 34
4.6.2 Pickup One/Two RPM Sender 34
4.6.3 Ready to take Load 35
4.6.4 Nominal/Max Speed 35
4.6.5 Overspeed 35
4.6.6 RUN Detected At 36
4.6.7 Run Detection Delay 36
4.6.8 Additional RUN Detection 36
4.6.9 Speed Relays 36
4.7 Battery 37
4.7.1 Start Battery Voltage 37
4.7.2 Low Battery Voltage Alarm 37
4.7.3 Delay before Alarm 37
4.8 Info 38
4.8.1 Fields 38
4.9 Relays 39
4.9.1 RK-60 39
4.9.2 RK-66 R2 39
4.9.3 MK-6 and MK-14 39
4.9.4 Signals to the optional Relay Cards 40
4.9.5 Available configurable signals 41
4.9.6 Disable Broken Wire Alarm on Terminal 44 42

Document revisions
Date Revision
March 2001
Release
March 2002 Support for control unit firmware 4.25 and above
November 2002 Added
May 2005
CAN / diagnostic info added for 4.35 and above
July 2005
Restart possibility after downloading added for 4.37 and above.
September 2006 Described the new function Additional Run detection delay
Copyright © Auto-Maskin AS, 1998-2009
Information given in this specification may change without prior
notice.
This document must not be copied without permission from Auto-
Maskin AS.
Title: Rudolf R2 User's Manual
Document order no: 09326
Revision: July 2009
All trademarks acknowledged.
Related documentation:
DCU 305 R2 User’s Manual, Eng
Article 06322
DCU 305 R2 Communication Manual, Eng
Article 06324
DCU 305 R2 Installation Manual
Article 06325
Archive: p:\so_arc\sah\2001.1\autom012.doc

4•0BIntroduction - 4BImportant information Rudolf R2 User's Manual
1 Introduction
This document describes the Rudolf R2 and Rudolf R2 Light
software for PC.
Rudolf R2 is the PC parameter software used to completely
customise the DCU 305 R2 range of Diesel Engine control
units; hereafter referred to as the control unit only.
Note: Rudolf R2 is backward compatible and new versions
completely replace earlier releases and versions.
Rudolf R2 is hereafter referred to as Rudolf only.
1.1 Important information
Rudolf is a powerful configuration tool that can completely
change the current behaviour of the control unit.
Make sure you know your system well and use precaution
whenever changing critical parameters in an installed system.
1.2 System requirements
Rudolf runs under Microsoft® Windows® 95/98/ME and
Windows® NT/2000/XP, and occupies ~30MB of the harddisk
space.
Note: Rudolf will not run on Windows 3.x.
The project files occupies 2-3k bytes only, and can easily be
emailed between organisations.

Rudolf R2 User's Manual 0BIntroduction - 6BInstallation of Rudolf R2 •5
1.2.1 Minimum PC requirements
A PC equipped with a Pentium processor running at 200MHz.
Windows® 95/98/ME: 32MB RAM
Windows® NT/2000/XP: 64MB RAM
Use a color screen with 800 x 600 dpi resolution or better.
Rudolf is delivered on a CD, so make sure the PC is equipped
with a CD-drive.
1.3 Installation of Rudolf R2
1.3.1 Uninstall previous installations
Before installation, be sure to uninstall any previous copies of
Rudolf.
Insert the CD-ROM in the drive. Run the SETUP.EXE file.
Select Remove and follow the guidelines from the uninstall
program.

6•0BIntroduction - 6BInstallation of Rudolf R2 Rudolf R2 User's Manual
1.3.2 Installation
Close all other programs before installation. Insert the CD-
ROM in the drive. Run the SETUP.EXE file.
Follow the guidelines on screen as given by the Setup program.

Rudolf R2 User's Manual 1BMenu Overview - 7BFile •7
2 Menu Overview
2.1 File
The file menu is used for creating new project files, opening
existing project files and saving current files.
The project files are small (2-3k bytes) and their extension is
RDF, for instance MYFILE.RDF or PROJECT 173.RDF.
2.1.1 New
Alt+F+N Select File-New to create a new project. The new project file has
default values for most parameters.
Often, it is faster to open an earlier project that is similar,
modify it, and save it with a new name.

8•1BMenu Overview - 7BFile Rudolf R2 User's Manual
2.1.2 Open
Alt+F+O Select File-Open to open a previous project. The following dialog
appears:
Select a file with the .RDF extension, and click Open.
2.1.3 Save
Alt+F+S Select File-Save. If this is the first time the project is saved,
Rudolf will prompt for a file name.
Type a file name. The extension .RDF is added automatically.
2.1.4 Save As…
Alt+F+A This menu is used when saving a project with a new name.
Type the new name and press Save.
2.1.5 Close
Alt+F+C
This closes the open file. If it is not saved, Rudolf will prompt you
to save it.
2.1.6 Export as Text
Alt+F+E The complete project setup can be exported to a text-file. The text-
file can easily be included into a word-processor document.

Rudolf R2 User's Manual 1BMenu Overview - 8BCommunication •9
2.1.7 E-mail…
Alt+F+M Select this option to send the opened Rudolf file as e-mail. This
requires an installed version of Microsoft Outlook®.
2.1.8 Print…
Alt+F+P Select this option to get a paper printout. It is possible see a preview
before printing.
2.1.9 Exit
Alt+F+X Select File-Exit to quit Rudolf. If the current project is not saved,
you will be prompted to do so.
2.2 Communication
This menu handles up- and download of project files between
the PC with Rudolf and the control unit.
Connect the Rudolf Cable between the control unit and the PC.
2.2.1 Load from control unit…
Alt+C+L Receive the project currently in a control unit to Rudolf. This
takes ~10 seconds.
The following dialog will appear:

10 •1BMenu Overview - 8BCommunication Rudolf R2 User's Manual
Opening Communication port
Rudolf opens the PC communication port, Com1 – Com4.
If the selected port is in use by another program, this operation
fails. If no port is selected, Rudolf brings up a dialog that
makes you select a port.
Connecting to control unit
Rudolf makes sure that a control System is connected to the PC.
If it fails, make sure the right cable is connected and that the
control unit is powered.
Receiving Data…
Rudolf receives the project currently in the control unit. If it
fails, there is a bad cable connection between the PC and the
control unit.
Verifying Data…
After receiving all data, Rudolf reads the control unit again to
make sure all data is correct. If it fails, there is a bad cable
connection between the PC and the control unit.
Completing
Rudolf informs the control unit the upload is finished and closes
the PC communication port.
2.2.2 Transmit to control unit…
Alt+C+T Transmit the open project to the control unit. This takes approx.
~10 seconds.
The following dialog will appear:

Rudolf R2 User's Manual 1BMenu Overview - 8BCommunication •11
Opening Communication port
Rudolf opens the PC communication port, Com1 – Com4.
If the selected port is in use by another program, this operation
fails. If no port is selected, Rudolf brings up a dialog that
makes you select a port.
Connecting to control unit
Rudolf makes sure that a control System is connected to the PC
and prepares the control unit for reception of a new Project.
If it fails, make sure the right cable is connected and that the
control unit is powered.
Make sure the unit is in the READY state before transmitting.
For security reasons, it is not possible to send a new project if
the engine is running. Connection will then fail.
Transmitting Data…
Rudolf sends the project to the control unit. If it fails, there is a
bad cable connection between the PC and the control unit.
Verifying Data…
After sending all data, Rudolf read the control unit and makes
sure all data is correct.
If this fails, there could be a bad cable connection between the
PC and the control unit. Check the cable and try again.
Completing
Rudolf tells the control unit the download is finished and closes
the PC communication port.
Note: Power the control unit off by removing the 24 volt
suplies, then on again. The control unit is now ready to use
with the new configuration.
If the control unit has Software version : 4.37 or later, then first
holding the lamp test and alarm log keys for a while, and when
the DEBUG screen has appeared, holding the Standby key until
the display turns black, will achieve the same.

12 •1BMenu Overview - 8BCommunication Rudolf R2 User's Manual
2.2.3 Retrieve log…
Alt+C+R The control unit stores all events in a built-in log. This command
will read the entire log and open it in Notepad on your PC.
Connect the Rudolf Cable between your PC and the control
unit.
Included in the log are the project information and the counters.

Rudolf R2 User's Manual 1BMenu Overview - 9BSettings •13
2.3 Settings
This menu has a collection of useful submenus with settings
that can be made in the control unit.
The built-in log and the counters can be reset to zero. This
requires a password that can be obtained from your supplier.
2.3.1 Backup System Settings…
Alt+E+B On some control units (R2), you are prompted to set the backup
parameters on the control unit after a new configuration is
downloaded.
Selecting this menu brings up the configuration again.

14 •1BMenu Overview - 9BSettings Rudolf R2 User's Manual
2.3.2 Control unit Clock
Alt+E+O Some control units (R1) has a built-in real time clock that keeps
track of time. When commissioning, it may be necessary to adjust
the clock.
Type the date in the format dd mm yyyy (date month year) and
time in the format hh mm (hours minutes).
Seconds are adjusted to zero when OK is selected.
Use UTC time as ships may travel across timezones.
Synchronise with Windows Clock (UTC)
If selected, the time in the control unit will match the current
UTC time in the PC.
Press OK to download the new time to the control unit.
2.3.3 Service
Shift+Ctrl
Click Settings
Click Service
Or select Expert Mode…
Behind this hidden menu there are options for deleting the built-in
log, and reset the built-in counters.
Follow the guidelines in the margin to access the menus.
Two choices appear:
Delete Log
Reset counters
A password is required to use actually delete or reset anything.
For passwords, contact your distributor.

Rudolf R2 User's Manual 1BMenu Overview - 9BSettings •15
2.3.4 Options…
A number of installations are made here, for instance:
2.3.4.1 Rudolf Mode
Choose between Normal Mode and Expert Mode.
In Expert Mode, only a minimum of dialogboxes is shown to
speed up the configuration.
2.3.4.2 File Open/Save
The default file open/save folder can be set here.

16 •1BMenu Overview - 9BSettings Rudolf R2 User's Manual
2.3.4.3 Rudolf R2 Com. Port
Select the PC/laptop communication port
to be used by Rudolf.
Most often, this is COM1.

Rudolf R2 User's Manual 2BButtons - 9BSettings •17
3 Buttons
A number of common tasks are quickly accessible using the
buttons located under the menu string.
The first three buttons are common in the Windows
environment and are New configuration, Open an existing
configuration and Save the current configuration.
Pressing the green arrow button will read the project
currently in the control unit into Rudolf. The project
may then be saved to a file.
Pressing the red arrow button will transmit the project
currently in Rudolf to the control unit.
The printer button will print the documentation on your
printer.
The rightmost button is the Help button and brings up
the Rudolf Help file.
Upload
Read from control
panel to Rudolf
Download
Transmit from Rudolf
to control panel

18 •3BConfiguration Sections - 9BSettings Rudolf R2 User's Manual
4 Configuration
Sections
The configuration is sorted into tab sections as follows:
The TAB sections
Note: The ‘Standby Operation’ tab changes to ‘Start/Fuel’ if
selecting Propulsion mode in the Main tab.
The sections can be completed in any order, but it is normal to
start with Main and then Switch and Analog In
When a configuration is made and saved, it can be reused.
. The
configurations made here will appear in the Relays section.
Other manuals for DCU 305 R2
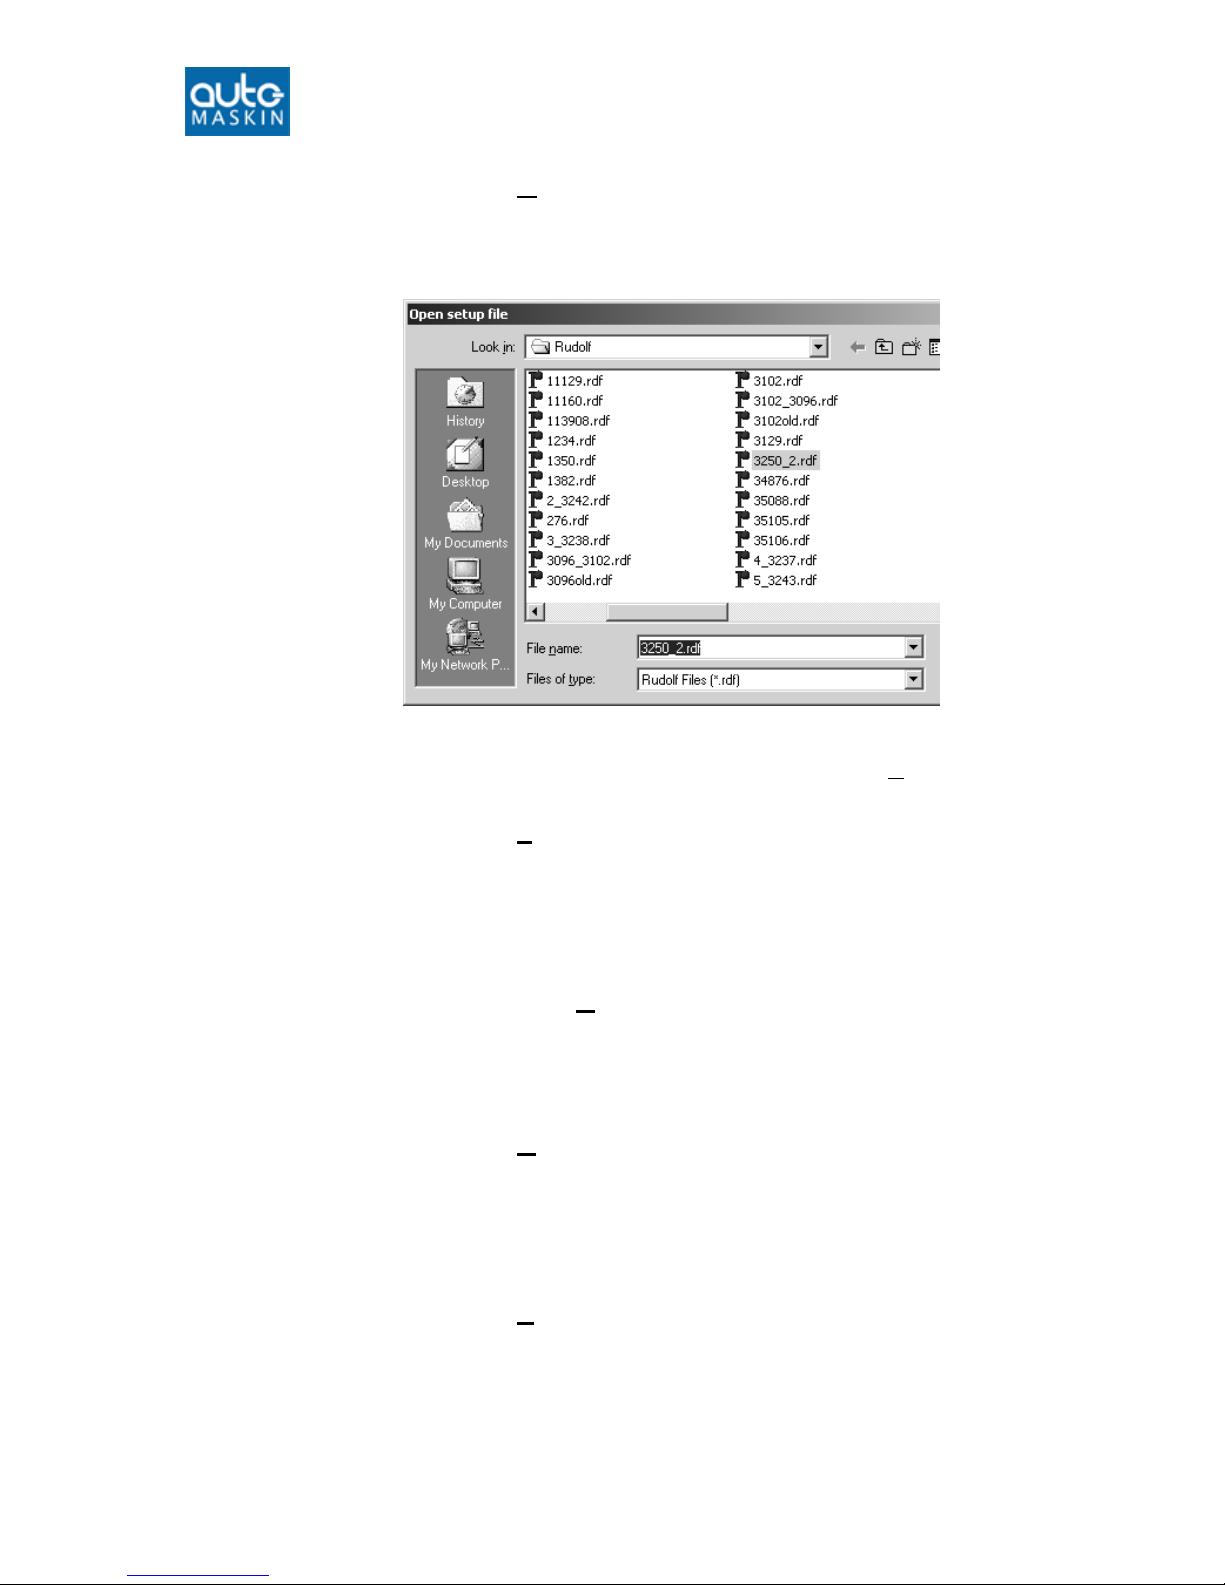
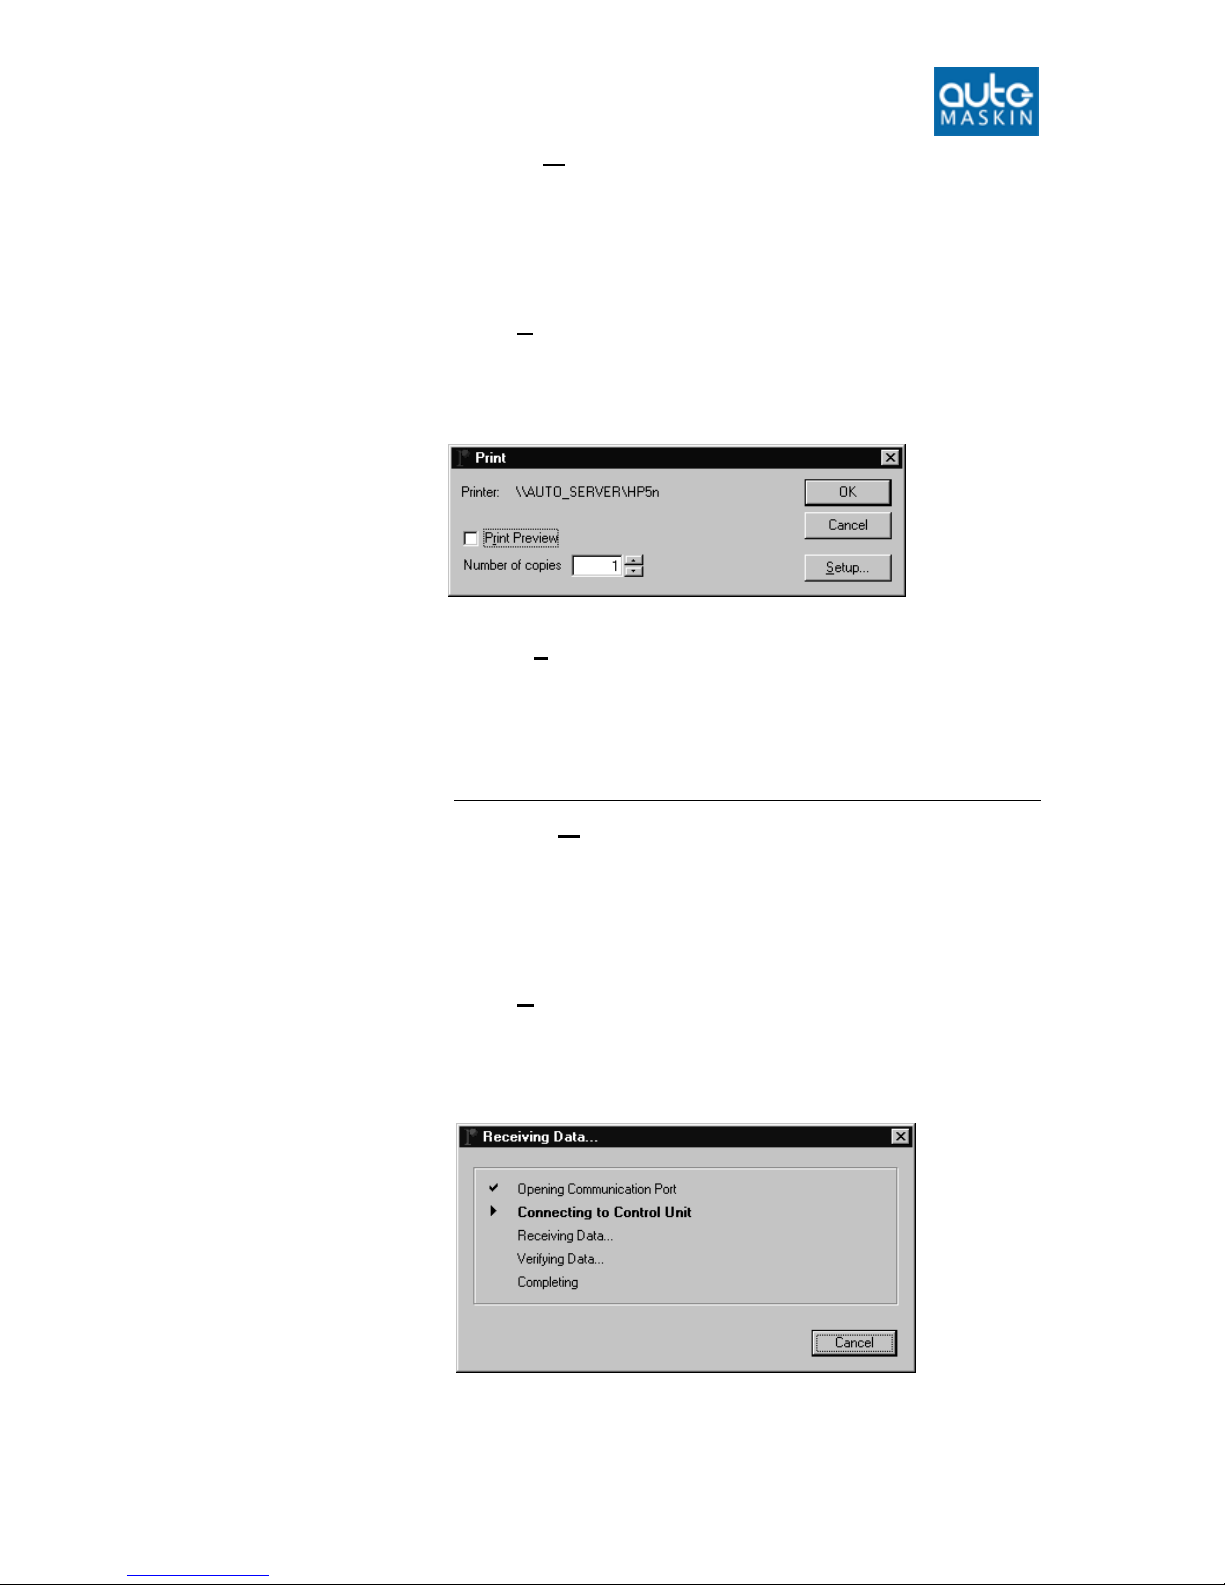
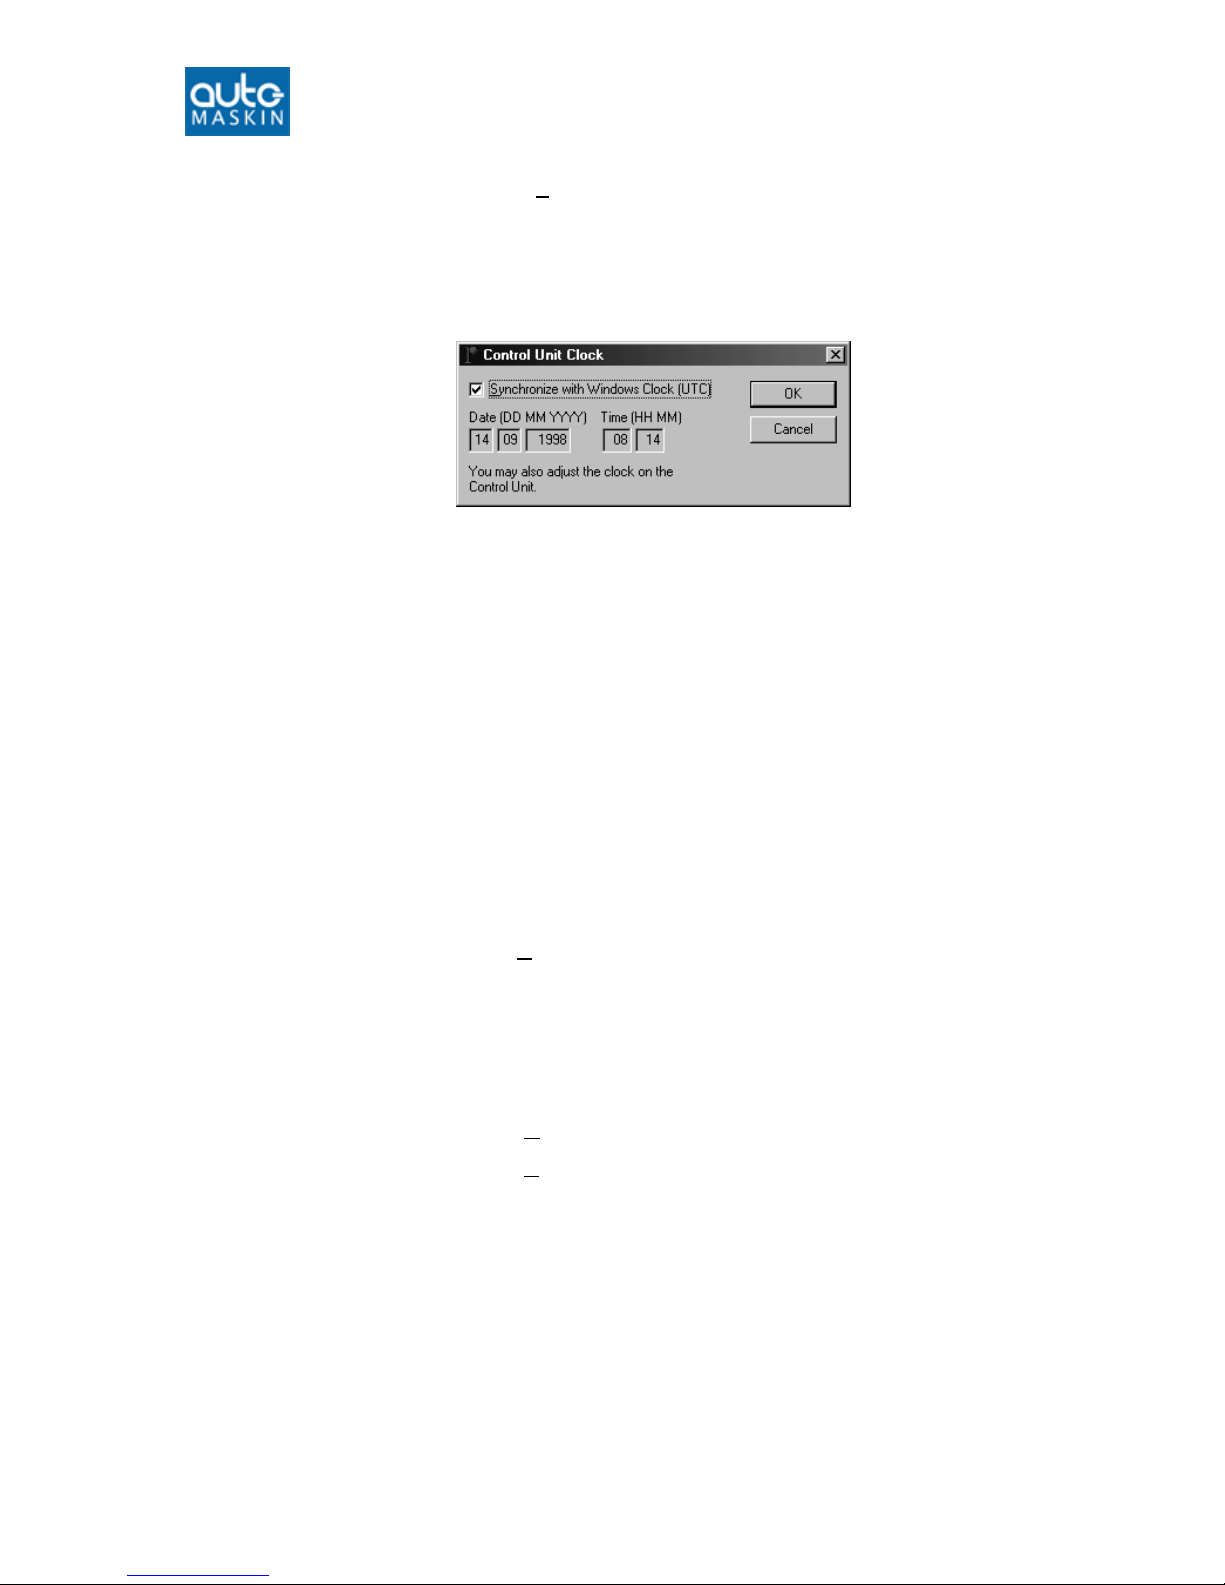
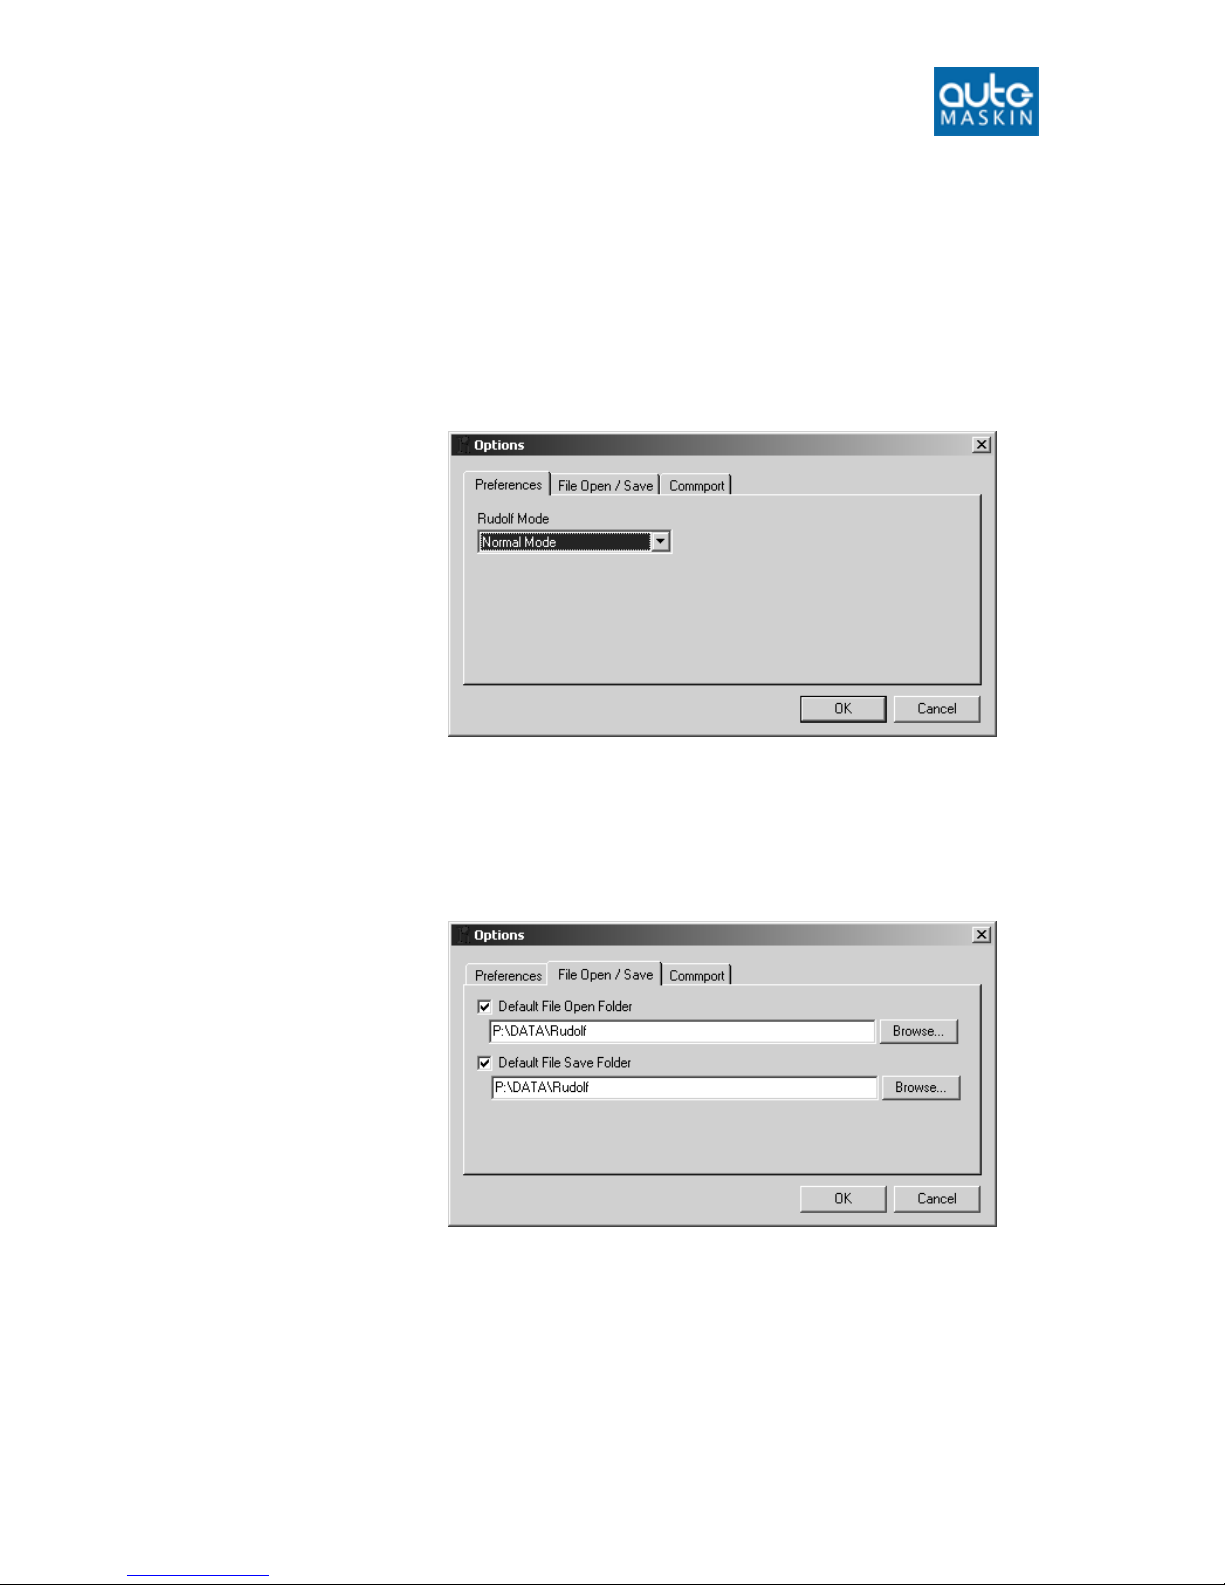
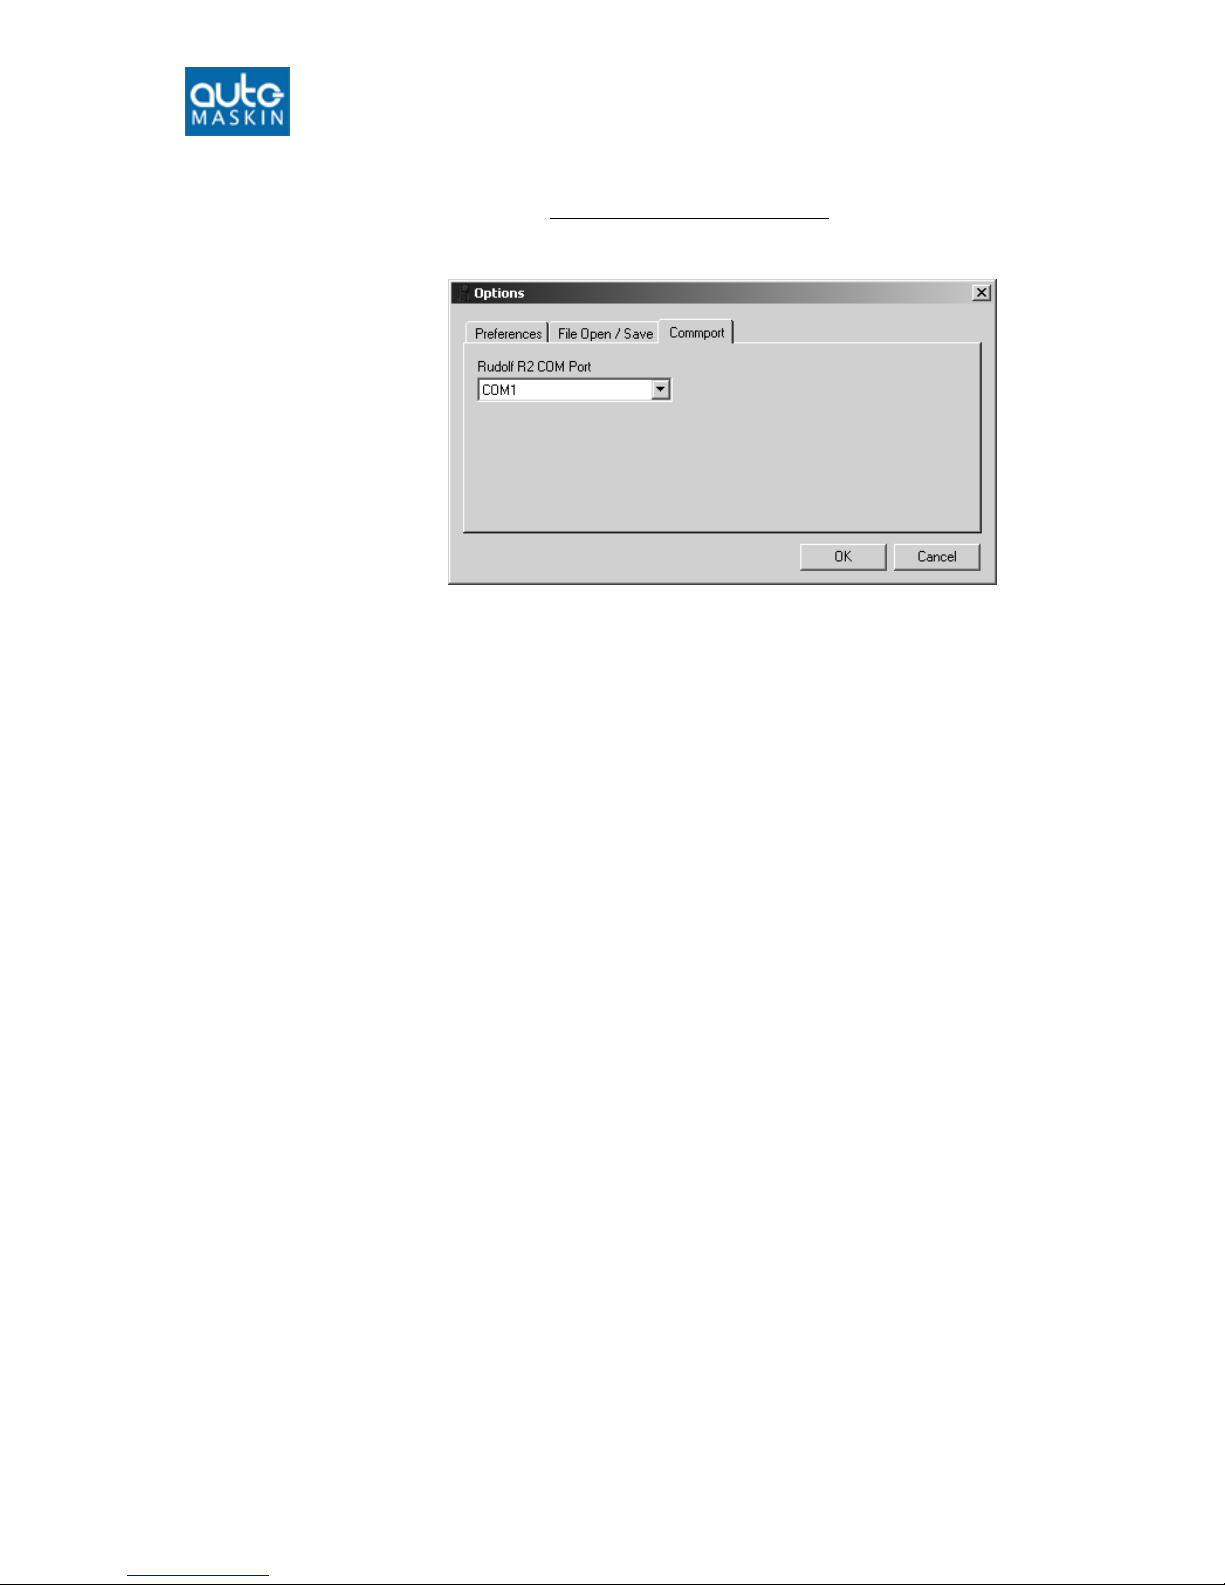
1
Table of contents
Other auto maskin Control Unit manuals
Popular Control Unit manuals by other brands

Braun
Braun Aesculap ELAN 4 Instructions for use/Technical description

Stahl
Stahl ConSig 8453 operating instructions

BENDIX
BENDIX INLET REG VALVE COMP manual

Texas Instruments
Texas Instruments TAS5782M user guide

Parker
Parker CK-6D Installation, Service and Parts Information

Toro
Toro 53799 installation guide