AutoMeter XTC-160 User manual

24
�
XTC-160
Operator’s Manual
Xpress Testing - Fast Charging
The Xpress XTC-160 is the ultimate load tester and battery charger with
fast and accurate automated testing and charging for the professional.
.
2650-1742-00 10/9/13
Auto Meter Products Inc.
413 West Elm Street
Sycamore, IL 60178
Service (815) 899-0801
Toll Free (866)-883-TEST (8378)
www.autometer.com/test
Test Equipment

2 23
LIMITED WARRANTY
12 MONTHS FROM DATE OF PURCHASE
The manufacturer warrants to the consumer that this product will
be free from defects in material or workmanship for a period of
twelve (12) months from the date of original purchase.
Products that fail within this 12 month warranty period will be
repaired or replaced at the manufacturer's option to the consumer,
when determined by the manufacturer that the product failed due
to defects in material or workmanship. This warranty is limited
to the repair or replacement of parts and the necessary labor
by the manufacturer to effect the repair or replacement of the
product. In no event shall the manufacturer be responsible for
special, incidental or consequential damages or costs incurred
due to the failure of this product.
Improper use, accident, water damage, abuse, unauthorized
repairs or alterations voids this warranty. The manufacturer
disclaims any liability or consequential damages due to breach of
any written or implied warranty on its test equipment.
WARRANTY AND SERVICE INFORMATION
Warranty claims to the manufacturer's service department must
be transportation prepaid and accompanied with dated proof of
purchase. This warranty applies only to the original purchaser
and is non-transferable. Shipper damage incurred during
return shipments is not covered under this warranty. It is the
responsibility of the shipper (the customer returning the Test
Equipment) to package the tester properly to prevent any damage
during return shipment. Repair costs for such damages will be
charged back to shipper (customer returning the Test Equipment).
Protect the product by shipping in original carton or add plenty
of over-pack cushioning such as crumpled up newspaper.
NOTES

22 3
Keep leads free of oil. Clean with warm, soapy water.
Never insert an object into the fan vents. This can
cause electrical and/or mechanical damage. Never cover the fan vents.
Never attempt to open up or repair the tester. Repairs should only
be done by an authorized repair center. Note: Doing so could void
the warranty.
Always be sure the tester is off and the smart clamps are removed
before cleaning.
SMART CLAMPSTM
Both jaws of each
clamp must rmly
engage the battery
terminal. One copper
jaw connects to the
smaller gauge wire that
reads the voltage and
the other jaw connects
to the larger conducting
wire that draws the load
in each test. Electrical
isolation between
jaws is necessary for
accurate readings. For
side terminal battery
connection, the threaded stud connects to the smaller gauge wire
that reads the voltage, and the load pad ring connects to the larger
conducting wire that draws the load in each test. Damaged clamps
or loose wires will affect the readings. Keep clamps clean and in
good repair
.
Use the side terminal feature on the clamp to connect battery side
terminals. When testing dual post batteries always check the post to
which the system is attached.
CARE AND MAINTENANCE
CHECK OFTEN FOR LOOSE JAWS
OR DAMAGED INTERNAL PLASTIC
SHOULDER INSULATORS
CONGRATULATIONS!
You have purchased Auto Meter’s XTC-160 system
designed to load test a battery and automatically provide a fast charge
when needed. The system is fully automated with LCD readout for
menu instructions, test results, and LED lights for unattended distance
viewing. If you should have any questions about this equipment or the
procedures, please see the back cover for contact information.
XTC-160
Tests ......................... 6 Volt and 12 Volt Battery Check and Load Test
Load Sequence ............................Automated 160 Amp resistive ribbon
Charge Sequence ......5 to 30 min. (larger discharged batteries longer)
CCA Range......................................................................... 100 – 1600
LCD .......................................... Backlit 1" x 2.5" 4 line x 16 characters
Cooling ...........................................................................5" Internal Fan
Battery Temperature Measurement ................................... Infrared (IR)
Temperature Probe Holder ................................. Mounts to side of unit
(screws included)
Temperature Probe Right Angle Connector.......... For use in tight area
applications and when equipment cart is used
Leads....................................Load Amp/Volt – 8 ft., 6 Gauge/18 Gauge
2 conductor Smart Clamp
Power Cord.....................................................................14 AWG 15 Ft.
Size ......................................................................... 11.5" x 11" x 9 1/4"
Weight .......................................................................................43.5 lbs
Internal Printer............................................................ AC-14 (Optional)
Equipment Cart..................................................ES-8, ES-11 (Optional)

4 21
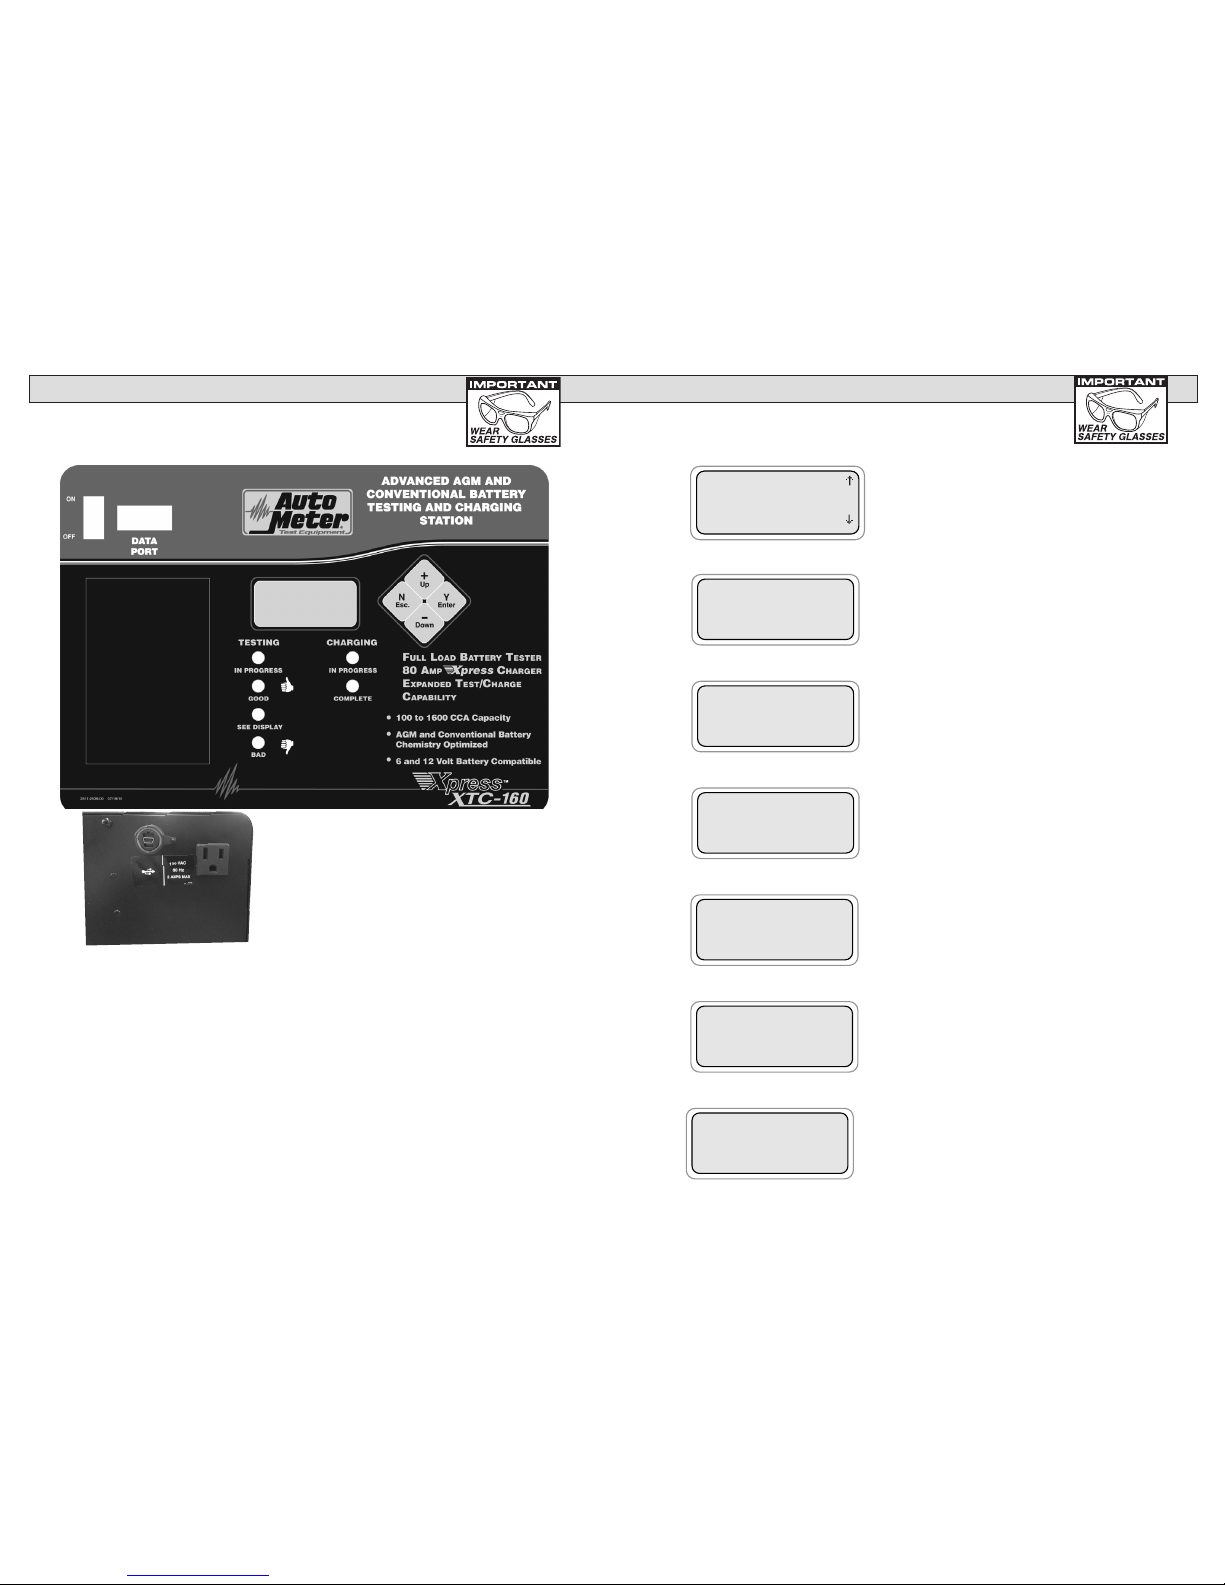
ABOUT THE XTC-160
XTC-160
VERSION 1.2
SN : 10001
COPYRIGHT 2011
REVIEW/PRINT
SETUP
USE USB DRIVE
>ABOUT
Press 'N' to return to the
main menu.
CONTENTS
Specications ............................................................................. 4
Safety ......................................................................................... 5
Cause of Battery Failure............................................................. 5
Inspection and Visual Check ...................................................... 6
What to Expect ........................................................................... 7
Controls and Functions............................................................... 8
Hook-Up ..................................................................................... 9
Battery Charge and Test Sequence.....................................10-12
Charge Only Sequence ............................................................ 13
Test Only Sequence ............................................................14-15
Test Results.............................................................................. 16
Setup ...................................................................................17-18
Printer Operation ...................................................................... 19
Review Tests ............................................................................ 19
Using USB Drive....................................................................... 20
About Menu .............................................................................. 21
Care and Maintenance ............................................................. 22
Warranty and Service Information ............................................ 23
Contact Information .................................................................. 24
Select ABOUT from the main menu. The following is displayed.
20 5
USB DRIVE
REVIEW PRINT
SETUP
>USE USB DRIVE
ABOUT
>SAVE TEST DATA
UPGRADE UNIT
'Y' TO CONTINUE
PLACE USB MEMORY
DEVICE INTO USB
SMART PORT
'Y' TO CONTINUE
PLACE USB MEMORY
DEVICE INTO USB
SMART PORT
'Y' TO CONTINUE
Select USB drive from
the menu.
The following menu appears that lets
you save the units stored data in a USB
memory device or upgrade the units
rmware via a USB memory device.
Plug USB memory device into the USB smart
port. Wait a few seconds for the smart port
to see the USB memory device and then
press 'Y'. The XTC-160 will save the data in
memory to the USB memory device's 'Root
Directory' as XTC160.CVS. It will return to the
USB menu when done. The le can then be
opened by most spreadsheet or text editor
programs.
Pressing 'Y' while the cursor is on Upgrading
Unit will display the screen asking to place
a USB memory device into the USB smart
port. Press 'Y' to start the update. The unit
will check that the update le is on the USB
memory device and then start the update
process. Be patient, this process can take up
to 25 minutes. The unit will restart when the
update is complete.
Saving test data
Upgrading
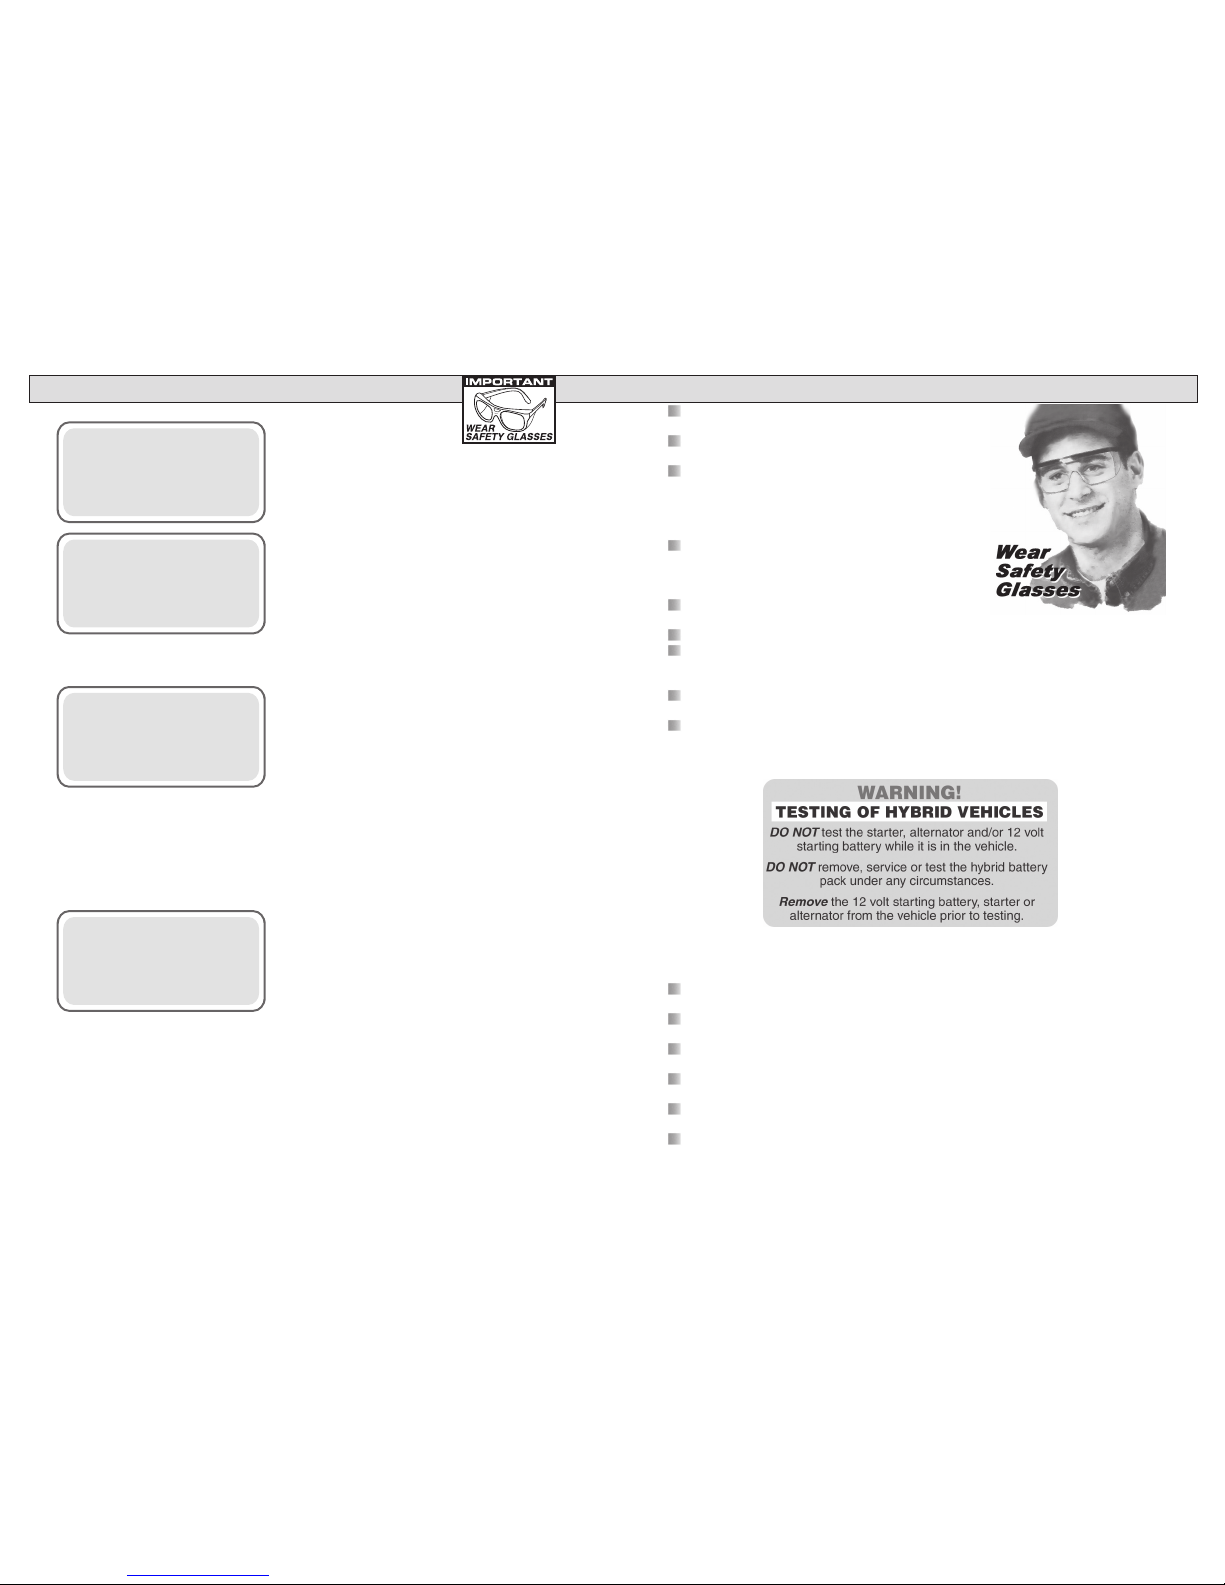
Carefully read all operating instructions before
using the XTC-160.
Wear eye protection when working around
batteries.
The XTC-160 is equipped with a power cord.
Never use an extension cord that is more than
50ft and it must not be smaller than 12 gauge.
Make sure the extension cord and receptacle are
properly grounded.
Be sure each test is completed before removing
load clamps to prevent arcing and potential
explosion from battery gases. Never remove load
clamps while testing.
Keep sparks ames or cigarettes away from
batteries.
Provide adequate ventilation to remove car exhaust.
In extremely cold temperatures, check for frozen electrolytic uid before applying load.
Do not attempt to Load Test or Charge a battery under 20°F. Allow the battery to warm
to room temperature before testing or charging.
Never connect load clamps to more than one 6 volt or one 12 volt battery at a time.
Connection to 24 volts will dangerously overload the circuitry.
Do not test multiple batteries or 24 volt systems using the XTC-160.
Warning! Never attach the XTC-160 to a battery that is connected to any other tester
or charging unit. Damage may result.
CAUSE OF BATTERY FAILURE
Incorrect Application: Wrong size battery may have inadequate cold cranking Amp
rating for original vehicle specications.
Incorrect Installation: Loose battery hold-downs cause excessive vibration, which
can result in damage to the plates.
Improper Maintenance: Low electrolytic uid and corrosion on battery connections,
can greatly reduce battery life and affect battery performance.
Age of Battery: If the date code on the battery indicates it is fairly old, the failure may
be due to natural causes.
Overcharging: Overcharging caused by a high voltage regulator setting or incorrect
battery charging can cause excessive gassing, heat and water loss.
Undercharging: Undercharging caused by a faulty charging system or low voltage
regulator setting can cause lead sulfate to gradually build up and crystallize on the
plates greatly reducing the battery’s capacity and ability to be recharge.
SAFETY
6 19
Dans le menu, sélectionnez REVISER/IMPRIMER en utilisant les
touches +/-.
From the menu select REVIEW/PRINT using the +/- keys.
Press the (+up) or (-down) key to select the desired test.
To print results to the selected printer either press the Print
Key on the Optional AC-14 Printer or press 'Y' to print on the
optional PR-16 Printer or Print Center. Press 'N' to return to
the main menu.
CHARGE & TEST
CHARGE ONLY
TEST ONLY
>REVIEW/PRINT
#290 12V BATTERY
GOOD BATTERY!
12.60V CHRG 100%
USE +/- NEXT
REVIEW / PRINT
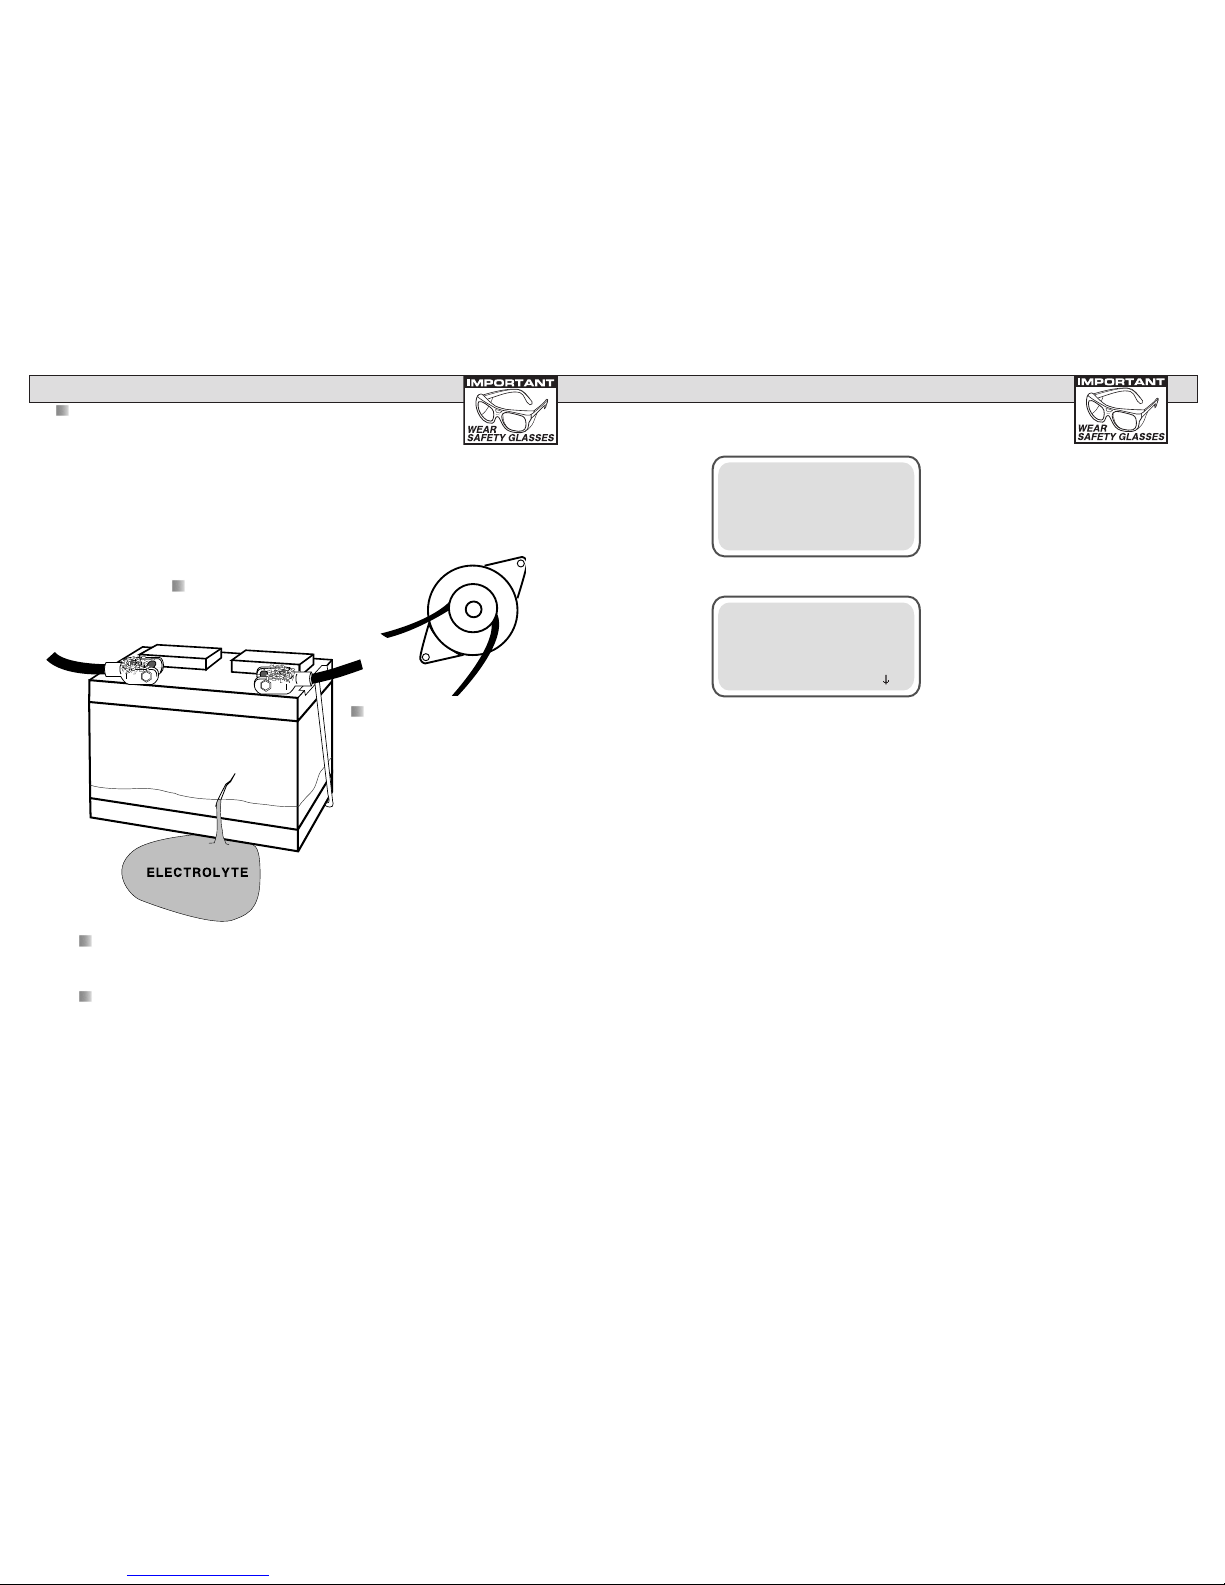
INSPECTION
Valid automotive electrical system testing depends
on all the components being in good operating
condition. In addition, the battery MUST have sufcient
charge for testing. Carefully perform the following before attempting
any electrical diagnosis.
VISUAL CHECK
Inspect Battery for terminal
corrosion, loose or broken
posts, cracks in the case,
loose hold-downs, low
electrolyte level, moisture,
and dirt around the
terminals.
Inspect Starting System; Check starter, solenoid, and
regulator for loose connections, loose mounts, and frayed or
cracked wires.
Important Note: A damaged battery must be replaced before
proceeding.
Inspect Belts for cracks,
glazed surface and fraying.
Tighten loose belts

18 7
WHAT TO EXPECT
…from your XTC-160 Tester/Charger
The Test and Charge Sequence can indicate if a 6 or 12 Volt battery is 'Good'
or 'Bad'. If the XTC-160 indicates that the battery needs charging it will
automatically charge the battery and in some cases you will know the results
within 5 minutes. Except in the case of deeply discharged batteries, 30 minutes
will be sufcient to determine if the battery is ‘Good', or 'Bad'. There is no need
to spend needless charging time on a bad battery. During the charge sequence
the XTC-160 will indicate the maximum time remaining to bring the battery to a
full charge. The LCD screen makes it possible to view the XTC-160 testing and
charging status – fully unattended.
The LCD provides easy menu instructions and test results for close-up operation
Setup cont.
>DO YOU WANT TO
ENTER CO. NAME
‘Y’ OR ‘N’
SELECT PRINTER
PR-16 PRINTER
USE -/+
'Y' TO SELECT
This allows you to enter & save the
following company information which is
included in printouts: Company name,
address, city, state, zip code and phone
number.
Chose which printer to use. The
choices are AC-14 Printer, PR-16
Printer, and Print Center.
Entry Hints:
To change the text or number press the (+)
or (-) keys. If you press N at the beginning
of the screen, no changes will be made.
To make changes, use the (+) and (-) keys
then press Y to save the change. The
cursor will then go to the next character or
number. If you are done making changes
but there is more text keep pressing Y until
the cursor is on a blank space at the end of
the lines of text. Pressing N saves the text
up to the cursor position. Any text after is
deleted.
Note: Address and city have a max of 23 characters.
>USE TEST RESULT
NEAR END OF LIFE
USE+/-
'Y' TO SELECT
Battery test results default to "Good"
or "Bad" To add "Near End of Life"
only test results use + or - to change
setting then use "y" to select this third
test result option.
8 17
1. AC On/Off Switch LCD turns
on when AC switch is on.
2. LCD: Displays menus
and test results
3. KEYS
When each key is pressed a
beep sounds to assure contact
has been made.
Y Enter Key:
This key selects the main or next
menu. It also selects the cursor
line item and answers yes to a
test progression.
+Up Key:
This key moves the cursor up in
order to select a menu line item.
It also increments a value.
-Down Key:
This key moves the cursor down
USB Type A - For data
download to ash memory and
USB printer connection.
USB Type B
USB Mini B Connection - future
expansion factory use.
CONTROLS AND FUNCTIONS SETUP
Scroll Down to Setup, Select setup
by pressing Y'.
Select the temp in Fahrenheit or
Centigrade.
Choose whether to have the temperature
probe take the battery temperature
automatically or wait until the probe
button is pressed.
Choose between English,
Spanish or French Language.
Set the LED display
contrast. Settings are
from 1 to 10. Press 'y'
when contrast is at an
acceptable level.
Select the rating from CCA, MCA, CA,
AH.
The tester/charger factory default settings are English, F (Temp), CCA,
600 CCA, (Good or Bad only). To change the settings, setup menu's
below.
>SET TEMPERATURE
SCALE: F.
USE +/-.
‘Y’ TO SELECT
>SET LANGUAGE
ENGLISH
USE +/-.
‘Y’ TO SELECT
>DEFAULT BATTERY
RATING: CCA
USE +/-.
‘Y’ TO SELECT
>TEMP MEASURE
AUTOMATIC
USE -/+
'Y' TO SELECT
>SET DEFAULT CCA
AS: 600.
USE+/-
'Y' TO SELECT
You can also select the default rating to be
the last entered CCA value or a particular
amount such as 600 CCA.
CHARGE ONLY
REVIEW/PRINT
>SETUP
ABOUT
>SET CONTRAST
CONTRAST 4
USE +/-
'Y' TO SELECT
in order to select a menu line. It
also decrements a value.
N Esc Key:
This key cancels a test or pro-
gression. It also returns to the
previous menu.
6. Battery Temperature
Aim temperature probe at battery
and press button to input battery
temperature.
4. Battery Test Sequence
Indicating Testing, 'Good', or 'Bad'.
5. Battery Charge Sequence
Indicating Charging or Charged.

16 9
Use the side terminal feature on the clamp to connect battery side terminals.
When testing dual post batteries always check the post to which the system
is attached.
HOOK UP
2.Connect to only one 6-volt or 12-volt battery at a time.
Red = (+) Positive and Black = (-)
Negative
Make sure the terminals are clean
and the connection is sure then
press ‘Y’ Enter. If the "Check
Battery Connections" remains
the connections are not secure. If
you are sure of a solid connection
replace the battery.
1. Turn on the AC switch. The LCD will indicate "XTC-160"
if the unit is properly plugged into an AC outlet. For your
safety, make sure the AC receptacle is properly grounded.
Note: The XTC-160 is equipped with a power cord. Never use an
extension cord smaller than 12 gauge or longer than 50ft. Make sure the
extension cord and receptacle are properly grounded.
Note: Due to gases and usual corrosion around the positive terminal it
is important to connect the positive (+) red clamp rst. Make sure the
connection is certain. Then connect the negative (-) black clamp.
3. If the XTC-160 displays one of the following messages check your
connections.
Connect Black
Clamp to Negative
(-) Terminal
Connect Red
Clamp to
Positive (+)
Terminal
REVERSED BATTERY
CONNECTIONS!!
CHECK BATTERY
CONNECTIONS
‘Y’ TO CONTINUE
After the Charge and Test Sequence or Test Only Sequence is
complete one of the following result screens will be displayed.
Battery passes
testing. Return to
service.
Charge battery and place into
service. (Test Only)
Battery did not have a sufcient
charge for a Digital Pulse Load
Test. Charge required. (Test only)
Battery passes testing and is
"Near End of Life" Recommend
retesting in three (3) months.
Battery did not have
sufcient remaining
capacity to pass tests.
Battery should be replaced
immediately.
#32 12V BATT.
GOOD BATTERY.
12.84V CHG 100%
#33 12V BATT.
BAD BATTERY
12.45V CHG 75%
REPLACE NOW
#34 12V BATT.
GOOD NEEDS CHARG
12.24V CHG 50%
CK START-CHG SYS
#35 12V BATT.
CHARGE & TEST
12.06V CHG 25%
ADDL TEST REQ'D
#36 12V BATT.
GOOD BATTERY!
12.80V CHG 100%
NEAR END OF LIFE
RESULTS

10 15
CHARGE and TEST SEQUENCE
From the menu select charge and test using the +/- keys.
If the battery temperature is above 120°F the following message will appear.
If the battery temperature is below 10°F the following message will appear.
If no temperature probe is connected use the +(Up) and -(Down) keys to enter the current
battery temp. The (Up) & (Down) keys increment & decrement in units of 10. Press ‘Y’ to
begin. If temperature probe is connected, point the temperature probe at the battery and
press the button on the temperature probe to input battery temperature.
Then press ‘Y’ to
enter
The unit will go back to main
menu.
THE BATTERY
NEEDS TO COOL
BEFORE CHARGING
‘Y’ TO CONTINUE
THE BATTERY
NEEDS TO WARM
BEFORE CHARGING
‘Y’ TO CONTINUE
>ENTER BATTERY
TEMP. 70F
USE +/-
‘Y’ TO BEGIN
THE BATTERY
IS TOO HOT TO
CHARGE SAFELY
‘Y’ TO CONTINUE
THE BATTERY
IS TOO COLD TO
CHARGE SAFELY
‘Y’ TO CONTINUE
>CHARGE & TEST
CHARGE ONLY
TEST ONLY
REVIEW/PRINT
The unit will go back to main
menu.
ENTER RATED CCA
1350
USE +/-.
‘Y’ TO BEGIN.
The rating displayed will be either the default rating or the last tested rating will be displayed (this setting can be
changed in setup). Adjust the rating using the +/- keys.
Summary Screen
Press ‘Y’ Enter to begin
charging.
ENTER RATED CCA
1350
USE +/-.
‘Y’ TO BEGIN.
>
STARTING STANDRD
BATTERY TEMP 70°
RATED CCA = 600
‘N’ OR ‘Y’
CHOOSE BATT TYPE
STARTING STANDRD
USE +/-,
‘Y’ TO CONTINUE
TESTING BATTERY
PLEASE WAIT...
S#22010 T#290
‘N’ TO STOP
#290 12V BATTERY
GOOD BATTERY
12.60 CHRG 100%
'Y' TO PRINT – MORE
Conrm that the inputs are correct.
Press ‘Y’ if they are correct. The test
will start. Press ‘N’ to re-enter temp,
battery rating and battery type.
BATTERY TYPE OPTIONS:
STARTING STANDRD
STARTING AGM
DEEP CYCLE AGM
DEEP CYCLE STANDRD
Press the (+Up) or (-Down) key to
cycle through the battery types.
Press 'Y' when it matches the
type of battery you are testing.
The rating displayed will be either the default rating or the last entered
rating will be displayed (this setting can be changed in setup). Adjust the
rating using the +/- keys
TEST ONLY SEQUENCE cont.
The XTC-160 serial number and
test number are displayed to help
reference the test to the print out.

14 11
CHARGE and TEST SEQUENCE cont.
Wait for results. See Automated Conditions
for status. Other Conditionss: if the battery
has a surface charge the LCD will display
"REMOVING SURFACE CHARGE" and if the
load clamps become disconnected or loose
"CHECK BATTERY CONNECTIONS" will
appear.
If 'Y' is pressed the XTC-160 will charge the battery in 6 volt mode. If 'N' is pressed the XTC-160 will attempt
to bring the battery up to a level where the normal 12V charge can be applied.
TESTING BATTERY
PLEASE WAIT...
‘N’ TO STOP
>IS THIS A 6V
BATTERY?
If the XTC-160 determines a low
voltage it will ask if the battery is a
6 Volt. Press the "Yes" or "No" key.
Summary Screen
Conrm that the inputs are correct. Press
‘Y’ if they are correct. The test will start.
Press ‘N’ to re-enter temp, battery rating
and battery type.
Press the (+Up) or (-Down) key to
cycle through the battery types. Press
'Y' when it matches the type of battery
you are testing.
BATTERY TYPE OPTIONS:
STARTING STANDRD
STARTING AGM
DEEP CYCLE AGM
DEEP CYCLE STANDRD
CHOOSE BATT TYPE
STARTING STANDRD
USE +/-,
‘Y’ TO CONTINUE
>STARTING STANDRD
BATTERY TEMP 70°
RATED CCA = 600
‘N’ OR ‘Y’
>ENTER BATTERY
TEMP. 70F
USE +/-
‘Y’ TO BEGIN
The unit will go back to main
menu.
THE BATTERY
NEEDS TO COOL
BEFORE TESTING
‘Y’ TO CONTINUE
THE BATTERY
IS TOO HOT TO
TEST SAFELY
‘Y’ TO CONTINUE
If the battery temperature is above
150°F the message to the left will
appear.
CHARGE & TEST
CHARGE ONLY
>TEST ONLY
REVIEW/PRINT
From the menu select TEST ONLY using the +/- keys.
Then press ‘Y’ Enter to
enter.
TEST ONLY SEQUENCE
If no temperature probe is connected use the +(Up) and -(Down) keys to enter the current
battery temp. The (Up) & (Down) keys increment & decrement in units of 10. Press ‘Y’ to
begin. If temperature probe is connected, point the temperature probe at the battery and
press the button on the temperature probe to input battery temperature.
12 13
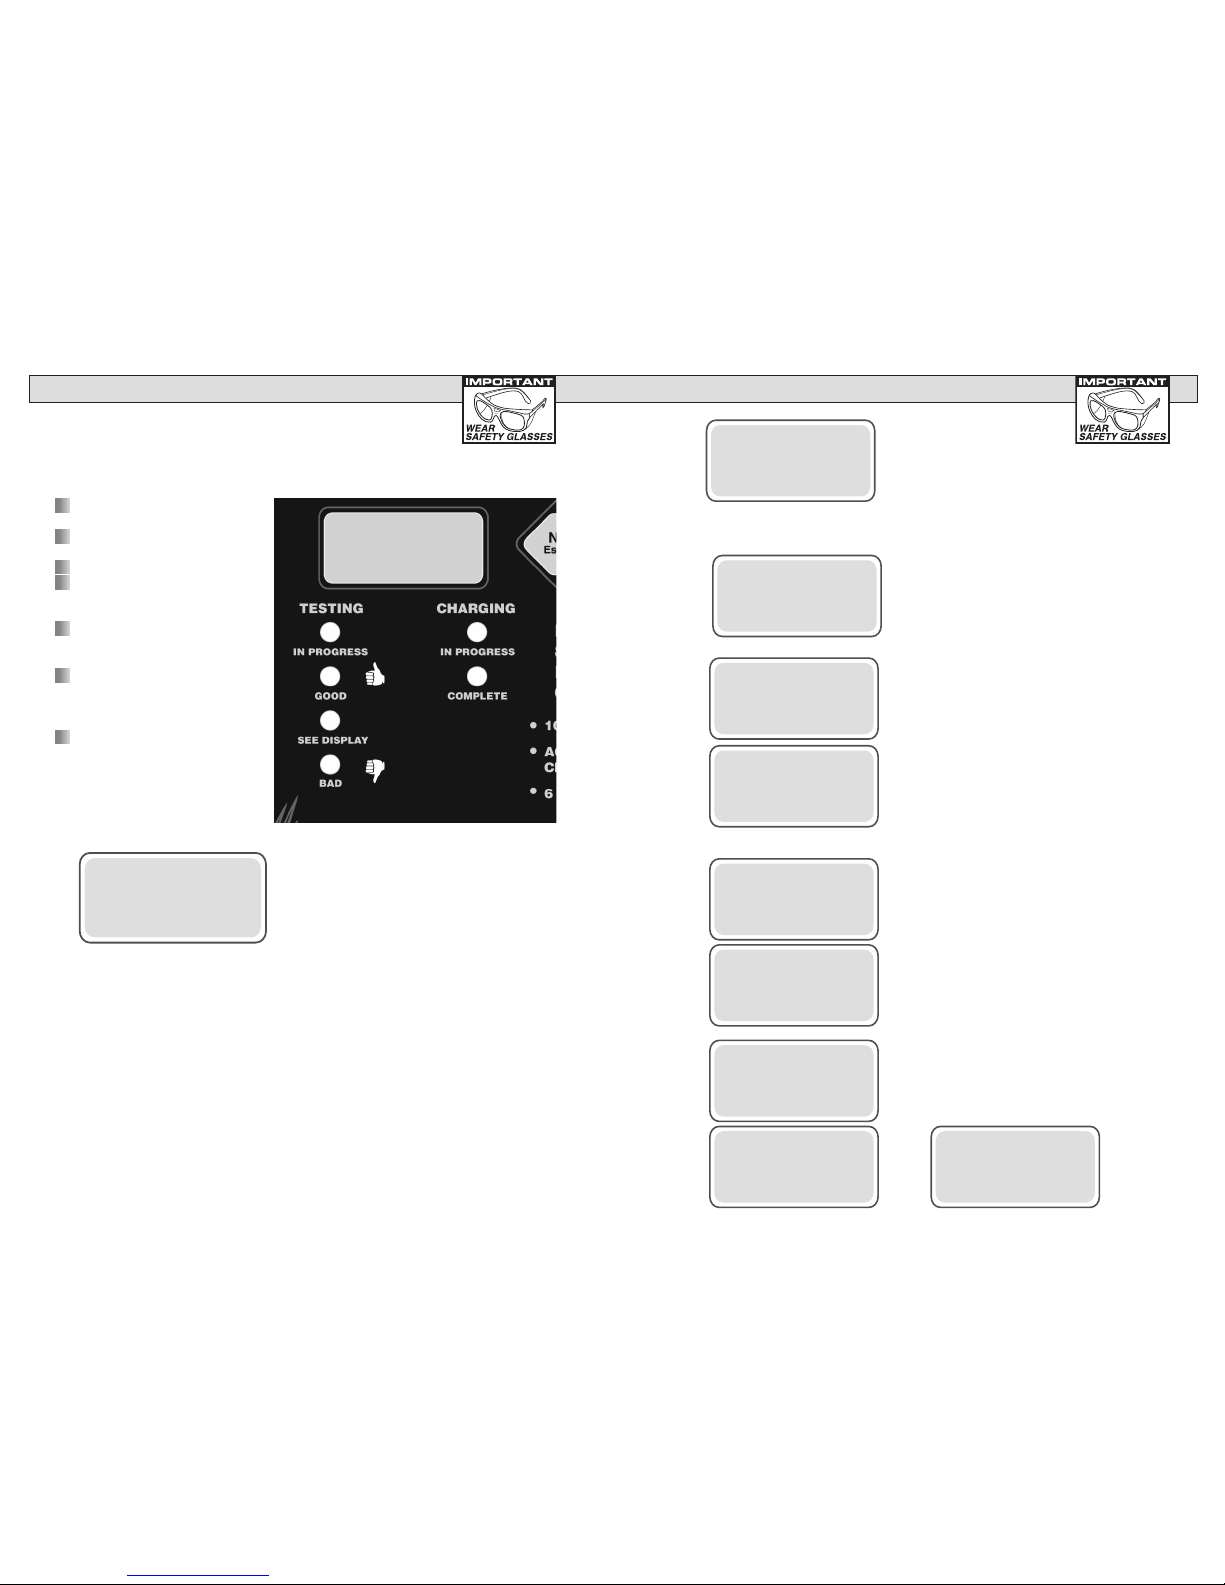
AUTOMATED CONDITIONS
If the battery needs charging the XTC-160 will automatically charge the battery and then
run a Load Test. The LED indicators will show the status during a fully automated Test and
Charge sequence. This makes it possible to view the status and nal results at a distance.
Red "TESTING" light indicates battery
is being tested.
Red "CHARGING" light indicates
battery is being charged. .
Green "GOOD" light indicates battery is good.
Green "GOOD" with Red
"CHARGING" light indicates battery is
being charged. .
Green "GOOD" with Green
"CHARGED" light indicates battery is
good and has been charged.
Yellow See Display indicates that some
condition occurred that did not let the
battery charge or that the battery is Near
End of Life. See the display for details.
Red "BAD" indicates the battery is too
bad to charge or is considered bad
after a charge is attempted.
CHARGE and TEST SEQUENCE cont
LCD TEST RESULTS: Include
"GOOD BATTERY" "GOOD, "NEAR
END OF LIFE" and "BAD BATTERY".
#290 12V BATTERY
GOOD BATTERY
MEAS. CCA 975
'Y' PRINT – MORE Press 'Y' to print results on store printer.
Press - to see "WHAT NEXT" screen.
Press 'N' to go back to menu
.
.
CHARGING
TIME LEFT: 10 MIN
CHRG CURR: 50A
'N' TO STOP
If the battery temperature goes over 140°F charging will stop.
If no temperature probe is connected use the +(Up) and -(Down) keys to enter the current battery temp.
The (Up) & (Down) keys increment & decrement in units of 10. Press ‘Y’ to begin. If temperature probe is
connected, point the temperature probe at the battery and press the button on the temperature probe to
input battery temperature.
CHARGE ONLY SEQUENCE
From the menu select CHARGE ONLY using the +/- keys.
Then press ‘Y’ Enter to enter.
Summary Screen
>STARTING STANDRD
BATTERY TEMP 70°
RATED CCA = 600
‘N’ OR ‘Y’
Conrm that the inputs are correct.
Press ‘Y’ if they are correct. The
charge will start. Press ‘N’ to re-enter
temp, battery rating and battery type.
CHOOSE BATT TYPE
STARTING STANDRD
USE +/-,
‘Y’ TO CONTINUE
BATTERY TYPE OPTIONS:
STARTING STANDRD
STARTING AGM
DEEP CYCLE AGM
DEEP CYCLE STANDRD
Press the (+Up) or (-Down) key to
cycle through the battery types. Press
'Y' when it matches the type of battery
you are testing.
The rating displayed will be either the default rating or the last entered rating will be displayed (this setting
can be changed at setup). Adjust the rating using the +/- keys.
ENTER RATED CCA
1350
USE +/-.
‘Y’ TO BEGIN.
>ENTER BATTERY
TEMP. 70F
USE +/-
‘Y’ TO BEGIN
The unit will go back to main
menu.
THE BATTERY
NEEDS TO COOL
BEFORE CHARGING
‘Y’ TO CONTINUE
THE BATTERY
IS TOO HOT TO
CHARGE SAFELY
‘Y’ TO CONTINUE
If the battery temperature is above 120° the following message will appear
TESTING BATTERY
PLEASE WAIT...
'N' TO STOP
#290 12V BATTERY
CHARGED ONLY
12.60 CHRG 100%
'Y' TO PRINT – MORE
CHARGE & TEST
>CHARGE ONLY
TEST ONLY
REVIEW/PRINT
Table of contents
Other AutoMeter Automobile Batteries Charger manuals


