Avady PANDuo pH Turboxy Cl T Instruction Manual

www.avadypool.com
PANDuo pH Turboxy Cl T
NOT044ENV02
INSTRUCTIONS AND USER MANUAL

Instructions and user manual PANDuo pH Turboxy NOT044ENV02
2
TABLE OF CONTENTS
1WARNING AND ADVICE ............................................................................................ 4
1.1 Guarantee and Warning.....................................................................................................4
1.2 Shipping and transporting..................................................................................................5
1.3 Proper use of the pump .....................................................................................................5
1.4 Risk ....................................................................................................................................5
1.5 Toxic and/or dangerous liquid dosage...............................................................................6
1.6 Assembling and dismantling the pump..............................................................................6
2DESCRIPTION OF PAN DUO PH TURBOXY.......................................................... 7
2.1 Description of buttons ..............................................................................................................7
2.2 Description of the plugs of the PAN DUO PH TURBOXY ...........................................................8
3RECOMMENDATIONS AND INSTALLATION ............................................................... 8
3.1 Recommendations..............................................................................................................8
3.2 Installation ................................................................................................................................9
4AVANCED UNIT SETTINGS .................................................................................... 13
4.1 Adjusting the pH setpoint .......................................................................................................13
4.2 Adjusting the Chloring setpoint (Cl)........................................................................................14
4.3 Activation type........................................................................................................................14
4.4 TURBOXY Duo pH Cl °C Web settings......................................................................................16
4.5 PAN DUO PH TURBOXY Standby mode...................................................................................20
4.6 PAN DUO PH TURBOXY Priming..............................................................................................20
4.7Display backlight .....................................................................................................................20
5SOLUTIONS TO PROBLEMS........................................................................................ 20
5.1 Incorrect measure and procedure for increasing the TAC .....................................................20
5.2 Technical details......................................................................................................................20
5.3 Alarms and displayed symbols................................................................................................21
5.4 Pairing the PAN DUO PH TURBOXY to AvadyConnect (OPTIONAL)........................................22
6MAINTENANCE ......................................................................................................... 23
6.1 Wear parts of the pump..........................................................................................................23
6.2 Cleaning electrode of the probe TURBOXY.............................................................................24
6.3 Maintenance of the electrode ................................................................................................24
6.4 Remplacement of the peristaltic tube ....................................................................................25

Instructions and user manual PANDuo pH Turboxy NOT044ENV02
3
6.5 Wintering ................................................................................................................................26
6.6 Recommended and non-recommended chemicals................................................................27
6.7 Shock Chlorination ..................................................................................................................27
7AFTER SALES SERVICE ........................................................................................... 27
8SPARE PARTS LIST ....................................................................................................... 28

Instructions and user manual PANDuo pH Turboxy NOT044ENV02
4
1WARNING AND ADVICE
Please read the warning notices very carefully because they provide important information regarding safety
in installation, maintenance and use of the pump.
•Keep this manual in a safe place, so that it will always be available for further consultation.
•The device complies with EMC: 2004/108/EEC “electromagnetic compatibility” and LVD: 2006/95/EC “
low voltage ” as also the subsequent modifications.
N.B. : the pump has been constructed in accordance with best practice. Both its life and its electrical and
mechanical reliability will be enhanced if it is correctly used and subjected to regular maintenance.
1.1 Guarantee and Warning
1.1.1 General equipment
The material is guaranteed 24 months parts and labour. The return address in our center is the following :
AVADY POOL - SAV
9 Chaussée Jules César
Bât. 4, Hall 406
95520 OSNY, France
The shipping costs to Osny are charged of the customer. If the repair is carried out as part of the warranty,
return is supported by AVADY POOL. The wear parts excluded of the warranty are: pH or redox probe
(except for the validation of the warranty extension), injection valve, foot filter and peristaltic hose.
WARNING : any intervention or repair to the internal parts of the pump must be carried out by
qualified and authorized personnel. The manufacturers decline all responsibility for the
consequences of failure to respect this rule.
1.1.2 Warranty extension for the sensor
Applicable conditions : The user's purchase must be declared on the AVADY POOL website
(www.avadypool.com) within one month. The warranty runs for 12 months from the date of purchase but
this period may not exceed 18 months from the date of sale by AVADY POOL. The warranty consists of the
direct replacement of the sensor identified as being faulty by our Technical Department, or its repair, after
examination by our Technical Department, excluding any other compensations of whatever form.
Exclusion conditions : This warranty does not cover damage caused by an accident, improper installation or
use, a lack of reasonable care, attempted falsification or attempted repair performed by an unauthorised
person.
Return conditions :
The probe's serial number must always be on its cable and readable as at the time of purchase.
A photocopy of the purchase receipt must be sent together with the return package.
The sensor must be sent in its original packaging with the extremity protected by its cap and filled
with water.
The transport costs to our company must be paid by the customer. However, for sensors under warranty,
the return transport costs will be paid by AVADY POOL.

Instructions and user manual PANDuo pH Turboxy NOT044ENV02
5
1.2 Shipping and transporting
No matter what the means of transport employed, delivery of the
pump, even when free to purchasers or the addressee’s domicile, is
always at the purchaser’s risk. Claim for any missing materials must
be made within 10 days of arrival, while claims for defective
materials will be considered up to the 30th day following receipt.
Return of pump or other materials to us or the authorized
distributor must be agreed beforehand with the responsible
personnel. Material should be disassembled and packed with care.
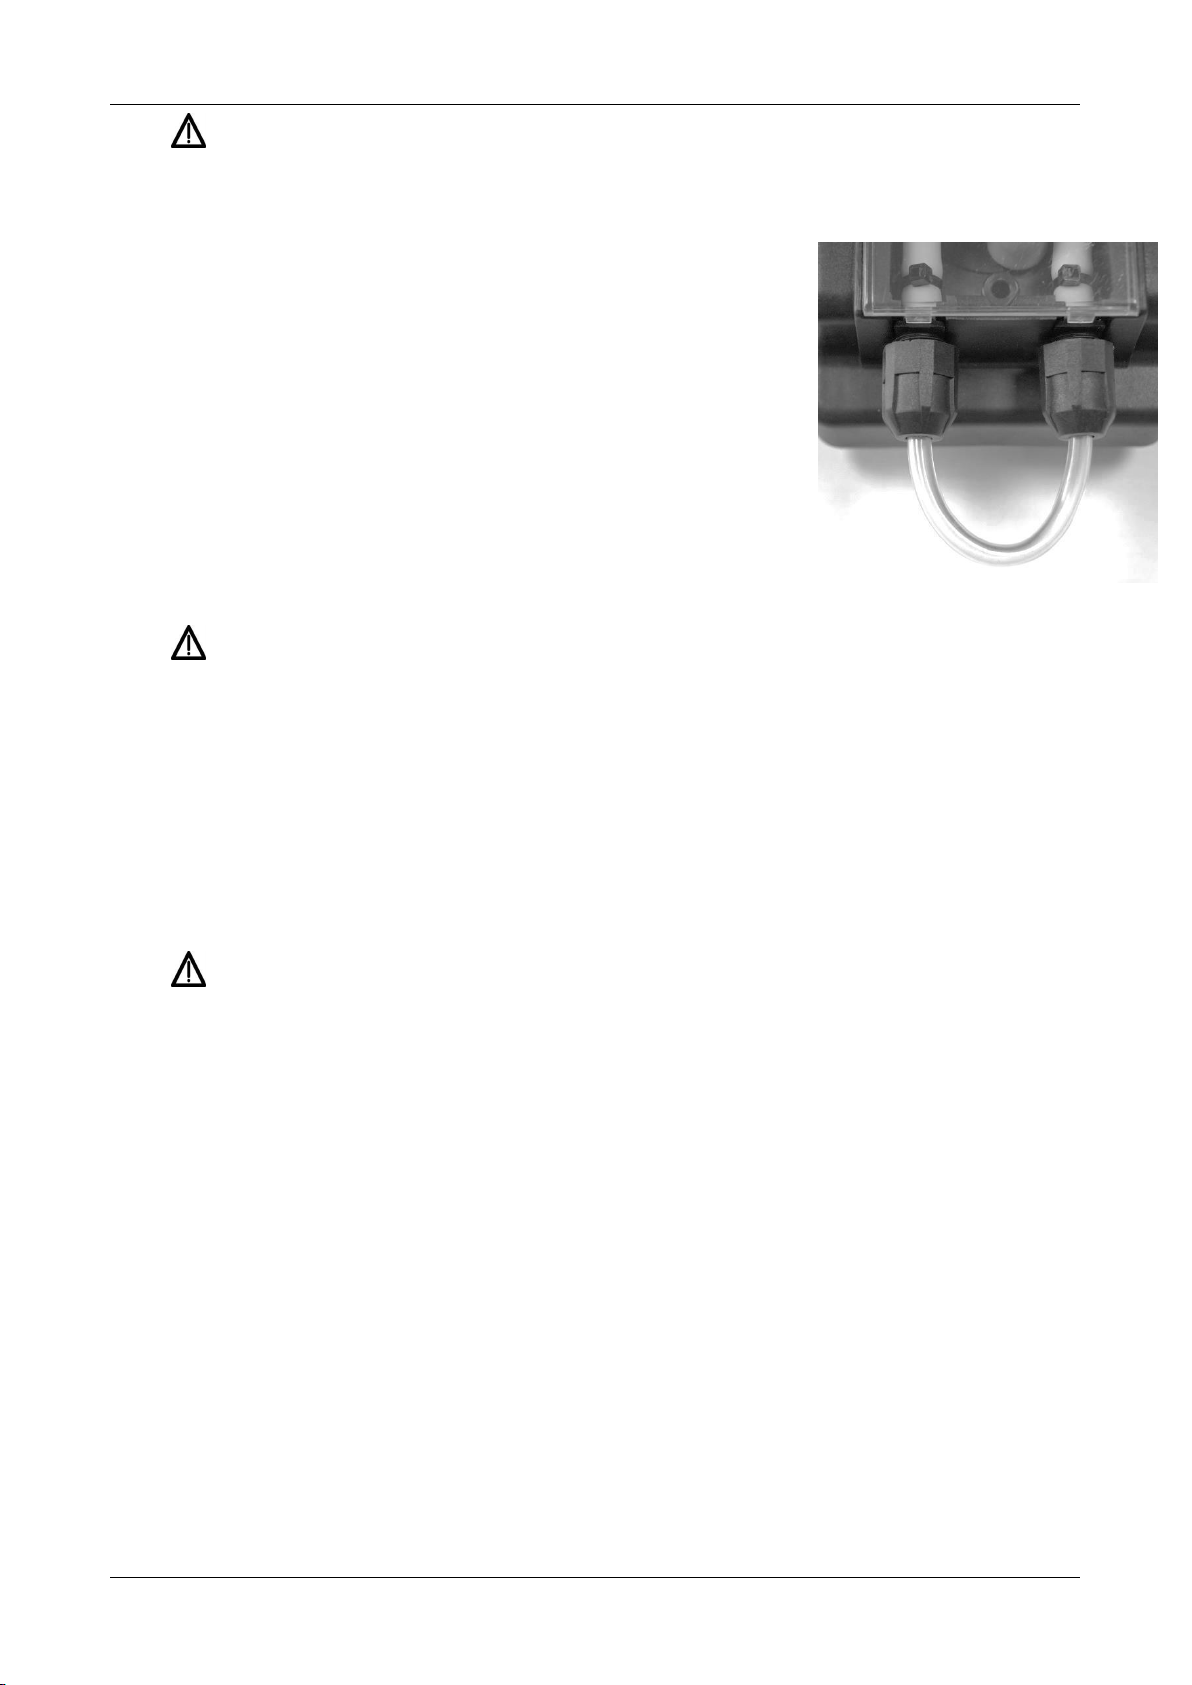
All parts in contact with the chemical should be purged and rinsed
for everyone’s safety. If the pump can not be purged, fasten the
input with the output using a tube (see figure below). In the case of
non-compliance with this guideline, we reserve not to support the
materials and to return it at your expense and any damage created
by the chemical on the material will undergo a repair quote.
1.3 Proper use of the pump
The pump should be used only for the purpose for which it has been expressly designed namely the dosing
of liquids. Install the pump in a dry and not floodable place and well away from sources of heat, and in any
case, at environmental temperature not exceeding 40°C. The operating minimum temperature depends of
the liquid to be pumped, bearing in mind that it must always remain in a liquid state. Any different use is to
be considered dangerous. The pump should not therefore be used for applications that were not allowed
for in its design. In case of doubt please contact our offices for further information about the characteristics
of the pump and it proper use. The manufactures can not be held responsible for damage deriving for
improper, erroneous or unreasonable use of the pump.
1.4 Risk
After unpacking the pump, make sure that it is completely sound. In case of doubt, do not use the pump
and contact qualified personnel. The packing materials (plastic bags, polystyrene, etc.) should be kept out
of the reach of children: they constitute potential sources of danger.
Before you connect the pump make sure that the voltage ratings correspond to your particular voltage
supply. You will find this value on the rating plates attached to the pump.
The electrical installation to which the pump is connected must comply with the standards and good
practice rule in force in the country under consideration.
Use of electrical equipment always implies observance of some basic rules. In particular :
Do not touch with wet or damp hands or feet,
Do not operate the pump with bare feet (typical place: swimming pool),
Do not leave the equipment exposed to the atmospheric agents,
Do not allow the pump to be used by children or unskilled individuals without supervision.
The pump has to be supplied through an isolating transformer or supplied through a RDC ( max operating
current = 30mA).
In case of breakdown or improper functioning of the pump, switch off, but do not touch. Contact our
technical assistance for any necessary repairs and insist on the use of original spares. Failure to respect this
condition could render the pump unsafe to use.

Instructions and user manual PANDuo pH Turboxy NOT044ENV02
6
In case of damage of power supply cord please ask the repair to our technical assistance or qualified and
authorized personnel.
When you decide to make no further of an installed pump, make sure to disconnect it from the power
supply.
Before carrying out any service on the item, check:
1. Disconnect the plug from the mains.
2. Relieve all the pressure from the pump head or the injection tube.
3. Drain or flush all dosing liquid from the pump head. This operation can also be done with the pump
disconnected from the plant by turning the pump upside-down for 10 seconds and without connecting
the tubing to the nipples.
In event of possible losses on the hydraulic system of the pump (breakage of the O-ring, the valves or the
hoses), the pump should immediately be brought to a stop, emptying and depressurizing the delivery hos
while taking all due the safety precautions (gloves, goggles, overalls.).
1.5 Toxic and/or dangerous liquid dosage
To avoid risk from contact with hazardous liquids or toxic fumes, always adhere to the notes in this
instruction manual:
• Follow the instructions of the dosing liquid manufacturer
• Check the hydraulic part of the pump and use it only if it is in perfect condition
• Use only the correct materials fir the tubing, valves and seals to suit the liquid to be dosed : where
possible shield the tubing with PVC conduit.
• Before disconnecting the metering pump, make sure to flush out and neutralize the pump head with the
proper reagent liquid.
1.6 Assembling and dismantling the pump
1.6.1 Assembly
See paragraph 3 RECOMMENDATIONS AND INSTALLATION page 8
1.6.2 Dismantlement
Proceed as follows when you dismantle the pump or before performing any operation on it :
Make sure that it is disconnected from the power supply (both polarities) by removing the
conductors from the network contact points..
See paragraph 1.2 page 5

Instructions and user manual PANDuo pH Turboxy NOT044ENV02
7
2DESCRIPTION OF PAN DUO PH TURBOXY
The PAN DUO PH TURBOXY is characterized by its ability to measure the pH (0 to 14 pH) and some chlorine
(between 0 and 4 ppm) thanks to its placed probes in the filtration circuit which analyzes the water of your
pool.
Depending on the measured value, the PAN DUO PH TURBOXY is going to pilot dosing pumps or solenoid
valves to maintain the balance of the pH and the rate of chlorine.
.
2.1 Description of buttons
Buttons
Press type
Actions
Short press
- Decrease a numerical value
- Scroll a list of selections
Long press
- Decreases a numerical value quickly
Short press
- Increase a numerical value
- Scroll a list of selections
Long press
- Increases a numerical value quickly
Short press
- Switch from one display to an other
- Exit current menu
Long press
- Give access to the installation configuration
with
- SET &
▲
Increase the value of setpoint
with
- SET &
▼
Decrease the value of setpoint
Short press
- OK allows the user to validate the value changes or validate
a selection in a menu
- Switch from one display to an other
Long press
- CAL allows the user to enter the automatically-guided
calibration phase

Instructions and user manual PANDuo pH Turboxy NOT044ENV02
8
2.2 Description of the plugs of the PAN DUO PH TURBOXY
3RECOMMENDATIONS AND INSTALLATION
3.1 Recommendations
If the temperature exceed 30° C, we recommend the abrasive B10 turbine use (ref : 10000019)
3.1.1 Information placard
3.1.2 Recommended chemicals
•It is recommended to use sulfuric acid, which is 100% compatible with the Santoprene tube.
•It is recommended to use chlorine diluted to 5% (maximum 10%)
3.1.3 Unrecommended chemicals
It is not recommended to use hydrochloric acid which can reduce the peristaltic tube's lifetime to a
few weeks and oxidise the pump's s metallic parts. In this case, the warranty is voided
The stabilizer rate must be less than 15 ppm in order not to disturb the reading of the redox.
The use of chlorine in hard water may clog the injection valve by the formation of a white deposit on
the part in contact with water. Please periodically check that the passage of the valve is free. In case of
blockage, the peristaltic tube may be damaged..
The TURBOXY probe ® is not compatible with the presence of salt in the water..
pH probe plug
Turboxy probe plug
Power supply
Supply frequency
Power
Max flow rate
Max pressure
230V power supply cable
pH low level
Chlorine low level

Instructions and user manual PANDuo pH Turboxy NOT044ENV02
9
3.2 Installation
3.2.1 Prepare the sensor for the start-up
3.2.2 Connect the pH sensors to the corresponding plug of the instrument
Plug the plug into the bayonet socket
Rotate the plug ¼ turn to close the connection
3.2.3 OPTIONNAL Connection of the lances of aspiration on the device
2 protective covers Jack
Remove the 2 protective covers
from Jack sockets
Plug the jack
plug into the
socket
If you remove the suction lances for a long time:
put the protective covers back on the Jack sockets
1) Remove the sensor's
protective cap and
keep it to re-use it for
the winter shutdown
period
2) Leave the sensor submerged
in tap water for at least 20
minutes, before proceeding
with the calibration.
We therefore recommend that
you start your installation with
this step.

Instructions and user manual PANDuo pH Turboxy NOT044ENV02
10
INSERT PROBE IN BUFFER 7pH, MOVE, LET INSIDE DON’T TOUCH IT
press OK
CALIBRATING pH 7
7.25pH*(-90s)
QUALITE 100%
4.0 pH press OK
INSERT PROBE IN BUFFER 4pH, MOVE, LET INSIDE DON’T TOUCH IT
press OK
CAUTION : before soaking the sensor in the
pH4 solution, rinse well using clean water
CALIBRATING pH 4
4.25pH*(-90s)
*: 7.25 is an example of instantaneous
measurement before calibration (values are
commonly between 6.5 and 7.5)
↓6.9pH
SET CAL
↓6.9pH 1.2Cl↑
1.2Cl↑
SET CAL
Tip
PRESS THE ESC KEY AT ANY TIME TO
EXIT THE CALIBRATION PROCEDURE
After pressing OK, the unit
continues operating normally
*: 4.25 is an example of instantaneous
measurement before calibration (values are
commonly between 3.5 and 4.5)
3.2.4 Calibration of the pH sensor
Remove the sensor from its soaking water indicated in STEP 2 and remove any excess water

Instructions and user manual PANDuo pH Turboxy NOT044ENV02
11
3.2.5 Hydraulic circuit
3.2.6 Calibration of the probe chlorinates Turboxy
Information: The probe of chlorine TURBOXY is a mechanical and strong probe, it is provided with a turbine
which detects the flow of the water and also cleans the electrode of measure in its axis. The probe
chlorinates TURBOXY require a rather long time to stabilize its measure owed to the stabilization of the
oxidation of the sensor by the chlorine in the water and its cleaning. The stabilization will be reached during
the balance between the oxidation and the cleaning by the turbine.
That is why in the first days it will certainly be necessary to re-calibrate the probe of chlorine.
1) Check that the TAC of the water is good between 150 and 250 ppm (Total alkalinity), if not to adjust it.
2) Put into service the part pH of the PAN DUO PH TURBOXY, because the calibration of the chlorine must
be realized between pH 7.2 and 7.5.
3) If you have to use of the stabilizing to reduce the destruction of the chlorine in the water by the UV of
the sun, it is necessary to stabilize manually its rate between 30 and 40 ppm (and then use some not
stabilized chlorine).
4) Maintain a rate of free chlorine in the swimming pool between 1 and 2 ppm for at least 3 hours.
5) Then, find a sample of water of the swimming pool in the place of the filtration or taken near a skimmer
in a depth from 30 to 40 cms.
6) To calibrate the chlorine part of the device as follows:
The hydraulic tube is placed in the same way on
the strainer and the pump.
1 : Slide the tube through the nut
2 : Push the tube down to the bottom of the
conical connector
3 : Hand tighten the nut onto the connector
Tube
Connector
Valve

Instructions and user manual PANDuo pH Turboxy NOT044ENV02
12
3.2.7 Installation complete
Default pH values
- Setpoint at pH 7.4
- Dosing of acid reagent to bring the pH down
Default values Chlorine
- Set point at 1.4 Cl (corresponding to 1.4 ppm)
If you would like to obtain a pH of 7.4 and you are dosing with acid, your unit is ready for use without
further preparation. Otherwise, please refer to the following sections to adjust the advanced parameters as
a function of your needs.
CALIBRATING Cl
↑↓1.55 Cl (xxx)
Record the analyzed value in mg / L (ppm)
with a DPD1 photometer or dipstick or pellet
comparator.
The number in parentheses is the current
generated by the chlorine probe. It's just
technical information, do not worry.
Keep pressed for at least 5 seconds
1.2Cl/↑
SET CAL
TIP
PRESS THE ESC KEY AT ANY TIME TO EXIT MENU.
After pressing OK, the unit resumes
normal operation
↓ 7.3pH 1.2Cl ↑
Analyze the rate of chlorine with a reactive DPD1 and memorize the obtained value
Take the water near the discharge. Measure the
chlorine Cl level in mg / L (ppm) with a DPD1
photometer or dipstick or pelletizer. Press OK
TAKE WATER NEAR THE DISCHARGE. MEASURE CL WITH PHOTOMETER DPD1 OR OTHER
Press OK
i
At this stage, PAN DUO PH TURBOXY is ready for use without any further adjustments in most
cases.

Instructions and user manual PANDuo pH Turboxy NOT044ENV02
13
SETPOINT
7.4pH
WHEN THE SET BUTTON IS RELEASED,
THE VALUE WILL BE MEMORIZED
Setting range
of 6,5 to 7,6 pH
4AVANCED UNIT SETTINGS
4.1 Adjusting the pH setpoint
↓6.9pH
SET CAL
↓6.9pH 1.2Cl↑
1.2Cl↑
SET CAL
Tip
To adjust the chlorine setpoint, press one
more time the MENU / ESC.

Instructions and user manual PANDuo pH Turboxy NOT044ENV02
14
SETPOINT
1.4 Cl
WHEN THE SET BUTTON IS
RELEASED, THE VALUE WILL BE
MEMORIZED
Setting range
Of 0.5 to 4.0 Cl
4.2 Adjusting the Chloring setpoint (Cl)
4.3 Activation type
4.3.1 Principle of operation
In order to allow mixing of the chemical in the pool and therefore to avoid overdosing, the device works
with an alternance of pause periods and dosing periods. When in a dosing period, the symbol / appears.
When in a pause period, the symbol appears. It is normal !
Adjusting the pH slowly preserves the natural quality of your water.
↓6.9pH 1.2Cl↑
1.2Cl↑
SET CAL
Tip
To adjust the chlorine setpoint, press
one more time the MENU / ESC.

Instructions and user manual PANDuo pH Turboxy NOT044ENV02
15
4.3.2 Proportional activation
The device sets longer dosing periods when the measured value is far from the desired value (set point).
The closer the measured value approaches the desired value (setpoint), the shorter is the dosing period.
Water volume
m3
Pump Acti Time
S / 0,1 pH
Pump Acti Time
S / 0.1 Cl
From 1 to 10
3
2
From 11 to 20
6
5
From 21 to 40
10
10
From 41 to 80
20
20
From 91 to 120
25
60
From 130 to 150
30
-
Proportional activation setting guide
The values given in this table are indicative and should be adjusted as a function of the configuration and
use of your pool.
4.3.3 Fixed activation
The length of the dosing period is fixed. The measured value being close or far of the desired value
(setpoint) does not affect it

Instructions and user manual PANDuo pH Turboxy NOT044ENV02
16
4.4 Device settings
4.4.1 pH menu
Info: the device returns to the default display after 1 minute without keypresses
PUMP FLOW RATE
1.5 l/h
OVERDOSING ALARM
0.00 l (OFF)
↓ 7.5pH 1.2Cl↑
LANGUAGE
ENGLISH
PROPORTIONNAL TIME : proportional from 1 to 60
s/0.1pH
FIXED TIME: Fixed from 3 to 300s/300s
Tip PRESS THE ESC KEY AT ANY TIME TO EXIT
MENU.
PUMP FLOW RATE :
pH pump flowrate information (no setting)
OVERDOSING ALARM :
Refer to section Erreur ! Source du renvoi
introuvable.
LANGUAGES :
FRANÇAIS ENGLISH DEUTSCH NEDERLANDS
PORTUGUES ESPANOL ITALIANO
PUMP ACTIVA.TYPE
PROPORTIONNAL
PUMP ACTIVATION TYPE :
PROPORTIONNAL (by default) / FIXED
PUMP ACTIVE TIME
20s/0.1pH
CONFIGURATION
pH
CONFIGURATION :
Cl / pH / SYS
↓7.5pH
SET CAL
DOSING MODE
ACID (pH-)
DOSING MODE :
ACID (pH-) by default / ALKALINE (pH+)
1.2Cl↑
SET CAL
PRIMING
PRIMING :
Upward: started by the hanging pump 30 s
downward: stop of the pump
MEASURE OFFSET
0.00 pH
MEASURE OFFSET:
From -0.4 to 0.4 pH

Instructions and user manual PANDuo pH Turboxy NOT044ENV02
17
4.4.2 Cl menu
OVERDOSING ALARM
0.00 l (OFF)
↓ 7.5pH 1.2Cl↑
LANGUAGE
ENGLISH
PROPORTIONNAL TIME : Proportional from 1 to 60
s/0.1 Cl
FIXED TIME: Fixed from 3 to 300s/300s
Tip PRESS THE ESC KEY AT ANY TIME TO
EXIT MENU
OVERDOSING ALARM :
Refer to section 4.4.4
LANGUAGES :
FRANÇAIS ENGLISH SVENSKA DEUTSCH NEDERLANDS
PORTUGUES ESPANOL ITALIANO
PUMP ACTIVATION.TYPE
PROPORTIONNAL
PUMP ACTIVATION TYPE :
PROPORTIONNAL / FIXED
PUMP ACTIVE TIME
6s/0.1Cl
1.2Cl↑
SET CAL
CONFIGURATION
Cl
CONFIGURATION :
Cl / pH / SYS
PRIMING
PRIMING :
Upward: started by the hanging pump 30 s
downward: stop of the pump
PUMP FLOW RATE
3 l/h
PUMP FLOW RATE :
Pump flow rate information Cl (no adjustment)
Info: the device returns to the default display after 1 minute without keypresses

Instructions and user manual PANDuo pH Turboxy NOT044ENV02
18
↓ 7.3pH 1.2Cl/↑
LANGUAGE
ENGLISH
Tip PRESS THE ESC KEY AT ANY TIME TO EXIT
MENU
CONFIGURATION
SYS
LANGUAGES :
FRANÇAIS ENGLISH SVENSKA DEUTSCH NEDERLANDS
PORTUGUES ESPANOL ITALIANO
Si oui, l’affichage par défaut montrera sur la
CONFIGURATION :
Cl / pH / SYS
STARTUP DELAY
30 min
STARTUP DELAY:
30 minutes (by default)
Range from 0 to 60 minutes
FACTORY SETTING: YES / NO
Returns to factory settings by erasing all subsequent
settings
FACTORY SETTING
NO
TECHNICAL DETAIL
NO
TECHNICAL DETAIL: YES / NO
Displays the offset and gain measurements for the
after-sales service
NETWORK
ID: xxxxxx
NETWORK: IDxxxxxx (OPTIONAL)
Displays the network number of the AvadyConnect
box. It is this number that will be reported on the
web interface www.avadyconnect.com for the
related installation. See the pairing chapter.
PUMP INPUT FLT:
ON
PUMP INPUT FLT:
ON / OFF
4.4.3 System menu « SYS »
Info: the device returns to the default display after 1 minute without keypresses

Instructions and user manual PANDuo pH Turboxy NOT044ENV02
19
4.4.4 Overdosing alarm
The pump blocks its dosing and displays an alarm message when it has dosed more than the volume
indicated in the alarm menu for 4 consecutive hours. This alarm allows dynamic monitoring of any potential
overdosing
When the unit is in an alarm state, the following screen is displayed
4.4.5 Guide to the first setting's alarm
The base of these regulations was realized according to the usual chemicals for the water treatment of
swimming pools on the market and our experience (*).
Water volume m3
Acid L/4H
Chlorine L/4H
1 - 5
0,1
0,3
6 - 10
0,2
0,6
11 - 20
0,3
1
21 - 40
0,8
1,5
41 - 80
0,8
2,5
81 - 120
1,0
4
121 - 150
1,5
5
(*) This table is for information purposes and could not engage the responsibility of AVADYPOOL.
OVERDOSING ALARM
X.XX L/4h
Adjusting the overdose alarm (cf 4.4.5): above the
defined threshold, the pump enters a state of alarm
requires that the button be pressed CAL/OK to start
again. To disable the alarm, adjust the threshold to 0 L/h
(OFF).
In average, in a 100 m3 pool :
1L of acid drops the pH by 0.3 pH
1L of chlorine adds 1 ppm
If the threshold is set to
0.00 L/h (OFF), the alarm
is disabled.
Press MENU/ESC to exit.
ALARM NOT ACTIVE
48h
Possibility to disable the alarm for 24h
or 48h to simplify startup, for example.
OFF to enable the alarm without period.
*****
OVERDOSING ALARM
Simply press CAL/OK to cancel the
alarm.
Resume the settings of the Duo
pH Turboxy

Instructions and user manual PANDuo pH Turboxy NOT044ENV02
20
4.5 PAN DUO PH TURBOXY Standby mode
To place the PAN DUO PH TURBOXY in standby mode, press the
▲
and
▼
keys simultaneously for 5
seconds.
To exit standby mode, repeat the same operation.
4.6 PAN DUO PH TURBOXY Priming
There are 2 manners to priming the PAN DUO PH TURBOXY :
1°: Priming of pumps at the same time :
By pressing at the same time and for 5 seconds the keys ▲et ▼
Press at the same time
the
MENU/ESC
and
CAL/OK
keys
the time wished to begin the pump.
Exit standby mode
the
PAN DUO PH TURBOXY by again pressing
▲
et
▼
simultaneously
2°: Priming of a pump after the other one :
See in each menu of each setting (pH ou Rx)
4.7 Display backlight
After 30 minutes without key presses, the backlight turns off to save power. A short press of SET or CAL
turns it on.
5SOLUTIONS TO PROBLEMS
5.1 Incorrect measure and procedure for increasing the TAC
If the displayed value on the device differs from the value obtained by another control method (drops,
strip, photometer) : check that the TAC (Total alkalinity) > 100 mg/L.
Procedure for increasing the TAC
In order to add TAC in your pool, follow the following procedure :
Stop the pH and chlorine regulators.
•Add in the pool the required amount specified on the TAC packaging. It is preferable to increase the
TAC to 250 mg/L in once.
Wait 4 hours for complete dissolution.
Turn on the pH regulator.
When the pH < 7,8 turn back on your chlorine disinfection system.
To get a stable pH value: 150 mg/L < TAC < 300 mg/L
5.2 Technical details
By putting the technical detail in yes in the menu SYS, the appreil is going to show values as :
oDown the the chlorine only display
The frequency of rotation of the turbine
The gain of the calibration of the chlorine
The current generated by the sensor of the probe TURBOXY
oDown the the pH only display
G = gain of the calibration pH inthe pH 4
O = The offset of the calibration in the pH 7
TECHNICAL DETAIL
NO
Table of contents
Other Avady Laboratory Equipment manuals
Popular Laboratory Equipment manuals by other brands

tbs electronics
tbs electronics SHURCut 4500 Operator's manual

Thermo Scientific
Thermo Scientific S1 Instructions for use

Millipore
Millipore XX11 000 00 user guide

Tektronix
Tektronix RFA300A user manual

WLD-TEC
WLD-TEC SteriMax instruction manual

Agilent Technologies
Agilent Technologies Cary 8454 installation guide

ThermoFisher Scientific
ThermoFisher Scientific Fresco 17 Instructions for use

MO BIO Laboratories
MO BIO Laboratories PowerWater DNA instruction manual

ORiNG
ORiNG INJ-101GT++ Series Quick installation guide

Codonics
Codonics Horizon XL manual

RR Mechatronics
RR Mechatronics Interrliner XN1 FRL Instructions for use

EYELA
EYELA N-3010 manual