manuals.online logo
Brands
  1. Home
  2. •
  3. Brands
  4. •
  5. Avaya
  6. •
  7. Conference System
  8. •
  9. Avaya Scopia XT5000 User manual

Avaya Scopia XT5000 User manual

Avaya Scopia® Telepresence Platform
Package Content:
• Camera mount for the 3 cameras
• Avaya Scopia Desktop Software
with a 10-port license
The Avaya Scopia XT Telepresence Platform
Platform creates a lifelike, immersive
experience replicating the feeling of meeting
in-person. The Avaya Scopia XT Telepresence
Platform is customizable to the unique
requirements of individual rooms and
customer needs. Installed and configured
by Avaya’s worldwide network of channel
partners, the Avaya Scopia XT Telepresence
Platform provides a cost-effective and
highly flexible approach, enabling partners
to meet the unique needs of each customer
deployment.
Quick Setup Guide
Avaya Scopia XT5000 Avaya Scopia Control
Step 1. Initial Setup
1. Install the three telepresence monitors and the monitor
(or projector) for PC content.
2. Ensure that table distances and furniture comply with the
recommendations.
3. Check that light conditions are uniform.
4. Check that loudspeaker position complies with
recommendations.
For information about recommendations and operational
information, see the Deployment Guide for
Avaya Scopia XT Telepresence Platform.
Step 2. Camera Mount Setup
Place the camera mount at the center of the Primary monitor,
following the instructions in the Deployment Guide for
Avaya Scopia XT Telepresence Platform.
Step 1 Step 2
Step 3 Step 4
10/100/1000
HD CAM
2
HD CAM
HD
CTRL
DVI-I IN
S/PDIF
10/100
1
CAM 24V 3.75A
1HD 2
DIAG
ANA LOG
OUTPUT
12V 2.2A
Microphone
Pod input
Microphone
Pod output
Avaya Scopia XT1200
10/100/1000
XNET
DIAG
HD CAM
2
HD CAM
HD
CTRL
DVI-I IN
S/PDIF
10/100
1
CAM
OUTPUT
12V 2.2A
24V 3.75A
1HD 2
10/100/1000
XNET
DIAG
HD CAM
2
HD CAM
HD
CTRL
DVI-I IN
S/PDIF
10/100
1
CAM
OUTPUT
12V 2.2A
24V 3.75A
1HD 2
Second Microphone
Second Microphone
Microphone
Pod input
Microphone
Pod output
Avaya Scopia XT5000
10/100/1000
XNET
DIAG
HD CAM
2
HD CAM
HD
CTRL
DVI-I IN
S/PDIF
10/100
1
CAM
OUTPUT
12V 2.2A
24V 3.75A
1HD 2
10/100/1000
XNET
DIAG
HD CAM
2
HD CAM
HD
CTRL
DVI-I IN
S/PDIF
10/100
1
CAM
OUTPUT
12V 2.2A
24V 3.75A
1HD 2
CAUTION: Make sure all units are
switched off whenever connecting
or disconnecting devices.
Step 3. Installing Avaya Scopia XT1200 or Avaya Scopia XT5000 Systems
1. Unpack all three Avaya Scopia XT5000 Codec Units.
2. Set up the Primary Codec (central one), connecting it to the Primary monitor and to the PC Presentation monitor as
described in the Deployment Guide for Avaya Scopia XT Telepresence.
3. Connect one Microphone Pod to the Primary codec input.
4. Connect the second Microphone Pod to the first Pod.
5. Distribute the Microphone Pods evenly on the table.
6. Install two Auxiliary endpoints (Right and Left), connecting them to their corresponding telepresence monitors as described
in the Deployment Guide for Scopia XT Telepresence.
7. Place the cameras on the camera mount. For mounting instructions, see the Deployment Guide for Avaya Scopia
XT Telepresence.
8. Retrieve your LAC (License Authentication Code) from your Customer Letter
9. Access Product Licensing Delivery System (PLDS): https://plds.avaya.com
10. Fill in LAC and get the list of your Entitlements
11. For each XT5000 endpoint, provide the information required on PLDS
12. For each XT5000 endpoint, the web form returns a license key that will enable your entitlements.
NOTE: For operational information and instructions refer to the Deployment Guide for Avaya Scopia XT Telepresence.
Step 4. Setup the Infrastructure for XT Telepresence
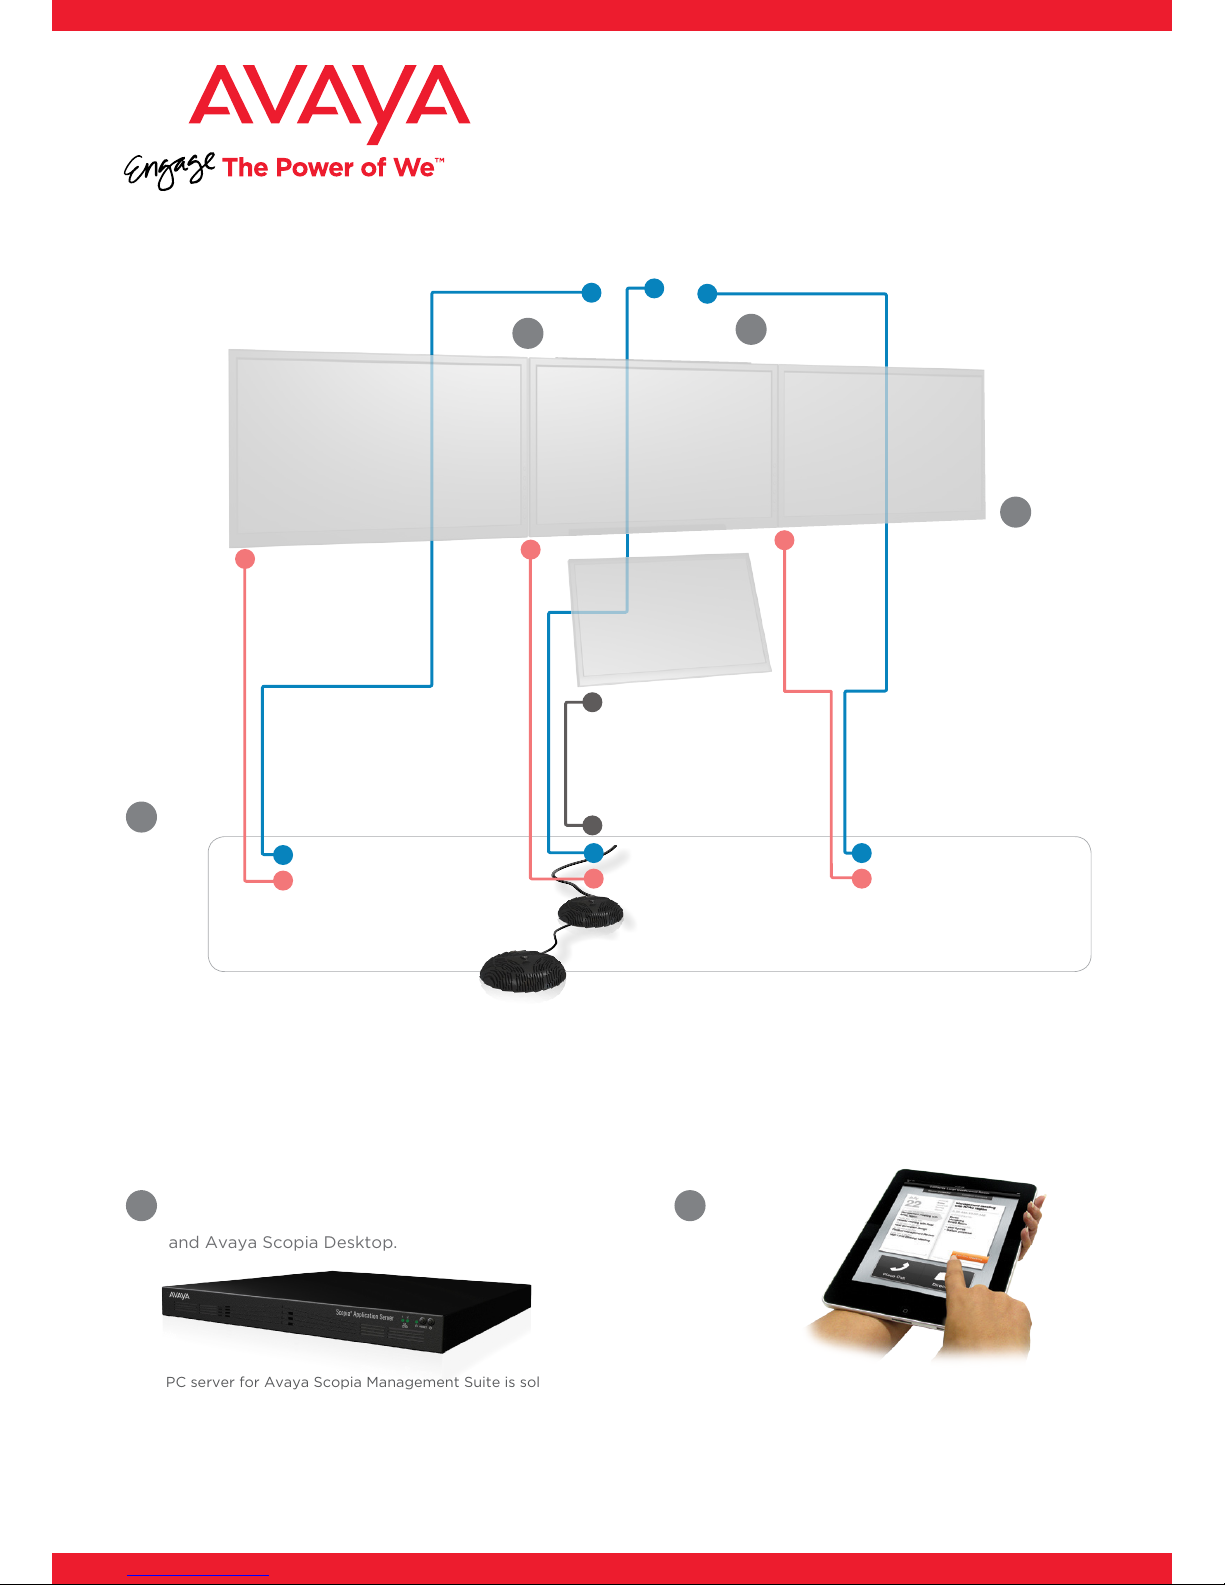
1. Install Avaya Scopia Management Suite on a PC server. For instructions, refer to the Installation Guide for Avaya Scopia
Management Suite.
2. Install Avaya Scopia Desktop on the same PC server as the Avaya Scopia Management Suite.
3. Configure Avaya Scopia Management Suite, for the three endpoints, as described in the Deployment Guide for Avaya
Scopia XT Telepresence Platform.
Step 5. Calibrate Cameras
1. Check the configuration of the three Telepresence monitors, calibrating their color.
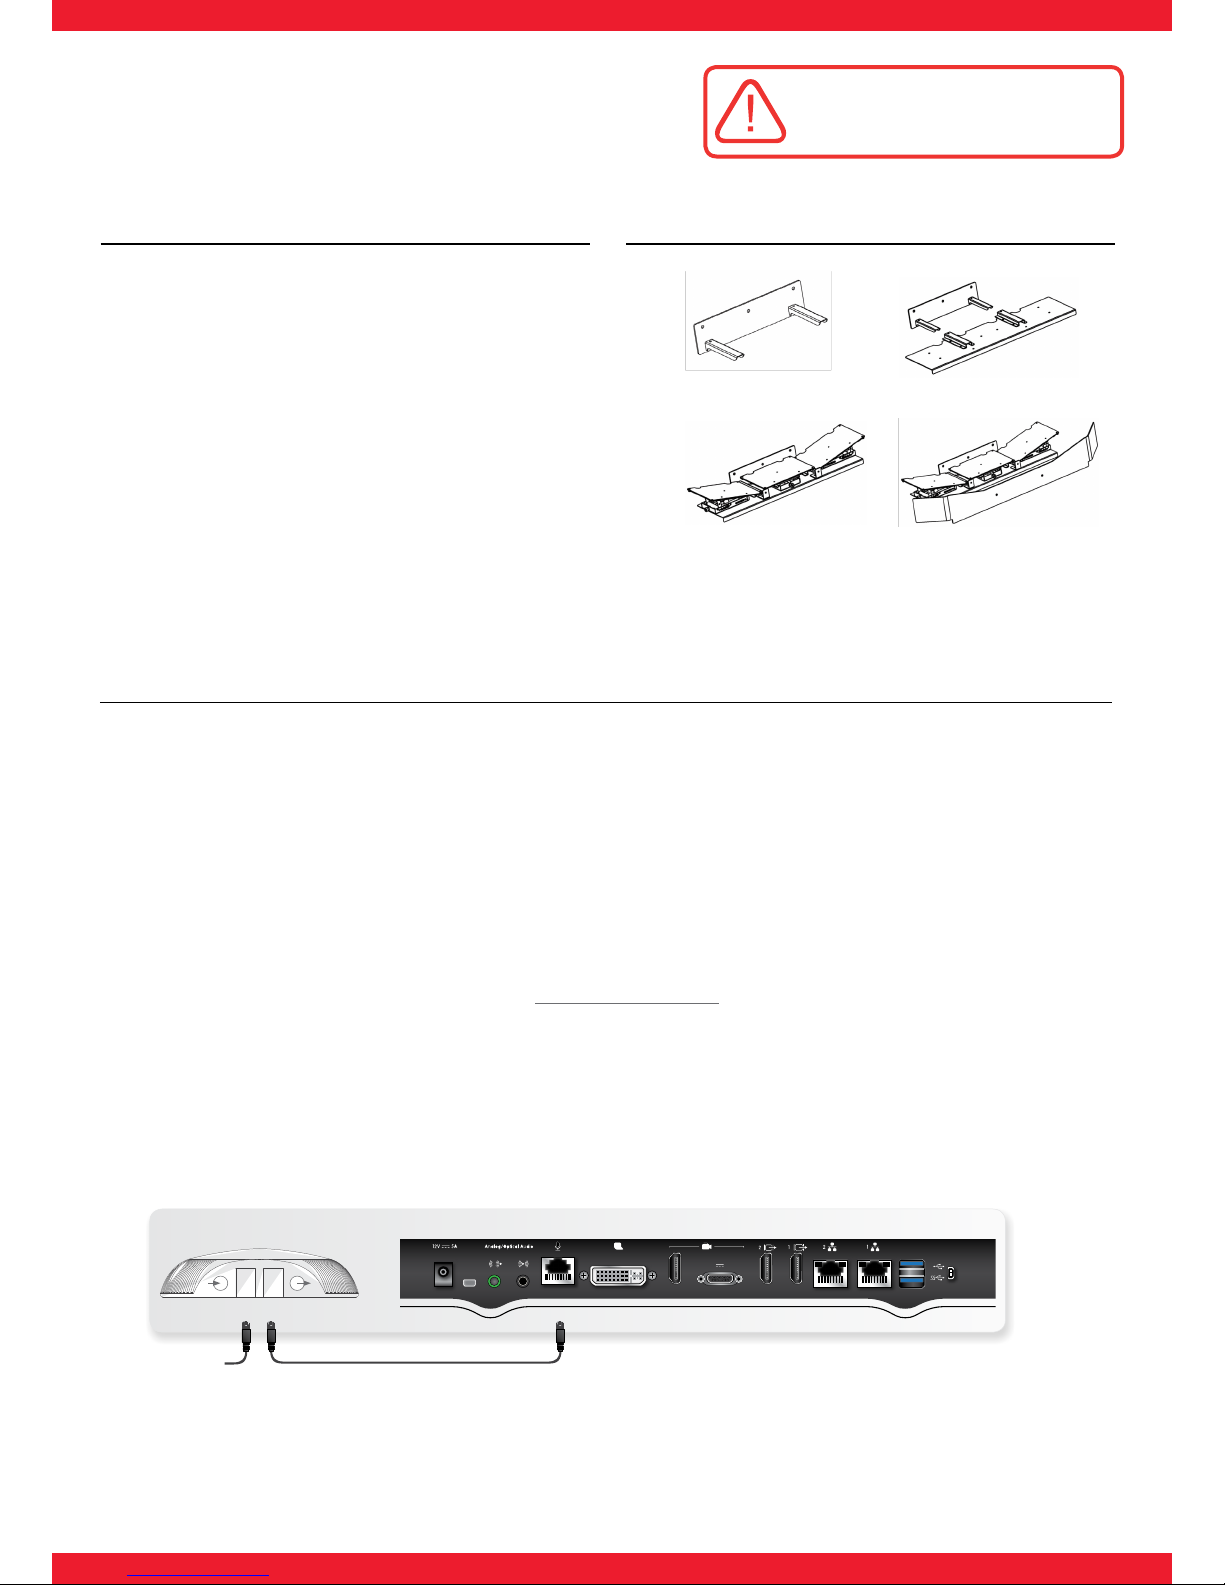
2. Adjust right and left camera mount slope, depending upon monitors dimensions and table distance.
3. Swap Camera cables, connecting Auxiliary R camera to Auxiliary L codec, and Auxiliary L camera to Auxiliary R codec.
This allows to see the continuous image of this telepresence room.
4. Download and install the calibration application to a laptop (PC or Mac) by remotely accessing the web interface of one
of the Avaya Scopia XT5000 Series endpoints in the telepresence system, as described in the chapter “Downloading
and Installing the Scopia XT Telepresence Calibration Application” of the “Deployment Guide for Avaya Scopia XT
Telepresence”. Deployment guide can be downloaded on Avaya support website (https://support.avaya.com/documents/).
5. Connect the software to the endpoints.
6. Perform system calibration.
7. Activate XT Telepresence mode from calibration software.
8. Swap back the cables, connecting again each camera to the corresponding endpoint.
Step 6. Install and Configure Scopia Control
1. Download the Avaya Scopia Control application v2.5 from Apple’s App store.
2. Install Scopia Control on the iPad (not provided with XT Telepresence Platform).
3. Configure Avaya Scopia Control.
Setting Up this Device
CAUTION: Make sure all units are
switched off whenever connecting
or disconnecting devices.
Connect the cables as detailed in the diagram overleaf, then follow the steps
below to complete the setup of the Avaya Scopia XT Telepresence Platform.
For details on how to use the system after setup, see the User Guide for
Avaya Scopia XT Telepresence Platform or the Quick Start Guide for Avaya
Scopia XT Telepresence Platform.
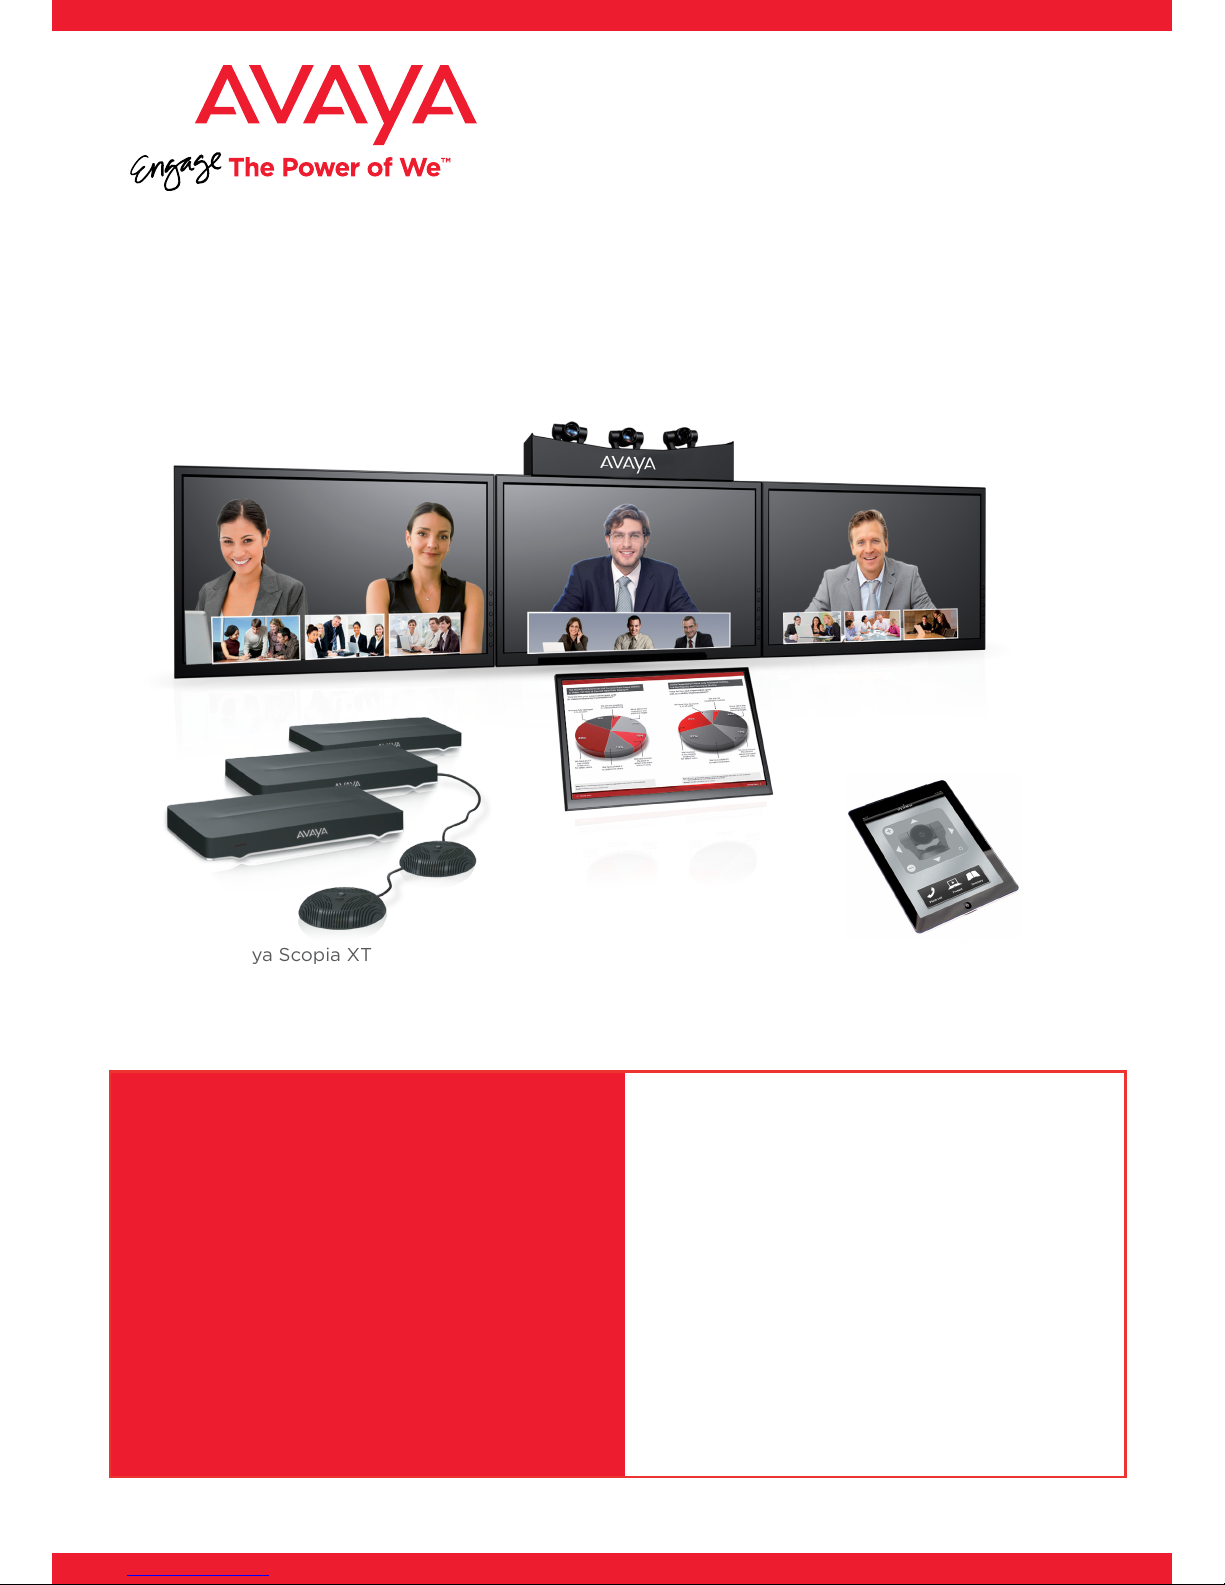
Not included in the kit:
Three Avaya Scopia XT5000 systems
Avaya Scopia Management Suite with internal gatekeeper – 10 Ports
An Apple iPad with a dock
Table and chairs, based on the design guidelines provided by Avaya
Three monitors (50” and above as recommended) and wall mounts
Audio amplifier and speakers (unless using monitor built-in speakers)
An optional projector or a fourth monitors for presentations
A PC server for installing Avaya Scopia Management Suite and Avaya Scopia Desktop Server for calendar, moderation
and enterprise phonebook
© 2000-2014 Avaya Inc. All intellectual property rights in this publication are owned by Avaya Inc. and are protected by United States copyright laws, other applicable copyright laws and international treaty provisions. Avaya Inc. retains all
rights not expressly granted.All product and company names herein may be trademarks of their registered owners. This publication is Avaya Inc. Confidential & Proprietary. Use pursuant to your signed agreement or Avaya policy. No part
of this publication may be reproduced in any form whatsoever or used to make any derivative work without prior written approval by Avaya Inc. No representation of warranties for fitness for any purpose other than what is specifically
mentioned in this guide is made either by Avaya Inc. or its agents. Avaya Inc. reserves the right to revise this publication and make changes without obligation to notify any person of such revisions or changes. Avaya Inc may make
improvements or changes in the product(s) and/or the program(s) described in this documentation at any time. If there is any software on removable media described in this publication, it is furnished under a license agreement included
with the product as a separate document. If you are unable to locate a copy, please contact Avaya Inc and a copy will be provided to you. Unless otherwise indicated, Avaya registered trademarks are registered in the United States and other
territories. All registered trademarks recognized.
For further information contact Avaya or your local distributor or reseller.
Quick Setup Guide for Avaya Scopia® XT Telepresence Platform Version 8.3, March, 2014.
http://www.avaya.com
rev. A03P/N 62111-02035
Avaya Scopia
Control
64 Avaya Scopia Management
Suite with internal gatekeeper
and Avaya Scopia Desktop.
Primary Codec Unit is connected to
the Primary monitor, Primary camera,
Presentation monitor and Pods.
Monitors are sold separately
Center Camera Right CameraLeft Camera
Left Monitor Center Monitor
Data Monitor
Right Monitor
PC server for Avaya Scopia Management Suite is sold separately.
3
iPad (sold separately)
Auxiliary R Codec Unit is
connected to Auxiliary R monitor
and Auxiliary R camera.
Auxiliary L Codec Unit is
connected to Auxiliary L monitor
and Auxiliary L camera.
XT5000
2
1
LC
LM
CC
DM
DM
CM
CM
RC
RM
Auxiliary L Codec Primary Codec Auxiliary R Codec
LC
LM
CC
5
RC
RM
Endpoints, Pods and
cameras are sold separately.

Other manuals for Scopia XT5000

6

This manual suits for next models

1

Other Avaya Conference System manuals

Avaya Scopia XT Series User manual

Avaya

Avaya Scopia XT Series User manual

Avaya 16-300310 Specification sheet

Avaya

Avaya 16-300310 Specification sheet

Avaya CS7000 User manual

Avaya

Avaya CS7000 User manual

Avaya CS 1000 Series Guide

Avaya

Avaya CS 1000 Series Guide

Avaya Scopia XT5000 User manual

Avaya

Avaya Scopia XT5000 User manual

Avaya Scopia XT7100 Quick reference guide

Avaya

Avaya Scopia XT7100 Quick reference guide

Avaya CU-360 Assembly instructions

Avaya

Avaya CU-360 Assembly instructions

Avaya Scopia XT Series How to use

Avaya

Avaya Scopia XT Series How to use

Avaya XT Series XT5000 Series XT4000 Series User manual

Avaya

Avaya XT Series XT5000 Series XT4000 Series User manual

Avaya PARTNER Advanced Communications System Technical manual

Avaya

Avaya PARTNER Advanced Communications System Technical manual

Avaya CU-360 User manual

Avaya

Avaya CU-360 User manual

Avaya Scopia Elite 6000 MCU Series Installation instructions manual

Avaya

Avaya Scopia Elite 6000 MCU Series Installation instructions manual

Avaya XT Telepresence Quick reference guide

Avaya

Avaya XT Telepresence Quick reference guide

Avaya CU-360 User manual

Avaya

Avaya CU-360 User manual

Avaya CU-360 Instruction Manual

Avaya

Avaya CU-360 Instruction Manual

Avaya VSP 9000 User manual

Avaya

Avaya VSP 9000 User manual

Avaya XT5000 720 User manual

Avaya

Avaya XT5000 720 User manual

Avaya PARTNER Phone Guide

Avaya

Avaya PARTNER Phone Guide

Avaya Scopia XT Series User manual

Avaya

Avaya Scopia XT Series User manual

Avaya XT Series Quick reference guide

Avaya

Avaya XT Series Quick reference guide

Avaya Scopia XT telepresence Quick reference guide

Avaya

Avaya Scopia XT telepresence Quick reference guide

Avaya PARTNER Advanced Communications System User guide

Avaya

Avaya PARTNER Advanced Communications System User guide

Avaya CS700 Instruction Manual

Avaya

Avaya CS700 Instruction Manual

Avaya Scopia XT Series Assembly instructions

Avaya

Avaya Scopia XT Series Assembly instructions

Popular Conference System manuals by other brands

Restmoment RX-3500 SERIES Installation & operation

Restmoment

Restmoment RX-3500 SERIES Installation & operation

ABB H82001-W product manual

ABB

ABB H82001-W product manual

Allworx 24x installation guide

Allworx

Allworx 24x installation guide

Twiins D1 VA instruction manual

Twiins

Twiins D1 VA instruction manual

TANDBERG 550 MXP user manual

TANDBERG

TANDBERG 550 MXP user manual

Biamp Crowd Mics Network administrator's guide

Biamp

Biamp Crowd Mics Network administrator's guide

Huawei TE30 Product overview

Huawei

Huawei TE30 Product overview

SKUTCH BA-1000-A Technical reference manual

SKUTCH

SKUTCH BA-1000-A Technical reference manual

Sena SRL-MESH quick start guide

Sena

Sena SRL-MESH quick start guide

Crestron UC-MX50-Z quick start

Crestron

Crestron UC-MX50-Z quick start

Cisco TelePresence SX10 Administrator's guide

Cisco

Cisco TelePresence SX10 Administrator's guide

Studer Xcom-GSM quick guide

Studer

Studer Xcom-GSM quick guide

Califone AV Tutor Fundamentals Center 2056 Specifications

Califone

Califone AV Tutor Fundamentals Center 2056 Specifications

Sena SMH10R quick start guide

Sena

Sena SMH10R quick start guide

AVer HVC series Quick installation guide

AVer

AVer HVC series Quick installation guide

Poly G40-T setup sheet

Poly

Poly G40-T setup sheet

TANDBERG Profile 42" Administrator's guide

TANDBERG

TANDBERG Profile 42" Administrator's guide

AT&T Palm Pre PARTNER Plus Communications System Release... installation guide

AT&T

AT&T Palm Pre PARTNER Plus Communications System Release... installation guide

manuals.online logo
manuals.online logoBrands
  • About & Mission
  • Contact us
  • Privacy Policy
  • Terms and Conditions

Copyright 2025 Manuals.Online. All Rights Reserved.