Avaya IP OFFICE 2410 Setup guide

Avaya Telephone
Quick Reference
Training Guide

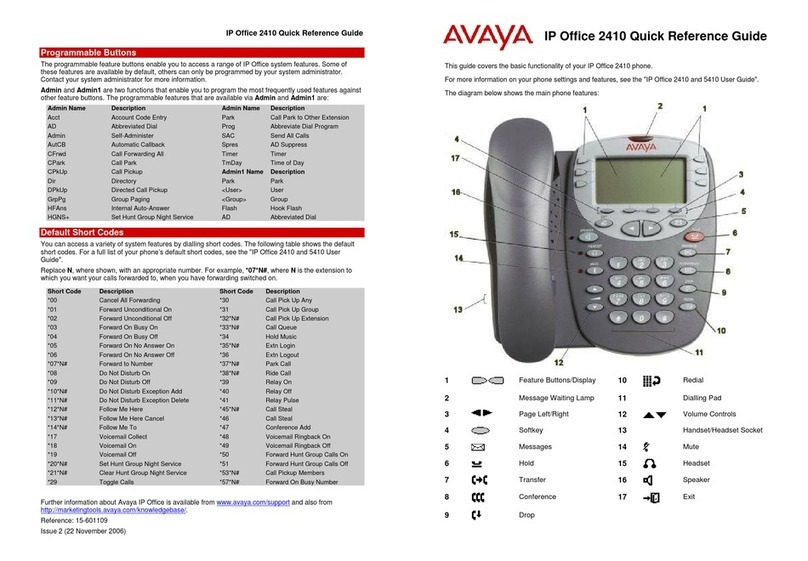
2410 Digital Telephone Quick Reference
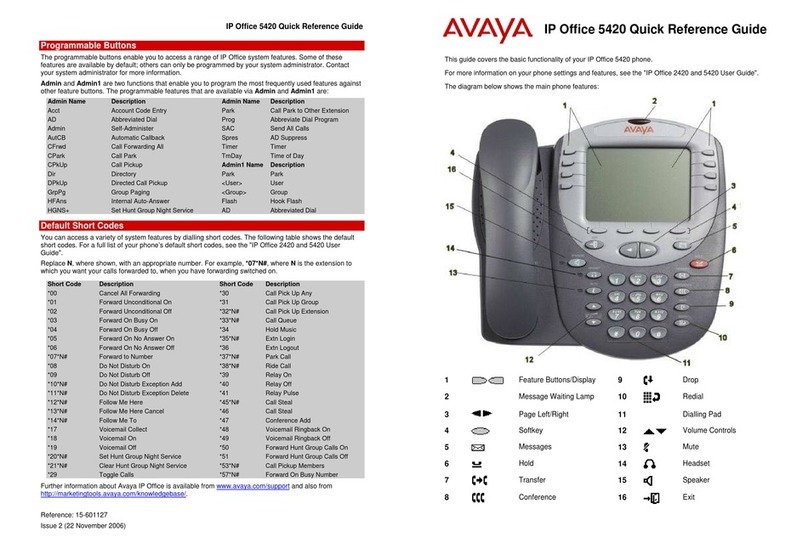
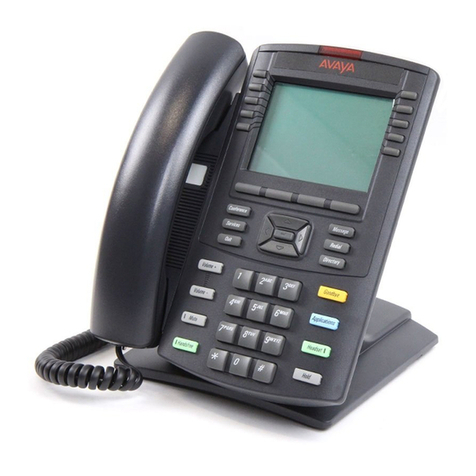
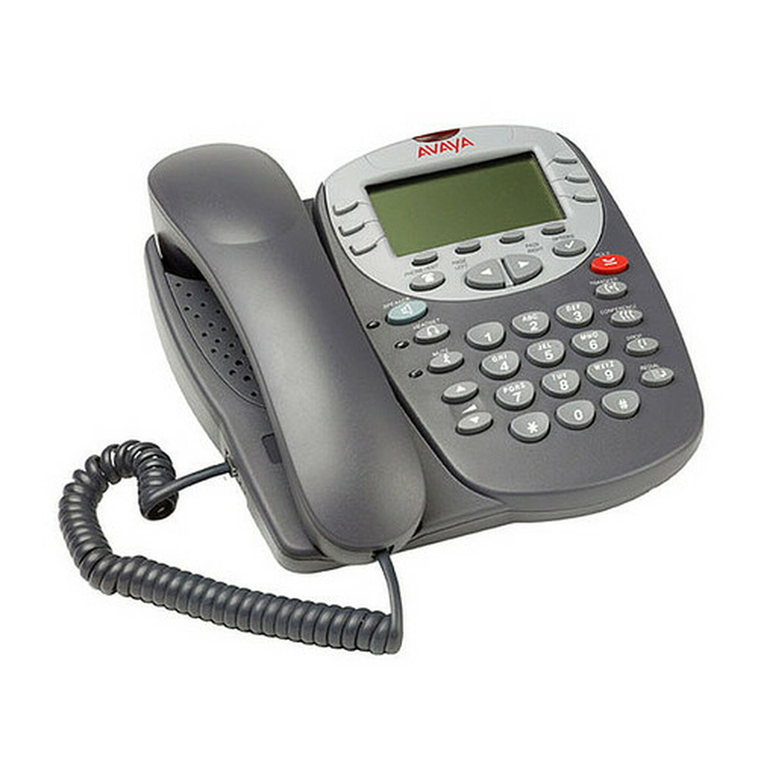
1. Call appearance/feature buttons: For accessing incoming/outgoing
lines and programmed features.
2. Display: This area shows status for the call appearances, information
provided by the Avaya call server, and the Home, Speed Dial, Call Log
and Options screens.
3. Message lamp: This lamp is lit when a message has arrived in your
voice mailbox.
4. Menu Keys: Allows you to perform specic functions when pressed.
The functions available and the corresponding menu key’s label change
according to the screen displayed.
5. Messages button: For retrieving messages.
6. Arrow keys: For moving between screen pages, cycling through Call
Log and Speed Dial entries and to move the cursor during data entry.
7. Hold button: For placing calls on hold.
8. Transfer button: For transferring calls.
9. Conference button: For conferencing calls.
10. Drop button: Disconnects the current call. If you are on a
conference call, press this button to drop the last person you added to
the conference.
11. Redial button: Dials the last number you dialed.
12. Dial pad: Standard 12-button pad for dialing telephone numbers.
13. Volume control buttons: For adjusting speaker, handset, headset or
ringer/button click volume depending on which component is in use.
14. Mute button: For turning off the microphone. When the Mute
feature is active, the associated lamp turns on and the person at the
other end of the call cannot hear you.
15. Headset button: For activating a headset connected to the 2410
headset jack.
16. Speaker button: For accessing the built-in speakerphone. The lamp
associated with this button turns on when the speaker is active.
17. Headset jack: For connecting a headset.
18. Exit button: Returns you to the rst page of the home screen.
23

Call-Handling Features
Answer a Call
Your incoming calls are shown by a blinking bell icon on the
display. In addition, call identication ashes above your Menu keys
on your display.
To answer an incoming call
Do one of the following:
• If you are not on another call, answer the call using your
handset, or speakerphone (see “Speakerphone”).
• If you are on a call already, place the caller on hold (see
“Hold”), and answer the incoming call or press the call
appearance button of the new incoming call.
• If the call appearance for the new call is not displayed on
the display screen, use , the arrow buttons to switch
between the screens.
Placing a call
Do one of the following:
• Lift handset or press the speaker button.
• To dial a local number, press 9, plus the 7-digit number or
4-digit extension.
• To dial toll free, press 9, plus the toll free number (do not
dial “1”)
• To dial long distance, dial 8, (the SCAN access code), the
area code and number you are calling, then enter your 7-
digit SCAN authorization number.
Note: To mute a call while on the handset or headset, press
the mute button. To begin speaking again, press
the mute button again.
Hold
The Hold feature puts a call on hold until you return to it.
To put a call on hold
Press , the hold button.
To return to the held call
Press the call appearance button of the held call.
Note: If you do not return to the held call within 3 minutes, the held
call will notify you with a ring tone.
Speakerphone
The two-way built-in speakerphone allows you to make and answer
calls without lifting your handset.
To make or answer a call without lifting the handset
1. Press , the speaker button.
2. Place or answer the call.
3. Adjust speakerphone volume if necessary, using the volume
control buttons.
To change from the speakerphone to handset
Pick up the handset.
To change from the handset to speakerphone
1. Press , the speaker button.
2. Hang up the handset.
To mute a speakerphone call
Press the mute button.
To begin speaking again, press the mute button again.
45

To end a speakerphone call
Press , the speaker button again.
Redial
The Redial (or Last Number Dialed) feature automatically redials the
last number you dialed.
To redial the last number that you dialed.
Press , the redial button.
Transfer
The Transfer feature allows you to transfer a call from your telephone
to another extension or outside number.
To transfer the current call to another extension
1. While on a call, press, the transfer button.
2. When you hear dial tone, dial the number to which the call
is to be transferred.
3. Do one of the following:
• To transfer the call without announcing it, simply hang up.
The transfer is complete.
• To announce the call before transferring it, wait for the
called party to answer. Go to Step 4.
4. When the called party answers, announce the call. (If the
line is busy or if there is no answer press , the drop
button. Then, you can return to the held call by pressing its
call appearance button on the display screen.
Conference
The conference feature allows you to conference up to 3 parties
(including yourself) on a call.
To add another party to a call
1. Press , the conference button
2. When you hear dial tone, dial the number of the person you
want to add to the call.
3. Wait for an answer.
4. To add the person to the call, press , the conference
button, again. If the called party does not answer or does
not want to join the conference call, press , the drop
button. Then, return to the held call by pressing its call
appearance button on the display screen.
To add a held call to a call you are on
1. While connected, press , the conference button.
When you hear dial tone, press the call appearance button
corresponding to the held call.
2. Press , the conference button again and begin
speaking.
To remove the last person added to the conference call
Press , the drop button, the last call added will be
dropped.
67

Accessing your Mailbox
Message
Your Message Light turns on when a caller has left a message for you.
Press , the message button to retrieve your messages. When
voice mail answers, enter your security code. See attached Voice Mail
instructions.
Personalized Settings
Ring Pattern
The Ring Pattern option on the display screen allows you to choose a
personalized ringing pattern for your telephone. You can choose from
eight different patterns.
To select a personalized ringing pattern
1. From the Display screen, press the Menu button.
2. From the Menu screen, choose Option
3. Press the Ring Pattern feature button.
The Select Ring screen with the current ring pattern is
displayed.
4. Use , the arrow buttons, or the Dial pad to cycle
through the ringing patterns.
5. To save the selected ringing pattern, press the Save button.
You will hear a conrmation tone.
Note: If you go off-hook or receive a call during selection, the process
is canceled and you must start again.
Speed Dial/Personal Directory
Add a Speed Dial Entry
You can store up to 48 personal speed dial entries.
To add speed dial entries
1. From the Display screen, press the Menu button
2. Choose the SpDial button.
3. Press the Add button.
The Edit Name screen is displayed with the Name eld
underscored.
4. Using the Dial pad, enter the name for your speed dial entry.
Note: Example; to enter “L”, press the 5 button (jkl) 3 times.
You can use the Case button to switch between upper and
lowercase. You can use the Space button to insert a space
between rst and last names. When you are done entering a
name, press Save, the cursor will advance to the number eld.
5. Using the Dial pad, enter the telephone number for this
speed dial entry. When you are done entering the telephone
number, press the Save button.
You will hear a conrmation tone.
6. Repeat Steps 2 through 6 for additional entries.
Make a call from Speed Dial
To make a call using the Speed Dial feature.
1. From the Display screen, press the Menu button,
2. Press the SpDial button.
The Speed Dial screen is displayed.
3. Press the feature button for the entry you want to call.
(Use the arrow buttons to cycle through the entries.)
89
Edit a Speed Dial Entry
To edit a stored speed dial entry.
1. From the Display screen, press the Menu button,
2. Press the SpDial button.
3. The Speed Dial screen is displayed.
4. Press the Edit button
5. Press the button corresponding to the entry you want to edit.
7. To edit the name, use , the arrow buttons to back up
and begin re-typing the name.
9. When you are done editing the name, press the feature
button to the left of the Number eld (Edit Number screen)
if you want to change the number, OR just press Save.
Call Log
View the Call Log
To view the list of calls recorded in your Call Log.
1. From the display screen, press the Menu button.
2. Press the Log button.
The Call Log Summary screen is displayed.
3. Use , the arrow buttons, to scroll through the Call
Log Summary pages.
4. To view information about a specic entry, press the button
corresponding to the entry.
The Call Log Detail screen for this entry is displayed.
5. Press , the exit button to return to the display screen.
(Up to 48 calls can be stored in the call log.)
Make a call from the Call Log
To make a call from an entry in the Call Log
1. From the display screen, press the Menu button, then the
Log button.
The Call Log Summary screen is displayed.
2. Use , the arrow buttons, to scroll through the Call
Log Summary pages.
3. When you locate an entry you want to call, press the button
corresponding to that entry.
The Call Log Detail screen for this entry is displayed.
4. Press the Call button to make the call.
Note: You can make calls directly to extensions using this
method. Or, to call outside numbers, go off-hook and dial
the necessary code (9 for example). Then press the Call
button to make the call.
Note: You will not be able to use the Call Log feature to dial
Scan calls.
10 11

To play messages
• Dial 1600
• Enter your security code
• Press P (7) to Play messages
• Press T (8) to Skip to another message
Message options
While listening to a message:
• Press A (2) to Answer the message
• Press D (3) to Discard (delete) the message
• Press G (4) + Ext. No. to Give (a copy of) the message to
another mailbox
• Press K (5) to Keep (save) the message
To change your personal options
• Dial 1600
• Enter your Security Code
• Press U (8) for Personal Options
• Press 4 (G) to Change your greeting
• Press 1, then 4 to Change your security code
• Press 1, then 5 to Change your name
Voice Mails are retained for 90 days from date received.
Additional information regarding the Avaya Telephone System can
be found under the Tacoma School District’s web-site: Technology
Services, Telecommunication section.
Voice Mail Quick Reference Guide
The following are the guidelines for accessing the most frequently
used features of the new CallXpress voice mail system. Once you
have accessed the system, please listen and carefully follow the
tutorial prompts.
To Call Voice Mail:
From your phone
Dial 1600, when Voice Mail answers,
enter your security code when prompted.
From another phone
Dial 1600, when Voice Mail answers,
press “*” “#”, plus your mailbox number and security code when
prompted.
Outside the District
Dial 571-1600, press “#”, then enter your mailbox number and security
code when prompted.
To transfer a call directly into a mailbox:
Press transfer, dial 1600, when Voice Mail answers, press “*” “8” then
the person’s mailbox number (same as their extension number) and
hang up.
12 13

Tacoma School District complies with all federal laws and regulations and does not discriminate on the
basis of race, religion, color, national origin or ancestry, sex, gender identity, sexual orientation, age,
marital or veteran status or disability. The district also prohibits the use of racial, ethnic, and/or sexual
slurs, including sexual harassment. This holds true for all students who are interested in participating in
educational programs and/or extra-curricular activities. Inquiries regarding the application of the above
reference should be directed to the assistant to the superintendent, equity and diversity, P.O. Box 1357,
Tacoma, WA 98401-1357; telephone 253.571.1292. Inquiries regarding the application of Section 504 of
the Rehabilitation Act (concerning disabilities) should be directed to the director, comprehensive guidance
programs, P.O. Box 1357, Tacoma, WA 98401-1357; telephone 253.571.1063.
Other manuals for IP OFFICE 2410
16
Table of contents
Other Avaya IP Phone manuals

Avaya
Avaya IP Office 4.0 User manual

Avaya
Avaya 3100 User manual

Avaya
Avaya IP Office 4602 User manual

Avaya
Avaya 9620 Deskphone Edition User manual

Avaya
Avaya J189 Guide

Avaya
Avaya 5620 User manual

Avaya
Avaya Definity 8410D User manual

Avaya
Avaya 3725 User manual

Avaya
Avaya J169 User manual

Avaya
Avaya 3641 User manual

Avaya
Avaya 3600 Series Supplement

Avaya
Avaya 4620 Instruction Manual

Avaya
Avaya 9620 Deskphone Edition User manual

Avaya
Avaya 3730 Use and care manual

Avaya
Avaya IP Office 9608 Service manual

Avaya
Avaya IP Office 4602 User manual

Avaya
Avaya IP Office 2050 User manual

Avaya
Avaya 96x1 Series Supplement

Avaya
Avaya one-X 1603 User manual

Avaya
Avaya J159 User manual