1 423
Getting to Know Your Phone
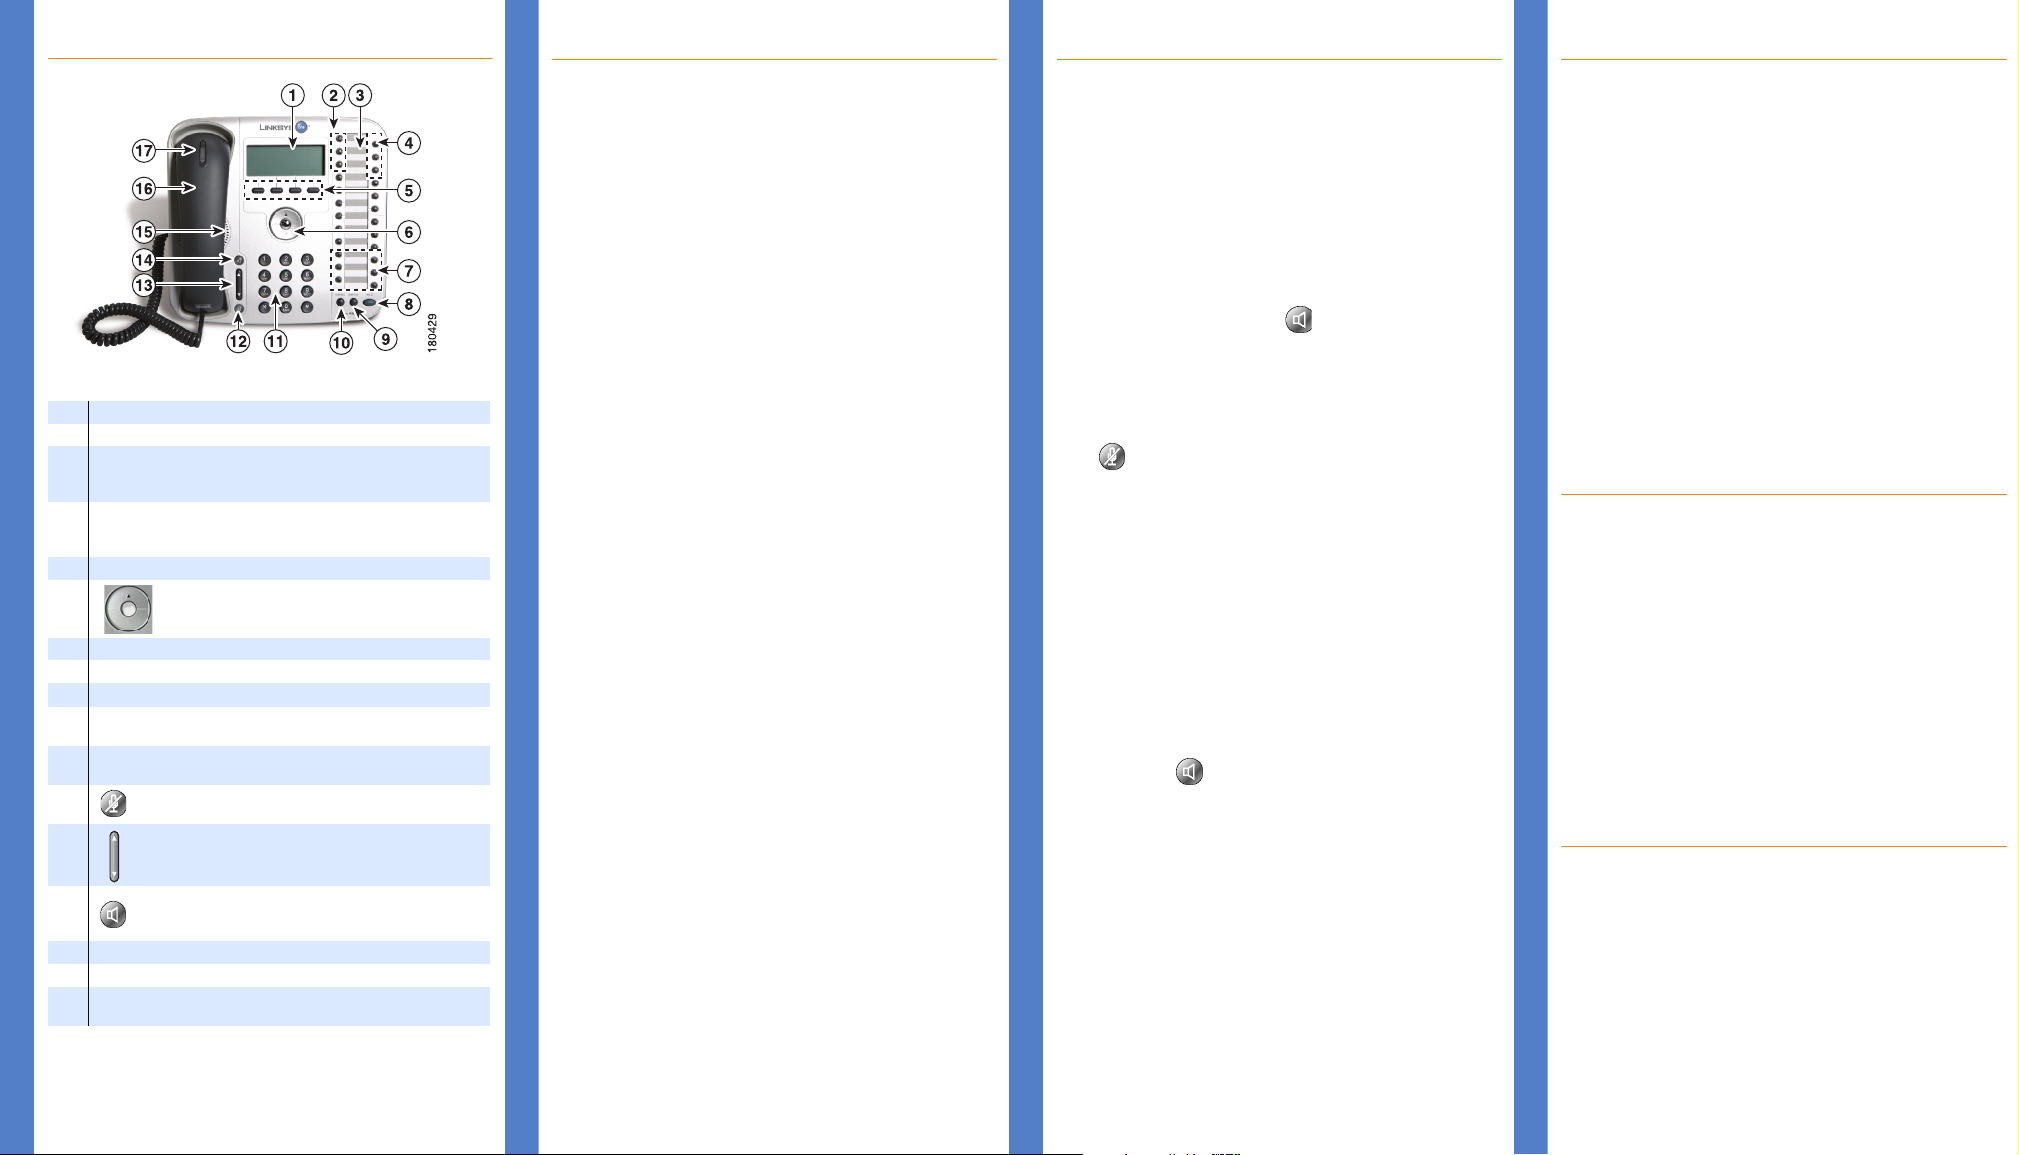
1Phone screen serves as your phone “desktop.”
2 Intercom buttons are for handling calls inside your company.
3
The button layout lists your intercoms, outside lines, and feature
button assignments. You can print the button template from your
User Settings page.
4Outside line buttons access the external phone lines assigned to
you. Use these buttons to place and receive calls outside your
company.
5Four softkeys.
6
3-position navigation key with up, down and select
functions.
7Feature buttons provide quick access to assigned phone features.
8Hold button puts a call on hold.
9Display button displays the phone’s IP address and Mac address.
10 Cancel button cancels the current phone task and displays the
previous screen.
11 Phone key pad allows you to dial the phone number and interact
with Voice Mail and Auto Attendant systems.
12 Microphone button mutes (red) and unmutes the
microphone.
13
Volume control adjusts the volume for the handset speaker
and the speakerphone.
14
Speakerphone button enables hands-free calling via the
speakerphone or headset. This button turns green when the
speakerphone is on.
15 Phone speaker provides hands-free listening.
16 Handset
17 Voice message indicator turns red when you have a voice mail
message.
Phone Features (A to Z)
Answer
• Lift the handset and press the flashing line button.
See also headset and speakerphone.
Answering a call while on another line
1. Press the flashing line button for the incoming call.
This puts the previous call on hold.
2. Greet the new caller.
3. To return to the previous call, press the flashing line
button for the call. The second caller will be put on hold.
Auto Dial
• Lift the handset and press the Auto Dial button for the phone
number or extension you want to call.
• To use the speakerphone, simply press the Auto Dial button
without lifting the handset.
See also Setting Auto Dial Numbers.
Call
Placing an internal call:
1. Lift the handset and press an intercom button OR
simply press an intercom button to use the speakerphone.
2. Dial the 3-digit extension number OR press the Auto Dial button
for the extension number.
Placing an outside call:
1. Lift the handset and press an outside line button OR simply
press an outside line button to use the speakerphone.
2. Dial the phone number. Depending on the dial plan for your
phone system, you may need to dial the 10-digit phone number
(area code plus phone number)
Call Forward
To set call forward on your phone screen:
1. Press the Tasks softkey tab on your phone and choose Set Call
Forward Always. Select an option from the phone menu.
2. When Call Forward Always is active, the Forward All button
lights up; press Forward All to set forward always on or off.
To set call forward on your User Settings page:
1. Access your User Settings page, click the Edit button.
2. From the drop down boxes, choose an option for Call Forward
Always and/or Call Forward Busy No Answer.
3. Click Commit
Call Park
1. During a call, press the Park feature button.
2. Note the Call Park phone number displayed on your phone
screen and hang up.
To unpark a call, press the Park feature button again or dial the
call park number from any phone on your network.
Phone Features (A to Z)
Do Not Disturb
Press the Do Not Disturb feature button to turn the ringer on
and off.
Emergency Calls
Press an outside line button and dial your local emergency service
number.
Headset
1. Plug a headset into the headset port on the back of the phone.
2. Press the Headset feature button.
3. Press the speakerphone button to place and receive calls
using the headset.
Hold
While in a call, press the Hold button on the phone or on the
phone screen. To resume the call, press the line button for the call.
Mute
Press the microphone button. When the phone is muted, the
microphone button LED lights red. To unmute the phone, press the
microphone button again.
Redial
To redial the last dialed extension or an outside number, press the
Redial feature button.
Shared Lines
• Incoming calls ring all phones that share the line, and the line
button on each phone flashes red.
• When a shared line is in use, the line button on the other
phones that share the line are red.
• You cannot make a call on a shared line that is in use.
Speakerphone
• Press an intercom or outside line button OR
• Press the speakerphone button.
Transfer
1. While on a call, press the Transfer feature button.
2. Open an intercom or outside line and call the number to which
you want to transfer the call.
3. Announce the call (optional).
4. Press Transfer again or hang up.
Volume
• To change the speaker volume during a call, press the
volume control up or down.
• To change the ringer volume, press the volume control while on
a call.
Making Conference Calls
To create a conference call:
1. Place a call to the first participant.
2. Press an intercom button or outside line button and dial the next
participant. This puts the first call on hold.
3. When the second participant answers the call, press the
Conference feature button.
4. Press the intercom or outside line button for the first call. The
participants are now connected in a conference call. A total of
3 participants can be connected in a conference call.
When a conference call is in progress, the buttons for the
intercoms or lines involved light up green.
To end or leave a conference call:
Hang up. If you created the conference, all participants drop and
the call ends. Only the person who created the conference can
end it. If you want to leave a conference call that you created,
press the Transfer feature button. The other call participants will
remain on the call (regular phone call) until they hang up.
Accessing Your User Settings
Use your web-based User Settings screen to set your call
forwarding options and change the name assigned on your
phone. To access your User Settings screen:
1. On the computer that is connected to your phone via DHCP,
open a web browser and type:
https://phoneadmin
2. Select the User option from the drop down box; enter your
username and password. The first time you access your User
web page, use the following settings:
Username: Your 3-digit phone extension
Password: Your 3-digit phone extension + 100.
3. Click on Phone Application.
4. Click on User Settings.
Setting Auto Dial Numbers
A web-based User Template screen allows you to customize Auto
Dial features. You can move and reorder Auto Dials on your button
template using the move button or direction arrow.
To set Auto Dials for inside or outside phone numbers:
1. Login to your User web page.
2. Click on Phone Applications.
3. Click on User Template.
4. Click the Edit button.
5. In the Auto Dial boxes, type the names and phone numbers you
want to set as Auto Dials.
6. Click Commit.


