Avidsen 114375 User manual
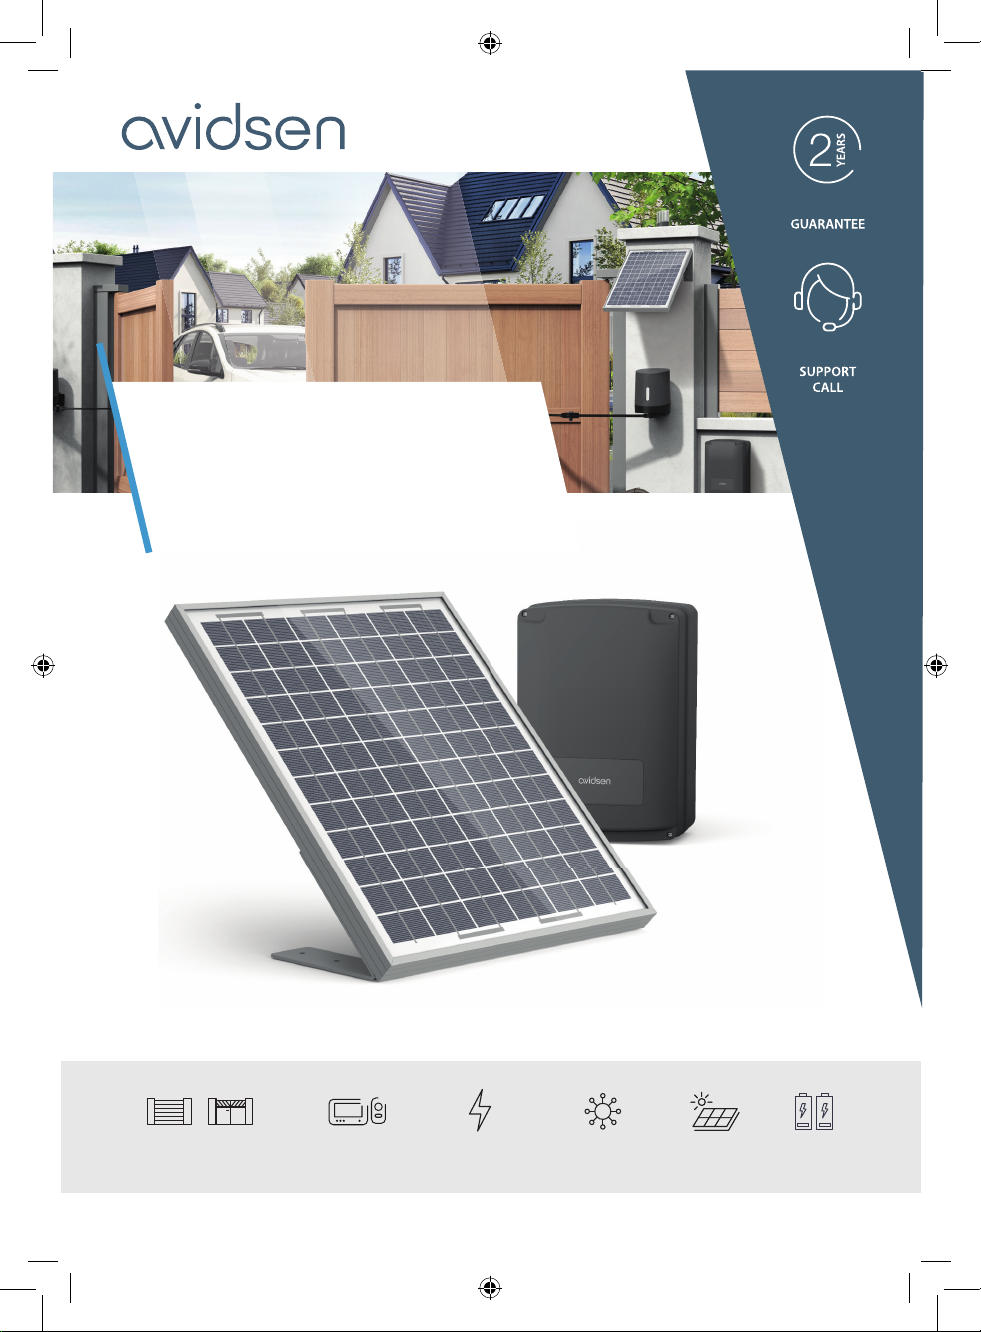
SOLAR POWER
KIT
12V and 24V compatible
Ref. 114375
www.avidsen.com
V1
COMPATIBLE
12V-24V UNIVERSEL 20W 12V 7AH X2
COMPATIBLE AVEC UNE LARGE
GAMME DE MOTORISATIONS
COMPATIBLE
VISIOPHONES SANS FILS
COMPATIBLE WITH A WIDE
RANGE OF MOTOR DRIVES
12-24V COMPATIBLECOMPATIBLE WITH WIRELESS
VIDEOPHONES
UNIVERSAL 20W 12V 7AH X2

EN3
EN 2

EN3
EN 2
CONTENTS
A - SAFETY
INSTRUCTIONS
1 - OPERATING PRECAUTIONS 04
2 - WARNING 04
3 - MAINTENANCE AND CLEANING 04
4 - RECYCLING 04
B - PRODUCT
DESCRIPTION
1 - KIT CONTENTS 05
C - INSTALLATION
1 - SOLAR PANEL 05
2 - BATTERY BOX 08
3 - BATTERY INSTALLATION 08
D - GENERAL
CONNECTION
1 - 12V CONNECTION 07
2 - 24V CONNECTION 10
3 - CONNECTION WITH AN AVIDSEN CIRCUIT
BOARD 10
E - USING WITH OTHER
AUTOMATIC OPENER
BRANDS
1 - USING WITH
OTHER AUTOMATIC OPENER BRANDS 13
F - FAQ
FAQ 13
G - TECHNICAL AND
LEGAL INFORMATION
1 - TECHNICAL CHARACTERISTICS 14
2 - WARRANTY 14
3 - HELP AND ADVICE 14
4 - DECLARATION OF CONFORMITY 15

EN 4
1 - OPERATING PRECAUTIONS
• Read this entire manual before starting the
installation.
• Do not allow children to handle the product.
• Be careful to check the connection polarity of
each item before installation.
• Do not use the solar kit in conjunction with a
power supply.
• Avidsen France cannot be held liable for any use
that does not comply with the instructions in this
manual and causes damage.
2 - WARNING
This product has been designed solely to power
a gate motor drive or a wireless videophone.
Any other use of the device is not covered by the
warranty or technical support. Avidsen cannot
be held liable for any use that does not comply
with the instructions in this manual and causes
damage. Children should be supervised to make
sure that they do not play with the device. Do not
modify or add components to the solar kit. When
replacing the battery, use a battery of the same
voltage and capacity.
3 - MAINTENANCE AND CLEANING
• External cleaning of the battery box can be
completed periodically. The solar panel must
be cleaned regularly in order to maintain full
efciency. Use a slightly dampened cloth for
cleaning.
• Do not use abrasive substances, substances
containing alcohol, thinners or other ammable
substances.
• Do not spray any products directly onto the unit.
4 - RECYCLING
This solar power kit is made of different types of
materials, some of which must be recycled and
others which must be discarded.
None of the items should be left outdoors or thrown
into a household bin. To separate the different
materials, the kit elements must be dissembled by
a qualied person.
Sort items by type:
- Battery
- Plastics
- Scrap metal
- Cardboard and paper
- Others
Once the items have been sorted, send them to
the appropriate recycling organisation and drop off
the other materials at a waste treatment centre.
Information on environmental
protection
The consumer is required by law to recycle all
used batteries and accumulators.
Disposing of them in household waste is strictly
forbidden.
Batteries/accumulators containing harmful
substances are marked with symbols (shown
opposite) which indicate that it is forbidden
to discard them in the household waste. The
corresponding heavy metal designations are
as follows: Cd = cadmium, Hg = mercury, Pb =
lead. These used batteries/accumulators can
be disposed of at local waste treatment centres
(centres for sorting recyclable materials), which
are required to accept them. Keep batteries, button
cells and accumulators out of reach of children.
Store them in a safe place that is not accessible
to children. They could be swallowed by children
or pets. Risk of death! In the event that a battery is
swallowed, immediately contact a doctor or go to
A&E! Never short-circuit the batteries, and do not
burn them as they may explode!
A - SAFETY INSTRUCTIONS

EN5
B - PRODUCT DESCRIPTION
1 - KIT CONTENTS
1x 1 2x 1 6x 1
5x 2
3x 4 4x 4
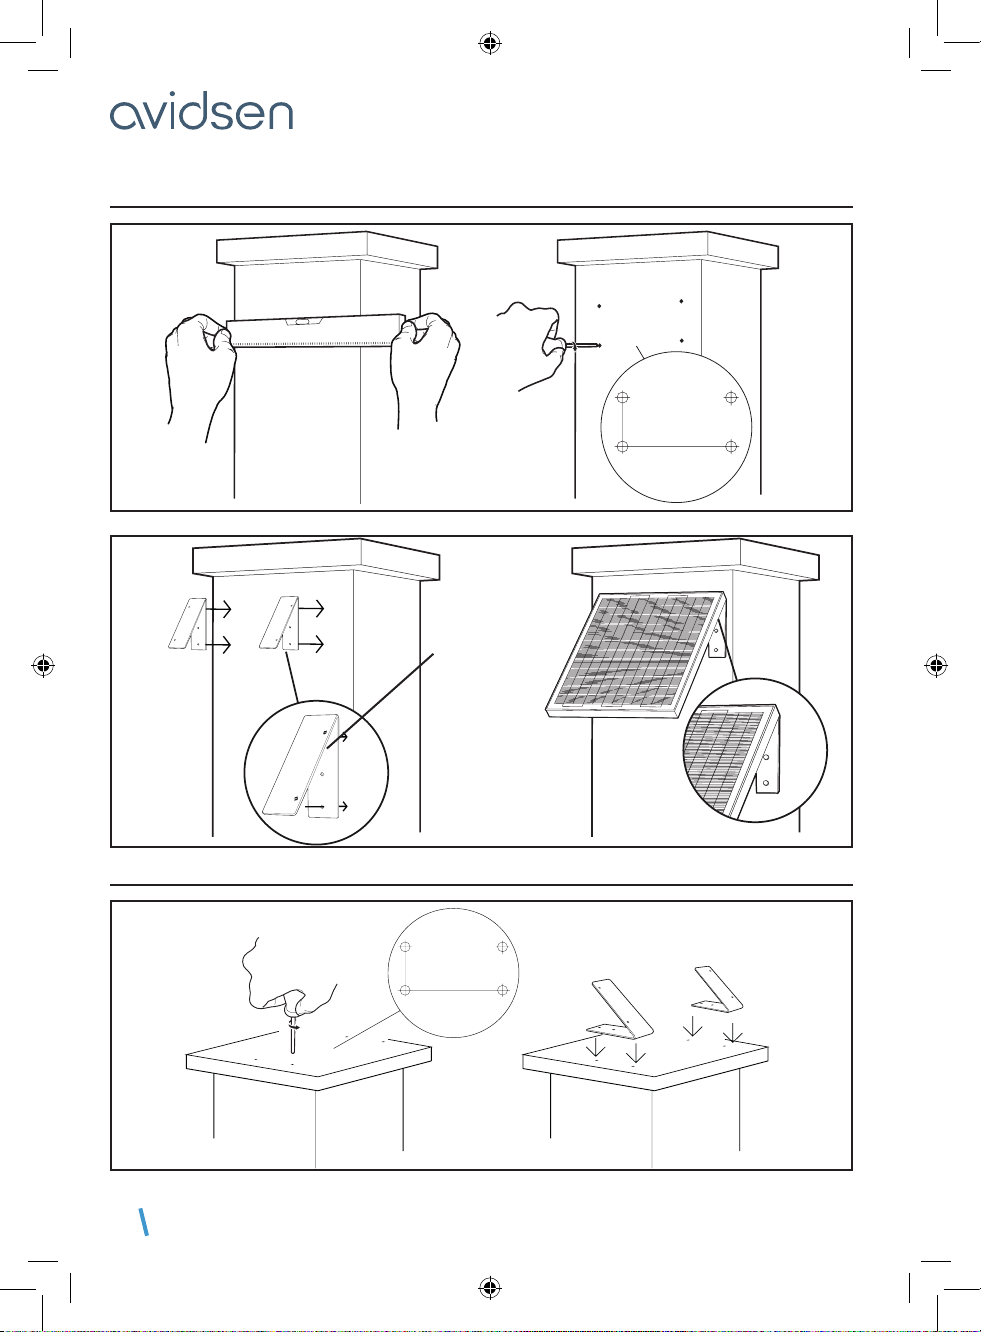
C - INSTALLATION
Use fasteners that are suitable for your type of post.
(the fasteners included in the kit are to be used when installing on solid materials only)
N
S
EW
SOUTH-FACING INSTALLATION MANDATORY:
The panel should never be in the shade.
1 - SOLAR PANEL
1Solar panel
2Charging box
3Screw for attaching the solar panel’s mounting
bracket
4Wall plugs for mounting the solar panel
5Batteries
6Battery terminals for
parallel and serial connection
7Solar panel brackets and connecting cables
7x 2
Possible installation directions
Top Side
EN 6
C - INSTALLATION
30,7 cm
10 cm
30,7 cm
10 cm
INSTALLATION ON A VERTICAL SURFACE
INSTALLATION ON A HORIZONTAL SURFACE
Maintain the outwards
direction of the
solar panel’s mounting
holes

EN7
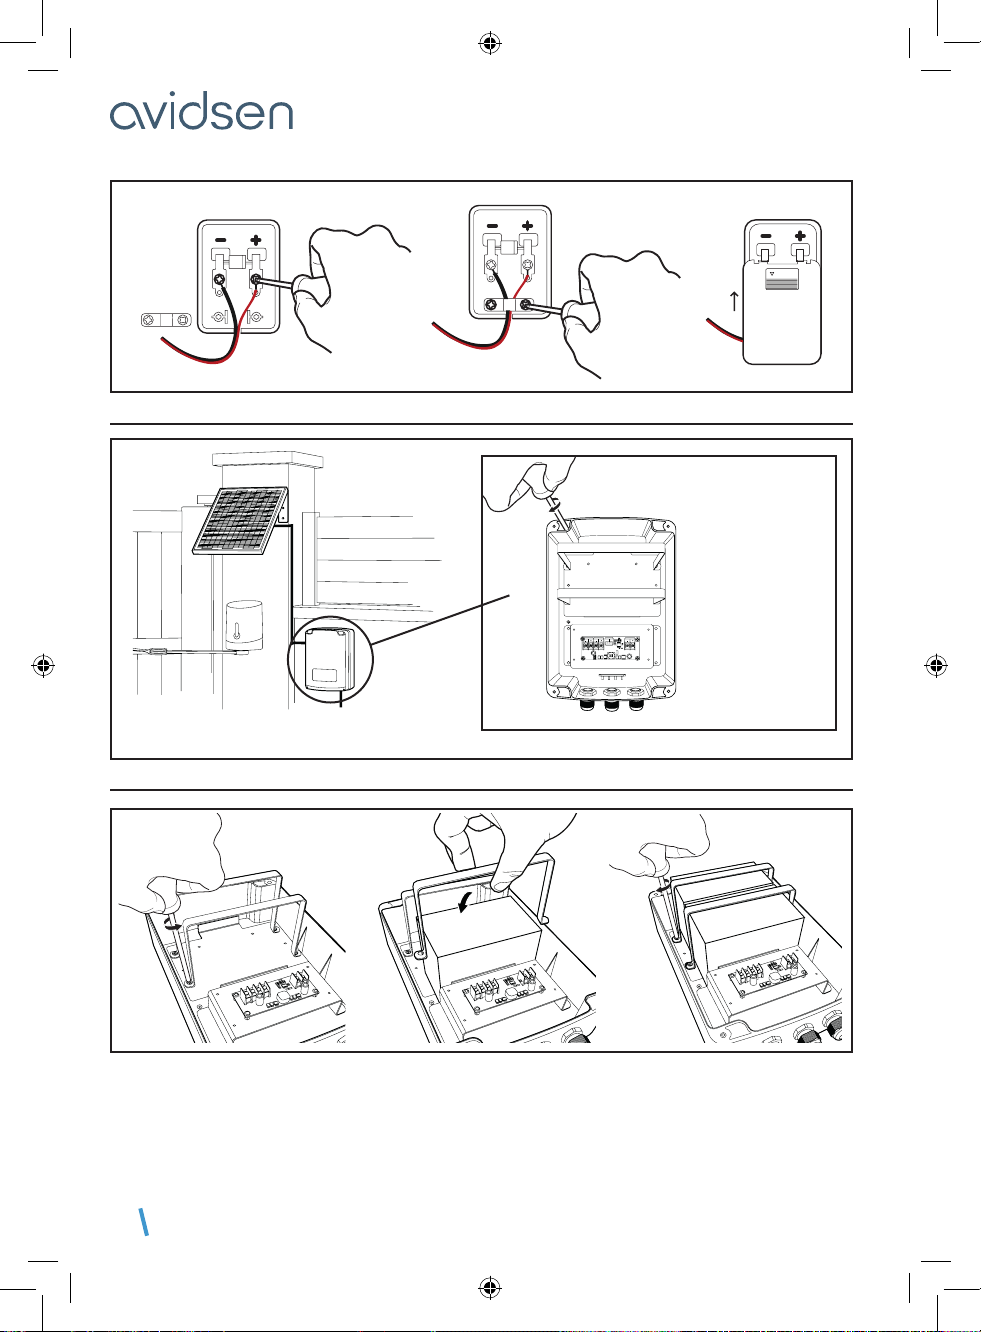
C - INSTALLATION
CONNECTING THE WIRES TO THE SOLAR PANEL
back
EN 8
C - INSTALLATION
2 - BATTERY BOX
Internal view of box
Battery box
Solar panel
SOLARCHARGE CO NTROLLER
MOTORISATION BATTERY SOLARINVOLTAGE
24V12V
3 - BATTERY INSTALLATION
Depending on how long the batteries have been stored in the warehouse, it may be necessary to leave the
system to charge for several days (preferably sunny days) before being able to use the gate motor drive.
The solar power kit allows you to complete an average of 10 open/close cycles a day.
!!! NOTE!!!
MAKE SURE YOU MAINTAIN THE CORRECT CONNECTION POLARITY AT ALL TIMES
Use fasteners that
are suitable for
your type of post
EN9
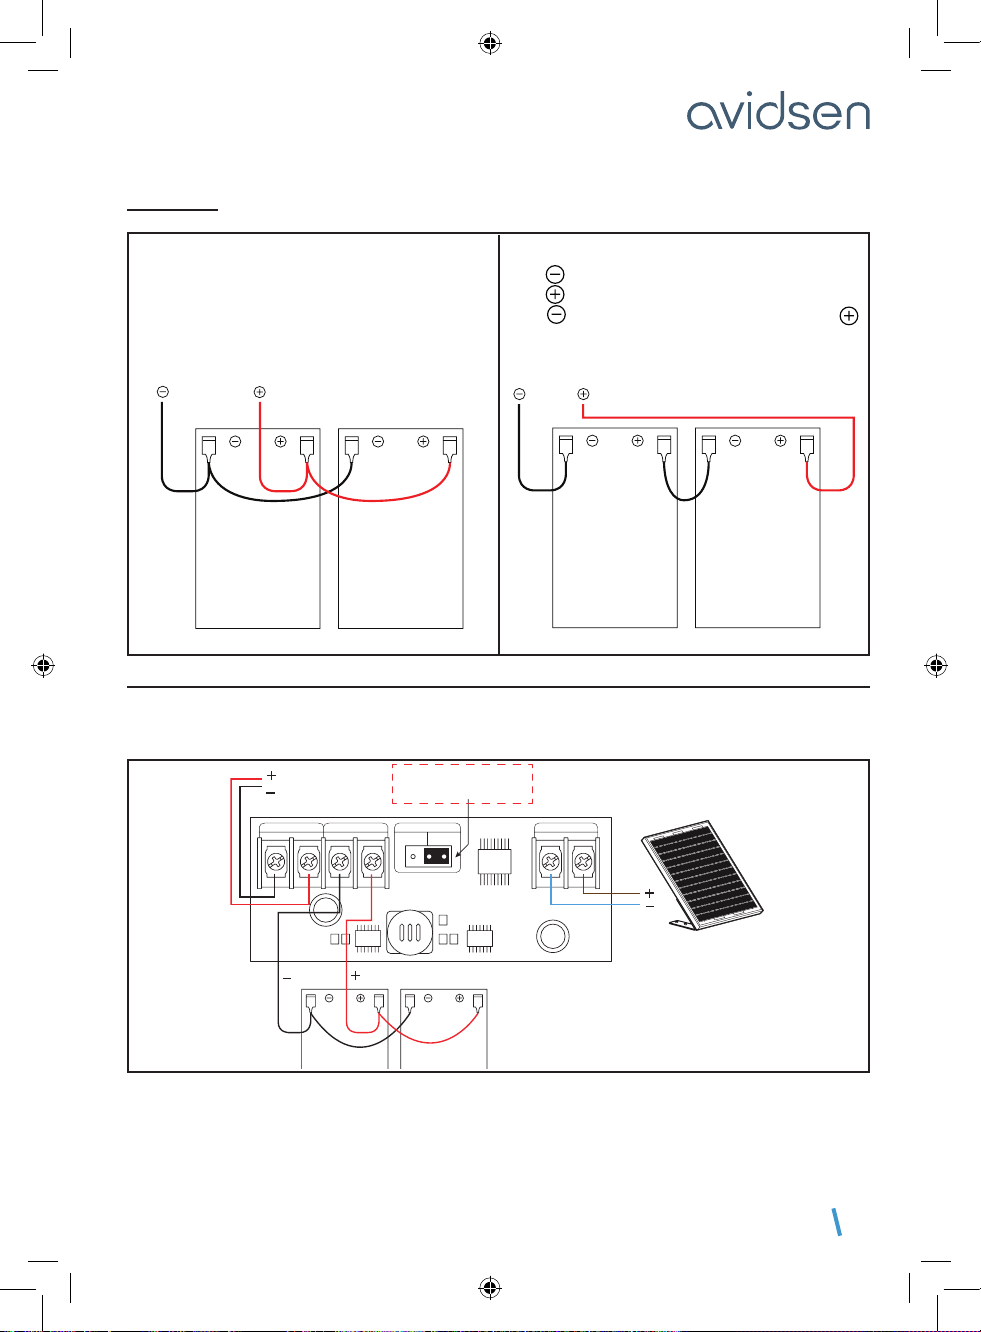
D - GENERAL CONNECTION
REMINDER:
Batteries
To the regulator To the regulator
Batteries
1 2
12V parallel connection
The red terminals connect together.
The black terminals connect together.
24V serial connection
The terminals of battery 1to the regulator.
The terminals of battery 2to the regulator.
The terminals of battery 2connect to the
terminal of battery 1.
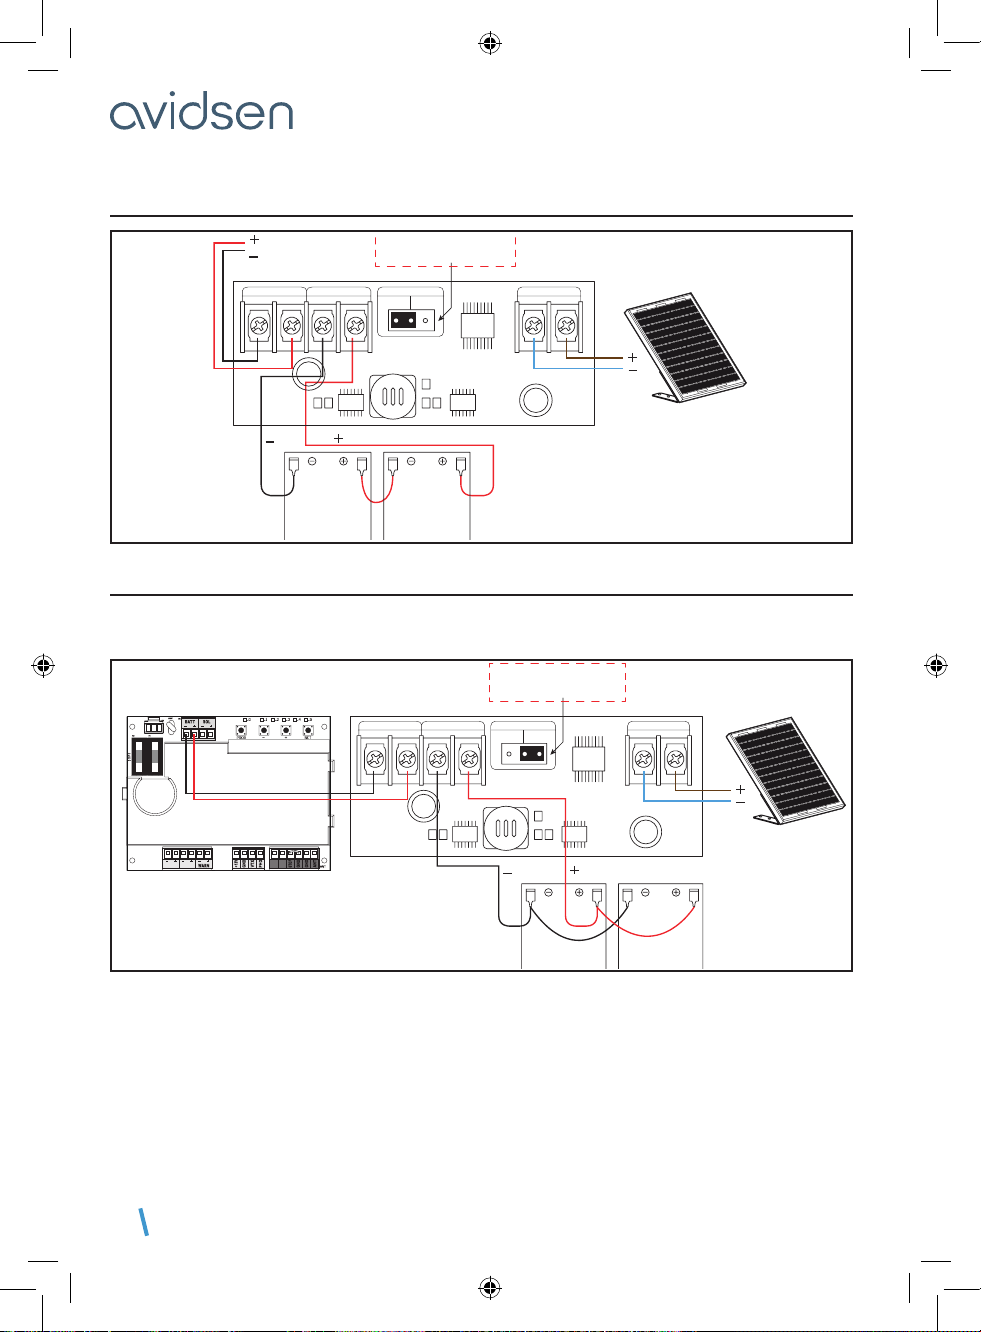
1 - 12V CONNECTION
Warning! Follow the steps below for connection (and vice versa for disconnection)
1. Connect the battery to the regulator (12V or 24V depending on your motor)
2. Connect the solar panel to the regulator
MOTORISATION BATTERYVOLTAGE
24V 12V
SOLAR IN
MOTORISATION BATTERYVOLTAGE
24V 12V
SOLAR IN
2 x 1.5mm2 (1.5m max.)
to automatic
battery
power
SET THE
SWITCH TO 12V
2 x 0.75mm2 (5m max.)
batteries
EN 10
D - GENERAL CONNECTION
2 - 24V CONNECTION
MOTORISATION BATTERYVOLTAGE
24V 12V
SOLAR IN
MOTORISATION BATTERYVOLTAGE
24V 12V
SOLAR IN
2 x 1.5mm2 (1.5m max.)
to automatic
battery
power
SET THE
SWITCH TO 24V
2 x 0.75mm2 (5m max.)
batteries
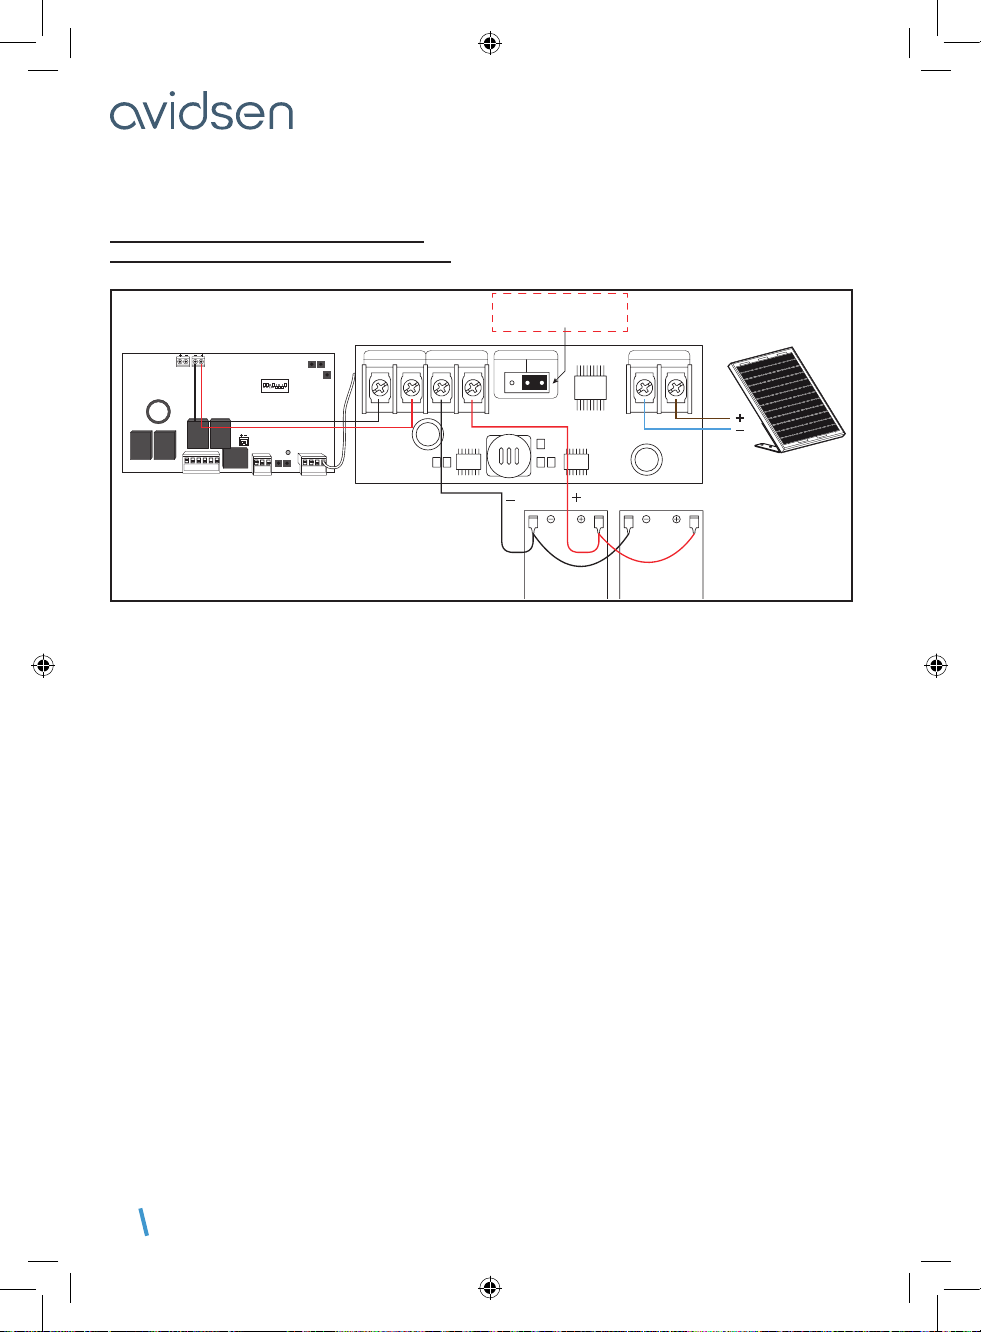
3 - CONNECTION WITH AVIDSEN CIRCUIT BOARD
12V CA2B9TRAC/TRAR/SLDTR Parallel battery connection
Do not connect anything to card’s GROUND - /+
MOTORISATION BATTERYVOLTAGE
24V 12V
SOLAR IN
M1 M2
2B 1B
SET THE
SWITCH TO 12V
batteries

EN11
D - GENERAL CONNECTION
24v CA2B9SLDR Serial battery connection
Do not connect anything to card’s BATT - /+
MOTORISATION BATTERY VOLTA GE
24V 12V
SOLAR IN
M1 M2
2B 1B
SET THE
SWITCH TO 24V
batteries
24v AVLO Serial battery connection
L0
PROG OK
+
-
L1 L2 L3 L4 +-
BATTRANS
GND
GND
PHO
+24V
M1-
M2-
M1+
M2+
warn-
warn+
2B
MOTORISATION BATTERYVOLTA GE
24V 12V
SOLAR IN
SET THE
SWITCH TO 24V
batteries
EN 12
12V SW200D2S Parallel battery connection
Do not connect anything to card’s GROUND - /+
OC1
LD1
ON
12345678
DP
OC2
-M2+ -M1+ -Warm+
RF1
RF2 AUTO
+12V
NC
COM
GND
O/C1 O/C2
GND ANT
SOLAR
PANEL BAT
COM4
MOTORISATION BATTERYVOLTAGE
24V 12V
SOLAR IN
SET THE
SWITCH TO 12V
batteries
D - GENERAL CONNECTION
EN13
E - USING WITH OTHER AUTOMATIC OPENER BRANDS
This power kit can be used with solar-compatible automatic gate openers from brands other than Avidsen.
Automatic openers must operate exclusively on 12VDC or 24VDC voltage.
This solar kit cannot be used with any other voltage.
Make sure that the circuit board has a backup battery input.
PAY ATTENTION TO THE CONNECTION POLARITY.
Please refer to this manual at all times for wiring the solar kit.
It is best if the circuit board goes into standby mode after a certain amount of time in order to limit power
consumption (refer to the circuit board’s technical specications for more details).
The motor drive may restrict some functionality when running on battery power. If some accessories or
other functions stop working, make sure this is not the cause.
If batteries discharge faster than expected, make sure that no external accessory is using the board for
power (control module, intercom panel, videophone, etc.). If this is the case, you will need to disconnect
them from the circuit board.
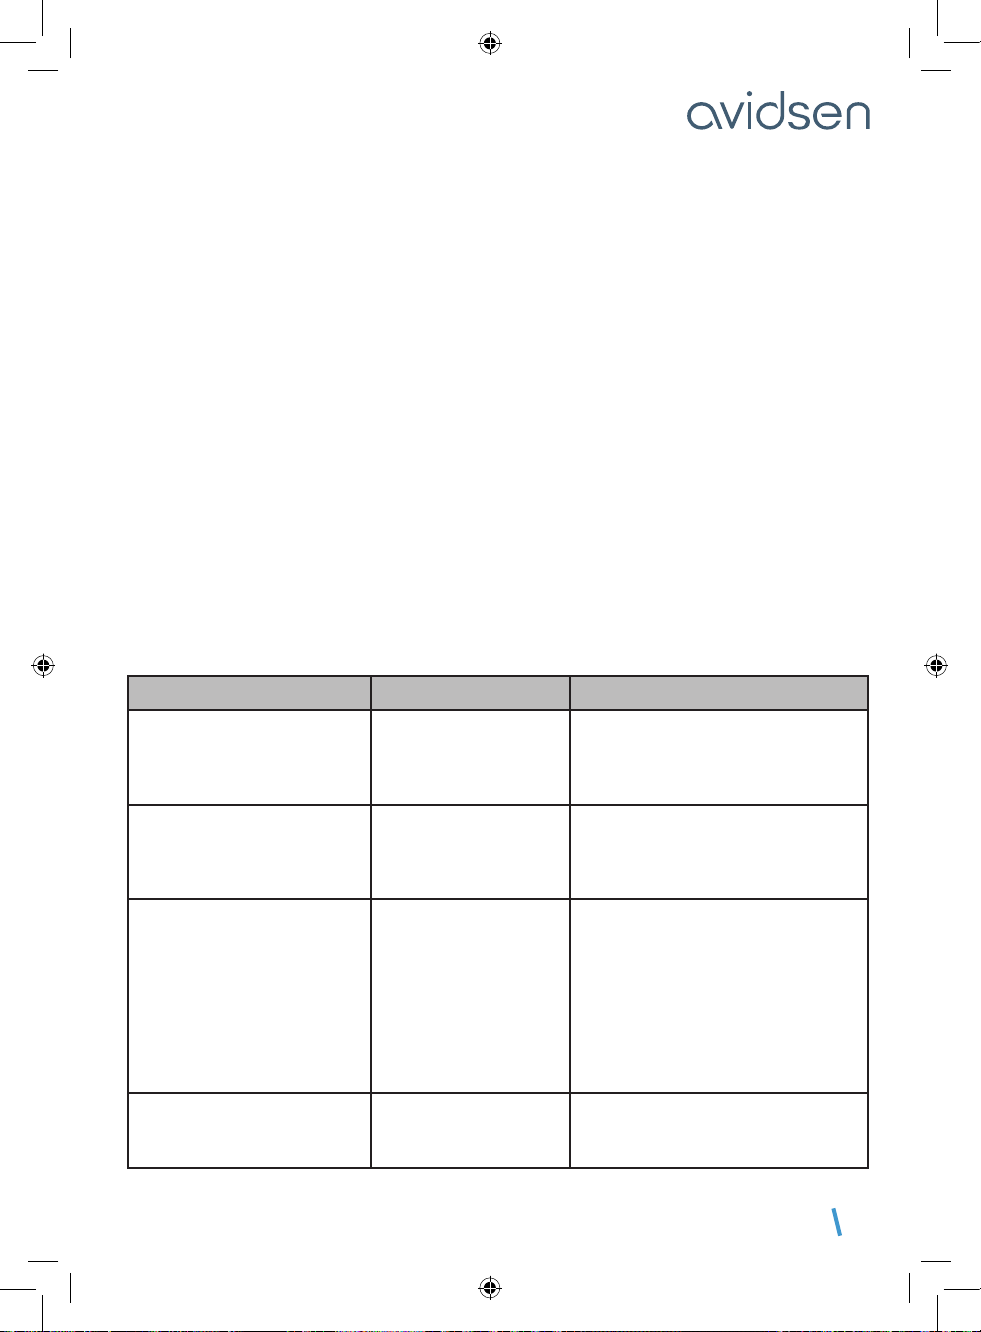
Symptoms Possible causes Solutions
The LEDs on the circuit board
light up faintly and the gate
doesn’t open
Batteries discharged
Disconnect the solar kit from the
motorised gate and allow the solar
panel to charge the battery for at least
48 hours
The circuit board reboots when
movement is attempted or an
L1L2 or L1L3 error code is
displayed (on a CA2B9 board)
Batteries discharged
Disconnect the solar kit from the
motorised gate and allow the solar
panel to charge the battery for at least
48 hours
Battery lasts less than
10 opening/closing cycles
Solar panel is charging
battery incorrectly due to
its orientation. Electric
overconsumption.
Reorient the solar panel to face south
and make sure the solar panel is
delivering 21V in full summer sun or
18V in winter sun.
Don’t use the board to power external
devices other than those accessories
designed to work with the motor drive.
Make sure the motor’s power
consumption isn’t too high.
Batteries discharge in 1 week
Solar panel or charging
module connected
backwards
Check solar panel and charging
module connections
F - FAQ
EN 14
G - TECHNICAL AND LEGAL INFORMATION
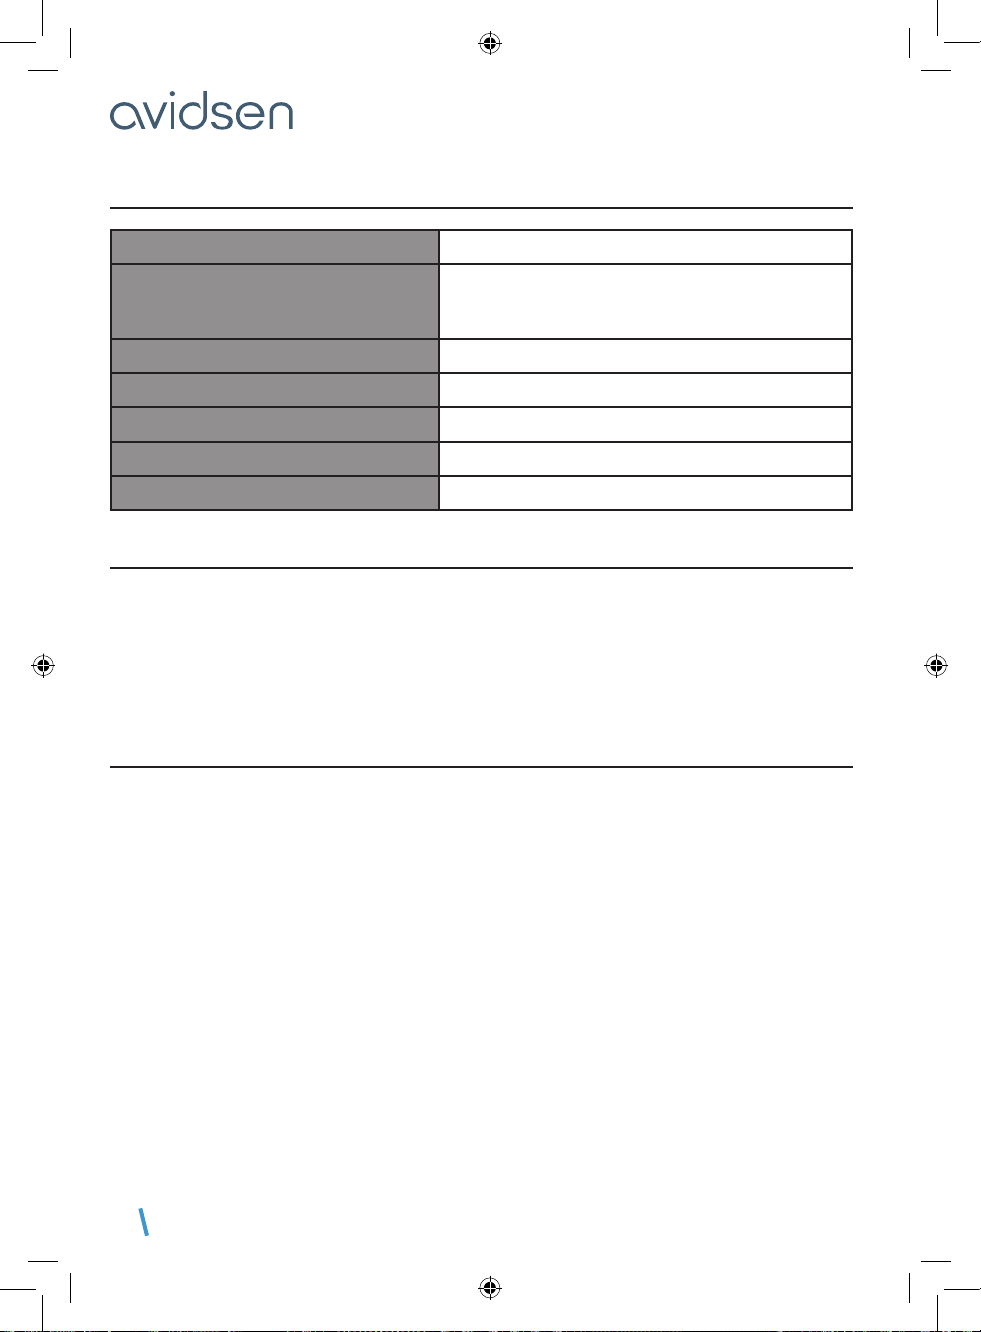
1 - TECHNICAL CHARACTERISTICS
2 Lead batteries Voltage12V Capacity 7Ah
Solar panel
Power: 20W
Max Power voltage (Vmp): 36.20 V
Max Power current (Imp): 0.57 A
Solar panel dimensions 440 x 385 x 25 cm
Battery box dimensions 210 x 297 x 130 cm
Protection rating IP44
Maximum output current 10 A
Operating temperature -20°C to +60°C
2 - WARRANTY
This product is guaranteed for parts and labour for 2 years from the date of purchase. Proof of purchase
must be retained for the duration of the warranty period. The batteries are guaranteed for one year.
The warranty does not cover damage caused by knocks or accidents. Be careful not to scratch the solar
panel surface when installing it or it will not effectively charge the batteries.
This solar kit is designed to power a solar compatible automatic gate opening mechanism or a solar
compatible wireless video intercom system. Any other use will not be covered by any warranty.
3 - HELP AND SUGGESTIONS
• If, despite the care we have taken in designing our products and drafting these instructions, you
encounter difculties when installing your product or you have any questions, we strongly recommend that
you contact one of our specialists who will be glad to help.
• If you encounter operating problems during installation or a few days afterwards, it is essential for you to
be in front of your installation when contacting us, so that one of our technicians can diagnose the source
of the problem, as it will probably be the result of a setting that is incorrect or an installation that is not to
specication. If the problem is caused by the product itself, the technician will give you an RMA number so
that you can return the unit to the workshop.
Need advice for the installation or start-up of your product?
Contact our after sales service team technicians:
0 892 701 369
Monday to Friday, 9pm to 12pm, and 2pm to 6pm.
Avidsen undertakes to keep a stock of spare parts for this product throughout the contractual warranty
period.

EN15
G - TECHNICAL AND LEGAL INFORMATION
4 - EU DECLARATION OF CONFORMITY
Avidsen declares, under its sole responsibility, that the equipment with reference number 114375 complies
with the applicable Union harmonisation legislation and its conformity has been assessed pursuant to the
applicable standards in force:
Directive EMC 2014/30/EU
• EN61000-6-3:2021
• EN61000-6-1:2019
The above-mentioned products comply with the RoHS 2011/65/EU Directive and delegated directive
2015/863.
Signed by Alexandre Chaverot, CEO, on behalf of Avidsen
19 avenue Marcel Dassault, 37200 Tours, France
Signed in Tours on 21 June 2023 by Alexandre Chaverot, CEO
Avidsen
19 avenue Marcel Dassault - ZAC des Deux Lions
37200 Tours - France
Other manuals for 114375
1
This manual suits for next models
1
Table of contents
Popular Solar Panel manuals by other brands


Phono Solar
Phono Solar diamond series installation instructions

Viessmann
Viessmann VITOVOLT Operating Instructions for the System User

COMFORTPOOL
COMFORTPOOL CP-80022 Installation & operation manual

Energie
Energie Solar Block 4 Installation and use manual

Motorline professional
Motorline professional APOLO User& installer's manual

Solar Fabrik
Solar Fabrik Professional 54 installation guide


