AVLink Lightcasso LCS-D1 User manual

AV LINK GROUP LTD. | 28F., No.97, Sec.1, Xintai 5th Rd., Xizhi Dist., New Taipei City
221, Taiwan
Lightcasso
User Manual

CAUTION
◼Follow all instructions marked on the device during using.
◼Provide proper ventilation and air circulation and do not use near water.
◼It is better to keep it in a dry environment.
◼Place the device on a stable surface (example cart, stand, table, etc.).
◼The system should be installed indoor only. Install either on a sturdy rack or
desk in a well-ventilated place.
◼Make sure the rack is level and stable before extending a device from the rack
if necessary.
◼Make sure all equipment installed on the rack including power strips and other
electrical connectors are properly grounded.
◼Only use the power cord supported with the device.
◼Do not use liquid or aerosol cleaners to clean the device.
◼Always unplug the power to the device before cleaning.
◼Unplug the power cord during lightning or after a prolonged period of non-use
to avoid damage to the equipment.
◼Do not stand on any device while installing the device to the rack.
◼Do not attempt to maintain the device by yourself, any faults, please contact
your vendor.
◼Save this manual properly for future reference.
Copyright and Trademarks
All rights reserved by AV LINK GROUP LTD. No part of this document may be
reproduced in any form or by any means without written permission from the product
manufacturer. Changes are periodically made to the information in this document.
They will be incorporated in subsequent editions. The product manufacturer may
make improvements and /or changes in the product described in this document at any
time.
All the registered trademarks referred to this manual are belonging to their respective
companies.
Contact Information
AV LINK GROUP LTD.
Headquarters: 28F., No. 97, SEC. 1, XINTAI 5TH RD., XIZHI DIST.,
NEW TAIPEI CITY 221, TAIWAN (R.O.C.)
TEL: 886-2-2697-2288
Fax: 886-2-2697-2299
E-mail: sales@cctch.com.tw

Table of Contents
Chapter 1 Introduction ................................................................................................1
1.1 Features .....................................................................................1
1.1.1 Web-based client application....................................................1
1.1.2 Content management ...............................................................2
1.1.3 Playback synchronization .........................................................2
1.1.4 Playback schedule....................................................................3
Chapter 2 Quick Start .................................................................................................4
Chapter 3 Specifications ............................................................................................5
3.1 Product Overview ...............................................................................5
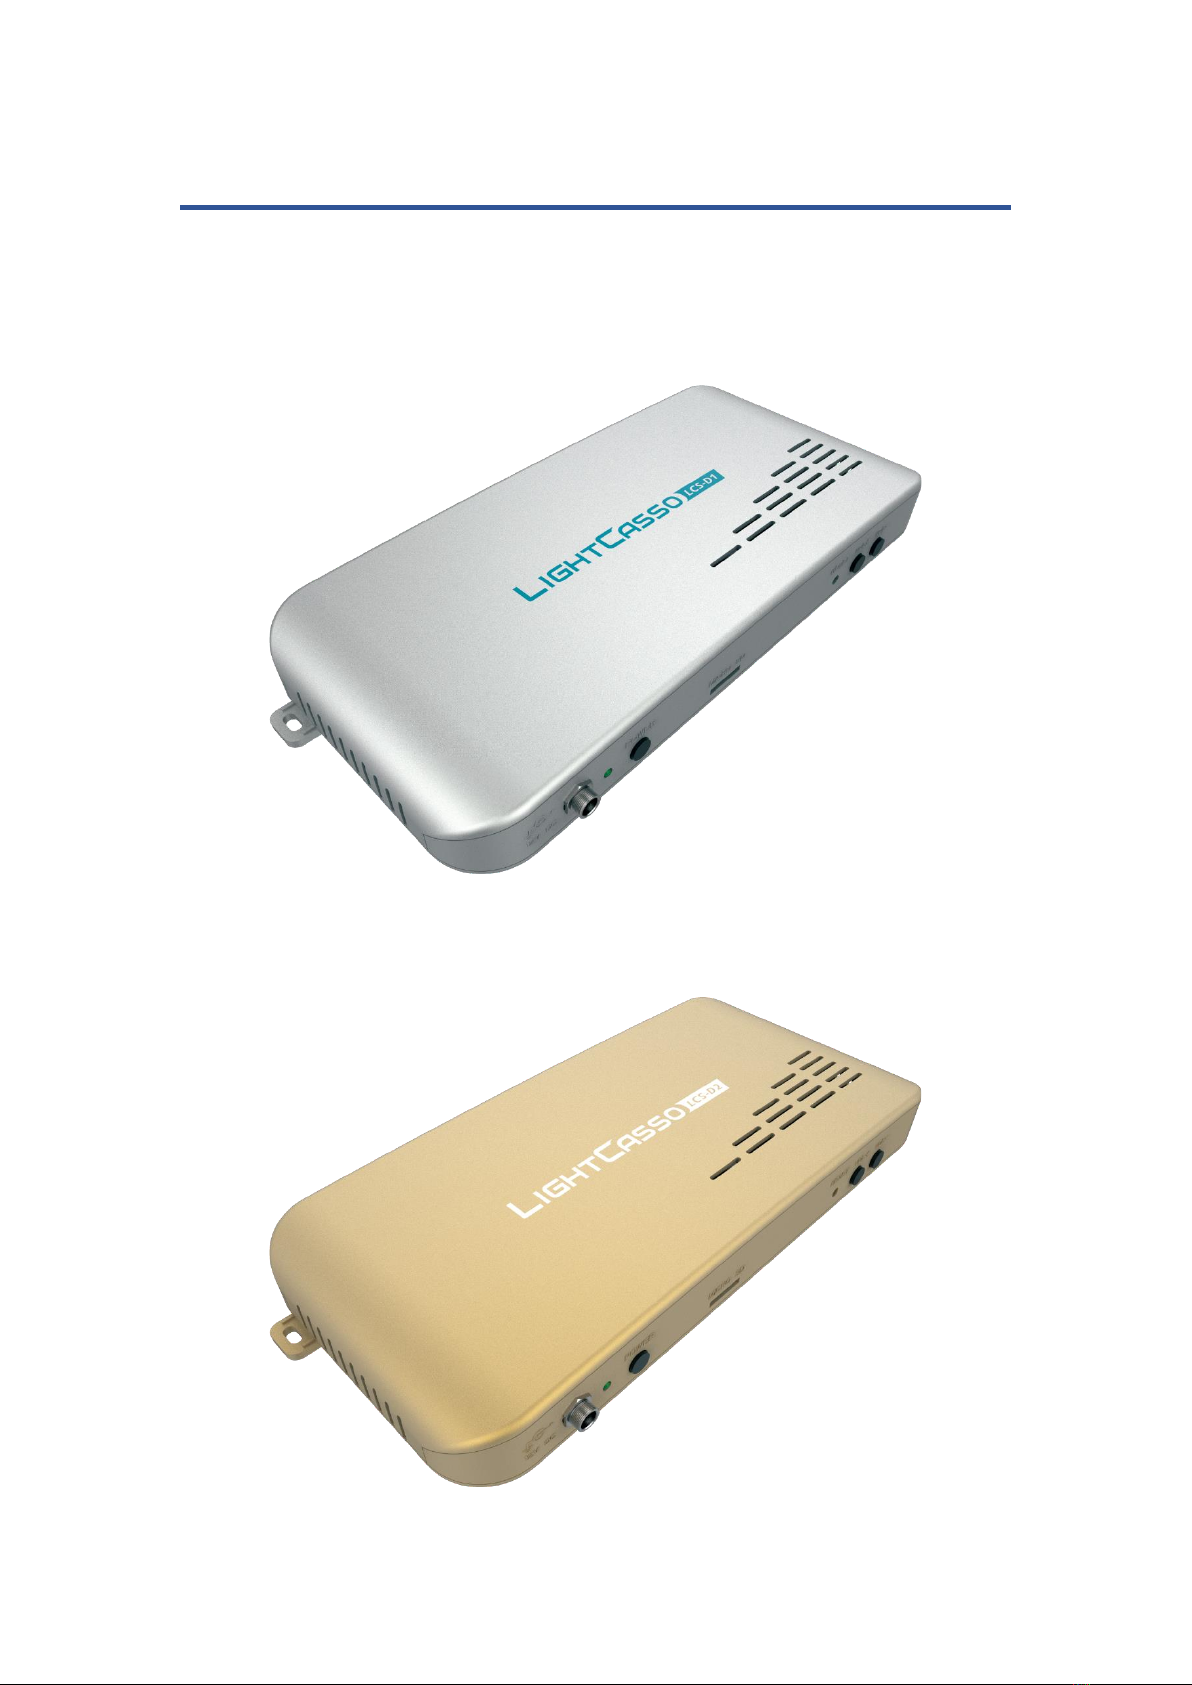
3.1.1 LCS-D1.....................................................................................5
3.1.2 LCS-D2.....................................................................................5
3.1.2 LCS-M ......................................................................................6
3.2 Product Specifications ........................................................................7
3.2.1 LCS-D1 and LCS-D2 Specifications .........................................7
3.2.2 LCS-M Specifications ...............................................................8
Chapter 4 Setup Guide...............................................................................................9
4.1 System architecture ............................................................................9
4.1.1 LCS-D1 and LCS-M..................................................................9
4.1.2 LCS-D2...................................................................................10
4.2 Launch Steps....................................................................................11
4.2.1 Launch LCS-D1 or LCS-D2 ....................................................11
4.2.2 Launch LCS-M........................................................................11
4.2.3 Launch LCS Web Client .........................................................11
Chapter 5 Interfaces .................................................................................................12
5.1 LCS-D1 and LCS-D2 Interfaces........................................................12
5.1.1 LCS-D1 Front Panel ...............................................................12
5.1.2 LCS-D1 Rear Panel ................................................................12
5.1.1 LCS-D2 Front Panel ...............................................................12
5.1.2 LCS-D2 Rear Panel ................................................................12
5.2 LCS-M Interfaces..............................................................................13
5.2.1 LCS-M Front Panel .................................................................13
5.2.2 LCS-M Rear Panel..................................................................13
5.2.3 LCS-M Information..................................................................13
5.3 LCS Web Client ................................................................................15
5.3.1 Layout.....................................................................................15
5.3.1.1 Layout top bar...............................................................16

5.3.1.2 Logo .............................................................................16
5.3.1.3 Play layout ....................................................................16
5.3.1.4 Reset layout..................................................................16
5.3.1.5 Save layout...................................................................16
5.3.1.6 3D Viewport ..................................................................17
5.3.1.7 Properties Editor...........................................................17
5.3.1.8 Gallery ..........................................................................22
5.3.1.9 Timeline ........................................................................25
5.3.1.10 Layout selector options...............................................26
5.3.2 Show.......................................................................................27
5.3.2.1 Show top bar ................................................................27
5.3.2.2 Logo .............................................................................27
5.3.2.3 Reset show...................................................................27
5.3.2.4 Save show ....................................................................27
5.3.2.5 Layout list .....................................................................28
5.3.2.6 Show player..................................................................28
5.3.2.7 Show card list ...............................................................29
5.3.2.8 Show card selector options...........................................33
5.3.3 Home ......................................................................................34
5.3.3.1 Main..............................................................................34
5.3.3.2 Gallery ..........................................................................39
5.3.3.3 Landscape ....................................................................41
5.3.3.4 Show ............................................................................42
5.3.3.5 Device...........................................................................43
5.3.3.6 Schedule.......................................................................46

1
Chapter 1 Introduction
Lightcasso is an easy-to-use projection mapping system. The Lightcasso Web Client
provides a full 3D edit environment for you to quickly setup a projection mapping.
Then, Lightcasso device LCS-D1 outputs appropriate contents on you target objects
from connected projector. Moreover, you can manage multiple LCS-D1 to perform a
cooperated projection mapping with Lightcasso controller LCS-M.
1.1 Features
1.1.1 Web-based client application
Lightcasso Web Client is a web-based client with a fully 3D environment editor. The
client can be launched in supported web browsers without any installation. In 3D
environment editor, you can place, scale, and rotate each projection target 3D
models and projectors. Moreover, you can design a playlist of media to project.
Lightcasso will automatically change media.

2
1.1.2 Content management
Lighcasso controller and device can stores your 3D objects and multimedia.
This feature makes Lighcasso still can playback your projection mapping
design without extra control PC after configuration. Moreover, Lighcasso
controller automatically deploys required contents to each Lightcasso
devices when using cooperation mode. This feature reduces the setup
time of uploading media on each device one by one.
1.1.3 Playback synchronization
You can use multiple Lightcasso devices together at same time to build a
cooperated projection mapping. Lighcasso controller automatically
detects Lightcasso devices in same network. Then, you can setup several
projectors and bind each one with appropriated device in the landscape
design of Lighcasso Web Client. When playing the landscape, Lightcasso
controller handles progress of playback in different Lighcasso devices to
make each device synchronously plays.

3
1.1.4 Playback schedule
The Lightcasso provides schedule feature to setup show playback. You can
organize a show with several landscapes as a show with playback
sequence and time. Then, Lighcasso controller and devices demonstrate
the show in the order. Moreover, you place shows in a timetable in day,
week, and even a month. After configuration, Lightcasso will plays your
show on schedule.

4
Chapter 2 Quick Start
1. Prepare required equipment, includes LCS-D1, LCS-M, projector, and project
target
2. Place each equipment at appropriate location
3. Connect each equipment as following figure:
4. Power on each equipment
5. Connect your PC or laptop to Switch
6. Open Lightcasso Web Client with browser
7. Start design and play your projection mapping
5
Chapter 3 Specifications
3.1 Product Overview
3.1.1 LCS-D1
3.1.2 LCS-D2

6
3.1.2 LCS-M

7
3.2 Product Specifications
3.2.1 LCS-D1 and LCS-D2 Specifications
VIDEO OUTPUT
Video Formats
Up to HDMI 2.0 4K60, 4:4:4
Connector
HDMI type A
EDID
Read Display EDID
SD CARD
Signal Format
SD 3.0
Connector
MicroSD Card
USB
Signal Format
USB 2.0
Connector
Type A
USB
Signal Format
USB 3.0
Connector
Type A
USB
Signal Format
USB Type-C
Connector
Type C
Phone Jack
Signal Format
Analogy Audio Output
Connector
3.5mm stereo phone jack
S/PDIF
Signal Format
Digital Audio Output
Connector
Toslink Optical
ETHERNET
Ethernet Speed
10/100/1000 Base-T
Connector
RJ-45
POWER CONSUMPTION
Voltage
+12V DC
Current (Max)
1.25A
CASE
Dimensions (LxDxH)
258 mm(L) x 123 mm(W) x 28mm(H)
Construction
Plastic
Weight
N/A

8
3.2.2 LCS-M Specifications
VIDEO OUTPUT
Video Formats
Up to HDMI 2.0 4K60, 4:4:4
Connector
HDMI type A
EDID
Read Display EDID
SD CARD
Signal Format
SD 3.0
Connector
MicroSD Card
USB
Signal Format
USB 2.0
Connector
Type A
USB
Signal Format
USB 3.0
Connector
Type C
ETHERNET
Ethernet Speed
10/100/1000 Base-T
Connector
RJ-45
POWER CONSUMPTION
Voltage
+12V DC
Current (Max)
1.25A
CASE
Dimensions (LxDxH)
210 mm(L) x 114 mm(W) x 25 mm(H)
Construction
SGCC enclosure with black textured paint finish
Weight
N/A

9
Chapter 4 Setup Guide
4.1 System architecture
4.1.1 LCS-D1 and LCS-M
⚫Requirements:
1. Several Lighcasso device LCS-D1
2. Same numbers of projector as Lightcasso device
3. One Lightcasso controller LCS-M
4. One 1G Switch
5. PC or laptop for controlling
⚫Connection diagram:
10
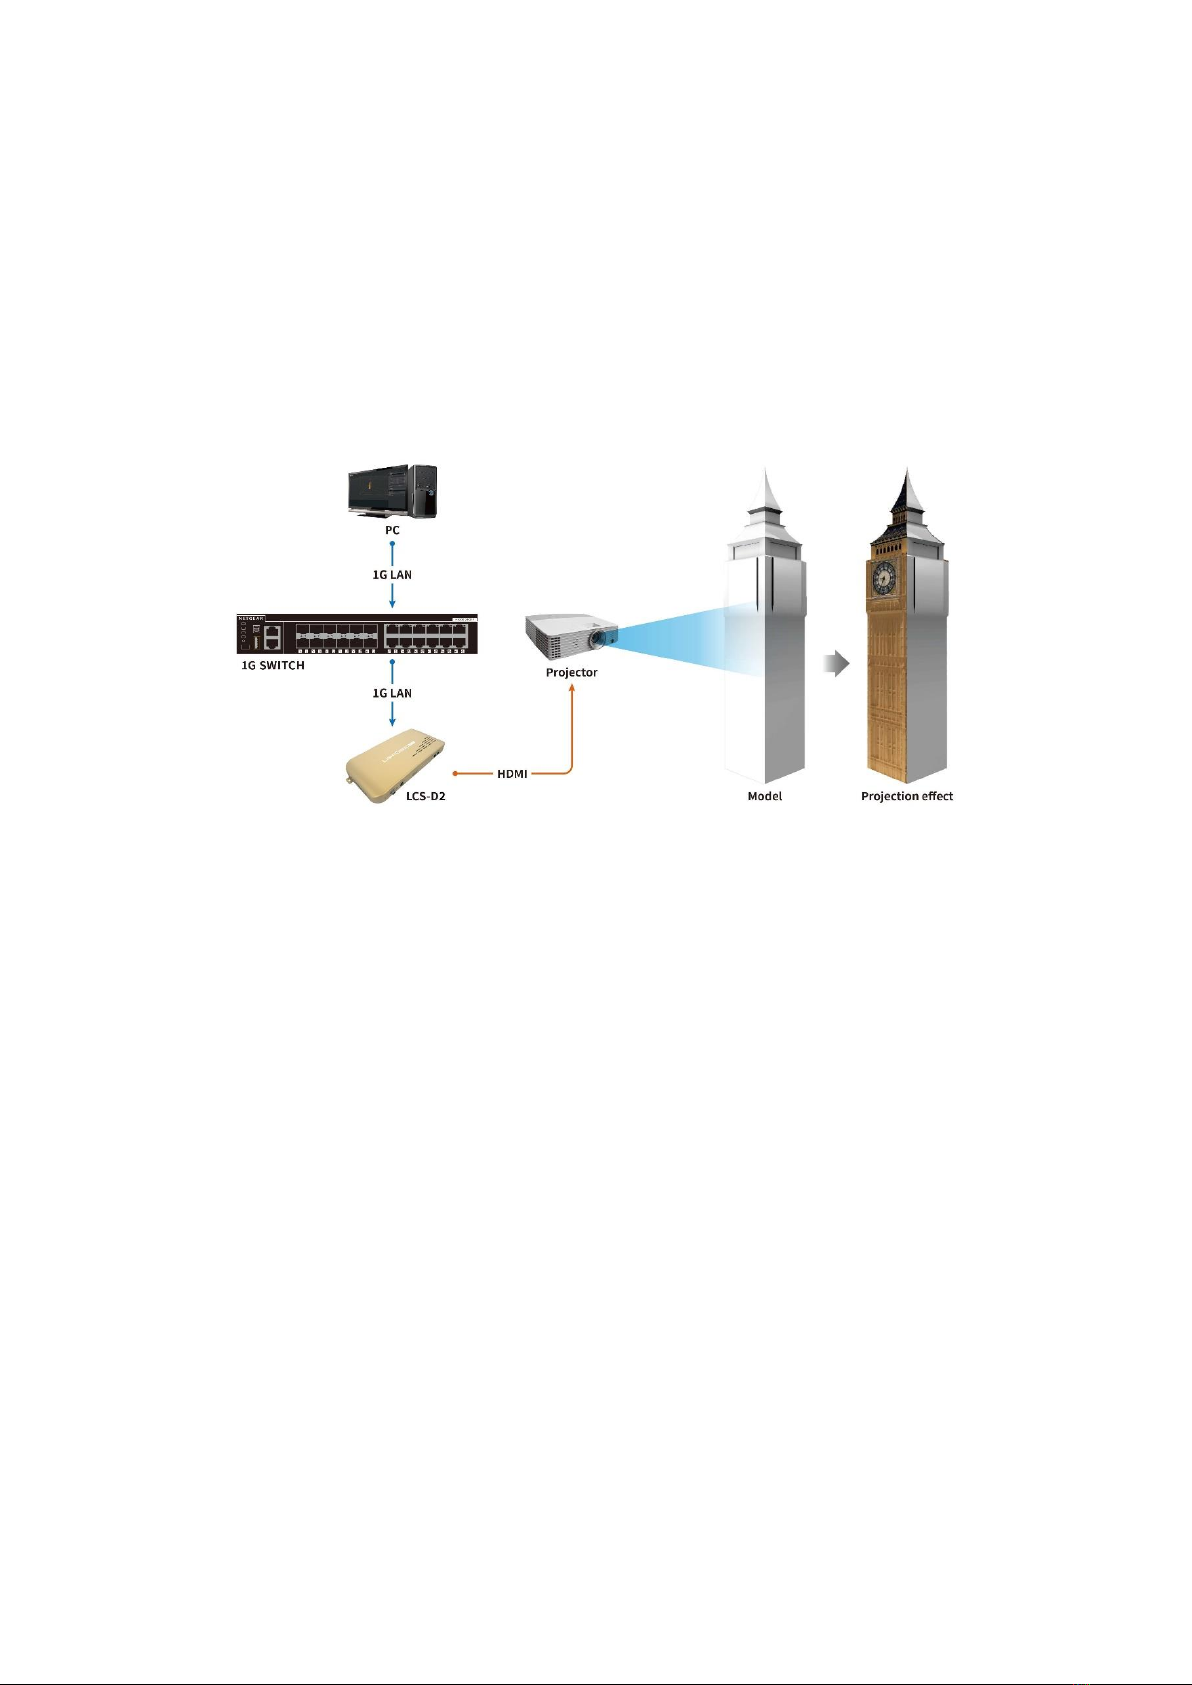
4.1.2 LCS-D2
⚫Requirements:
1. Lighcasso device LCS-D2
2. One projector
3. One 1G Switch
4. PC or laptop for controlling
⚫Connection diagram:

11
4.2 Launch Steps
4.2.1 Launch LCS-D1 or LCS-D2
1. Connect projector to the HDMI port
2. Connect Cat 5e cable to the Ethernet port
3. Connect power adapter cable to the Power Jack
4. Press power key for 3 seconds to boot device
4.2.2 Launch LCS-M
1. Connect Cat 5e cable to the Ethernet port
2. Connect power adapter cable to the Power Jack
3. Connect display device to the HDMI port for the LCS-M Information
4. Press power key for 3 seconds to boot device
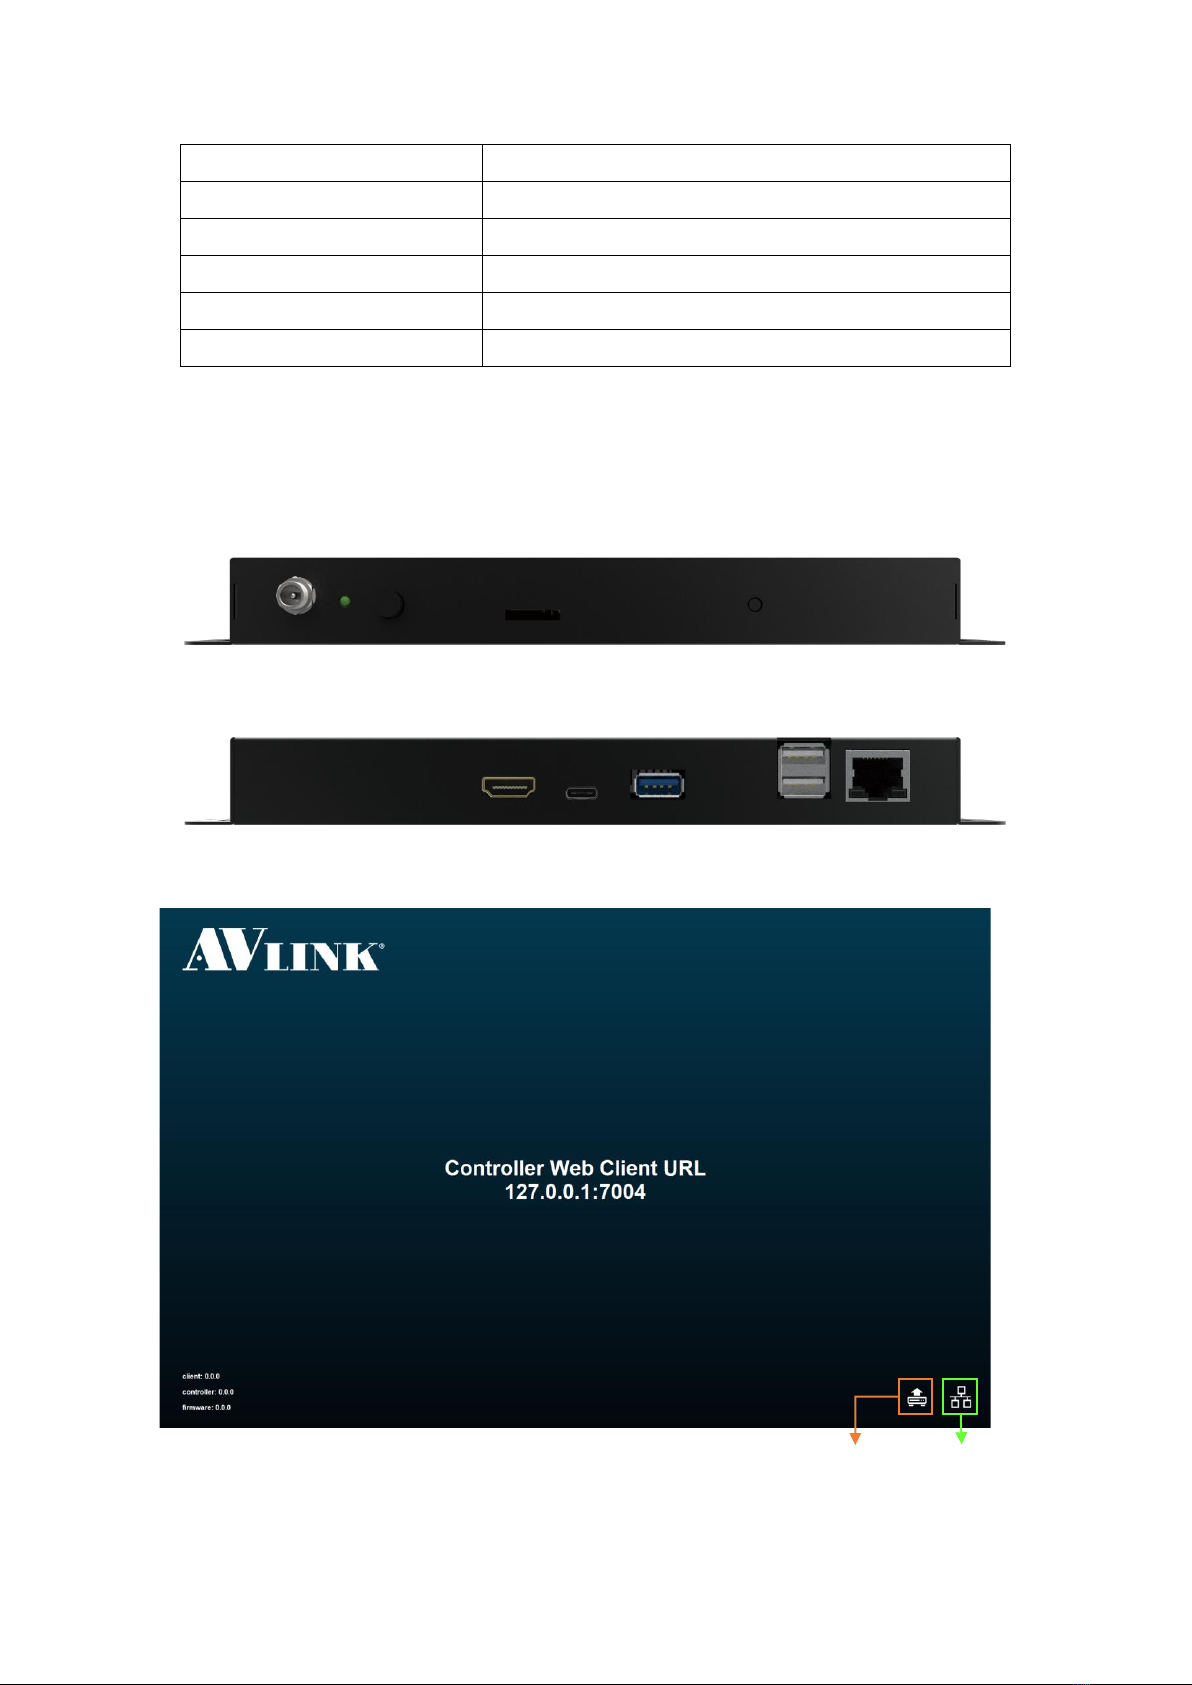
4.2.3 Launch LCS Web Client
1. Open appropriated browser
2. Find the IP address on LCS-M Information screen
or video output screen of LCS-D2.
3. Enter following URL in browser:
http://{ip_address}:7004
12
Chapter 5 Interfaces
5.1 LCS-D1 and LCS-D2 Interfaces
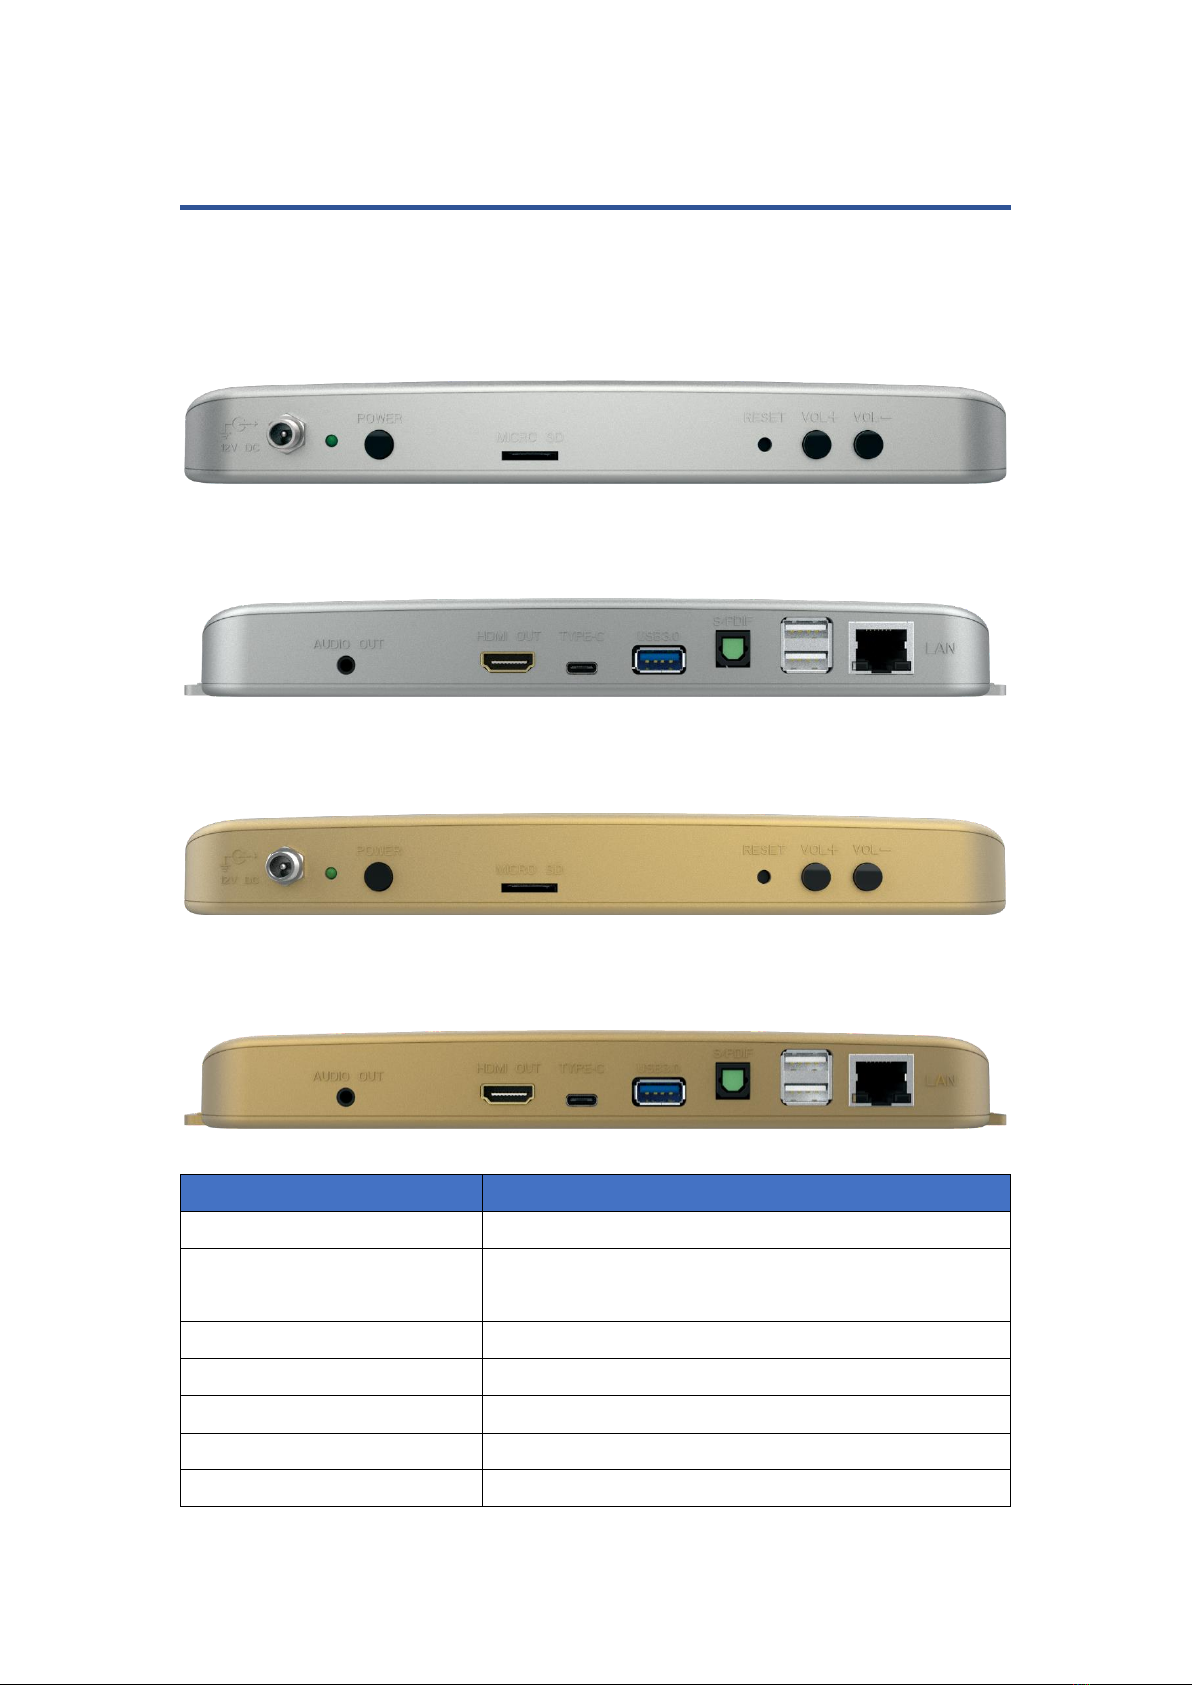
5.1.1 LCS-D1 Front Panel
5.1.2 LCS-D1 Rear Panel
5.1.1 LCS-D2 Front Panel
5.1.2 LCS-D2 Rear Panel
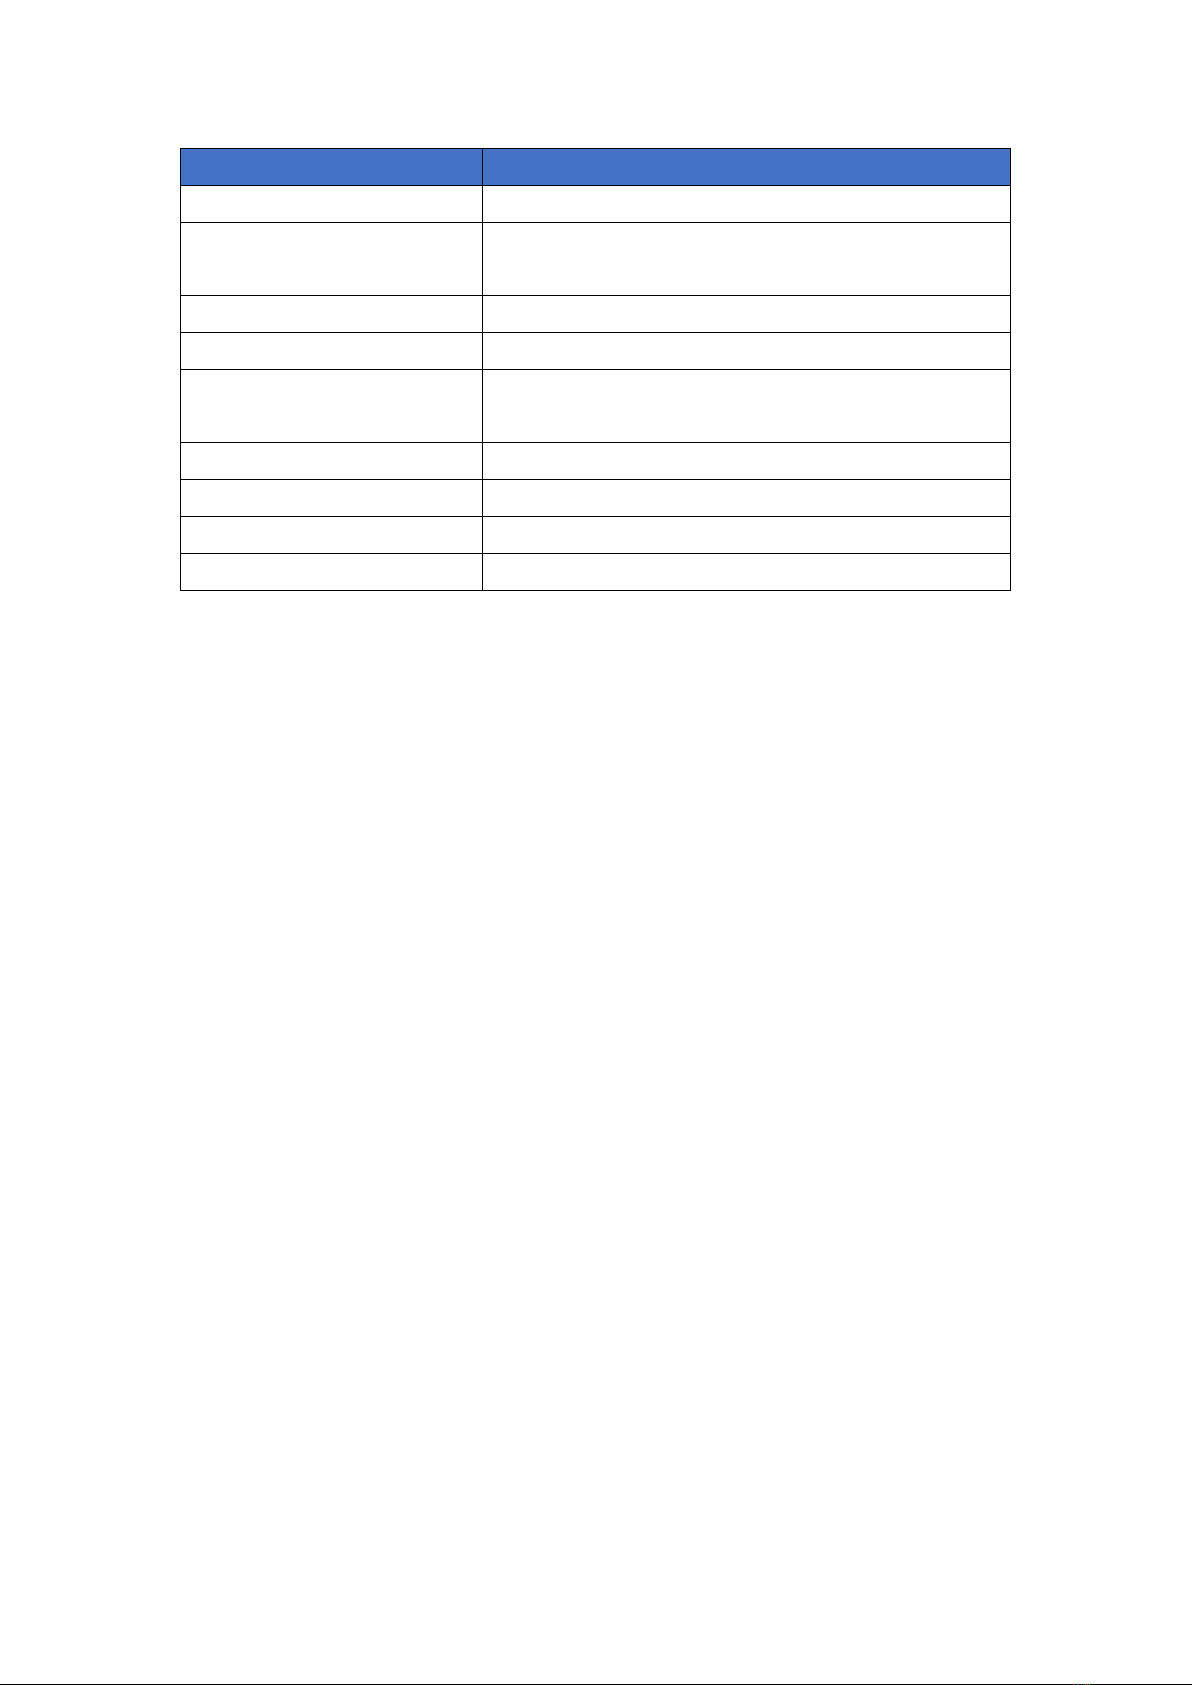
INTERFACE
DESCRIPTION
12V DC
Connected to +12V voltage adapter
POWER
Press 3 seconds to boot device.
After boot, the LED is green bright.
MICRO SD CARD
Engineer only
RESET
Press 3 seconds to reboot device
VOL +/-
Increase or decrease audio volume
AUDIO OUT
Connected to speaker
HDMI OUT
Connected to a HDMI (2.0 or above) compatible
13
5.2 LCS-M Interfaces
5.2.1 LCS-M Front Panel
5.2.2 LCS-M Rear Panel
5.2.3 LCS-M Information
Projector
TYPE-C
Engineer only
USB 3.0
Engineer only
S/PDIF
Connected to speaker
USB 2.0
Engineer only
LAN
Connected to switch
Network
Upgrade
14
INTERFACE
DESCRIPTION
DC 12V
Connected to +12V voltage adapter
POWER
Press 3 seconds to boot device
After boot, the LED is green bright
MICRO SD CARD
Engineer only
RESET
Press 3 seconds to reboot device
HDMI OUT
Connected to a HDMI (2.0 or above) compatible
Monitor
TYPE-C
Engineer only
USB 3.0
Connected to Keyboard or Mouse
USB 2.0
Connected to Keyboard or Mouse
LAN
Connected to switch

15
5.3 LCS Web Client
5.3.1 Layout
Main
Gallery
3D Viewport
Timeline
Properties
Editor
Layout top bar
Media
&
Model
File list
16
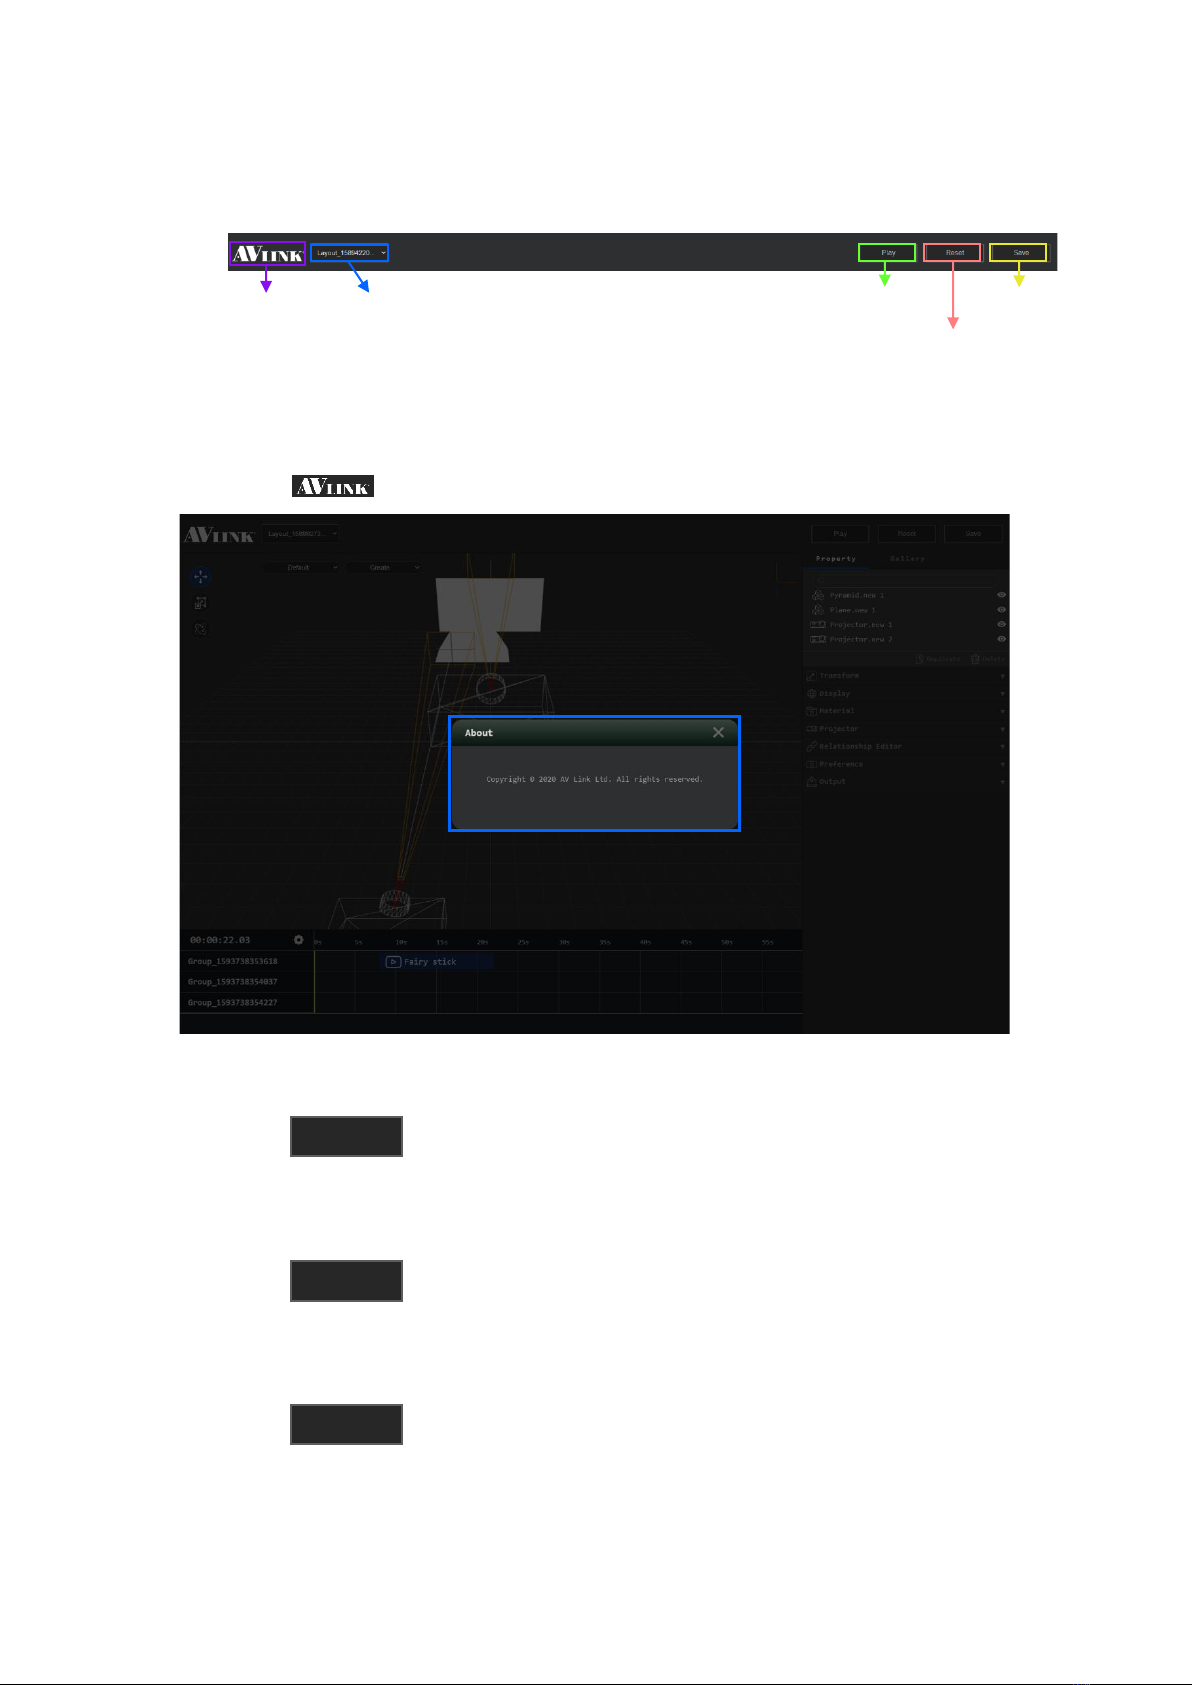
5.3.1.1 Layout top bar
5.3.1.2 Logo
⚫Click will popup Copyright info
5.3.1.3 Play layout
⚫Click to preview current layout
5.3.1.4 Reset layout
⚫Click to start over edit layout
5.3.1.5 Save layout
⚫Click to save the layout that user edited
Layout list
Play layout
Reset layout
Save layout
Logo
(About Copyright)
Save
Reset
Play
This manual suits for next models
2
Table of contents
Other AVLink Media Converter manuals

AVLink
AVLink 122.416UK User manual

AVLink
AVLink MaitreView 4KLite User manual

AVLink
AVLink HRM-212F User manual

AVLink
AVLink 100.598UK User manual

AVLink
AVLink MaitreView 4KPro User manual

AVLink
AVLink 122.417UK User manual

AVLink
AVLink IAA-22 User manual

AVLink
AVLink VH-01 User manual

AVLink
AVLink 128.827UK User manual

AVLink
AVLink HRM-2212F User manual


