axing HKI-135 User manual

HKI-135 / HKI 41/81-35
H.264/H.265 HD HDMI Encoder for
IPTV
Operation Instructions

2
Table of Contents
1. Features........................................................................................................................3
2. Package Contents........................................................................................................3
3. Hardware Description...................................................................................................4
4. Typical Application........................................................................................................4
5. Environment Configuration...........................................................................................5
5.1. Software.............................................................................................................5
5.1.1. Change the IPAddress of PC ...........................................................................5
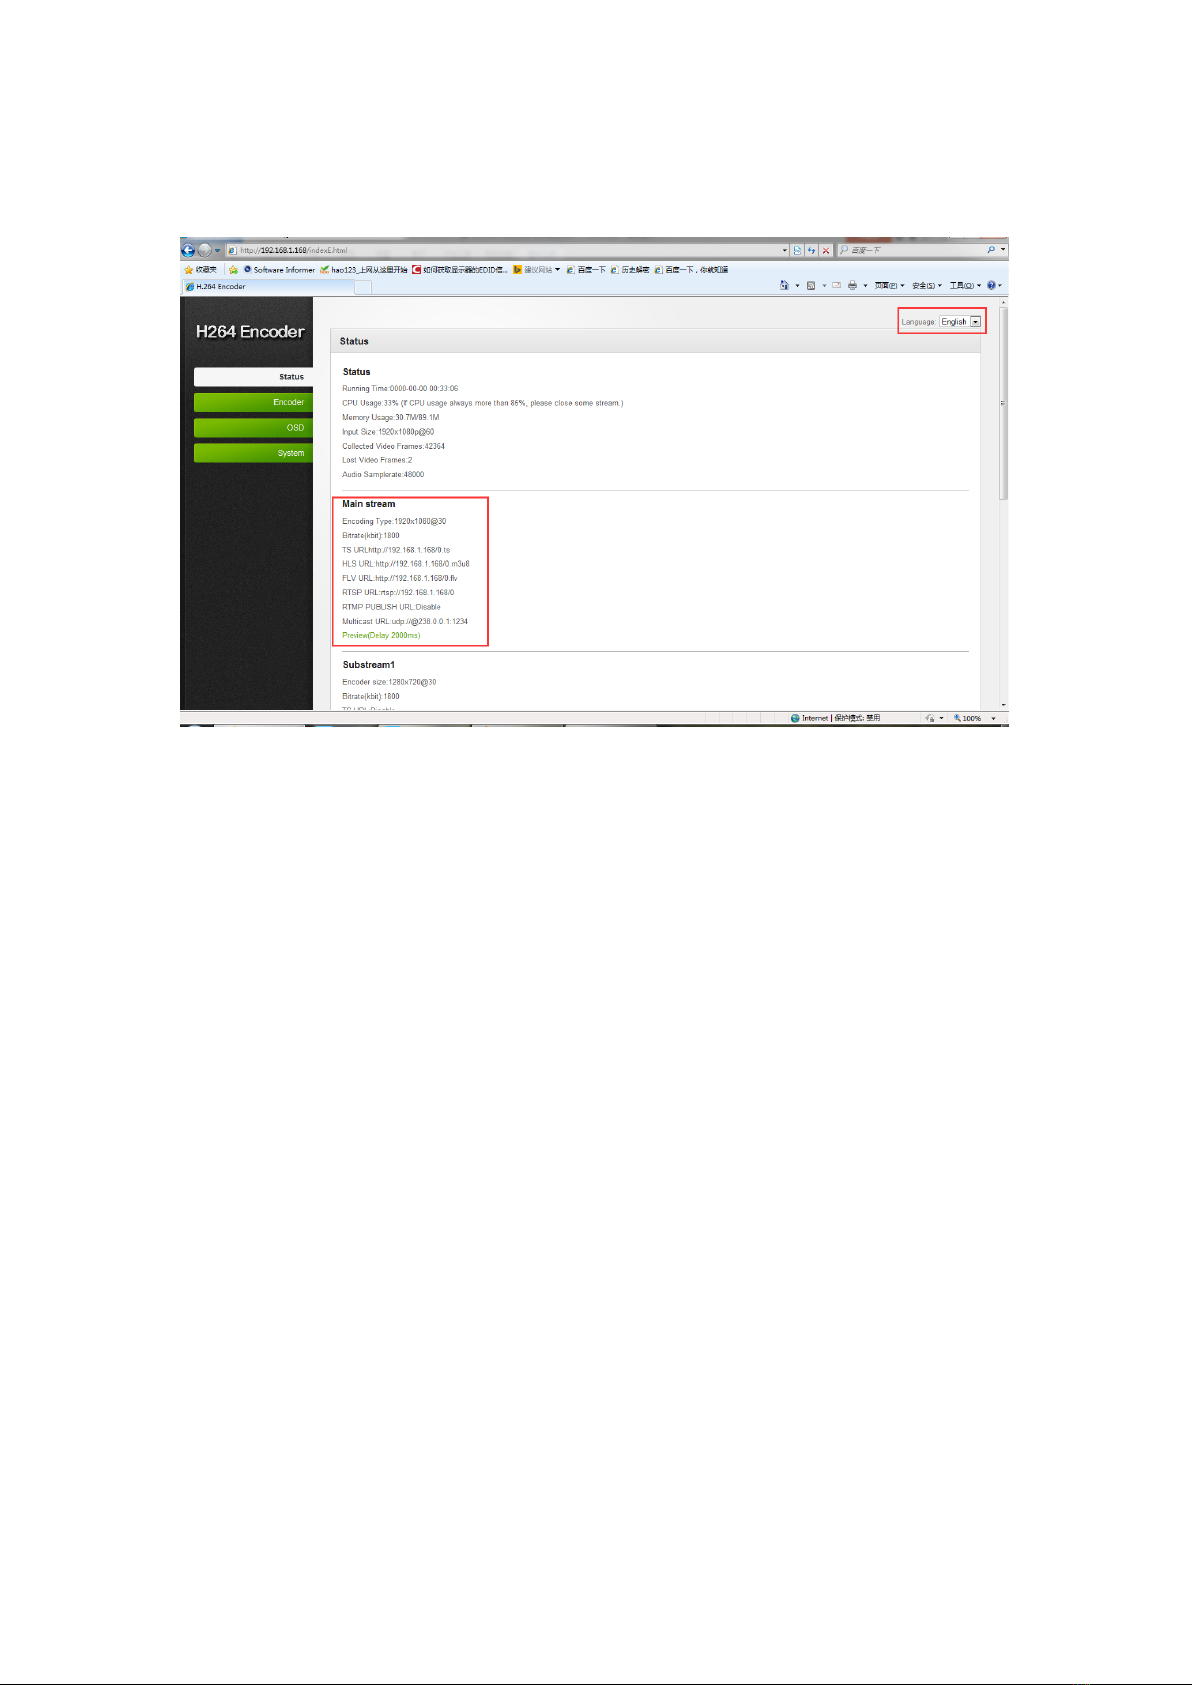
5.1.2. Login for configuration.......................................................................................6
5.1.3. Check the stream address ................................................................................6
6. Encoder Setting............................................................................................................6
6.1. Encoder Setting.................................................................................................6
6.2. Audio Setting.....................................................................................................7
6.3. Advanced...........................................................................................................7
7. OSD Setting..................................................................................................................8
7.1. Stream OSD Setting..........................................................................................8
7.2. LOGO Uploading...............................................................................................9
8. System Setting .............................................................................................................9
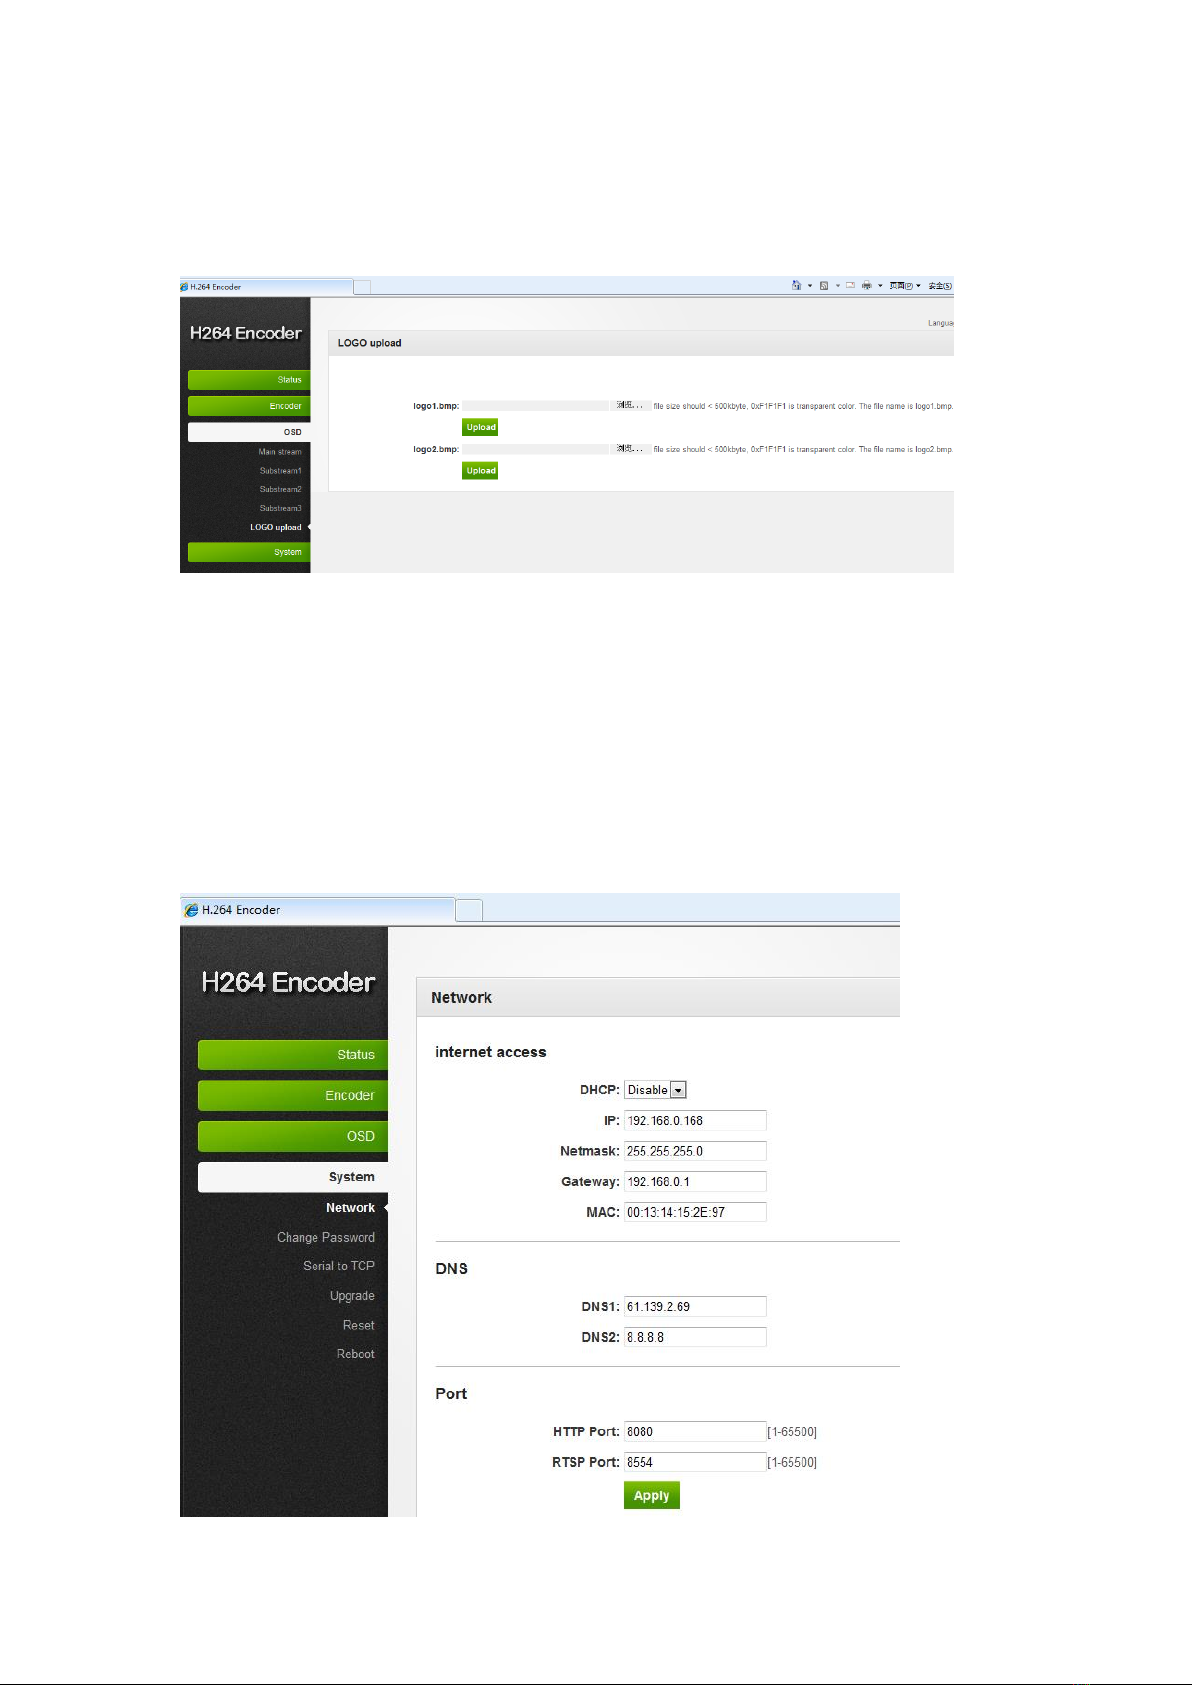
8.1. Network..............................................................................................................9
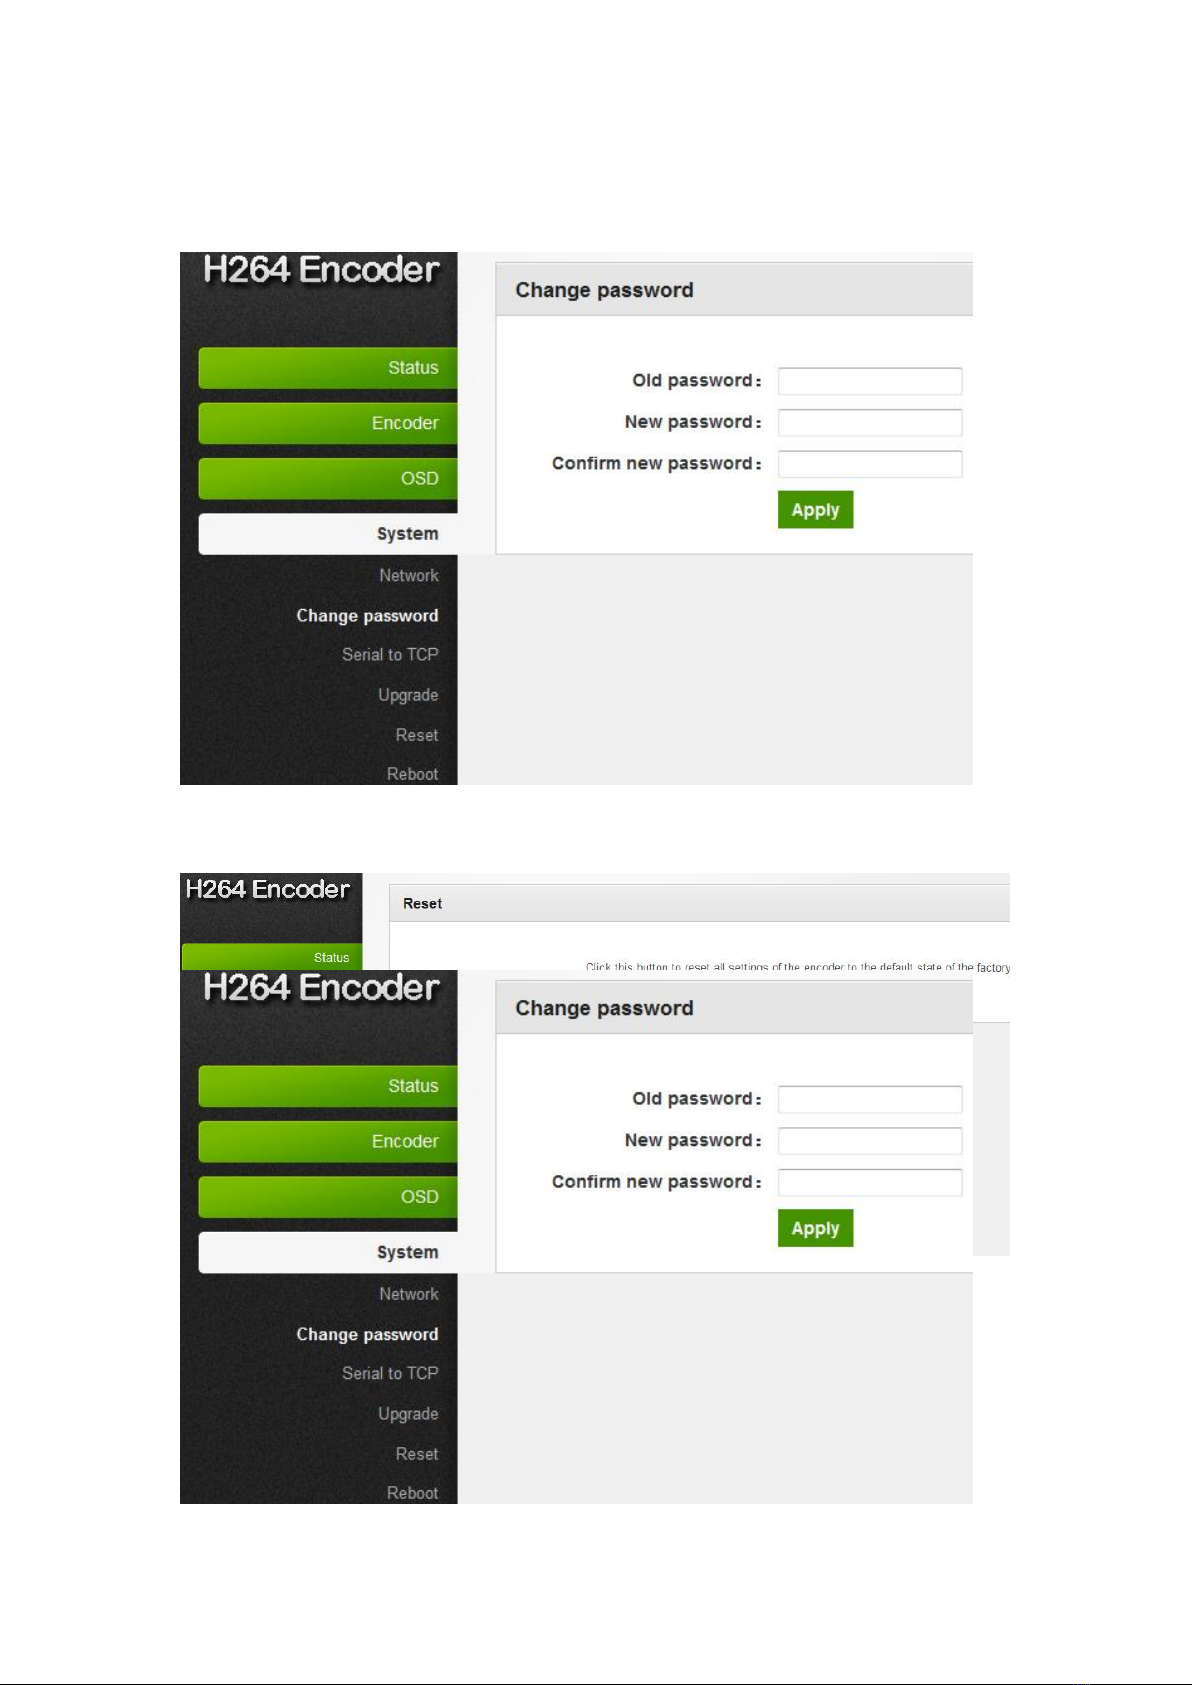
8.2. Change password............................................................................................10
8.3. Reset ...............................................................................................................10
8.4. Reboot.............................................................................................................10
9. Application..................................................................................................................11
9.1. User Application Example...............................................................................11
9.1.1. Web Video Preview.........................................................................................11
9.1.2. VLC Play..........................................................................................................12
9.2. Multi Local UserApplication Multicast Way.....................................................14
9.3. Local Surveillance SystemApplication NVR Conncetion ...............................15
9.4. Remote Multi User Application RTMP Connection.........................................16
WARRANTY......................................................................................................................16

3
Dear Customer
Thank you for purchasing this product. For optimum performance and safety, please read
these instructions carefully before connecting, operating or adjusting this product. Please
keep this manual for future reference.
1. FEATURES
➢Support H.264/H.265 encoding.
➢Support UDP, HTTP, RTSP, RTMP, ONVIF protocol.
➢Support MPEG1 Audio Layer 2.
➢CBR/VBR rate: 16Kbps~16Mbps.
➢1000M network interface uses full duplex mode.
➢Support up to 720p, 1080p@60HZ HD video input.
➢Support image parameter settings.
➢WEB interface management authority.
➢Support remote management in WAN (WEB).
➢Support resolution customized settings.
➢Support one key to restore the factory configuration.
➢SupportAudio Embedded.
2. PACKAGE CONTENTS
1). Main Unit HD HDMI Encoder
2). 1x Power adapter DC 12V
3). Operating Instruction manual

4
3. HARDWARE DESCRIPTION
①LAN output ②Indicator of the HDMI /Power input
③HDMI input port ④Reset button
⑤Audio input port ⑥Power input port
Note: . LAN: default IP is 192.168.0.168 for the unit.
. Reset to the factory default setting: press “Reset”for 10 seconds till all three
indicators go out.
4. Typical Application

5
5. Environment Configuration
5.1 Software
5.1.1 Change the IP Address of PC
Assign the PC (or laptop) IP address on the computer: “Control Panel”→ “Network
Connections”→ “Local Area Connections Status”→ “Properties”→ “Internet Protocol
(TCP/IP)”→Type the IP address with 192.168.0.XX (0-255) and Subnet mask with
255.255.255.0.After that press OK to save the configuration.
5.1.2 Login for configuration
Enter the unit IP 192.168.0.168 on browser, to open the web GUI. Login with default user
name and pass word both as admin.

6
5.1.3 Check the stream address
As below, the stream address is in the red frame.
6. Encode Setting
6.1 Encode Setting
Click Encode setting→Main stream→Setting the parameters→Click Apply

7
6.2 Audio setting
Click encode→Audio→Setting the parameters→Click apply
6.3 Advanced

8
Click Encoder→Advanced→Setting all the parameter→Click apply.
7. OSD Setting
7.1 Streaming OSD Setting
Click OSD→Network→Setting all the Parameter→Click apply, as below picture show

9
7.2 LOGO uploading
Click logo upload→provide the logo picture as the requirements→Click Apply
※Note: The screenshots might have some difference with actual operation interface due
to software upgrade, all the screenshots are for reference only, please follow up the real
operation interface.
8. System
8.1 Network
Click system→Network→Setting all the parameter→Click apply.

10
8.2 Change password
System→Change password→Set your password→Apply
8.3 Reset
System→Reset→Reset
8.4 Reboot
System→Reboot→Reboot (please refresh the web after 1 minute)

11
9. Application
9.1 User Application Example
9.1.1 Web Video Preview
Status→Main stream→Preview

13
Enter Stream URL which showed from the page of Main stream. Click “play”, You can
successfully play the video stream encoded from this device.

14
9.2 Multi Local User Application Multicast Way
If many local users need watch the video of same HD encoder at the same time, we
suggest using multicast. Enable the multicast IP, then re-power the HD encoder.
There is a multicast URL in the Status page, copy it into the VLC Player.
This address can be visited by many visitors at the same time

15
9.3 Local Surveillance System Application NVR Connection
1. Confirm if NVR support H.264 decoder. Since using ONVIF, you need enable the
"RTSP" function as below picture.
2. If you need the NVR recognize theAudio of HD Encoder, you still need enable the
Audio as below picture:

16
Note: If you've finished above setting and still can't open the video , we suggest you dow
nload the standard testing tool to test the ONVIF function of HD Encoder ( Down load ad
dress http://url.cn/2ESQRcn)
9.4 Remote Multi User Application RTMP Connection
If many users from different location need watch the source of the same HD Encoder, we
suggest you use RTMP.
Our product support belowing Free platform: NGINX, RED5 MEDIA SERVER etc.
Charged platform: ADOBE MEDIA SERVER5 and http://mudu.tv/ etc.
Since the current RTMP protocol only support H.264 function, you need set the HD Enco
der as H.264, set the RTMPAddress and enable it as below picture. Re-Start the HD en
coder after finishing the setting.

17
Note: If you have finished above setting and still can't open the video, please check as
below:
1. Check the collected data of HD Encoder, if it shows 0, then the HD Encoder connectio
n is failed; you need check if the hardware connection is correct.
2. Check the RTMP connection status, if it shows unconnected, you need check if the Net
work setting is correct (You need set the IPAddress to have access to the internet)

18
MAINTENANCE
Clean this unit with a soft, dry cloth. Never use alcohol, paint thinner of benzine to clean
this unit.
PRODUCT SERVICE
1) Damage requiring service: The unit should be serviced by qualified service personnel
if:
(a)The DC power supply cord or AC adaptor has been damaged;
(b)Objects or liquids have gotten into the unit;
(c)The unit has been exposed to rain;
(d)The unit does not operate normally or exhibits a marked change in performance;
(e)The unit has been dropped or the cabinet damaged.
2) Servicing Personnel: Do not attempt to service the unit beyond that described in
these operating instructions. Refer all other servicing to authorized servicing personnel.
3) Replacement parts: When parts need replacing ensure the service uses parts
specified by the manufacturer or parts that have the same characteristics as the original
parts. Unauthorized substitutes may result in fire, electric shock, or other hazards.
4) Safety check: After repairs or service, ask the service to perform safety checks to
confirm that the unit is in proper working condition.
WARRANTY
If your product does not work properly because of a defect in materials or workmanship,
our Company (referred to as "the warrantor" ) will, for the length of the period indicated as
below, (Parts(2)Year, Labor(90) Days) which starts with the date of original purchase
("Limited Warranty period"), at its option either(a) repair your product with new or
refurbished parts, or (b) replace it with a new of a refurbished product. The decision to
repair or replace will be made by the warrantor.
During the "Labor" Limited Warranty period there will be no charge for labor.
During the "Parts" warranty period, there will be no charge for parts. You must mail-in your
product during the warranty period. This Limited Warranty is extended only to the original
purchaser and only covers product purchased as new. A purchase receipt or other proof of
original purchase date is required for Limited Warranty service.
MAIL-IN SERVICE
When shipping the unit carefully pack and send it prepaid, adequately insured and
preferably in the original carton. Include a letter detailing the complaint and provide a day
time phone and/or email address where you can be reached.
LIMITED WARRANTY LIMITS AND EXCLUSIONS
This Limited Warranty ONLY COVERS failures due to defects in materials or workmanship,
and DOES NOT COVER normal wear and tear or cosmetic damage.
The Limited Warranty ALSO DOES NOT COVER damages which occurred in shipment,
or failures which are caused by products not supplied by warrantor, or failures which result
from accidents, misuse, abuse, neglect, mishandling, misapplication, alteration, faulty
installation, set-up adjustments, misadjustment of consumer controls, improper
maintenance, power line surge, lightning damage, modification, or service by anyone
other than a Factory Service center or other Authorized Servicer, or damage that is
attributable to acts of God.
THERE ARE NO EXPRESS WARRANTIES EXCEPT AS LISTED UNDER "LIMITED
WARRANTY COVERAGE". THE WARRANTOR IS NOT LIABLE FOR INCIDENTAL OR
CONSEQUENTIAL DAMAGES RESULTING FROM THE USE OF THIS PRODUCT, OR
ARISING OUT OF ANY BREACH OF THIS WARRNTY. (As examples, this excludes
damages for lost time, cost of having someone remove or re-install an installed unit if
applicable,
travel to and from the service, loss of or damage to media or images, data or other
recorded content. The items listed are not exclusive, but are for illustration only.)
PARTS AND SERVICE, WHICH ARE NOT COVERED BY THIS LIMITED WARRANTY,
ARE YOUR RESPONSIBILITY.
This manual suits for next models
2
Table of contents
Other axing Media Converter manuals

axing
axing HoE 1-00 User manual

axing
axing HKI 81-34 User manual

axing
axing Basic-line AVC 1-00 User manual

axing
axing HKC 1-00 User manual

axing
axing Premium EOC 30-01 User manual

axing
axing basic-line DCC 1-00 User manual

axing
axing RF DTM-8HD/C-19S User manual

axing
axing premium-line SVE 5502-09 User manual

axing
axing HKI 41-34 User manual

axing
axing SAB 5501-10 User manual