Bahco BH1AOZ2000A User manual

www.bahco.com.au
ORIGINAL INSTRUCTIONS
BH1AOZ2000A 1 Rev. 012919
BH1AOZ2000A
AS 2615:2016
Consult the vehicles manufacturer’s
manual prior to lifting the vehicle.
Conduct a pre-operational check
of the equipment.

GHES450
BH1AOZ2000A 2
Rev. 012919
SAFETY WARNINGS
MUST READ INSTRUCTIONS BEFORE USE
• Read, study, understand, & follow all instructions before using.
• Failure to heed these warnings may result in serious or fatal personal injury and/or property damage.
• Inspectthejackbeforeeachuse.Donotusejackifdamaged,altered,modied,inpoorcondition,leaking
hydraulicuid,orunstableduetolooseormissingcomponents.Makecorrectionsbeforeusing.
• Do not use jack beyond its rated capacity. Do not shock load.
• This is a lifting and lowering device only. Immediately after lifting, support the vehicle with two support
stands capable of sustaining the load before working on the vehicle.
• Use only on a hard level surface free from obstructions so the jack is free to reposition itself during lifting and
lowering operations.
• Liftonlyonareasofthevehicleasspeciedbythevehiclemanufacturer.
• Chock the unlifted wheels of the vehicle.
• No person should remain in a vehicle that is being lifted.
• Center load on saddle. Be sure setup is stable before working on vehicle.
• Do not move or dolly the vehicle while on the jack.
• Do not use any materials that may serve as risers, spacers or extenders between the stock lifting saddle and the
load.
• Do not use any adaptors that replace the stock lifting saddle unless approved or supplied by the manufacturer.
• Do not use (or modify) this product for any other purpose than that for which it was designed.
REFER TO VEHICLE MANUFACTURER’S
MANUAL FOR INSTRUCTIONS
SAVE THESE INSTRUCTIONS
DEATH OR INJURY
FROM INCORRECT USE USE TWO
SUPPORT STANDS
FLAT HARD
LEVEL GROUND FREE TO ROLL DURING
LIFTING AND LOWERING

BH1AOZ2000A 3
Rev. 012919
• Consult the vehicle manufacturer’s manual prior to the lifting of the vehicle.
• Conduct a pre-operational check of the equipment.
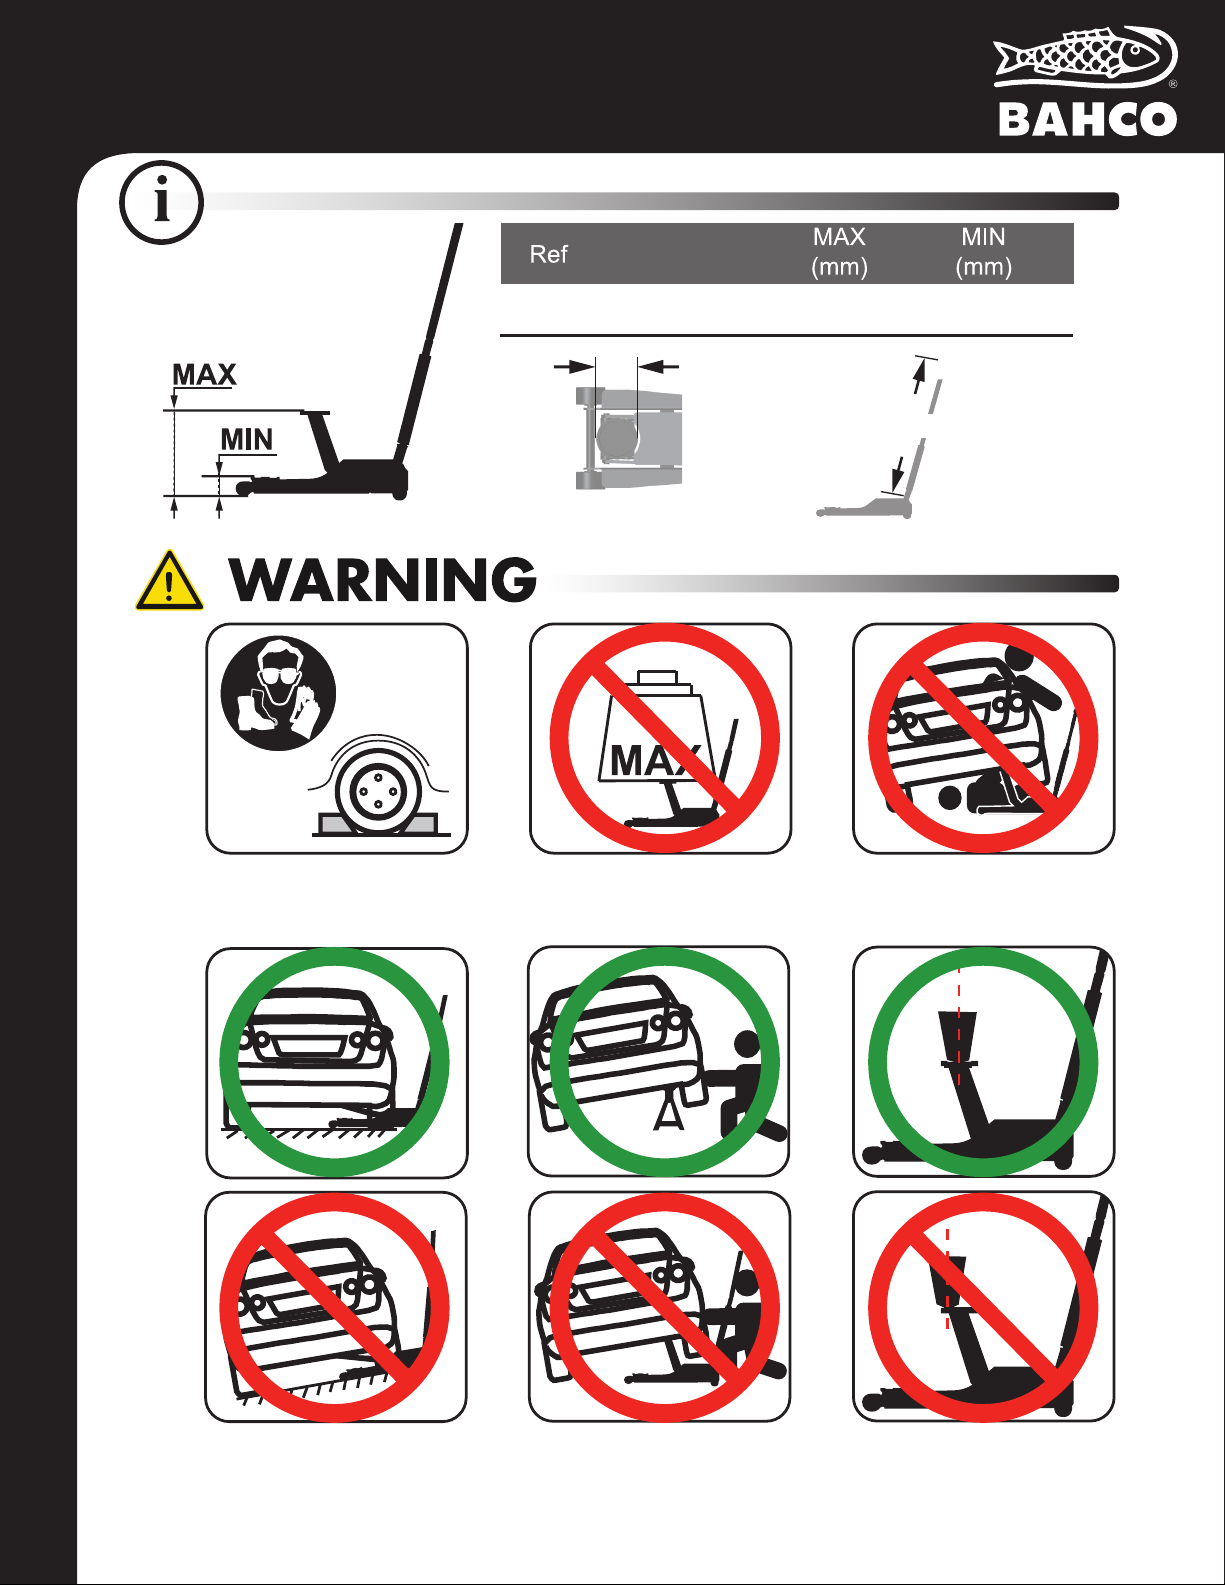
• Use the hydraulic trolley jack for lifting and lowering only; the raised vehicle should be supported on suitably rated vehicle
support stands.
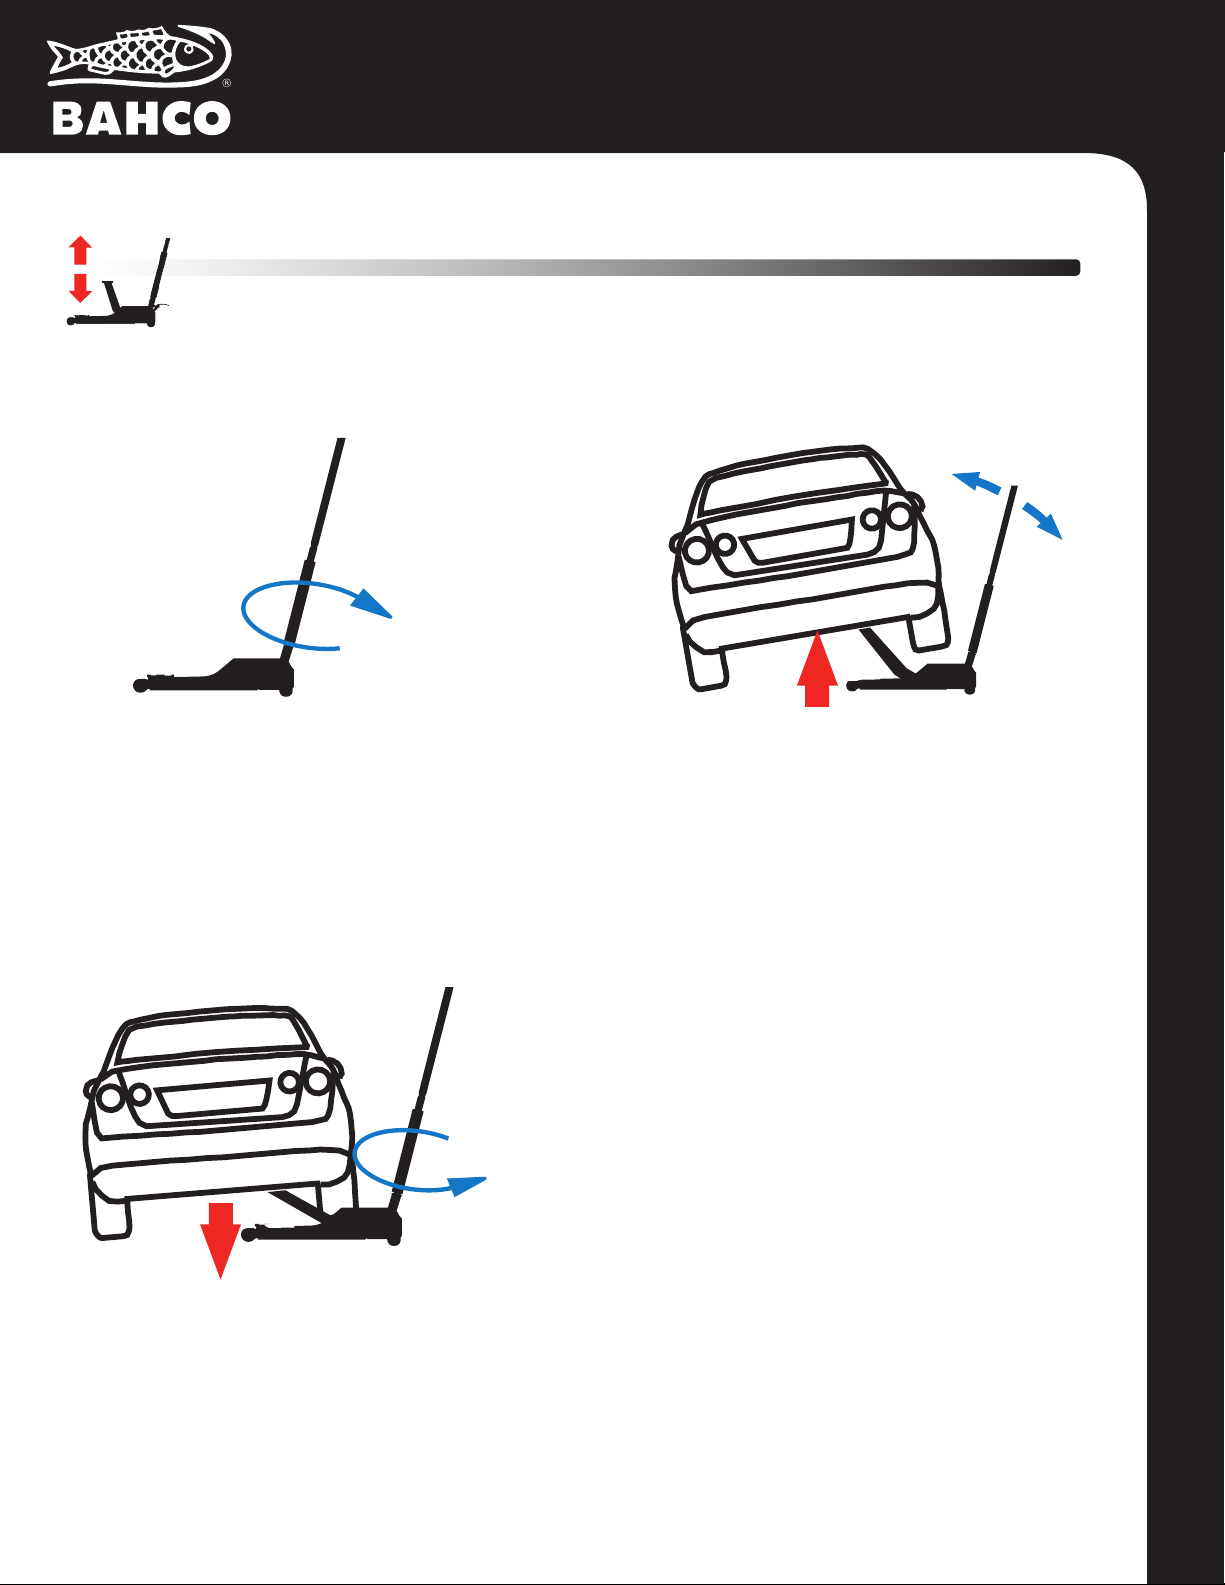
• Use the hydraulic trolley jack on a hard level surface and ensure it is free to roll during lifting and lowering.
• No person should remain in a vehicle that is being lifted.
• Chock the unlifted wheels of the vehicle.
• Centrally locate the load on the head cap.
• Support the vehicle on suitably rated vehicle support stands and remove the hydraulic trolley jack prior to
commencement of work on the vehicle.
• No person should get bodily under a vehicle that is supported only by a hydraulic trolley jack.
• Modicationsmustnotbecarriedoutoraccessoriesadded.
PREVENTATIVE MAINTENANCE
Obey all instructions to avoid possible injury or death.
1. Always store the jack in a well protected area where it will not be exposed to inclement weather, corrosive vapors,
abrasive dust, or any other harmful elements. The jack must be cleaned of water, snow, sand, grit, oil, grease or other
foreign matter before using.
2. The jack must be lubricated periodically in order to prevent premature wearing of parts. A general purpose grease
must be applied to all zerk grease fittings, caster wheels, front axle, elevator arm, handle base pivot bolts, release
mechanism and all other bearing surfaces. Worn parts resulting from inadequate or no lubrication are not eligible for
warranty consideration.
3. It should not be necessary to refill or top off the reservoir with hydraulic fluid unless there is an external leak.
An external leak requires immediate repair which must be performed in a dirt-free environment by an authorized
service center.
IMPORTANT: In order to prevent seal damage and jack failure, never use alcohol, hydraulic brake fluid or transmission
oil in the jack.
Use Chevron Hydraulic Oil AW ISO 32 or its equivalent Unocal Unax AW 150.
4. Every jack owner is responsible for keeping the jack labels clean and readable. Use a mild soap solution to wash
external surfaces of the jack but not any moving hydraulic components.
5. Inspect the jack before each use. Do not use the jack if any component is cracked, broken, bent, shows sign of
damage or leaks hydraulic fluid. Do not use the jack if it has loose or missing hardware or components, or is modified
in any way. Take corrective action before using the jack again.
6. Any hydraulic repairs within the warranty period must be performed by an authorized service center.
IMPORTANT: Service jacks are designed for lifting purposes only; always support raised load with jack stands.
REGULAR MAINTENANCE
MONTHLY or as necessary (depending on usage)
1. Using a grease gun, add grease to grease fitting in the lift arm pivot shaft.
(Use a multi-purpose NLGI type grease only.)
2. Lubricate all linkages and pivot points. (Use white lithium spray grease only.)
3. Remove handle; lubricate handle receptacle and handle end. (Use white lithium spray grease only.)
4. Lubricate both rear casters, bearing and both front wheels. (Use white lithium spray grease only.)
5. Tighten all accessible hardware.

GHES450
BH1AOZ2000A 4
Rev. 012919
Refilling The Hydraulic System
1. Remove the #7 metal cover. Remove the fill screw in the #5 pump reservoir.
2. Make sure the jack is on a flat level surface. Rotate the #9 pump action bar counterclockwise to lower the jack’s
lift arm all the way down and position the pump action bar parallel to the ground.
3. Dispense hydraulic jack oil through the fill screw hole in the #5 jack’s reservoir and make sure the fluid level is no
higher than the top of the cylinder inside the reservoir tube.
4. Reinstall the fill screw in the jack’s reservoir and the #7 metal cover on the jack and follow the Gas Purging
iinstructions on page 6.
FILL SCREW
FLUID LEVEL RESERVOIR TUBE
CYLINDER

BH1AOZ2000A 5
Rev. 012919
ITEM# PART CODE DESCRIPTION
1 BH1AOZ2000-01 SADDLE PAD
2 BH1AOZ2000-02 SADDLE
3 BH1A2500-03 2 FRONT FIX WHEELS
4 BH1AOZ2000A-04 2 REAR ROTATING WHEELS
5 BH1AOZ2000-05 PUMP
6 BH1A2500-06 LATERAL U-SHAPED HANDLE
7 BH1A2500-07 METAL COVER
8 BH1A2500-08 HANDLE YOKE
9 BH1A2500-09 PUMP ACTION BAR

GHES450
BH1AOZ2000A 6
Rev. 012919
Plug the swivel handle into the jack.
Tighten the locking screw.
Clockwise
turn the handle to
completely close the
release valve.
Pumping the handle
up and down for at
least 5 times.
With the handle in a horizontal position
closest to the floor. Turn the handle
counter clockwise to completely
close the release valve to purge
all gas inside the oil
Gas Purging
1. 2. 3.
Handle Assembly

BH1AOZ2000A 7
Rev. 012919
Clockwise turn the handle
to completely close
the release valve.
1.Turn off release valve 2.Lift vehicle
3.Lower vehicle
Pumping the handle up
and down to lift the vehicle.
Counter-clockwise
and slowly rotate the
handle to lower the vehicle.
Lifting and Lowering

GHES450
BH1AOZ2000A 8
Rev. 012919
>
BH1AOZ2000A
2000 482 95
Personal protection equipment
is required before operation.
The unlifted wheels of the
vehicle should be chocked.
Loading can not
exceed maximum capacity.
No person should remain in a vehicle
that is being lifted. No person should
get bodily under a vehicle that is supported
by a hydraulic trolley jack.
The trolley jack should be used
on a hard level surface and be
free to roll during lifting and lowering.
This hydraulic trolley jack should
be used for lifting and lowering only;
The raised vehicle should be
supported on two vehicle support stands.
The load should be centrally
located on the head cap.
Cap diameter:120mm
Handle length:1210mm
WORKING
LOAD LIMIT
(kg)
2000

BH1AOZ2000A 9
Rev. 012919

GHES450
BH1AOZ2000A 10
Rev. 012919
Hereby declares that the device:
Was manufactured in conformity with the provisions in the:
Quality manager / Signature:
DECLARATION OF CONFORMITY
Type: BH1AOZ2000A Type: 2019
Type: Jack
AS 2615:2016
SNA E Australia PO Box 98, Hoxton Park, NSW 2171 Australia
Table of contents
Other Bahco Jack manuals
Popular Jack manuals by other brands

Cattini Oleopneumatica
Cattini Oleopneumatica Yak 214/P Operating and maintenance manual

Maurer
Maurer 80927 instruction manual

Ultra-tow
Ultra-tow 603645 owner's manual

Mega
Mega TJ-6 A Operation and maintenance instructions

K Tool International
K Tool International KTI-61201 owner's manual

Clarke
Clarke CTJ10GLS Operation & maintenance instructions