Baofeng Pofung UV-6R User manual

DUAL BAND/DUAL DISPLAY RADIO
UV-6R
OPERATING MANUAL

PREFACE
Thank you for purchasing UV-5R Ama eur Por able Radio, which is a dual band/dual display radio.
This easy- o-use radio will deliver you secure, ins an and reliable communica ions a peak
efficiency. Please read his manual carefully before use. The informa ion presen ed herein will help
you o derive maximum performance from your radio.

CONTENT
1.-SAFETY INFORMATION
2.-FEATURES AND FUNCTIONS
3.-UNPACKING AND CHECKING EQUIPMENTS
4.- OPTIONAL ACCESSORIES
5.- INSTALLATION OF ACCESSORIES
5.1.- INSTALLING THE ANTENNA
5.2.- INSTALLING THE BELT CLIP
5.3.- MICRO-HEADSET INSTALLATION OF EXTERNAL
5.4. – BATTERY INSTALLATION
.-BATTERY CHARGING
7.-BATTERY INFORMATION
7.1.-INITIAL USE
7.2.-BATTERY TIPS
7.3.-PROLONG BATTERY LIFE
7.4.-BATTERY STORAGE
8.-PARTS, CONTROLS AND KEYS
8.1.-RADIO OVERVIEW
8.2.- COMMAND/KEY DEFINITION
9.-‘LCD’ DISPLAY
10.- 1750 Hz TONE FOR ACCESS TO REPEATERS
11.1.-RADIO ON-OFF/VOLUME CONTROL
11.2.- SELECTING A FREQUENCY OR CHANNEL
12-ADVANCED OPERATION
12.1.-SET MENU DESCRIPTION

12.2.-SHORTCUT MENU OPERATION
12.3.-“SQL” (SQUELCH)
12.4.-FUNCTION “VOX” (VOICE OPERATED TRANSMISSION)
12.7.-TOT(TRANSMISSION TIMER)
12.8.-CTCSS/DCS
12.9.- ANI
12.10.- DTMFST (DTMF TONE OF TRANSMITTING CODE )
12.11.- SC-REV(SCAN RESUME METHOD)
12.12.- PTT-ID(PTT OR RELEASE PTT TO TRANSMIT THE SIGNAL CODE)
12.13-BCL(BUSY CHANNEL LOCKOUT)
12.14.- SFT-D(DIRECTION OF FREQUENCY SHIFT)
12.15.- OFFSET(FREQUENCY SHIFT)
12.1 .-STE(STE TAIL TONE ELIMATION)
13.-CTCSS TABLE
14.-DCS TABLE
15.-TECHNICAL SPECIFICATION
15.1.-GENERAL
15.2. – TRANSMITTER
15.3. - RECEIVER
1 .-TROUBLESHOOTING
17.-WARRANTY

1.-SAFETY INFORMATION:
The following safe y precau ions shall always be observed during opera ion, service and repair of his
equipmen .
◇ This equipmen shall be serviced by qualified echnicians only.
◇ Do no modify he radio for any reason.
◇ Use only BAOFENG supplied or approved ba eries and chargers.
◇ Do no use any por able radio ha has a damaged an enna. If a damaged an enna comes in o con ac wi h
your skin, a minor burn can resul .
◇ Turn off your radio prior o en ering any area wi h explosive and flammable ma erials.
◇ Do no charge your ba ery in a loca ion wi h explosive and flammable ma erials.
◇ To avoid elec romagne ic in erference and/or compa ibili y conflic s, urn off your radio in any area where
pos ed no ices ins ruc you o do so.
◇ Turn off your radio before boarding an aircraf . Any use of a radio mus be in accordance wi h airline
regula ions or crew ins ruc ions.
◇ Turn off your radio before en ering a blas ing area.
◇ For vehicles wi h an air bag, do no place a radio in he area over an air bag or in he air bag deploymen
area.
◇ Do no expose he radio o direc sunligh over a long ime, nor place i close o hea ing source.
◇ When ransmi ing wi h a por able radio, hold he radio in a ver ical posi ion wi h he microphone 3 o 4
cen ime ers away from your lips. Keep an enna a leas 2.5 cen ime ers away from your body when ransmi ing.
!
2.-FEATURES AND FUNCTIONS:
-Dual-band handheld ransceiver wi h display func ion menu on he display "LCD".
- DTMF encoded.
- Commercial FM radio receiver (65 MHz ~ 108 MHz).
- Incorpora es 105 codes "DCS" and 50 privacy codes "CTCSS" programmable.
- Func ion "VOX" (voice opera ed ransmission).
- Alarm func ion.
- Up o 128 memory channels.
- Broadband (Wide) / Narrowband (Narrow), selec able.
- High power / low (5 W/1 W) selec able.
- Display illumina ion and programmable keyboard.
- Func ion "beep" on he keyboard.

- Dual Wa ch/dual recep ion .
- Selec able Frequency S ep 2.5/5/6.25/10/12.5/25 kHz.
- Func ion "OFFSET" (frequency offse for repea er access).
- Ba ery saving func ion "SAVE".
- Timer ransmission "TOT" programmable.
- Selec ing he Scan Mode.
- Func ion Busy Channel Lock "BCLO".
- Buil -in RX CTCSS/DCS scan
- Buil -in LED flashligh .
- Programmable by PC.
- Level Threshold "Squelch" adjus able from 0 o 9.
-Crossband recep ion/ ransmission
-Tone end of ransmission
- Buil -in key lock
3.-UNPACKING AND CHECKING EQUIPMENTS:
Carefully unpack he ransceiver. We recommend ha you iden ify he i ems lis ed in he following
before discarding he packing ma erial. If any i ems are missing or have been damaged during
shipmen , please con ac your dealers immedia ely.
Note:
- Items included in the package, may differ from those listed in the table above depending
on the country of purchase. For more information, consult your dealer or vendor.
4.- OPTIONAL ACCESSORIES:
"#$%
5.- INSTALLATION OF ACCESSORIES:

5.1.- INSTALLING THE ANTENNA:
Ins all he an enna as shown in he figure below and urn i clockwise un il i s ops.
"!&$
!
"'()*&
++%!%,
-
".$
%$%
"%
5.2.- INSTALLING THE BELT CLIP:
If necessary, ins all he bel clip a he rear of he ba ery compar men cover as
shown in he figure below.
".(!-'$
/%!0!
5.3.- MICRO-HEADSET INSTALLATION OF EXTERNAL:
Plug he ex ernal micro-headse connec or in o he jack of ‘SP. & MIC’
of he ransceiver as shown in he figure below.

5.4. – BATTERY INSTALLATION:
-When a aching he ba ery, make sure he ba ery is in parallel and in good con ac wi h he
aluminum chassis. The ba ery bo om is abou 1 o 2 cen ime ers below he bo om of he radio’s
body.
-Align he ba ery wi h he guide rails on he aluminum chassis and slide i upwards un il a ‘click’ is
heard.
-The ba ery la ch a he bo om locks he ba ery.
-Turn off he radio before removing he ba ery.
-Slide he ba ery la ch, a he bo om of he radio’s body, in he direc ion indica ed by he arrow.
-Slide down he ba ery for abou 1 o 2 cen ime ers, and hen remove he ba ery from he radio’s
body.
.-BATTERY CHARGING:
Use only he charger specified by he manufac urer. The charger’s LED indica es he charging
progress.
CHARGING STATUS LED INDICATION
S andby (no-load) Red LED flashes,while Green LED glows
Charging Red LED solidly glows
Fully Charged Green LED solidly glows
Error Red LED flashes,while Green LED glows
Please follow hese s eps:

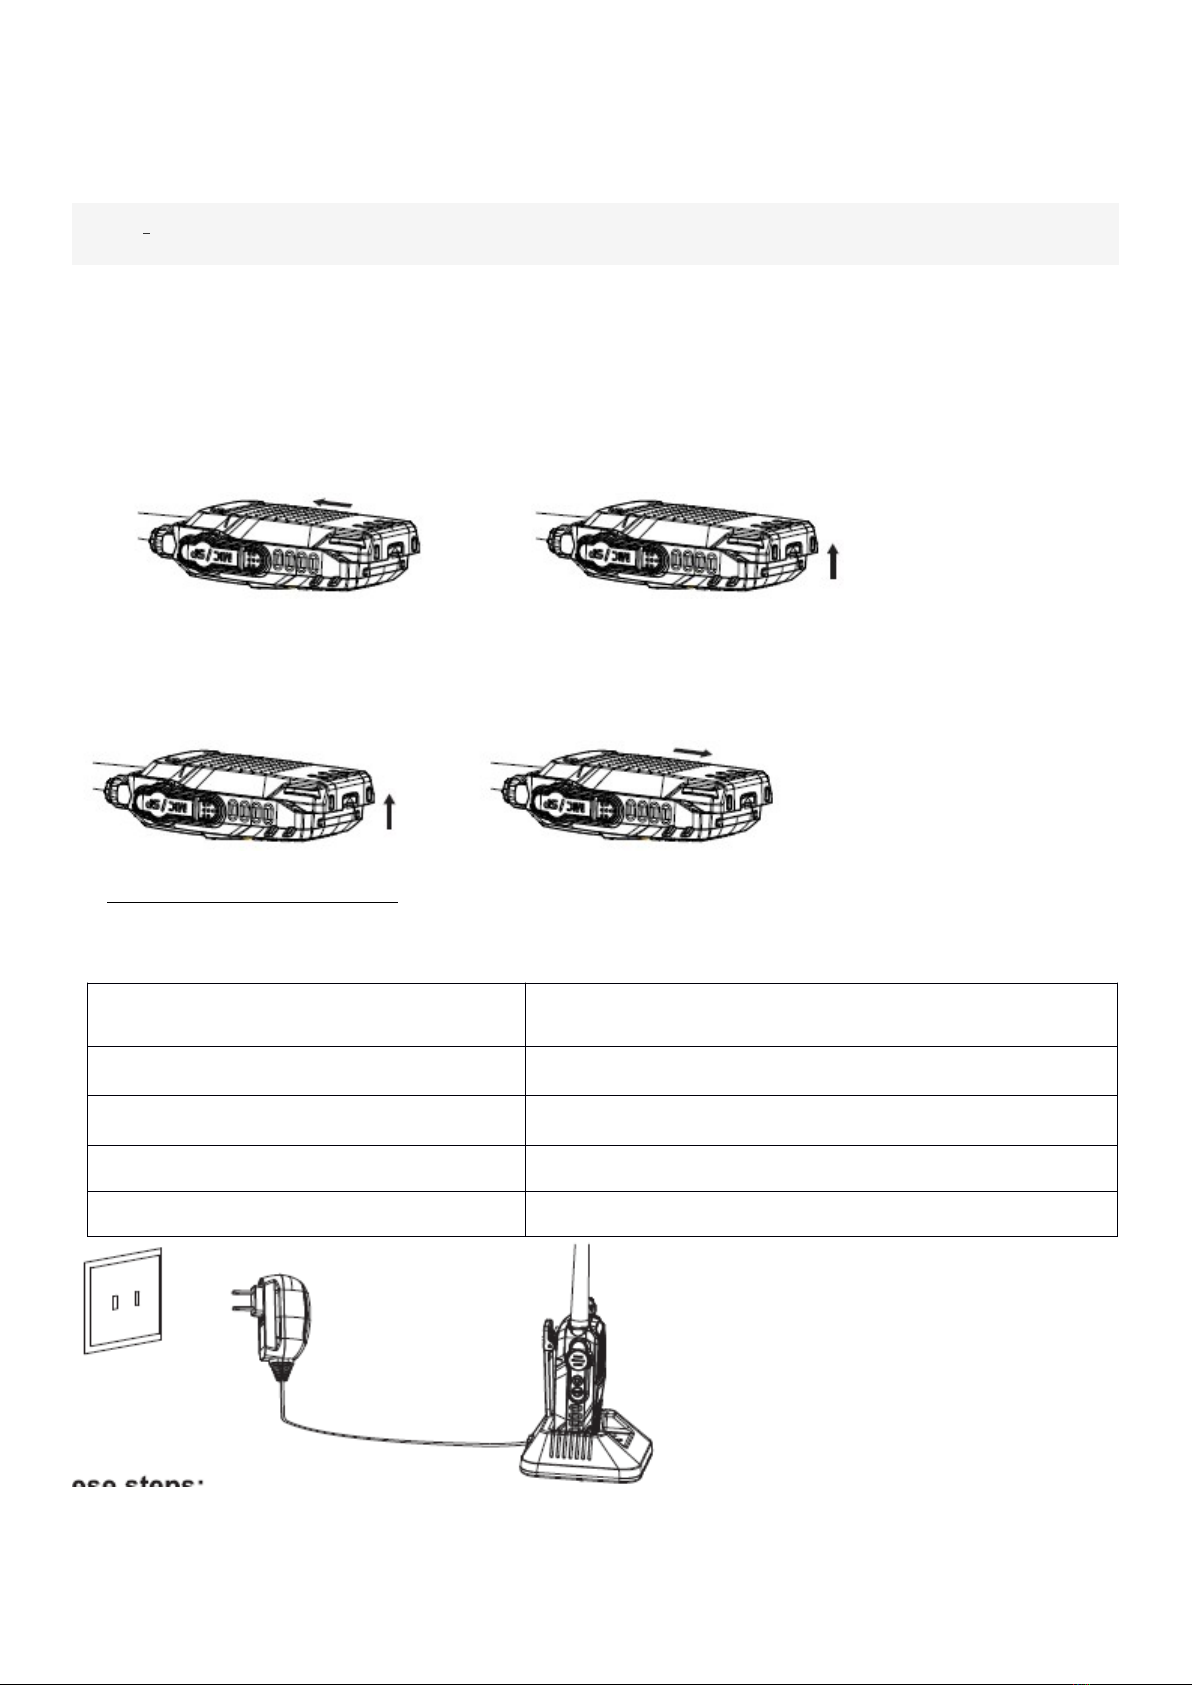
1. Plug he power cord in o he adap er.
2. Plug he AC connec or of he adap er in o he AC ou le socke .
3. Plug he DC connec or of he adap er in o he DC socke on he back of he charger.
4. Place he radio wi h he ba ery a ached, or he ba ery alone, in he charger.
5. Make sure he ba ery is in good con ac wi h he charging erminals. The charging process
ini ia es when he red LED ligh s.
6. The green LED ligh s abou 4 hours la er indica ing he ba ery is fully charged. Then remove
he radio wi h he ba ery a ached or he ba ery alone from he charger.
7.-BATTERY INFORMATION:
7.1.-INITIAL USE
New ba eries are shipped uncharged fully from he fac ory. Charge a new ba ery for 5 hours
before ini ial use. The maximum ba ery capaci y and performance is achieved af er hree full
charge/discharge cycles. If you no ice he ba ery power runs low, please recharge he ba ery.
WARNING:"/(1!0$-20
!1$$!
"/%($1$0-3
".$0!!4!!5.$
"%0$0
7.2.-BATTERY TIPS:
1. When charging your ba ery, keep i a a empera ure among 5℃ - 40℃. Tempera ure ou of
he limi may cause ba ery leakage or damage.
2. When charging a ba ery a ached o a radio, urn he radio off o ensure a full charge.
3. Do no cu off he power supply or remove he ba ery when charging a ba ery.
4. Never charge a ba ery ha is we . Please dry i wi h a sof clo h prior o charge.
5. The ba ery will even ually wear ou . When he opera ing ime ( alk- ime and s andby ime) is
no iceably shor er han normal performance, i is ime o buy a new ba ery.
7.3.-PROLONG BATTERY LIFE:
1. Ba ery performance will be grea ly decreased a a empera ure below 0 . A spare ba ery is℃
necessary in cold wea her. The cold ba ery unable o work in his si ua ion may work under room
empera ure, so keep i for la er use.
2. The dus on he ba ery con ac may cause he ba ery canno work or charge. Please use a
clean dry clo h o wipe i before a aching he ba ery o he radio.

7.4.-BATTERY STORAGE:
1. Fully charge a ba ery before you s ore i for a long ime, o avoid ba ery damage due o over-
discharge.
2. Recharge a ba ery af er several mon hs’ s orage (Li-Ion ba eries: 6 mon hs), o avoid ba ery
capaci y reduc ion due o over-discharge.
3. S ore your ba ery in a cool and dry place under room empera ure, o reduce self-discharge.
8.-PARTS, CONTROLS AND KEYS:
8.1.-RADIO OVERVIEW:

8.2.- COMMAND/KEY DEFINITION:
-【PTT】(PUSH-TO-TALK):
Press and hold down he 【PTT】 bu on o ransmi ; release i o receive.
- SK-SIDE KEY1/【CALL】:
-Press he 【ALL】bu on, o ac iva e he FM Radio;Press i again o deac iva e he FM Radio.
-Press and hold on he 【ALL】bu on, o ac iva e he alarm func ion; Press and hold i again, o
deac iva e he alarm func ion.
- SK-SIDE KEY2/【MONI】:
-Press he 【MONI】bu on, o urn on he flashligh ;Press i again o urn off.Press and hold on he
【MONI】 bu on, o moni or he signal.
-【VFO/MR】BUTTON:
-Press he 【VFO/MR】bu on, o swi ch he frequency mode and channel mode.
-【A/B】BUTTON:
-Press he 【A/B】bu on, o swi ch frequency display.
-【BAND】BUTTON:
-Press he 【BAND】bu on, o swi ch band dispaly.
-While FM radio being ac iva ed,press he 【BAND】bu on o swi ch he band of FM radio(band
65-75MHz/76-108MHz).
-【*SCAN】KEY:
-Press he 【*S AN】key o ac iva e he Reverse func ion,i will exchange a separa e recep ion
and ransmission frequency.
-Press he 【*S AN】key for 2 seconds o s ar scanning(frequency/channel).
- While FM radio being ac iva ed,press he 【*S AN】key o search FM radio s a ion.
-While se ing he RX CTCSS/DCS, press he key 【*SCAN】o scan he RX CTCSS/DCS.
- KEY:
-Under channel mode, press key o swi ch High/Low ransmi power.
-Press key for 2 seconds o lock/unlock he keypad.
-FUNCTION KEYPAD:

-【MENU】key:
-To en er he menu of he radio and confirm he se ing.
-【▲】【▼】key:
-Press and hold 【▲】or 【▼】key for frequency up or down fas .
-Press 【▲】or 【▼】key, he scanning will be opposi e.
-【EXIT】key:
-To cancel /clear or exi .
-NUMERIC KEYPAD:
!"#
-ACCESSORY JACK:
-The jack is used o connec audio accessories, or o her accessories such as programming cable.
9.-‘LCD’ DISPLAY:
The display icons appear when cer ain opera ions or specific fea ures are ac iva ed.
Icon Description
188 Opera ing channel.
75/25
CT ‘CTCSS’ ac iva ed.
DCS ‘DCS’ ac iva ed.
+ - Frequency offse direc ion for accessing repea ers.
SDual Wa ch/Dual Recep ion func ions ac iva ed.
VOX Func ion ‘VOX’ enabled.
R Reverse func ion ac iva ed.
N Wide Band selec ed.
Ba ery Level indica or

Keypad lock func ion ac iva ed.
LLow ransmi power.
▲▼ Opera ion frequency.
Signal S reng h Level.
10.- 1750 Hz TONE FOR ACCESS TO REPEATERS:
The user needs o es ablish long dis ance communica ions hrough an ama eur radio repea er
which is ac iva ed af er receiving a 1750 Hz one. Press and hold on he 【PTT】, hen press he
【BAND】bu on o ransmi a 1750Hz one.
11.- BASIC OPERATION:
11.1.-RADIO ON-OFF/VOLUME CONTROL :
-Make sure he an enna and ba ery are ins alled correc ly and he ba ery charged.
-Ro a e he knob clockwise o urn he radio on, and ro a e he knob fully coun er-clockwise un il a
‘click’ is heard o urn he radio off. Turn he knob clockwise o increase he volume, or coun er-
clockwise o decrease he volume.(开机图)
11.2.- SELECTING A FREQUENCY OR CHANNEL:
-Press he key 【 ▲ 】 or 【 ▼ 】 o selec he desired frequency/channel you wan . The display
shows he frequency / channel selec ed.
-Press and hold down he key 【▲】or 【▼】for frequency up or down fas .
Note:
- You can not select a channel if not previously stored.
12-ADVANCED OPERATION :
You can program your ransceiver opera ing in he se up menu o sui your needs or preferences.
12.1.-SET MENU DESCRIPTION:
Menu Function/Description Available settings
$ %&'" (#)*)*+#()*$,*$(#)*()-.
( /!" -01-*234
5 67%89:$;$*$;(*$;5*$;<" 3&&*$*(*5*<

< 73/7" 3&&*,$,
) 4*=4*!" 40>%*=6??
+ 68?>" 3&&*$*(*5*<*)
@ >?>!*" 3&&*3=
A 8%%B" 3&&*3=
C 3 $)*5,*<)*+,###*)A)*+,,
$, ?>?'" 3&&*>,(5=###>@)<0
$$ ??'" +@#,-.###()<#$-.
$( >'" 3&&*>,(5=###>@)<0
$5 '" +@#,-.###()<#$-.
$< 730%7" 3&&*3=
$) 6=06D
!#
$+ >E&>E&F#" 3&&*>*6=0*>G6=0
$@ 3>% !#" $H$)
$A ?%7" 3*3*%
$C 0>9" 3&&*83*%3*83-
(, 2" ,H5,
($ E>&66#=;
!#
&?%I*-*=6E%
(( E>&88#=;
!#
&?%I*-*=6E%
(5 82" 3&&*3=
(< 632B" 3&&*3=
() &>' " 3&&*G*
(+ 3&&%' " ,,#,,,H+C#CC,
(@ E%E-" ,,,H$(@
(A >%2-" ,,,H$(@
(C 42%>" 3&&*82%*3?6=1%*?2%
5, ?/2%>" 3&&*82%*3?6=1%*?2%
5$ /2%>F" 3&&*82%*3?6=1%*?2%
5( 62E3>" 0%*3=%*3>%
55 86=>" 7-&*-&
5< /68F!!*" 3&&*6*8
5) %%" 3&&*3=
5+ ?J%" 3&&*$(5H$,
5@ ?J?2>" 3&&*$(5H$,
5A 3=E18" &22*E1
5C ?31%?" 3=*3&&
<, ?%%?F" 7&3*622
12.2.-SHORTCUT MENU OPERATION:
$#E%= #▲ ▼
(#E%=F#
5# #▲ ▼

<#E%=D:%/0F#
!"#$%&!!'(")%*''+,!-(!./0!-/&#,!1&'," )))))
))2!'3%4+#$.'"5$%&!-"
12.3.-“SQL” (SQUELCH):
! " # " $ $ # $% #
It is recommended that you set Level 5.
12.4.- FUNCTION “VOX” (VOICE OPERATED TRANSMISSION):
KL:#
::#4D
:!:#8M73/1:
:!#
0!?&!:
M#
This fea ure allows you o opera e be ween frequency A and frequency B. Periodically, he
ransceiver checks whe her a signal is received on ano her frequency ha we have scheduled. If
you receive a signal, he uni will remain in he frequency un il he received signal disappears.

12.7.-TOT(TRANSMISSION TIMER):
This func ion can au oma ically con rol he ime we ransmi each ime you press [PTT] on he ransceiver. This
fea ure is very useful o avoid overhea ing excessive power ransis ors of he ransceiver. The ransceiver will be
off ransmission au oma ically once he se ime.
12.8.-CTCSS/DCS:
0!'
!NNN>N#
N'N ! : ' ! NN N>N
:#0:O
:N'N!:#
No e:
- The use of "CTCSS" or "DCS" in a communica ion, does no guaran ee comple e confiden iali y
communica ion.
12.9.- ANI
6=06=0D"!0>0>9!
9*#0>!D!#
3 !#
12.10.- DTMFST (DTMF TONE OF TRANSMITTING CODE ):
& #'()*+,-+,*+.
/+&&012#$#! 3)4&!"
## #
/)012#$#! )4&!"
#
/56(01# $ #! )4& ! " #
#
/)56(01# $ #! )4& ! "
## #
12.11.- SC-REV(SCAN RESUME METHOD):
:!#
4:!#

=;
N3N3";
!!:#!
:' !#
N3N3";
!':#
N%N3";
!' :#
12.12.- PTT-ID(PTT OR RELEASE PTT TO TRANSMIT THE SIGNAL CODE):
" ""
/+&&01)3#"'
/*+0#"'# # '7"
/-+0#"'
/*+.0#"'
12.13.- BCL(BUSY CHANNEL LOCKOUT):
823:9:
PQ'#3'!O>
:823:
!"#
12.14.- SFT-D(DIRECTION OF FREQUENCY SHIFT):
The "OFFSET" is he difference or offse be ween he recep ion frequency and he frequency of
ransmission for access o ama eur radio repea ers. Se he "OFFSET" according o
he "OFFSET" ama eur radio repea er hrough which wan o communica e.
12.15.- OFFSET(FREQUENCY SHIFT):
When communica ing via a repea er, he direc ion of displacemen of
frequency should be imed o he displacemen of he ransmission frequency is
higher or lower han he receiving frequency.
example:
If we wan o make a communica ion hrough ama eur radio repea er whose frequency
inpu is 145,000 MHz and 145,600 MHz is ou pu , we selec he
"OFFSET" of he previous sec ion in 0600 and he direc ion of ravel "SHIFT" programmed
o [-], so he ransceiver will always 145,600 MHz in frequency and when
you press [PTT] o ransmi ransceiver, he frequency will au oma ically move o
145,000 MHz
12.1 .-STE (TAIL TONE ELIMATION):
This func ion is used o ac iva e or deac iva e he ransmission end of he ransceiver. his
final one ransmission only be used in communica ions be ween ransceivers and no in
communica ions hrough a repea er, which mus be deac iva ed.

13.-CTCSS TABLE:
Nº Tone
(Hz)
Nº Tone
(Hz)
Nº Tone
(Hz)
Nº Tone
(Hz)
Nº Tone
(Hz)
1 67.0 11 4.8 21 131.8 31 171.3 41 203.5
2 6 .3 12 7.4 22 136.5 32 173.8 42 206.5
3 71. 13 100.0 23 141.3 33 177.3 43 210.7
4 74.4 14 103.5 24 146.2 34 17 . 44 218.1
5 77.0 15 107.2 25 151.4 35 183.5 45 225.7
6 7 .7 16 110. 26 156.7 36 186.2 46 22 .1
7 82.5 17 114.8 27 15 .8 37 18 . 47 233.6
8 85.4 18 118.8 28 162.2 38 1 2.8 48 241.8
88.5 1 123.0 2 165.5 3 1 6.6 4 250.3
10 1.5 20 127.3 30 167. 40 1 .5 50 254.1
14.-DCS TABLE:
Nº Code Nº Code Nº Code Nº Code Nº Code
1 D023N 22 D131N 43 D251N 64 D371N 85 D532N
2 D025N 23 D132N 44 D252N 65 D411N 86 D546N
3 D026N 24 D134N 45 D255N 66 D412N 87 D565N
4 D031N 25 D143N 46 D261N 67 D413N 88 D606N
5 D032N 26 D145N 47 D263N 68 D423N 8 D612N
6 D036N 27 D152N 48 D265N 6 D431N 0 D624N
7 D043N 28 D155N 4 D266N 70 D432N 1 D627N
8 D047N 2 D156N 50 D271N 71 D445N 2 D631N
D051N 30 D162N 51 D274N 72 D446N 3 D632N
10 D053N 31 D165N 52 D306N 73 D452N 4 D645N
11 D054N 32 D172N 53 D311N 74 D454N 5 D654N
12 D065N 33 D174N 54 D315N 75 D455N 6 D662N
13 D071N 34 D205N 55 D325N 76 D462N 7 D664N
14 D072N 35 D212N 56 D331N 77 D464N 8 D703N
15 D073N 36 D223N 57 D332N 78 D465N D712N
16 D074N 37 D225N 58 D343N 7 D466N 100 D723N
17 D114N 38 D226N 5 D346N 80 D503N 101 D731N
18 D115N 3 D243N 60 D351N 81 D506N 102 D732N
1 D116N 40 D244N 61 D356N 82 D516N 103 D734N
20 D122N 41 D245N 62 D364N 83 D523N 104 D743N
21 D125N 42 D246N 63 D365N 84 D526N 105 D754N
15.-TECHNICAL SPECIFICATION:
15.1.-GENERAL:
&';+)E-.$,AE-.3&E"#
7-&;$5+E-.$@<E-.?R*R"#
-&;<,,E-.<A,E-.?R*R"#

E;$(A
&';(#)#
&';(#)-.*)-.*+#()-.*$,-.*$(#)-.*()-.#
6;),Ω.
3;(,SG+,S#
:;?206@#<7*$A,,#
;
;5A,6
;T$#<6#
E;RR#
>;,5*,5*)<#?R*R*"#
>;)AR$$,R5(
4;$5,R"#
15.2. - TRANSMITTER:
?&!;<4*$4#
;&E#
%;$+BU&5%*$$BU&5%4*="#
ER:;TV)-.*TV(#)-.4*="#
;W+,8#
15.3. - RECEIVER:
?::;,#(X7$(80=6>"#
0;+,8#
6;
?;
''/4$,6$&7!//%+!&#/.58$$%&!-+,%.!7$
1 .-TROUBLESHOOTING:
Problem Possible cause / solution
The radio does no s ar . 9!9!
99#
9:
99#

#" 9
9!!#
99
#
:2%>
#
E:F!#
ENNN>N
:#
4F
:#
ENNN>N
:
:
#
Y#
Y?&
#
0NN:
!NN#
:MN73/N
:#
?:
!!#
'#
NNN>N
#
!
!'#
Y!
##
!$%/$%$9/),*3./7''%&14#5'(/+,%%#&!/$,1#)$%$9+,%3.#",/#,5.#)"&'##
/#1,$$!#
Table of contents
Other Baofeng Radio manuals

Baofeng
Baofeng UV-82 User manual

Baofeng
Baofeng UV-5 Troubleshooting guide

Baofeng
Baofeng UV-5R Series User manual

Baofeng
Baofeng UV-5RV2+ User manual

Baofeng
Baofeng UV-82 User manual

Baofeng
Baofeng UV-81C User manual

Baofeng
Baofeng UV-82 User manual

Baofeng
Baofeng UV-82 User manual

Baofeng
Baofeng BF-5C User manual

Baofeng
Baofeng BF-17H Series User manual