Baroness LS62 Operation manual
Standard Mower Unit
Owner's Operating Manual
Serial No. LS62:10221-・LS66:10757-
"Required reading"
Read this manual before using the machine.
Original Instructions Ver.1.4

Thank you for purchasing the Baroness product.
This manual describes the proper handling,
adjustment, and inspection of your product.
We hope you will use the product safely, and take
advantage of its best performance.
For details on the handling, adjustment and
inspection of the main vehicle, refer to the
Owner's Operating Manual for the main vehicle.
LS62・LS66
Greeting

Read this manual carefully to ensure that you thoroughly understand how to properly operate and maintain the
product, and to avoid causing injury to yourself or others.
The operator is responsible for operating the product properly and safely.
Maintenance service for this machine should be performed by a mechanic with expertise.
If you have any questions concerning maintenance or genuine parts, please contact a Baroness dealer or
Kyoeisha.
When making inquiries about the product, please specify the product's model designation and serial number.
When loaning or transferring the product, please also provide this manual together with the product.
Kyoeisha Co., Ltd.
Warning Symbols
This manual uses the following warning symbols for handling precautions that are important for your
safety.
696cq5-001
Warning symbol
This symbol indicates the articles regarding “Danger,” “Warning,” or “Caution.”
Those articles describe important safety precautions and so read them carefully to understand completely before
operating the machine.
Failure to adequately follow these safety precautions may cause an accident.
Danger
Danger
This symbol indicates that serious injury or death will occur if the warning is ignored.
Warning
This symbol indicates that serious injury or death may occur if the warning is ignored.
Caution
This symbol indicates that injury or damage to property may occur if the warning is ignored.
Important
This symbol indicates precautions on the mechanism of the machine.
LS62・LS66
Introduction

Precautionary Statement
Caution
The information described in this manual is
subject to change for improvement without
prior notice.
When replacing parts, be sure to use genuine
Baroness parts or parts designated by
Kyoeisha.
Note that the Baroness product warranty may
not apply to defects caused by the use of
parts from other companies.
Prior to use, carefully read the following
manuals to thoroughly understand the contents
for safe and correct operation.
Baroness Owner's Operating Manual
Purpose
This mower unit is intended for cutting turf grass
at golf courses.
Do not use this machine in any way other than
its intended purpose, and do not modify the
machine.
Operating this mower unit for other purposes
and modifying it may be very dangerous and
may cause damage to the machine.
・
LS62・LS66
Introduction

Safety .............................................................. Page 1-1
Safe Operating Practices ...............................Page 1-2
Disposal .......................................................... Page 2-1
Recycle and Waste Disposal ......................... Page 2-2
Product Overview .......................................... Page 3-1
Specifications .................................................Page 3-2
Names of Each Section ................................. Page 3-3
Regulation Decals ..........................................Page 3-3
Safety Signs and Instruction Signs ................ Page 3-4
Handling Instructions .................................... Page 4-1
Handling Precautions .....................................Page 4-2
Inspections .....................................................Page 4-2
Tightening Torques ........................................Page 4-4
Adjustment before Work ................................ Page 4-7
Storage ........................................................ Page 4-12
Maintenance ................................................... Page 5-1
Maintenance Precautions .............................. Page 5-2
Maintenance Schedule .................................. Page 5-2
Greasing ........................................................ Page 5-4
Maintenance Work .........................................Page 5-5
LS62・LS66
Contents

LS62・LS66
Contents


Failure to adequately follow these safety
precautions may cause an accident resulting in
injury or death.
Danger
Danger
This product is designed to ensure safe
operation and has been tested and inspected
thoroughly before shipment from the factory.
The product is equipped with safety devices to
prevent accidents.
However, whether the product demonstrates
its original performance level depends on the
manner in which it is operated and handled,
as well as the manner in which it is managed
on a daily basis.
Inappropriate use or management of the
product may result in injury or death.
Observe the following safety instructions to
ensure safe operation.
Safe Operating Practices
Read Safe Operating Practices described in the
Owner's Operating Manual of Baroness main
vehicle equipped with this mower unit
thoroughly.
LS62・LS66
Safety
Page 1-2 Safe Operating Practices


Recycle and Waste Disposal
About Recycle
Recycling battery etc. is recommended for
environmental conservation and economical
use of resources.
It may be required by local laws.
About Waste Disposal
Make sure that waste generated when
servicing or repairing the machine is disposed
of in accordance with local regulations.
(e.g. waste oil, antifreeze, rubber products, and
wires etc.)
LS62・LS66
Disposal
Page 2-2 Recycle and Waste Disposal

Specifications ........................................ Page 3-2
Specifications List ..................................Page 3-2
Features of the STD Mower Unit ........... Page 3-3
Names of Each Section ......................... Page 3-3
Regulation Decals ..................................Page 3-3
Positions of Regulation Decals ..............Page 3-3
Description of Regulation Decals .......... Page 3-3
Safety Signs and Instruction Signs ..... Page 3-4
About Safety Decals and Instruction
Decals ....................................................Page 3-4
Positions of Safety Decals and
Instruction Decals .................................. Page 3-4
Description of Safety Decals and
Instruction Decals .................................. Page 3-4
Product Overview
LS62・LS66
Product Overview
Page 3-1

Specifications
Specifications List
LS62
Model LS62
Type Base unit (incl. one weight) With CR brush
Dimensions
Total length 16.54 in 420 mm 16.54 in 420 mm
Total width 29.72 in 755 mm 30.55 in 776 mm
Total height 9.17 in 233 mm 9.17 in 233 mm
Weight
Mower Unit 110.23 lb 50.0 kg 114.64 lb 52.0 kg
Weight (one piece) 4.41 lb 2.0 kg - -
CR brush - - 11.02 lb 5.0 kg
Operating height (Mowing height) 0.394 - 1.811 in 10.0 - 46.0 mm 0.394 - 1.811 in 10.0 - 46.0 mm
Operating width (Mowing width) 22 in 557.5 mm 22 in 557.5 mm
Diameter of the reel cutter 6.4 in 163 mm 6.4 in 163 mm
Blades 9 9
LS66
Model LS66
Type Base unit (incl. one weight) With CR brush
Dimensions
Total length 16.54 in 420 mm 16.54 in 420 mm
Total width 33.74 in 857 mm 34.61 in 879 mm
Total height 9.17 in 233 mm 9.17 in 233 mm
Weight
Mower Unit 116.84 lb 53.0 kg 123.46 lb 56.0 kg
Weight (one piece) 4.41 lb 2.0 kg - -
CR brush - - 11.02 lb 5.0 kg
Operating height (Mowing height) 0.394 - 1.811 in 10.0 - 46.0 mm 0.394 - 1.811 in 10.0 - 46.0 mm
Operating width (Mowing width) 26 in 660 mm 26 in 660 mm
Diameter of the reel cutter 6.4 in 163 mm 6.4 in 163 mm
Blades 5・7・9 5・7・9
LS62・LS66
Product Overview
Page 3-2 Specifications

Features of the STD Mower Unit
Equipped with a 6.4-inch (163 mm) -
diameter reel cutter (cutting cylinder).
Blade engagement can be adjusted by
changing the reel cutter (cutting cylinder)
position without changing the position and
angle of the bed knife (bottom blade), and
therefore the bed knife attitude does not
change due to wear of the reel cutter.
The front roller is a grooved roller that will
not press down the lawn.
Grass clippings can be discharged either
forward or backward.
The grass catcher can be installed.
The CR brush can be installed onto the rear
roller.
The scraper can be installed on the front and
rear roller.
Names of Each Section
1
2
4
6
5
3
quwxcl-137
Names of Each Section_001
1.
2.
3.
4.
5.
6.
7.
1 Reel cover
2 Reel cutter
3 Bed knife
4 Front roller
5 Rear roller
6 CR brush
Regulation Decals
Positions of Regulation Decals
A
quwxcl-138
Positions of Regulation Decals_001
ASerial number plate
Description of Regulation Decals
Serial Number Plate
The serial number plate indicates the model
and serial number of the machine.
㻭㼀㼀㻭㻯㻴㻹㻱㻺㼀
㻭㼀㼀㻭㻯㻴㻹㻱㻺㼀
㼀㼅㻼㻱
㼀㼅㻼㻱
㻿㻱㻾㻵㻭㻸
㻿㻱㻾㻵㻭㻸
㻺㻻㻚
㻺㻻㻚
4ogipb-007
Serial Number Plate_001
Product Overview
LS62・LS66
Product Overview
Page 3-3
Names of Each Section

Safety Signs and Instruction Signs
About Safety Decals and Instruction
Decals
Important
Safety decals and instruction decals are
attached to this mower unit.
Make sure that decals are preserved in their
entirety. If they are damaged, become dirty, or
peel off, replace them with new ones.
Part numbers for decals that need to be
replaced are listed in the parts catalog.
Order them from a Baroness dealer or
Kyoeisha.
Positions of Safety Decals and Instruction
Decals
1
6iul4h-107
Positions of Safety Decals and Instruction Decals_001
1Caution to mutilation decal
Description of Safety Decals and
Instruction Decals
Caution to Mutilation Decal
K4205001600
DECAL, CAUTION TO MUTILATION
Warning
May cut your hand or leg - Stop the cutter
rotation and engine. Otherwise you may get
injured.
STOP
STOP
wyikja-001
Caution to Mutilation Decal_001
LS62・LS66
Product Overview
Page 3-4 Safety Signs and Instruction Signs

Handling Precautions ............................Page 4-2
Inspections .............................................Page 4-2
Reel Cutter (Cutting Cylinder) and
Bed Knife (Bottom Blade) ...................... Page 4-2
Cover ..................................................... Page 4-2
Belt .........................................................Page 4-2
Roller ..................................................... Page 4-3
CR brush ................................................Page 4-3
Scraper .................................................. Page 4-3
Tightening Torques ............................... Page 4-4
Standard Tightening Torques ................ Page 4-4
Principal Tightening Torques .................Page 4-6
Adjustment before Work ....................... Page 4-7
Adjustment of Blade Engagement ......... Page 4-7
Adjustment of Cutting Height .................Page 4-8
Adjustment of Cutter Adjustment
Spring .................................................... Page 4-9
Adjustment of Reel Cover (Variable
Type) ......................................................Page 4-9
Adjustment of Reel Cover (Variable
Easy Latch Type) .................................Page 4-10
Adjustment of CR Brush ...................... Page 4-10
Adjustment of Scraper ......................... Page 4-11
Storage ................................................. Page 4-12
Before Long-Term Storage ..................Page 4-12
Handling Instructions
LS62・LS66
Handling Instructions
Page 4-1
Handling Precautions
Important
This manual contains descriptions for handling
the mower unit.
For details on handling the main vehicle, refer
to this manual and the Owner's Operating
Manual for the main vehicle.
Inspections
Inspect the machine according to the
maintenance schedule so that you will be able to
take advantage of its optimum performance for a
long period of time.
Reel Cutter (Cutting Cylinder) and Bed
Knife (Bottom Blade)
Inspection of Reel Cutter (Cutting Cylinder) and
Bed Knife (Bottom Blade)
Caution
Wear gloves when touching edged tools to
avoid cutting your hands.
The reel cutter (cutting cylinder) and bed knife
(bottom blade) may become dull due to
frequent use, objects crushed during mowing,
or damage caused during transportation.
Inspect the reel cutter (cutting cylinder) and
bed knife (bottom blade), and if necessary,
adjust the blade engagement, perform back
lapping, or resharpen or replace the reel
cutter (cutting cylinder) and the bed knife
(bottom blade).
Check to see whether or not the edge of
the reel cutter (cutting cylinder) and the bed
knife (bottom blade) are too blunt to cut.
Make sure that the reel cutter (cutting
cylinder) and the bed knife (bottom blade)
are not cracked.
Check to see how much the reel cutter
(cutting cylinder) and the bed knife (bottom
blade) are worn.
Make sure that the reel cutter (cutting
cylinder) and the bed knife (bottom blade)
have not changed color due to heat from
grinding.
Check to see whether or not the second
edge face (relief) remains at the point of
reel cutter (cutting cylinder).
1.
2.
3.
4.
5.
Make sure that the welding between the
reel cutter (cutting cylinder) and the disc
has not come off.
Cover
Inspection of Covers
Warning
If you have removed the covers during
inspection, be sure to securely install them in
their original positions.
If a cover remains removed, the operator may
come into contact with rotating parts or belts
and foreign objects may fly off, possibly
resulting in injuries.
Make sure that there is no wear or
deterioration of the reel cover and all other
covers.
Make sure that there is no damage to the
reel cover and all other covers.
Make sure that there is no interference with
moving parts due to deformation of the reel
cover and all other covers.
Make sure that the reel cover and all other
covers are installed in their appropriate
positions.
Belt
Inspection of Belt
Caution
The engine must be stopped when the belt is
inspected.
Caution
If you have removed the cover during
inspection, make sure that you replace it in
the original position securely.
If the cover remains removed, the operator
may come in contact with the rotating objects
or belt, possibly resulting in injuries.
Press the middle of the belt with your finger
to check the belt tension.
Make sure that there are no cracks,
damage or abnormal wear.
6.
1.
2.
3.
4.
1.
2.
LS62・LS66
Handling Instructions
Page 4-2 Handling Precautions

Roller
Inspection of Rollers
Bearing wear due to frequent use or bearing
damage caused by water infiltration may
prevent the roller from rotating smoothly.
Inspect the roller and, if necessary, replace
parts such as oil seals and bearings.
Make sure that there is no abrasion nor
adhesion of the roller.
Make sure that there is no wear of the roller
shaft.
Make sure that there is no wear nor
damage of the oil seal.
Make sure that there is no wear nor rust of
the bearing.
Make sure that there is no play in the roller
shaft.
CR brush
Inspection of CR Brush
Note:
Depending on the specifications, this function
may not be available.
Bearing wear due to frequent use or bearing
damage caused by water infiltration may
prevent the brush from rotating smoothly.
Inspect the brush and, if necessary, replace
parts such as bearings.
Make sure that there is no abrasion nor
adhesion of the brush.
Make sure that there is no wear of the
brush shaft.
Make sure that there is no abnormality in
the brush.
Make sure that there is no play in the fit of
the bearing and the housing.
Make sure that there is no play in the brush
shaft.
1.
2.
3.
4.
5.
1.
2.
3.
4.
5.
Scraper
Inspection of Scraper
Inspection of Front Scraper
Note:
Depending on the specifications, this
function may not be available.
The operating efficiency may be reduced
due to frequent use, objects crushed during
operation, or damage during transportation.
Inspect the scraper, and replace any parts if
necessary.
Make sure that there is no damage nor
deformation of the scraper.
Make sure that there is no contact
between the scraper and roller.
Inspection of Rear Scraper (Wire Type)
Note:
Depending on the specifications, this
function may not be available.
The operating efficiency may be reduced
due to frequent use, objects crushed during
operation, or damage during transportation.
Inspect the scraper, and replace any parts if
necessary.
Make sure that there are no breaks nor
sagging in the scraper (wire).
Make sure that there is no contact
between the scraper and roller.
■
1.
2.
■
1.
2.
Handling Instructions
LS62・LS66
Handling Instructions
Page 4-3
Inspections

Tightening Torques
Important
Refer to the Tightening Torque table.
Note that the Baroness product warranty may
not apply to defects caused by incorrect or
overtorque tightening, etc.
Standard Tightening Torques
Bolts and Nuts
Important
A number of bolts are used in each part of this machine.
Be sure to re-tighten the bolts and nuts, because they may be loosened at the earlier stage of the
use.
As to the bolts and nuts without any special instruction, tighten them in appropriate tightening torque
with proper tool.
Too much tightening may cause the looseness or damage of the screw.
The strength of tightening is determined by types of screws, strength, the friction of thread face or
base face and others.
The table below is for the galvanized or parkerized bolts.
In case that the strength of internal thread is weak, it is not applied.
Do not use rusty or sand attached "screw."
Otherwise, it may cause insufficient tightening even if you apply the specified tightening torque.
The friction of the screw face becomes higher and the tightening torque is canceled out by the
friction, therefore sufficient tightening cannot be applied.
If "screw" is wet by water or oil, do not tighten it with normal tightening torque.
If the screw is wet, the torque coefficient will get smaller and it may result in too much tightening.
Too much tightening may cause looseness by the screw stretched or result in damage.
Do not use a bolt experienced too much burden.
Using the impact wrench requires the skill.
Do exercise as much as possible for steady tightening.
LS62・LS66
Handling Instructions
Page 4-4 Tightening Torques
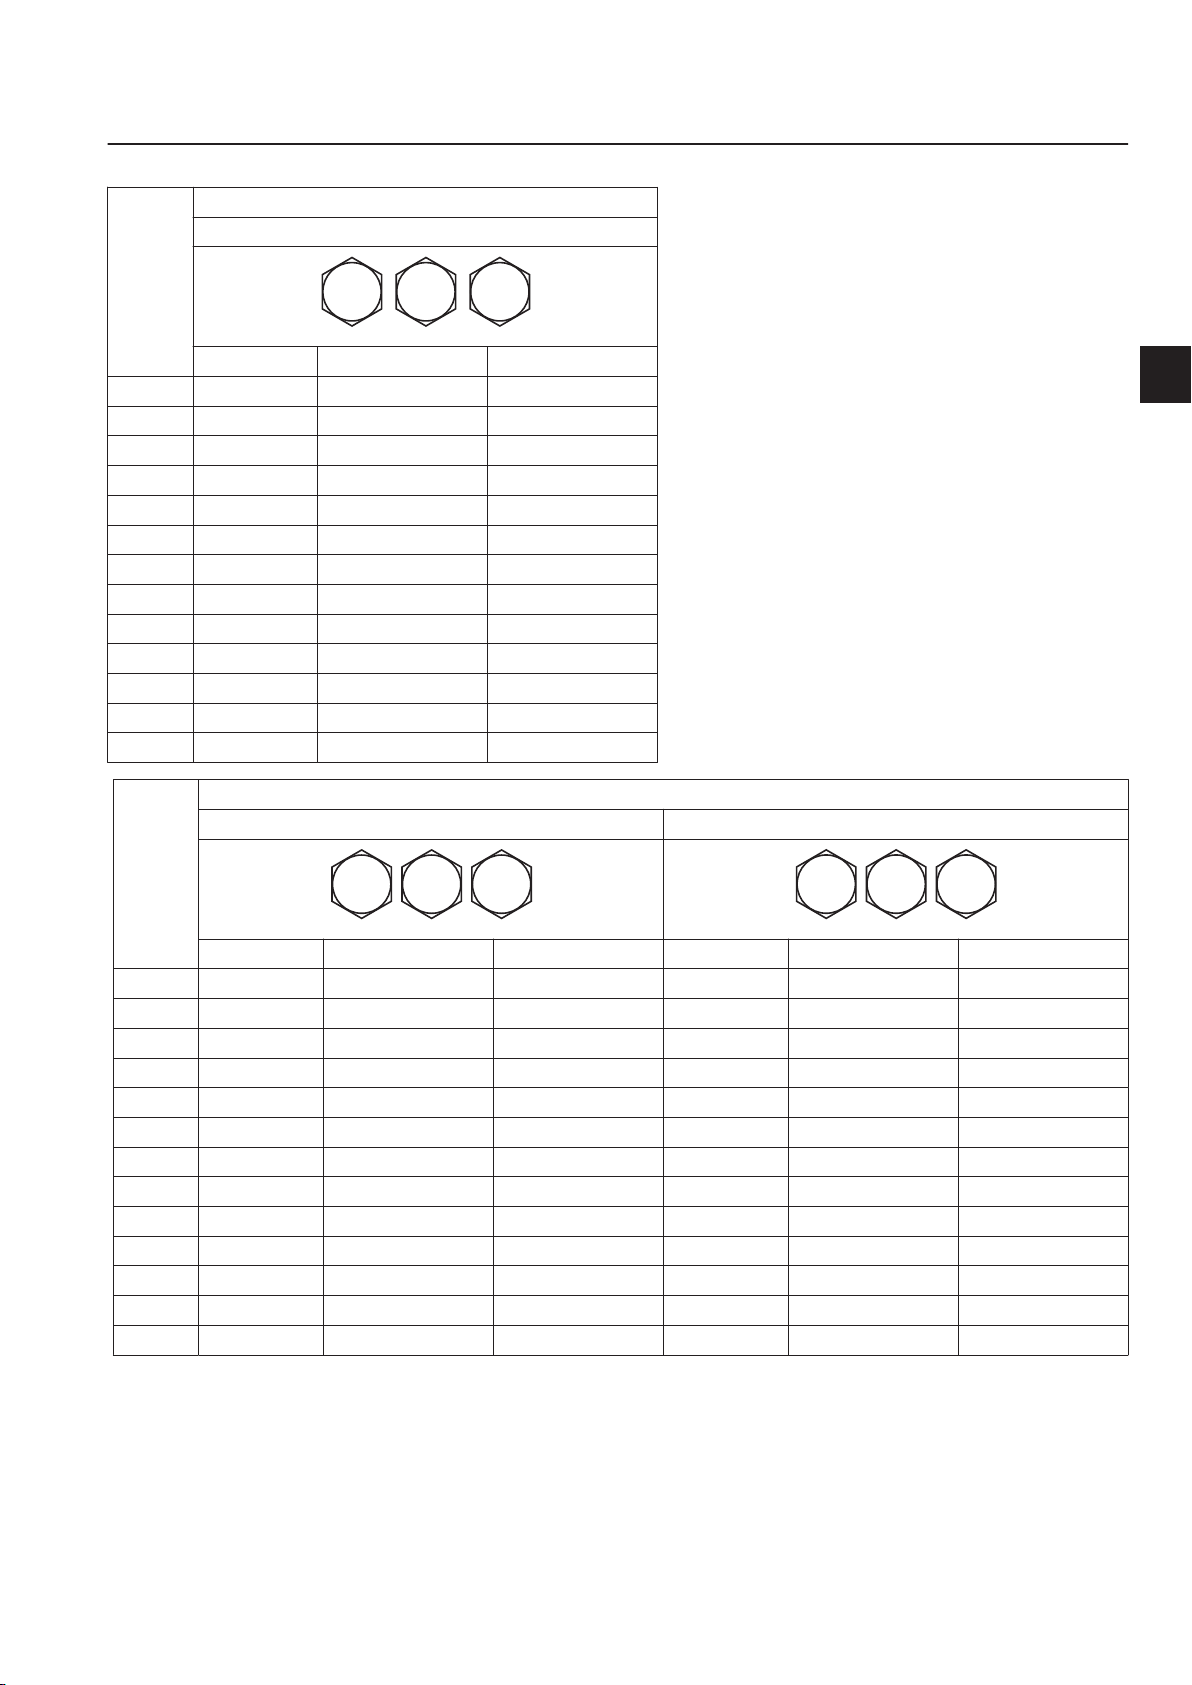
Nominal
diameter
General bolt
Strength classification 4.8
M4 T
4.8
tib3yb-001
N-m kgf-cm lb-in
M5 3 - 5 30.59 - 50.99 26.55 - 44.26
M6 7 - 9 71.38 - 91.77 61.96 - 79.66
M8 14 - 19 142.76 - 193.74 123.91 - 168.17
M10 29 - 38 295.71 - 387.49 256.68 - 336.34
M12 52 - 67 530.24 - 683.20 460.25 - 593.02
M14 70 - 94 713.79 - 958.52 619.57 - 831.99
M16 88 - 112 897.34 - 1142.06 778.89 - 991.31
M18 116 - 144 1,182.85 - 1,468.37 1,026.72 - 1,274.54
M20 147 - 183 1,498.96 - 1,866.05 1,301.10 - 1,619.73
M22 295 3,008.12 2,611.05
M24 370 3,772.89 3,274.87
M27 550 5,608.35 4,868.05
M30 740 7,545.78 6,549.74
Nominal
diameter
Heat-treated bolt
Strength classification 8.8 Strength classification 10.9
8 T
8.8
8
tib3yb-002
11T
10.9
11
tib3yb-003
N-m kgf-cm lb-in N-m kgf-cm lb-in
M5 5 - 7 50.99 - 71.38 44.26 - 61.96 7 - 10 71.38 - 101.97 61.96 - 88.51
M6 8 - 11 81.58 - 112.17 70.81 - 97.36 14 - 18 142.76 - 183.55 123.91 - 159.32
M8 23 - 29 234.53 - 295.71 203.57 - 256.68 28 - 38 285.52 - 387.49 247.83 - 336.34
M10 45 - 57 458.87 - 581.23 398.30 - 504.51 58 - 76 591.43 - 774.97 513.36 - 672.68
M12 67 - 85 683.20 - 866.75 593.02 - 752.34 104 - 134 1,060.49 - 1,366.40 920.50 - 1186.03
M14 106 - 134 1,080.88 - 1,366.40 938.21 - 1,186.03 140 - 188 1,427.58 - 1,917.04 1,239.14 - 1,663.99
M16 152 - 188 1,549.94 - 1,917.04 1,345.35 - 1,663.99 210 - 260 2,141.37 - 2,651.22 1,858.71 - 2,301.26
M18 200 - 240 2,039.40 - 2,447.28 1,770.20 - 2,124.24 280 - 340 2,855.16 - 3,466.98 2,478.28 - 3,009.34
M20 245 - 295 2,498.27 - 3,008.12 2,168.50 - 2,611.05 370 - 450 3,772.89 - 4,588.65 3,274.87 - 3,982.95
M22 - - - 530 5,404.41 4,691.03
M24 - - - 670 6,831.99 5,930.17
M27 - - - 1,000 10,197.00 8,851.00
M30 - - - 1,340 14,628.78 11,860.34
Note:
The same values are applied to "fine screw thread."
Handling Instructions
LS62・LS66
Handling Instructions
Page 4-5
Tightening Torques

Principal Tightening Torques
Tightening Torque by Model
LS66/LS62
Tighten the following bolts and nuts at the torque specified in the table.
For thread locking adhesive, apply a middle strength thread locker (ThreeBond 1322 or equivalent
anaerobic sealant).
Location Code Part name
Tightening torque Thread
locking
adhesive
N-m kgf-cm lb-in
Bed knife K0071001182 SCREW, HT FLAT
HEAD M10-16 29 - 38 295.71 -
387.49
256.68 -
336.34 -
LS62・LS66
Handling Instructions
Page 4-6 Tightening Torques
This manual suits for next models
1
Table of contents
Other Baroness Farm Equipment manuals


Popular Farm Equipment manuals by other brands

Schaffert
Schaffert Rebounder Mounting instructions

Stocks AG
Stocks AG Fan Jet Pro Plus 65 Original Operating Manual and parts list

Cumberland
Cumberland Integra Feed-Link Installation and operation manual

BROWN
BROWN BDHP-1250 Owner's/operator's manual

Molon
Molon BCS operating instructions

Vaderstad
Vaderstad Rapid Series instructions


