manuals.online logo
Brands
  1. Home
  2. •
  3. Brands
  4. •
  5. Baumatic
  6. •
  7. Dryer
  8. •
  9. Baumatic BCD1W User manual

Baumatic BCD1W User manual

THE CONTROLS PREPARATION
A. THE TIMER
Select the required dryer time based on the
recommendations on the control panel.
B. HEAT SWITCH
Select the required heat setting based on the
recommendations on the control panel.
C.BOTTLE FULL NEON
This will light when the bottle needs emptying or when it is
incorrectly inserted.
D.START BUTTON
Press Start button after selecting the required drying time.
Check care labels inside the garments.
CARE LABELS YOU MAY FIND ON YOUR FABRICS
Do not tumble dry woollen or wool mixture articles unless the
article is labelled to be suitable due to a possibility of shrinkage.
Roll dripping wet articles in a towel to remove excess water.
Place delicate articles e.g. tights, scarves, inside a pillowcase.
To avoid the need to iron easycare polyester/cotton items it is
better to only dry small loads (i.e half fill drum).
It is better to dry small and large articles together.
We suggest a fabric conditioner to be used to reduce static
electricity.
Do not overload the dryer or dry large bulky items such as duvets
or sleeping bags as it is important that the airflow through the
dryer is not obstructed.
Do not place items contaminated with flammable substances in
the dryer, such as petrol, cleaning solvents, cooking oil, fat, or
hair lacquer.These can cause fires. For the same reason, do not
dry rubber, foam rubber, plastic or paper.
Suitable for tumble drying
Tumble dry using full heat
Tumble dry using half heat
Do not tumble dry
INSTALLATION
To return your drier back to taking the condensed water to the
water bottle, simply fit the drain hose back to the valve at the top
of your drier.
If the drain hose is not long enough to reach your waste pipe, a
drain extension kit can obtained from your retailer
(part number 4213 089 8778).
The illustration shows the minimum
space required by the dryer and the
position of the waste-pipe within this
space and behind the dryer.If a trap
is fitted it must not obstruct the air
inlet at the back of the dryer.
The waste pipe can be positioned on
either side of the dryer.
If the waste pipe is used by both the
dryer and a washing machine then its
diameter must be large enough to
contain both hoses - 1.5" bore (38mm)
minimum.
FINAL INSTALLATION
Push the filter into its operating position
as shown in the diagram.
If you wish to change the side on which
your door opens, see the instructions on
the back page.
Remove any dust by wiping the drum
and door with a damp cloth. Any initial
smell from the heater should disappear
after the first period of heating.
L
A B C D E
Flashing Green
Green
Amber
Red
600mm
50mm
KJ
OPERATION
Open the door.
Load clothes loosely into the drum.
Load sheets first, starting with one corner.
Close the door.
Dry your hands.
Check that the timer is in the ‘0’ position.
Plug in the machine.
Select correct heat position (see programme chart on control
panel for recommendations).
Set the timer to the required time setting (see programme chart on
control panel for recommendations).
The drum will begin rotating. Reversing drum models will stop
every few minutes to rotate in the reverse direction for a short
time.
Should the clothes become dry before the cycle has finished, or if
an excessive programme time has been selected, the drum will
continue to rotate while the thermostat will automatically switch
the heater off to prevent over-drying and save energy.
If the door is opened during a cycle the dryer will stop. To restart,
close the door and press the start button (if fitted). When drying
large items such as sheets, we suggest you periodically stop the
dryer to redistribute the load.
There is an automatic 12 minute cool down period at the end of
every cycle, during which the heater is switched off.This helps to
minimise creasing.
NEVER SWITCH THE DRYER OFF AND LEAVE A
HOT LOAD IN THE DRUM.
ALWAYS CLEAN THE FILTER AFTER EACH USE.
Failure to do so could cause the safety cut-out to operate.
L
A B C D E
Flashing Green
Green
Amber
Red
600m
50mm
KJ
ALWAYS EMPTY THE WATER BOTTLE
ADDITIONAL INFORMATION
ANY PROBLEMS
If the clothes are not dryafter normal drying time:
–Check that you used the correct heat setting.
–Check that you have not set the timer within a cool down
period.
–Check that the lint filter has been cleaned. A blocked filter
will restrict the airflow.
–Check that the condenser unit and associated duct work are
clean. If blocked these will restrict the airflow.
–Check that your dryer is heating - below the door to the left
side, should feel warm to the touch after the first 10-15
minutes of its programme. Failure to heat may indicate the
safety cut-out has operated. To reset, simply press the red
button at the rear of the machine.If it has operated then a
sharp“click” will be heard. This cut-out only operates if the
airflow is severely restricted so make sure the filter is clean
and that all other restrictions are removed before re-starting.
If the cut-out continues to operate after checking the above
points, you should contact your service agent.
–Check that the machine has the correct weight load in the
drum before starting the appliance.
If your machine does not work check the following before
calling a service engineer:
–Check that there is a supply of electricity.
–Check that the door has been properly closed and the
machine is switched on.
–Check that the water bottle has been withdrawn from, and
replaced into the machine.The bottle full warning light
should be off.
–Check the fuse in the moulded plug.
OPTIONAL EXTRAS
Stacking Kit.
This enables the dryer to be stacked on top of another similar flat
topped appliance.Only stack kit 0312-004-01000 should be
used. Any other stack kit may affect performance.
The above item can be purchased as an accessory for your
tumble dryer from your supplier.
TECHNICAL DATA
OVERALL DIMENSIONS:
Height: 85 cm
Width: 59.5 cm
Depth: 58 cm
MAXIMUM DRY WEIGHT LOADS:
Cotton 6kg
(for minimum creasing 2kg)
Delicates 2kg
For electrical ratings see plate on back of dryer.
For Model No.see serial plate inside door (needed when
requesting service).
Room temperature range 5˚C to 30˚C.
Your washing machine should have a spin speed of not less
than 800rpm.
–Pull the filter upwards and away from
the appliance.
–Remove any threads or fluff by hand or
with a soft brush.
–Slide the filter back.
– Wash the filter occasionally in detergent
solution using a soft brush to remove
small particles.
–Open the door, pull out and empty the
bottle.
–Replace the bottle ensuring that it is
pushed all the way in - if it is not, the
dryer will not operate.
–If the dryer is connected to a drain there
is no need to empty the bottle but it must
be correctly fitted to the machine.
L
A B C D E
Flashing Green
Green
Amber
Red
600mm
50mm
KJ
Position the tumble dryer so that the plug remains accessible
after installation. Do not block the vent at the front or base of the
dryer, as this will impair the working of the machine.This
appliance must not be installed behind a lockable door, a sliding
door or a door with hinges on the opposite side to that of the
tumble dryer
DRAINAGE OPTIONS
Your new tumble dryer is fitted with an internal drain pump, which
gives you the option of being able to drain condensed water to its
water bottle, or to your household waste pipe.Connecting your
dryer to a household waste pipe will mean you will not need to
periodically empty the water bottle.As supplied, the drier will drain
the water to its bottle.If you wish to convert the dryer so that its
water is diverted to a household waste pipe, follow the simple
instructions below:-
1/ Pull the drain hose from the valve at the top of the unit.
2/ Fit the drain hose into your household waste pipe,ensuring a
gap between the end of the hose and any water in the waste pipe.
95601 18.04.05 18/4/05 03:29 pm Page 1
–This tumble dryer is intended for NORMAL DOMESTIC
USE ONLY.
–Please note it is not recommended that the dryer is placed
directly next to ovens or cookers as the performance of the
dryer may be affected.
–A carpet must not obstruct the ventilation openings in the
base of the dryer.
–Do not stack the tumble dryer on top of other appliances
without the correct stacking kit.
–Any electrical work required to install the appliance should
be carried out by a qualified person.
–It is important to clean the lint filter after each drying cycle
and the condenser every three or four months or the
restrictions to airflow will extend drying times and could
cause the safety cut-out to trip.
–Under no circumstances should anything other than the
recommended articles be placed in the tumble dryer.
–The tumble dryer should be serviced by an appointed
service organisation and only genuine parts used.
–It is dangerous to alter or modify the product in any way
other than fitting authorised accessories.
– We recommend that the appliance is unplugged each time
after use.It should always be disconnected from the
electricity supply if it is to be left unattended for long
periods (i.e. weekends, holidays etc.)
–The rear of the dryer gets quite hot during use. Position the
dryer so that the back is not accessible while in operation.
–The special mains cable and plug assembly must only be
replaced with a genuine part from the manufacturer or his
service agent.
–It is important to clean fluff from the window of the dryer
and around the door seal after each drying cycle. Failure to
do so could result in water leaking.
–DO NOTuse a two-way adaptor, or extension lead. The
dryer must be connected to its own socket.
–DO NOTblock the air inlets at the front, base and side of
your dryer.
–DO NOTallow fluff to accumulate around the tumble dryer.
–DO NOTexceed the recommended maximum load.
–DO NOTallow children to tamper with the controls and
keep them away from the dryer when it is in operation.
–DO NOTplace articles in the dryer if anything other than a
water solution has been used in the cleaning process.
–DO NOTattempt to dry dripping wet articles or items
containing foam rubber or rubber-like materials.
–DO NOTuse the tumble dryer if you suspect that it is
damaged in any way. Under no circumstances should you
attempt to repair the appliance yourself.Repairs carried
out by inexperienced persons may cause serious injury.
Consult your local appointed service engineer and insist
on genuine spare parts.
THIS APPLIANCE MUST BE EARTHED
IMPORTANT USER INFORMATION
These notes are provided in the interest of safety. You must read them before installing or using the appliance.
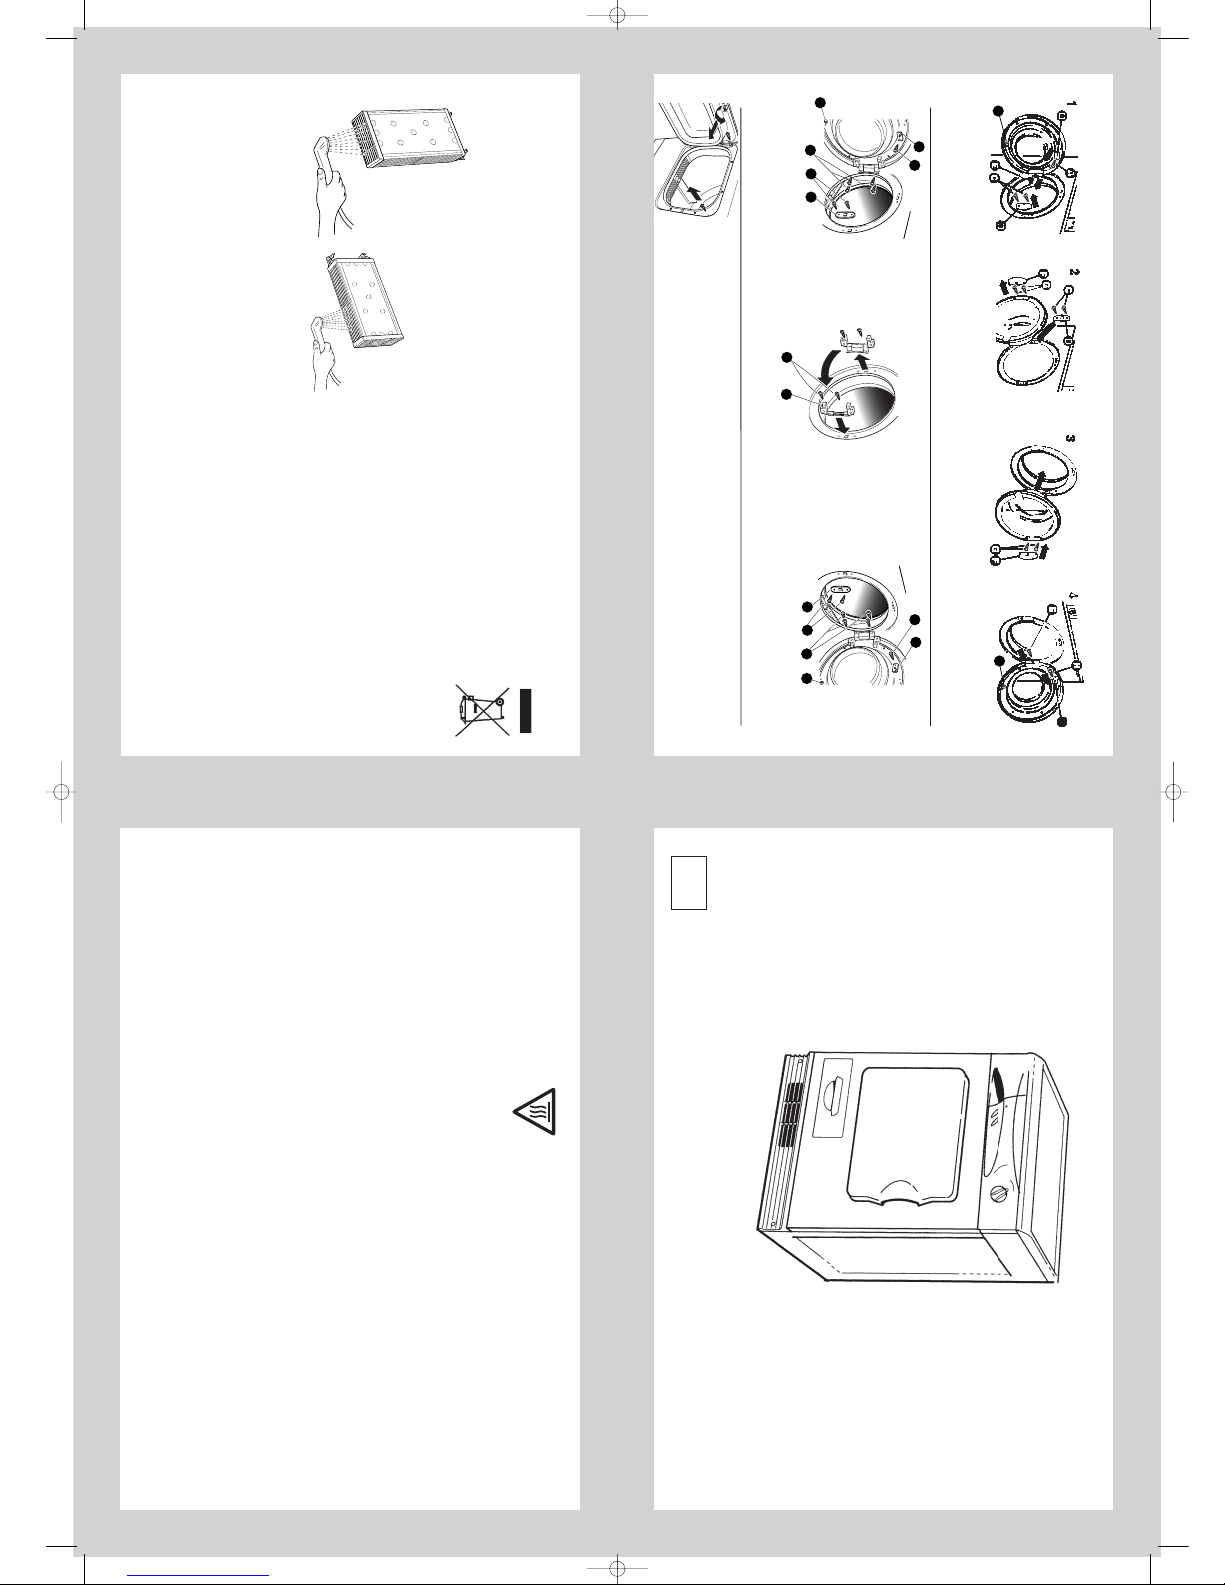
REVERSING THE DOOR OPENING
4213 094 95601
INSTRUCTIONS FOR USE
IMPORTANT:
PLEASE READ THESE INSTRUCTIONS THOROUGHLY BEFORE USING THIS APPLIANCE.
KEEP THEM IN A SAFE PLACE FOR FUTURE REFERENCE.
GB
THE CONDENSER
The condenser and ducting should be cleaned monthly
or more frequently if the dryer is in constant use.
See “CLEANING THE CONDENSER” opposite.
NOTE: The condenser will discolour through use.
REMOVING THE CONDENSER
–Firmly pull the condenser out.
RE-INSTALLING THE CONDENSER
–Carefully push the condenser back into the machine, until it is
pushed fully home and a “click” is heard.
–Ensure all lint and fluff is removed from around the grille seal
before closing or water may leak.
–IMPORTANT:The dryer may leak if the condenser is not
correctly re-installed.
CLEANING THE CONDENSER
CAUTION: For maximum efficiency, the plates are made from
very thin aluminium and are easily damaged. Do not try to poke
anything between the plates or use a hard object or tool for
cleaning. At all times, handle the condenser carefully and avoid
crushing the plates.
–Remove the condenser (see opposite).
–Flush the fluff from between the plates under running water
and carefully shake off excess water.
–Whilst the condenser is
removed, clean as much fluff
as possible from inside the
ducting by reaching a hand
into the machine.In particular,
keep the passage from the fan
clear (on the right hand side of
the condenser duct).
–After cleaning, re-install the condenser (see opposite).
1
1
2
1
2
2
2
1
1
2
1
2
2
2
First remove the child safety peg from the top of the door by rotating 90˚
anticlockwise.
Now unscrew the door hinges from the machine by
removing the 4 screws. Do not use a power screwdriver as this may damage the screw threads.
Remove the four screws from the opposite side of the door opening. Place these screws in the hinge holes on the other side of the door
opening.
Reverse the door and re apply the hinge screws.
Replace the child safe peg in the top of the, now reversed, door.
Open the door. Undo screw (A) remove
switch strike (B) and replace screw. Undo
screw (J) and remove buffer. Remove
screws (C) and latch plate (D). Remove
hinge cover screw (E). Close the door.
Open the door. Undo screw (A) remove switch
strike (B) and replace screw. Undo screw (J) and
remove buffer. Remove screws (C) and latch
plate (D). Remove hinge block screw (E).
Remove door from hinge blocks.
Your dryer is fitted with a reversible door. To change the direction of opening proceed as follows for your type of door.
Dryers fitted with hinge cover :-
Pull the hinge cover (F) forwards to
remove it. Remove two outer
screws (G). Remove door. Fit latch
plate (D) with screws (C)
Remove hinge screws (F) and hinge (G)
and refit to opposite side as shown.
Reverse door and fit to dryer in
closed position. Refit screws (G)
and hinge cover (F). Open the door.
Refit latch plate (D) with screws (C). Remove
screw (H) at top of door and re fit switch strike
(B) as shown. Refit buffer (J). Fit door to
hinge blocks and secure with screws (E)
Fit screw (E) to secure hinge cover.
Remove screw (H) at top of door
and refit switch strike (B) as shown.
Refit buffer (J).
Large Door Opening :-
Dryers fitted without hinge cover :-
32
1
FG
B
H
E
CD
BA
J
EC D
B
J
J
J
This label, positioned on the rear of your
dryer, indicates the surface is hot when in
operation - avoid touching
CAUTION
HOT SURFACE
This appliance is marked according to the European Directive
2002/96/EC
on Waste Electrical and Electronic Equipment (WEEE).
This guideline is the frame of a Europeanwide validity of return
and recycling on Waste Electrical and Electronic Equipment
95601 18.04.05 18/4/05 03:29 pm Page 2

Other Baumatic Dryer manuals

Baumatic BCD71 User manual

Baumatic

Baumatic BCD71 User manual

Baumatic BCD70 User manual

Baumatic

Baumatic BCD70 User manual

Baumatic BVD50 User manual

Baumatic

Baumatic BVD50 User manual

Baumatic BFVTD6BL User manual

Baumatic

Baumatic BFVTD6BL User manual

Baumatic BFVTD6BL User manual

Baumatic

Baumatic BFVTD6BL User manual

Baumatic BTD1 User manual

Baumatic

Baumatic BTD1 User manual

Baumatic BTD1 User manual

Baumatic

Baumatic BTD1 User manual

Popular Dryer manuals by other brands

GE DDC4400TWH installation instructions

GE

GE DDC4400TWH installation instructions

MSA DPGT650E/G manual

MSA

MSA DPGT650E/G manual

GE DDC4400S Dimensions and specifications

GE

GE DDC4400S Dimensions and specifications

Beko DCU 9330 Installation & operating instructions and drying guidance

Beko

Beko DCU 9330 Installation & operating instructions and drying guidance

Haier HDY-HMS70 Operation manual

Haier

Haier HDY-HMS70 Operation manual

Puregas PHF instruction manual

Puregas

Puregas PHF instruction manual

Svan SVSB84 owner's manual

Svan

Svan SVSB84 owner's manual

Vogue DRY.CR.CON.7KG owner's manual

Vogue

Vogue DRY.CR.CON.7KG owner's manual

Beko B3T48241DW user manual

Beko

Beko B3T48241DW user manual

Miele Touchtronic T 9800 user guide

Miele

Miele Touchtronic T 9800 user guide

LG DLE7150W owner's manual

LG

LG DLE7150W owner's manual

Speed Queen KES18AWF Specifications

Speed Queen

Speed Queen KES18AWF Specifications

GE DuraDrum GTDP250GM Dimensions and installation information

GE

GE DuraDrum GTDP250GM Dimensions and installation information

Frigidaire FEQ332CE Factory parts catalog

Frigidaire

Frigidaire FEQ332CE Factory parts catalog

Heinner HCD-V8T1CHB manual

Heinner

Heinner HCD-V8T1CHB manual

Bosch WQG24590BY User manual and installation instructions

Bosch

Bosch WQG24590BY User manual and installation instructions

Frigidaire Affinity FAQG7001LB Installation

Frigidaire

Frigidaire Affinity FAQG7001LB Installation

Puregas P1500W Series user guide

Puregas

Puregas P1500W Series user guide

manuals.online logo
manuals.online logoBrands
  • About & Mission
  • Contact us
  • Privacy Policy
  • Terms and Conditions

Copyright 2025 Manuals.Online. All Rights Reserved.