Bayco NightStick TAC-500 User manual

Bayco Products, Inc. • 640 South Sanden Blvd. • Wylie, TX 75098 • 1-800-233-2155 • 1-469-326-9400 • www.nightstick.com
INS-T500-18
Instruction Manual
TAC-500/510/550/560
US PATENT 9,713,217
THANK YOU FOR SELECTING THE NIGHTSTICK TAC!
Please read these instructions before using your TAC. They include important safety
and operation information. Be sure to charge the TAC fully before the rst use. A battery
is fully charged when the charger light is green.
WARNINGS
yLithium-ion batteries must be used and charged properly. Improper use can result in
serious injury, re, or death.
yNOT FOR USE IN HAZARDOUS LOCATIONS. Do not use this product in explosive
atmospheres, near ammable liquids, or where explosion proof or intrinsically safe
lighting is required.
yDO NOT use this product in the proximity of vehicles or equipment when there is a
risk of ammable liquids coming into contact with the ashlight.
yLight can become hot while on. To prevent damage DO NOT cover or place next to
any potentially ammable materials while in use.
yDo not leave the battery in direct sunlight or use or store the battery inside cars in
hot weather.
yDo not expose the battery to water or salt water, or allow the battery to get wet.
yDo not store the battery with metallic objects that may cause a short circuit.
yImmediately discontinue use of the battery if the battery emits an unusual smell,
feels hot, changes color, changes shape or appears abnormal in any way.
yKeep out of the reach of children.
INITIAL USE
yFully charge the TAC before the rst use, or if the battery is new or has been unused
for several months. The maximum charge time required is approximately 4 hours.
DAILY USE
yUse only the supplied Nightstick charger, battery and AC or DC adapter. For best
performance, charge the TAC when the ashlight beam starts to dim.
yConnect the AC power adapter to the charger. The LED indicator will not be
illuminated at this point.
yWith the ashlight facing forward, slide the TAC into the charger until the contacts
snap into place.
yThe LED indicator changes to constant red indicating the TAC is properly inserted
into the charger and is in fact charging. The LED indicator remains red until the battery
is fully charged. At full charge, the LED indicator turns green.
yThe total time to full charge the TAC varies depending on the remaining charge in
the battery pack.
yTo conrm a full charge, keep the TAC in the charger and turn it on. The LED indicator
will change to red. Turn off the TAC. If the TAC is fully charged, the LED indicator will
turn green. If not, it remains red until the charge is completed and the LED indicator
turns green. The TAC will now be fully charged.
OPERATION
The TAC has ve light modes: momentary ashlight, full brightness ashlight,
medium brightness ashlight, low brightness ashlight and strobe. The TAC has a single
tail switch providing access to all modes.
MOMENTARY FLASHLIGHT MODE
Lightly press the tail switch for momentary operation. Release the switch to turn the
light off.
CONSTANT-ON
Press the tail switch until it clicks and then release for constant-on in high-brightness
mode. Press and release the tail switch again to turn the light off.
SELECT BRIGHTNESS LEVEL
Press and hold down the tail switch. The light will cycle from high to medium to low
and then back up again at a rate of approximately one mode per second. The light will
continue to cycle up and down through the various modes as long as the tail switch is
held down. When the desired brightness level is reached, simply release the tail switch,
and the light will remain in that brightness mode. Pressing and holding the tail switch
again will cause the light to cycle from whatever mode it is currently in. Press and
release the tail switch to turn the light off.
STROBE FUNCTION
To activate the strobe, rapidly double click the tail switch. The strobe can be activated
from any mode including off. Press and release the body switch to turn the strobe off.
CR-123 BATTERY CARRIER
The CR123 battery carrier converts the TAC from rechargeable Lithium-ion to non-
rechargeable Lithium battery operation.
Load two CR-123 Lithium batteries with the positive terminals pointing in the direction
of the arrow. NOTE: The ashlight cannot be charged with the CR-123 CARRIER
installed.
LIMITED LIFETIME WARRANTY
Bayco Products, Inc. warrants this product to be free from defects in workmanship
and materials for the original purchaser’s lifetime. The Limited Lifetime Warranty
includes the LEDs, housing and lenses. Rechargeable batteries, chargers, switches,
electronics and included accessories are warranted for a period of two years with proof
of purchase. Normal wear and failures which are caused by accidents, misuse, abuse,
faulty installation and lightning damage are excluded.
We will repair or replace this product should we determine it to be defective. This
is the only warranty, expressed or implied, including any warranty of merchantability or
tness for a particular purpose.
For a complete copy of the warranty, go to www.nightstick.com/nightstick-product-
support/warranties. Retain your receipt for proof of purchase.
Included in the box - Compris dans la boîte - Incluido en la caja

Bayco Products, Inc. • 640 South Sanden Blvd. • Wylie, TX 75098 • 1-800-233-2155 • 1-469-326-9400 • www.nightstick.com
INS-T500-18
Mode d’emploi
TAC-500/510/550/560
MERCI D’AVOIR CHOISI LA TORCHE ÉLECTRIQUE NIGHTSTICK TAC!
VEUILLEZ CONSERVER CES INSTRUCTIONS.
Veuillez lire ces instructions avant d’utiliser votre TAC. Elles comprennent des
informations importantes liées à la sécurité et à l’utilisation de ce produit. Assurez-
vous de charger la TAC à bloc avant de l’utiliser pour la première fois. La batterie est
chargée à bloc quand le voyant du chargeur est vert.
AVERTISSEMENTS
yLes batteries au lithium-ion doivent être utilisées et rechargées correctement. Une
mauvaise utilisation peut causer des blessures graves, un incendie ou la mort.
yNE PAS UTILISER DANS DES ENDROITS DANGEREUX. Ne pas utiliser ce
produit dans des atmosphères explosibles, à proximité de liquides inammables,
ou un endroit antidéagrant ou un emplacement dont un éclairage à sécurité
intrinsèque est requis.
yNE PAS utiliser ce produit à proximité de véhicules ou équipements quand il y a
risque de liquides inammables entrant en contact avec la lampe de poche.
yLa lumière peut être chaude lorsqu’elle est allumée. Pour éviter tout dommage
NE PAS couvrir ou placer à proximité de matériaux potentiellement inammables
pendant qu’elle est allumée.
yNe pas laisser la batterie en contact direct avec les rayons de soleil ou utiliser ou
conserver la batterie à l’intérieur des autos lorsqu’il fait chaud.
yNe pas mettre la batterie dans l’eau ou l’eau salée. La batterie ne doit jamais être
mouillée.
yNe pas conserver la batterie avec des objets métalliques qui peuvent causer un
court-circuit.
yNe pas mettre la batterie dans l’eau ou l’eau salée. La batterie ne doit jamais être
mouillée.
yNe pas conserver la batterie avec des objets métalliques qui peuvent causer un
court-circuit.
yCesser immédiatement d’utiliser la batterie si elle émet une odeur inhabituelle,
semble chaude, change de couleur ou de forme ou paraît anormal.
yGarder hors de la portée des enfants.
UTILISATION INITIALE
yChargez la TAC à bloc avant la première utilisation ou si la batterie est neuve ou
n’a pas été utilisée depuis plusieurs mois. La durée maximale de charge requise est
d’environ 4 heures.
UTILISATION QUOTIDIENNE
yUtilisez exclusivement le chargeur, la batterie et l’adaptateur c.a ou c.c Nightstick
fournis. Pour de meilleurs résultats, chargez la torche électrique TAC quand le
faisceau lumineux commence à s’affaiblir.
yConnectez l’adaptateur de courant c.a. au chargeur. Le voyant LED ne sera alors
pas allumé.
yLa torche électrique orientée vers l’avant, faites glisser la TAC dans le chargeur
jusqu’à ce que les contacts s’emboîtent.
yLe voyant LED passe au rouge, ce qui indique que la TAC est correctement
insérée dans le chargeur et est en train de charger. Le voyant LED reste rouge
jusqu’à ce que la batterie soit chargée à bloc. Une fois la charge terminée, le voyant
LED devient vert. Pour une charge à bloc, la durée de charge de la TAC varie en
fonction de la charge qui reste dans la batterie.
yPour conrmer une charge complète, laissez la TAC dans le chargeur et allumez-
la. Le voyant LED deviendra rouge. Éteignez la TAC. Si la charge est complète, le
voyant LED deviendra vert. Sinon, il restera rouge jusqu’à ce que la charge soit
terminée, puis deviendra vert. La torche électrique TAC sera alors chargée à bloc.
FONCTIONNEMENT
Le TAC contient cinq modes de lumières : lampe de poche à lumière momentanée,
lampe de poche à luminosité maximale, lampe de poche à luminosité moyenne, lampe
de poche à faible luminosité et mode stroboscopique. Le TAC a un bouton interrupteur
unique qui donne accès à tous les modes de lumière.
LAMPE DE POCHE À MODE MOMENTANÉ
Appuyer légèrement sur le bouton interrupteur pour un fonctionnement
momentané. Relâcher l’interrupteur pour éteindre la lumière.
MODE CONTINU
Appuyer sur le bouton interrupteur jusqu’à ce qu’il y a un enclenchement et
puis relâcher pour un mode continu de luminosité maximale. Appuyer et relâcher
l’interrupteur à nouveau pour éteindre la lumière.
CHOISIR LE NIVEAU DE LUMINOSITÉ
Appuyer et tenir le bouton interrupteur vers le bas. La lumière aura une luminosité
allant de maximale, à moyenne et à faible et reviendra de nouveau à maximale à
un taux approximatif d’une seconde par cycle. Ce cycle de luminosité persistera
aussi longtemps que l’interrupteur sera maintenu vers le bas. Lorsque le niveau
de luminosité est atteint, relâcher simplement le bouton interrupteur et le niveau
de luminosité restera sur le même mode. Si vous appuyer et relâcher le bouton
interrupteur de nouveau, vous enclencherez le cycle de luminosité à partir du mode où
il se trouve actuellement. Appuyer et relâcher l’interrupteur pour éteindre la lumière.
MODE STROBOSCOPIQUE
Pour activer le mode stroboscopique, cliquer rapidement deux fois le bouton
interrupteur. La lumière stroboscopique peut être activée à partir de n’importe quel
mode même s’il est éteint. Appuyer et relâcher l’interrupteur pour désactiver le mode
stroboscopique.
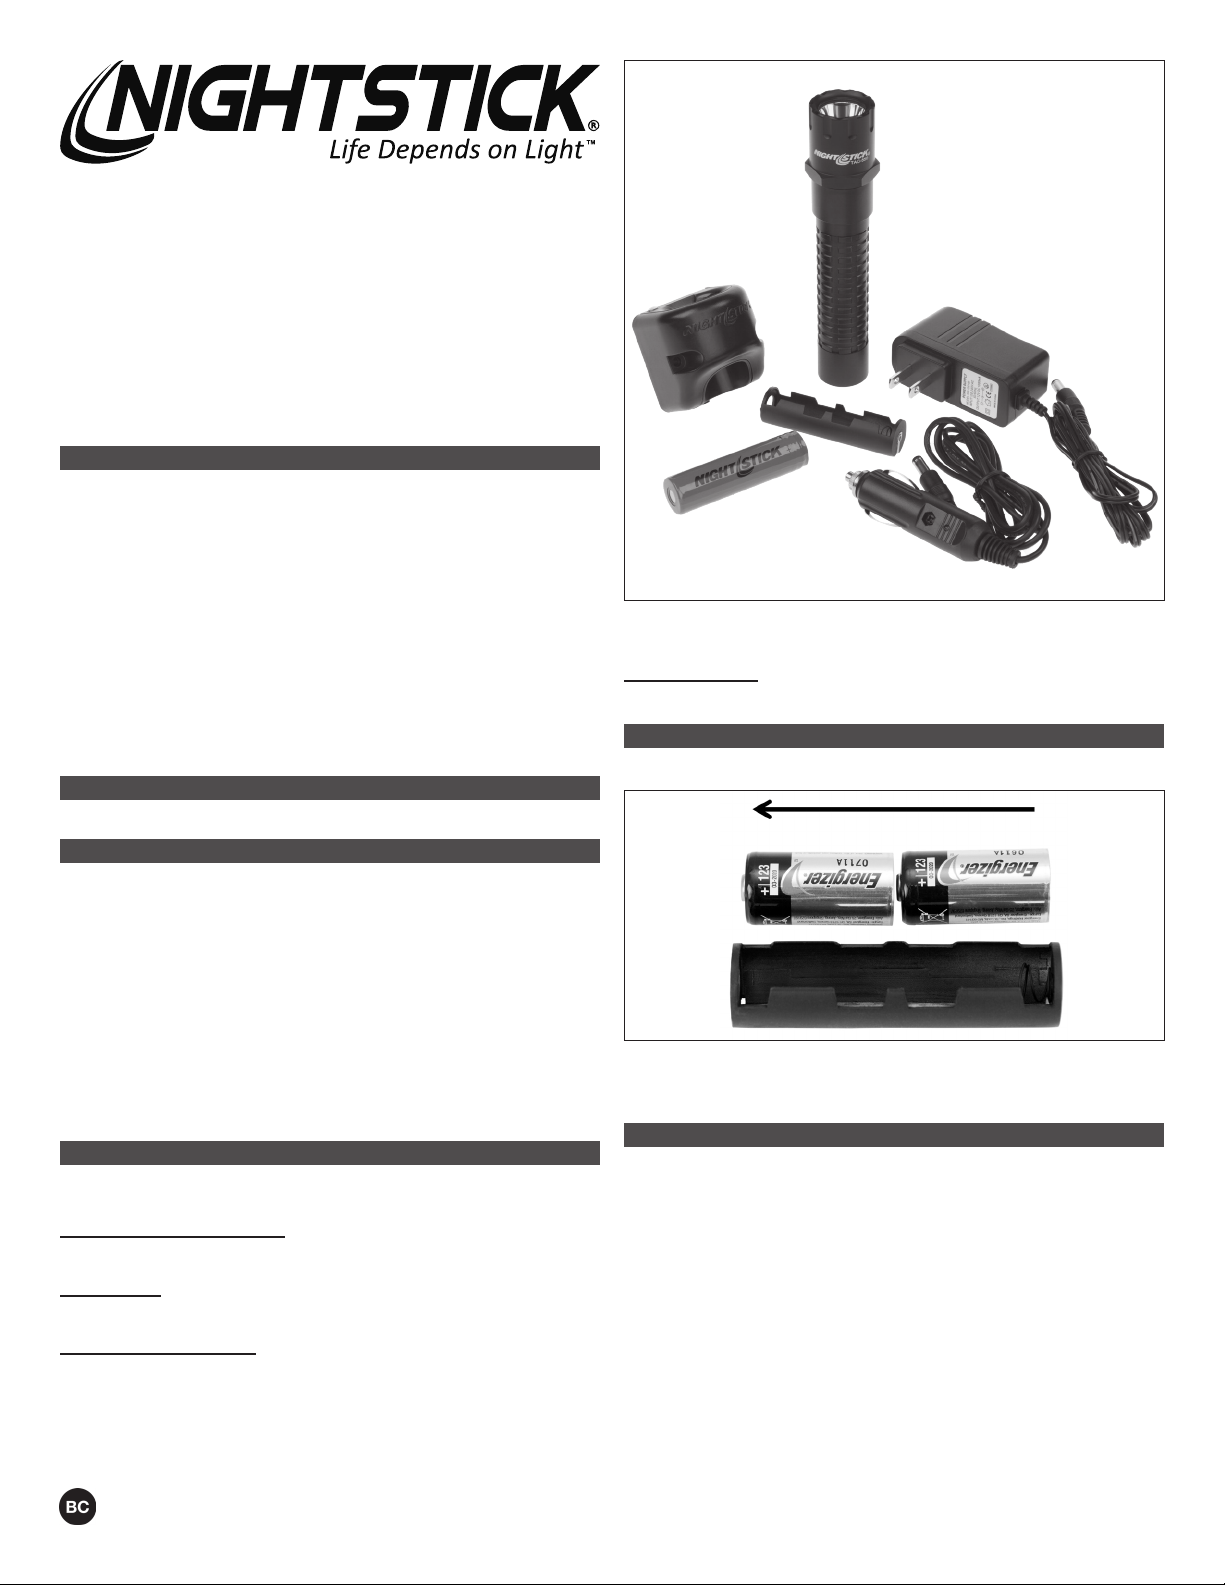
PORTE-BATTERIE CR-123
Le porte-batterie CR123 convertit le système d’alimentation TAC de lithium-ion
rechargeable au lithium non rechargeable.
Insérer 2 batteries au lithium CR-123 avec les bornes positives qui pointent en
direction de la èche.
REMARQUE : la lampe de poche ne peut être rechargée avec le porte-batterie
CR-123 installé.
GARANTIE
GARANTIE À VIE LIMITÉE
Bayco Products, Inc. garantit que ce produit est exempt de défauts de matériaux
et de fabrication à l’acheteur original durant toute sa vie. La garantie à vie limitée
inclut les DEL, les boîtiers et les lentilles. Les batteries rechargeables, les chargeurs,
les interrupteurs, les électroniques et les accessoires compris sont garantis pour une
période de deux ans avec une preuve d’achat. L’usure normal et les défaillances qui
sont causés par des accidents, une mauvaise utilisation, un abus, une installation
défectueuse et un système d’éclairage endommagé sont exclus.
Ce produit sera réparé ou remplacé si nous déterminons qu’il est défectueux.
Ceci est la seule garantie explicite ou implicite, y compris toute garantie de qualité
marchande ou d’adéquation à un usage particulier.
Pour une copie détaillée de la garantie, vous rendre sur le site www.nightstick.
com/nightstick-product-support/warranties. Gardez ce reçu comme preuve d’achat.
Manual de Instrucción
TAC-500/510/550/560
Por favor lea a las instrucciones antes del usar el TAC. Ellas incluyen información
importante sobre la seguridad y la operación. Esté seguro de cargar al TAC por
completo antes del primero uso. La batería es cargado por completo cuando la luz
es verde.
ADVERTENCIAS
yLas baterías de litio se deben utilizar y cargar correctamente. El uso inadecuado
puede causar lesiones graves, incendio o muerte.
yNO PARA USO EN LUGARES PELIGROSOS. No utilice este producto en
ambientes explosivos, cerca de líquidos inamables, o donde se requiere la
iluminación a prueba de explosión o de seguridad intrínseca.
yNO utilice este producto en las proximidades de vehículos o equipos cuando hay
un riesgo de que líquidos inamables entren en contacto con la linterna.
yLa luz puede calentarse mientras que está encendida. Para evitar daños, NO
cubra ni la coloque al lado de cualquier material potencialmente inamable mientras
esté en uso.
yNo deje la batería en la luz solar directa ni use o guarde la batería en el interior de
los vehículos cuando hace calor.
yNo exponga la batería al agua o al agua salada, ni permita que la batería se moje.
yNo guarde la batería con objetos metálicos que puedan causar un cortocircuito.
ySuspenda inmediatamente el uso de la batería si ésta emite un olor raro, se siente
caliente, cambia de color, cambia de forma o parece anormal de alguna manera.
yMantener fuera del alcance de los niños.
EL USO INICIO
yCarga por completo el TAC antes del uso o si la batería es nueva o no ha sido
usado por varias meses. El máximo tiempo de carga requerido es aproximadamente
4 horas.
EL USO DIARIO
yUsa sólo el proveido cargador, batería y adaptador de AC o CC de Nightstick. Para
el mejor rendimiento, carga el TAC cuando la luz de la lámpara de mano se atenúa.
yConecte el adaptador de corriente al cargador. El indicador LED no se iluminará
a este punto.

Bayco Products, Inc. • 640 South Sanden Blvd. • Wylie, TX 75098 • 1-800-233-2155 • 1-469-326-9400 • www.nightstick.com
INS-T500-18
yCon la luz de la lámpara de mano hacia adelante, deslice el TAC en el cargador
hasta que los contactos encajen en su lugar.
yEl indicador LED cambia a rojo constante indicando que el TAC está insertado
correctamente en el cargador y está cargando. El indicador LED permanence rojo
hasta que la batería es cargada por completo. Cuando completamente cargado, el
indicador LED se iluminará en verde. El tiempo total de para cargar completamente
el TAC varía en función de la carga restante en la batería.
yPara conrmar una carga completa, mantenga el TAC en el cargador y encenderlo.
El indicador LED se cambiará en rojo. Apague el TAC. Si el TAC es cargado por
completo, el indicador LED se cambiará en verde. Si no, permanecerá rojo hasta
que la carga es complete y el indicador LED se cambia a verde. El TAC será cargada
por complete.
OPERACION
El TAC tiene cinco modos de luz: linterna, linterna de brillo momentáneo completo,
linterna de brillo medio, linterna de bajo brillo y de luz estroboscópica. El TAC tiene un
solo interruptor trasero que proporciona acceso a todos los modos.
MODO DE LINTERNA MOMENTÁNEO
Presione ligeramente el interruptor trasero para el funcionamiento momentáneo.
Suelte el interruptor para apagar la luz.
ENCENDIDO CONSTANTE
Presione el interruptor trasero hasta que haga clic y luego suelte para el modo
de encendido constante en de alto brillo. Presione y suelte el interruptor trasero de
nuevo para apagar la luz.
SELECCIONE EL NIVEL DE BRILLO
Presione y mantenga presionado el interruptor trasero. La luz tendrá un ciclo de
alta a media a baja y luego volverá a subir a un ritmo aproximado de un modo por
segundo. La luz continuará en ciclos de arriba y abajo a través de los distintos modos
mientras el interruptor trasero se mantenga presionado. Cuando se alcanza el nivel
de brillo deseado, simplemente suelte el interruptor trasero, y la luz permanecerá en
ese modo de brillo. Presionando y manteniendo presionado el interruptor trasero, hará
que la luz haga los ciclos desde cualquier modo que se encuentre. Presione y suelte
el interruptor trasero para apagar la luz.
FUNCIÓN STROBE
Para activar la luz estroboscópica, rápidamente haga doble clic en el interruptor
trasero. La luz estroboscópica puede ser activada desde cualquier modo incluso
desde el modo de apagado. Presione y suelte el interruptor del cuerpo para apagar
la luz estroboscópica.
SOPORTE DE LA BATERIA CR-123
El soporte de la batería CR-123 convierte el TAC de Litio-ion recargable en una
batería de litio para el funcionamiento no recargable.
Cargue dos baterías de litio CR-123 con los terminales positivos apuntando en
la dirección de la echa. NOTA: La linterna no se puede cargar con el soporte de la
CR-123 instalado.
GARANTÍA
GARANTIA LIMITADA DE POR VIDA
Bayco Products, Inc. garantiza que este producto está libre de defectos
de mano de obra y materiales durante la vida del comprador original. La
garantía de por vida limitada incluye los LED, la carcasa y los lentes. Las pilas
recargables, los cargadores, los interruptores, la electrónica y los accesorios
incluidos están garantizados por un período de dos años con un comprobante
de compra. Se excluyen el desgaste y los fallos normales, que son causados
por accidentes, mal uso, abuso, instalación defectuosa y daños por rayos.
Repararemos o reemplazaremos este producto si lo determinamos como
defectuoso. Esta es la única garantía, expresa o implícita, incluyendo cualquier
garantía de comerciabilidad o idoneidad para un propósito particular.
Para obtener una copia completa de la garantía, visite www.nightstick.
com/nightstick-product-support/warranties. Conserve su recibo para
comprobar la compra.
This manual suits for next models
5
Table of contents
Languages:
Other Bayco Flashlight manuals
Popular Flashlight manuals by other brands

PowerTac
PowerTac Scholar user manual

StreamLight
StreamLight strion operating instructions

BRASSELER USA
BRASSELER USA VE Beam Cordless Headlight System Instructions for use

Yarkiy Luch
Yarkiy Luch Lemur user manual

Gear Light
Gear Light S1000 user manual

GreatLite
GreatLite EXPE51 Operating instructions and parts manual

Silverline
Silverline 456996 quick start guide

Exposure Lights
Exposure Lights BLAZE user guide

RovyVon
RovyVon Angel Eyes E300S user manual

Hypertherm
Hypertherm Duramax Series Field Service Bulletin

Pro-4 Tactical
Pro-4 Tactical Mega Tac-Light instruction manual

Velleman
Velleman MK154 operating instructions