be bionic BeBionic 3 Manual

technical information

2
technical information

3
Contents
1.0 Introduction............................................................................................................. 04-07
1.1 In the Box
1.2 Principal Dimensions
1.3 Specifications
2.0 bebionic Grips......................................................................................................... 09-19
2.1 Factory Settings
2.2 Programme Switch
2.3 Thumb Adjustment
2.4 Opposed Grips
2.5 Non-opposed Grips
2.6 Further Grips and Hand Positions
3.0 bebionic Glove.......................................................................................................... 21-25
3.1 How to fit a bebionic Glove
3.2 Removing a bebionic Glove
3.3 Care Instructions for bebionic Glove
4.0 Connections & Compatibility...................................................................................... 27-35
4.1 Wrist Options
4.2 Battery Options
4.3 Power Information
4.4 System Connections
4.5 System Compatibility
5.0 bebalance ...............................................................................................................37-49
5.1 Introduction
5.2 Installation
5.3 Start up
5.4 Language Selection
5.5 Radio Frequency Module Configuration
5.6 Operating Modes
5.7 Hand Configuration
5.8 Grip Selection
5.9 Advanced
6.0 Additional Information, Warranty, Repairs and Returns...................................................51-63
6.1 Gaiter Removal
6.2 Gaiter Refitting
6.3 Clevis Link Replacement
6.4 Quality Assurance
6.5 Warranty
6.6 Returns

04
1.0 Introduction
This document contains important information
for the correct use and set up of the bebionic3
hand. Please note some of the images may
differ as this document applies to both the
medium and large size of hands. Read this
document throughly before fitting a bebionic3
hand.
A bebionic system is completed by adding from
a selection of compatible system components
including myo electrodes (or other input
devices), battery systems, wrists and cables.
We recommend RSLSteeper components for
all of these requirements.
The bebionic3 hand is designed for mild to
moderate activities. Its use in situations where
heavy loads, vibrations or impacts may be
encountered must be avoided.
Key:
Texts with this symbol need special
attention. They contain information to do
with safety.
WARNING
!
Caution
Texts with this symbol draw your attention
to potential sources of damage to the hand.

05
1.1 What’s in the box
1. 2.
3.
4.
5.
6.
7.
1. bebionic radio frequency (RF) module
2. bebionic3 hand
3. bebionic tool kit
4. bebionic in car charger
5. bebalance3 programming software
6. bebionic3 user guide
7. bebionic3 technical information

06
1.2 Principal Dimensions
Principal Dimensions Large Medium
A Middle Finger Tip to Hand Base 200mm 190mm
B Thumb Tip to Hand Base 125mm 121mm
C Max Chassis Width (no glove) 92mm 84mm
D Diameter of Chassis at Wrist 50mm 50mm
Palm Circumference (no glove) 220mm 204mm
Maximum Opening Width - Tripod Grip 105mm (with glove) 105mm (with glove)
Thumb Swing Through Angle 68o68o
X EQD Only 5mm 5mm
B
D
X
A
C
X

07
1.3 Specifications
Part Number Build Height †Weight Description
BBHLG*QD 125mm + 25mm 598g bebionic3 Large Hand with EQD Wrist
BBHLG*FW 125mm + 37mm 557g bebionic3 Large Hand with RSLSteeper Friction Wrist
BBHLG*SW 125mm + 12mm 577g bebionic3 Large Hand with Short Wrist
BBHLG*EU 125mm + 16mm 574g bebionic3 Large Hand with M12 Thread Stud
BBHLG*NA 125mm + 16mm 572g bebionic3 Large Hand with 1/2x 20 UNF Stud
BBHMD*QD 121mm + 25mm 591g bebionic3 Medium Hand with EQD Wrist
BBHMD*FW 121mm + 37mm 550g bebionic3 Medium Hand with RSLSteeper Friction Wrist
BBHMD*SW 121mm + 12mm 570g bebionic3 Medium Hand with Short Wrist
BBHMD*EU 121mm + 16mm 567g bebionic3 Medium Hand with M12 Thread Stud
BBHMD*NA 121mm + 16mm 565g bebionic3 Medium Hand with 1/2x 20 UNF Stud
†Build height comprises of thumb tip to base of hand measure, followed by the build height for each wrist option.
The second number refers to the minimum allowance for the mating wrist unit.
*Denotes side of hand, i.e. insert L for a left hand, or R for a right hand.
Large Medium
Maximum Power Grip Force 140.1N 140.1N
Maximum Tripod Grip Force 36.6N 36.6N
Maximum Key Grip Force 26.5N 26.5N
Maximum Time to Open or Close - Tripod Grip 0.5 Seconds 0.5 Seconds
Maximum Time to Open or Close - Power Grip 1.0 Seconds 1.0 Seconds
Maximum Time to Open or Close - Key Grip 1.0 Seconds 1.0 Seconds
Maximum Static Load - Hook Grip 45Kg 45Kg
Maximum Load Individual Finger - Hook Grip 25Kg 25Kg
Maximum Finger Tip Extension Load 6Kg 6Kg
Maximum Safe Vertical Load Taken Through Knuckles 90kg 90kg

08
2.0 bebionic grips

09
The
bebionic3
hand provides a
number of grips, allowing the user
to have a more complete device to
assist them in their day to day life.
The hand has two selectable thumb
positions: opposed & non-opposed.
Opposed is where the thumb is in
opposition to the fingers on the hand,
allowing grips like pinch and power.
Non-Opposed is where the thumb is
parallel with the fingers of the hand
and allows grips like key and finger
point.
Opposed Non-opposed

10
The hand is supplied preset in Mode 4. This provides
two input operation with proportional control of grip and
speed. Speed & grip force are set to maximum.
To alternate between default and alternative grip pattern,
an OPEN OPEN signal must be applied (i.e. the hand
must be fully opened, the signal relaxed and then a
second open signal supplied). To alternate between the
primary grip pattern table and secondary grip pattern
table, press the Programme Switch for less than 2
seconds. The Auto Grip feature is turned off.
Introduction
Primary Opposed
Default - Tripod
Alternative - Power
Primary Non-Opposed
Default - Key
Alternative - Finger Point
Secondary Opposed
Default - Active Index
Alternative - Tripod
Secondary Non-Opposed
Default - Column
Alternative - Mouse
A Programme Switch is provided on the back of the
hand. This has four functions;
1. Switch the hand ON and OFF
A single press for approximately three seconds will
switch the hand OFF. A single press for more than two
seconds will switch the hand ON.
2. Alternate between the primary and secondary
grip patterns
When the hand is switched ON, a single press of less
than two seconds will alternate between the primary and
secondary grip patterns. This will be accompanied by
a short bleep and vibration (if activated on bebalance).
3. Enable / disable the in-hand RF module
With the hand switched ON, a single press for more
than four seconds will enable the RF module. Pressing
the switch again for more than two seconds or
disconnecting the power to the hand will disable the RF
module.
4. Enter / exit glove mode as follows
With the hand switched OFF, press the button until the
thumb begins to drive in. Then release the button.
2.2 Programme Switch
2.1 Factory Settings

11
2.3 Thumb Adjustment.
To achieve certain grips it is necessary to adjust the thumb position. There are two different planes to
move the thumb in and they are detailed below.
1. Thumb ML Adjuster 2. Thumb Contact Point Adjuster
Underside of Thumb Bracket
An adjuster has also been provided to alter the baseline
position of the thumb in order to optimise the contact
point of the thumb tip against the opposing finger(s)
for Tripod, Pinch and Precision Grips. This is done by
moving the thumb either towards the palm or away
from the palm. This adjuster is located under the thumb
bracket as shown above. Using a hex drive the adjuster
should be turned clockwise to move the thumb towards
the palm and anticlockwise to move the thumb away
from the palm. The effect will not be observed whilst
making the adjustment and can only be observed by
resetting the hand i.e. switching the hand OFF and ON
again.
An adjuster is provided to allow repositioning of the
thumb for contact with either the index and middle
fingers, as in Tripod Grip, or with index finger only, as in
Pinch and Precision Grips. The thumb pivot assembly
is fitted with a slotted screw as shown in diagram 1.
This acts to adjust the friction on an internal clamp and
is loosened by turning two complete turns and pushing
the screw inward. With the clamp slackened the thumb
position can be manually re-positioned. The assembly
must be retightened before electrically driving the thumb.
!
Caution
Thumb adjustment MUST be done by a
qualified technician or practitioner.
Please ensure screw is securely
tightened before resuming use.
WARNING
12
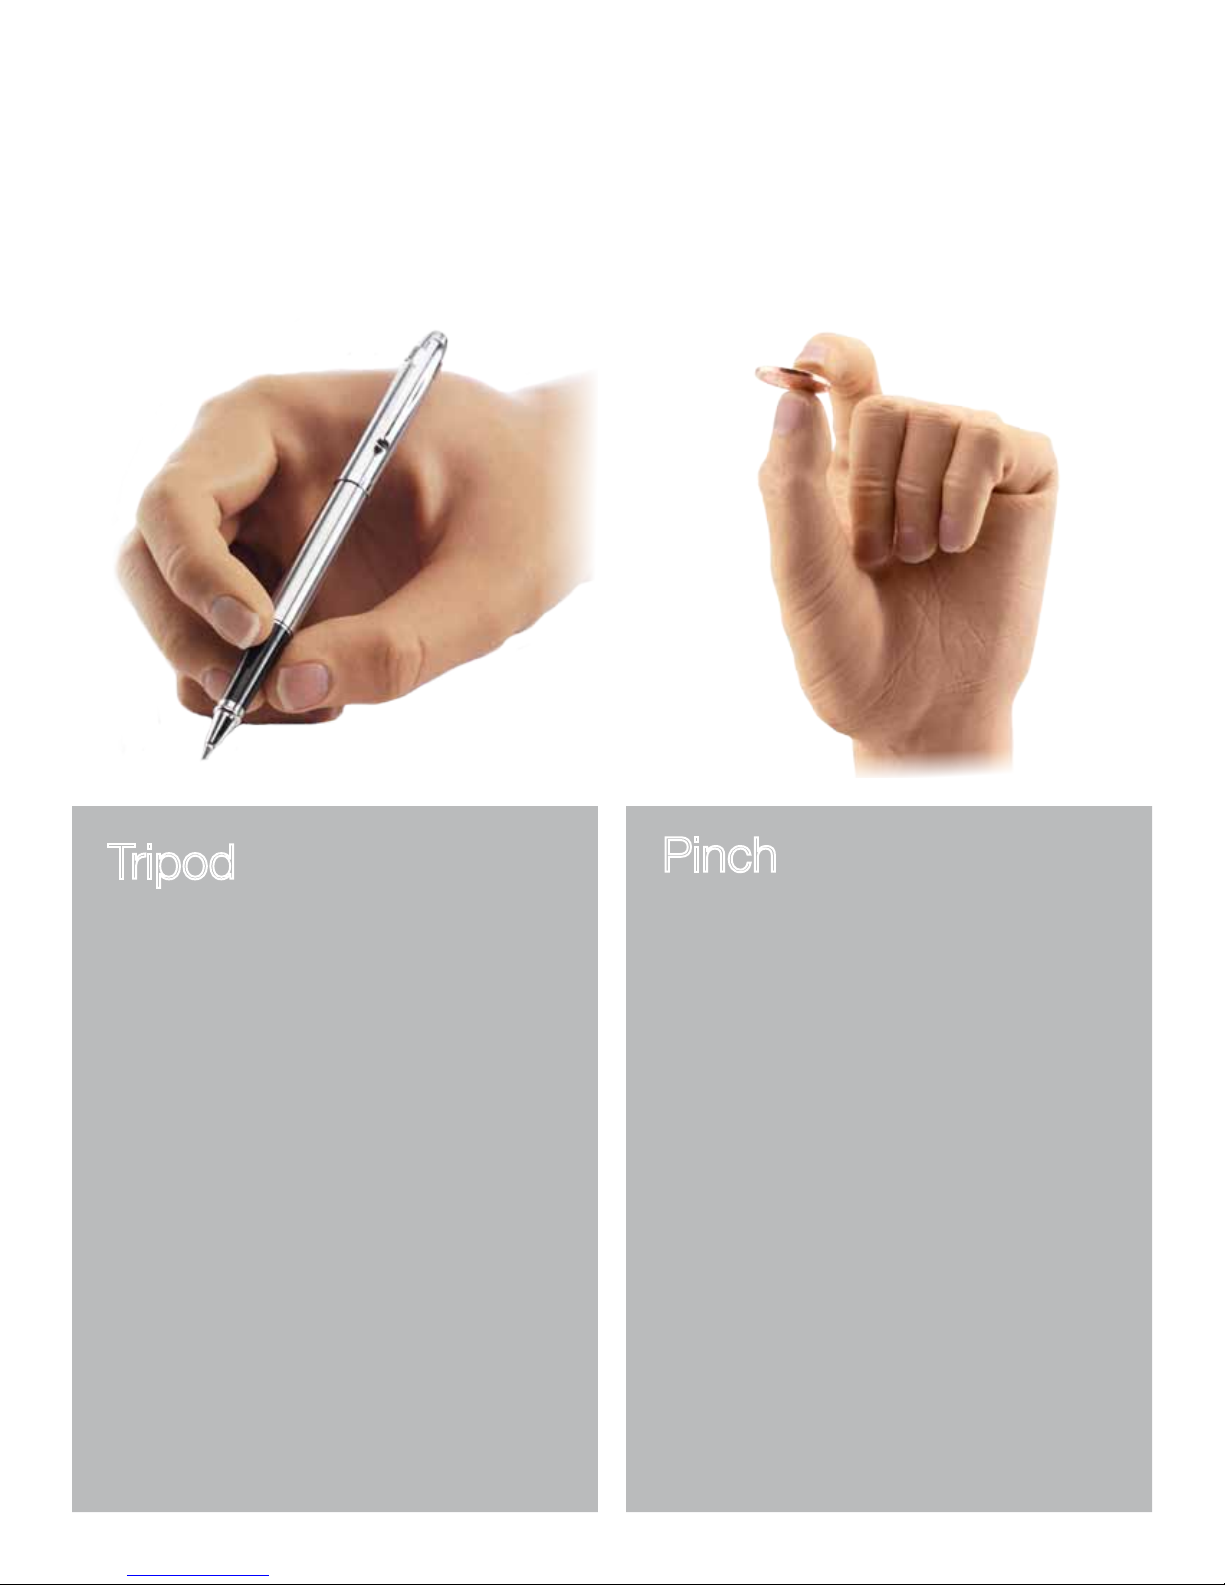
Grips
Pinch
To achieve this grip it is necessary
for the thumb to be manually
repositioned by the practitioner/
technician so that the thumb only
contacts the index finger (See
section 2.3). The thumb only
contacts index finger and is used for
the fine manipulation of objects.
2.4 Opposed - Thumb is opposite to the fingers
Tripod
When the thumb is opposed, the
hand closes into Tripod Grip with
index and middle fingers meeting
the thumb. Ring and little fingers
continue to close until they meet
resistance or the close signal stops.
This type of grip allows users to pick
up, hold and manipulate a variety of
everyday objects such as car keys,
coins, jar lids and pens.

13
Power
With the thumb opposed, all four
fingers close into the palm until
they meet resistance or the close
signal stops. When fingers are
approaching a fully closed position,
the thumb drives in to cover the
fingers for additional grip security.
This pattern allows round objects
such as a ball or a piece of fruit to
be held securely. This grip can also
provide a handshake. Cylindrical
shaped objects such as bottles,
home & garden utensil handles are
also held easily and securely.
Active Index (Formerly Trigger)
With the thumb opposed Active
Index Grip will grasp the handle of
an object with the middle, ring and
little fingers and secure the grip with
the thumb. The index finger will then
close – this may be positioned over
the lever of the device held such
as a spray bottle. The index finger
is under independent user control
and may be positioned accordingly.
To exit Active Index, an open signal
will fully open the index finger before
the other fingers and thumb release
their grip.
NEVER use a
bebionic
hand with firearms.
SERIOUS WARNING

14
Grips
2.5 Non-Opposed - Thumb is inline with the palm.
Key
In the non-opposed thumb position,
the four fingers partially close. The
thumb then closes onto the side of
the index finger. The thumb position
may be raised and lowered without
moving the other four fingers allowing
for release, capture or reposition
of the object being gripped. This
pattern is ideal for carrying paper
or letters, using a spoon and for
holding a thin flat object such as a
plate, a credit card or a key.
Finger Point
With the thumb in the non-opposed
setting, the user can move to a
Finger Point position. The middle,
ring, and little fingers close against
the palm and the thumb moves
against the middle finger. With this
grip, typing on a keyboard or input
pad, pressing a bell or a button can
be achieved.

15
Column
This grip moves the thumb into the
palm from a non-opposed position.
The fingers then close over the
thumb to provide a fixed column
that can be used as a way to push
heavier objects or larger buttons
and switches. Column is also the
recommended grip for dressing, as
the thumb is kept out of the way.
Mouse
With the thumb non-opposed, the
thumb and little finger close to hold
the side of the mouse, with the
middle and ring fingers providing
stability. The index finger closes on
to the mouse button and then backs
off to provide the button press. Each
close signal will give a mouse click
whilst an open signal will release the
mouse.

16
Grips
2.6 Further functions of the
bebionic3
hand.
Precision Closed
To achieve this grip it is necessary
for the thumb to be manually
repositioned by the practitioner/
technician so that the thumb only
contacts the index finger. This grip
can be used in situations similar
to the Precision Open Grip but
where extended fingers would be
obstructive, when working at a desk
for instance.
Initially the middle, ring and little
fingers close into the palm. The
thumb moves to the midpoint of its
range and pauses. The Index is then
active and under user control.
Precision Open
To achieve this grip it is necessary
for the thumb to be manually
repositioned by the practitioner/
technician so that the thumb only
contacts the index finger. With the
thumb opposed, the index finger
meets the static thumb allowing
the user to pick up and manipulate
small objects. When this grip is
selected and a close signal is
applied, the thumb closes to the
midpoint of its range and pauses.
The index is then active and under
user control. The middle, ring and
little fingers remain extended.

17
Hook
With the thumb in opposed, a
partially closed Power Grip gives the
Hook Grip.This is ideal for carrying a
shopping bag or briefcase.
Finger Adduction
The fingers of the bebionic hand
move together naturally as the
fingers close. This allows the user
to securely grip thin objects, such
as cutlery or a toothbrush, between
the fingers to achieve function in a
different plane. Finger Adduction
is most functional with the hand in
Power Grip but can also be achieved
with the hand in Key and Pinch.

18
Grips
2.6 Further functions of the
bebionic3
hand.
Open Palm
With the thumb in the non-opposed
position the hand may be fully
opened to provide a flat palm suitable
for carrying a tray or a plate.
Relaxed Hand
The thumb is set to the non-opposed
position and partially driven in toward
the palm. All the fingers are driven to
a slightly flexed position.
Applying a further signal will drive the
fingers into a carrying position.

19
be yourself

20
3.0 bebionic glove
Table of contents
Other be bionic Medical Equipment manuals


