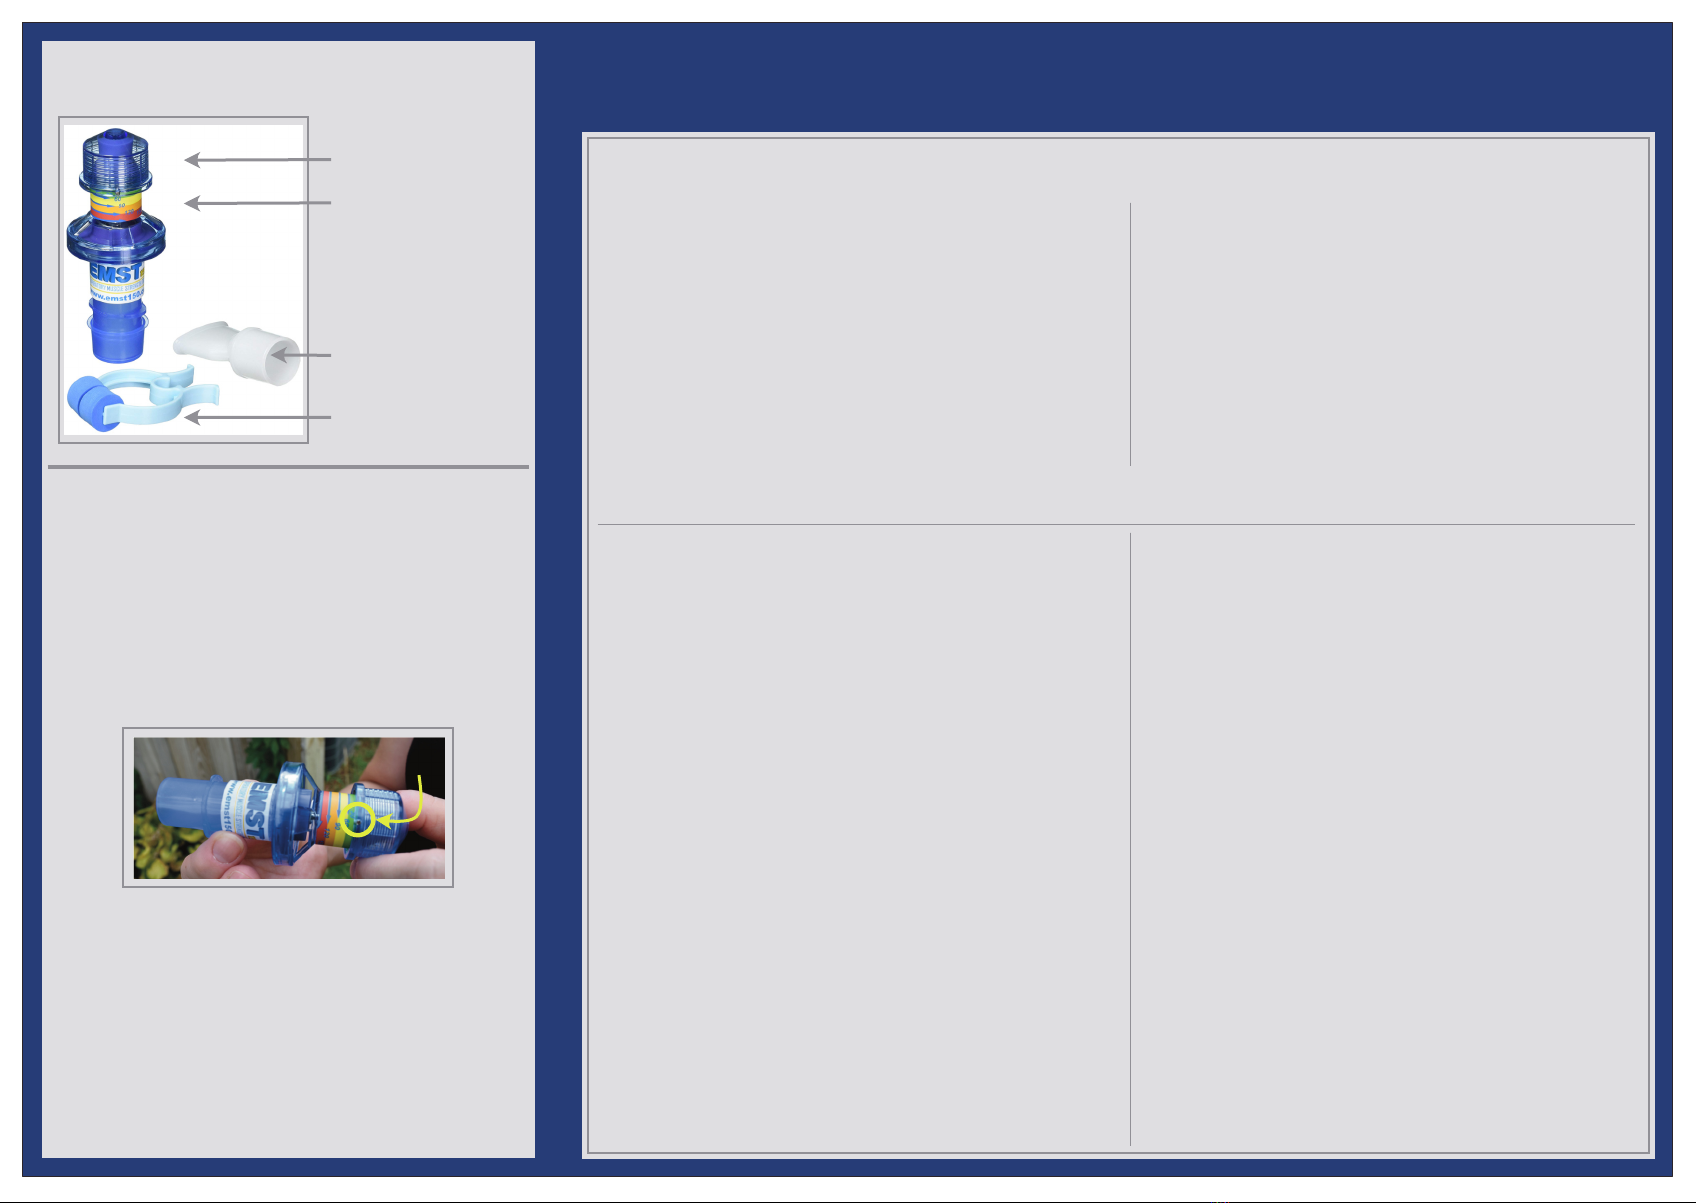
manuals.online logo
Brands
  1. Home
  2. •
  3. Brands
  4. •
  5. Aspire
  6. •
  7. Medical Equipment
  8. •
  9. Aspire EMST150 User manual

Aspire EMST150 User manual

YOUR EMST150 TRAINING
WITH THE
EMST150
Training with the EMST150 has been proven to improve
breathing and swallowing function as well as quality of life
and physical tness. For optimal results, seek advice from
your doctor or therapist and exercise only as directed.
Please keep these instructions in a safe place!
 
   
  
The EMST150TM is a product of
Aspire LLC
925B Peachtree St NE Suite 333
Atlanta GA 30309, USA
„EMST150TM“is a protected trademark of Aspire LLC
and is used with permission.
Exclusive distribution in D, A, CH, B & NL:
armadillo GbR
Brunssumstraße 21b, 52074 Aachen, Germany
www.armadillo-medtec.de • [email protected]
www.emst150.de
EC Certicate No. 38774-2008-CE-NOR 2.0
EMST150-Manual v3.0EN - 08/2019
The only removable part of the trainer is the mouthpiece.
The remaining parts of the trainer do not dissemble. Never
attempt to take the rest of your EMST 150 trainer apart. To
remove the mouthpiece from the trainer, pull gently until
loosened.
We strongly recommend the trainer’s mouth piece be
cleaned weekly. Since this trainer is for sole use only, warm
water and mild soap can be used to rinse the mouthpiece.
Do not place in the dishwasher or microwave. Air dry before
re-using.
The trainer should not be shared with any other person. Life
of the trainer will be based on actual usage and on
appropriate cleansing. Harmful cleaning agents such as
bleach and ultrasonic cleaning are not recommended.
Extreme heat is also harmful to the trainer. Always keep the
trainer in a clean place.
Keep trainer and all removable parts away from small
children. Small pieces can be swallowed!
      
• You are or suspect being pregant
• You have untreated hypertension
• You had a recent stroke
• You suffer from elevated intracranial or intra-ocular
pressure
• Have cardiac problems or abnormalities
• You have asthma, emphysema or chronic obstructive
lung disease
• You have a history of collapsed lung
• You had head/neck surgery or suffered a trauma
• You have untreated gastroesophageal reux
• You had esophageal surgery
• You have a ruptured drum or recent ear surgery
• Valsalva-like maneuvers might be detrimental for
your health for some reason.
     
      
    


Rotary knob
Calibrated scale
Comfort
Mouthpiece
Nose clip
Turning the knob clockwise (to the right) increases the
resistance of the valve, making exhalation through the valve
more difcult. Counterclockwise (left) rotation causes the valve
to loosen, making exhalation easier. The position of the small
metal screw at the bottom of the knob indicates the expiratory
pressure required to open the valve.
TIP: Perform the training if you can take enough time and are
not tired. The training takes about 20 - 30 minutes per day.
It is recommended to train at the same time every day. EMST
training can be done while standing or sitting, but we
recommend a seated position for greater comfort.
Remember that in the rst week, you should train 5 days a week
with the same setting, and only then adjust the resistance
further.
Metal screw
TRAINING WITH THE EMST150
      
   
     
    
 
First, the maximum exhalation pressure (ADmax) must be determined.
This can easily be done using the EMST device itself. To do this, please
perform the following steps:
1. Close your nose with the enclosed nose clip.
2. Turn the small metal screw on the knob so it aligns with the number
30 on the scale.
3. Take a deep breath. Fix the EMST mouthpiece in your mouth behind
your teeth and loosely enclose the mouthpiece with your lips. Do not
exhale until the mouthpiece has been positioned securely .
4. Exhale quickly and vigorously through the device. Stop when the air
has audibly escaped from the device and the valve has opened.
5. If you were able to easily perform steps 1-4, turn the knob
clockwise a quarter of a turn and repeat steps 1-4.
6. If you can no longer pass the exhaled air through the valve, turn
the knob back about a quarter of a turn and try again until the valve
opens. This is your nal setting.
Once you have thus found the right exppiration resistance, leave
this setting for your rst week of training.
Write down the value and date for further reference!
                         
             
Now that you have determined your maximum expiratory strength we
are ready to get started making you stronger. First, turn the knob 1⁄4
turn counterclockwise from where you determined your maximum
expiratory strength. The reason we do this is because we want to start
training your muscles at about 75% of your maximum strength.
1. Place the noseclips on your nose.
2. Take a deep breath in, do not breathe out.
3. Place the mouthpiece in your mouth, behind your teeth, securing
your lips tightly around it, holding / pressing the sides of your cheeks if
needed.
4. Breathe out hard and fast using your chest and stomach muscles to
push air through the device. This breathing effort should only last a
couple seconds for the air to move through.
5. Rest for a minimum of 15-30 seconds. Do not skip resting in between
breaths. Your muscles need time to prepare for the next set.
6. REPEAT this exercise 5 times (steps 1-5). Then you need a minute
break. We call this a 5-breath trial.
7. After the 1 minute break, do another 5-breath trial (steps 1-5). Take
another 1 minute break.
8. You need to do ve 5-breath trials for a total of 25 training breaths
per day.
9. If you feel lightheaded at anytime during the exercise, stop and
discontinue.
10. Record the date and time the exercises were completed.
At the end of training Week 1, move the knob on the device a
quarter turn clockwise (90°) and begin training for Week 2.
If you feel you can turn the knob to a higher level, then do so, but
remember: air must move freely through the device without
extreme effort.
In weeks 2,3,4 and 5, continue training as described.
Stop training if you feel uncomfortable or dizzy!
Each week, note the new value you trained with. This will help you
and your therapist to track your progress.
After the 5 weeks of training have been completed, you can
continue to train at the nal setting you achieved in Week 5 in order
to prevent de-training and loss of function.
During the Maintenance Program you will train 3 days per week, 25
breaths into the device.
Over the course of the Maintenance Program if you feel the knob
can be turned to a higher level, then do so.
But again, always remember training with the device should never
cause extreme breathing effort or fatigue.
We wish you lots of success and fun with your EMST150!

Other Aspire Medical Equipment manuals

Aspire ULTIMATE 8 User manual

Aspire

Aspire ULTIMATE 8 User manual

Aspire CombiMotion ACTIV CARE User manual

Aspire

Aspire CombiMotion ACTIV CARE User manual

Aspire MAXI LIFESTYLE User manual

Aspire

Aspire MAXI LIFESTYLE User manual

Aspire AspireAssist User manual

Aspire

Aspire AspireAssist User manual

Aspire Community & Homecare Bed Range User manual

Aspire

Aspire Community & Homecare Bed Range User manual

Aspire ACTIVE AIR 8 User manual

Aspire

Aspire ACTIVE AIR 8 User manual

Aspire ACTIVE AIR ACUTE 8 Series User manual

Aspire

Aspire ACTIVE AIR ACUTE 8 Series User manual

Aspire ACTIVE AIR BARI 10 Series User manual

Aspire

Aspire ACTIVE AIR BARI 10 Series User manual

Popular Medical Equipment manuals by other brands

Teeter Hang Ups ComforTrak Series Assembly instructions

Teeter Hang Ups

Teeter Hang Ups ComforTrak Series Assembly instructions

Atmos Strobo 21 LED operating instructions

Atmos

Atmos Strobo 21 LED operating instructions

Reliefband Reletex manual

Reliefband

Reliefband Reletex manual

eove 70 quick guide

eove

eove 70 quick guide

Air Liquide Soffio PLUS manual

Air Liquide

Air Liquide Soffio PLUS manual

Roche Accu-Check Insight user manual

Roche

Roche Accu-Check Insight user manual

Storz 10331B2 Instructions for use

Storz

Storz 10331B2 Instructions for use

Eizo RadiForce RX560 MammoDuo Additional information

Eizo

Eizo RadiForce RX560 MammoDuo Additional information

Joerns Healthcare Hoyer Sling Guide

Joerns Healthcare

Joerns Healthcare Hoyer Sling Guide

Atmos Variotherm plus operating instructions

Atmos

Atmos Variotherm plus operating instructions

Bodypoint Moduform Dynamic Arm Support AS001 manual

Bodypoint

Bodypoint Moduform Dynamic Arm Support AS001 manual

Fehling Instruments CERAMO CONCEPT X PUNCHES Assembly instructions

Fehling Instruments

Fehling Instruments CERAMO CONCEPT X PUNCHES Assembly instructions

TASKA QDW user guide

TASKA

TASKA QDW user guide

Sirona galileos Maintenance instructions

Sirona

Sirona galileos Maintenance instructions

BMB MEDICAL TIM VELVET SWANN user manual

BMB MEDICAL

BMB MEDICAL TIM VELVET SWANN user manual

uniprox JT40 instruction manual

uniprox

uniprox JT40 instruction manual

Dentsply Sirona TENEO Installation requirements

Dentsply Sirona

Dentsply Sirona TENEO Installation requirements

Promeba PC-678 user guide

Promeba

Promeba PC-678 user guide

manuals.online logo
manuals.online logoBrands
  • About & Mission
  • Contact us
  • Privacy Policy
  • Terms and Conditions

Copyright 2025 Manuals.Online. All Rights Reserved.