Beaba BIB EXPRESSO BEA0206 User manual

BIB EXPRESSO
Modèle n° BEA0206

2
3
FR Notice d’utilisation
EN Instructions
NL Handleiding
DE Gebrauchsanweisung
ES
Folleto de Instrucciones
IT Istruzioni per l’uso
RU Инструкция по эксплуатации
PT
Instruçoes de utilização
NO Bruksanvisning
DK Bruksanvisning
RO Instrucțiuni
PL Instrukcja obsługi
GR Οδηγίες Xρήσης
TR Kullanım kılavuzu
CZ Návod k použití
CT
使用说明书
CN
使用說明書
3
5
6
BIB EXPRESSO

2
3
1
2
3
5
6
9
4
7
5
8
10
6

4
5
CONSIGNES DE SECURITE
IMPORTANT
• Un mauvais usage de l’appareil peut entrainer des risques de blessure :
respectez scrupuleusement les consignes de cette notice.
• ATTENTION, RISQUE DE BRULURE - Cet appareil chauffe de l’eau
jusqu’à 90°C. Ne pas manipuler l’appareil lorsqu’il est en fonctionnement.
• Ne pas lancer de cycle sans eau dans l’unité de chauffe.
• Si vous déclenchez un cycle sans eau, attendre 5 minutes avant de mettre de
l’eau car risque de projection d’eau chaude
• Ne jamais toucher la plaque chauffante avec les doigts en n de cycle.
USAGE
• Cet appareil ne peut pas être utilisé par des enfants.
• Cet appareil peut être utilisé par des personnes ayant des capacités
physiques, sensorielles ou mentales réduites ou dénuées d’expérience
ou de connaissance, s’ils (si elles) sont correctement surveillé(e)s ou si des
instructions relatives à l’utilisation de l’appareil en toute sécurité leur ont été
données et si les risques encourus ont été appréhendés.
• Cet appareil est destiné à être utilisé dans des applications domestiques
et analogues telles que : coins cuisines réservés au personnel dans des
magasins, bureaux, autres environnements professionnels, fermes, utilisation
par les clients des hôtels, motels et autres environnements à caractère
résidentiel, environnements du type chambres d’hôtes.
RACCORDEMENT ÉLECTRIQUE
• Ne jamais immerger l’appareil dans l’eau.
• Débrancher l’appareil avant chaque montage, démontage ou nettoyage.
• Débrancher l’appareil si vous le laissez sans surveillance
•
Ne pas utiliser l’appareil si le câble d’alimentation est endommagé*.
•
Débrancher l’appareil s’il ne fonctionne pas correctement*
•
Débrancher l’appareil s’il a été endommagé (chute, casse,…)*.
* contacter immédiatement le Service Après-Vente.
VIGILANCE / ENFANTS
•
Placez l’appareil et son cordon électrique hors de portée des enfants.
•
Le nettoyage de l’appareil ne doit pas être effectué par un enfant.
•
L’entretien de l’appareil ne doit pas être effectué par un enfant.
•
Ne laissez pas un enfant jouer avec l’appareil.
PRECAUTIONS D’EMPLOI
•
Bien se laver les mains avant de manipuler les produits et nourriture destinés
à votre bébé.
•
Toujours utiliser l’appareil sur une surface solide et plane.
•
Ne pas poser l’appareil proche d’une source de chaleur, plaque de cuissons…
•
Ne pas déplacer l’appareil ou le recouvrir pendant son utilisation.
•
Ne pas soulever le couvercle lorsque le produit est en cycle de chauffage pour
garantir la bonne température nale.
•
Avant toute préparation de biberon, consulter un professionnel de santé ou
votre pédiatre pour plus d’information sur la sécurité et la préparation des
aliments (eau à utiliser, stockage, mode de préparation…).
•
Se référer également aux instructions fournies avec votre lait ou vos petits pots
pour toute recommandation particulière.
•
Avec le mode préparation instantanée (picto bouton de distribution d’eau)
utiliser uniquement de l’eau. Ne pas utiliser d’autre liquide (ex : lait) ou l’ajout de
sirop, poudre… pouvant moisir et obstruer le système de vidange.
•
Il est recommandé de ne pas chauffer la nourriture pendant une période trop
longue.
•
Les températures indiquées sont indicatives. Avant de donner à manger à
bébé, vérier la température de l’aliment en versant quelques gouttes sur le
dos de votre main ou en gouttant la nourriture.
•
L’unité de chauffe peut rester chaude après utilisation.
•
Vous pouvez à tout moment arrêter le cycle lancé en ré-appuyant sur le même
bouton.
1
2
3
4
5
6
7
8
9
10
FR
VEUILLEZ LIRE ATTENTIVEMENT LA PRÉSENTE NOTICE ET LA CONSERVER.
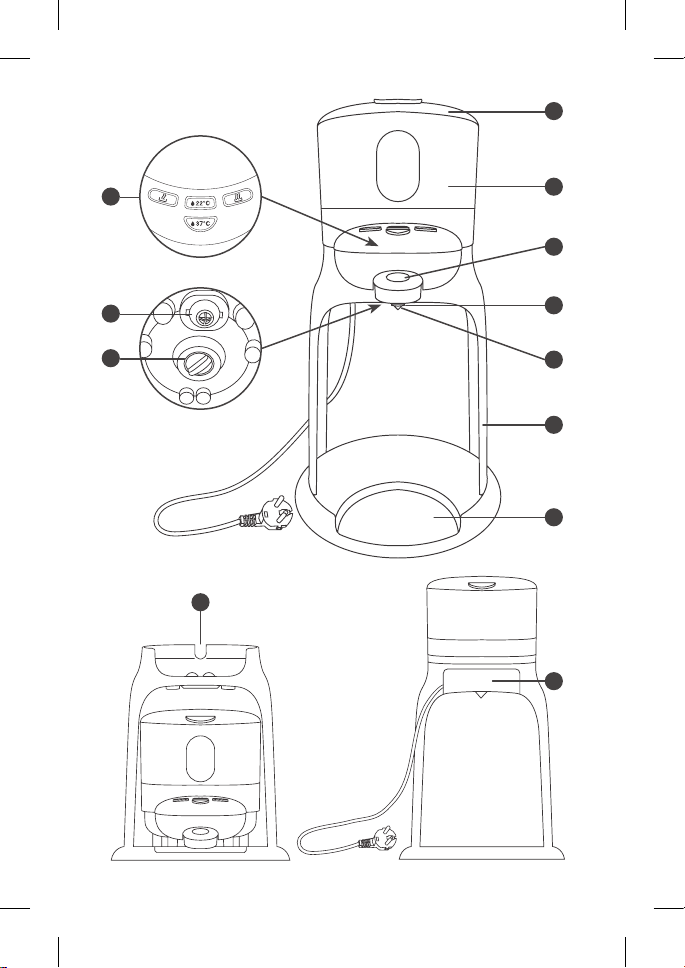
Couvercle unité de chauffe
Unité de chauffe
Boutons de commande
Bouton de distribution d’eau
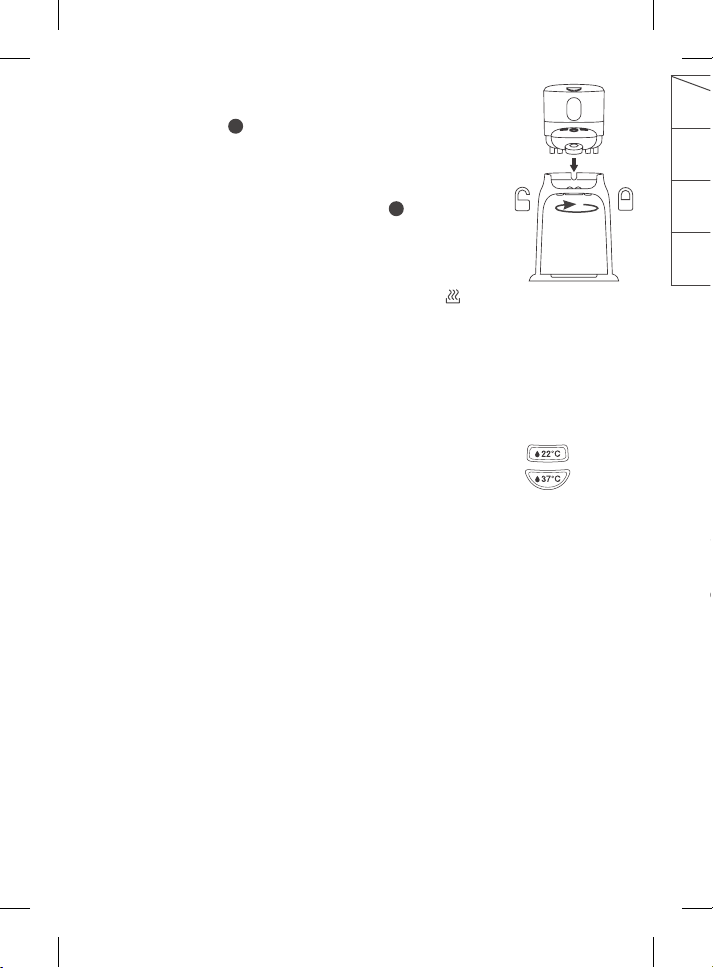
Verrou de l’unité de chauffe
Sortie d’eau
Arche
Support biberon
Rangement produit
Support câble alimentation

4
5
CONSIGNES DE SECURITE
IMPORTANT
• Un mauvais usage de l’appareil peut entrainer des risques de blessure :
respectez scrupuleusement les consignes de cette notice.
• ATTENTION, RISQUE DE BRULURE - Cet appareil chauffe de l’eau
jusqu’à 90°C. Ne pas manipuler l’appareil lorsqu’il est en fonctionnement.
• Ne pas lancer de cycle sans eau dans l’unité de chauffe.
• Si vous déclenchez un cycle sans eau, attendre 5 minutes avant de mettre de
l’eau car risque de projection d’eau chaude
• Ne jamais toucher la plaque chauffante avec les doigts en n de cycle.
USAGE
• Cet appareil ne peut pas être utilisé par des enfants.
• Cet appareil peut être utilisé par des personnes ayant des capacités
physiques, sensorielles ou mentales réduites ou dénuées d’expérience
ou de connaissance, s’ils (si elles) sont correctement surveillé(e)s ou si des
instructions relatives à l’utilisation de l’appareil en toute sécurité leur ont été
données et si les risques encourus ont été appréhendés.
• Cet appareil est destiné à être utilisé dans des applications domestiques
et analogues telles que : coins cuisines réservés au personnel dans des
magasins, bureaux, autres environnements professionnels, fermes, utilisation
par les clients des hôtels, motels et autres environnements à caractère
résidentiel, environnements du type chambres d’hôtes.
RACCORDEMENT ÉLECTRIQUE
• Ne jamais immerger l’appareil dans l’eau.
• Débrancher l’appareil avant chaque montage, démontage ou nettoyage.
• Débrancher l’appareil si vous le laissez sans surveillance
• Ne pas utiliser l’appareil si le câble d’alimentation est endommagé*.
• Débrancher l’appareil s’il ne fonctionne pas correctement*
• Débrancher l’appareil s’il a été endommagé (chute, casse,…)*.
* contacter immédiatement le Service Après-Vente.
VIGILANCE / ENFANTS
• Placez l’appareil et son cordon électrique hors de portée des enfants.
• Le nettoyage de l’appareil ne doit pas être effectué par un enfant.
• L’entretien de l’appareil ne doit pas être effectué par un enfant.
• Ne laissez pas un enfant jouer avec l’appareil.
PRECAUTIONS D’EMPLOI
• Bien se laver les mains avant de manipuler les produits et nourriture destinés
à votre bébé.
• Toujours utiliser l’appareil sur une surface solide et plane.
• Ne pas poser l’appareil proche d’une source de chaleur, plaque de cuissons…
• Ne pas déplacer l’appareil ou le recouvrir pendant son utilisation.
• Ne pas soulever le couvercle lorsque le produit est en cycle de chauffage pour
garantir la bonne température nale.
• Avant toute préparation de biberon, consulter un professionnel de santé ou
votre pédiatre pour plus d’information sur la sécurité et la préparation des
aliments (eau à utiliser, stockage, mode de préparation…).
• Se référer également aux instructions fournies avec votre lait ou vos petits pots
pour toute recommandation particulière.
• Avec le mode préparation instantanée (picto bouton de distribution d’eau)
utiliser uniquement de l’eau. Ne pas utiliser d’autre liquide (ex : lait) ou l’ajout de
sirop, poudre… pouvant moisir et obstruer le système de vidange.
• Il est recommandé de ne pas chauffer la nourriture pendant une période trop
longue.
• Les températures indiquées sont indicatives. Avant de donner à manger à
bébé, vérier la température de l’aliment en versant quelques gouttes sur le
dos de votre main ou en gouttant la nourriture.
• L’unité de chauffe peut rester chaude après utilisation.
• Vous pouvez à tout moment arrêter le cycle lancé en ré-appuyant sur le même
bouton.
6
7
8
9
10
FR
VEUILLEZ LIRE ATTENTIVEMENT LA PRÉSENTE NOTICE ET LA CONSERVER.
Sortie d’eau
Arche
Support biberon
Rangement produit
Support câble alimentation

6
7
MISE EN MARCHE DU PRODUIT
1- Mettre en place l’unité de chauffe sur l’arche :
Tourner le verrou
5
dans le sens des aiguilles d’une
montre
2- Brancher l’appareil sur une prise 220-240V équipée d’une
isolation à la terre.
3- Ranger votre cordon à l’arrière du produit
10
4- Avant la 1ère utilisation, lancer un cycle « Bain-marie »
pour rincer l’appareil :
- Verser environ 200 ml d’eau dans l’unité de chauffe.
- Refermer le couvercle et appuyer sur le bouton ( ) Un
« bip » retenti et le bouton clignote durant tout le cycle.
- A la n du cycle l’appareil émet 3 bips et le bouton s’éteint, placer un récipient
de plus de 200 ml sous la sortie d’eau.
- Appuyer sur le bouton de distribution d’eau pour vider complètement la cuve,
ATTENTION, RISQUE DE BRULURE !
- Attendre quelques minutes le refroidissement de l’appareil avant de l’utiliser
MODE PREPARATION INSTANTANEE
Le mode de préparation instantanée est le mode le plus rapide pour la
préparation des biberons. Il suft de quelques secondes pour obtenir un biberon
à la température souhaitée.
1. Remplir le biberon avec la quantité d’eau correspondant au volume de la
préparation souhaitée.
2. Ouvrir le couvercle et verser l’eau dans l’unité de chauffe.
3. Refermer ensuite le couvercle.
4. Remplir le biberon avec la quantité de poudre correspondant au volume de
la préparation souhaitée et placer le biberon sur le support biberon et sous
la sortie d’eau.
5. Appuyer sur le bouton 22°C ou 37 °C. Un « bip » retenti et le bouton clignote
pendant le processus de chauffe.
6. Dès que l’eau est arrivée à bonne température, l’appareil émet 3 « bips » et le
bouton s’éteint.
7. Appuyer sur le bouton de distribution d’eau pour remplir le biberon.
8. Essuyer l’eau restée au fond de l’unité de chauffe avec un linge propre, avant
de ranger votre appareil.
Remarque : Par mesure d’hygiène et an d’éviter tout risque microbiologique, le
biberon doit être consommé rapidement après préparation.
Température initiale
de l’eau Temps de chauffe * Température nale du
biberon **
Distribution eau 22°C Température frigo 30-60 s 22-24°c
Distribution eau 37°C Température frigo 30-60 s 37-39 °c
Distribution eau 37°C Température ambiante 20-50 s 37-39 °c
* Le temps de chauffe dépend du volume d’eau à chauffer et de la température
de l’eau au départ
** L’ajout de la poudre fait baisser la température de l’eau.
MODE BAIN MARIE
Le mode bain-marie permet de réchauffer des biberons et des petits pots. Le
mode bain-marie ne permet pas un contrôle précis de la température de la
préparation que vous réchauffez. Il convient d’adapter le choix du mode bain-
marie en fonction de la quantité de préparation à réchauffer et du matériau du
contenant :
•
Mode 1 :
Pot et biberon petite quantité en plastique / Tous les pots et biberons en verre
•
Mode 2 :
Pot et biberon grande quantité en plastique uniquement
1.
Ouvrir le couvercle de l’unité de chauffe.
2.
Remplir l’unité de chauffe d’eau jusqu’au marquage « Max. ».
3.
Placer le biberon ou le petit-pot à réchauffer dans l’unité de chauffe.
4.
Appuyer sur le bouton du mode choisi, un « bip » retenti et le bouton clignote
durant le temps de chauffe.
5.
A la n du cycle, l’appareil émet 3 « bips » et le bouton s’éteint.
6.
ATTENTION, RISQUE DE BRULURE ! Retirer alors le biberon ou le
petit-pot avec un linge an d’éviter tout risque de brûlure.
7.
Bien refermer le couvercle et attendre que l’eau refroidisse avant de la vider.
8.
Après avoir mélangé le contenu du petit-pot ou agité le biberon, toujours

6
7
MISE EN MARCHE DU PRODUIT
1- Mettre en place l’unité de chauffe sur l’arche :
Tourner le verrou
5
dans le sens des aiguilles d’une
montre
2- Brancher l’appareil sur une prise 220-240V équipée d’une
isolation à la terre.
3- Ranger votre cordon à l’arrière du produit
10
4- Avant la 1ère utilisation, lancer un cycle « Bain-marie »
pour rincer l’appareil :
- Verser environ 200 ml d’eau dans l’unité de chauffe.
- Refermer le couvercle et appuyer sur le bouton ( ) Un
« bip » retenti et le bouton clignote durant tout le cycle.
- A la n du cycle l’appareil émet 3 bips et le bouton s’éteint, placer un récipient
de plus de 200 ml sous la sortie d’eau.
- Appuyer sur le bouton de distribution d’eau pour vider complètement la cuve,
ATTENTION, RISQUE DE BRULURE !
- Attendre quelques minutes le refroidissement de l’appareil avant de l’utiliser
MODE PREPARATION INSTANTANEE
Le mode de préparation instantanée est le mode le plus rapide pour la
préparation des biberons. Il suft de quelques secondes pour obtenir un biberon
à la température souhaitée.
1. Remplir le biberon avec la quantité d’eau correspondant au volume de la
préparation souhaitée.
2. Ouvrir le couvercle et verser l’eau dans l’unité de chauffe.
3. Refermer ensuite le couvercle.
4. Remplir le biberon avec la quantité de poudre correspondant au volume de
la préparation souhaitée et placer le biberon sur le support biberon et sous
la sortie d’eau.
5. Appuyer sur le bouton 22°C ou 37 °C. Un « bip » retenti et le bouton clignote
pendant le processus de chauffe.
6. Dès que l’eau est arrivée à bonne température, l’appareil émet 3 « bips » et le
bouton s’éteint.
7. Appuyer sur le bouton de distribution d’eau pour remplir le biberon.
8. Essuyer l’eau restée au fond de l’unité de chauffe avec un linge propre, avant
de ranger votre appareil.
Remarque : Par mesure d’hygiène et an d’éviter tout risque microbiologique, le
biberon doit être consommé rapidement après préparation.
Température initiale
de l’eau Temps de chauffe * Température nale du
biberon **
Distribution eau 22°C Température frigo 30-60 s 22-24°c
Distribution eau 37°C Température frigo 30-60 s 37-39 °c
Distribution eau 37°C Température ambiante 20-50 s 37-39 °c
* Le temps de chauffe dépend du volume d’eau à chauffer et de la température
de l’eau au départ
** L’ajout de la poudre fait baisser la température de l’eau.
MODE BAIN MARIE
Le mode bain-marie permet de réchauffer des biberons et des petits pots. Le
mode bain-marie ne permet pas un contrôle précis de la température de la
préparation que vous réchauffez. Il convient d’adapter le choix du mode bain-
marie en fonction de la quantité de préparation à réchauffer et du matériau du
contenant :
• Mode 1 :
Pot et biberon petite quantité en plastique / Tous les pots et biberons en verre
• Mode 2 :
Pot et biberon grande quantité en plastique uniquement
1. Ouvrir le couvercle de l’unité de chauffe.
2. Remplir l’unité de chauffe d’eau jusqu’au marquage « Max. ».
3. Placer le biberon ou le petit-pot à réchauffer dans l’unité de chauffe.
4. Appuyer sur le bouton du mode choisi, un « bip » retenti et le bouton clignote
durant le temps de chauffe.
5. A la n du cycle, l’appareil émet 3 « bips » et le bouton s’éteint.
6. ATTENTION, RISQUE DE BRULURE ! Retirer alors le biberon ou le
petit-pot avec un linge an d’éviter tout risque de brûlure.
7. Bien refermer le couvercle et attendre que l’eau refroidisse avant de la vider.
8. Après avoir mélangé le contenu du petit-pot ou agité le biberon, toujours

8
9
vérier que la température de la nourriture n’est pas trop élevée et qu’il n’y a
pas de risque de brûlure pour votre enfant.
9. Ne jamais utiliser l’eau issue du mode bain marie pour préparer un biberon.
10. Verser l’eau de l’unité de chauffe dans un évier et l’essuyer avec un linge
propre, papier absorbant avant de ranger votre appareil.
En mode bain-marie, le produit peut être utilisé sans l’arche
7
.
1. Pour ôter l’unité de chauffe de l’arche tourner le verrou dans le sens inverse
des aiguilles d’une montre.
2. Poser l’unité de chauffe sur le plan de travail puis suivre les étapes du mode
bain-marie ci-dessus.
Température de l’eau
du bain-marie
Temps de chauffe *
de la préparation
Température du
biberon ou du petit pot
Bain-marie 70 °C 7 à 8 min 30 à 40 °C
Bain-marie 90 °C 11 à 12 min 30 à 40 °C
* Le temps de chauffe dépend de la température initiale de l’eau.
ENTRETIEN
• Toujours débrancher l’appareil avant de procéder à son nettoyage.
• Nettoyer la cuve et les surfaces avec un linge humide ou une éponge essorée.
• Essuyer soigneusement.
• A l’usage, du calcaire peut se déposer au fond de la cuve de chauffe. Procéder
alors au détartrage de la cuve :
1. Retirer la cuve de l’arche
2. Dans l’appareil froid non raccordé au secteur, verser un mélange de 50
ml d’eau et de 50 ml de vinaigre d’alcool ou de produit d’entretien Béaba.
Laisser reposer une nuit complète. Eviter d’utiliser un détartrant chimique ou
détartrant à cafetière dans la cuve.
3. Vider le contenu de l’unité de chauffe, la rincer et l’essuyer avec un linge
propre.
4. Renouveler l’opération si nécessaire jusqu’à élimination complète du calcaire
5. Lancer un cycle de chauffe ( ) avant toute nouvelle utilisation.
6. Pour ranger votre produit, déverrouiller l’unité de chauffe et la placer dans
l’arche
9
ENVIRONNEMENT ET RECYCLAGE
Vous avez acheté un produit avec le logo ci-contre, cela vous engage à ne pas
jeter ce produit avec les ordures ménagères ordinaire. Se renseigner sur les
dispositions en vigueur dans votre région concernant la collecte séparée des
appareils électriques et électroniques. Apportez ce produit à un point de de
collecte pour le recyclage des équipements électriques et électroniques.
FICHE TECHNIQUE
Tension : 220-240V ~ 50Hz - 60Hz. Puissance : 460W - 540W, Température
d’usage : 10 à 40°C
QUESTIONS / REPONSES
Le produit
ne fonctionne pas
• Vérier que le cordon n’est pas endommagé
• Assurer vous que l’appareil est bien relié au réseau
électrique 220V
Toute l’eau s’écoule
avant que l’appareil ne
chauffe
• Vérier que le bouton de distribution de l’eau n’est
pas bloqué et bien le remonter en position haute.
L’actionner plusieurs fois si besoin.
• Vérier que la cuve n’est pas trop entartrée. Lancer
un cycle de détartrage si besoin.
Tous les boutons
clignotent
• L’appareil se met en mode défaut, Il n’y a pas d’eau
dans la cuve au moment de lancer les cycles
• Sinon faire appel au service SAV de Béaba
Un seul bouton
fonctionne • Faire appel au service SAV de Béaba
L’appareil émet un long
bip et se coupe
• Un cycle a été lancé sans eau dans la cuve,
attendre que la cuve refroidisse avant de verser de
l’eau.

10
11
SAFETY INSTRUCTIONS
IMPORTANT
• Incorrect use of the appliance may cause injury: always follow these instructions.
• CAUTION BURN RISK - This appliance heats water to 90°C, never handle
the product when it is in use.
• Never launch a cycle without any water in heating unit.
• If this does happen, please wait 5mn before adding water into the heating unit
to prevent hot water from splattering.
• Never touch the heating plate with hand at the end of cycle
USE
• This appliance cannot be used by children.
• This device may be used by people with reduced physical, sensorial or mental
capacities, or without any experience or knowledge, if they are correctly
supervised or if the instructions for using the device safely have been provided
and the risks have been understood.
• This appliance is intended to be used in household and similar applications such
as: staff kitchen areas in shops, ofces and other working environments, farm
houses, by clients in hotels, motels and other residential type environments,
bed and breakfast type environments.
POWER CONNECTION
• Never immerse the appliance in water.
• Unplug the appliance before assembling, dismantling or cleaning.
1
2
3
4
5
6
7
8
9
10
EN
PLEASE READ THESE INSTRUCTIONS CAREFULLY AND KEEP FOR FUTURE
REFERENCE.
Heating unit lid
Heating unit
Control buttons
Water distribution lever
Heating unit lock switch
Water outlet
Arch support
Base and baby bottle receptacle
Product storage
Power cable holder
•
Unplug the appliance if you leave it unsupervised.
•
Do not use your appliance if the power cable is damaged*.
•
Unplug the appliance if it is not working properly*.
•
Unplug the appliance if it is damaged (fall, breakage, etc.) *
*contact the Customer Service immediately.
CAUTION/CHILDREN
•
Keep the appliance and its cord out of the reach of children.
•
The appliance should not be cleaned by a child.
•
The appliance should not be maintained by a child.
•
Do not let a child play with the appliance.
PRECAUTIONS
•
Wash your hands well before handling your baby’s products and food.
•
Always use the appliance on a solid and even surface.
•
Do not place the appliance near a heat source, hotplates, etc.
•
Do not move the appliance or cover it while it is in function.
•
Do not lift the lid while the product is in function to ensure the correct water
temperature is reached.
•
Before preparing food, please consult a healthcare professional or your
paediatrician for further information about food safety and preparation (water
to use, storage, preparation method, etc.).
•
Also refer to the instructions provided with your milk formula box or food jars
for specic recommendations
•
With the instant preparation mode, only use water and avoid using any other
liquid (milk), or adding syrup, powder which may remain or rot in the water drop
system.
•
It is advised not to heat food for a long period of time.
•
Temperatures are provided for information. Before feeding your baby, check
the temperature of the food by pouring a few drops on the back of your hand
or by tasting the food.
•
The heating element surface is subject to residual heat after use.
•
By pressing on the button a second time you are able to stop launched cycle.

10
11
SAFETY INSTRUCTIONS
IMPORTANT
• Incorrect use of the appliance may cause injury: always follow these instructions.
• CAUTION BURN RISK - This appliance heats water to 90°C, never handle
the product when it is in use.
• Never launch a cycle without any water in heating unit.
• If this does happen, please wait 5mn before adding water into the heating unit
to prevent hot water from splattering.
• Never touch the heating plate with hand at the end of cycle
USE
• This appliance cannot be used by children.
• This device may be used by people with reduced physical, sensorial or mental
capacities, or without any experience or knowledge, if they are correctly
supervised or if the instructions for using the device safely have been provided
and the risks have been understood.
• This appliance is intended to be used in household and similar applications such
as: staff kitchen areas in shops, ofces and other working environments, farm
houses, by clients in hotels, motels and other residential type environments,
bed and breakfast type environments.
POWER CONNECTION
• Never immerse the appliance in water.
• Unplug the appliance before assembling, dismantling or cleaning.
6
7
8
9
10
EN
PLEASE READ THESE INSTRUCTIONS CAREFULLY AND KEEP FOR FUTURE
REFERENCE.
Water outlet
Arch support
Base and baby bottle receptacle
Product storage
Power cable holder
• Unplug the appliance if you leave it unsupervised.
• Do not use your appliance if the power cable is damaged*.
• Unplug the appliance if it is not working properly*.
• Unplug the appliance if it is damaged (fall, breakage, etc.) *
*contact the Customer Service immediately.
CAUTION/CHILDREN
• Keep the appliance and its cord out of the reach of children.
• The appliance should not be cleaned by a child.
• The appliance should not be maintained by a child.
• Do not let a child play with the appliance.
PRECAUTIONS
• Wash your hands well before handling your baby’s products and food.
• Always use the appliance on a solid and even surface.
• Do not place the appliance near a heat source, hotplates, etc.
• Do not move the appliance or cover it while it is in function.
• Do not lift the lid while the product is in function to ensure the correct water
temperature is reached.
• Before preparing food, please consult a healthcare professional or your
paediatrician for further information about food safety and preparation (water
to use, storage, preparation method, etc.).
• Also refer to the instructions provided with your milk formula box or food jars
for specic recommendations
• With the instant preparation mode, only use water and avoid using any other
liquid (milk), or adding syrup, powder which may remain or rot in the water drop
system.
• It is advised not to heat food for a long period of time.
• Temperatures are provided for information. Before feeding your baby, check
the temperature of the food by pouring a few drops on the back of your hand
or by tasting the food.
• The heating element surface is subject to residual heat after use.
• By pressing on the button a second time you are able to stop launched cycle.

12
13
STARTING UP OF APPLIANCE
1- Place the heating unit on the arch support :
2- Plug the appliance into an earthed 220-240V socket.
3- Place the power cable at the rear passing it through the
groove as shown on picture 10
4- Before the 1st use, launch a Bain Marie cycle to rinse the
heating unit:
- Pour 200ml of water into the unit
- Close the lid and press the button ( ). You will hear 1
Beep and back lighting of button ashes.
- When the cycle is over, you hear 3 beeps and back light
switches off. Put any big cup over 200ml on the baby bottle receptacle
- Push the water lever downwards to empty the heating unit. BE CAREFUL,
RISK OF BURNING due to hot water being released.
- Wait for unit to cool down a few minutes before using the appliance.
INSTANT PREPARATION MODE
Instant preparation mode is the fastest mode for preparing bottles. You only need
a few seconds to obtain a bottle at the selected temperature.
1. Fill the bottle with the amount of water for the volume of the preparation
required.
2. Open the lid #1 and pour water into the empty heating unit #2
3. Close the lid#1
4. Fill the bottle with the amount of milk formula for the volume of the preparation
required and put the bottle in the centre of the receptacle #8
5. Select a temperature button. You will hear a beep and the button will ash
during the heating process.
6. As soon as the water has reached the correct temperature, the appliance
beeps 3 times and the button’s light switches off.
7. Push the water lever#4 downwards until the bottle is full.
8. Use a clean cloth to remove any water remaining in the bottom of the heating
unit (...) before storing your appliance.
Note : For hygiene reasons and in order to avoid all microbiological risks, the
bottle must be consumed quickly after preparation (within two hours).
Initial water
temperature Heating Time * Final temperature of
bottle **
Water distribution: 22°C Fridge Temperature 30-60 s 22-24°c
Water distribution: 37°C Fridge Temperature 30-60 s 37-39 °c
Water distribution: 37°C Room Temperature 18 – 50s 37°C-39°C
* heating time will depend on volume and initial water temperature
** mixing water with milk formula reduces the nal temperature
BAIN MARIE MODE
The bain-marie mode should be used for heating bottles and jars. The bain-marie
mode does not allow you to control the exact temperature of the preparation you
are heating. The choice of the bain-marie mode should be adapted to the amount
of preparation to be heated and material of the container:
•
Mode 1 :
small quantity or glass container
•
Mode 2 :
large quantity or plastic container
1.
Open the lid of the heating unit#1.
2.
Fill the heating unit#2 with water to «Max» level.
3.
Place the bottle or jar to be heated in the heating unit#2.
4.
Select and press the button for the chosen mode, you will hear a beep and
the button will ash during the heating process.
5.
At the end of the heating cycle, the appliance beeps three times and the
button’s light switches off.
6.
BE CAREFUL, RISK OF BURNING Rremove the bottle or the jar with
a cloth to avoid the risk of burns.
7.
Close the lid#1 and wait for the water to cool down before emptying the unit.
8.
After mixing the contents of the jar or shaking the bottle, always check that
the temperature of the food is not too high and that there is no risk of burning
your child.

12
13
STARTING UP OF APPLIANCE
1- Place the heating unit on the arch support :
2- Plug the appliance into an earthed 220-240V socket.
3- Place the power cable at the rear passing it through the
groove as shown on picture 10
4- Before the 1st use, launch a Bain Marie cycle to rinse the
heating unit:
- Pour 200ml of water into the unit
- Close the lid and press the button ( ). You will hear 1
Beep and back lighting of button ashes.
- When the cycle is over, you hear 3 beeps and back light
switches off. Put any big cup over 200ml on the baby bottle receptacle
- Push the water lever downwards to empty the heating unit. BE CAREFUL,
RISK OF BURNING due to hot water being released.
- Wait for unit to cool down a few minutes before using the appliance.
INSTANT PREPARATION MODE
Instant preparation mode is the fastest mode for preparing bottles. You only need
a few seconds to obtain a bottle at the selected temperature.
1. Fill the bottle with the amount of water for the volume of the preparation
required.
2. Open the lid #1 and pour water into the empty heating unit #2
3. Close the lid#1
4. Fill the bottle with the amount of milk formula for the volume of the preparation
required and put the bottle in the centre of the receptacle #8
5. Select a temperature button. You will hear a beep and the button will ash
during the heating process.
6. As soon as the water has reached the correct temperature, the appliance
beeps 3 times and the button’s light switches off.
7. Push the water lever#4 downwards until the bottle is full.
8. Use a clean cloth to remove any water remaining in the bottom of the heating
unit (...) before storing your appliance.
Note : For hygiene reasons and in order to avoid all microbiological risks, the
bottle must be consumed quickly after preparation (within two hours).
Initial water
temperature Heating Time * Final temperature of
bottle **
Water distribution: 22°C Fridge Temperature 30-60 s 22-24°c
Water distribution: 37°C Fridge Temperature 30-60 s 37-39 °c
Water distribution: 37°C Room Temperature 18 – 50s 37°C-39°C
* heating time will depend on volume and initial water temperature
** mixing water with milk formula reduces the nal temperature
BAIN MARIE MODE
The bain-marie mode should be used for heating bottles and jars. The bain-marie
mode does not allow you to control the exact temperature of the preparation you
are heating. The choice of the bain-marie mode should be adapted to the amount
of preparation to be heated and material of the container:
• Mode 1 :
small quantity or glass container
• Mode 2 :
large quantity or plastic container
1. Open the lid of the heating unit#1.
2. Fill the heating unit#2 with water to «Max» level.
3. Place the bottle or jar to be heated in the heating unit#2.
4. Select and press the button for the chosen mode, you will hear a beep and
the button will ash during the heating process.
5. At the end of the heating cycle, the appliance beeps three times and the
button’s light switches off.
6. BE CAREFUL, RISK OF BURNING Rremove the bottle or the jar with
a cloth to avoid the risk of burns.
7. Close the lid#1 and wait for the water to cool down before emptying the unit.
8. After mixing the contents of the jar or shaking the bottle, always check that
the temperature of the food is not too high and that there is no risk of burning
your child.

14
15
9. Never use water from the bain-marie mode to prepare a bottle.
10. Empty the heating unit and wipe it with a clean cloth or a paper towel before
storing your appliance.
In Bain Marie mode, the heating unit may be used without the arch support
1. To remove the heating unit#2 from the support, unlock the lock switch by
turning it anti-clockwise.
2. Place the heating unit#2 on a at surface and then follow Bain Marie
instructions.
water temperature Heating Time * Final temperature of
bottle **
Bain-marie 70 °C 7 to 8 min 30 - 40 °C
Bain-marie 90 °C 11 to 12 min 30 - 40 °C
* Heating time will depend of initial water temperature
MAINTENANCE
• Always unplug the appliance before cleaning it.
• Clean the tank and surfaces with a damp cloth or sponge. Wipe carefully.
• Over time, limescale deposits may accumulate on the bottom of the tank,
descale the unit as below:
1. Remove the tank from its arch support
2. When the appliance is cold and unplugged, pour in a mixture of 50 ml of
water and 50 ml of white vinegar or BEABA cleaning solution. Leave overnight.
Never use a chemical or a coffee machine de-scaler in the unit.
3. Empty the contents of the heating unit and wipe it with a clean cloth.
4. Repeat the operation if necessary until complete removal of the limescale.
5. Complete a ( ) cycle with clear water before using again.
6. For storage you can unlock and remove the heating unit and place it inside
arch support (9)
9
SPECIFICATIONS
Voltage: 220-240V ~ 50Hz- 60Hz. Power: 460W - 540W. Temperature for use:
10 to 40°C.
ENVIRONMENT AND RECYCLING
You bought a product with this logo, do not throw this product away with ordinary
household waste. Enquire about the rules in effect in your region concerning
the selective collection of electric and electronic appliances. please contact your
local authorities in case you need more information on the collection points in
your area.
TROUBLE SHOOTING
The product does not
work
• Check that the power cord is not damaged.
• Check that the appliance is connected to a 220V –
240V electricity supply
All the buttons are
ashing
• The appliance is in default mode
• There is no water in the unit when starting the cycle
• Or contact Beaba’s after-sales service
All the water ows
before cycle is starting.
• Check that water distribution lever is not blocked
and pull it up.
• Check that limescale deposits are not preventing
the appliance from functioning
The water is not hot
enough
• Check that limescale deposits are not preventing
the appliance from functioning.
• Or contact Beaba’s after-sales service
Only one button is
functioning • contact Beaba’s after-sales service
A long beep is hearing • A cycle has been launched without water inside the
tank. Wait a few minutes before adding water.

16
17
BELANGRIJKE
VEILIGHEIDSINSTRUCTIES
• Een verkeerd gebruik van het apparaat kan leiden tot letsel: neem de
aanwijzingen in deze handleiding nauwlettend in acht.
• LET OP, RISICO OP BRANDWONDEN - Dit apparaat verwarmt het
water tot op 90°C. Hanteer en verplaats het apparaat niet tijdens de werking.
• Start geen cyclus op zonder water in de verwarmingsunit.
• Als u een cyclus zonder water opgestart heeft, wacht dan 5 minuten alvorens
water toe te voegen om opspatten van heet water te voorkomen
• Raak de verwarmende plaat nooit met uw handen aan bij het einde van de
cyclus.
GEBRUIK
• Dit apparaat mag niet door kinderen gebruikt worden.
• Dit apparaat kan gebruikt worden door personen met lichamelijke, zintuiglijke
of verstandelijke beperkingen of zonder ervaring of kennis, bij voldoende
toezicht en als ze de juiste aanwijzingen en uitleg met betrekking tot een veilig
gebruik verstrekt krijgen en ze de bijbehorende gevaren begrijpen.
• Dit apparaat is bestemd voor huishoudelijk gebruik of soortgelijke
omstandigheden zoals: pauzeruimtes voor het personeel in winkels, kantoren
en overige werkplaatsen, boerderijen, gebruik door klanten in hotels, motels en
overige types woonruimtes, accommodaties van het B&B type.
AANSLUITING
• Dompel het apparaat nooit onder in water.
• Haal de stekker van het apparaat uit het stopcontact voor het monteren,
demonteren of het reinigen.
• Haal de stekker van het apparaat uit het stopcontact als u het apparaat zonder
1
2
3
4
5
6
7
8
9
10
NL LEES DEZE HANDLEIDING ZORGVULDIG DOOR EN BEWAAR HET.
Deksel verwarmingsunit
Verwarmingsunit
Bedieningsknoppen
Waterafgifte knop
Vergrendeling van de verwarmingsunit
Wateruitgang
Boog
Flessensteun
Opberging product
Snoerhouder
toezicht laat
•
Gebruik het apparaat niet als het snoer beschadigd is*.
•
Haal de stekker van het apparaat uit het stopcontact als het niet correct werkt*
•
Haal de stekker van het apparaat uit het stopcontact als het beschadigd is
geraakt (val, gebroken onderdelen, ...)*
* neem direct contact op met de After Sales dienst
OPLETTENDHEID / KINDEREN
•
Plaats het apparaat en het snoer altijd buiten bereik van kinderen.
•
Het apparaat mag niet door kinderen gereinigd worden.
•
Het onderhoud aan het apparaat mag niet door kinderen uitgevoerd worden.
•
Laat kinderen nooit met het apparaat spelen.
GEBRUIKSVOORZORGEN
•
Was zorgvuldig uw handen alvorens de producten en de voor uw baby
bestemde etenswaren aan te raken.
•
Gebruik het apparaat altijd op een vlakke en stabiele ondergrond.
•
Plaats het apparaat niet in de nabijheid van hittebronnen, kookplaten...
•
Verplaats het apparaat niet of dek het niet af tijdens de werking.
•
Til de deksel niet op tijdens de opwarmcyclus om de goede eindtemperatuur
te garanderen.
•
Neem,vóórhetbereidenvanbabyvoeding,contactopmethetconsultatiebureau
of uw kinderarts voor nadere informatie over de voedselveiligheid en de
bereiding van de voeding (te gebruiken water, opslag, bereidingswijze…).
•
Raadpleeg tevens de op de melk of potjes vermelde instructies voor bijzondere
aanwijzingen.
•
Gebruik uitsluitend water voor de directe bereidingswijze (picto waterafgifte
knop). Vermijd overige vloeistoffen (bijv.: melk) of siroop, poeder... te gebruiken
die in het afvoersysteem kunnen blijven zitten en beschimmelen.
•
Het wordt aangeraden de etenswaren niet langdurig op te warmen.
•
De vermelde temperaturen dienen slechts als richtlijn. Controleer altijd de
temperatuur van de voedingsmiddelen alvorens ze aan uw baby te geven,
door enkele druppels op de rug van uw hand te gieten of door de voeding te
proeven.
•
De verwarmingsunit kan warm blijven na gebruik.
•
U kunt op elk moment de gestarte cyclus onderbreken door nogmaals op
dezelfde knop te drukken.

16
17
BELANGRIJKE
VEILIGHEIDSINSTRUCTIES
• Een verkeerd gebruik van het apparaat kan leiden tot letsel: neem de
aanwijzingen in deze handleiding nauwlettend in acht.
• LET OP, RISICO OP BRANDWONDEN - Dit apparaat verwarmt het
water tot op 90°C. Hanteer en verplaats het apparaat niet tijdens de werking.
• Start geen cyclus op zonder water in de verwarmingsunit.
• Als u een cyclus zonder water opgestart heeft, wacht dan 5 minuten alvorens
water toe te voegen om opspatten van heet water te voorkomen
• Raak de verwarmende plaat nooit met uw handen aan bij het einde van de
cyclus.
GEBRUIK
• Dit apparaat mag niet door kinderen gebruikt worden.
• Dit apparaat kan gebruikt worden door personen met lichamelijke, zintuiglijke
of verstandelijke beperkingen of zonder ervaring of kennis, bij voldoende
toezicht en als ze de juiste aanwijzingen en uitleg met betrekking tot een veilig
gebruik verstrekt krijgen en ze de bijbehorende gevaren begrijpen.
• Dit apparaat is bestemd voor huishoudelijk gebruik of soortgelijke
omstandigheden zoals: pauzeruimtes voor het personeel in winkels, kantoren
en overige werkplaatsen, boerderijen, gebruik door klanten in hotels, motels en
overige types woonruimtes, accommodaties van het B&B type.
AANSLUITING
• Dompel het apparaat nooit onder in water.
• Haal de stekker van het apparaat uit het stopcontact voor het monteren,
demonteren of het reinigen.
• Haal de stekker van het apparaat uit het stopcontact als u het apparaat zonder
6
7
8
9
10
NL LEES DEZE HANDLEIDING ZORGVULDIG DOOR EN BEWAAR HET.
Wateruitgang
Boog
Flessensteun
Opberging product
Snoerhouder
toezicht laat
• Gebruik het apparaat niet als het snoer beschadigd is*.
• Haal de stekker van het apparaat uit het stopcontact als het niet correct werkt*
• Haal de stekker van het apparaat uit het stopcontact als het beschadigd is
geraakt (val, gebroken onderdelen, ...)*
* neem direct contact op met de After Sales dienst
OPLETTENDHEID / KINDEREN
• Plaats het apparaat en het snoer altijd buiten bereik van kinderen.
• Het apparaat mag niet door kinderen gereinigd worden.
• Het onderhoud aan het apparaat mag niet door kinderen uitgevoerd worden.
• Laat kinderen nooit met het apparaat spelen.
GEBRUIKSVOORZORGEN
• Was zorgvuldig uw handen alvorens de producten en de voor uw baby
bestemde etenswaren aan te raken.
• Gebruik het apparaat altijd op een vlakke en stabiele ondergrond.
• Plaats het apparaat niet in de nabijheid van hittebronnen, kookplaten...
• Verplaats het apparaat niet of dek het niet af tijdens de werking.
• Til de deksel niet op tijdens de opwarmcyclus om de goede eindtemperatuur
te garanderen.
• Neem,vóórhetbereidenvanbabyvoeding,contactopmethetconsultatiebureau
of uw kinderarts voor nadere informatie over de voedselveiligheid en de
bereiding van de voeding (te gebruiken water, opslag, bereidingswijze…).
• Raadpleeg tevens de op de melk of potjes vermelde instructies voor bijzondere
aanwijzingen.
• Gebruik uitsluitend water voor de directe bereidingswijze (picto waterafgifte
knop). Vermijd overige vloeistoffen (bijv.: melk) of siroop, poeder... te gebruiken
die in het afvoersysteem kunnen blijven zitten en beschimmelen.
• Het wordt aangeraden de etenswaren niet langdurig op te warmen.
• De vermelde temperaturen dienen slechts als richtlijn. Controleer altijd de
temperatuur van de voedingsmiddelen alvorens ze aan uw baby te geven,
door enkele druppels op de rug van uw hand te gieten of door de voeding te
proeven.
• De verwarmingsunit kan warm blijven na gebruik.
• U kunt op elk moment de gestarte cyclus onderbreken door nogmaals op
dezelfde knop te drukken.

18
19
INBEDRIJFSTELLING VAN HET
PRODUCT
1- Breng de verwarmingsunit op de boog aan
2- Draai de vergrendeling in de richting van de wijzers van
de klok (zie schema)
3- Sluit het apparaat aan op een geaard 220-240V
stopcontact.
4- Plaats het snoer aan de achterzijde van het product
10
5- Voer, vóór het eerste gebruik, een ‘Bain-marie’ cyclus uit om het apparaat
schoon te spoelen
- Giet circa 200 ml water in de verwarmingsunit.
- Sluit de deksel en druk op de ( ) knop. Het apparaat ‘piept’ en de knop
knippert tijdens de hele cyclus.
- Aan het einde van de cyclus piept het apparaat 3 maal en gaat de knop uit.
Plaats een es van meer dan 200 ml onder de wateruitgang.
- Druk op de waterafgifte knop om het reservoir volledig te legen,
LET OP RISICO OP BRANDWONDEN!
- Laat het apparaat enkele minuten afkoelen alvorens het te gebruiken.
INSTANTBEREIDING
De instantbereiding is de meest snelle manier om essen te bereiden. De es
heeft binnen enkele seconden direct de gewenste temperatuur.
1. Vul de es met een hoeveelheid water die overeenkomt met de te bereiden
hoeveelheid.
2. Open de deksel en giet het water in de lege verwarmingsunit.
3. Sluit vervolgens de deksel
4. Vul de es met de benodigde hoeveelheid poeder voor de bereiding en plaats
de es op de essenhouder en onder de wateruitgang.
5. Druk op de knop 22°C of 37°C. Het apparaat piept en de knop knippert
gedurende de opwarmtijd.
6. Zodra het water op de juiste temperatuur is, piept het apparaat 3 maal en gaat
de knop uit.
7. Druk op de waterafgifte knop om de es te vullen.
8. Droog het resterende water op de bodem van verwarmingsunit met een
schone doek, alvorens het apparaat op te bergen.
Opmerking: Om hygiënische redenen en om microbiologische risico’s te
voorkomen, moet de es binnen korte tijd na het bereiden opgedronken worden.
Begintemperatuur van
het water Opwarmtijd*
Uiteindelijke
temperatuur van de
es **
Waterafgifte op 22°C Koelkasttemperatuur 30-60 s 22-24°c
Waterafgifte op 37°C Koelkasttemperatuur 30-60 s 37-39 °c
Waterafgifte op 37°C Kamertemperatuur 20-50 s 37-39 °c
* De opwarmtijd is afhankelijk van de hoeveelheid water en de begintemperatuur
van het water.
**Door toevoeging van het poeder daalt de temperatuur van het water.
BAIN-MARIE STAND
De bain-marie stand maakt het mogelijk essen en potjes op te warmen. De bain-
marie stand maakt het niet mogelijk de exacte temperatuur van de opgewarmde
voeding te controleren. De instelling van de bain-marie stand is afhankelijk van de
hoeveelheid te verwarmen voeding en het materiaal van de es:
•
Stand 1 :
Potje en es met kleine inhoud van kunststof / Alle glazen potjes en essen
•
Stand 2 :
Potje en es met grote inhoud en uitsluitend van kunststof
1.
Open de deksel van de verwarmingsunit 2
2.
Vul de verwarmingsunit tot aan de ‘Max.’ streep. .
3.
Plaats de te verwarmen es of het potje in de verwarmingsunit.
4.
Druk op de knop van de gewenste stand, het apparaat piept en de knop
knippert gedurende de opwarmtijd.
5.
Aan het einde van de cyclus piept het apparaat 3 maal en gaat de knop uit.
6.
LET OP, RISICO OP BRANDWONDEN. Verwijder vervolgens de es
of het potje met een doek om brandwonden te voorkomen.
7.
Sluit de deksel goed af en wacht tot het water is afgekoeld alvorens het
apparaat te legen.

18
19
INBEDRIJFSTELLING VAN HET
PRODUCT
1- Breng de verwarmingsunit op de boog aan
2- Draai de vergrendeling in de richting van de wijzers van
de klok (zie schema)
3- Sluit het apparaat aan op een geaard 220-240V
stopcontact.
4- Plaats het snoer aan de achterzijde van het product
10
5- Voer, vóór het eerste gebruik, een ‘Bain-marie’ cyclus uit om het apparaat
schoon te spoelen
- Giet circa 200 ml water in de verwarmingsunit.
- Sluit de deksel en druk op de ( ) knop. Het apparaat ‘piept’ en de knop
knippert tijdens de hele cyclus.
- Aan het einde van de cyclus piept het apparaat 3 maal en gaat de knop uit.
Plaats een es van meer dan 200 ml onder de wateruitgang.
- Druk op de waterafgifte knop om het reservoir volledig te legen,
LET OP RISICO OP BRANDWONDEN!
- Laat het apparaat enkele minuten afkoelen alvorens het te gebruiken.
INSTANTBEREIDING
De instantbereiding is de meest snelle manier om essen te bereiden. De es
heeft binnen enkele seconden direct de gewenste temperatuur.
1. Vul de es met een hoeveelheid water die overeenkomt met de te bereiden
hoeveelheid.
2. Open de deksel en giet het water in de lege verwarmingsunit.
3. Sluit vervolgens de deksel
4. Vul de es met de benodigde hoeveelheid poeder voor de bereiding en plaats
de es op de essenhouder en onder de wateruitgang.
5. Druk op de knop 22°C of 37°C. Het apparaat piept en de knop knippert
gedurende de opwarmtijd.
6. Zodra het water op de juiste temperatuur is, piept het apparaat 3 maal en gaat
de knop uit.
7. Druk op de waterafgifte knop om de es te vullen.
8. Droog het resterende water op de bodem van verwarmingsunit met een
schone doek, alvorens het apparaat op te bergen.
Opmerking: Om hygiënische redenen en om microbiologische risico’s te
voorkomen, moet de es binnen korte tijd na het bereiden opgedronken worden.
Begintemperatuur van
het water Opwarmtijd*
Uiteindelijke
temperatuur van de
es **
Waterafgifte op 22°C Koelkasttemperatuur 30-60 s 22-24°c
Waterafgifte op 37°C Koelkasttemperatuur 30-60 s 37-39 °c
Waterafgifte op 37°C Kamertemperatuur 20-50 s 37-39 °c
* De opwarmtijd is afhankelijk van de hoeveelheid water en de begintemperatuur
van het water.
**Door toevoeging van het poeder daalt de temperatuur van het water.
BAIN-MARIE STAND
De bain-marie stand maakt het mogelijk essen en potjes op te warmen. De bain-
marie stand maakt het niet mogelijk de exacte temperatuur van de opgewarmde
voeding te controleren. De instelling van de bain-marie stand is afhankelijk van de
hoeveelheid te verwarmen voeding en het materiaal van de es:
• Stand 1 :
Potje en es met kleine inhoud van kunststof / Alle glazen potjes en essen
• Stand 2 :
Potje en es met grote inhoud en uitsluitend van kunststof
1. Open de deksel van de verwarmingsunit 2
2. Vul de verwarmingsunit tot aan de ‘Max.’ streep. .
3. Plaats de te verwarmen es of het potje in de verwarmingsunit.
4. Druk op de knop van de gewenste stand, het apparaat piept en de knop
knippert gedurende de opwarmtijd.
5. Aan het einde van de cyclus piept het apparaat 3 maal en gaat de knop uit.
6. LET OP, RISICO OP BRANDWONDEN. Verwijder vervolgens de es
of het potje met een doek om brandwonden te voorkomen.
7. Sluit de deksel goed af en wacht tot het water is afgekoeld alvorens het
apparaat te legen.

20
21
8. Controleer, na het doorroeren van het potje of het schudden van de es,
altijd of de voeding niet te heet is om te voorkomen dat uw kindje zijn mondje
brandt.
9. Gebruik nooit het water van de bain-marie stand om een es te bereiden.
10. Leeg het water van de verwarmingsunit in de gootsteen en droog het af
met een schone doek of keukenpapier, alvorens het apparaat op te bergen.
In de bain-marie stand kan het product zonder de boog
7
gebruikt worden.
1. Draai, om de verwarmingsunit van de boog los te koppelen, de vergrendeling
tegen de wijzers van de klok in.
2. Plaats de verwarmingsunit op het keukenblad en volg de bovenstaande
stappen voor de bain-marie stand op.
Watertemperatuur van
de bain-marie
Opwarmtijd van de
bereiding*
Temperatuur van de
es of het potje
Bain-marie 70 °C 7 tot 8 min. 30 tot 40 °C
Bain-marie 90 °C 11 tot 12 min. 30 tot 40 °C
* de opwarmtijd is afhankelijk van de begintemperatuur van het water.
ONDERHOUD
• Haal de stekker van het apparaat uit het stopcontact alvorens het te reinigen.
• Reinig het reservoir en het oppervlak met een vochtige doek of een uitgeknepen
spons.
• Droog het zorgvuldig af.
• Naarmate het gebruik, kan er zich kalkaanslag op de bodem van de
verwarmingsunit vormen. Ontkalk in dit geval de verwarmingsunit:
1. Verwijder het reservoir van de boog.
2. Giet een mengsel van 50 ml water en 50 ml schoonmaakazijn of het Béaba
onderhoudsmiddel in een koud en van de stroom afgekoppeld apparaat.
Laat dit een hele nacht inwerken. Vermijd chemische ontkalkingsmiddelen of
ontkalkingsmiddel voor kofezetapparaten in het reservoir te gebruiken.
3. Leeg het reservoir van de verwarmingsunit, spoel het schoon en droog het af
met een schone doek.
4. Herhaal de behandeling indien nodig totdat het apparaat volledig kalkvrij is.
5. Start een ( ) opwarmcyclus op alvorens het apparaat opnieuw te
gebruiken.
6.
Ontgrendel de verwarmingsunit, om het product op te bergen, en plaats het
in de boog
9
MILIEU EN RECYCLING
U heeft een product aangeschaft met het hiernaast vermelde logo. U mag dit
product dus niet bij het gewone huisafval wegwerpen. Informeer naar de van
kracht zijnde bepalingen in uw streek voor de gescheiden inzameling van
elektrische en elektronische apparaten. Breng dit product naar een inzamelpunt
voor het recyclen van elektrische en elektronische apparaten.
TECHNISCHE GEGEVENS
Spanning: 220-240V ~ 50Hz - 60Hz. Vermogen: 460W - 540W,
Bedrijfstemperatuur: 10 tot 40°C
VRAGEN/ANTWOORDEN
Het product werkt niet
• Controleer of het snoer niet beschadigd is
• Controleer op het apparaat is aangesloten op een
voeding van 220V
Het water loopt weg,
voordat het apparaat
opwarmt.
• Controleer of de knop van de waterafgifte niet
geblokkeerd is en zet deze in de hoge stand. Druk,
indien nodig, meerder keren op de knop.
• Controleer of het reservoir geen kalkaanslag
vertoont. Verwijder indien nodig de kalkaanslag.
Alle knoppen knipperen
• Het apparaat schakelt over op de storingsstand
omdat er zich geen water in het reservoir bevindt
bij het opstarten van de cyclus
• Neem anders contact op met de After Sales dienst
van Béaba
Slechts één knop werkt • Neem contact op met de After Sales dienst van
Béaba
Het apparaat piept en
schakelt uit
• Er werd een cyclus opgestart zonder water in het
reservoir, wacht tot het reservoir afgekoeld is en vul
het met water.
This manual suits for next models
1
Table of contents
Languages:
Other Beaba Bottle Warmer manuals

Beaba
Beaba BABYMILK SECOND User manual

Beaba
Beaba Bib'Expresso User manual

Beaba
Beaba BABYMILK SECOND User manual

Beaba
Beaba MILKEO User manual

Beaba
Beaba Bib'bain-marie User manual

Beaba
Beaba Bib'bain-marie User manual

Beaba
Beaba MILKEO User manual

Beaba
Beaba Bib'secondes User manual

Beaba
Beaba Milk Prep User manual

Beaba
Beaba Bib'secondes User manual