Bebecar Spinner 0986 User manual
www.bebecar.com
instructions
instrucciones
instruções
ISOFIX
B1, C
0 - 18 Kg
GROUP 0+/1
Ref.0986
40 - 105 cm
Size
9 - 18 kg
75 - 105 cm
Max. 18 kg
ISOFIX
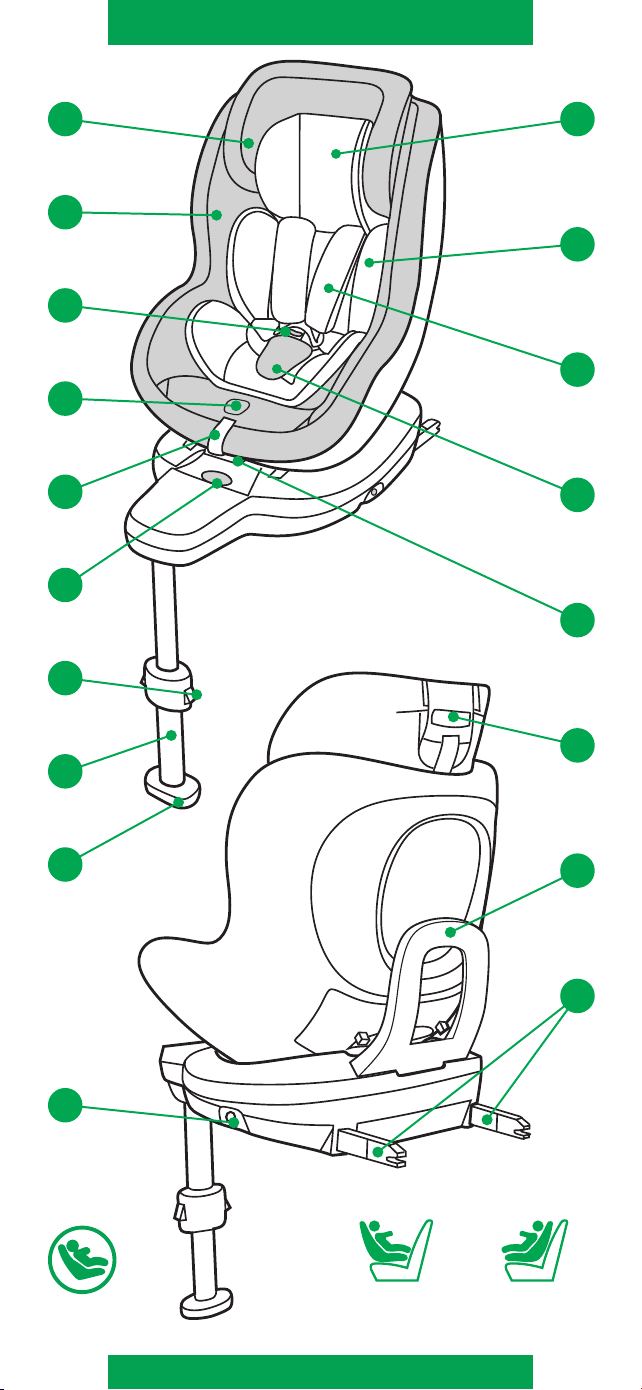
01 Headrest
02 Backrest
03 Buckle
04 Safety Belt Adjuster
05 Adjustment Webbing
06 Support Leg Indicator
07 Support Leg
08 Support Leg Adjustment
Button
09 Seat Rotate Release Button
10 Seat Recline Release Button
11 Crotch Strap
12 Shoulder Strap
13 Inner Pad
14 Small Headrest Pad
15 Headrest Adjuster
16 Rebound Bar
17 ISOFIX Connector
18 ISOFIX Pop-up Trigger
01 Reposacabezas
02 Respaldo
03 Hebilla
04 Pulsador de regulación del arnés
05 Cinta regulación arnés
06 Indicador de color de la barra de apoyo
07 Barra soporte
08 Pulsador de regulación de barra de apoyo
09 Botón de ajuste de rotación
10 Mecanismo de cambio de posiciones
de reclinación
11 Cinta entrepierna
12 Cinta hombrera
13 Cojín adaptador
14 Almohadilla de reposacabezas
15 Palanca ajuste cabezal
16 Barra de rebote
17 Anclajes Isofix
18 Gatillo de anclajes Isofix
01 Cabeceiro
02 Encosto
03 Fivela
04 Botão de Regulação do Arnês
05 Cinto de Ajustamento do Arnês
06 Indicador do Pé de Apoio
07 Pé de Apoio
08 Botão de Regulação do Pé de Apoio
09 Botão de Desbloqueio da Rotação
10 Botão de Regulação da Inclinação
11 Cinto de Entrepernas
12 Cinto de Ombros
13 Redutor do Encosto
14 Redutor do Cabeceiro
15 Pega de Regulação do Cabeceiro
16 Barra de Ressalto
17 Conetor ISOFIX
18 Botão de Ativação do ISOFIX
01 Repose-tête
02 Dossier
03 Boucle
04 Bouton de Réglage du Harnais
05 Sangle de Réglage du Harnais
06 Indicateur du Pied de Fixation
07 Pied de Fixation
08 Bouton de Réglage du Pied de Fixation
09 Bouton de Déblocage de la Rotation
10 Bouton de Réglage de l'Inclinaison
11 Sangle d'Entrejambe
12 Sangle d'Épaule
13 Réducteur du Dossier
14 Réducteur du Repose-tête
15 Bouton de Réglage du Repose-tête
16 Barre de Rebond
17 Connecteurs ISOFIX
18 Déclencheur de l'ISOFIX
- All BÉBÉCAR products have a period of guaranteed subject to
the local law of the country in which it is being sold, from the date of purchase, against
mechanical defects which will be repaired, or parts replaced free of charge within this
period. This is conditional upon the product having been used for the purpose for which
it was designed and no liability is accepted for defects arising out of fair wear and tear,
undue force, neglect or accident. In furtherance of their policy of continuous product
development BÉBÉCAR reserve the right to make specification and design changes.
- Todos los productos BÉBÉCAR están garantizados por el período
establecido en la normativa vigente contra defectos de fabricación. Los mismos serán
reparados o sustituidas las piezas averiadas durante ese periodo. BÉBÉCAR no aceptará
reclamaciones por daños causados por resultado de una utilización contraria a las
instrucciones, bien como negligencias o accidentes. Conforme a su política de desarrollo
continuo de sus productos, BÉBÉCAR se reserva el derecho de modificar dibujos o
especificaciones de los mismos.
- Todos os produtos BÉBÉCAR estão garantidos de acordo com a
lei em vigor contra defeitos de fabrico. Os mesmos serão reparados ou substituídas as
peças avariadas durante esse período. A BÉBÉCAR não aceitará reclamações por danos
causados, em resultado de uma utilização contrária às instruções, bem como
negligências ou acidentes. A BÉBÉCAR reserva o direito de modificar desenhos ou
especificações dos seus produtos sempre que entenda conveniente.
- Tous les produits BÉBÉCAR sont garantis pendant une période
légalement prévue dans le pays d'achat, à partir de la date d'achat contre les défauts de
mécanisme qui seront réparés ou remplacés pendant cette période. BÉBÉCAR ne
reconnaît pas les défauts causés par un emploi contraire aux instructions, négligence
d'entretien ou accidents. BÉBÉCAR se réserve le droit de modifier les dessins et
spécifications de ses produits.
GUARANTEE
GARANTIA
GARANTIA
GARANTIE
ISOFIX
ISOFIX
B1, C
08
07
05
04
03
02
01
09
06
18
13
15
16
17
12
11
10
14
1
40 - 105 cm
9 - 18 kg
75 - 105 cm
Max. 18 kg

2
3
4
5
6
7
1
2
3
8
9
10
11
1

14
12
13
15
1
2
1

18
16
17
19
22
20
21
23
1
2
26
24
25
27
1
30
28
29

ENGLISH
General
DO NOT install this child restraint under the following conditions:
• Vehicle seats with lap belt.
• Vehicle seats facing sideward or rearward with respect to the
running direction of the vehicle.
• Vehicle seats movable during installation.
This is an i-Size universal ISOFIX enhanced child restraint
system. It is approved according to Regulation 129/02, for use in
an i-Size compatible vehicle seating position. It will fit vehicles
with positions approved as ISOFIX positions (as detailed in the
vehicle handbook), depending on the category of the child
restraint and of the fixture. If in doubt, consult either the child
restraint manufacturer or vehicle manufacturer.
Read all the instructions in this manual before using this product.
If you have any further questions. If in doubt, please consult the
child restraint manufacturer or the retailer.
The mass group and the ISOFIX size class for which this device is
intended is: Group 1, B1 and C; Group 0+, C.
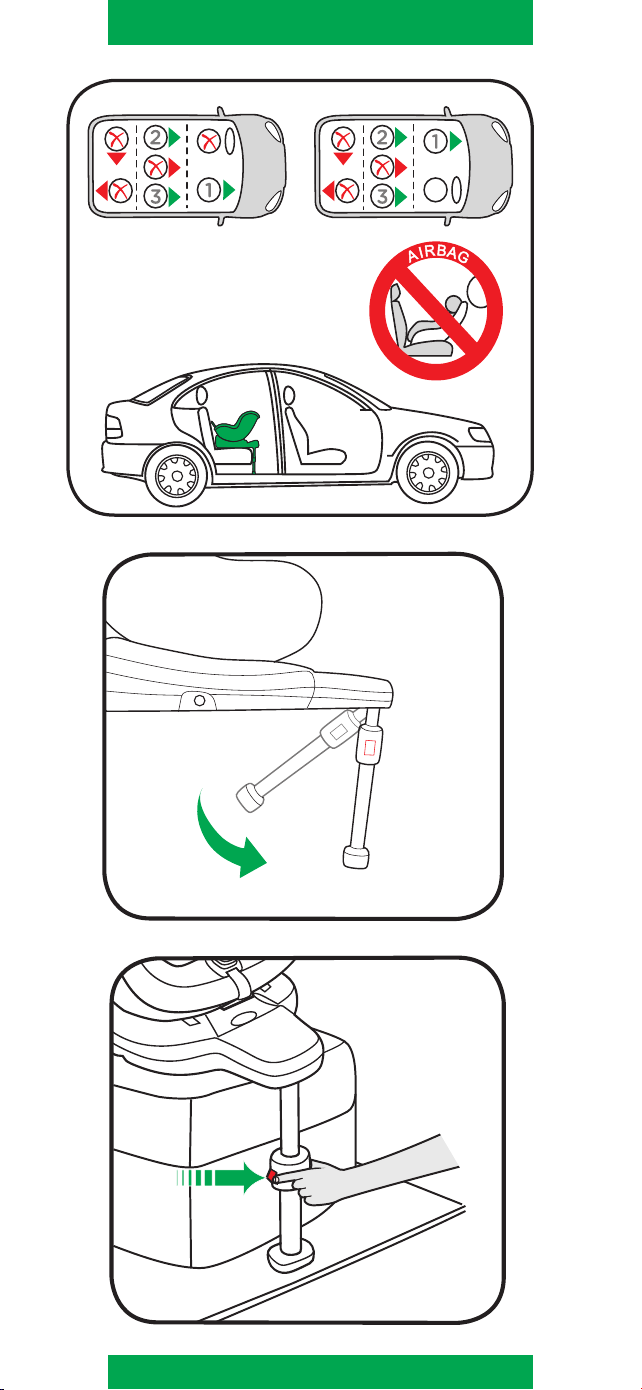
DO NOT install this child restraint on vehicle seats with Lap Belts
and 3-point Retractor Safety Belt (Fig. 2 & Fig. 3).
This child restraint is suitable for vehicle seats with ISOFIX
anchor points with the Base (Fig. 4).
DO NOT install this child restraint on vehicle seats that face
sideways or rearward with respect to the moving direction of the
vehicle (Fig. 5.1).
DO NOT place rear-facing child restraint on front seat with air bag
(Fig. 5.2), death or serious injury may occur. Please reference
vehicle owner's manual for more information.
It is recommended to install this child restraint on the rear vehicle
seat, facing rearwards (Fig. 5.3).
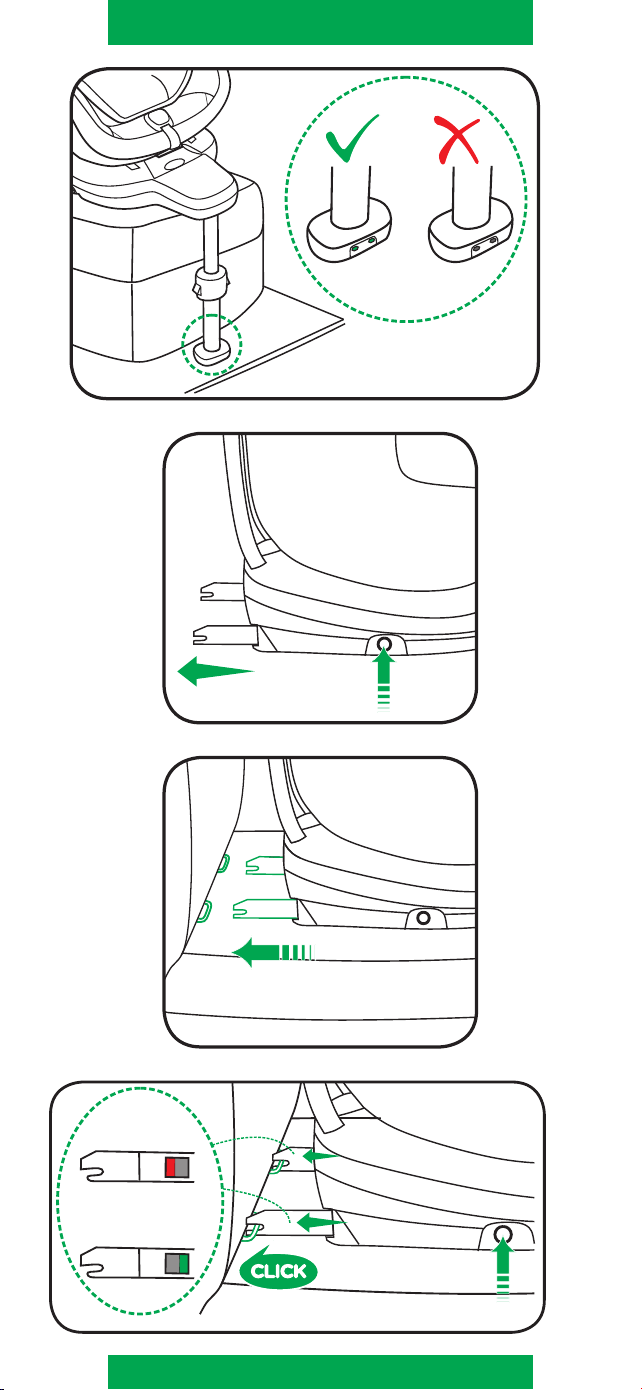
• Unfold the Support leg from the base (Fig. 6).
• After placing the base on the vehicle seat, extend the Support
leg to floor (Fig. 7), when the Support leg indicator shows green
means it is installed correctly (Fig. 8).
Make sure the Support leg is fully contact with the vehicle floor
pan. Squeeze the Support leg releasing button, then shorten
the Support leg upwards.
• Press the ISOFIX Pop-up Triggers on two sides and the ISOFIX
connectors will be popup (Fig. 9).
• Make the ISOFIX connectors face the ISOFIX anchorage
system between the seat and the backrest of the vehicle seat
(Fig. 10).
• Click the child seat ISOFIX connectors into the ISOFIX
anchorage system. When clicking in (Fig. 11), the indicators
informing you about the correct installation, should be green
(Fig. 11.1) and your child restraint's backrest is aligned parallel
(Fig. 11) with the backrest of the vehicle seat.
Concerns on Installation
Installation of ISOFIX System
ISOFIX

ENGLISH
Make sure that both ISOFIX connectors are securely attached
to their ISOFIX anchor points. The colors of the indicators on
the both ISOFIX connectors should be completely green
(Fig. 11.1).
Check to make sure the base is securely installed by pulling on
the both ISOFIX connectors.
• The completely assembled base is shown as (Fig. 12).
The ISOFIX connectors must be attached and locked onto the
ISOFIX anchor points (Fig. 12.1).
The support leg must be installed correctly with green indicator
(Fig. 12.2).
• Please refer to rearward facing and forward facing in section to
use the child restraint.
• To remove the child restraint, turn the ISOFIX connectors
switches off and the indicators will be red, meanwhile you will
hear the “click”- sound, the ISOFIX connectors will be bounce
off and then can be removed from the anchorage system of
vehicle seat (Fig. 13). The ISOFIX is folded completely.
Reference age: Newborn to 4 years old
Recline position: Position 1
There is only reclined position and without upright position when
installing for children weighting 0-13 kg.
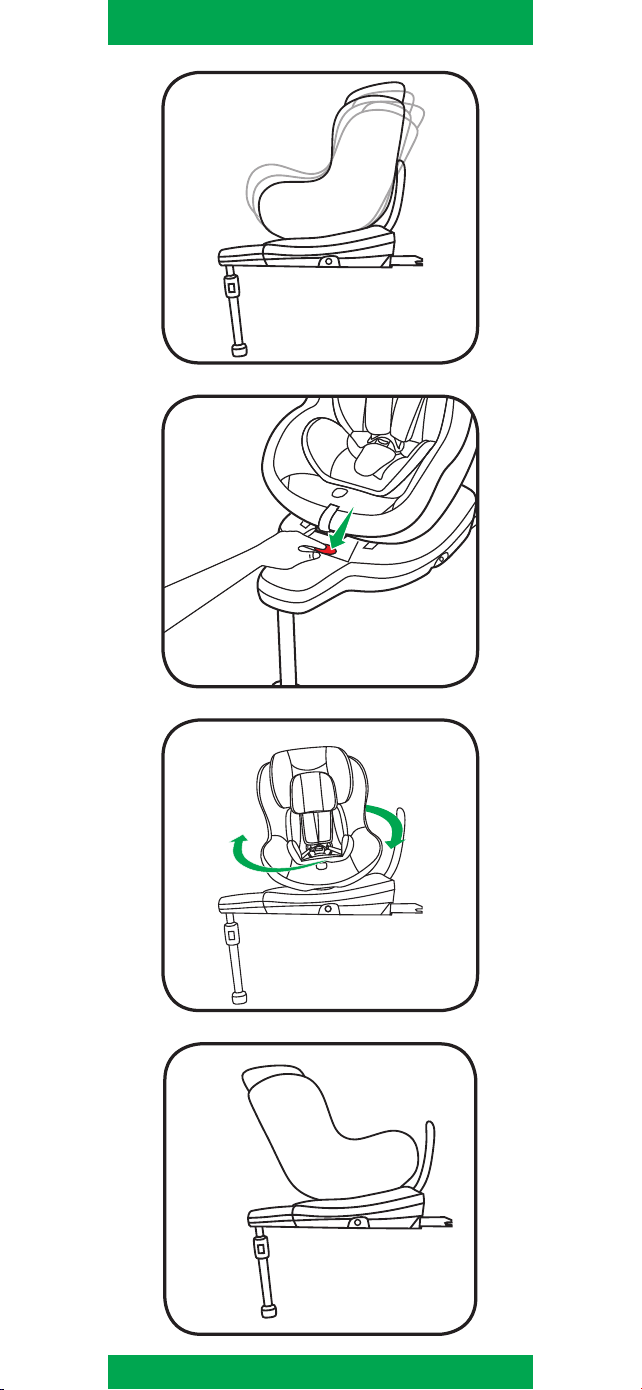
Please install the child restraint on the vehicle seat, then put the
child in it. Squeeze child restraint rotate release button (Fig. 25),
turn the child restraint to backward position (Fig. 26-27), and you
can hear a "click-sound”.
We recommend using the full inner pads while the baby
is 0-6 months or until they outgrow the pads. The inner
pads increase side impact protection (Fig. 14).
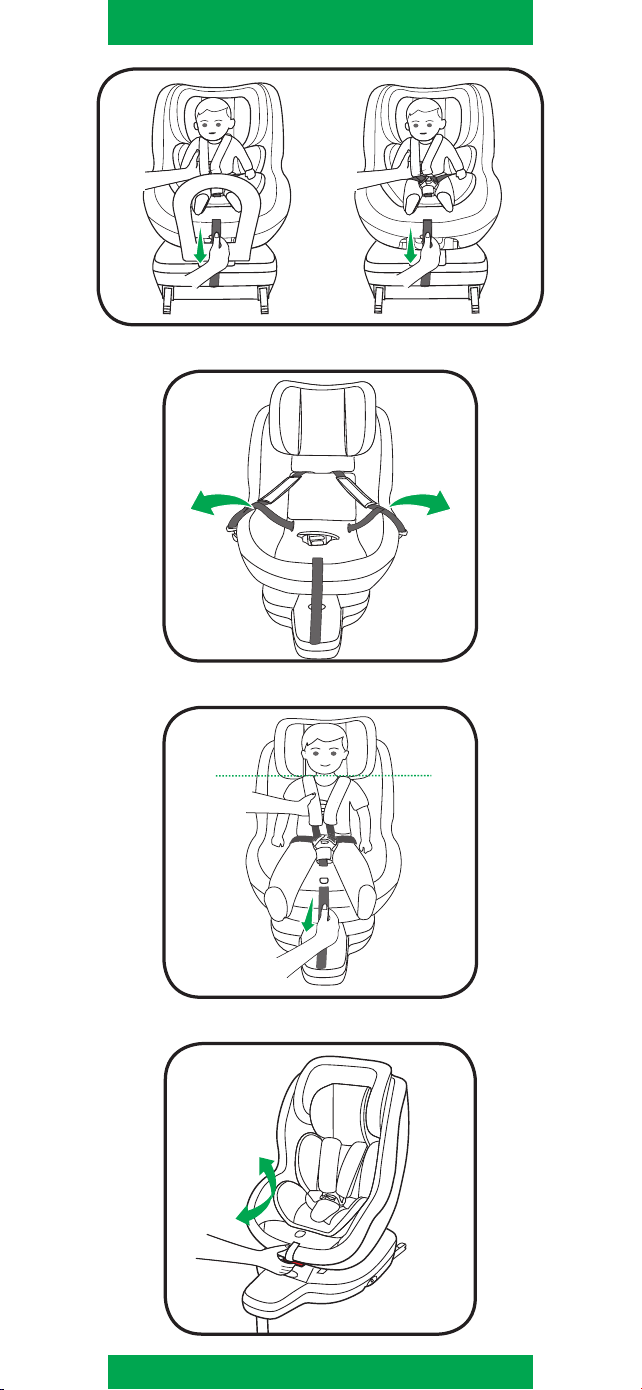
After the child is placed into the seat, check whether the
shoulder harnesses are at proper height.
• Push down the webbing adjuster button (Fig. 15.1), while
pulling out the shoulder harnesses to the proper length
(Fig. 15).
• Press the red button to disengage the buckle (Fig. 16).
• If necessary, place the small child inner pads in the child
restraint and thread the shoulder harnesses, waist harnesses.
• Leave the harnesses on the left side and right side respectively
(Fig. 17).
• Place the child into the child restraint and pass both arms
through the harnesses (Fig. 18).
NOTE: After the child is seated, recheck whether the shoulder
harnesses are at the proper height.
• Engage the buckle (Fig. 19).
• Pull down the adjustment webbing and adjust it to the proper
length to make sure your child is snugly secured (Fig. 20).
NOTE: Make sure the space between the child and the
shoulder harness is about the thickness of one hand (Fig. 20).
Using the Child Restraint
Rearward Facing Mode -
for Child under 18kg / Newborn - 4 years old
NOTE:
NOTE:
Securing your Child in the Child Restraint Rearward Facing
ISOFIX

ENGLISH
Forward Facing Mode -
for Child between 9-18kg / 1 - 4 years old
Securing your Child in the Child Restraint Forward Facing
NOTE:
NOTE:
NOTE:
Recline Adjustment
NOTE:
Height Adjustment for Headrest and Shoulder Harnesses
Detach Soft upholstery
Reference age: 1-4 years old
Recline position: Position 2
You can adjust child seat to upright or reclined when installing for
children weighting 9-18 kg.
Please install the child restraint on the vehicle seat, then put the
child in the child restraint.
If the child restraint in backward position, pull the child restraint
reclining wrench up while squeezing the child restraint recline
release button (Fig. 25), adjust child restraint to the most vertical
position, then squeeze child restraint rotate release button and
turn to forward position (Fig. 24), you can hear a “click” sound.
When installing the child restraint for forward facing, do
not use the small child insert.
After the child is placed into the child restraint, check
whether the shoulder harnesses are at proper height.
• Squeeze the webbing adjuster, while pulling out the shoulder
harnesses to the proper length (Fig. 15).
• Press the red button to disengage the buckle (Fig. 16).
• Leave the harnesses on the left side and right side of the seat
(Fig. 21).
• Place the child into the child restraint and engage the buckle
(Fig. 22).
After the child is seated, recheck whether the shoulder
harnesses are at the proper height.
• Engage the buckle.
• Pull down the adjustment webbing and adjust it to the proper
length to make sure your child is snugly secured (Fig. 22).
Make sure the space between the child and the
shoulder harness is about the thickness of one hand.
Press the recline adjustment button (Fig. 23.1) and adjust the
child restraint to the proper position (Fig. 23.2).
The recline angles are shown as (Fig. 24)
Please recheck the support leg position after reclining.
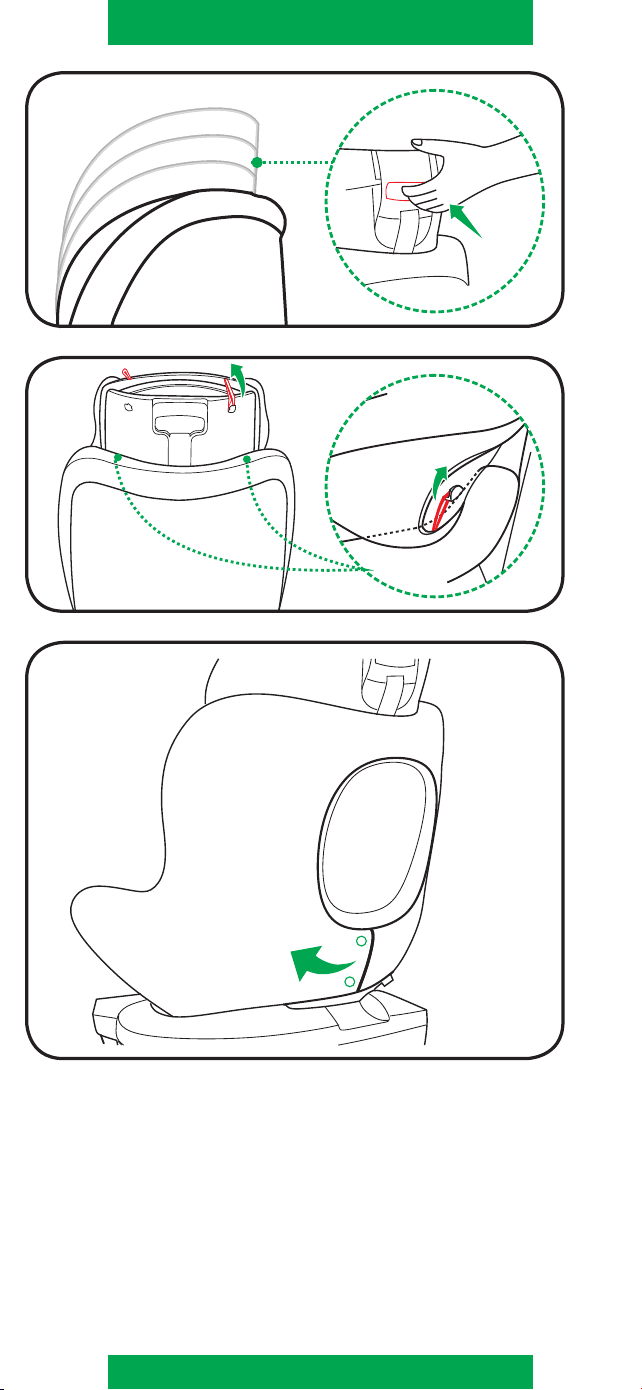
• Please adjust the headrest and check if the shoulder harnesses
are at the correct height according to (Fig. 20 and Fig. 22).
• Pull the headrest adjuster (Fig. 28.1) up, meanwhile pull up or
push down the headrest. The headrest positions are shown as
(Fig. 28).
• Press the red button to disengage the buckle (Fig. 16).
• Remove the small inner pads and crotch strap.
• Detach the elastic band (Fig. 29) on the headrest, and then
remove the cover.
• Detach the snaps on the seat pad, pull the buckle to the back of
seat pad, and then remove the seat pad (Fig. 30).
• To assemble soft upholstery in reverse steps.
ISOFIX

ENGLISH
Care and Maintenance
Vehicle Fitting Information
Please wash the seat cover and inner padding with cold water
under 30°C.
Do not iron the soft goods.
Do not bleach or dry clean the soft goods.
Do not use undiluted neutral detergent, gasoline or other organic
solvent to wash the child restraint or base. It may cause damage
to the child restraint.
Do not twist the seat cover and inner padding to dry with great
force. It may leave the seat cover and inner padding with wrinkles.
Please hang dry the seat cover and inner padding in the shade.
Please remove the child restraint and base from the vehicle seat if
not in use for a long period of time.
Put the child restraint in a cool, dry place and somewhere your
child cannot access it.
This child restraint with base is classified for "Semi-Universal" or
ISOFIX child restraint system use. It is suitable for fixing into the
seat positions of most cars.
Seat positions in other cars may also be suitable to accept the
child restraint.
The following Vehicle Fitting Information is only for vehicles sold
in European markets. If in doubt, consult either the child restraint
manufacturer or the distributor.
ALWAYS give priority to the rear seats of your vehicle.
NEVER install this child restraint on any vehicle seat equipped
with safety airbags when used rearward facing.
• The manual of the child restraint system is placed in a small bag
on the right side of the backrest.
• NO child restraint can guarantee full protection from injury in an
accident.
However, proper use of this child restraint will reduce the risk of
serious injury or death to your child.
• The child should weight under 18kg (approximately 4 years old
or under).
DO NOT use forward facing mode before the child's weight
exceeds 9kg. Any straps of child restraint and vehicle seat
should be tightened and not twisted.
• When using this child restraint in baby or toddler mode, the
harness must be used correctly, and make sure the lap belt is
not above the child's pelvis portion.
• Please keep this child restraint away from sun-light, otherwise it
may be too hot for the child's skin.
• Frequently check the ISOFIX guides for dirt and clean them if
necessary.
WARNING
ISOFIX

• Stop using this child restraint 7 years after date of
manufacturing. Due to ageing the quality of the material may
change.
Do not use second-hand products whose history is unknown.
The warranty only applies for the first owner and is not
transferable.
• Ensure that ISOFIX system straps that fasten the child's seat in
the car is securely fastened and tightened.
• Make sure that the Spinner is installed in such a way that no
parts of the Spinner or the seat belts can get caught between
the door or the mechanism of the adjustable car seat.
• Always secure the child in the seat using the 5-point seat belt.
• Make sure that the belts are not twisted.
• Make sure that the belt fits snugly around the body of the child.
• Ensure that the lap strap is worn low down, so that the pelvis is
firmly engaged.
• It may be unsafe to use accessories other than those approved
by Bébécar.
• It may be unsafe to use replacements parts, other than those
supplied or approved by Bébécar.
• Upon purchasing the Spinner, place it in the car and verify that it
can be installed and used as indicated in these instructions.
If this is not the case, then contact your dealer or manufacturer.
• It is dangerous to make any alterations or additions to the
device without the approval of competent authority. It is
dangerous if the installation instructions, provided by the
manufacturer, are not followed closely.
The non-upholstered synthetic parts of the seat may become
too warm for your child's skin if the car is left standing in the sun
for a long time.
• The Spinner should be replaced following a car collision. You
can contact your dealer, if so desired.
• Baggage or other items that may cause injury during a car
collision should be properly secured.
• Never leave your child unattended in the seat.
• WARNING: Do not use any load bearing contact points other
than those described in the instructions and marked in the child
restraint.
• Do not use the Spinner without the seat cover.
• The seat cover can be washed by hand at 30°C.
• The synthetic parts can be cleaned using lukewarm water and
soap.
• The seat cover should not be replaced with any other than the
one recommended by the manufacturer, because the seat
cover constitutes an integral part of the restraint performance.
Read the car manufacturer’s handbook.
ENGLISH ISOFIX

ISOFIX
ESPAÑOL
General
NO instale este sistema de retención infantil en las siguientes
condiciones:
• Asientos de vehículos con cinturones de seguridad
horizontales
• Asientos de vehículos que estén orientados hacia un lateral o
hacia atrás en lugar de los que están orientados en el sentido
de la marcha del vehículo
• Asientos de vehículos que se giran o no están fijos durante la
instalación de la silla de auto
Este es un sistema de retención infantil equipado con Isofix
universal I-Size. Está aprobado según Reglamento 129/02, para
utilización en un vehículo compatible con asiento I-Size. Se
puede instalar en vehículos con posiciones aprobados con
posiciones ISOFIX (como se detalla en el manual del vehículo),
dependiendo en la categoría del sistema de retención infantil y su
anclaje. Ante cualquier duda, consulte con el fabricante de la silla
de auto o con el fabricante del vehículo.
Lea detenidamente todas las instrucciones antes de usar el
producto. Si tiene alguna pregunta más o alguna duda, por favor,
consulte con el fabricante de la silla de auto o con el
establecimiento de venta.
El grupo y la clase de tamaño Isofix para los cuales este
dispositivo está destinado es: Grupo 1, B1 y C; Grupo 0+, C..
NO instale este sistema de retención infantil en asientos de
vehículos con cinturones de seguridad horizontales y cinturones
de seguridad retractiles de 3 puntos (Fig. 2 & Fig. 3).
Este sistema de retención infantil es apto para asientos de
vehículos con puntos de anclaje de Isofix con la base (Fig. 4). .
NO instale este sistema de retención infantil en asientos de
vehículos que están orientados hacia un lateral o hacia atrás en
lugar de los que están orientados en el sentido de la marcha del
vehículo (Fig. 5.1). NO instale la silla de auto mirando hacia atrás
en el asiento delantero con el airbag. Muerte o lesiones graves
pueden ocurrir (Fig.5.2). Por favor, consulte con el manual del
vehículo para más información.
Se recomienda instalar el sistema de retención infantil en el
asiento trasero, mirando hacia atrás (Fig. 5.3).
• Despliegue la Barra de apoyo desde la base (Fig. 6).
• Después de colocar la base de la silla de auto en el asiento del
vehículo, extienda la Barra de Apoyo hasta el suelo del
vehículo (Fig. 7), cuando el indicador de la Barra de apoyo
muestra el color verde, está instalada correctamente (Fig. 8).
Asegúrese que la Barra de apoyo está completamente en
contacto con el suelo del vehículo. Apriete el pulsador de la
Barra de apoyo y suba la Barra de apoyo hacia arriba para
acortarla un poco (Fig. 8).
• Pulse los gatillos de anclajes Isofix en ambos lados y los
anclajes de Isofix saldrán automáticamente (Fig. 9).
• Coloque los anclajes de Isofix mirando hacia los puntos de
anclaje Isofix del vehículo localizados entre el asiento y el
respaldo del asiento del vehículo (Fig. 10).
Advertencias sobre la Instalación
Instalación del sistema Isofix

ISOFIX
ESPAÑOL
•
anclaje Isofix del vehículo. Cuando enganche los anclajes
Isofix (Fig. 11), los indicadores de informarán de la correcta
instalación cuando muestran el color verde (Fig. 11.1) y el
respaldo de la silla de auto debe estar alineado paralelo
(Fig. 11) con el respaldo del asiento del vehículo.
Asegúrese que los anclajes Isofix están bien anclados. Los
colores de ambos indicadores de instalación deben de ser
totalmente verdes (Fig. 11.1).
Asegúrese que la base está correctamente instalada tirando
de ambos anclajes Isofix.
• La base completamente instalada se muestra en (Fig. 12).
Los anclajes Isofix tienen que estar completamente
enganchados a los puntos de anclaje Isofix (Fig. 12.1).
La Barra de apoyo debe estar correctamente instalada con su
indicador en color verde (Fig. 12.2).
• Por favor, consulte la sección de estas instrucciones donde se
refiere a las posiciones de mirar hacia atrás o la de en el sentido
de la marcha del vehículo antes de usar la silla de auto.
• Para desinstalar la silla de auto, pulse al interruptor de los
anclajes Isofix hasta que los indicadores se vuelven rojos,
mientras, oirá un sonido “click” cuando los anclajes se sueltan
de los puntos de anclaje Isofix del vehículo y ya se puede retirar
la silla de auto de los puntos de anclaje del asiento del vehículo
(Fig. 13). Pulse los gatillos de los anclajes Isofix mientras que
empuja el anclaje Isofix hacia la base de la silla de auto hasta
que se quedan completamente plegados en ambos lados.
Edad de referencia: Recién nacido hasta los 4 años de edad
Posición de la reclinación: Posición 1
Solo hay una posición de reclinación que no sea vertical cuando
instale la silla de auto para niños con pesos entre 0-13 kg.
Instale primero la silla de auto en el vehículo y después coloque
el niño en la silla. Pulse el botón de ajuste de rotación de la silla
de auto (Fig. 25) y gire la silla de auto a la posición contra la
marcha del vehículo (Fig. 26-27) hasta que oiga un “click”.
Recomendamos el uso tanto el cojín adaptador y la
almohadilla para la cabeza cuando el niño tiene entre 0-6
meses o hasta que está demasiado grande para ellos ya
que ofrecen más protección de impactos laterales
(Fig. 14).
Una vez colocado el niño en la silla de auto, compruebe
que la altura de las hombreras están en la altura correcta
para el niño.
• Pulse el pulsador de regulación del arnés (Fig. 15.1), mientras
tire de las cintas hombreras hasta la longitud que requiere el
niño (Fig. 15).
• Pulse el botón rojo de la hebilla central para soltarla (Fig. 16).
• Si fuese necesario, coloque los cojines adaptadores para
bebés más pequeños en la silla de auto y pase los cinturones
por los cojines adaptadores.
Enganche los anclajes Isofix de la silla de auto a los puntos de
Uso de la Silla de Auto
Modo Sentido Contra la Marcha – para niños con menos de
18 kg/Recién nacido – 4 años de edad
NOTA:
NOTA:
Sujeción de su hijo en la Silla Auto modo sentido contra
marcha

ISOFIX
ESPAÑOL
•
silla de auto respectivamente (Fig. 17).
• Coloque el niño en la silla de auto y pase ambos de sus bracitos
por las cintas hombreras (Fig. 18).
NOTA: Una vez que haya colocado el niño en la silla,
compruebe de nuevo que la altura de las cintas hombreras sea
la correcta.
• Enganche la hebilla central (Fig. 19).
• Tire de la cinta regulación del arnés para ajustar la longitud y
asegúrese que en niño está bien sujeto (Fig. 20).
NOTA: Asegúrese de que el espacio entre el niño y las cintas
hombreras sea el de la anchura de una mano (Fig. 20).
Edad de referencia: 1-4 años de edad
Posición de la reclinación: Posición 2
Se puede ajustar la silla de auto en posición sentado o reclinada
cuando la instale para niños 9-18 kg.
Por favor, instale la silla de auto y después, coloque el niño en la
silla.
Si la silla de auto está en modo sentido contra la marcha, tire del
mecanismo de cambio de posiciones de reclinación (Fig. 25)
mientras coloque la silla de auto en posición vertical. Después,
pulse el botón de ajuste de rotación y gire la silla hasta que esté
mirando hacia adelante (Fig. 24) y oiga un “click” indicando que
haya encajado en posición.
Cuando instale la silla de auto en modo sentido de la
marcha, no utilice el cojín adaptador para los bebés más
pequeños. Una vez que haya colocado el niño en la silla,
compruebe que la altura de las cintas hombreras sea la
correcta.
• Pulse el pulsador de regulación del arnés mientras tire de las
cintas hombreras hasta la longitud que requiere el niño
(Fig. 15).
• Pulse el botón rojo de la hebilla central para soltarla (Fig. 16).
• Aparte los cinturones al lado derecha y al lado izquierda de la
silla de auto respectivamente (Fig. 21).
• Coloque el niño en la silla de auto y enganche la hebilla central
(Fig. 22)
Una vez que haya colocado el niño en la silla,
compruebe de nuevo que la altura de las cintas
hombreras sea la correcta.
• Tire de la cinta regulación del arnés para ajustar la longitud y
asegúrese que en niño está bien sujeto (Fig. 22).
• Asegúrese de que el espacio entre el niño y las cintas
hombreras sea el de la anchura de una mano.
Pulse el mecanismo de cambio de posiciones de reclinación
(Fig. 23.1) y ajuste la silla de auto en la posición que necesite
(Fig. 23.2).
Los ángulos de reclinación se muestran en (Fig. 24)
Por favor, compruebe la posición de la barra de apoyo
después de cambiar la posición de reclinación.
Aparte los cinturones al lado derecha y al lado izquierda de la
Modo Sentido de la marcha -
para niños con pesos entre 9-18 kg/1-4 años de edad
Sujeción de su hijo en la Silla Auto modo sentido de la
marcha
NOTA:
NOTA:
NOTA:
Ajuste de la reclinación
NOTA:

ISOFIX
ESPAÑOL
Ajuste del reposacabezas y las cintas hombreras
Desmontar la tapicería
Cuidado y mantenimiento
Información sobre la instalación en automóviles
• Ajuste el reposacabezas y compruebe que la altura de las
cintas hombreras sea la correcta según se muestra (Fig. 20 y
Fig. 22).
• Tire de la palanca ajuste cabezal hacia arriba (Fig. 28.1),
mientras empuje para abajo o tire hacia arriba el
reposacabezas. Las posiciones del reposacabezas se
muestran en (Fig. 28).
• Pulse el botón rojo de la hebilla central para abrirla (Fig. 16).
• Retire las almohadillas protectoras y la cinta entrepierna.
• Quite la cinta elástica (Fig. 29) enganchado al reposacabezas
y retire la tapicería.
• Suelte los automáticos en la tapicería y pase la hebilla por
detrás de la tapicería y retire la tapicería (Fig. 30).
• Para volver a colocar la tapicería, sigue los mismos pasos
inversos.
Lave la tapicería y las almohadillas con agua fría a menos de
30 º C. No planche ninguno de los tejidos
No lave con lejía ni limpie en seco ninguno de los tejidos.
No use detergentes neutros sin diluir, gasolina u otro solvente
orgánico para lavar la silla de auto ni su base. Pueden causar
daños a la silla de auto.
No retuerza la tapicería ni las almohadillas para forzar el secado.
Puede dejar la tapicería y su relleno interior con arrugas.
Por favor, cuelgue la tapicería y su relleno interior para secar en
la sombra.
Retire la silla de auto del vehículo si no la use durante un periodo
prolongado.
Guarde la silla de auto en un lugar fresco y seco fuera del alcance
de niños.
Esta silla de auto con base se clasifica como "Semi-Universal" o
uso como sistema de retención infantil ISOFIX.
Se puede instalar en los asientos de la mayoría de automóviles.
La instalación en asientos de otros automóviles depende del tipo
de cinturones de seguridad del vehículo. La información para
instalación proporcionada solo se refiere a vehículos vendidos
para mercados europeos. Si tiene alguna duda, consulte con el
fabricante de la silla de auto o con el establecimiento de venta.
SIEMPRE conceda prioridad a los asientos traseros de su
vehículo. NUNCA instale la silla de auto en un asiento de
automóvil equipado con airbag activado cuando la utilice en
modo sentido contra la marcha.
• Las instrucciones del sistema de retención infantil están
colocadas dentro de una pequeña bolsa de plástico en el
lateral derecho del respaldo.
• Ningún sistema de retención infantil puede garantizar la
completa protección de lesiones en caso de un accidente. Sin
embargo, el uso correcto del sistema de retención infantil
puede reducir los riesgos de lesiones graves o muerte de su
hijo.
ADVERTENCIA
Table of contents
Languages:
Other Bebecar Car Seat manuals


