Beko EFS5100W User manual

Stand fan
User Manual
EFS5100W
EN

Please read this user manual rst!
Dear Customer,
Thank you for preferrng a Beko product. We hope that you get the best results
from your product whch has been manufactured wth hgh qualty and state-of-
the-art technology. Therefore, please read ths entre user manual and all other
accompanyng documents carefully before usng the product and keep t as a
reference for future use. If you handover the product to someone else, gve the user
manual as well. Follow all warnngs and nformaton n the user manual.
Meanings of the symbols
Followng symbols are used n the varous secton of ths manual:
C
Important nformaton or useful
hnts about usage.
A
Warnng for hazardous stuatons
wth regard to lfe and property.
Warnng to actons that must never
perform.
B
Warnng for electrc shock.
Warnng for danger of fre.
Warnng for hot surfaces.
This product has been produced in environmentally friendly, modern facilities
Complies with the WEEE Regulation.

Stand fan / User Manual 3 / 12 EN
1 Safety nstructons 4
2 Part fgure 6
3 Assembly of chasss & column unt 7
4 Grll & fan blade assembly 8
5 Operatng nstructon 9
6 Other 10
6.1 Mantenance nstructon. . . . . . . . . . . . . . . . . . . . . . . . . . . . . . . . . . . . . . . . . . . . . . . . . . . . . . . . . . . . . . . . . . . . . . . . . . 10
6.2 Cleanng. . . . . . . . . . . . . . . . . . . . . . . . . . . . . . . . . . . . . . . . . . . . . . . . . . . . . . . . . . . . . . . . . . . . . . . . . . . . . . . . . . . . . . . . . . . 10
6.3 Techncal data . . . . . . . . . . . . . . . . . . . . . . . . . . . . . . . . . . . . . . . . . . . . . . . . . . . . . . . . . . . . . . . . . . . . . . . . . . . . . . . . . . . . 10
7 Dsposal 11
CONTENTS

4 / 12 EN Stand fan / User Manual
1 Safety nstructons
Warnng
Read rules for safe operaton and nstructons carefully.
•
If the supply cord s damaged, t must be replaced by manufacturer
or ts servce agent or a smlarly qualfed person n order to avod
a hazard.
•
To protect aganst the rsk of electrcal shock, do not mmerse the
unt, cord or plug n water or other lqud.
•
Ths applance can be used by chldren aged from 8 years and
above and persons wth reduced physcal, sensory or mental
capabltes or lack of experence and knowledge f they have been
gven supervson or nstructon concernng use of the applance n
a safe way and understand the hazards nvolved. Chldren shall not
play wth the applance. Cleanng and user mantenance shall not
be made by chldren wthout supervson.
•
When the applance s not n use and before cleanng, unplug the
applance from the outlet.
•
Keep electrcal applances out of reach from chldren or nfrm
persons. Do not let them use the applances wthout supervson.
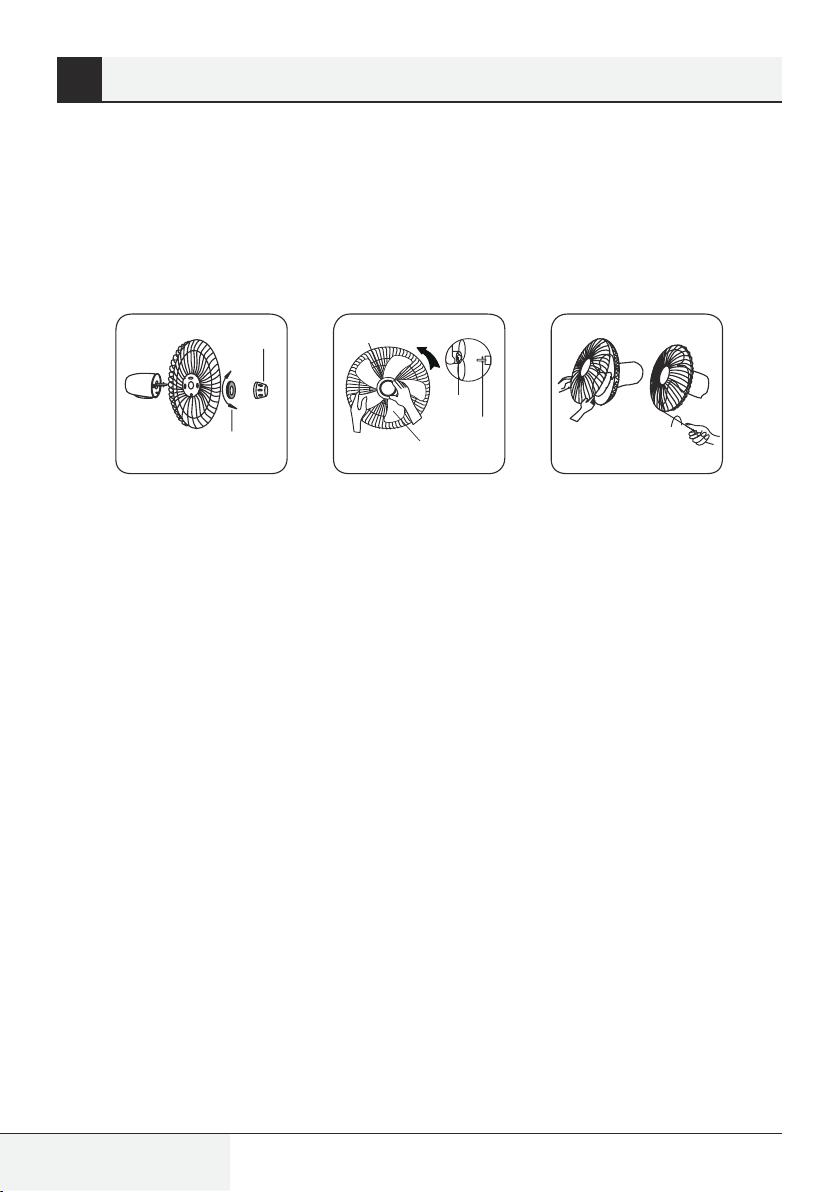
•
When the fan was assembled, the rotor blade guard shall not be
taken off anymore.
-
Pror cleanng unplug the fan.
-
The rotor guard shall not be dssembled/opened to clean the rotor
blades.
-
Wpe the fan enclosure and rotor blade guard wth a slghtly damp
cloth.

Stand fan / User Manual 5 / 12 EN
1 Safety nstructons
Rules for safe operaton
•
Never nsert fngers, pencls, or any other object through the grlle
when fan s runnng.
•
Dsconnect fan when movng from one locaton to another.
•
Be sure fan s on a stable surface when operatng to avod
overturnng.
•
Do not use fan n wndow, ran may create electrcal hazard.
•
Household use only.

6 / 12 EN Stand fan / User Manual
1 2 3 4 5
6
7
8
9
10
11
12
13
14
15
1617
18
Loosen Fasten
Tghten
1. Front grll
2. Fan blade
3. Plastc nut
4. Motor shaft
5. Clutch knob
6. Motor housng
7. Fan body
8. Thumb screw
9. Heght adjustment rng
10. 7-shape bolt
11. Chasss
12. Extenson pole
13. Internal pole
14. Pano swtch
15. Tmer
16. Rear grll
17. Crclp
18. Spnner
C
Note: All the pctures n ths manual are for explanaton purpose only. Any dscrepancy
between the real object and the llustraton n the drawng shall be subject to the real
subject.
2 Part fgure

Stand fan / User Manual 7 / 12 EN
1. Unscrew the 7-shape bolt from the extenson pole. (Fg.1)
2. Insert the extenson pole nto the chasss and tghten the 7-shape bolt (Fg.2)
3. From the extenson pole loosen the heght adjustment rng and adjust the nternal pole to the
desred heght.
C
Note: If you can’t fnd the nternal pole, t must nsde the extenson pole. You can pull t
out from the extenson pole. (Fg.3)
4. To attach the head unt to the nternal pole, loosen the thumb screw on the bottom of the head
unt. Place the head unt on the nternal pole and tghten the thumb screw n algnment wth the
groove on the nternal pole. (Fg.4)
A
Warnng: Heght adjustment rng must be fully fastened before the assembly of the motor
secton to the nternal pole.
Fg. 1
Fg. 3
Loosen
Mountng hole
Thumb screw
Annular groove
Fg. 2
Fg. 4
3 Assembly of chasss & column unt

8 / 12 EN Stand fan / User Manual
1. Unscrew the spnner clockwse (or take the spnner out from the bag) and the plastc nut
counterclockwse to remove both of them. Fx the rear grll to the motor then tghten the plastc nut
agan. (Fg. 5)
2. Insert the blade nto shaft, and make sure the rotor shaft pn s ftted nto groove of the blade. Turn
the spnner counterclockwse to tghten the blade. (Fg. 6)
3. Fasten the front grll and the rear grll by the grll clp and then tghten the fan grll lockng screw and
nut. (Fg. 7)
Spnner Spnner
Loose
Plastc nut
Tght
Tght
Slot
Blade
Retanng
pn
Fg. 5 Fg. 6 Fg. 7
4 Grll & fan blade assembly

Stand fan / User Manual 9 / 12 EN
5 Operatng nstructon
1. Speed control
Speed s controlled by the pano swtch:
0---Off 1---Low 2---Medum 3---Hgh
2. Automatc 120-mnute tmer
Turn the knob of tme swtch to the rght and set the tme, the tmer swtch s cut
at the tme wthn 120 mnutes. In case the tme swtch s not use, set the tme
swtch to “On”.
3. Oscllatıon control
To make the fan oscllate, press the clutch knob located on the top of the motor
housng. To get the drectonal arflow, pull the clutch knob up to ts ntal poston.
4.Tlt adjustment
To adjust the ar flow upward or downward, push the grlles lghtly to the desred drecton.
5. Heght adjustment
The heght of the fan can be adjusted by loosenng the heght adjustment rng carefully rasng or
lowerng the fan and frmly re-tghtenng the heght adjustment rng.

10 / 12 EN Stand fan / User Manual
6 Other
6.1 Mantenance nstructon
The fan requres lttle mantenance. Do not try to fx t by yourself. Refer t to qualfed servce
personnel f servce s needed.
1. Before cleanng and assemblng, fan must be unplugged.
2. To ensure adequate ar crculaton to the motor, keep vents at the rear of the motor free of dust.
Do not dsassemble the fan to remove dust.
3. Please wpe the exteror parts wth a soft cloth soakng a mld detergent.
4. Do not use any abrasve detergent or solvents to avod scratchng the surface. Do not use any of the
followng as a cleaner: gasolne, thnner.
5. Do not allow water or any other lqud nto the motor housng or nteror parts.
6.2 Cleanng
1. Be sure to unplug from the electrcal supply source before cleanng.
2. Plastc parts should be cleaned wth a soft cloth mosten wth mld soap. Thoroughly remove soap
flm wth dry cloth.
6.3 Techncal data
Power supply: 220V-240V, 50Hz
Techncal and desgn modfcatons reserved.

Stand fan / User Manual 11 / 12 EN
C
Note: Do not dspose of electrcal applances as unsorted muncpal waste, use separate
collecton facltes. Contact your local government for nformaton regardng the collecton
systems avalable. If electrcal applances are dsposed of n landflls or dumps, hazardous
substances can leak nto the groundwater and get nto the food chan, damagng your
health and well-beng.
Informaton
Descrpton Symbol Value Unt
Maxmum fan flow rate F 55.3 m3/mn
Fan power nput P 50 W
Servce value SV 1.11 (m3/mn)/W
Standby power consumpton PSB 0 W
Fan sound power level LWA 63 dB(A)
Maxmum ar velocty C 2.83 meters/sec
Measurement standard for servce value IEC 60879: 1986+ (corr. 1992)
Contact detals for obtanng more
nformaton
Arcelk: Arcelk A.S. Sutluce, Karaagac Cd. 2, 34445
Beyoglu Istanbul Turkey
7 Dsposal

www.beko.com

Ventilateur sur pied
Manuel de l’utilisateur
EFS5100W
FR

Veuillez lire attentivement ce manuel de l’utilisateur
au préalable !
Cher clent,
Nous vous remercons d’avor chos un produt Beko. Nous espérons que notre produt,
fabrqué avec une technologe de qualté supéreure et de dernère génératon, satsfera
vos attentes. Par conséquent, veullez lre attentvement ce manuel ans que tous
les autres documents y afférents avant l’utlsaton du produt. Veullez également
conserver ce manuel pour une consultaton ultéreure. S vous remettez le produt à un
autre utlsateur, donnez-le-lu avec le manuel de l’utlsateur. Veullez respecter tous les
avertssements et les nstructons contenus dans ce manuel de l’utlsateur.
Signication des symboles
Les symboles de sécurté c-après sont utlsés dans ce manuel :
C
Indque des nformatons mportantes ou des
consels utles relatfs à l’utlsaton du produt.
A
Indque un danger qu pourrat entraîner des
blessures, la mort ou des dégâts matérels.
Avertssement relatf aux actons à ne jamas
effectuer.
B
Danger d’électrocuton.
Rsque d’ncende.
Attenton ! Surfaces chaudes !
Ce produit a été fabriqué dans le respect de l’environnement et dans des installations modernes.
Ce produit est conforme à la réglementation
DEEE (Déchets d’équipements électriques
et électroniques) en vigueur.

Ventlateur sur ped/Manuel de l’utlsateur 3 / 12 FR
1 Consgnes de sécurté 4
2 Schéma des pèces 6
3 Montage du socle et du ped de l’unté 7
4 Montage de l’hélce et de la grlle du ventlateur 8
5 Notce technque d’utlsaton 9
6 Autres nstructons 10
6.1 Consgnes d’entreten. . . . . . . . . . . . . . . . . . . . . . . . . . . . . . . . . . . . . . . . . . . . . . . . . . . . . . . . . . . . . . . . . . . . . . . . . . . . . 10
6.2 Nettoyage. . . . . . . . . . . . . . . . . . . . . . . . . . . . . . . . . . . . . . . . . . . . . . . . . . . . . . . . . . . . . . . . . . . . . . . . . . . . . . . . . . . . . . . . . 10
6.3 Données technques . . . . . . . . . . . . . . . . . . . . . . . . . . . . . . . . . . . . . . . . . . . . . . . . . . . . . . . . . . . . . . . . . . . . . . . . . . . . . . 10
7 Mse au rebut 11
Tables des matères

4 / 12 FR Ventlateur sur ped/Manuel de l’utlsateur
1 Consgnes de sécurté
Avertssement
Veullez lre attentvement les nstructons et consgnes de sécurté.
•
S le cordon d’almentaton est endommagé, l dot être remplacé
par le constructeur, une personne mandatée pour fare le SAV ou
toute autre personne qualfée afn d’évter toute mse en danger.
•
Ne jamas mmerger l’unté, le cordon ou la fche dans de l’eau n
dans tout autre lqude afn d’évter tout rsque d’électrocuton.
•
Cet apparel peut être utlsé par des enfants âgés de 8 ans
au mons ans que par des personnes ayant des capactés
physques, sensorelles ou mentales restrentes ou manquant
de connassances ou d’expérence s celles-c sont survellées ou
ont été nformées quant à l’utlsaton sûre de l’apparel et des
rsques exstants. Les enfants ne dovent pas jouer avec l’apparel.
Le nettoyage et l’entreten ne dovent pas être effectués par des
enfants lassés sans survellance.
•
Débranchez l’apparel de la prse électrque lorsque vous ne
l’utlsez pas ou avant de le nettoyer.
•
Gardez les apparels électrques hors de la portée des enfants et
des personnes défcentes. Ne les lassez pas utlser les apparels
sans survellance.
•
Une fos le ventlateur monté, la grlle de protecton de l’hélce ne
dot plus être enlevée.
-
Débranchez le ventlateur avant de le nettoyer.
-
Il n’est pas nécessare de démonter/d’ouvrr la grlle de protecton
du rotor pour nettoyer l’hélce.

Ventlateur sur ped/Manuel de l’utlsateur 5 / 12 FR
1 Consgnes de sécurté
-
Essuyez la grlle de protecton de l’hélce ans que la surface du
ventlateur à l’ade d’un chffon légèrement humde.
Consgnes de sécurté
•
Ne tentez jamas d’ntrodure vos dogts, un crayon ou tout autre
objet à travers la grlle lorsque le ventlateur est en marche.
•
Débranchez le ventlateur lorsque vous le déplacez d’un endrot à
un autre.
•
Assurez-vous que le ventlateur est placé sur une surface stable
lorsqu’l est en marche, afn d’évter qu’l ne se renverse.
•
Ne mettez pas le ventlateur en marche à proxmté d’une fenêtre
car la plue pourrat générer un danger électrque en s’nfltrant
dans l’apparel.
•
Cet apparel est unquement conçu pour un usage domestque.

6 / 12 FR Ventlateur sur ped/Manuel de l’utlsateur
1 2 3 4 5
6
7
8
9
10
11
12
13
14
15
1617
18
Desserrer Serrer
Serrer
1. Grlle avant
2. Hélce du ventlateur
3. Écrou en plastque
4. Axe du moteur
5. Bouton d’oscllaton
6. Boîter du moteur
7. Corps du ventlateur
8. Vs papllon
9. Bague de réglage de la hauteur
10. Boulon en forme de L
11. Socle
12. Ped d’extenson
13. Ped télescopque
14. Boutons-poussors de type pano
15. Mnutere
16. Grlle arrère
17. Cerclage
18. Dspostf de blocage
C
Remarque : Toutes les llustratons présentes dans ce manuel sont données
unquement à ttre d’exemple. En cas de dfférence entre l’objet réel et son llustraton, la
forme actuelle prévaut.
2 Schéma des pèces

Ventlateur sur ped/Manuel de l’utlsateur 7 / 12 FR
1. Dévssez le boulon en forme de L stué sur le ped d’extenson. (Fg. 1)
2. Insérez le ped d’extenson dans le socle, pus revssez le boulon en forme de L (Fg. 2).
3. Desserrez la bague de réglage de la hauteur stuée sur le ped d’extenson, pus postonnez le ped
télescopque à la hauteur souhatée.
C
Remarque : S le ped télescopque n’est pas dans le carton d’emballage, l dot se trouver
à l’ntéreur du ped d’extenson. Vous pouvez le sortr du ped d’extenson. (Fg. 3)
4. Pour fxer l’unté de tête au ped télescopque, desserrez la vs papllon stuée au bas de l’unté de
tête. Postonnez l’unté de tête sur le ped télescopque, pus resserrez la vs papllon de manère à
ce qu’elle s’algne avec la ranure sur le ped télescopque. (Fg. 4)
A
Avertssement : Assurez-vous que la bague de réglage de la hauteur est complètement
vssée avant de procéder au montage de la parte motrce sur le ped télescopque.
Fg. 1
Fg. 3
Desserrer
Trou de fxaton
Vs papllon
Ranure annulare
Fg. 2
Fg. 4
3 Montage du socle et du ped de l’unté

8 / 12 FR Ventlateur sur ped/Manuel de l’utlsateur
1. Retrez le dspostf de blocage en le dévssant dans le sens des agulles d’une montre (ou sortez-le
du sac) et retrez l’écrou en plastque en le dévssant dans le sens nverse des agulles d’une montre.
Fxez la grlle arrère sur le moteur, pus resserrez l’écrou en plastque. (Fg. 5)
2. Insérez l’hélce dans l’axe en vous assurant que la tge de l’axe du rotor passe dans l’orfce de l’hélce.
Tournez le dspostf de blocage dans le sens nverse des agulles d’une montre pour resserrer
l’hélce. (Fg. 6)
3. Fxez ensemble les grlles avant et arrère à l’ade du cerclage, pus serrez l’écrou et la vs de blocage
de la grlle du ventlateur. (Fg. 7)
Dspostf de blocage Dspostf de blocage
Desserré
Écrou en plastque
Serré
Serré
Orfce
Hélce
Gouplle de
retenue
Fg. 5 Fg. 6 Fg. 7
4 Montage de l’hélce et de la grlle du ventlateur
Other manuals for EFS5100W
1
Table of contents
Languages:
Other Beko Fan manuals
Popular Fan manuals by other brands

Ortech
Ortech Supreme Series quick start guide

Vents-us
Vents-us TwinFresh Comfo RA1-50 user manual

Kichler Lighting
Kichler Lighting Windham instruction manual

Goldair
Goldair GCPF340B operating instructions

DENALI AIRE
DENALI AIRE 1DAFCR20 owner's manual

TZS First AUSTRIA
TZS First AUSTRIA FA-5560-2 instruction manual

Skov
Skov DA 820 LPC Technical user guide

EIPL
EIPL 10289MG-GB user manual

Xpelair Premier
Xpelair Premier DX200 Installation and maintenance instructions

Westinghouse
Westinghouse ETL-ES-Quince LED-WH19 owner's manual

Eurolux
Eurolux F43 quick start guide

Brandson Equipment
Brandson Equipment 305883 user manual