Belluscura X-PLO2R User manual

USER MANUAL
LIVE LIFE. BREATHE EASY. GO X-PLO
R.
®
®®
X-PLO
2RTM PORTABLE OXYGEN CONCENTRATOR
1-877-774-9271 | www.oxygenconcentratorstore.com

TABLE OF CONTENTS
X-PLO
2RChecklist . . . . . . . . . . . . . . . . . . . . . . . . . . . . 1
Quick Start Guide . . . . . . . . . . . . . . . . . . . . . . . . . . . . 2
SECTION 1. Introduction . . . . . . . . . . . . . . . . . . . . . . . . . . . . . . . 3
SECTION 2. Safety Information . . . . . . . . . . . . . . . . . . . . . . . . . . . 4
Contraindications . . . . . . . . . . . . . . . . . . . . . . . . 4
General Precautions . . . . . . . . . . . . . . . . . . . . . . . 4
Warnings . . . . . . . . . . . . . . . . . . . . . . . . . . . . . . 5
Cautions . . . . . . . . . . . . . . . . . . . . . . . . . . . . . . 7
SECTION 3. Operating the X-PLO
2R . . . . . . . . . . . . . . . . . . . . . . . . . 8
Turning the X-PLO
2R ON & OFF . . . . . . . . . . . . . . . . . 8
Audible Alarm . . . . . . . . . . . . . . . . . . . . . . . . . . . 9
Flow Setting . . . . . . . . . . . . . . . . . . . . . . . . . . . . 9
LCD Screen. . . . . . . . . . . . . . . . . . . . . . . . . . . . . 9
Air Intake & Exhaust . . . . . . . . . . . . . . . . . . . . . . . 9
Carrying Bag. . . . . . . . . . . . . . . . . . . . . . . . . . . . 9
SECTION 4. Battery . . . . . . . . . . . . . . . . . . . . . . . . . . . . . . . . . .10
Battery Life . . . . . . . . . . . . . . . . . . . . . . . . . . . .10
Charging the Battery . . . . . . . . . . . . . . . . . . . . . .12
Steps to Connect & Disconnect the Battery . . . . . . . . .12
SECTION 5. User-Replaceable Cartridges . . . . . . . . . . . . . . . . . . . . .13
SECTION 6. Nasal Cannula . . . . . . . . . . . . . . . . . . . . . . . . . . . . . .16
SECTION 7. Troubleshooting . . . . . . . . . . . . . . . . . . . . . . . . . . . .18
SECTION 8. Alarms . . . . . . . . . . . . . . . . . . . . . . . . . . . . . . . . . .18
SECTION 9. Accessories & Replacement Parts . . . . . . . . . . . . . . . . . .20
SECTION 10. Maintenance & Cleaning . . . . . . . . . . . . . . . . . . . . . . .21
SECTION 11. Labeling Symbols. . . . . . . . . . . . . . . . . . . . . . . . . . . .23
SECTION 12. Specifications . . . . . . . . . . . . . . . . . . . . . . . . . . . . . .25
Flow Settings & Pulse Volume . . . . . . . . . . . . . . . . .26
SECTION 13. Electromagnetic Interference . . . . . . . . . . . . . . . . . . . .27
SECTION 14. Traveling with the X-PLO
2R. . . . . . . . . . . . . . . . . . . . . .29
SECTION 15. Trademarks & Disclaimer . . . . . . . . . . . . . . . . . . . . . . .31
1-877-774-9271 | www.oxygenconcentratorstore.com
WARNING: Do not use the X-PLO
2R or any accessory if they show any sign of damage.
Call your equipment provider for replacement.
IMPORTANT: While the box or packaging may look to have damage, such as tears or
dents, the device may still be in a usable condition. If the POC or any
accessory shows any sign of damage, contact your equipment provider.
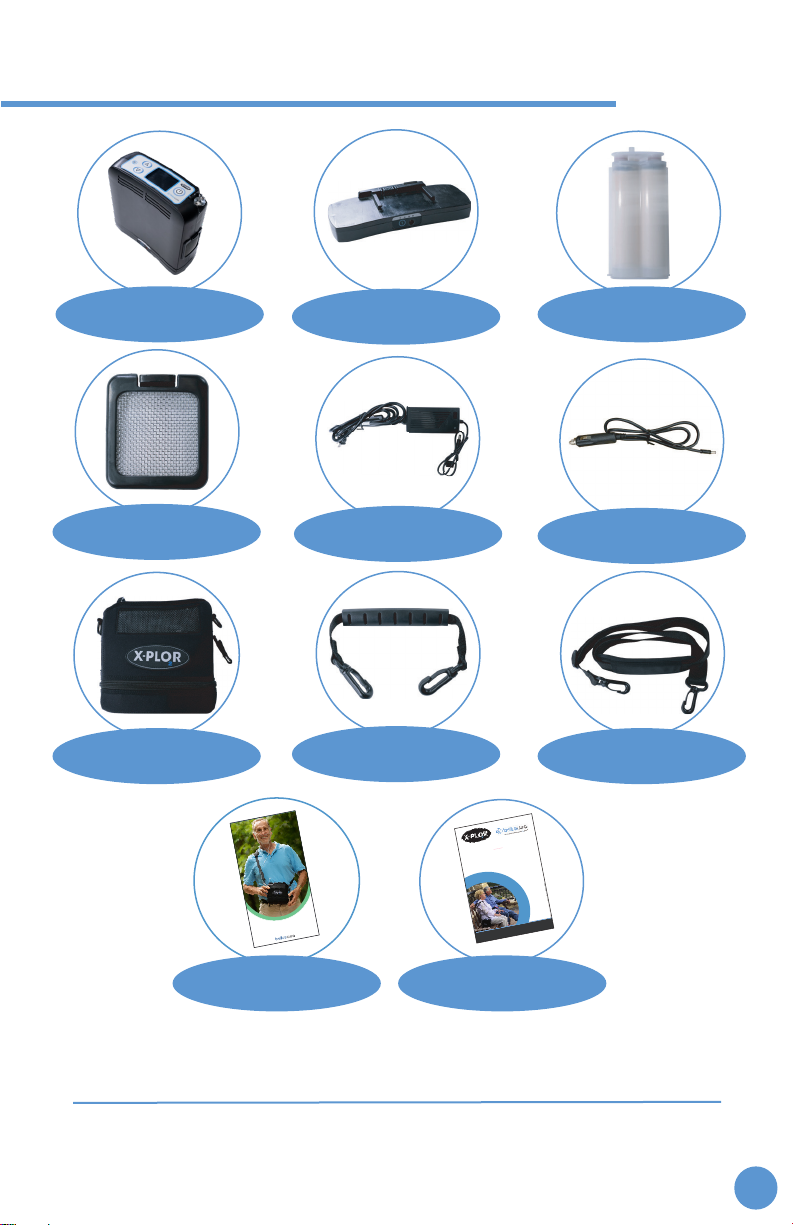
X-PLO
2R INCLUDES THE FOLLOWING
X-PLO
2R
AIR INTAKE FILTER
CARRYING BAG CARRYING BAG
HANDLE
CARRYING BAG
SHOULDER STRAP
QUICK START GUIDE USER MANUAL
DC POWER SUPPLY
AC POWER SUPPLY
ONE 4-CELL OR
8-CELL BATTERY CARTRIDGE
USER MANUAL
X-PLO
2
R® PORTABLE OXYGEN CONCENTRATOR
LIVE LIFE. BREATHE EASY. GO X-PLO
2
R.
®
®
®®
The X-PLO
2
R lets you travelwith ease.
It’s perfect for carrying on buses, trains,
cruise ships and is even FAA compliant
for air travel. And with supplemental
oxygenand direct-charge batteries,
exploring has never been so easy.
©2021 Belluscura. All Rights Reserved.
XplorOxygen.com
START GUIDE
Quick
Locate the following itemsin your X- PLO
2
R
TM
box to get started:
CHECK LIST
X-PLO
2
R Unit Includes:
- Air intake lter
Carrying Bag
User Manual
4-Cell Battery or 8-Cell Battery
Cartridge
AC PowerSupply
DC Power Supply
Handle
(Attaches to Carrying Bag)
Shoulder Strap
(Attaches to Carrying Bag)
By:
TRAVEL
WI TH X-PLO
2
R
X-PLORPORTABLEOXYGENCONCENTRATOR
USERMANUAL
2
BREATHEEASY.LIVELIFE.GOX-PLO
₂
R!
®
1
1-877-774-9271 | www.oxygenconcentratorstore.com
QUICK START GUIDE
POWER
UP/DOWN ARROWS
RELEASE LATCH
REMOVE DUST CAP
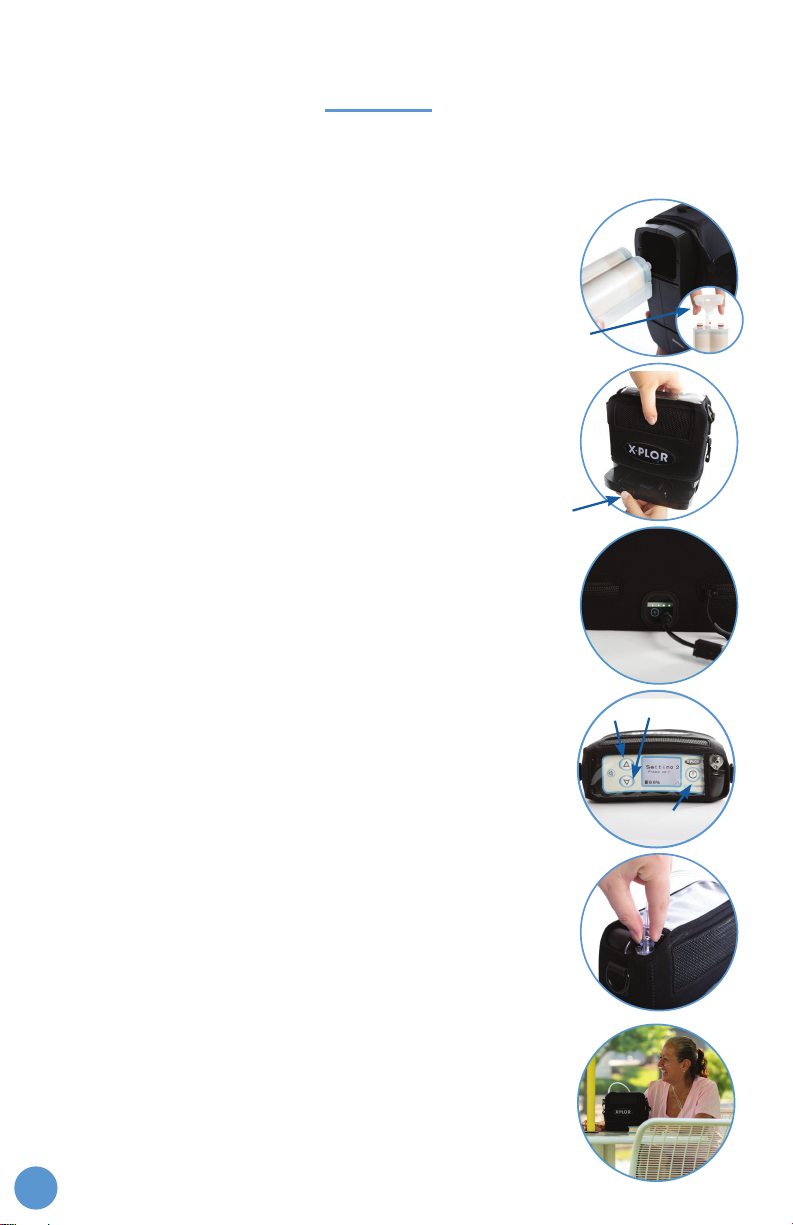
1. REMOVE DUST CAP & INSERT CARTRIDGE
• Remove the dust cap from the cartridge.
• Then insert the cartridge all the way into the unit so the handle
lays flat.
2. LOCATE THE BATTERY
• Insert your X-PLO
2Rinto the carry bag. When the X-PLO
2Ris
correctly inserted into the bag, the LCD screen is seen through
the plastic window and the air intake and exhaust are aligned
with mesh panels.
• To attach the battery, slide it on until the latch is in the locked
position and zip the bag.
• To disconnect the battery, simply push the release latch down
and slide the battery towards you.
3. CHARGE THE BATTERY
• Place in a well-ventilated area to fully charge the battery
before using your X-PLO
2R, which can take up to 5 hours for
the 4-cell battery and up to 6 hours for the 8-cell battery.
• To charge, insert the AC power connector into the battery’s
power receptacle and the other end into an electrical outlet.
4. TURN ON & SET OXYGEN FLOW
• When powered on, position the unit upright to warm-up
(warm-up time is less than 2 minutes.)
• Press the POWER button for 2 seconds to turn on your X-PLO
2R.
• Use the UP/DOWN ARROWS to set the oxygen flow level, as
specified in your oxygen prescription.
5. NASAL CANNULA
• NOTE: Cannula must be purchased separately.
• Connect the nasal cannula to the oxygen output nozzle
located on top of the X-PLO
2R.
• Place the other end in your nostrils. Oxygen will be delivered
through the nasal cannula with each breath.
• Remember to breathe through your nose as normal.
6. GO X-PLO
2R!
Attach the shoulder strap and handle to your X-PLO
2R
carrying bag, and you are ready to go!
It is quick and easy to get your X-PLO
2Rstarted, but please read the entire User Manual
before using your X-PLO
2R. DO NOT TURN ON X-PLO
2R UNTIL STEP 4.
2
1-877-774-9271 | www.oxygenconcentratorstore.com

This user manual serves as a reference for users of the X-PLO
2R and should be read in
its entirety before operating the X-PLO
2R. The term “POC” will be used to refer to the
X-PLO
2R. “Patient” and “User” are used interchangeably. The term sieve cartridge and
cartridge will be used interchangeably throughout the document.
X-PLO
2R enables patients who need a POC to be treated at home according to a
clinician’s prescription.
Before using the X-PLO
2R for the first time, make sure the battery is fully charged. This
can take up to 5 hours for the 4-cell battery and up to 6 hours for the 8-cell battery. The
battery must be charged and connected to the X-PLO
2R in order to operate the POC.
Please refer to the X-PLO
2R manual for detailed information regarding any warnings,
cautions, specifications, and additional information. We hope the manual answers all
of your questions, but if you still have questions, please call your equipment provider.
INTENDED USE
The X-PLO
2R is a transportable, soware-monitored device designed to be used by
patients as a portable oxygen delivery system requiring high concentrations of oxygen
on a supplemental basis. It is small, portable, and is capable of continuous use in
home, institutional, and travel or mobile environments.
X-PLO
2R provides supplemental oxygen to patients with chronic pulmonary diseases,
such as COPD, and any patient requiring supplemental oxygen. X-PLO
2R is a pulse
only mode POC. X-PLO
2R is not intended for use in life supporting or life sustaining
situations or by patients who have had a tracheotomy. It is a prescription only device
and designed for indoor and outdoor use. The prescribed oxygen delivery setting
should be periodically reassessed by healthcare provider.
X-PLO
2R Portable Oxygen Concentrator is not intended to be used:
• in life-supporting or life-sustaining situations
• in an operating or surgical environment
• in conjunction with flammable anesthetic or flammable materials
• with newborns, infants or pediatrics
INTENDED LIFE
The expected service life for the X-PLO
2R is 3 years. The service life of the replaceable
cartridge will depend on operating conditions. Replace the cartridge as needed, when
indicated by the alarm message (for more information on the Replaceable Cartridge
see Chapter 5). The battery has an expected life of 200 full charge / discharge cycles.
1. INTRODUCTION
3
1-877-774-9271 | www.oxygenconcentratorstore.com

This section describes the warnings and cautions for the use of the X-PLO
2R. The
following guidelines apply to this document.
WARNING: Indicates possibility of serious adverse reactions & potential safety hazards.
CAUTION: Indicates possibility of damage to the equipment.
IMPORTANT: Statements calling attention to additional significant information about
the device.
WARNING: USA Federal law restricts the sale of this POC to the order of a physician.
May also be applicable in other countries.
WARNING: Availability of an alternate source of oxygen is recommended in case of
power outage or mechanical failure. Consult your equipment provider for
type of back-up system recommended.
WARNING: It is the responsibility of the patient to make back-up arrangements for
alternative oxygen supply when traveling. Belluscura® assumes no liability
for persons choosing not to adhere to manufacturer recommendations.
CONTRAINDICATIONS
WARNING: This POC is NOT INTENDED to be life sustaining or life supporting.
WARNING:
Under certain circumstances, the use of non-prescribed oxygen therapy
can be hazardous. This POC and specific settings should be used only
when prescribed by a physician.
WARNING:
Additional monitoring or attention may be required for geriatric or
any other patients using this device who are unable to hear or see
alarms or communicate discomfort. If the patient shows any signs of
discomfort, consult a physician immediately.
CAUTION: The
X-PLO
2R is not designed or specified to be used in conjunction with a
humidifier or nebulizer, or to be connected to any other equipment. Do not
use this POC with a humidifier or nebulizer or connect it to any other
equipment. Doing so may impair the performance and could damage the
equipment. Do not modify the X-PLO
2R. Any modification to the equipment
may impair performance or damage equipment and will void your warranty.
GENERAL PRECAUTIONS
WARNING: Smoking during oxygen therapy is dangerous and is likely to result in facial
burns or death. DO NOT ALLOW SMOKING OR OPEN FLAMES WITHIN THE
SAME ROOM OF THE X-PLO
2ROR ANY OXYGEN CARRYING ACCESSORIES.
If you smoke, you must always turn the oxygen concentrator o, remove
the cannula and leave the room where either the cannula or oxygen
concentrator is located. If unable to leave the room, you must wait 10
minutes aer the flow of oxygen has been stopped.
WARNING: Do not submerge the X-PLO
2R or any of the accessories in liquid. Do
not expose to water or precipitation or allow any liquid to enter the
enclosure. Do not operate the POC while exposed to rain.
WARNING: Do not use oil, grease, or petroleum-based products on or near the X-PLO
2R
to avoid the risk of fire or burns. Use only water-based lotions or salves
that are oxygen compatible when using or setting up near the X-PLO
2R
.
2. SAFETY INFORMATION
4
1-877-774-9271 | www.oxygenconcentratorstore.com

WARNINGS
• The operator should read and understand this entire manual before using X-PLO
2R.
• The POC is not intended for life support. Where the prescribing health care
professional has determined that an interruption in the supply of oxygen, for any
reason, may have serious consequences to the user, an alternate source of oxygen
should be available for immediate use.
• Do not use the POC in the presence of a flammable anesthetic mixture in
combination with oxygen or air, in the presence of nitrous oxide, cleaning agents or
other chemical vapors.
• Do not use the POC in the presence of pollutants, smoke or fumes.
• Do not use oil or grease on the POC or its components as these substances,
when combined with oxygen, can greatly increase the potential for a fire
hazard and personal injury.
• Use only approved X-PLO
2R parts and accessories to avoid the risk of fire.
• Turn the POC o when not in use as concentrated oxygen makes
furnishings flammable.
• If you notice any of the following, discontinue use and contact your
equipment provider:
1. unexplained changes in the performance of this device
2. unusual or harsh sounds
3. dropped or mishandled device or power supply
4. water spilled into the enclosure
5. broken enclosure
• Use only with the X-PLO
2R batteries and AC and DC power supplies and cords.
• Use only approved X-PLO
2R parts and accessories to maintain the eicacy of
oxygen therapy for prescribed settings.
• Use of accessories other than those approved by Belluscura could result in
increased electromagnetic emissions or decreased electromagnetic immunity of
X-PLO
2R. Either of these results could aect operation of your unit.
• Only use a standard single lumen nasal cannual. Nasal cannula should be rated for 4
liters per minute, for example the Salter 16SOFT, to ensure proper patient usage and
oxygen output.
• Replace the cannula on a regular basis. Check with your POC distributor
or clinician to determine how oen the cannula should be replaced. Always
follow the cannula manufacturer’s instructions for proper use.
5
1-877-774-9271 | www.oxygenconcentratorstore.com

WARNINGS CONTINUED
• Repairs and adjustments must be performed by authorized X-PLO
2R service
personnel only. Unauthorized service could cause injury, invalidate the warranty, or
result in costly damage.
• Periodically inspect electrical cords, cables, and the power supplies for damage or
signs of wear. Discontinue use and replace if damaged.
• Be aware that the electrical cord or tubing could present a tripping or
strangulation hazard.
• To avoid electric shock, unplug the POC and remove the battery before servicing or
cleaning the POC. DO NOT immerse the POC in any fluids.
• Never drop or insert any object into any opening of the POC.
• For proper operation, the POC requires unobstructed ventilation. Always make
sure any openings in the case are not obstructed by items which may impede
ventilation. Do not place the POC in a small closed space (such as a closet). The
POC should not be used adjacent to or stacked with other equipment. For more
information, contact your equipment provider.
• Do not obstruct air intake or exhaust when operating the POC. Blockage of air
circulation or proximity to a heat source may lead to internal heat buildup and
shutdown or damage to the POC.
• Do not use an extension cord with the POC.
• Operation of the POC outside of the specified limits for temperature (41°F/5°C to
95°F/35°C) or altitude (10,000 /3048 m) is expected to have an adverse eect on
therapy
• The settings of Belluscura X-PLO
2R may not correspond with continuous flow
oxygen.
• The settings of other models or brands of oxygen therapy equipment do not
correspond with the settings of the Belluscura X-PLO
2R.
• Wind or strong dras can adversely aect accurate delivery of oxygen therapy.
• This device produces enriched oxygen gas which accelerates combustion. DO NOT
ALLOW SMOKING OR OPEN FLAMES within 10 feet of this device while in use.
• DO NOT USE in conjunction with other medical equipment or medical systems.
6
1-877-774-9271 | www.oxygenconcentratorstore.com

CAUTIONS
• When the POC is used in an automobile, disconnect it from the DC auto adapter outlet
when the automobile is turned o.
• Do not operate the POC in a non-running vehicle for an extended period of time, as
this may deplete the vehicle’s battery and prevent the vehicle from starting.
• Do not allow the POC to be connected to the auto adapter outlet while starting the
vehicle normally or while you are starting the vehicle with battery recharging cables.
Wait until the vehicle starts before connecting the POC to the DC power outlet.
• All vehicles’ auxiliary power varies significantly; therefore rate of charging may vary.
• Do not connect the X-PLO
2R to a backup generator.
• Secure the POC when used in any moving vehicle.
• Turn o the POC before removing the battery. The POC cannot be operated without
the battery installed.
• Only use the supplied handle and shoulder strap to carry your device. With every use,
verify that the case, shoulder strap and handle are in good condition.
• Use X-PLO
2R within its carry bag for ease of use. The insulation in the carry bag will
keep the maximum surface temperature of the device for patient contact to ≤ less
than 48˚C.
NOTE: Additional warnings, cautions and notes are located throughout the manual.
7
1-877-774-9271 | www.oxygenconcentratorstore.com
3. OPERATING THE X-PLO
2R
The X-PLO
2R is a Pulse Mode POC. Each time you inhale through your nose, you will feel a
pulse of oxygen that the POC provides, determined by your breath rate and the setting number.
As soon as you begin breathing through the cannula, the X-PLO
2R will sense you
are
breathing from it and begin delivering pulses of oxygen based on your breathing. When a
breath is detected, a breath icon will appear in the upper le corner of the
LCD
screen
and a pulse of oxygen will be
delivered.
If the POC does not sense a breath aer 15 seconds, a “No Breath Detected” message will
appear on the screen and the alarm (beep) will sound.
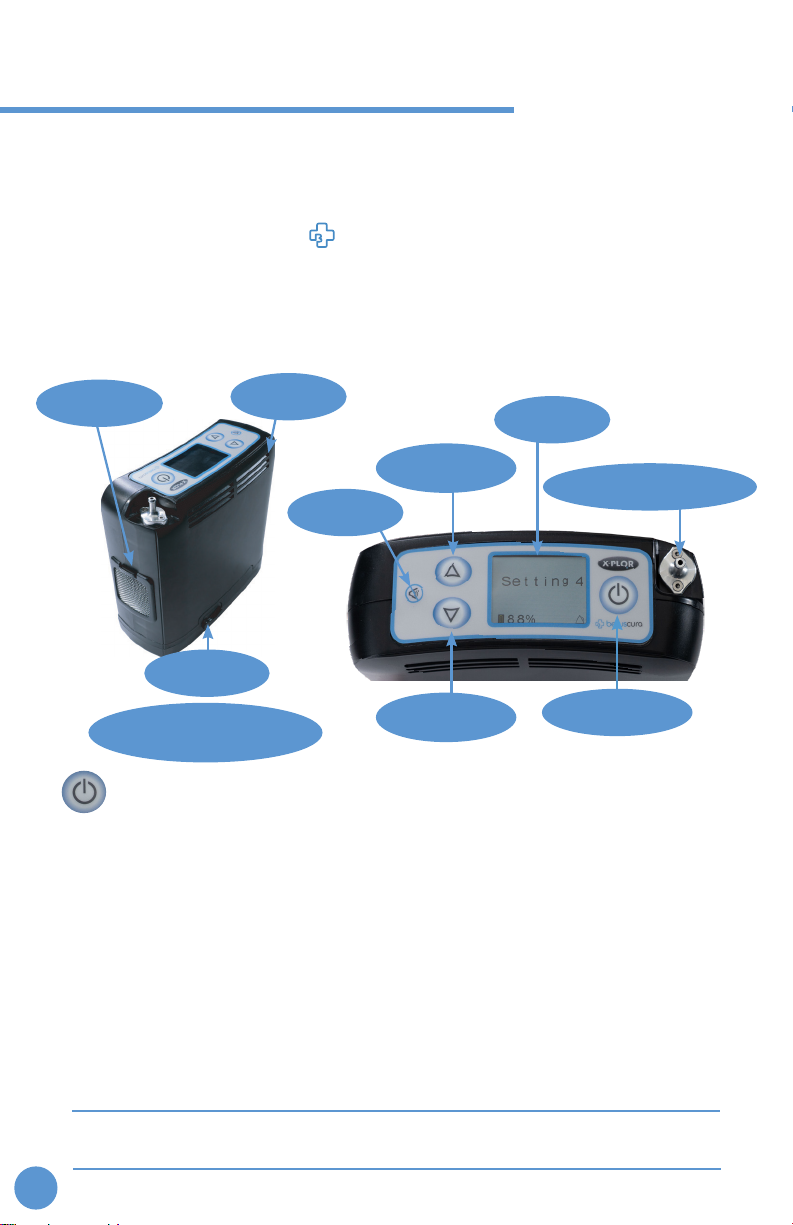
POWER BUTTON
TURNING ON THE X-PLO
2R
• Hold down the POWER button for TWO SECONDS.
• While the X-PLO
2R is warming-up (total warm-up time is less than two minutes),
the X-PLO
2R name will appear on the LCD screen. Ten seconds aer power on,
the Pulse Setting, Battery, and Audible Alarm icons will appear on the LCD screen
with the message "Please wait" which will remain until warm-up is complete.
X-PLO
2Rshould be operated in an upright position.
• Aer warm-up, proper operation of the X-PLO
2Ris indicated by the delivery of
oxygen pulses in response to inhalation, and the absence of alarms.
TURNING OFF THE X-PLO
2R
• Hold down the POWER button for TWO SECONDS.
• The shutdown period will last up to 30 seconds.
IMPORTANT: The X-PLO
2R will automatically start the oxygen level at the flow setting used
when the X-PLO
2Rwas last turned o.
OVERVIEW OF THE X-PLO
2R
AIR INTAKE EXHAUST
ALARM
LCD SCREEN
CANNULA CONNECTOR
POWER BUTTON
INCREASE
FLOW SETTING
DECREASE
FLOW SETTING
BATTERY
CARTRIDGE IS LOCATED
UNDER BATTERY
TM
8
1-877-774-9271 | www.oxygenconcentratorstore.com

AUDIBLE ALARM BUTTON
• Pressing this button will toggle the X-PLO
2R breath detection audible alarm on and
o. The corresponding icon will be displayed on the screen.
• Pressing this button during an active alarm will acknowledge and mute the audible
alarm. This will not remove the visual message on the POC display.
For more information on the Alarms see Chapter 8.
FLOW SETTING CONTROL BUTTONS
• The X-PLO
2R provides a PULSE of oxygen in response to each inhalation.
• The X-PLO
2R will provide a pulse of oxygen once the unit is warmed up.
• Flow setting can be changed by pushing the up or down arrows. To change the flow
setting when the screen is dimmed, activate the screen first by pressing the POWER
button for less than two seconds.
LCD SCREEN
The LCD screen displays information regarding flow setting,
battery life, power status and alarms. The LCD screen has a
backlight that turns on and o automatically. The backlight will
automatically shut o aer 10 seconds as a power-saving feature.
The backlight turns on:
• When the X-PLO
2R is turned on or shuts down.
• Automatically for any alarm indications. An audible signal (beep) will also indicate
either a change in operating status or a condition that may need a response.
• Any time when the POWER button is pressed briefly (less than 2 seconds).
AIR INTAKE & EXHAUST
Place the X-PLO
2R in a well-ventilated location. Air intake and exhaust must not be
obstructed. Exhaust is located on the front and back of the POC. Do not use the
X-PLO
2R without the air intake filter in place. Particles drawn into POC may
damage the X-PLO
2R.
CARRYING BAG
The carrying bag provides protection and convenience. Always
use your X-PLO
2R in the supplied carrying bag, with the supplied
handle and/or shoulder strap. When the X-PLO
2R is correctly
inserted in the bag, the LCD screen is seen through the plastic
window and the air
intake and exhaust are aligned with mesh panels.
AIR INTAKE EXHAUST
9
1-877-774-9271 | www.oxygenconcentratorstore.com

X-PLO
2R comes with a 4-cell lithium-ion battery (optional 8-cell lithium-ion battery
also available) that powers the X-PLO
2R with or without an external power supply
connected. The X-PLO
2R ships to you with the battery. Fully charge the battery before
using the X-PLO
2R.
Charge the X-PLO
2R battery only with the power supplies provided with the X-PLO
2R.
To maximize battery life and run time, avoid letting the battery drain to empty. Always
check the battery level prior to use to ensure adequate charge level.
AC & DC POWER SUPPLIES
The AC power supply allows the X-PLO
2Rto be powered on and the battery to be
charged from a standard 100-240 VAC, 50/60 Hz electrical outlet.
The DC power supply allows the X-PLO
2Rto be powered and the battery to be charged
from a vehicle's standard 12 VDC outlet.
BATTERY LIFE
• Up to 2.5 hours of battery life with the 4-cell battery
• Up to 5 hours of battery life with the 8-cell battery
4.BATTERY
WARNING: Use only with Belluscura X-PLO
2R. Use only the power supply listed in the
manual. There is a risk of fire, burns, explosion, and release of toxic material
if the battery and the power supply are not used properly. Do not crush or
heat above 176˚F (80˚C). Do not short circuit or reverse polarity.
10
1-877-774-9271 | www.oxygenconcentratorstore.com

WARNING: Always have the battery connected to the X-PLO
2R. Without the battery
connected, the X-PLO
2R will not turn on.
WARNING: If loss of battery charge is imminent, ensure you have access to an external
AC or DC power source. Use of AC supply may cause surface temperature
to be hot to the touch. Use care in replacing sieve cartridge and battery
pack. Cool system o before changing parts.
WARNING: When operating X-PLO
2Rwhile it is connected to an external power source,
ensure that it is positioned so that it is not diicult to disconnect the power
source if the necessity arises.
CAUTION: The battery should be fully charged before the first time you use that
battery with the X-PLO
2R.
CAUTION: Only remove the battery when X-PLO
2R is turned o. Do not remove the
battery while the X-PLO
2R is operating.
IMPORTANT: The battery run time may vary based on the breathing rate, age of
battery, and environmental conditions. If the battery is near the end of
its life, you may experience shorter battery run times.
BATTERY INDICATOR ON LCD SCREEN
• When POC is turned on, the battery indicator will show the level of the
battery charge.
• Each of the five horizontal yellow bars represents approximately 20% of the
total battery charge.
• When the X-PLO
2R is using an external AC or DC power supply, the icon
will appear on the LCD screen. If there is no icon, the battery is working
without external power.
The following alarm messages are accompanied by a sound and a yellow
MESSAGE DISPLAY & TEXT CONDITION/ACTION/EXPLANATION
Battery low
Attach power source
Battery power is low, with less than 20% of charge remaining.
Attach external power or turn o and then use a charged
battery.
Battery empty
Attach power source
Concentrator has insuicient battery power to produce
oxygen. Attach external power supply or, if
necessary, power o the POC and exchange the battery,
then restart.
Replace battery
Battery error has occurred. Stop using the battery and
switch to a new battery, connected to an external power
supply, if needed.
11
1-877-774-9271 | www.oxygenconcentratorstore.com
STEPS TO CHARGING THE BATTERY
1. Connect the power supply to the X-PLO
2R power receptacle on the
front of the battery. (image 1)
2. Plug the other end of the AC power supply (image 2) into a power
outlet, or start the car and plug in the DC (image 3) power supply
into the car's DC outlet.
3. If the battery is connected to the X-PLO
2R, turn the POC on. If POC is
charging, this icon will be displayed on the LCD screen.
4. If the battery is not connected to the X-PLO
2R, check the indicator
lights on the battery to ensure the battery is being charged.
5. It could take the 4-cell battery up to 5 hours and the 8-cell up to 6
hours to attain full charge.
6. To check the battery charge, press the charge indicator button on
the battery. (image 4)The battery charge level is indicated by 4
green lights on the battery, each light representing approximately
25% charge.
• The battery can be charged while connected to the X-PLO
2R or
while the battery is disconnected from the X-PLO
2R.
• The battery can be charged by using either the AC or DC power
supply source provided.
STEPS TO CONNECT & DISCONNECT THE BATTERY
Connect the battery to the bottom of the X-PLO
2Rby sliding the battery into place
until the latch returns to the locked position. To disconnect, push the release latch
down and slide the battery toward you.
Release
latch
Secure
latch
4
2
1
1
1
2
2
3
3
3
STEPS TO CONNECT
STEPS TO DISCONNECT
12
1-877-774-9271 | www.oxygenconcentratorstore.com

A cartridge will arrive in a Mylar bag in the box with your X-PLO
2R. You have to insert
the cartridge into the unit before using the X-PLO
2R. Do not remove the dust cap until it
is time to install the cartridge.
To insert the cartridge, first ensure the POC is powered o and then disconnect the
battery (see Chapter 4). Remove the dust cap from the top of the cartridge (see page
14). Push the cartridge top first into the unit until it is fully inside and the handle lays
flat (see page 15). Once the cartridge is in place, reconnect the battery.
Over time cartridges, like a filter, can lose their eectiveness and need be to replaced.
The service life of a cartridge depends on the operating conditions, including oxygen
setting levels, the amount of time the POC is used, and environmental conditions, like
high elevation or very dry climate.
CAUTION: Cartridge replacement instructions are only to be used when maintenance
is required and are not intended for practice purpose.
The following alarm messages are accompanied by a sound and a yellow
5. USER-REPLACEABLE CARTRIDGES
MESSAGE DISPLAY & TEXT CONDITION/ACTION/EXPLANATION
Oxygen Low
The sieve cartridge is nearing the end of its service
life. Contact your equipment provider to arrange for
replacement.
Replace sieve cartridge
Replace the sieve cartridge as soon as possible.
Contact your equipment provider to arrange for
replacement. If replacing the sieve cartridge does not
clear the alarm, then switch to a backup source of
oxygen and contact your equipment provider.
DUST CAP
CARTRIDGE
13
1-877-774-9271 | www.oxygenconcentratorstore.com
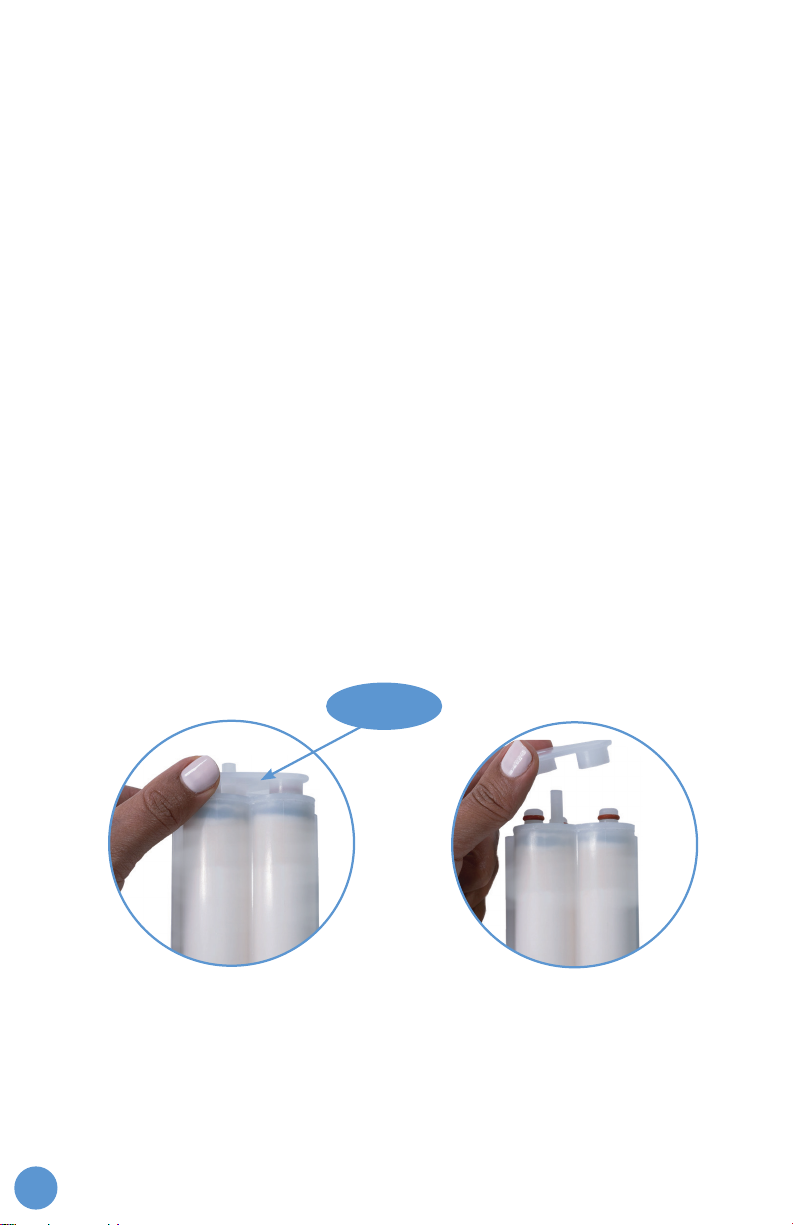
CARTRIDGE REPLACEMENT
1. Turn o the X-PLO
2Rby pressing the power button to shut down the POC.
2. Remove the X-PLO
2Rfrom the carrying bag, if applicable.
3. Remove the battery from the X-PLO
2R.
4. Place the X-PLO
2Ron its side to access the underside of the POC. (see image 1)
5. Pull the cartridge assembly out of the POC by pulling on the cartridge pull
handle. (see image 2)
6. Remove the cartridge completely from the X-PLO
2R and throw it away.
(see image 3)
7. Remove cartridge from Mylar bag. The new cartridge has a dust cap on top.
Remove the dust cap. Make sure there is no dust or debris where the dust cap
was located.
8. Insert new cartridge top first into the X-PLO
2R. Do not leave the cartridge ends
exposed; the cartridge should be inserted into the X-PLO
2Ras soon the old
cartridge is removed. (see image 4)
9. Push the cartridge into the X-PLO
2Rsuch that the cartridge is fully seated into
the X-PLO
2R. (see image 5)
10. The cartridge pull handle should lay flat once the cartridge is
secured. (see image 6)
11. Connect a charged battery to the X-PLO
2R.
12. Turn on the X-PLO
2Rby pressing the power button for 2 seconds. Set the Flow
Setting to your prescribed setting and use normally.
DUST CAP
14
1-877-774-9271 | www.oxygenconcentratorstore.com

STEPS FOR CARTRIDGE REPLACEMENT
1 4
2
3
5
6
REMOVING CARTRIDGE INSTALLING CARTRIDGE
15
1-877-774-9271 | www.oxygenconcentratorstore.com

6. NASAL CANNULA
Nasal cannula is not included with the X-PLO
2Rand must be purchased separately.
The proper placement and positioning of the nasal cannula in the nose is critical to the
consistent operation of the X-PLO
2R. The length of the cannula should not exceed 25 feet
in length. Tubing lengths greater than 25 feet may impede proper flow.
Take care that any hose lying on the floor is not trapped under heavy items or allowed to
kink. Ensure the tubing is not laid across the floor where it can be a tripping hazard.
Attaching the cannula:
1. Ensure the cannula is not being pinched or kinked to avoid a disruption of
oxygen flow.
2. Align the patient cannula to the oxygen output nozzle on the X-PLO
2R.
3. Install the cannula by pressing onto the nozzle. Press down to fully seal the
connection and test with a light pull.
4. While the system is running, squeeze the distal end of the nasal cannula
and then you will see displayed on the screen. Then release the cannula,
allowing the bolus of oxygen to release. Repeat the process several times to
verify the flow of oxygen.
Positioning the nasal cannula on your face:
1. Position the nasal cannula with the nasal prongs facing
upward and curved toward the face.
2. Insert the two nasal prongs into the nostrils.
3. Wrap the headset loop up and over both ears or for
alternative placement: Secure headset loop behind
your head.
4. Glide the bolo up under your chin.
5. Leave enough space to fit at least two fingers between
the bolo and chin.
6. Once the cannula is secured, breathe normally through your nose. X-PLO
2Rwill
detect a breath and deliver the oxygen during inhalation.
TM
16
1-877-774-9271 | www.oxygenconcentratorstore.com

7. TROUBLESHOOTING
The table below lists common problems and actions you can take. If you are unable to
resolve a problem, please contact your equipment provider.
Device won’t
turn on
Device will not
trigger a pulse of
oxygen
Alarm occurs
PROBLEM POSSIBLE CAUSE WHAT YOU SHOULD DO
Battery charge is
depleted
Power button not
pressed long enough
X-PLO
2R is not
turned on
Cannula tubing is
kinked or twisted
Device malfunction
The device needs
your attention
Use the AC or DC power cord to
operate the device (with the battery
inserted) to recharge the battery. If
this does not resolve the problem,
contact your equipment provider.
Press the power button for two
seconds.
Press the power for two seconds.
Make sure the tubing is connected
properly to the oxygen outlet port
and that it is free of any obstruction.
Contact your equipment provider.
See the Alarm Indicators and Screen
Symbols section for information
about specific alarms and what you
should do.
Switch is defective
Remove AC power cord if installed.
Detach battery. Discontinue use and
contact your equipment provider.
Device won’t
turn o
Power button not
pressed long enough
Press the power button for two
seconds.
Switch is defective
Remove AC power cord if installed.
Detach battery. Discontinue use and
contact your equipment provider.
17
1-877-774-9271 | www.oxygenconcentratorstore.com

8. ALARMS
MESSAGE DISPLAY & TEXT CONDITION/ACTION/EXPLANATION
Shutting down On/O button has been pressed for two seconds. Concentrator is
performing system shut down.
Battery low
Attach power source
Battery power is low, with less than 20% of charge remaining. Attach
external power supply or power down and then insert a fully charged
battery.
Battery empty
Attach power source
Concentrator has insuicient battery power to produce oxygen. Attach
external power supply or exchange battery, then restart unit if necessary
by pressing On/O button.
Replace battery Battery error has occurred. Stop using the battery and switch to a new
battery, connected to an external power supply, if needed.
System hot
POC temperature is too high. Ensure air intake and outlet vents have
clear access and particle filters are clean. If the vents are not obstructed,
the filter is clean and this alarm condition does not clear, try moving to a
cooler environment.
System cold POC temperature is too cold. Try moving to a warmer environment.
Oxygen low
The sieve cartridge is nearing the end of its service life. Contact your
equipment provider to arrange for replacement.
Replace sieve cartridge
Replace the sieve cartridge as soon as possible. Contact your equipment
provider to arrange for replacement. If replacing the sieve cartridge
does not clear the alarm, then switch to a backup source of oxygen and
contact your equipment provider.
External Power Failure
The concentrator is plugged in, but the POC is running on battery power
and is not charging. Switch external power supply or exchange battery.
If the problem persists please contact your equipment provider.
NOTIFICATIONS
X-PLO
2R
incorporates alarms (a message on the display combined with an audible tone) of
only one type: those that arise from monitored equipment functions, which indicate that the
user’s attention to the alarm condition is required. Audible notifications, ranging from 65 dB(A)
to 85 dB(A), depending on equipment conditions and the user’s position, are to alarm the user
of problems. To ensure that audible notifications may be heard, the maximum distance that
the user can move away from it must be determined to suit the surrounding noise level.
X-PLO
2R
monitors various parameters during operation and utilizes an intelligent alarm
system to indicate a malfunction of the concentrator. Mathematical algorithms and
time delays are used to reduce the probability of false alarms while still ensuring proper
notification of an alarm condition. All alarms are classified as Low Priority technical
alarm condition.
ALARMS
The following alarm messages are accompanied by a sound and a yellow
If the suggested procedures do not clear the alarm condition, switch to a backup
source of oxygen and contact your equipment provider.
18
1-877-774-9271 | www.oxygenconcentratorstore.com
Other manuals for X-PLO2R
4
Table of contents
Other Belluscura Medical Equipment manuals

Belluscura
Belluscura 6400-010-001 User manual

Belluscura
Belluscura X-PLOR User manual

Belluscura
Belluscura X-PLO2R User manual

Belluscura
Belluscura X-PL02R User manual

Belluscura
Belluscura X-PLO2R User manual

Belluscura
Belluscura SLYDE 6400-000-000 User manual

Belluscura
Belluscura X-PLO2R User manual

Belluscura
Belluscura X-PLOR RES50051 User manual

Belluscura
Belluscura X-PLOR Guide

Belluscura
Belluscura X-PLOR RES50051 User manual


