GE marquette MAC 1100 User guide

MAC 1100/1200
Servicing Instructions
Version 1.1
227 492 20 SA(e) Revision D

Caution:
During repairs/service interventions,
observe the protective measures against
damage due to ESD.
* Marquette Hellige considers itself respon-
sible for the effects on safety, reliability,
and performance of the equipment, only
if:
- assembly operations, extensions,
readjustments, modifications, or
repairs are carried out by
Marquette Hellige or by persons
authorized by Marquette Hellige,
- the electrical installation of the
relevant room complies with the
applicable national and local require-
ments, and
- the instrument is used in accordance
with the instructions for use.
* This manual contains service informati-
on; operating instructions are provided in
the user manual of the instrument.
* This manual is in conformity with the
instrument at printing date.
* All rights are reserved for instruments,
circuits, techniques, and names appearing
in the manual.
©Marquette Hellige GmbH
Printed in Germany

Marquette Hellige GmbH MAC 1100/1200 V 1.1 Page 3
227 492 20 D - 0002
1 Device description_______________________________________________________7
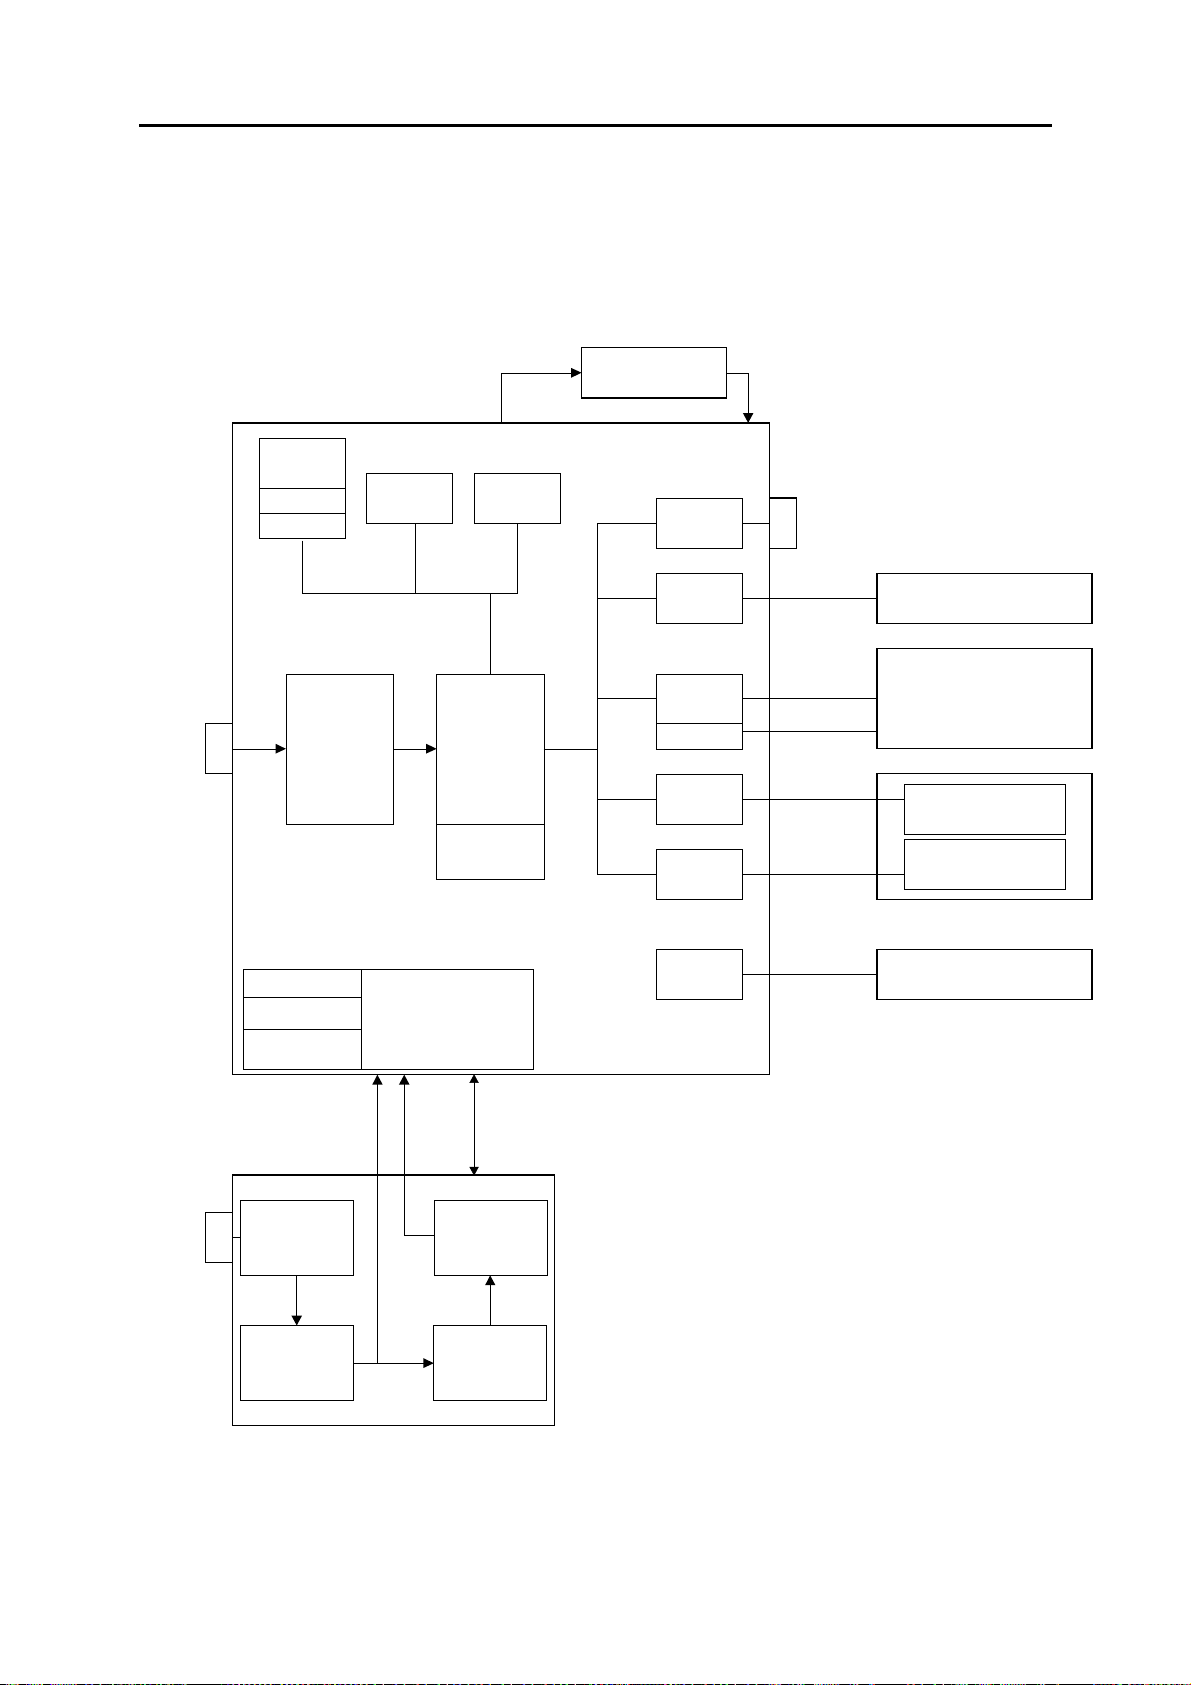
1.1 Block circuit diagram of entire instrument_______________________________________ 9
1.2 Mechanical components ___________________________________________________ 10
2 Functional description __________________________________________________11
2.1 Switching power supply ___________________________________________________ 11
2.2 PCB NC Battery Charge __________________________________________________ 11
2.2.1 Charging circuit for the NC battery _______________________________________________ 11
2.2.2 Device behavior depending on the state of battery charge______________________________ 12
2.3 PCB Control CS_CI ______________________________________________________ 12
2.3.1 Generation of internal power supplies _____________________________________________ 13
2.3.2 Switch On/Off circuit__________________________________________________________ 13
2.3.3 ECG recording and front-end processing___________________________________________ 14
2.3.4 Controller core_______________________________________________________________ 15
2.3.5 Real time clock ______________________________________________________________ 16
2.3.6 Memory ____________________________________________________________________ 16
2.3.7 LCD graphics display interface __________________________________________________ 17
2.3.8 Keypad interface _____________________________________________________________ 17
2.3.9 Printhead control _____________________________________________________________ 18
2.3.10 Motor control________________________________________________________________ 18
2.3.11 RS-232 interface _____________________________________________________________ 19
2.3.12 Buzzer _____________________________________________________________________ 19
2.4 PCB Modem Supply CS_M ________________________________________________ 19
2.5 Internal interfaces________________________________________________________ 19
2.5.1 Mechanical interfaces _________________________________________________________ 19
2.5.2 Electronic interfaces __________________________________________________________ 20
2.5.2.1 Interface to the switching power supply__________________________________________ 20
2.5.2.2 Interface to the PCB NC battery charge__________________________________________ 20
2.5.2.3 Interface to the LCD Graphics Display __________________________________________ 21
2.5.2.4 Interface to the keypad_______________________________________________________ 21
2.5.2.5 Interface to the printhead_____________________________________________________ 22
2.5.2.6 Interface to the motor________________________________________________________ 23
2.5.2.7 Interfaces for production tests _________________________________________________ 23
2.5.2.8 Interface to PCB Modem Supply CS_M _________________________________________ 24
2.6 Interfaces to peripherals___________________________________________________ 25
2.6.1 Electronic interfaces __________________________________________________________ 26
2.6.1.1 RS-232 interface ___________________________________________________________ 26
2.6.1.2 Patient input_______________________________________________________________ 27
2.7 Software Updates ________________________________________________________ 28
2.8 Limitations______________________________________________________________ 28
3 System test functions____________________________________________________29
3.1 General information ______________________________________________________ 29
3.2 Test start _______________________________________________________________ 29
3.3 Display test______________________________________________________________ 30
3.4 Keyboard test____________________________________________________________ 31
3.5 Motor test_______________________________________________________________ 31
3.6 Test results______________________________________________________________ 32

Marquette Hellige GmbH MAC 1100/1200 V 1.1 Page 4
227 492 20 D - 0002
3.7 Self-test_________________________________________________________________ 32
3.8 Recording test ___________________________________________________________ 33
3.9 V24 tests________________________________________________________________ 33
3.10 Time and date ___________________________________________________________ 35
3.11 Electrode test____________________________________________________________ 35
3.12 Time constant ___________________________________________________________ 36
3.13 Setting the device model___________________________________________________ 36
3.14 Switching over the program for interpretation ________________________________ 38
3.15 Pace enhance ____________________________________________________________ 39
3.16 Serial number ___________________________________________________________ 39
4 Repair instructions _____________________________________________________41
4.1 Safety instructions________________________________________________________ 41
4.2 Replacing components ____________________________________________________ 41
5 Troubleshooting tips____________________________________________________45
6 Adjustment instructions_________________________________________________49
7 Servicing and maintenance ______________________________________________51
7.1 Technical inspection ______________________________________________________ 51
7.1.1 Visual check_________________________________________________________________ 51
7.1.2 Test functions________________________________________________________________ 52
7.1.2.1 Recommended testing instruments and accessories_________________________________ 52
7.1.2.2 Test preparations ___________________________________________________________ 52
7.1.2.3 Operating and display unit performance tests _____________________________________ 52
7.1.2.4 Test for recording speeds 25 and 50 mm/s _______________________________________ 53
7.1.2.5 Device Test result check _____________________________________________________ 53
7.1.2.6 RS-232 interface test ________________________________________________________ 53
7.1.2.7 Analysis of the ECG signals and HR value _______________________________________ 53
7.1.2.8 Pacemaker identification test__________________________________________________ 54
7.1.2.9 Identification of disconnected electrodes_________________________________________ 55
7.1.2.10 Checking the charge status of the NC battery ___________________________________ 55
7.1.3 Safety Analysis Tests__________________________________________________________ 55
7.1.3.1 General information_________________________________________________________ 55
7.1.3.2 Protective Earth Resistance Test _______________________________________________ 56
7.1.3.3 Measurement of Leakage Current ______________________________________________ 56
7.1.3.3.1 Enclosure Leakage Current Test ____________________________________________ 56
7.1.3.3.2 Patient Leakage Current Test_______________________________________________ 57
7.2 Maintenance, cleaning, disinfection _________________________________________ 58
8 Parts List _____________________________________________________________59
9 Specifications__________________________________________________________63
10 Device Documents ____________________________________________________71

Marquette Hellige GmbH MAC 1100/1200 V 1.1 Page 5
227 492 20 D - 0002
Revision History
Each page of this manual has the document number followed by a revision letter,
located at the top of the page. This letter identifies the manual update level. The
latest letter of the alphabet corresponds to the most current version of the document.
The revision history of this manual is summarized below.
Date ECO No Revision Remarks
March 05,1999 A V 1.0, initial release
May 10, 1999 062 136 B Software Package for
MAC 1100/1200 (Software change)
page 55, new MRI
June 29, 1999 062727 C Pin 4 – Coding pin, page 19,
Supplementation to chapter 3.4; page 29
Software Release V 5.02 page 55,
new MRI,
PCB Control CS_CI , Sheet 9 new Index
PCB Control CS_C, new Index
PCB Battery Charge CS_CI, new Index
February 4, 2000 062920 D Device Version V1.1 with Remote
Start Input, internal Modem Supply
(MAC1200 US device only) and Software
Release V5.1

Marquette Hellige GmbH MAC 1100/1200 V 1.1 Page 6
227 492 20 D - 0002

Marquette Hellige GmbH MAC 1100/1200 V 1.1 Page 7
227 492 20 D - 0002
1 Device description
This Service Manual describes device version V1.1 of MAC1100 and MAC1200.
The MAC1100 is a portable electrocardiograph with an integrated printing unit.
They are used to acquire, record and process ECG signals.
The integrated LCD graphics Display shows 3 ECG channels. It also displays status
information, filter settings, speed/format, gain and the status of the electrodes.
With the setup feature, the user is able to setup the device and the modes for his
own needs.
The MAC1100 offers 2 modes of operation: Automatic (12-lead) and Manual (6-
lead).
Transmission of one in the automatic mode aquired ECG to the MUSE or CardioSys
system directly or via a modem.
It is designed for line-power operation.
In addition, a NC-battery with a charging circuit can be integrated into the instrument
as a separate option.
In addition, a pump for the KISS system can be integrated into the instrument as a
separate option.
The patient cable for the acquisition of ECG signals is connected by means of a 15-
pin connector as used with MAC 500. Patient cables used with MAC 1000 cannot be
connected to the MAC 1200.
The MAC1200 has all features of the MAC1100, in addition, the following features
are included:
-NC battery with charging circuit is integrated in general
-Arrhythmia as third mode of operation
-Automatic mode with CSI protocol for transmission
-Automatic mode with interpretation (Option)
-Automatic mode with storage for up to 40 ECGs (option)
The acquired ECGs can be transmitted to MUSE or CardioSys directly or via a
Modem.
MAC1100/1200 with version V1.1 has all features of the version V1.0 described
above, additionally version V1.1 has a Remote Start Input, an internal Modem
Power Supply (MAC1200 US device only) and the new Software Release V5.1.

Marquette Hellige GmbH MAC 1100/1200 V 1.1 Page 8
227 492 20 D - 0002
Variants of the MAC1100/1200
The complete list of the variants is included in Section 8 “Parts List”.
The following table gives an overview of the different device models of the
MAC1100/1200.
With version V1.1, the ASIA device models are identical to the INTERNATIONAL
device models, because the Manufacturer ID is GE marquette in general now, so
special ASIA device models are not required any longer.
Device Device Model Manufacturer
ID Keypad Labeling Mains Voltage
MAC1100
MAC1200 INT GE marquette Icons International 230V
MAC1100
MAC1200 Europe 2 GE marquette Text International 230V
MAC1200 USA GE marquette Text USA 115V
MAC1100
MAC1200 RUSS GE marquette Kyrillian International 230V
Hardware functional blocks:
MAC1100 and MAC1200 comprises of the same hardware functional blocks.
Differences between both are mentioned.
List of the main functional blocks:
Switching power supply
NC Battery for MAC1100 only as an option
PCB NC Battery charge for MAC1100 only as an option
PCB Control CS_CI
PCB Modem Supply CS_M for MAC1200 US device only,
from version V1.1
Printing unit
Keypad
¼ VGA graphics display, monochrome
The description of the functional blocks is valid for MAC1100 and MAC1200.
Differences between MAC1100 and MAC1200 in single functional blocks are
mentioned within the description of such blocks.

Marquette Hellige GmbH MAC 1100/1200 V 1.1 Page 9
227 492 20 D - 0002
1.1 Block circuit diagram of entire instrument
MAC1100/1200 Version V1.1
ECG
Acquisition
and
Conditioning
Controller
Core
Real Time
Clock
buffered
Programm-
Memory
ECG RAM
buffered
Internal
RAM RS232
Driver
Pump
Interface (not
in US Device)
Thermal
Pinthead
Control
Motor
Control
Display
Interface
Keypad
Interface
Display
Supply
Configuration
Memory
Keypad
LCD Grafics Display
1/4 VGA Monochrome
Option Pump
(not in US Device)
NC Battery
PCB
NC Battery
Charge
Switching
Power Supply
+26,5V
Line Power
Input
with Fuse
Thermal Printhead
Motor
RS232
Interface
Logic Supply
+5V +3.3V
Analog Supply
Printhead
Supply
Device
On/OFF
Control
ECG
Input
Line
Power
Input
MAC1100/1200
V 1.1
14.01.2000
MAC1100:
No Modem Supply,
No buffered ECG RAM,
NC Battery as Option.
MAC1200:
Modem Supply in US
device only,
Option Pump not in US
device.
PCB Control CS_CI
Line Power, NC Battery
Printing Unit
Boot
Loader
Modem Supply
(MAC1200 US only)
PCB Modem Supply

Marquette Hellige GmbH MAC 1100/1200 V 1.1 Page 10
227 492 20 D - 0002
1.2 Mechanical components
The main mechanical components comprise the upper and lower shell of the
MAC1100/1200.
The lower shell serves as a basic unit to receive the following assemblies:
Line power input module with fuse
Switching power supply
NC Battery
PCB NC Battery Charge
PCB Control CS_CI
PCB Modem Supply CS_M
Graphics display
Thermal printing unit
Paper container
The upper shell accommodates the keypad, which is connected to the PCB Control
CS_CI via a 26-pin connector.
The MAC1100/1200 can be opened by releasing 5 screws at the bottom of the lower
shell, opening the paper flap and lifting up the upper shell a little bit to remove the
keypad cable from the PCB Control CS_CI. The upper shell then can be removed
completely.
To replace the NC Battery, the battery flap at the bottom of the lower shell must first
be unlocked with a screw-driver before it can be removed.
The 15-pin input connector to connect the patient cable and the 9-pin connector for
the RS-232 interface are located directly on the PCB Control CS_CI.

Marquette Hellige GmbH MAC 1100/1200 V 1.1 Page 11
227 492 20 D - 0002
2 Functional description
The block circuit diagram of the entire instrument in Section 1.1 and the functional
blocks of circuit diagram sheets (P-plans) describe the individual functional blocks.
2.1 Switching power supply
The switching power supply generates the fundamental device voltage for the PCB
Control CS_CI and for the PCB NC Battery Charge.
It has the following input specifications:
Input voltage range: 85 ... 264V ac
Line frequency range: 47 ... 65 Hz
The output voltage is +26.5 V dc, the maximum load is 1.5A.
2.2 PCB NC Battery Charge
MAC1200 and MAC1100 with the option “Battery” can operate battery powered. With
a new, fully charged NC battery, in Automatic Mode up to 50 ECG can be recorded.
The PCB NC Battery Charge, controls and monitors the charging process, depending
on the status of the battery and the status of the device.
Section 2.2.1 and 2.2.2 is not valid for MAC1100 without option “Battery”.
2.2.1 Charging circuit for the NC battery
An integrated charging device is used to charge the battery. During charging it
monitors the battery voltage function and switches over from rapid charging to trickle
charging.
Applying the line power to the MAC 1200, or insertion of the battery activates the
charging circuit.
During a recording, the charging current is reduced.
In standby mode, a depleted battery is fully charged within 4 hours.

Marquette Hellige GmbH MAC 1100/1200 V 1.1 Page 12
227 492 20 D - 0002
2.2.2 Device behavior depending on the state of battery charge
Depending on the status of the battery and the status of the device, the following
behavior occurs:
State1: Battery depleted, line power supply is connected up:
Battery charged in rapid mode; when fully charged, switchover to trickle
charging.
State 2: Battery full, line power supply is connected up:
Battery charged in rapid mode for some minutes till the charging circuit
recognizes “battery full“, then switchover to trickle charging.
State 3: Battery depleted, no line power supply, device is switched on:
Device inoperative.
State 4: Battery full, no line power supply, device is switched on:
Device fully operative.
When battery is almost depleded, the LEDBAT signal is activated to
Indicate that the device should be charged by connecting to the line
power supply. If the operation is continued without line power, MAC
1200 will shut down itself when a minimum level is reached to prevent
the battery from a excessive discharge.
State 5: Battery depleted, line power supply is connected up, device is switched
on:
Battery is charged in rapid mode, device is fully operative, including
recording.
During recording, the charging current is reduced. If in this phase, a lot
of recordings take place, the battery is not fully charged within 4 hours.
2.3 PCB Control CS_CI
The PCB Control CS_CI is the mainboard of the MAC 1200, the PCB Control CS_C
is the mainboard of the MAC1100, which has not all memory circuit mounted. The
mainboard accommodates the control functions of the device, except the line power
supply and the NC battery-charging controller.

Marquette Hellige GmbH MAC 1100/1200 V 1.1 Page 13
227 492 20 D - 0002
2.3.1 Generation of internal power supplies
Logic power supply + 5V and + 3.3V
The processor core and the memory is a fully + 3.3V design.
The interface functions to display, to RS-232, to the printing unit and to the ECG
acquisition unit are supplied with + 5V.
Both the + 3.3V and the + 5V are generated separately by a clock-rated voltage
controller. By using the „adjustable version“ of the voltage controller, both supplies
are based on the same voltage controller. The output voltage is determined by
appropriate dimensioning of the voltage divider at the feedback input of the voltage
controller.
Standby supply + 5VSTB and + 3.3VSTB
The standby supply + 5VSTB supplies the ON/OFF Control, the + 3.3VSTB buffers
the patient ECG memory when the device is turned off.
Both supplies are generated together from one low-power linear regulator with low
quiescent supply current.
Analog supply + 12V
+ 12V is used for the heating control and temperature monitoring of the printing unit,
which requires only a current of a few milliamperes.
This supply is generated by a linear regulator with feedback input.
2.3.2 Switch On/Off circuit
The Switch On/Off Circuit consists of the On/Off Control and the Voltage Control.
The On/Off Control switches the device on or off by switching the device supplies
+UVERS and +USUPPSW.
The On/Off Control is supplied from the + 5VSTB.
Device On Sequence:
The transition from Device Off State, or Standby State when line power is connected
to Device On State can only be activated by pressing the On/Off button.
Device Off Sequence:
The transition from Device On State to Device Off State, or Standby State when line
power is connected can be achieved as follows:
pressing the On/Off button
when the control core activates the signal DEV_OFF,

Marquette Hellige GmbH MAC 1100/1200 V 1.1 Page 14
227 492 20 D - 0002
when the voltage control applies the signal REG_OFF_, because the battery
voltage gets too low during battery operation.
The Voltage Control controls the battery voltage during battery operation.
The signal BATT_LEV2 indicates that the battery charge has gone down, and the
device should be connected to the line power soon.
The signal BAT_LEV1 indicates that the battery has been discharged almost
completely, the device should be connected to the line power immediately, otherwise
the device will shut down within few minutes.
If battery discharge is continued without connecting to the line power, the signal
REG_OFF_ is activated and the device is switched off.
2.3.3 ECG recording and front-end processing
The patient input is classified as being cardiac floating and is defibrillation-proof.
The patient leads are connected with a 15-pin connector with a special form for the
specified and released patient cables for the MAC1100/1200.
The main element of the ECG recording and front-end processing is a set of chips
comprising 3 ASICs. Pace detection is realized by a separate circuit.
Every disconnected electrode is detected by a special AC measurement, which
allows higher impedance between electrode and patient.
N common-mode compensation ensures suppression of interference, at the same
time serving to improve the in-phase suppression of the input electrodes.
To protect patients, the ECG recording and front-end processing are assembled as
floating components. Digital signals from and to the controller core are transmitted
via opto-electronic couplers. The floating supply +/- 5V is generated by an isolated
flyback converter from the + 5V logic power supply.

Marquette Hellige GmbH MAC 1100/1200 V 1.1 Page 15
227 492 20 D - 0002
2.3.4 Controller core
The actual core comprises the Motorola Power PC MPC821, which contains the
following integrated components:
chipselect logic
DRAM controller
SCC and SMC for RS-232
LCD controller
SPI Interface
I/O ports
Real-Time Clock counter register
In addition, the MPC821 contains a JTAG port with test and programming
capabilities.
The MPC821 has the following additional power supplies:
VDDSYN, filtered from the + 3.3V logic supply, for the clock generation.
KAPWR, generated from the + 3.3V logic supply, or from a battery when device is
off, used for buffering the RTC Counter Register.
The clock generation for the MPC821 is realized by a quartz oscillator with
32.768KHz. The system clock CLOCKOUT is adjusted with the internal PLL register.
The system frequency is 25 MHz.
The Watchdog /Reset Generation is implemented separately in an integrated
system monitoring chip. It has the following functions:
Power-up reset for the MPC821 when the device is switched on
Voltage monitoring of the + 3.3V and + 5V, with reset generation
Watchdog
Switchover to battery supply for patient ECG memory when device is switched off
Signal for access protection for patient ECG memory when device is switched off
The Reset Configuration defines startup conditions like boot port size and clock
generation source.
Four LEDs indicate the device status in addition:
LED1: active when a HRESET_ occurs
LED2: indicator for the logic supply
LED3, LED4: indicate internal software states
The control register comprises device control signals to switch off the device,
control battery charging and display control signals.
The status register contains information on the device hardware configuration and
the state of the battery charge.

Marquette Hellige GmbH MAC 1100/1200 V 1.1 Page 16
227 492 20 D - 0002
2.3.5 Real time clock
Since the internal Real-Time Counter Register of the MPC821 is used, no external
Real Time Clock chip is required. The internal RTC Register is buffered by the
voltage KAPWR.
2.3.6 Memory
The complete memory of the MAC1100/1200 is located on the PCB Control CS_C(I).
The software of the device can be loaded through the JTAG Port during the
production process, or for service purposes with the appropriate programming
software through the RS-232 interface.
Program Memory:
Type: Flash, + 3.3V supply
Organization: 1 Mbit x32, 4 Mbyte MAC1100: 0,5Mbit x32, 2 Mbyte
Waitstates: 1 Waitstate
DRAM:
Type: EDO DRAM, + 3.3V supply
Organization: 1 Mbit x32, 4 Mbyte
Waitstates: 0 Waitstate
Patient ECG Memory:
Type: buffered SRAM, + 3.3V supply
Organization: 256 Kbit x16, 512Kbyte MAC1100: No patient ECG memory
Waitstates: 1 Waitstate
Configuration Memory:
The configuration memory is part of the program memory Flash. With special
hardware and software protection facilities, write access to the Flash is only possible
in the defined configuration memory of the Flash. Thus an external configuration
Memory like an EEPROM is not required.

Marquette Hellige GmbH MAC 1100/1200 V 1.1 Page 17
227 492 20 D - 0002
2.3.7 LCD graphics display interface
For the LCD interface to the ¼ VGA monochrome LCD interface, the internal LCD
controller of the MPC821 is used.
Controller Interface:
For the digital control signals, delivered from the MPC821, only an output driver is
required.
LCD Power Supply:
The LCD power supply VEE of -23V is generated from the +5V logic supply. The
generation starts after HRESET_ becomes inactive to ensure that the logic supply of
+5V first is applied to the display.
Adjusting Contrast:
Contrast adjustment of the Display is accomplished with the contrast voltage V0. The
level of V0 is controlled with the PWM signal BLCD_CONTR from the timer module
of the MPC821. In addition, the contrast voltage is temperature compensated.
Backlight:
The LCD backlight converter for the CCFL tube is located on the PCB Control
CS_CI too. The backlight converter is generated from the +5V logic power supply.
The signal BLCD_ENBA switches the backlight on or off.
The user can define the backlight active time in the configuration menu.
2.3.8 Keypad interface
The keypad interface contains the control register for 8 keypad columns and the
receiving register for 7 keypad rows, and the control signals for the status LEDs:
LED_LIN, LED_BATT, LED_START and LED_STOP.
Using the matrix of 8 x 7, up to 56 keypads can be detected.
Identification of the key pressed is as follows:
The controller activates a column, activation is via low-level, then the row-register is
read to identify the pressed key by a low-level. This procedure is repeated with the
next column, till all columns have been activated.

Marquette Hellige GmbH MAC 1100/1200 V 1.1 Page 18
227 492 20 D - 0002
2.3.9 Printhead control
The printhead controller takes on the complete control of the 216-mm thermal
printhead with a line width of 200 mm.
The output rate to the printhead is 1000 /sec. The resolution in the Y-direction is
8 dot/mm, in the X- time axis up to 40 dots/mm.
Thermal Printhead Dot Control:
The MPC821 prepares a complete dot column and sends it to the FIFO. A complex
PLD reads out a complete column of the FIFO and generates the digital control
signals for the printhead, which are shifted in series.
The duration of heating a dot column is defined through the pulse width of the PWM
Signal HEAT that is generated from the complex PLD too.
In addition, the duration of heating a dot column is influenced by the thermal
printhead monitoring.
Thermal Printhead Temperature Monitoring:
The thermal printhead temperature monitoring measures the temperature of the
thermistor, located on the printhead. A constant current source effects a
temperature-dependent voltage drop.
If a printhead temperature of 55°C is exceeded, the signal REC_OVHEAT_ is
activated and the heating of the printhead is prevented by disabling the signal
STROBE.
Only when the printhead temperature drops below 50°C is the signal
REC_OVHEAT_ disabled and the heating via the signal STROBE re-enabled.
In addition, a continuous reduction of the heating duration occurs with increasing
printhead temperature, resulting in a regular typeface throughout the entire
temperature range.
2.3.10 Motor control
Paper transportation for the speeds 5mm/s, 25mm/s and 50mm/s is driven by a
stepping motor. The stepping motor is controlled by an integrated stepping motor
driver circuit. The current for the motor is adjusted by the sense resistors of the
stepping motor driver.
For the speed 5mm/s, the motor current is reduced, triggered by the signal
LOW_SPEED.
The motor speed is controlled by the frequency of the signal RECTMR_STEP, which
is generated by the timer unit of the MPC821.
The driver circuit is enabled by the signal REC_MOTEN, the driver is powered from
+22,5V.

Marquette Hellige GmbH MAC 1100/1200 V 1.1 Page 19
227 492 20 D - 0002
2.3.11 RS-232 interface
The MAC1100/1200 has an RS-232 interface accessible with a 9-pin Sub-D
connector.
Except for the RS-232 driver chip, the interface is integrated into the control core of
the MPC821.
The interface has the following attributes:
hardware handshake with the signals RTS and CTS
or software handshake with XON/XOFF
transmission speeds from 4800 ... 38400 Baud
maximum input voltage range: +/- 15V
minimum driver output voltage: +/- 5V
maximum ESD interface protection: +/- 10kV
From version V1.1, MAC1100/1200 additionally provides a remote start input on the
RS-232 interface. The MAC1200 US device additionally provides a modem power
supply output on the RS-232 Interface.
2.3.12 Buzzer
The buzzer is an integrated signal generator with fixed frequency, directly operating
from the +5V logic power supply.
Activating and deactivating is controlled with the signal SPEAKER.
2.4 PCB Modem Supply CS_M
PCB Modem Supply CS_M generates a supply voltage of +8V dc, to operate a
special GE marquette modem direct on the RS-232 interface on the MAC1200
without the need of an external power supply for the modem.
The Voltage is generated by a switching regulator with current limit and thermal
protection from the +26,5V.
The modem supply voltage +8V is accessible on Pin 6 of the RS232 interface.
The protection against ESD is realized with a Transzorb diode on the PCB Control
CS_CI
.
2.5 Internal interfaces
2.5.1 Mechanical interfaces
Mechanical interfaces are described in Section “1.2 Mechanical Components“.

Marquette Hellige GmbH MAC 1100/1200 V 1.1 Page 20
227 492 20 D - 0002
2.5.2 Electronic interfaces
This section describes the pinning, function and significance of the signals on the
internal interfaces of the functional components.
2.5.2.1 Interface to the switching power supply
The interface to the switching power supply is realized by the connector POSUP/ on
the PCB Control CS_CI.
Connector denotation: POSUP/
Type: male connector 1 X 4-pin., 180°, AMP MODU I
reverse terminal protection achieved mechanically.
The function of the individual pins is given in the following table . The definition as an
input/output is seen with reference to PCB Control CS_CI.
POSUP/
Pin
Number Signal Name input/output Function Definition
1 +24VPS In
p
ut Volta
g
e from
p
ower su
p
.+26
,
5V
2 +24VPS Input Volta
g
e from power sup. + 26,5V
3 GNDPS Input GND from power suppl
y
4 GNDPS Input GND from power suppl
y
2.5.2.2 Interface to the PCB NC battery charge
This interface has the supply for battery charging, charging control and status
signals and the battery voltage from the PCB NC battery charge.
Connector denotation: BATT/
Type: male multipoint connector 2x 10-pin, 180°
reverse terminal protection and coding with coding pin 15
The function of the individual pins is given in the following table . The definition as an
input/output is seen with reference to PCB Control CS_CI.
This manual suits for next models
1
Table of contents
Other GE Medical Equipment manuals
Popular Medical Equipment manuals by other brands

Breg
Breg AFO Attachment Instructions for use

ORTHOSERVICE RO+TEN
ORTHOSERVICE RO+TEN 8403 quick start guide

Braun
Braun Aesculap activ C Instructions for use/Technical description

JOUSING
JOUSING iAED-S1 user manual

RhythMedix
RhythMedix RhythmStar Operator's manual

IBRAMED
IBRAMED SONOPULSE III instruction manual

HEINEMANN
HEINEMANN MODULA Paris user manual

bort medical
bort medical Dual-Tension Ankle Support manual

Rehband
Rehband 7080 quick start guide

BIOPAC Systems
BIOPAC Systems Advanced Brain Monitoring B-ALERT X10 Hardware manual

Maxtec
Maxtec MaxO2ME Operating manual & instructions for use

Ferno
Ferno Pedi-Mate 678 user manual