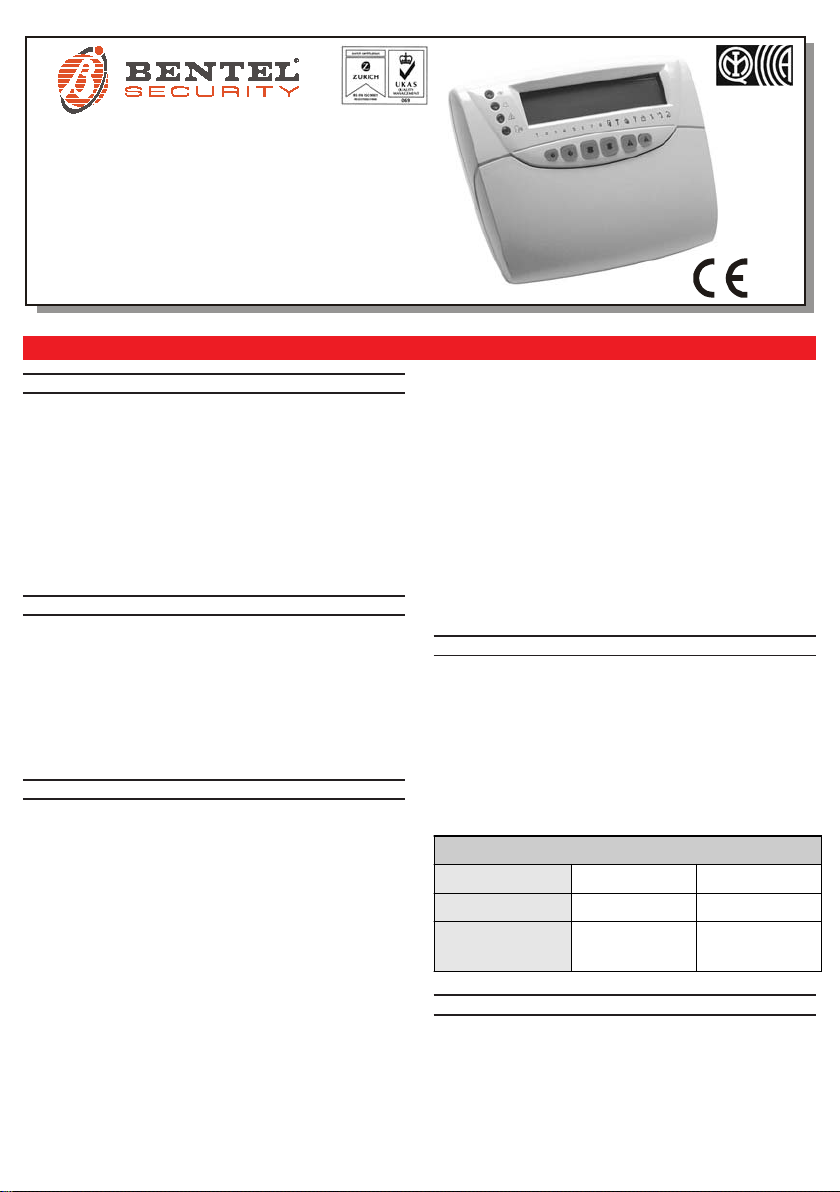
Bentel Security MIA-S User manual
Caratteristiche Generali
Design innovativo ed ergonomico
Grande display retroilluminato, 2 righe, 16 colonne
Luminosità e Contrasto del display regolabili
Tasti retroilluminati
3 coppie di tasti per l’attivazione immediata degli
allarmi Furto, Incendio ed Emergenza
2 Deviatori Antisabotaggio
1 Deviatore Antistrappo (opzionale)
1 Zona programmabile
Numerosi fori per il fissaggio in ogni situazione
Descrizione Generale
La Tastiera MIA-S è un dispositivo per il controllo delle
centrali della linea Omnia ed Academy40.
Il funzionamento della tastiera MIA-S è uguale a quel-
lo della tastiera OmniaTAST-R, per cui si rimandano
l’installatore e l’utente alla lettura delle istruzioni rela-
tive a quest’ultima.
In questo foglio d’istruzioni si descrivono solo le dif-
ferenze fra le due Tastiere.
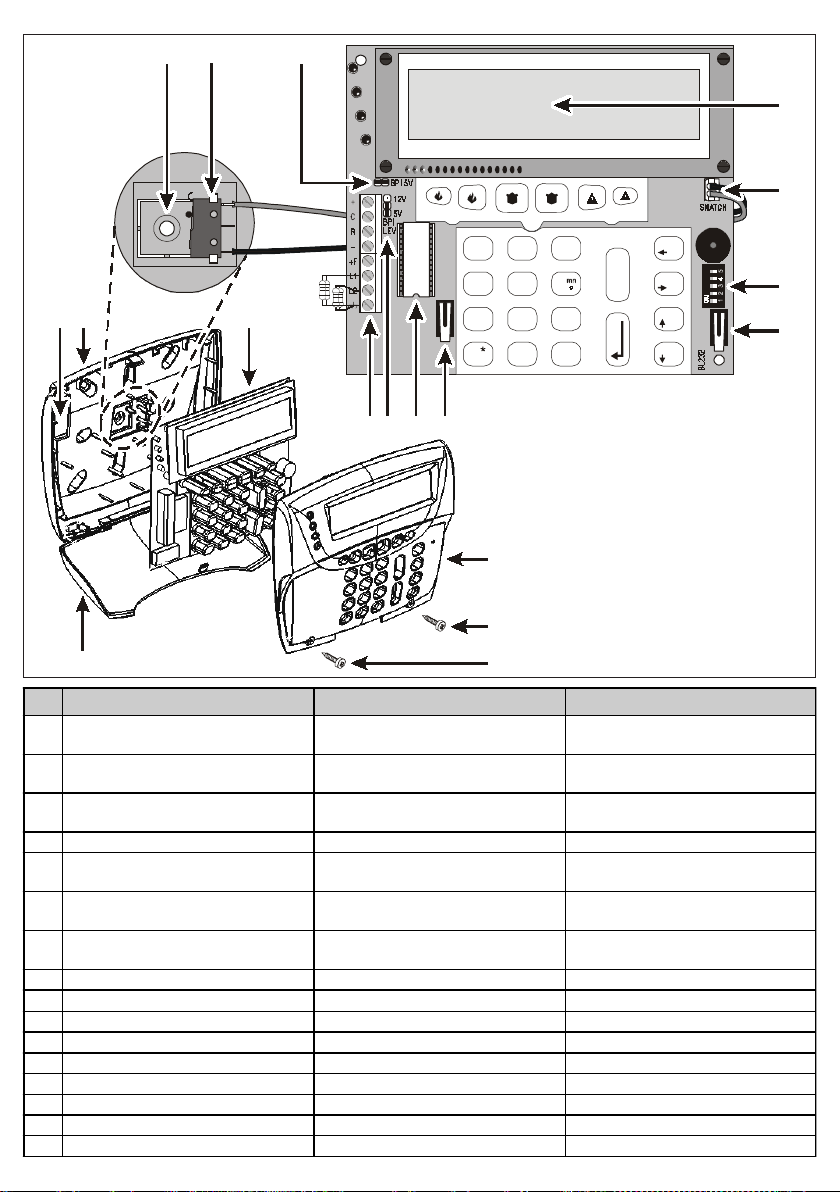
Installazione
Per l’installazione di questa Tastiera procedere come
descritto di seguito (vedere la Figura 1)
1. Aprire lo sportello 14.
2. Svitare le viti 15.
3. Togliere il coperchio 16.
4. Separare la Scheda Elettronica 11 dal fondo 12.
5. Installare il Deviatore Antistrappo 2come mostra-
to in Figura 1, altrimenti leggere il passo seguen-
te.
Il Deviatore Antistrappo è opzionale (art. ASNC).
6. Passare il cavo per i collegamenti attraverso l’aper-
tura 13.
7. Fissare il Fondo 12 alla parete o alla scatola pre-
disposta tramite le asole opportune.
8. Fissare il Tassello Antistrappo 1, altrimenti legge-
re il passo seguente.
=91C
0$'(
,1
,7$/<
ITALIANO
Il Deviatore Antistrappo è inefficace quando la
Tastiera viene fissata ad una scatola.
9. Riagganciare la Scheda Elettronica 11 al Fondo 12.
10. Collegare il Deviatore Antistrappo 2al connettore
5, altrimenti leggere il passo seguente.
11. Impostare il Livello BPI come descritto nel para-
grafo omonimo.
12. Impostare l’Indirizzo, come descritto nel paragra-
fo omonimo.
13. Eseguire i collegamenti sulla morsettiera 10 come
descritto nel paragrafo omonimo.
14. Riagganciare il Coperchio 16 al Fondo 12.
15. Avvitare le viti 15.
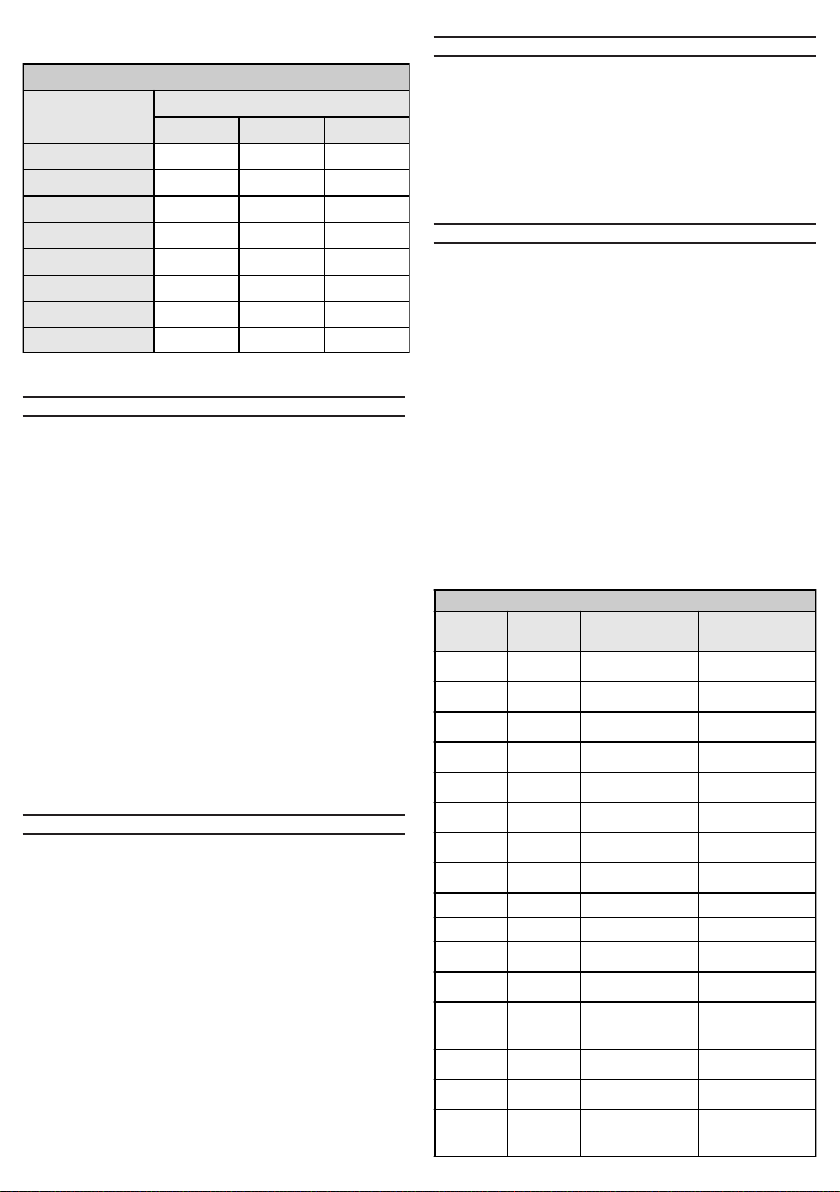
Livello BPI
Il Livello BPI della Tastiera deve essere uguale a quel-
lo della centrale alla quale sarà collegata (leggere le
istruzioni della centrale per conoscere il suo Livello
BPI).
Il Livello BPI delle centrali della linea Omnia ed
Academy40 è 5 V.
Il Livello BPI della Tastiera si imposta tramite i ponticelli
3e 9come mostrato nella Tabella 1.
Indirizzo
Ogni Tastiera collegata alla Centrale deve avere un
indirizzo diverso.
L’Indirizzo della Tastiera si imposta tramite il banco di
microinterruttori 6, come mostrato nella Tabella 2.
La posizone dei microinterruttori n. 1 e 2 è
ininfluente.
EDINTEC S.R.L. Viale Umbria, 24 20090 Pieve Emanuele (MI)
Luminosità e Contrasto del Display
Per regolare la Luminosità e il Contrasto del
Display, la Tastiera deve essere nello Stato di
Riposo.
La Luminosità del Display si regola tramite i tasti AA
AA
A
e BB
BB
B:
tenere premuto il tasto AA
AA
Aper aumentare la
Luminosità;
tenere premuto il tasto BB
BB
Bper diminuire la Lu-
minosità.
Il Contrasto del Display si regola tramite i tasti CC
CC
Ce
DD
DD
D:
tenere premuto il tasto CC
CC
Cper aumentare il Con-
trasto;
tenere premuto il tasto DD
DD
Dper diminuire il Con-
trasto.
In casi eccezionali, il Display può perdere la Lu-
minosità e il Contrasto regolati.
Volume
Il Volume del Buzzer può essere regolato su tre livelli:
nullo (buzzer muto), basso e alto. Il volume del Buzzer
si regola tramite il tasto e: tenere premuto il tasto e
fino a quando non si ottiene il volume desiderato.
I tre livelli possibili sono segnalati da beep di intensità
e lunghezza diversa:
beep corto e basso = Volume nullo (buzzer muto);
beep di lunghezza e intensità media = Volume
basso;
beep lungo e alto = Volume alto.
Collegamenti
La tastiera MIA-S si collega come la tastiera
OmniaTAST- R.
La zona L2 non è supportata dalla tastiera MIA-S.
La tastiera MIA-S assorbe 50 mA.
Questo assorbimento non include quelli relativi
all’alimentazione dei dispositivi connessi alla Ta-
stiera.
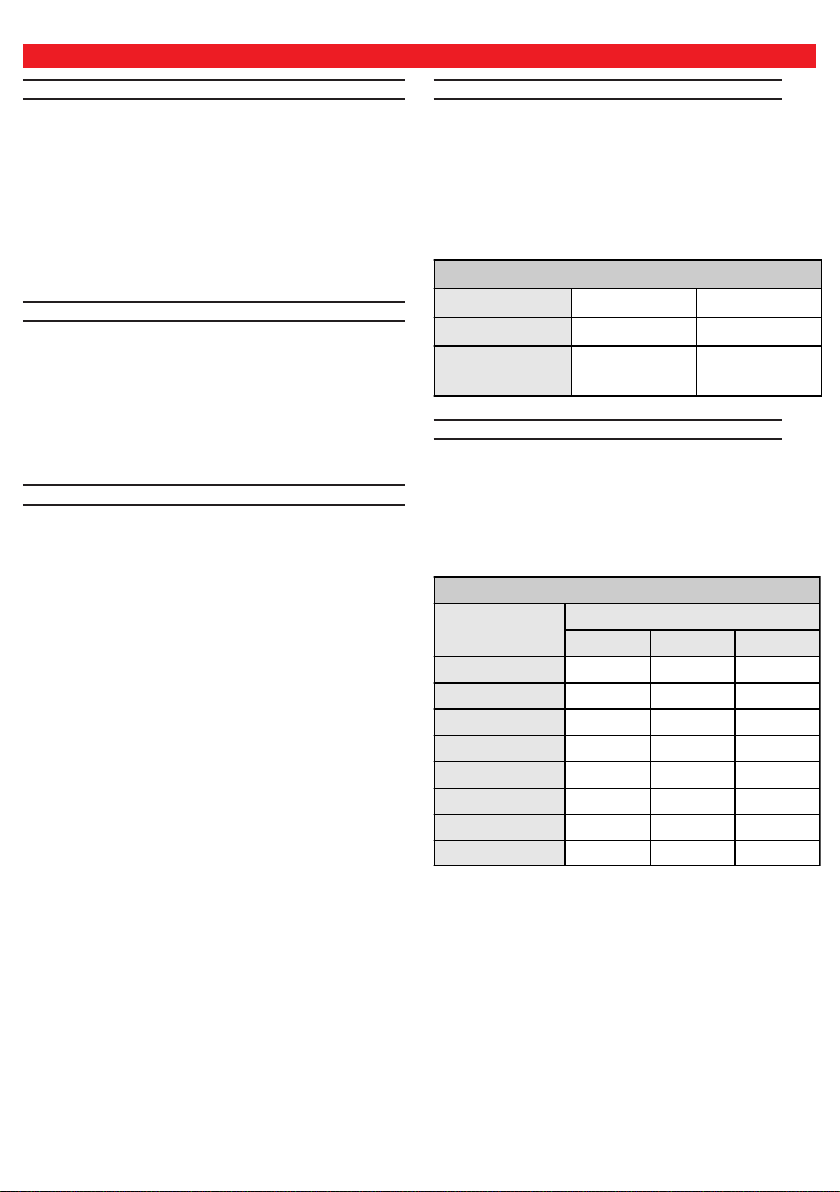
Uso della Tastiera
Fra i tasti della OmniaTAST-R e quelli dell MIA-S esiste
la corripondenza mostrata nella Tabella 3.
Le funzioni svolte dai Supertasti 11
11
1, 22
22
2e 33
33
3della
OmniaTAST-R, possono essere svolte anche premen-
do insieme i tasti ÌÍÌÍ
ÌÍÌÍ
ÌÍ PpPp
PpPp
Pp e ÁÁÁ
ÁÁ
Ádella MIA-S.
Le funzioni svolte dai tasti 99
99
9e 00
00
0della OmniaTAST-
R, quando sono usati come Tasti Cursore, possono
essere svolte anche dai tasti CC
CC
Ce DD
DD
Ddella MIA-S.
General Features
New ergonomic design
Large backlighted display, 2 lines, 16 columns
Brightness and Contrast adjustment
Backlighted keys
3 pairs of keys for fast activation of Burglar, Fire
and Emergency alarms
2 Tamper Switches
1 Snatch Switch (optional)
1 Programmable zone
Choice of Wall Anchorage
Description
The MIA-S keypad has been designed to be used
with compatible Omnia and Academy40 series Con-
trol panels.
The operating principles of the MIA-S and OmniaTAST-
R keypads are the same, barring the differences de-
scribed in this Instructions Insert. Therefore, please
review the Control panel manual to get an overall
understanding.
Installation Guidelines
Carefully work through the following steps (see Fig-
ure 1)
1. Open the flip 14.
2. Remove the screws 15.
3. Remove the frontplate 16.
4. Detach the PCB 11 from the backplate 12.
5. Insert the Snatch Switch 2as per Figure 1 (for
keypads with Snatch Switches only).
The Snatch Switch is optional (order code ASNC).
6. Pull the connection wires through the wire entry
13.
7. Using wall anchors, secure the backplate 12 to
the wall or onto the outlet box.
8. Secure the Snatch bracket 1to the wall (for
keypads with Snatch Switches only).
The Snatch Switch cannot be used when mount-
ing the MIA-S onto an outlet box
9. Reattach the PCB 11 to the backplate 12.
10. Connect the Snatch switch 2to the connector 5
(for keypads with Snatch Switches).
11. Set the BPI Level, as per the relevant instructions
in the Control panel manual.
12. Assign the Address, as per the relevant instruc-
tions in the Control panel manual.
13. Complete the connections on the terminal board
10, as per the relevant instructions in the Control
panel manual.
14. Replace the Cover 16 to the backplate 12.
15. Using the screws 15 secure the Cover.
Setting the BPI Level
The BPI Level of the keypad must match the BPI
Level of the Control panel (please refer to your
Control panel manual for details).
The BPI Level of Omnia and Academy40 se-
ries Control panels is 5 V.
Using jumpers 3and 9, as per Table 1, select the
keypad BPI Level.
Assigning the Address
Each keypad must occupy a different Address.
Using the DIP switches 6, as per Table 2, assign
the keypad Address.
The positions of DIP switches no. 1 and no. 2
are irrelevant.
ENGLISH
Display Brightness and Contrast
Brightness and Contrast can be adjusted during
standby status only.
Use AA
AA
Aand BB
BB
Bfor Brightness adjustment:
press AA
AA
Ato increase Brightness;
press BB
BB
Bto reduce Brightness.
Use CC
CC
Cand DD
DD
Dfor Contrast adjustment:
press CC
CC
Cto increase Contrast;
press DD
DD
Dto reduce Contrast.
On rare occasions, the Display may lose the pro-
grammed Brightness and Contrast.
Volume
The Buzzer has 3 volume levels: Off (Mute), High and
Low. Use the ekey to select the level.
Press the ekey until the required level is obtained.
Each level is identified by a specific beep:
short low beep = Volume Off (Mute)
long medium-high beep = Low Volume
long high beep = High Volume
Connections
Connect the MIA-S keypad as per the connection in-
structions of the Omnia-TAST-R keypad (refer to the
Control panel manual).
The MIA-S keypad cannot manage Zone L2.
The current draw of MIA-S is 50 mA.
This value refers to the current absorbed by the
Keypad with no load (no peripherals).
Using the keypad
Table 3 shows the keys of the OmniaTAST-R keypad,
and their coincident keys on the MIA-S keypad.
The Superkey functions of 11
11
1, 22
22
2and 33
33
3on the
OmniaTAST-R keypad can also be obtained by press-
ing simultaneously the relevant pair of keys on the
MIA-S, that is ÌÍÌÍ
ÌÍÌÍ
ÌÍ, PpPp
PpPp
Pp or ÁÁÁÁ
ÁÁÁÁ
ÁÁ.
The scroll functions of 99
99
9and 00
00
0can also be ob-
tained by using CC
CC
Cand DD
DD
Don the MIA-S.
Caractéristique Generale
Nouvelle conception ergonomique
Afficheur LCD rétroéclairé, 2 lignes, 16 caractères
Ajustement de la luminosité et du contraste
Touches rétroéclairées
3 touches appairées pour alarme Feu, Panique et
Police
2 Swtiches d’autoprotection
1 Switch à l’arrachement (option)
1 Zone programmable (en fct de la centrale)
Choix de fixation au mur
Description
Le Clavier MIA-S a été conçu pour être employé avec
les centrales Kyo, Omnia et Academy40. Les
principes de fonctionnement des claviers MIA-S et
OmniaTAST-R sont les mêmes, excepté les
différences décrites en ce manuel d'instructions. Par
conséquent, le manuel de la centrale est aussi
nécessaire pour avoir vue globale.
Installation
Respecter les étapes suivantes (voir le schéma 1)
1. Ouvrir le capot 14.
2. Enlever les vis 15.
3. Enlever la face avant 16.
4. Détacher la carte 11 de la plaque arrière 12.
5. Insérer le switch AP 2 selon le schéma 1.
le switch AP 2 est facultatif (code ASNC).
6. Passer les câbles par le passage13.
7. En utilisant des trous de fixations, assurez vous
de la fixation de la plaque 12 au mur.
8. Fixer le support 1 au mur (pour les claviers équipés
du switch AP 2).
le switch AP 2 ne peut pas être utilisé si le MIA-S
est monté sur une boitier outlet.
9. Rattacher la carte 11 à la plaque arrière 12.
10. Relier le switch AP 2 au connecteur 5 (si option
utilisée).
11. Placer le niveau de BPI, selon les instructions du
manuel de la centrale (5 ou 12V).
12. Adresser le clavier, selon les instructions du manuel
de la centrale .
13. Complèter les raccordements au bornier 10, selon
les instructions du manuel de la centrale
14. Remplacer laface avant16 à la plaque arrière 12.
15. Utiliser les vis 15 bloquées la face avant.
FRANÇAIS
Réglage du niveau de tension du Bus BPI
Le niveau BPI des claviersdoit être en accord avec le
niveau de BPI de la cantrale (selon les instructions du
manuel de la centrale).
le niveau BPI des centralesOmnia etAcademy40
est 5 V.
Utiliser les jumpers 3 et 9, selon le tableau 1, pour
choisir le niveau BPI des claviers.
Adressage
Chaque clavier doit avoir une adresse différente.
Utiliser les DIP switches 6, comme indiqué dans le
tableau 2, pour définir l’adresse du clavier.
La position des DIP switches 1 et 2 sont sans
effet.

Réglage de la luminosité et du contraste
Ce régalge ne peut être éffectué qu’au repos.
Utiliser AA
AA
Aet BB
BB
Bpour adjuster la luminosité:
presser AA
AA
Apour augmenter;
presser BB
BB
Bpour diminuer.
Utiliser CC
CC
Cet DD
DD
Dpour adjuster le Contraste:
presser CC
CC
Cpour augmenter;
presser DD
DD
Dpour diminuer.
Dans de rare occasions, l’écar peut perdre ce
réglage.
Réglage du Volume
Le Buzzer a 3 niveaux de volume: Off (Muet), Haut et
Bas. Utilser epour sélectionner le niveau.
Presser ejusqu’à obtenir le niveau souhaité.
Chaque niveau est identifié par un Bip:
Bip Court et Bas = Volume Off (Muet)
Bip Long et Medium = Volume Bas
Bip Long et Haut = Volume Haut
Connexions
Connecter le clavier MIA-S comme indiqué das le
manuel de la cnetrale.
Le clavier MIA-S ne peut pas gérer Zone L2.
La consommation du MIA-S est 50 mA.
Cette valeur est donnée Hors Charge (rien de
connecté sur L1).
Utilisation du clavier
Le Tableau 3 présente les touches d’un clavier
OmniaTAST-R , et les même touches sur un MIA-S.
Les SuperTouches 11
11
1, 22
22
2et 33
33
3du clavier
OmniaTAST-R peuvent être obtenues sur le clavier
MIA-S, en pressant simultanéent les ÌÍÌÍ
ÌÍÌÍ
ÌÍ, PpPp
PpPp
Pp
ou ÁÁÁÁ
ÁÁÁÁ
ÁÁ.
Les fonctions 99
99
9et 00
00
0peuvent être obtenue par
CC
CC
Cet DD
DD
Dsur un MIA-S.
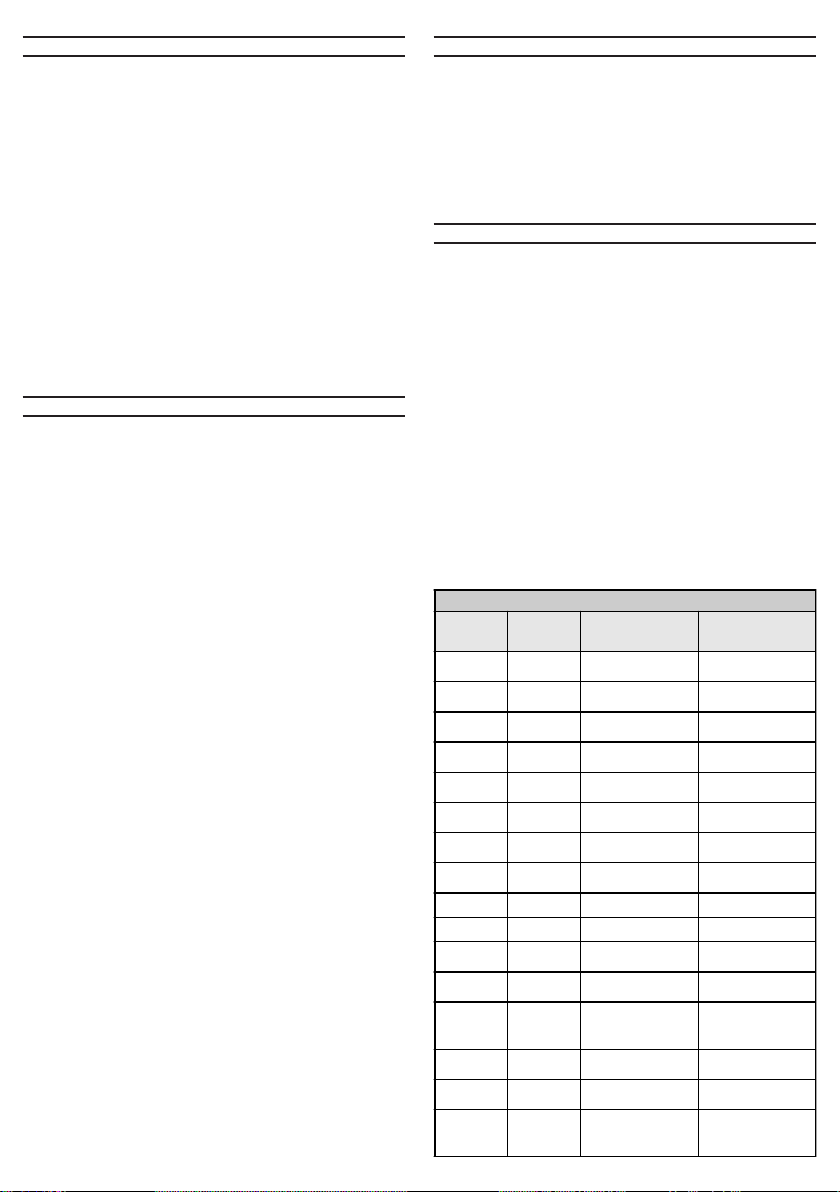
$
Fig. 1 - Parti della Tastiera
Fig. 1 - Parts
Fig. 1 - Composition du clavier

BENTEL SECURITY S.r.l. - Via Gabbiano, 22 - Z.I. Santa Scolastica - 64013 CORROPOLI - TE - ITALY
Tel.: +39 0861 839060 - Fax: +39 0861 839065
E-mail: info@bentelsecurity.com - http://www.bentelsecurity.com
ISTISBLVMIA-S 0.0 120606 P70
BENTEL SECURITY s.r.l. si riserva il diritto di modificare le specifiche tecniche di questo prodotto senza preavviso.
BENTEL SECURITY s.r.l. reserves the right to change the technical specifications of this product without prior notice.
BENTEL SECURITY s.r.l. se réserve le droit de modifier les spécifications techniques de ce produit sans préavis.
Table of contents
Languages:
Other Bentel Security Keypad manuals

Bentel Security
Bentel Security ALISON/S User manual

Bentel Security
Bentel Security CLASSIKA Series User manual

Bentel Security
Bentel Security PREMIUM Series User manual

Bentel Security
Bentel Security KYO 32 Owner's manual

Bentel Security
Bentel Security Absoluta M-touch User manual

Bentel Security
Bentel Security Absoluta T-Line Series User manual
Popular Keypad manuals by other brands

SmartDrive Systems
SmartDrive Systems SR4 Removal guide

AT&T
AT&T 1035 Identification and Connections

Neets
Neets UniForm installation guide

SIB
SIB Standalone Keypad Access Control user manual

Digital Monitoring Products
Digital Monitoring Products Security Command 690 Installation sheet

Bosch
Bosch B920 User quick reference guide


