Berger & Schroter 31884 User manual

1
(D) Bedienungsanleitung
Solar Panel Art.-Nr. 31884
Einführung: Die Betriebsanleitung ist Bestandteil dieses Produkts. Sie
enthält wichtige Informationen zu Sicherheit, Verwendung und Entsor-
gung. Bevor Sie das Produkt verwenden, machen Sie sich mit allen Be-
triebs- und Sicherheitshinweisen vertraut. Verwenden Sie dieses
Produkt nur wie beschrieben und nur für die genannten Anwendungs-
bereiche.
Diese Dokumentation ist urheberrechtlich geschützt. Eine Vervielfälti-
gung oder Wiedergabe, auch auszugsweise, und die Wiedergabe von
Bildern (auch in einem modifizierten Zustand) ist nur mit schriftlicher
Genehmigung des Herstellers zulässig.
Verwendungszweck: Dieses Gerät ist nur für die Stromversorgung von
unseren Wild-Kameras. Der Hersteller übernimmt keine Haftung für
Schäden verursacht durch Nichtbeachtung dieser Vorschriften, unsach-
gemäßen Gebrauch oder nicht fachgerechte Reparaturen.

2
Produktübersicht
1. Energieabsorptionsglas
2. Kontrollleuchte
3. Stativschlitz
4. 6V Ausgangsschnittstelle
5. 5V Eingabeschnittstelle
6. Stativschlitz

3
Spezifikation
•Maximale Solar- adeenergie: 1,5W
•Maximale Strom- adung: 300 mA
• Eingebaute 1500mAh Lithium-Batterie
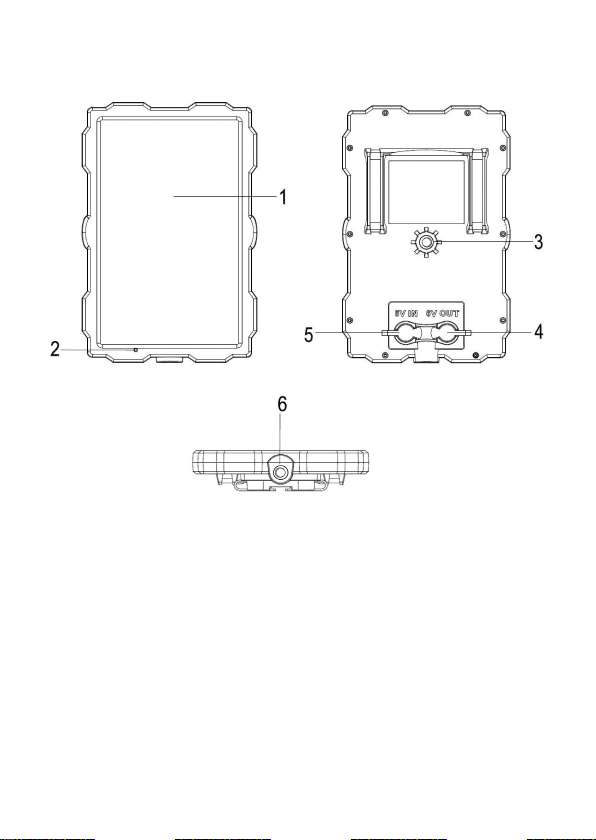
• Externer Ladeeingang: DC 5V / 500mA
• Maximale Ausgabe: DC 6V / 1500mA
• Batterieladedauer: Der Ladevorgang kann an einem Tag bei
ausreichender Sonneneinstrahlung abgeschlossen werden.
• Max. 9418 Fotos am Tag oder 3741 Fotos in der acht möglich
• Max. 2716 Videoclips am Tag oder 458 Videoclips in der acht.
(die Standardlänge eines Videoclips beträgt 5 Sekunden)
• Betriebstemperatur: -20 ℃bis + 50 ℃
• Lagerungstemperatur: -30 ℃bis + 70 ℃
• Lebensdauer: ca. 3 bis 5 Jahre
• Maße: ca.158 x 102 x 14 mm
• Gewicht: ca.188 g
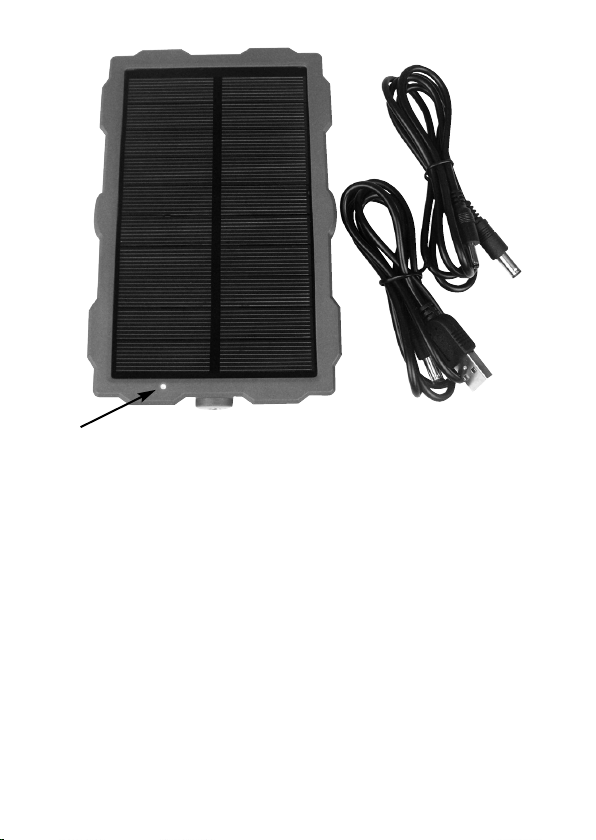
• Das Solarpanel ist Spritzwasser geschützt (IP-Schutzklasse 56).
Vorsicht
1. Beim Einschalten der Jagdkamera durch das Solar Panel, stellen Sie
bitte sicher, dass Sie mindestens 4 Stück Batterien in der Jagdkamera
als Reserve installiert haben.
2. Versuchen Sie niemals, das Gehäuse des Geräts zu öffnen oder es in
irgendeiner Weise zu ändern. Wartung und Reparatur sollte nur von au-
torisierten Dienstleistern durchgeführt werden. Sollte eine Reparatur er-
forderlich sein, wenden Sie sich bitte direkt an den Händler.
3. Zum Reinigen ist regelmäßige ein trockenes und weiches Tuch zu ver-
wenden um Staub oder Schmutz auf dem Solarpanelglas zu entfernen,
das kann sonst ein Aufladen verhindern.
4. Die Gummiabdeckung an der Schnittstelle stecken lassen, wenn
diese nicht verwendet wird um zu vermeiden das Wasser eintritt, das
kann zu Kurzschlussschäden führen.

4
Bedienung Einführung
Installieren
Sie können das Solarpanel an einem Baum durch ein Gurtband befe-
stigen. Oder mit einer Halterung an ebenen Flächen.
1.Das Solarpanel mit einem Gurtband oder Halterung befestigen.
2.Das Solarpanel sollte dort platziert werden, wo es genug Sonnenlicht
bekommt und keine Äste mit Blättern das Sonnenlicht abhalten. Das
Energieabsorptionsglas muss zum Sonnenlicht ausgerichtet sein.
3. Platzieren Sie das Solarmodul dort, wo es nach möglichkeit nicht vom
Regen überschwemmt werden kann.
4. Justieren Sie den Winkel zwischen dem Sonnenkollektorglas und ho-
rizontale Ebene, in einem Winkel von ca. 30-45 Grad. Wenn der Winkel
zu klein ist, wird das Glas zu sehr dem Regen ausgesetzt oder herun-
terfallende Fremdkörper können das Glas beschädigen. Wenn der Win-
kel ist zu groß kann eventuell das Sonnenlicht nicht ausreichen.
5.Überprüfen Sie, ob das Solarmodul gut befestigt ist.
Verbindung
Wir liefern zwei Kabel wie unten.
Kabel A: Wird zum aden des Solarpanels mit 5V Strom verwendet,
Quadratische Seite mit dem Adapter verbinden und runde Seite an die
5V IN - Schnittstelle an der Sonnenkollektor.
Kabel B: Wird verwendet, um die Jagdkamera mit Strom vom Solar
Panel zu versorgen. Die schmale Seite Seite mit der DC-Buchse der
Jagdkamera verbinden. Die größere Seite an der 6V OUT-Schnittstelle
auf dem Solarpanel anschließen.
Kabel A Kabel B

5
Schließen Sie den Adapter zum Laden an
Schließen Sie die Jagdkamera an, um die Stromversorgung zu
unterstützen

6
LED Kontrollleuchte
Das ED icht zeigt an in welchem Modus sich das Solar Panel befindet.
1. Das icht ist blau, das Panel ist betriebsbereit.
2. Das icht ist rot, wenn das Solar Panel über den Adapter oder das
Sonnenlicht geladen wird.
3. Der adevorgang ist beendet, das icht erlischt.

7
Verwendung der Wandaufhängung
Sie können das Solar Panel mithilfe der Wandaufhängung an einer
Wand oder einem Baum befestigen. Bevor Sie die Wandaufhängung in-
stallieren, sollten Sie sicherstellen, dass alle Schrauben festgedreht wur-
den.
Bauteile
1. Stativschraube
2 Sicherungsmutter
3 Gelenkbolzen
4 Bohrlöcher
5 Innensechskantschlüssel
6 Dübel
7 Schrauben
Installation der Wandaufhängung
Erforderliche Werkzeuge
• Bohrer
• 6 mm Steinbohrer/Betonbohrer
• Kreuzschlitzschraubenzieher
Achtung
• Bohren Sie nicht wo Stromleitungen, Wasserleitungen oder
Heizungsrohren verlaufen.
• Die mitgelieferten Dübel eignen sich nur zur Installation an Beton oder
Stein. Bevor Sie mit der Installation anfangen, sollte sichergestellt wer-
den, dass der Einbauort für die Verwendung der Dübel geeignet ist. Das
Montagematerial muss für den jeweiligen Ort passend gewählt werden.
Falls Sie sich nicht sicher sind, wenden Sie sich bitte an einen Spezial-
isten.

8
Berger & Schröter GmbH
Voerder Str. 83 - 58135 Hagen
Einbauschritte
• Markieren Sie die Bohrlöcher, indem Sie den Fuß der Wandaufhän-
gung an die gewünschte Einbaustelle halten und die Position der
Bohrlöcher markieren.
• Verwenden Sie einen Bohrer mit einem 6 mm Bohraufsatz um die er-
forderlichen Löcher zu bohren, installieren Sie dann die Dübel bündig
mit der Wand.
• Schrauben Sie die Wandaufhängung mithilfe der mitgelieferten
Schrauben an die Wand.
• Befestigen Sie das Solar Panel an der Stativschraube und schrauben
Sie das Solar Panel leicht an (mit etwa drei Umdrehungen).
• Drehen Sie das Solar Panel in die gewünschte Richtung und sichern
Sie diese mit der Feststellmutter.
• Lösen Sie die beiden Gelenkbolzen leicht um das Solar Panel in die
Endposition zu bringen, stellen Sie dann die Solarposition ein und fix-
ieren Sie die Position indem Sie die beiden Gelenkbolzen festziehen.

9
(GB) Operating Instructions
Solar Panel Item No. 31884
Introduction: The operating instructions are part of this product. It con-
tains important information about safety, use and disposal. Before using
the product, familiarize yourself with all operating and safety instructi-
ons. Use this product only as described and only for the stated areas
of application.
This documentation is protected by copyright. Reproduction or repro-
duction, including excerpts, and the reproduction of images (even in a
modified state) is only permitted with the written consent of the manu-
facturer.
Intended use: This device is only for the power supply of our wild ca-
meras. The manufacturer assumes no liability for damage caused by
non-compliance with these regulations, improper use or improper re-
pairs.

10
Product Overview
1. Energy absorption glass
2. Indicator light
3. Tripod slot
4. 6V output interface
5. 5V input interface
6. Tripod slot

11
Specification:• Solar maximum charge power:1.5W
• Solar maximum charge electrical current:300mA
• Built-in 1500mAh lithium battery
• External charging input:DC 5V/500mA
• Maximum output:DC 6V/1500mA
• Battery life: Charging can be completed in one day under the
condition of enough sunlight.
• Support to take 9418 photos in the daytime or 3741 photos in the
night.
• Support to record 2716 video clips in the daytime or 458 video clips
in the night. (the default length of one video clip is 5 seconds)
• Operation temperature:-20℃to + 50℃
• Storage temperature:-30℃to + 70℃
• Working life:3 to 5 years
• Dimension: approx.158 x 102 x 14 mm
• Weight: approx.188 g
• The solar panel has a spray-water protected (IP protection class 56).
Cautions
1. When powering the hunting camera by solar panel, please make sure
you have installed at least 4pcs batteries in the hunting camera as re-
serve.
2. Never try to open the case of the device or attempt to modify it in
any way. Maintenance and repair should be carried out only by autho-
rized service providers. Should repair is required, please contact retailer
directly.
3. It is necessary to use a dry and soft cloth to clean the dust or dirt on
the solar panel glass regularly to avoid affecting charging.
4. Please keep the rubber cover plug in when not using the interface to
avoid water leaking that may lead to short-circuit even damage.

12
Operation Introduction
Installing
You can fix the solar panel to a tree by the bandage. Or fix it to flat sur-
faces by bracket.
1.You should mount the solar panel via bandage or bracket in advance.
2.The solar panel should be placed in where has enough sunlight, no
barrier and shelter. And the energy absorption glass has to face to the
sunlight.
3.Place the solar panel in where above the ground or platform to avoid
being inundated by rain.
4.Adjust the angle between the solar panel glass and horizontal plane,
suggest to keep an angle of 30-45 degree. If the angle is too small, the
panel glass will be easy to water or fall foreign matter. If the angle is too
big, sunlight will be not enough.
5.Check and make sure the solar panel is fixed well.
Connection
We supply two cables as below.
Cable A: Used for charging the solar panel by power adapter in 5V.
Square side connect to the adapter and round side connect to the 5V
IN interface on the solar panel.
Cable B: Used for powering the hunting camera by solar panel.Smaller
side connect to the DC socket of hunting camera. Bigger side connect
to the 6V OUT interface on the solar panel.
Cabel A Cabel B

13
Connect the adapter to charge
Connect the hunting camera to support power

14
LED Indicator Light
The ED light indicates in which mode the solar panel is located.
1. The solar panel glass faces to light, the indicator light will be blue.
Now the panel is working.
2. When charging the solar panel via adapter or sunlight, the indicator
light will keep red.
3. After charging completed, the light goes out.

15
Using the wall bracket
You can mount the solar panel on a wall or tree by the supplied wall
bracket. Before mounting the wall bracket you should ensure that all
existing screws are tight.
Components
1.Tripod screw
2 Lock nut
3 Pivot bolts
4 Drill holes
5 Hexagonal screw
6 Wall plugs
7 Screws
Mounting the wall bracket
equired tools
• Drill
• 6 mm masonry/concrete drill bit
• Phillips head screwdriver
Caution
• Ensure that there are no electric lines, water or heating pipes installed
at the proposed drilling location.
• The supplied wall plugs are only suitable for mounting on
concrete or stone. Before starting the installation, please check your in-
stallation location carefully for its suitability for the plugs. The assembly
material used must be suitable for the respective location. If in doubt,
consult a professional.

16
Install Steps
• Mark the drill holes by holding the foot of the wall bracket at the de-
sired mounting location and marking the hole positions.
• Use a drill with a 6 mm drill bit to drill the required holes and insert the
plugs and insert the wall plugs flush with the wall.
• Screw the wall bracket to the wall using the supplied screws .
• Mount the solar panel on the tripod screw and screw the solar panel
a little way on (about three turns).
• Turn the solar panel in the desired direction and lock it with the lock
nut.
• To move the solar panel into its final position, undo the two pivot bolts
a little, position the solar panel and fix the position by tightening the two
pivot bolts.

17
(F) Instructions d'utilisation
panneau solaire ef. Art. 31884
Introduction
e mode d’emploi fait partie intégrante de ce produit. Il contient des in-
formations importantes concernant la sécurité, l’utilisation et la mise au
rebut. Familiarisez-vous avec toutes les consignes d’utilisation et de sé-
curité avant d’utiliser le produit. N’utilisez ce produit qu’en respectant
les instructions données et pour les seuls domaines d’application cités.
Cette documentation est protégée par le copyright. Toute reproduction
ou diffusion, qu’elle soit totale ou partielle, et diffusion d’images (qu’el-
les aient été modifiées ou non) n’est autorisée qu’après accord écrit du
fabricant.
Utilisation
Cet appareil est seulement pour l'alimentation de nos caméras sauva-
ges. e fabricant ne peut être rendu responsable de dommages surve-
nus par manque de respect de ces consignes, du fait d’une utilisation
non appropriée ou de réparations non réalisées par un spécialiste.

18
Présentation du produit
1. Verre d'absorption d'énergie
2. Voyant lumineux
3. Fente de trépied
4. interface de sortie 6V
5. interface d'entrée 5V
6. Fente de trépied

19
Spécification
•Puissance de charge solaire maximale: 1.5W
• Charge de courant maximale: 300 mA
• Batterie au lithium 1500mAh intégrée
• Entrée de charge externe: DC 5V / 500mA
• Sortie maximale: DC 6V / 1500mA
• Durée de charge de la batterie: a charge peut être effectuée en une
journée suffisamment de rayonnement solaire peut être complété.
• Maximum de 9418 photos par jour ou de 3741 photos pendant la nuit
possible
• 2716 clips vidéo maximum par jour ou 458 clips vidéo la nuit.
(la durée par défaut d'un clip vidéo est de 5 secondes)
• Température de fonctionnement: -20 ℃à + 50 ℃
• Température de stockage: -30 ℃à + 70 ℃
• Durée de vie: environ 3 à 5 ans
• Dimensions: ca.158 x 102 x 14 mm
• Poids: environ 188 g
e panneau solaire est protégé contre les projections d'eau (indice
de protection IP 56).
Prudence
1. orsque vous allumez la caméra de chasse à travers le panneau so-
laire, assurez-vous que vous avez au moins 4 piles installées dans la
caméra de chasse en réserve.
2. N'essayez jamais d'ouvrir le boîtier ou de le modifier de quelque ma-
nière que ce soit. a maintenance et les réparations ne doivent être ef-
fectuées que par des prestataires agréés. Si une réparation est
nécessaire, veuillez contacter le revendeur directement.
3. Pour le nettoyage, utilisez un chiffon sec et doux ordinaire pour enle-
ver la poussière ou la saleté sur la vitre du panneau solaire, sinon cela
pourrait empêcher la charge.
4. aissez le couvercle en caoutchouc à l'interface s'il n'est pas utilisé
pour empêcher l'eau d'entrer, ce qui pourrait causer des dommages en
court-circuit.

20
Introduction à l'opération
installer
Vous pouvez attacher le panneau solaire à un arbre à travers une sangle.
Ou avec un support sur des surfaces planes.
1. Fixez le panneau solaire avec une sangle ou un support.
2. e panneau solaire devrait être placé là où il y a assez de lumière du
soleil et aucune branche avec des feuilles n'écarterait la lumière du sol-
eil. e verre d'absorption d'énergie doit être aligné avec la lumière du
soleil.
3. Placez le panneau solaire à l'endroit où il ne sera pas inondé par la
pluie si possible.
4. Réglez l'angle entre le verre du capteur solaire et le plan horizontal,
à un angle d'environ 30-45 degrés. Si l'angle est trop petit, le verre sera
trop exposé à la pluie ou la chute de débris risque d'endommager le
verre. Si l'angle est trop grand, la lumière du soleil peut ne pas suffire.
5. Vérifiez que le panneau solaire est bien fixé.
Lien
Nous livrons deux câbles comme ci-dessous.
Câble A: Utilisé pour charger le panneau solaire avec une alimentation
de 5V, connecter le côté carré à l'adaptateur et le côté rond à l'interface
5V IN du panneau solaire.
Câble B: Utilisé pour alimenter la caméra de chasse avec l'énergie du
panneau solaire. Connectez le côté étroit avec la prise DC de la caméra
de chasse. Connectez le plus grand côté à l'interface 6V OUT du pan-
neau solaire.
Câble A Câble B
Table of contents
Languages: