manuals.online logo
Brands
  1. Home
  2. •
  3. Brands
  4. •
  5. Berkeley Varitronics Systems
  6. •
  7. Security Sensor
  8. •
  9. Berkeley Varitronics Systems YORKIE Setup guide

Berkeley Varitronics Systems YORKIE Setup guide

Cell Phone Detector
TM
YORKIEYORKIE
Scott Schober - Berkeley CEO, Wireless Tech & Cybersecurity Expert
QUICK START USER GUIDE
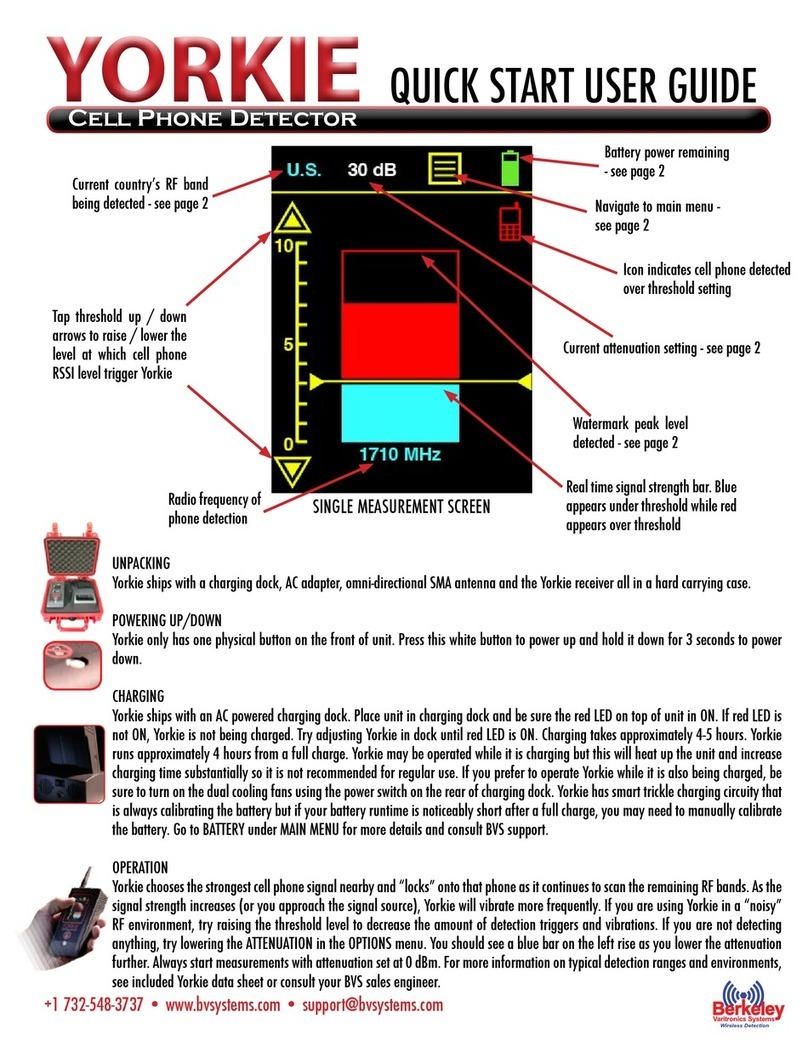
Tap threshold up / down
arrows to raise / lower the
level at which cell phone
RSSI level trigger Yorkie
Current country’s RF band
being detected - see page 2
Radio frequency of
phone detection
Battery power remaining
- see page 2
Navigate to main menu -
see page 2
Current attenuation setting - see page 2
Icon indicates cell phone detected
over threshold setting
Watermark peak level
detected - see page 2
Real time signal strength bar. Blue
appears under threshold while red
appears over threshold
SINGLE MEASUREMENT SCREEN
UNPACKING
Yorkie ships with a charging dock, AC adapter, omni-directional SMA antenna and the Yorkie receiver all in a hard carrying case.
POWERING UP/DOWN
Yorkie only has one physical button on the front of unit. Press this white button to power up and hold it down for 3 seconds to power
down.
CHARGING
Yorkie ships with an AC powered charging dock. Place unit in charging dock and be sure the red LED on top of unit in ON. If red LED is
not ON, Yorkie is not being charged. Try adjusting Yorkie in dock until red LED is ON. Charging takes approximately 4-5 hours. Yorkie
runs approximately 4 hours from a full charge. Yorkie may be operated while it is charging but this will heat up the unit and increase
charging time substantially so it is not recommended for regular use. If you prefer to operate Yorkie while it is also being charged, be
sure to turn on the dual cooling fans using the power switch on the rear of charging dock. Yorkie has smart trickle charging circuity that
is always calibrating the battery but if your battery runtime is noticeably short after a full charge, you may need to manually calibrate
the battery. Go to BATTERY under MAIN MENU for more details and consult BVS support.
OPERATION
Yorkie chooses the strongest cell phone signal nearby and “locks” onto that phone as it continues to scan the remaining RF bands. As the
signal strength increases (or you approach the signal source), Yorkie will vibrate more frequently. If you are using Yorkie in a “noisy”
RF environment, try raising the threshold level to decrease the amount of detection triggers and vibrations. If you are not detecting
anything, try lowering the ATTENUATION in the OPTIONS menu. You should see a blue bar on the left rise as you lower the attenuation
further. Always start measurements with attenuation set at 0 dBm. For more information on typical detection ranges and environments,
see included Yorkie data sheet or consult your BVS sales engineer.
+1 732-548-3737 • www.bvsystems.com • support@bvsystems.com
MAIN MENU
Choose sub-menus from this
screen. The yellow arrow on the
top left of every screen will re-
turn to the previous screen.
SELECT COUNTRY
Yorkie is factory congured for the country it ships to but users can change that country anytime by choosing
the country of origin for devices they are trying to detect. For U.S. customers, Yorkie includes an option to
turn off iDEN bands (helps to avoid false triggers from nearby emergency units) or turn on FirstNet bands in
addition to standard U.S. bands.
PRODUCT INFO
View rmware version installed
and your unit’s serial number.
OPTIONS
All measurement options with
‘SET’ choices will take you to
additional screens except for ‘VI-
BRATOR’ which is toggled ON by
default.
BATTERY
View remaining battery power in
this screen.
WATERMARK
SET reset time for watermark
peak level or ‘MANUAL’ which
resets when users tap on main
measurement screen.
ATTENUATION
Tap up / down on yellow arrow
to raise / lower attenuation
from 0 to 30 dB. Lower the at-
tenuation (increases sensitivity)
to detect faint signals and raise
attenuation to lower sensitivity
of overly strong RF signals.
STEALTH MODE
This mode keeps the screen mini-
mized and dim for covert opera-
tions. Vibration is ON by default.
Tap screen anytime to exit mode.

Other Berkeley Varitronics Systems Security Sensor manuals

Berkeley Varitronics Systems Yorkie Setup guide

Berkeley Varitronics Systems

Berkeley Varitronics Systems Yorkie Setup guide

Berkeley Varitronics Systems wolfhound pro User manual

Berkeley Varitronics Systems

Berkeley Varitronics Systems wolfhound pro User manual

Berkeley Varitronics Systems PocketHound User manual

Berkeley Varitronics Systems

Berkeley Varitronics Systems PocketHound User manual

Popular Security Sensor manuals by other brands

Chemtronics MDRAI302 user manual

Chemtronics

Chemtronics MDRAI302 user manual

ADEMCO 4278EX-SN installation instructions

ADEMCO

ADEMCO 4278EX-SN installation instructions

Marmitek MS845 user manual

Marmitek

Marmitek MS845 user manual

ABB Busch Watchdog Prasenz EIB 6131-102-500... manual

ABB

ABB Busch Watchdog Prasenz EIB 6131-102-500... manual

CARLO GAVAZZI LDP1 instruction manual

CARLO GAVAZZI

CARLO GAVAZZI LDP1 instruction manual

Hama 00176554 operating instructions

Hama

Hama 00176554 operating instructions

Jamara LiPo Save Audio LED Instruction

Jamara

Jamara LiPo Save Audio LED Instruction

Quandify CubicDetector QCD-01 manual

Quandify

Quandify CubicDetector QCD-01 manual

Makita CV100D instruction manual

Makita

Makita CV100D instruction manual

RKI Instruments 65-2515RK Operator's manual

RKI Instruments

RKI Instruments 65-2515RK Operator's manual

schmersal RSS 36-I2-SD-ST-DU manual

schmersal

schmersal RSS 36-I2-SD-ST-DU manual

Radenso RC-M User & installation manual

Radenso

Radenso RC-M User & installation manual

LEGRAND Sensors CU-250 installation instructions

LEGRAND

LEGRAND Sensors CU-250 installation instructions

Riken Keiki GD-1OXi Series operating manual

Riken Keiki

Riken Keiki GD-1OXi Series operating manual

nedis WIFISM10WT quick start guide

nedis

nedis WIFISM10WT quick start guide

Ness Quantum Pet aware Dual Installation notes

Ness

Ness Quantum Pet aware Dual Installation notes

Johnson Controls LC-200S installation instructions

Johnson Controls

Johnson Controls LC-200S installation instructions

Honeywell RAEGuard 2 PID user guide

Honeywell

Honeywell RAEGuard 2 PID user guide

manuals.online logo
manuals.online logoBrands
  • About & Mission
  • Contact us
  • Privacy Policy
  • Terms and Conditions

Copyright 2025 Manuals.Online. All Rights Reserved.