BIMG Metvisa CLMC.510 User manual

1

2
CONGRATULATIONS,
You have just purchased a IMG-BRASIL equipment, product of the highest quality, safety
and efficiency.
Founded in 1989, IMG-BRASIL is a respected company as one of the best and most
complete companies in the field of gastronomy equipment manufacturing.
Constant innovation and improvement of its products, using top-of-line raw materials, ensure
superior products consumed in Brazil and in more than 25 countries worldwide.
THE RELIABILITY AND CERTAINTY OF A GOOD PRODUCT ARE IN THE NAME
IMPORTANT:
PRODUCT FORPROFESSIONAL USE.DONOT USEBEFOREREADINGTHEMANUALCAREFULLY.
IN CASEOFQUESTIONS, PLEASECONTACTUS:
:
IMG-BRASIL Gastronomy Machinery Industry Ltda.
CNPJ 11.193.347/0001-14 - CREA 131726-3
Road. Antônio Heil –KM 23 Nº 5825 –Neighborhood: Limoeiro –ZIP CODE 88352-502
Brusque –SC –Brasil
Phone/fax. +55 47 3251-5555 - Site: www.metvisa.com.br
E-mail: sac@metvisa.com.br - vendas@metvisa.com.br

3
INDEX
1.
Safety Information……………............................................................................... 4
1.1
General warnings…............................................................................................................ 4
1.2
Mechanical Safety…. ......................................................................................................... 5
1.3
Electrical Safety.................................................................................................................. 7
2.
Technical Characteristics..................................................................................... 7
2.1
Main Components……….................................................................................................... 7
2.2
Technical Data…................................................................................................................. 9
2.3
Supply and Disposal of the Machine Packing………...……................................................ 9
3.
Installation........................................................................................................... 10
3.1
Machine Layout……………............................................................................................. 10
3.2
Electrical Connection....................................................................................................... 13
3.3
Safety Procedures and User Instruction………................................................................. 15
4.
Machine Use……................................................................................................. 15
4.1
Utility................................................................................................................................. 15
4.2
Commands........................................................................................................................ 15
4.3
Operating Procedures………............................................................................................ 16
5.
Cleaning and Maintenance................................................................................. 18
5.1
Cleaning Procedures and Products Used……………....................................................... 18
5.2
Breakdown Maintenance and Procedures……………...................................................... 19
5.3
Prolonged Interruption in Use of Equipment..................................................................... 19
6.
Analysis and Troubleshooting…….....................................................................20
6.1
Problems, possible causes and solutions........................................................................ 20
7.
Lifetime of the Equipment and Components…................................................ 21
8.
Annexes............................................................................................................... 22
Electrical Schematic - Voltage 110 V……......................................................................... 22
Electrical Schematic - Voltage 220 V................................................................................ 23
Exploded view drawing..................................................................................................... 24
List of Spare Parts…......................................................................................................... 27
ATTENTION!
The characteristics, pictures and figures presented in this manual should be considered for
information. IMG BRASIL reserves the right to make such modifications as may be deemed
necessary without prior notice.

4
1. Safety Information
1.1 General Warnings
• Cautions / precautions must be observed when installing, using, maintaining and discontinuing use
of this equipment;
• Before carrying out any operation (assembly, use (use), maintenance and reuse after prolonged use
of the equipment), read the manual carefully;
• The machine must be used by trained personnel familiar with the use and safety regulations
described in this manual;
• This appliance is not intended for use by persons (including children) with reduced physical, sensory
or mental capacities, or people with lack of experience and knowledge, unless they have received
instructions regarding the use of the appliance or are under the supervision of a person responsible
for their safety.
• It is recommended that children be supervised to ensure that they are not playing with the
equipment;
• In case of rotation of the personnel that will work with the equipment, the new operator must be
educated about the standards and the operation of the same one;
• The operator must use the Adequate PPE (equipment for individual safety). As for example: use
cap to the hair avoiding that they lock in the moving parts of the machine;
• The operator must always be aware of situations that can cause a risk of accidents and avoid them.
For example: avoid working with sleeves of loose uniforms, where they can lock in moving parts,
causing accidents;
• After reading and clarifying all doubts, this manual should be carefully stored in an easily accessible
location, known to all persons who will operate the machine and make it available to those who will
carry out maintenance for any inquiries. Whenever any questions arise, be sure to check the manual.
Do not operate the machine in any way with doubts;
• In the installation, it is essential to make this manual available to the professionals who will do the
same;
• Never place your hands on rolling cylinders, or on or near moving parts;
• Before starting any cleaning and maintenance, it is essential to disconnect the equipment from the
electrical mains;
• Periodically check the condition of the cables and electrical parts;
• Do not leave the machine switched on unattended.
ATTENTION!
Do not perform repairs on your own. Refer servicing to qualified service personnel. Only use
original parts in your machine.

5
1.2 Mechanical Safety
• Before turn on the machine, be sure that the low table be fixed with the screws and washer. Never
operates the equipment without this part properly fixed.
• Use the machine only for the specific products that the equipment is designated for and never put
the hands, fingers or objects directly in the cylinders with the equipment on. Do not handle the dough
on the side of the low table, could cause an accident.

6
• When the equipment is being cleaned take care. Turn off the equipment pushing the on/off button
and the putting general switch to the position “0” (turn off). Then, disconnect the equipment of the
electrical mains. Never put the hands in the cylinders moving.
ATTENTION!
The manufacturer does not take responsibility for possible damage direct or indirect caused
by the non-compliance of the norms and instructions present in this manual.
The machine described in this manual meets regulation against the mechanical risks. The
safety is obtained with:
1. Mechanical project that makes the hands access impossible to the electrical and spinners
dangerous parts;
2. Fixed right and left side protections preventing access to move parts, as for example, gear
and chain transmission set.
3. Fixed rear cover inhibiting access to the engine.
4. Front protection e obstruction cylinder that prevent access to the cylinders during the
dough handling.
5. Dough Scraper, which scrapes the dough from the cylinder, avoiding that the worker do in
another ways, as putting sharp objects or even the hands.
6. Low Table projected for the worker to be at a safety distance of the equipment during the
dough handling.
7. Gutter, used to support and direct the dough until the cylinders.
8. Ruler (graduated ruler) indicates the distance between the superior and inferior cylinder,
determining the thickness of the dough. With the graduated ruler avoiding the worker put the
hands in the cylinders to check the distance between then.
9. Feet (model CLMC.510) with the appropriate height for handling the machine, following the
requirements for good ergonomics.
10. Non-slip feet prevent the machine to move during the use.
To view the parts described above, see the image in item 2.1 (Main Components –Page 8)
of this manual.
ATTENTION!
Always that some item referred to safety be removed from the equipment (for example, for
cleaning or maintenance), replace it in place and confirm that it is performing its function
correctly.

7
1.3 Electrical Safety
• Periodically check the condition of the cables and electrical parts;
• If the power cord is damaged, it must be replaced with a new one. The exchange must be made by
the manufacturer, authorized agent or a qualified person in order to avoid risk;
• Do not use a water jet as this may cause electric shock. To clean your equipment, follow the
instructions in item 5 of this manual;
• Do not operate the equipment in damp locations or wet clothing and shoes. Wear proper footwear,
this will prevent electric shocks and even death;
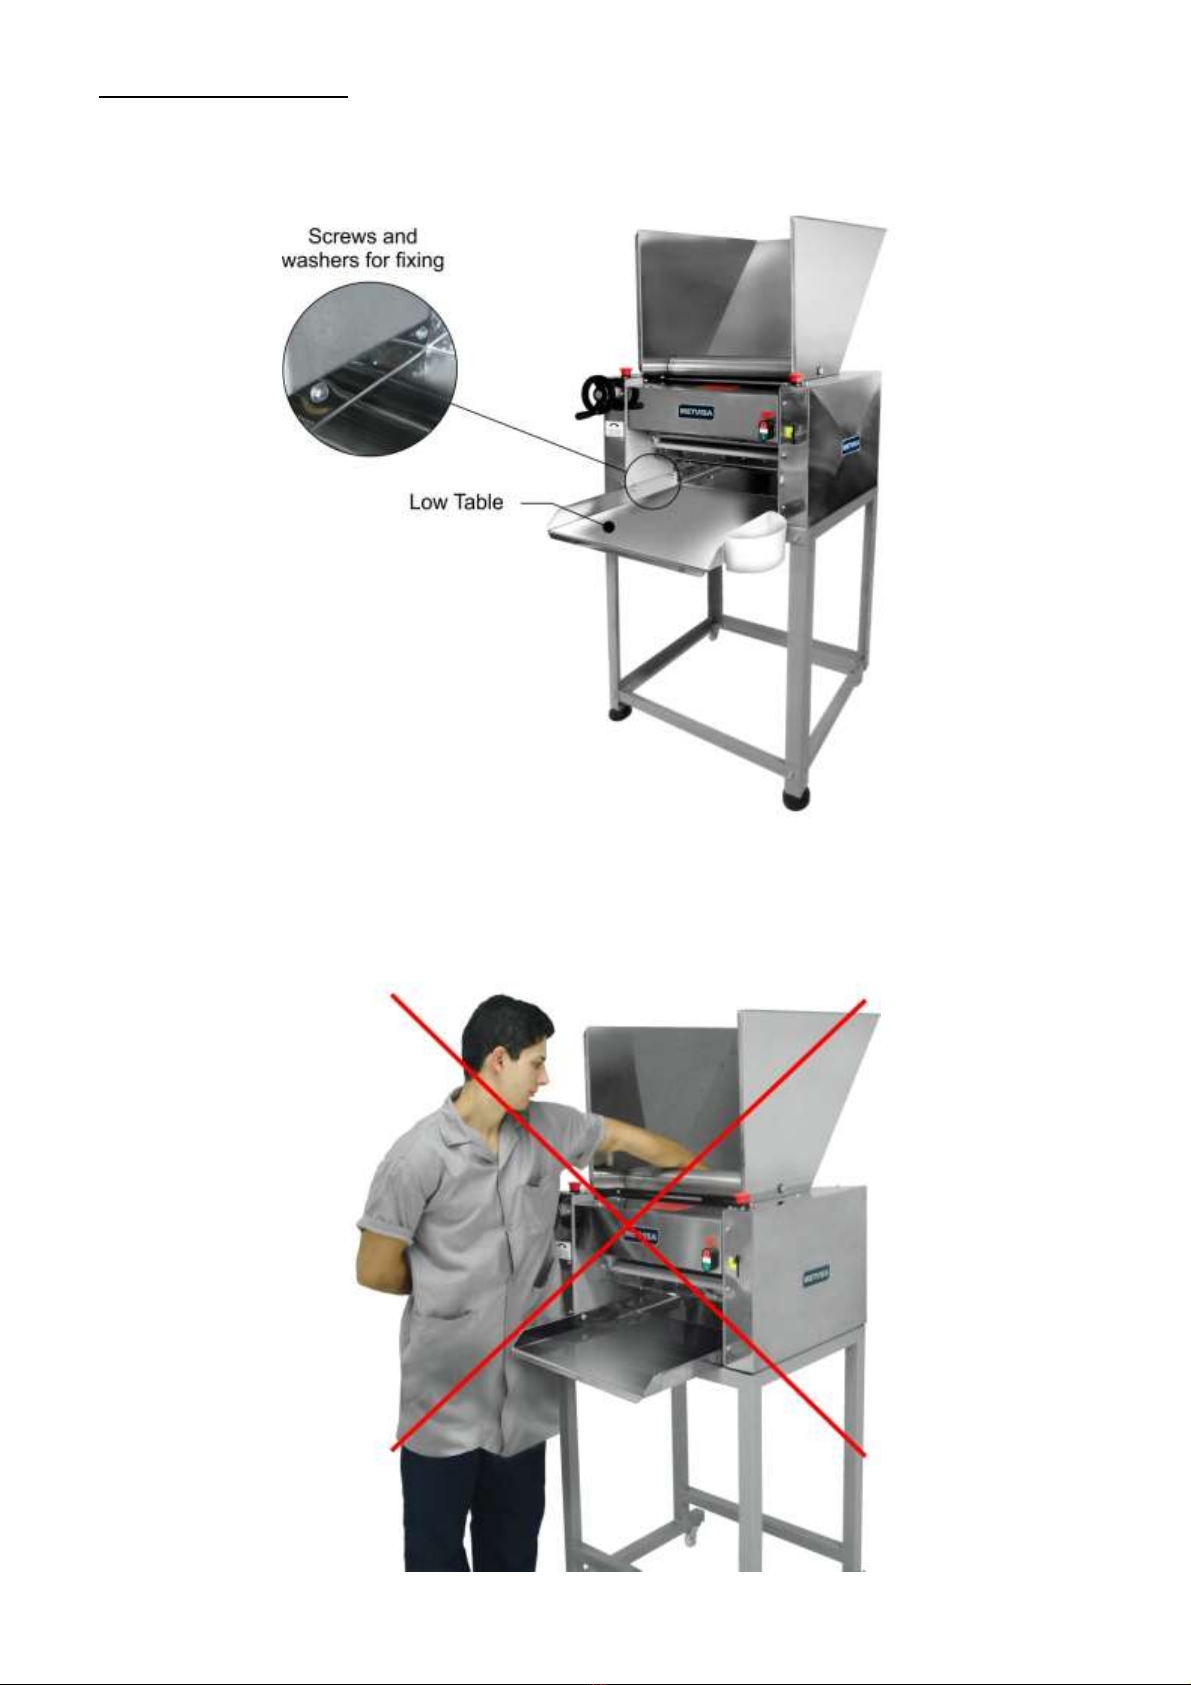
• Lay the equipment on a firm, dry, level surface;
• Never carry out any maintenance, adjustment or disassembly of the equipment connected to it. For
such procedures, make sure that it is turned off by removing the plug from the electrical mains;
•Do not use extension cords or adapters with several other devices connected to them. This may
cause a fire or an overload;
Components used for safety against electrical hazards have been selected in accordance with
applicable standards. Given the perfect insulation of all the electrical parts and the excellent resistor
of all the materials used, this unit is able to carry out the works to which they are proposed.
CAUTION!
Whenever any item regarding the safety of the equipment (such as cleaning or maintenance)
is removed, reset it and confirm that it is performing its function correctly.
2. Technical Characteristics
2.1 Main Components
For the equipment described in this manual, safety in use, cleaning, maintenance and
maximum hygiene are guaranteed by the design and special design of all parts and also by using
stainless steel and other materials suitable for contact with the dough.
The equipment was built with the following characteristics:
• Front guard, side guards, back cover, gutter, low table, and ruler (graduated ruler), made of stainless
steel, which has superior corrosion resistance to other steels. It is a material resistant to the attack of
several corrosive agents;
• The plastic scraper made of PE (polyethylene) plastic and the PVC plastic mixture roller are both
non-toxic, odorless, impact and corrosion resistant materials;

8
• The upper and lower roller cylinders are made of stainless steel, which withstands the attack of
several corrosive agents, such as most organic acids, organic substances in general, alkalis, oxysalts
etc.;
Note: Stainless steel is attacked by sulfuric acid, and also cannot withstand hydrochloric acid,
dilute sulfuric acid, chlorides and halides in general.
• Feet (model CLMC.510) made of carbon steel coated with epoxy electrostatic paint, an excellent
corrosion protection;
• Dispenser for flour, which prevents the operator from moving to add flour to the dough. Made of non-
toxic plastic.
Below are the main components of the machine:
Note: for the exploded view
with the spare parts list, check
the annexes.

9
2.2 Technical Data
Model
Nominal Measures
WidthxHeightxDepth
(mm)
Net Weight
(approx.)
(kg)
Voltage
(V)
Rated
Current
(A)
Capacity
(kg of dough)
CLMC110M60S5_
770x1710x960
96.60
110
22.0
15
CLMC220M50S5_
770x1710x960
96.60
220
10.2
15
CLMC220M60S5_
770x1710x960
96.60
220
11.0
15
CLMM110M60S5_
770x870x960
82.30
110
22.0
15
CLMM220M50S5_
770x870x960
82.30
220
10.2
15
CLMM220M60S5_
770x870x960
82.30
220
11.0
15
Noise level: 74 db.
ATTENTION!
Features like: model, serial number and voltage of the equipment are provided on the label
(figure below). Before installation, check that the power supply voltage of the appliance
corresponds to that of the mains.
2.3 Supply and Disposal of Equipment Packaging
The equipment is packed with wood or cardboard to ensure its perfect integrity during
transport and is accompanied by the following documents:
• Instruction Manual for Installation. Use, Maintenance and Safety;

10
IMPORTANT
The packaging components (cardboard, wood, foam, strips, etc.) are products that can be
assimilated to municipal solid waste and can be disposed of without difficulty. If the
equipment is installed in countries with different standards, dispose of the packaging in
accordance with current regulations. Dispose of the product correctly to help protect the
environment. For more information on recycling, contact your local authorities, waste
disposal service or the shop where you purchased the product.
3. Installation
3.1 Machine Layout
The connection to the electrical mains and the arrangement for operation must be carried out
by a qualified professional. Check if the machine voltage matches to the electrical mains voltage.
It is essential to make this manual available to the professionals who carry out the
installation.
For ease of transportation, the machine is packed with the feet (model CLMC.510), the low
table and wheel handle crank disassembled.
To mount the crank, it is necessary to thread it onto the wheel handle. The fixing of the feet
parts (model CLMC.510), must be done with the washers, screws and nut that came with the
equipment.
Following, the positions of assembly and the spare parts list of the feet (only model
CLMC.510):

11
Spare Parts List of the Feet –Cylinder Model CLMC.510
Posição
Código
Descrição
Quant.
1
CVT034
Feet Left Side
01
2
TAS100
Platter Feet
02
3
ARL004
Flat Washer 1/4"
36
4
PRS062
Hexagon Screw M6 x 16 mm
04
5
POS143
Hexagon Nut Self-locking 1/4"
16
6
PRS010
Hexagon Screw 1/4"
16
7
TAS077
Bottom Platter Feet
02
8
CVT035
Feet Right Side
01
9
FRG925
Star Switch 7/16”
02
10
FRG1003
Star Switch M10
01
11
SPT004
Non Slip Feet
02
12
ROD007
Fixed Wheel
02
After to assembly the feet, fix the machine
(CLMC.510) on the feet through the 04 screws
and washers of the position 05 and 03 of the
spare parts list above.

12
Follow the guidelines below to assemble and secure the low table:
After fixing the table, place the machine in a sufficiently wide, level, dry and stable area,
away from heat sources, water faucets and areas with high circulation of people. Install the machine
leaving a free area on the front and a minimum distance of 50 cm on the sides and back so there is
enough space for inspection, maintenance, cleaning and use.
The model CLMM.510 must be placed on a stand with an average height of 80 cm.
Reserving an area with at least 1,0 m above the gutter. The model CLMC.510 having its feet must be
placed directly on the floor.

13
ATTENTION!
The installation and the place where the machine will be disposed must comply with the
norms of risk prevention and safety at work (regulatory norm in force in your country).
The manufacturer does not take responsibility for possible damage direct or indirect caused
by the non-compliance of the norms and instructions present in this manual.
3.2 Electrical Connection
The equipment is supplied with a plug-in power cable to be connected directly to the
electrical mains. If the power cable is damaged, must be replaced for a new one. The exchange must
be carried out by the manufacturer, authorized agent or qualified person, in order to avoid risks.
The power cable has 3 round pins, with the largest diameter being the grounding pin. It is
mandatory to connect the three points before starting the machine, as well also it is mandatory to
make a good grounding connection, according to the current regulation.

14
ATTENTION!
The power mains of the machine for 110 V requires a circuit breaker with 30 A and for 220 V
a circuit breaker with 15 A.
In case of need some maintenance in the power cable and/or in the power plugs of this
equipment this procedure must be carried out by an authorized agent or qualified person. These
people, when reassembling these components and make the connections of the points, can also use
the marks on the inside of the plug, in its plastic region as reference.
These marks, the grounding pin (ground pin) is indicated with the grounding symbol, the
phase conduction pin has the symbol “L\+”, and the pin without mark is the neutral conductor. Check
the following picture:
For more details about the rest of the electrical part of the equipment, check the Electrical
Schematic in the annexes of the manual.

15
ATTENTION!
The voltage of this equipment can be 110 V (60 Hz) or 220 V (60 Hz or 50 Hz), you can check
this information on the voltage sticker attached on the power cable or in the sticker of the
equipment information, that is located on the back of the equipment (see the image of this
sticker on the item 2.2 of this manual).
Make sure that the voltage of the electrical mains where the equipment is installed is
compatible with the voltage indicated in the stickers.
IMPORTANT
The manufacturer does not take responsibility for possible damage direct or indirect caused
by the non-compliance of the norms and instructions present in this manual.
3.3 Safety Procedures and User Instruction
The professional that effects the sale of the equipment must instruct the user about the
correct operation of the equipment and must give the instruction manual.
The user must be informed of the necessary safety procedures and must respect them, as
well as all procedures described in this manual.
Your machine has mechanical protections (see item 1.2 Mechanical Safety) that prevent
access to moving parts and electrical components. Removing or tampering these safety components
can cause serious risks to the worker's upper limbs.
4. Machine Use
4.1 Utility
This machine is exclusively intended for laminate various kinds of dough.
ATTENTION!
The machine only laminates fine dough (ex. lasagna, pastry etc.). It is not suitable for kneading
(ex. bread dough).
4.2 Commands
The machine is composed of the general switch, emergency button, on/off button, the wheel
handle and the ruler.

16
The general switch is in the back of the equipment, near to the power cable. The emergency
button, the on/off button, the wheel handle and the ruler are in the front of equipment.
View the description of each command below:
• General Switch (Interrupter) –switch used to in a safety way turn on and turn off the energy from
the electrical mains to the equipment. In the position “1” turns on, “0” turns off the energy to the
equipment.
• On/Off Button- Used to turn the machine on and off. In position "1" it turns the device on, and turns
it off in position "0".
• Emergency Button –must be used in case of necessity to stop the machine due to some
emergency. To arm the button you just need to push and to disarm, turn the button on clockwise (as
indicated by the arrows on the button)
• Wheel Handle -This has the function of regulating the distance between the rolling cylinders. It
should be rotated clockwise to close the cylinders and counterclockwise to open them. As the handle
is rotated, the cursor will move.
• Ruler - Operated using the wheel handle. It indicates the thickness of the dough by means of a
marking on the ruler and the scale label.
4.3 Operating Procedures
Before operating the machine, clean it well, especially of the components that will come into
contact with the mixture. Carry out cleaning with the machine disconnected from the mains. Follow
the cleaning instructions in item 5 of this manual (below).
After this initial care, confirm that the supply voltage of the electrical mains is the same as
that of the machine.

17
• Operation: The machine can only be operated after verifying its ideal positioning, if the low table is
correctly fitted and fixed by the screws, according to the instructions in item 3.1 (Arrangement of the
Machine).
After checking these items, follow the operating procedure of the machine:
• Connect the power cord to the mains;
• Open the cylinders at the maximum (cursor at position 20 on the scale);
• Fill the dispenser with flour and place it on the side of the low table;
• Check if the two buttons of emergency are in the position of work (disarmed);
• Turn the general power switch (interrupter),
• Turn the power switch to "1" (on) and leave the machine on for a few seconds;
• Position it in front of the low table and throw some flour into the gutter (enough for the dough to slide
through);
• Put the dough in the gutter in a way that it be conducted through the cylinder, taking care for your
hands do not overtake the frontal protection of the equipment.
• Remove the dough from the low table;
• Close the cylinders gradually until the ideal thickness is obtained;
• After the process is completed, switch off the machine by switching the power button to the "0" (off)
position.
ATTENTION!
If the dough is stuck in the chute or one of the guards, turn the machine off by switching the
power button to the "0" (off) position, unplug the mains cord, and remove the mixture safely.
Throw more flour into the chute and perform the rolling operation again as instructed above.
ATTENTION!
Do not put all of the dough at once with the cylinders closed. If you still notice that the
machine cannot process the dough or that it is not processing, decrease the quantity of
dough.
Only increase the dough gradually so as not to impair the motor speed and performance, as
well as the working life of the machine.
Failure to comply with these guidelines will be considered an unsafe act and abusive use of
the machine.
In the case of any irregularities please contact the nearest authorized service center.

18
ATTENTION!
Never place your hands, fingers or objects (such as spoons and knives) directly into the
cylinders with the machine turned on as this may cause an accident.
5. Cleaning and Maintenance
5.1 Cleaning Procedures and Products Used
Your machine was built with first-line materials, so use it properly and you will obtain great
satisfaction. Always keep your machine clean and well-cared for, which will make it much more
durable.
Daily cleaning of the machine must be carried out for good operation and durability.
ATTENTION!
Before performing maintenance or cleaning, make sure that the appliance is switched off
and that the plug is disconnected from the mains.
ATTENTION!
Do not use water jet to clean the machine.
IMPORTANT
This machine is not intended to be immersed in water for cleaning.
Follow the instructions below to find out which parts can be immersed and the special care
to be taken with the other parts.
The removable part (flour dispenser and mixing roller) must be removed from the machine and
washed with water and neutral soap. The remainder of the machine should be cleaned as many times
as possible to prevent the residue of the dough from drying out and sticking to the parts. For cleaning,
dilute soap or mild detergent in warm water and apply with a damp, soft cloth on the cylinders and the
outside of the machine. With a cloth moistened with water, rinse and then wipe the parts with a dry
cloth. Clean the corners well, eliminating residue from the flour and mixture.
Never use abrasive products or sponges for cleaning as they may scratch or ruin the surface
of the parts. Do not spill water on the motor and electrical parts for cleaning, as turning it on
afterwards may cause electric shock or even burn the machine.
ATTENTION!
It is extremely important that the products used in cleaning ensure maximum cleanliness
and are not toxic.

19
5.2 Breakdown Maintenance and Procedures
The operator must be instructed to carry out routine inspections, making small adjustments,
cleaning and observing signs of breakdowns that may occur. Examples include: checking for strange
noises; loss of machine power; the non-execution by the machine to the proposed service; among
others. Actions like these are indispensable to guarantee a longer machine life.
ATTENTION!
When maintenance occurs (even small adjusts) disconnect the equipment from the electrical
mains.
It is recommended that each 6 months be made preventive maintenance, checking and
adjusting the loose, cleaning the internal parts, and others. Detecting broke parts or without the
correct functionality the worker needs to exchange the parts, always using original parts only.
By carrying out preventive maintenance, the inconvenience of having the machine stopped
when it is most needed is eliminated, the cost of maintenance is reduced and the risk of accidents is
reduced.
ATTENTION!
The preventive maintenance must be made by a capacity person.
Make sure that the equipment be disconnected from the electrical mains.
Always that some item referred to safety be removed from the equipment (for example, for
cleaning or maintenance), replace it in place and confirm that it is performing its function
correctly.
Detecting broke parts or without the correct functionality, please contact the nearest
authorized service center.
5.3 Prolonged Interruption in Use of Equipment
When leaving the appliance unattended for an extended period of time, unplug it from the
mains, keep the oven door open, and perform a thorough cleaning, including the various accessories.
It is advisable to protect all parts of the equipment with white vasoline or with suitable commercially 23
available products. You should also protect the equipment from dust by covering it with a nylon or
other material.

20
6. Analysis and Troubleshooting
6.1 Problems, possible causes and solutions
Products with IMG quality are designed with materials and components that guarantee
longer life to your equipment. However, due to natural wear, improper use or lack of maintenance, the
equipment may have irregularities in its operation.
In the following table, you can check possible causes and solutions:
PROBLEMS
POSSÍBLE CAUSES
SOLUTIONS
Equipment do not turn on
- Lack of electricity;
- Check for power on the network;
- Check that the power cord is plugged into a wall
outlet;
- Voltage different from electrical
mains voltage;
- Send the equipment to the nearest authorized
service station or contact the factory;
- Emergency button armed;
- To disarm, turn the button on clockwise (as
indicated by the arrows on the button);
- Bad contact in the internal
electrical connections;
- Send the equipment to the nearest authorized
service station or contact the factory;
- Problems with the motor;
Equipment stops during
the use
- Lack of electricity;
- Check for power on the network;
- Check that the power cord is plugged into a wall
outlet;
- Different equipment from the
indicated on the manual;
- This machine is exclusively intended for laminate
various kinds of dough;
- Excess of dough in the
cylinders;
- Do not put all the dough at once and with the
cylinders closed. Increase the quantity of dough
gradually;
- Realize the cleaning of the equipment according to
the instructions in the item 5.0 of the manual;
- Bad contact in the internal
electrical connections;
- Send the equipment to the nearest authorized
service station or contact the factory;
- Problems with the motor;
- Mechanical problems;
Equipment present
noises
- Mechanical problems;
- Send the equipment to the nearest authorized
service station or contact the factory;
- Defective with the motor starting
capacitor;
- Different equipment from the
indicated on the manual;
- This machine is exclusively intended for laminate
various kinds of dough;
- Incorrect arrangement of the
equipment;
- Check the ideal layout of the equipment in the item
3.1 (Equipment Arrangement) in the instruction
manual;
- Parts bad assembled or loose;
- Send the equipment to the nearest authorized
service station or contact the factory;
This manual suits for next models
1
Table of contents
Other BIMG Commercial Food Equipment manuals
Popular Commercial Food Equipment manuals by other brands

WIESHEU
WIESHEU Dibas 64 blue Series Operation manual

Redfox
Redfox FE 70/04 E Instructions for installation and use

Hussmann
Hussmann R3B Installation & operation guide

Allure
Allure Melanger 4-0.25-230-50-A owner's manual

Continental Refrigerator
Continental Refrigerator DL3RRFE-SS-PT-HD Installation and operation manual

Angelo Po
Angelo Po 190TP0 Use and installation manual