elmeg D151R / eng / elmeg D151R_V1 / Cover_front.fm / 8/11/16
Template bintec-elmeg, Version 1, 01.07.2014
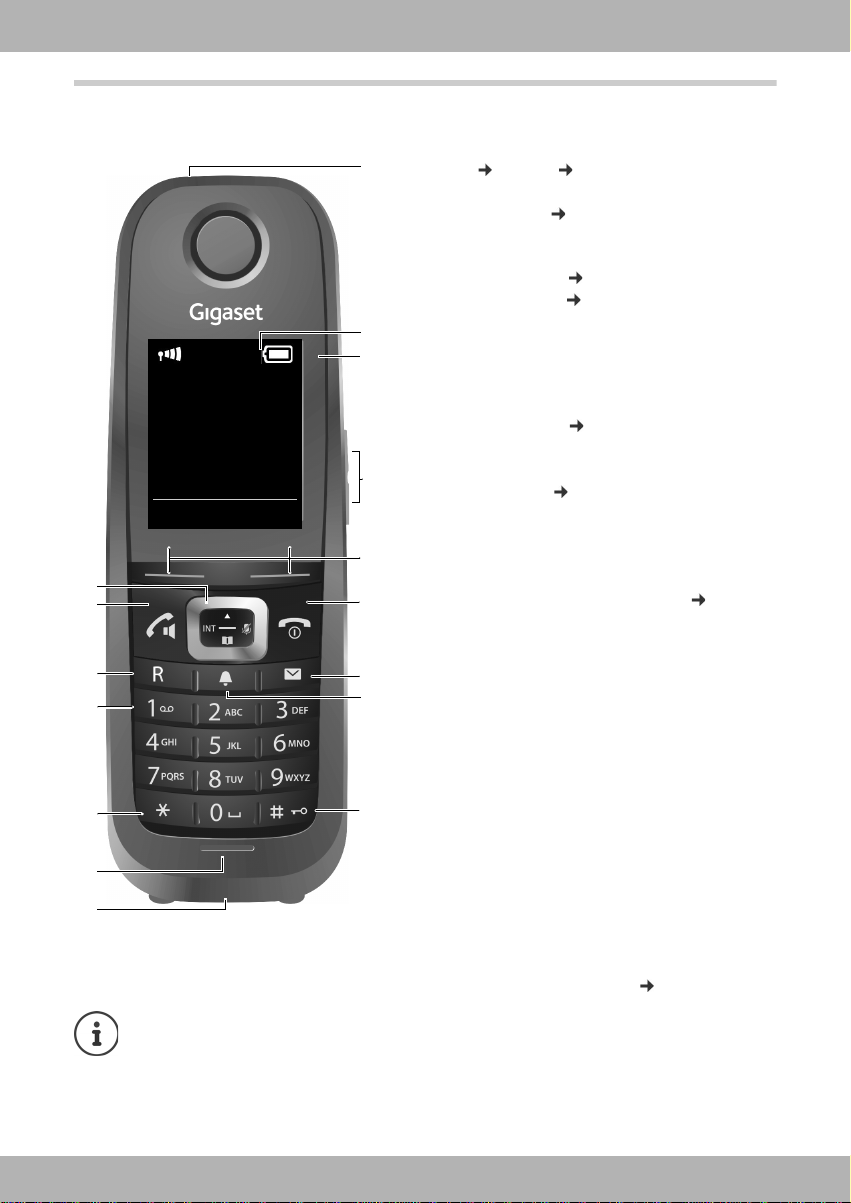
2elmeg D151R
bintec elmeg
Legal Notice
Aim and purpose
This document is part of the user manual for the installation and configuration of bintec elgmeg
devices. For the latest information and notes on the current software release, please also read
our release notes, particularly if you are updating your software to a higher release version. You
will find the latest release notes under www.bintec-elmeg.com.
Liability
This manual has been put together with the greatest possible care. However, the information
contained in this manual is not a guarantee of the properties of your product. bintec elmeg
GmbH is only liable within the terms of its conditions of sale and supply and accepts no liability
for technical inaccuracies and/or omissions.
The information in this manual can be changed without notice. You will find additional informa-
tion and also release notes for bintec elmeg devices under www.bintec-elmeg.com.
bintec elmeg devices make WAN connections as a possible function of the system configura-
tion. You must monitor the product in order to avoid unwanted charges. bintec elmeg GmbH
accepts no responsibility for data loss, unwanted connection costs and damage caused by unin-
tended operation of the product.
Trademarks
bintec trademarks and the bintec logo, artem trademarks and the artem logo, elmeg trade-
marks and the elmeg logo are registered trademarks of bintec elmeg GmbH.
Company and product names mentioned are usually trademarks of the companies or manufac-
turers concerned.
Copyright
All rights reserved. No part of this manual may be reproduced or further processed in any way
without the written consent of bintec elmeg GmbH. The documentation may not be processed
and, in particular, translated without the consent of bintec elmeg GmbH.
You will find information on guidelines and standards in the declarations of conformity under
www.bintec-elmeg.com/confomity.
How to reach bintec elmeg GmbH
bintec elmeg GmbH
Südwestpark 94, D-90449 Nürnberg, Deutschland,
Telefon: +4991196730, Fax: +499116880725
Internet: www.bintec-elmeg.com
© bintec elmeg GmbH 2016, All rights reserved. Rights of modification reserved.