BinTec elmeg D150R User manual

elmeg D150R / en / elmeg_D150R / Cover_front.fm / 02.12.2014elmeg_D150R
Version 2, 27.05.2010
elmeg D150R
bintec elmeg User guide
Copyright© Version 1.0, 2015 bintec elmeg GmbH
User Guide
elmeg D150R

elmeg D150R / en / elmeg 150_v1 / Cover_front.fm / 02.12.2014
Version 2, 27.05.2010
2elmeg D150R
bintec elmegUser guide
Legal Notice
Aim and purpose
This document is part of the user manual for the installation and configuration of bintec elgmeg
devices. For the latest information and notes on the current software release, please also read our
release notes, particularly if you are updating your software to a higher release version. You will find
the latest release notes under www.bintec-elmeg.com.
Liability
This manual has been put together with the greatest possible care. However, the information con-
tained in this manual is not a guarantee of the properties of your product. bintec elmeg GmbH is
only liable within the terms of its conditions of sale and supply and accepts no liability for technical
inaccuracies and/or omissions.
The information in this manual can be changed without notice. You will find additional information
and also release notes for bintec elmeg devices under www.bintec-elmeg.com.
bintec elmeg devices make WAN connections as a possible function of the system configuration.
You must monitor the product in order to avoid unwanted charges. bintec elmeg GmbH accepts
no responsibility for data loss, unwanted connection costs and damage caused by unintended
operation of the product.
Trademarks
bintectrademarks and the bintec logo, artem trademarks and the artem logo, elmeg trademarks
and the elmeg logo are registered trademarks of bintec elmeg GmbH.
Company and product names mentioned are usually trademarks of the companies or manufactur-
ers concerned.
Copyright
All rights reserved. No part of this manual may be reproduced or further processed in any way with-
out the written consent of bintec elmeg GmbH. The documentation may not be processed and, in
particular, translated without the consent of bintec elmeg GmbH.
You will find information on guidelines and standards in the declarations of conformity under
www.bintec-elmeg.com.
How to reach bintec elmeg GmbH
bintec elmeg GmbH
a Teldat Group Company
Südwestpark 94, D-90449 Nürnberg, Deutschland,
Telefon: +4991196730, Fax: +499116880725
Internet: www.bintec-elmeg.com
© bintec elmeg GmbH 2015, All rights reserved. Rights of modification reserved.

elmeg D150R / en / elmeg 150_v1 / overview.fm / 02.12.2014
Version 2, 27.05.2010
3elmeg D150R
bintec elmeg Overview of handset
Overview of handset
Please note
The product images are depicted schematically and may differ from the actual appearance of the
product.
3
5
6
9
16
2
15
13
i
V
07:15
INT 1 14 Oct
Calls Spot LED
8
4
14 7
12
1LED light / Visual call signal
(£page 32, £page 32)
2Display in idle status
3Status bar (£page 37)
Icons display current settings and operating sta-
tus of the phone
4Side keys (£page 16)
5Display keys (£page 16)
6End call key, on/off key
End call, cancel function, go back one menu level
(press briefly), back to idle status (press and
hold), switch handset on/off (press and hold in
idle status)
7Message key (£page 17)
Access to the calls and message lists;
Flashing: new message or new call
8Profile key (£page 32)
9Hash key
Keypad lock on/off (press and hold in idle sta-
tus);
Toggles between upper/lower case and digits
10 Connection socket for headset (£page 8)
11 Microphone
12 Star key
With an open connection: switch from pulse dial-
ling to tone dialling (press briefly);
When inputting text: Open special characters
table
13 Key 1
Select network mailbox (press and hold)
14 Recall key
- Consultation call (flash)
- Insert a dialling pause (press and hold)
15 Answer call key / Handsfree key
Dial number displayed;
Accept call; switch from earpiece to
handsfree mode;
Open the redial list (press briefly); start dialling
(press and hold);
16 Control key / Menu key (£page 15)
1
11
10

elmeg D150R / en / elmeg 150_v1 / elmeg_D150RIVZ.fm / 02.12.2014
Version 2, 27.05.2010
4elmeg D150R
bintec elmegContents
Contents
Overview of handset . . . . . . . . . . . . . . . . . . . . . . . . . . . . . . . . . . . . . . . . . . . . . . . . . . . . . . . . . 3
Safety precautions . . . . . . . . . . . . . . . . . . . . . . . . . . . . . . . . . . . . . . . . . . . . . . . . . . . . . . . . . . . 5
Getting started . . . . . . . . . . . . . . . . . . . . . . . . . . . . . . . . . . . . . . . . . . . . . . . . . . . . . . . . . . . . . . 6
Understanding the operating steps in the user guide . . . . . . . . . . . . . . . . . . . . . . . . . 14
Getting to know your phone . . . . . . . . . . . . . . . . . . . . . . . . . . . . . . . . . . . . . . . . . . . . . . . . 15
Making calls . . . . . . . . . . . . . . . . . . . . . . . . . . . . . . . . . . . . . . . . . . . . . . . . . . . . . . . . . . . . . . . . 19
Adjusting the telephone settings . . . . . . . . . . . . . . . . . . . . . . . . . . . . . . . . . . . . . . . . . . . . 22
Restoring phone to default setting . . . . . . . . . . . . . . . . . . . . . . . . . . . . . . . . . . . . . . . . . . 27
ECO DECT . . . . . . . . . . . . . . . . . . . . . . . . . . . . . . . . . . . . . . . . . . . . . . . . . . . . . . . . . . . . . . . . . . 27
Multiple handsets . . . . . . . . . . . . . . . . . . . . . . . . . . . . . . . . . . . . . . . . . . . . . . . . . . . . . . . . . . 28
Phonebook (Address book) . . . . . . . . . . . . . . . . . . . . . . . . . . . . . . . . . . . . . . . . . . . . . . . . . . 29
Call list . . . . . . . . . . . . . . . . . . . . . . . . . . . . . . . . . . . . . . . . . . . . . . . . . . . . . . . . . . . . . . . . . . . . . 31
Sound profiles . . . . . . . . . . . . . . . . . . . . . . . . . . . . . . . . . . . . . . . . . . . . . . . . . . . . . . . . . . . . . . 32
Spot LED . . . . . . . . . . . . . . . . . . . . . . . . . . . . . . . . . . . . . . . . . . . . . . . . . . . . . . . . . . . . . . . . . . . 32
Calendar . . . . . . . . . . . . . . . . . . . . . . . . . . . . . . . . . . . . . . . . . . . . . . . . . . . . . . . . . . . . . . . . . . . 33
Alarm clock . . . . . . . . . . . . . . . . . . . . . . . . . . . . . . . . . . . . . . . . . . . . . . . . . . . . . . . . . . . . . . . . . 34
Baby monitor . . . . . . . . . . . . . . . . . . . . . . . . . . . . . . . . . . . . . . . . . . . . . . . . . . . . . . . . . . . . . . . 35
Display icons . . . . . . . . . . . . . . . . . . . . . . . . . . . . . . . . . . . . . . . . . . . . . . . . . . . . . . . . . . . . . . . 37
Menu tree . . . . . . . . . . . . . . . . . . . . . . . . . . . . . . . . . . . . . . . . . . . . . . . . . . . . . . . . . . . . . . . . . 39
bintec elmeg support . . . . . . . . . . . . . . . . . . . . . . . . . . . . . . . . . . . . . . . . . . . . . . . . . . . . . . . 40
Appendix . . . . . . . . . . . . . . . . . . . . . . . . . . . . . . . . . . . . . . . . . . . . . . . . . . . . . . . . . . . . . . . . . . 42
Index . . . . . . . . . . . . . . . . . . . . . . . . . . . . . . . . . . . . . . . . . . . . . . . . . . . . . . . . . . . . . . . . . . . . . . 45

elmeg D150R / en / elmeg 150_v1 / security.fm / 02.12.2014
Version 2, 27.05.2010
5elmeg D150R
bintec elmeg Safety precautions
Safety precautions
Warning
Be sure to read this user guide and the safety precautions before using your telephone.
Use only the power adapter indicated on the device.
Use only rechargeable batteries that correspond to the specification (see "Specifications").
Never use a conventional (non-rechargeable) battery or other battery types as this could
result in significant health risks and personal injury. Rechargeable batteries, which are notice-
ably damaged, must be replaced.
Using your telephone may affect nearby medical equipment. Be aware of the technical con-
ditions in your
particular environment, e.g. doctor's surgery.
If you use a medical device (e.g. a pacemaker), please contact the device manufacturer. They
will be able to advise you regarding the susceptibility of the device to external sources of high
frequency energy (for the specifications of your elmeg product seeTechnical data.
Do not hold the rear of the handset to your ear when it is ringing or when speaker mode is
activated. Otherwise you risk serious and permanent damage to your hearing.
Your handset is compatible with the majority of digital hearing aids on the market. However,
perfect function with all hearing aids cannot be guaranteed.
The phone may cause interference in analogue hearing aids (humming or whistling) or cause
them to overload. If you require assistance, please contact the hearing aid supplier.
The base and charger are not splashproof. For this reason do not install them in a damp envi-
ronment such as bathrooms or shower rooms.
Do not use the devices in environments with a potential explosion hazard (e.g. paint shops).
If you give your phone to a third party, make sure you also give them the user guide.
Remove faulty devices from use or have them repaired by our Service team, as these could
interfere with other wireless services.
Do not use the device if the display is cracked or broken. Broken glass or plastic can cause
injury to hands and face. Send the device to our Service department to be repaired.
To prevent loss of hearing, avoid listening at high volume over long periods of time.
Please note
Emergency numbers cannot be dialled if the keypad/display lock is activated!

elmeg D150R / en / elmeg 150_v1 / starting.fm / 02.12.2014
Version 2, 27.05.2010
6elmeg D150R
bintec elmegGetting started
Getting started
Checking the contents of the package
uOne handset,
uOne charging cradle incl. power adapter,
uOne battery cover (rear cover for the handset),
uOne locking disc for the battery cover,
uTwo batteries,
uOne belt clip,
uOne rubber cover for the headset socket.
Installing the charging cradle
The charging cradle is designed for use in closed, dry rooms in a temperature range of
+5°C to +45°C.
¤Set up the charging cradle on a flat, non-slip surface.
The phone's feet do not usually leave any marks on surfaces. However, due to the multitude of
different varnishes and polishes used on today's furnishings, marks on the surfaces cannot be
completely ruled out.
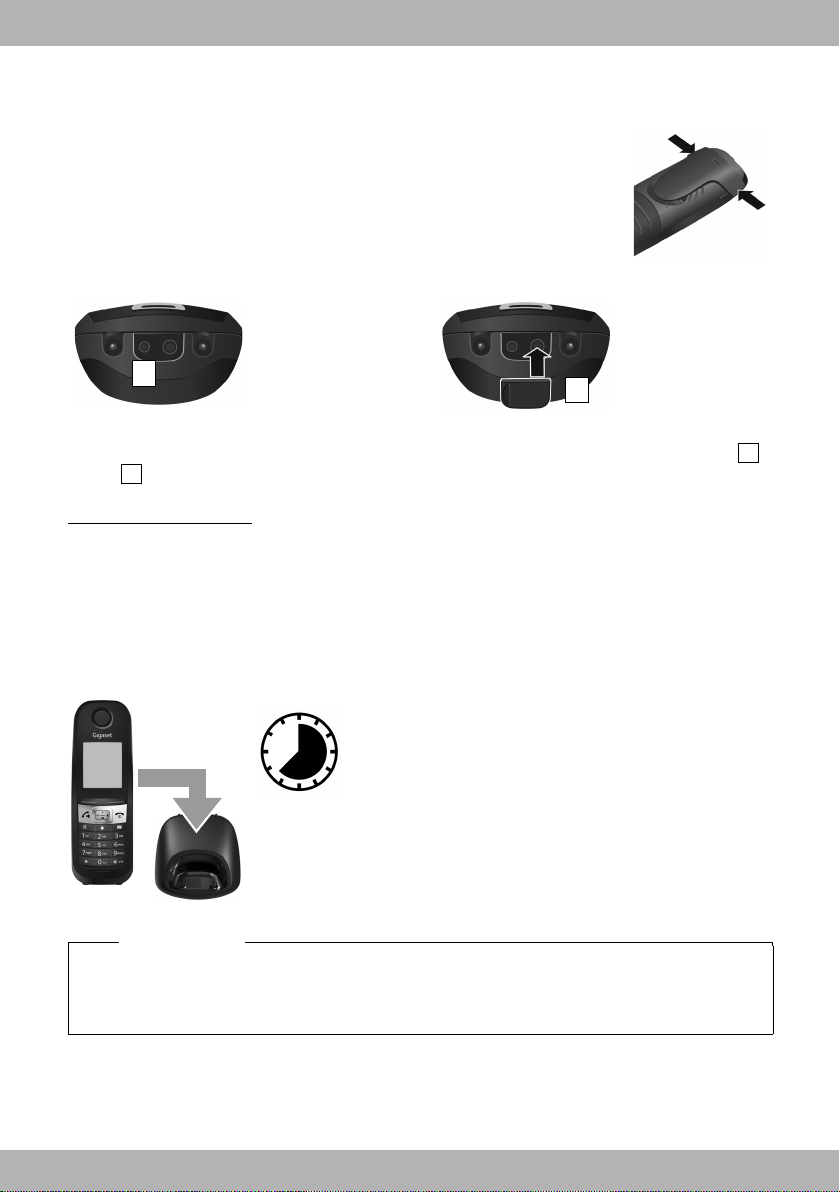
Connecting the charging cradle
Notes
uNever expose the telephone to the effects of heat sources, direct sunlight or other
electrical devices.
uProtect your phone from moisture, dust, corrosive liquids and fumes.
uPay attention to the range of the base. This is up to 50 m inside buildings and up to 300 m
in unobstructed outdoor areas. The range is reduced when Maximum Range is deacti-
vated.
¤Connect the flat plug to the charging cradle .
¤Plug the power adapter into the power socket .
If you have to remove the plug from the charging cradle
again:
¤Disconnect the power adapter from the mains power
supply.
¤Press the release button and disconnect the plug
.
1
2
3
4
2
1
3
4

elmeg D150R / en / elmeg 150_v1 / starting.fm / 02.12.2014
Version 2, 27.05.2010
7elmeg D150R
bintec elmeg Getting started
Setting up the handset for use
The display is protected by a plastic film. Please remove the protective film!
Inserting the batteries and closing the battery cover
Caution
Use only rechargeable batteries recommended by bintec elmeg GmbH (£page 43) , as this
could otherwise result in significant health risks and personal injury. For example, the outer
casing of the batteries could be destroyed or the batteries could explode. The phone could
also malfunction or be damaged as a result of using batteries that are not of the recom-
mended type.
¤Insert the batteries with the polarity in the right direction
(for correct +/- direction, see diagram).
¤Hold the battery cover at a slight angle and insert the
bottom into the casing first .
¤Then press the cover until it clicks into place.
¤Insert the locking disc as shown (at an angle of approx.
20°) . Pay attention to the arrow markings.
1
2
3
1
2
To open the battery cover, for example to change the bat-
teries:
¤Turn the locking disc anti-clockwise to the end stop
(approx. 20°) and remove .
¤Place your fingernail in the notch on the side between the
cover and the casing and remove the cover .
6
7
8
9
8
3
5
4
¤Turn locking disc clockwise to the end stop . The lock-
ing disc is closed once the markings on the disc are
aligned with those on the cover .
4
5
9
6
7
elmeg D150R / en / elmeg 150_v1 / starting.fm / 02.12.2014
Version 2, 27.05.2010
8elmeg D150R
bintec elmegGetting started
Belt clip
The handset has notches on each side to attach the belt clip.
uTo attach — press the belt clip onto the back of the handset so that the
tabs on the belt clip click into place in the notches.
uTo remove — press the centre of the belt clip firmly with your right
thumb, push the fingernail of your left thumb up between the clip and
the casing and pull the clip in an upward direction.
Connecting the headset
Charging the batteries
The batteries are supplied partially charged. Please charge completely before use. (The batter-
ies are fully charged when the power icon Ÿdisappears from the display.)
¤Charge the handset in the charging cradle for 7.5 hours.
Notes
uThe handset may only be placed in the designated base/charging cradle.
uThe battery may heat up during charging. This is not dangerous.
uAfter a time, the charge capacity of the battery will decrease for technical reasons.
You can connect a headset to the underside
of your telephone with the 2.5 mm jack con-
nector . For information on recommended
headsets, see the relevant product page at
www.bintec-elmeg.com.
1
If you do not wish to connect a headset,
please insert the rubber cover supplied
to guarantee the unit is still splash proof.
2
1
2
7.5 h

elmeg D150R / en / elmeg 150_v1 / starting.fm / 02.12.2014
Version 2, 27.05.2010
9elmeg D150R
bintec elmeg Getting started
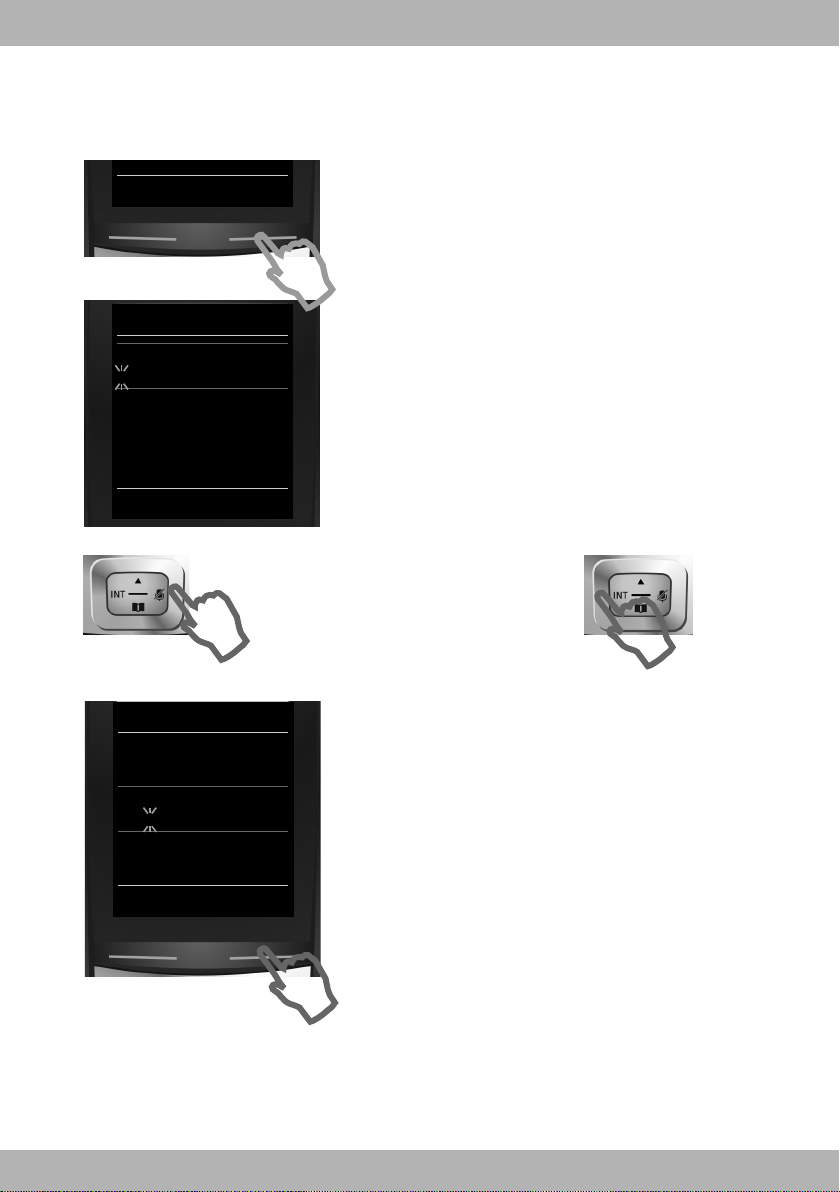
Changing the display language
You can also change the display language via the menu:
v
¤
Ï
¤OK ¤
q
Language ¤OK ¤
q
Select language ¤Select
or, if you do not understand the language currently set, go to:
¤Press and hold the End call key
a
to return to idle status.
¤Press right on the control key.
¤Press keys
L
and
5
slowly one after the other.
The language selection display appears.
The current language (e.g. English) is selected.
¤Press the down control key
s
...
... until the language you wish to use is displayed e.g.
French.
¤Press the right key, directly under the display, to
select the language.
Deutsch
±
English
Ø
Francais
±
±
Deutsch
±
English
Ø
Francais
±
±
Deutsch
±
English
Ø
Francais
±
Italiano
±
Espanol
±
x
Back Select
Deutsch
±
English
Ø
Francais
±
±
Deutsch
±
English
±
Francais
Ø
±
L5
Example
Example
Example

elmeg D150R / en / elmeg 150_v1 / starting.fm / 02.12.2014
Version 2, 27.05.2010
10 elmeg D150R
bintec elmegGetting started
Registering the handset
The registration process depends on the base. You must initiate
registration on the handset and on the base. Both must be car-
ried out within 60 secs.
¤On the base: Press and hold (min. 3 secs) the Registration/
paging key.
¤On the handset, press the display key Register.
Or:
v
¤Ï¤OK ¤
q
Registration ¤OK ¤Register Hand-
set ¤OK
Display shows: Searching for a base in registration mode. The
connection to the base will be established; this may take some
time.
¤Enter the system PIN if required (factory setting: 0000). ¤OK
When registering, the display screen shows: Handset is registering
After registering successfully, the display screen shows: Handset registered
Your handset can be registered on up to four bases. To see how to use your handset with
multiple bases and de-register a handset, refer to the user guide for the base.
Registration
Ð
Please register
handset
Register
elmeg D150R / en / elmeg 150_v1 / starting.fm / 02.12.2014
Version 2, 27.05.2010
11elmeg D150R
bintec elmeg Getting started
Setting the date and time
Set the date/time so that the correct date and time can be assigned to incoming calls, and so
that you can use the alarm.
¤Press the key Time below the display screen to open
the input field.
(If you have already set the date/time, open the
input field via the menu:
v
¤Ï¤OK ¤Date/Time ¤OK)
The submenu Date/Time is shown on the display.
¤The active input position flashes.
Enter the day, month and year as an 8-digit number
via the keypad,
e.g.
4Q2Q3
for 14.10.2013.
Press the right or left control key to
change the input position, e.g. to cor-
rect an entry.
¤Press the down control key to switch to the time
input field.
¤Enter the hours and minutes in 4-digit format via
the keypad e.g.,
QM5
for 07:15 am.
Change the input position with the control key if
necessary.
¤Press the key Save below the display screen to save
the entry.
Date/Time
Date:
15.01.2013
Time:
00:00
Back Save
Calls Time
Date/Time
Date:
14.10.2013
Time:
07:15
Back Save

elmeg D150R / en / elmeg 150_v1 / starting.fm / 02.12.2014
Version 2, 27.05.2010
12 elmeg D150R
bintec elmegGetting started
Display shows: Saved. You will hear a confirmation
tone.
Date/Time
‰
Saved
i
V
07:15
INT 1 14 Oct
Calls Spot LED
You will automatically return to idle status.
Your phone is now ready for use.

elmeg D150R / en / elmeg 150_v1 / starting.fm / 02.12.2014
Version 2, 27.05.2010
13elmeg D150R
bintec elmeg Getting started
What would you like to do next?
After successfully setting up the phone, you can make calls straight away, customise your phone
according to your requirements or firstly familiarise yourself with the operation.
If you have any questions about using your phone, please read the tips on troubleshooting
(£page 40)or contact our Customer Service team (£page 40).
Setting ringtones
Assign specific tunes to internal and external calls, reminders (£page 24), wake-up calls
(£page 34)and to certain callers (£page 29).
Protecting yourself against unwanted calls
Set your phone up so that it doesn't ring if there is an anonymous call or use the time control
(£page 25).
Adjusting your phone to your surroundings
Use 3 sound profiles to adjust your phone to a quiet or loud background (£page 32).
Register an existing elmeg handset and add it to the phonebook
Use available handsets to continue calling from your new base. Transfer directory entries from
these handsets to your new handset (£page 30).
Configuring ECO DECT settings
Reduce the transmission power (emissions) of your phone (£page 27).

elmeg D150R / en / elmeg 150_v1 / starting.fm / 02.12.2014
Version 2, 27.05.2010
14 elmeg D150R
bintec elmegUnderstanding the operating steps in the user guide
Understanding the operating steps in the user guide
The keys on your elmeg handset are set out in these operating instructions as follows:
c
/
v
/
a
Answer call key / Menu key / End call key
Q
to
O
Number / Letter keys
*
/
#
Star key / Hash key
f
/
S
/
C
Message key / Recall key / Profile key
Overview of display icons (£page 37).
Example: Activating/deactivating Auto Answer
Illustration in the user guide:
v
¤Ï¤OK ¤
q
Telephony ¤OK ¤Auto Answer ¤Change (
³
= activated)
Follow this procedure:
¤
v
: With the handset in idle status, press the right control key to open the main menu.
¤Ï: Navigate to the Ïicon using the control key
p
.
¤OK: Press the display key OK or the middle of the control key
w
to open the submenu
Settings.
¤
q
Telephony: Scroll to the entry Telephony with the control key
q
.
¤OK: Press the display key OK or the middle of the control key
w
to open the submenu
Telephony.
¤Auto Answer: The activate/deactivate auto answer function is selected.
¤Change (
³
= activated): Press the display key Change or the middle of the control key
w
to alternate between activating or deactivating (
³
= activated,
´
= deactivated).
elmeg D150R / en / elmeg 150_v1 / operating.fm / 02.12.2014
Version 2, 27.05.2010
15elmeg D150R
bintec elmeg Getting to know your phone
Getting to know your phone
Switching the handset on/off
¤Press and hold the End call key
a
in idle status to switch the handset on or off.
Locking/unlocking the keypad
The keypad lock prevents any accidental use of the phone. If you press a key when the keypad
is locked, a message is displayed.
¤Press and hold the
#
key to lock or unlock the keypad.
If a call is signalled on the handset, the keypad automatically unlocks. and you can accept the
call. It then locks again when the call is finished.
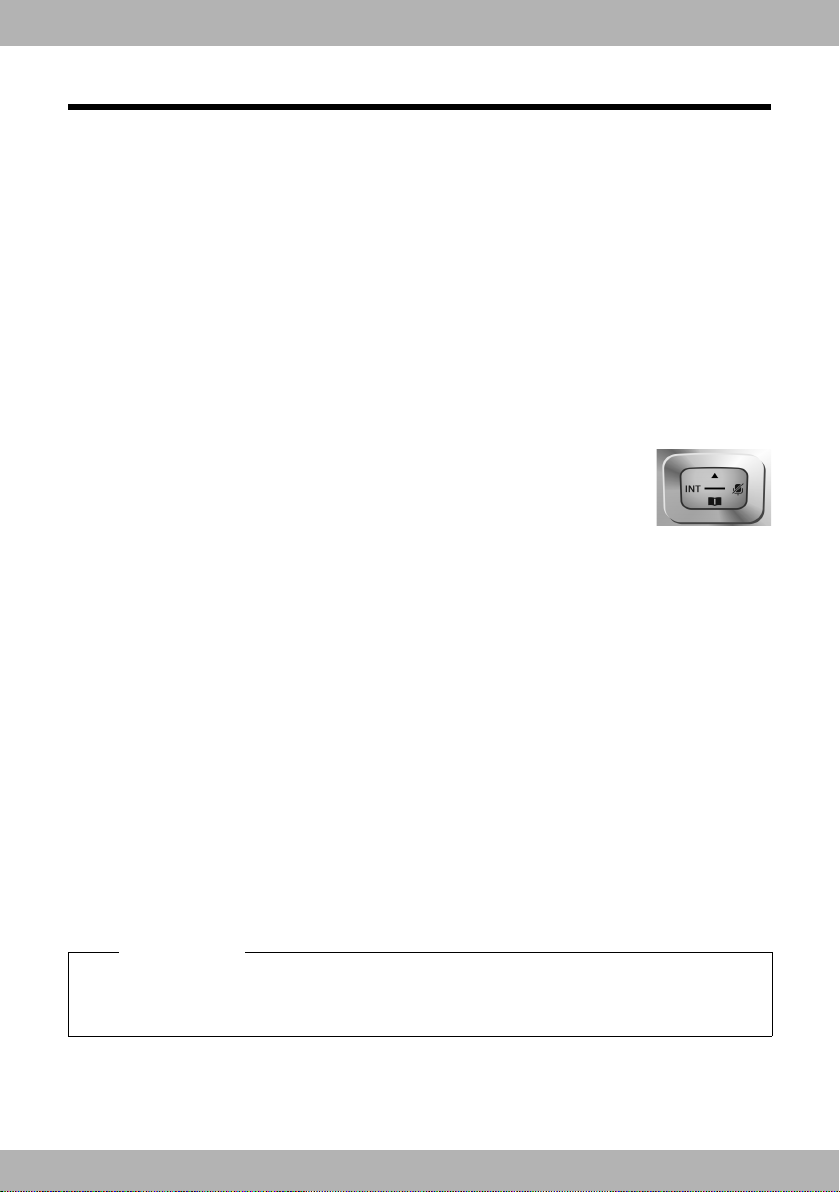
Control key
In the description below, the side of the control key (up, down, right, left, mid-
dle) that you have to press in the different operating situations is marked in
black, e.g.
v
for "press right on the control key".
The control key allows you to navigate within menus and entry fields. In idle
status or during an external call, it has the following functions:
When the handset is in idle status
s
Open the phonebook.
v
or
w
Open the main menu.
u
Open list of handsets.
During an external call
s
Open the phonebook.
u
Initiate an internal consultation call.
t
Adjust the loudspeaker volume for earpiece and handsfree mode.
Functions when pressing the centre of the control key
The key has different functions, depending on the operating situation.
uIn idle status, it opens the main menu.
uIn submenus, selection and entry fields, the key takes on the function of the display keys
OK, Yes, Save, Select or Change.
Note
These instructions demonstrate opening the main menu by pressing the right of the control
key and confirming the functions by pressing the appropriate display key. However, if you
prefer, you can also press the middle of the control key.

elmeg D150R / en / elmeg 150_v1 / operating.fm / 02.12.2014
Version 2, 27.05.2010
16 elmeg D150R
bintec elmegGetting to know your phone
Side keys
ø
/
÷
Press these keys on the right-hand side of the handset to set the volume for the ear-
piece, ringtone, handsfree mode, alarm clock, appointments and the headset
depending on the situation.
Display keys
The display keys have a function preset by default in idle status, but the keys can be re-assigned
(£page 26).
The functions of the display keys change depending on the operating situation.
Example
Some of the important display keys are:
Options Open a menu for further functions.
OK Confirm selection.
Back Skip back one menu level or cancel operation.
Save Save entry.
Overview of icons on the display keys (page 38).
Menu guidance
The functions of your telephone are displayed on a menu that consists of several levels. Menu
overview £page 39.
Main menu (first menu level)
¤When the handset is in idle status, press right on the control key
v
to open the main menu.
The main menu functions are shown in the display as icons. The
icon for the selected function is highlighted and the name of the
associated function appears in the display header.
Accessing a function, i.e. opening the corresponding submenu
(next menu level):
¤Use the control key
p
to navigate to the required function
and press the display key OK.
Returning to idle status: Briefly press the display key Back or End
call key
a
.
Back Save
Current display key functions
Display keys
Settings
Ë Ê
Ì Ç
ÉÏ
Back OK
Example

elmeg D150R / en / elmeg 150_v1 / operating.fm / 02.12.2014
Version 2, 27.05.2010
17elmeg D150R
bintec elmeg Getting to know your phone
Submenus
The functions in the submenus are displayed as lists.
To access a function:
¤Scroll to the function using the control key
q
and press OK.
Returning to the previous menu level: Briefly press the display key
Back or End call key
a
.
Returning to idle status
From any menu:
¤Press and hold the End call key
a
.
Or:
¤If you do not press a key, the display automatically returns to
idle status after 2 minutes.
Message lists
Any messages you receive are saved in the message lists.
An advisory tone sounds as soon as a new entry appears on a list.
The Message key also flashes. Icons for message types and the
number of new messages are shown on the idle display.
New messages available:
uÃOn the answer machine (depending on the base)/network
mailbox
u
™
In the missed calls list
u
î
In the SMS list (depending on the base)
uIn the missed alarms list
Open the message list by pressing the Message key
f
. You can
access the following message lists:
uAnswer Mach.: Answer machine list (depending on the base)
uMailbox: Network mailbox (if your network provider supports this function and the number
of the network mailbox has been stored.)
uSMS: Incoming message list
uMissed Calls: Missed call list (see "Call list" £page 31)
uMissed Alarms: Missed appointments list
The icon for the network mailbox is always displayed, provided the number is stored in the
telephone. The other lists are only displayed if they contain messages.
Opening the list:
q
Select required list. ¤OK
Exception: If you select the network mailbox, the number of the network mailbox will be
selected. Lists are not opened on the display.
Settings
Date/Time
Audio Settings
Display
Language
Registration
x
Back OK
Example
i
V
07:15
INT 1 14 Oct
Ã
™ Ë
02 10 09 08
Calls Spot LED
Example

elmeg D150R / en / elmeg 150_v1 / operating.fm / 02.12.2014
Version 2, 27.05.2010
18 elmeg D150R
bintec elmegGetting to know your phone
Entering numbers and text
If several number and/or text fields are displayed (e.g.
First Name and Surname in a phonebook entry), the field is
automatically activated. The following fields must be activated
by navigating with the control key
q
. A field is activated when
a cursor is blinking inside it.
Correcting incorrect entries
uDeleting characters before the cursor: press the display key
Ñ
briefly.
uDeleting words before the cursor: press and hold the display
key
Ñ
.
Entering text
uLetters/Characters: Multiple letters and characters are assigned to each key between
Q
and
O
. The characters are shown according to the key in a selection line at the bottom left
of the display. The selected character is highlighted. Briefly press the key several times in
succession to select the required letter/character.
uPlacing the cursor: Letters/characters are inserted at the cursor position. You can insert the
cursor by pressing the control key
r
, or
q
in fields with multiple characters.
uTyping lower case, upper case and numbers: Press the hash key
#
to switch between
lower case, upper case or numbers for the following letters.
When editing a phonebook entry, the first letter and each letter following a space is
automatically in upper case.
uSpecial characters: Press the star key
*
to open the special characters table. Navigate to
the character desired using the star key and press the display key Insert to select it.
uSpecial letters: Umlauts or other marked/diacritic characters can be selected by pressing the
corresponding letter several times. See the character table £page 44.
New Entry
First Name:
I
Surname:
Phone (Home):
Abc
x
ÛSave

elmeg D150R / en / elmeg 150_v1 / telefony.fm / 02.12.2014
Version 2, 27.05.2010
19elmeg D150R
bintec elmeg Making calls
Making calls
Making an external call
¤Enter number, briefly press the Answer call key
c
.
Or:
¤Press and hold the Answer call key
c
, enter number.
You can cancel the dialling process with the End call key
a
.
Dialling with the redial list
The redial list contains the 20 numbers last dialled with the handset. You can manage this
similarly to your phone's message lists (£page 17).
¤Press the Answer call key
c
briefly to open the redial list.
¤
q
Select entry. ¤Press the Answer call key
c
. The number is dialled.
When a name and corresponding phone number are displayed: Press the display key View.
Managing entries in the redial list:
¤Open redial list. ¤
q
Select entry. ¤Options
You can select the following functions:
uCopy to Directory ¤OK
Copy an entry to the phonebook (£page 29).
uDisplay number ¤OK
Copy a number into the display and edit it or add to it, then select with
c
or save as a new
entry in the phonebook with
Ó
.
uDelete entry ¤OK
Delete the selected entry.
uDelete all ¤OK
Delete all entries.
Dialling from the call list
v
¤Ê¤OK ¤
q
Select list. ¤OK
¤
q
Select entry. ¤
c
¤The number is dialled.
Notes
uYou can also bring up the call list using the display key
Calls, but you must assign a display key accordingly
(£page 26).
uYou can also open the list Missed calls using the Message
key
f
.
Example
All calls
™äJames Foster
Today, 18:30
™01712233445566
11/06/2013, 18:30
š0168123477945
10/06/2013, 17:13
View Options

elmeg D150R / en / elmeg 150_v1 / telefony.fm / 02.12.2014
Version 2, 27.05.2010
20 elmeg D150R
bintec elmegMaking calls
Dialling with the phonebook
s
¤
q
Select entry. ¤
c
¤If multiple numbers are entered: Select the number with
r
and press the Answer call
key
c
or OK.
¤The number is dialled.
One touch call
You can set up your phone so that you can dial a specific number when you press any key on
the keyboard. This allows children, who are unable to enter a number, to call a certain number,
for example.
v
¤É¤OK ¤
q
One Touch Call ¤OK
¤Activation:
r
On / Off
¤Call to: Enter or change the number that you wish to dial.
¤Save
The activated One Touch Call appears on the idle display. The saved number is dialled by press-
ing any key. Press the End call key
a
to cancel dialling.
Ending one touch call mode:
¤Press the display key OFF.¤Press and hold the
#
key.
Or:
¤Press and hold the
#
key.
Accepting a call
You have the following options:
¤Press
c
.
¤If Auto Answer is switched on (£page 23), remove the handset from the charging cradle.
Activate/deactivate Simple Auto Answer
In addition to using the Answer call key
c
, you can also answer a call using the keys
Q
...
O
,
*
and
#
.
v
¤Ï¤OK ¤
q
Telephony ¤OK ¤
q
Easy Acceptance ¤Change (³= activated)
Please note: Changes are only saved permanently in Profile Personal (£page 32).
Handsfree mode
If you are going to let someone listen in, you should tell the other party that this is happening.
¤Press
c
.
Placing the handset in the charging cradle during a call:
¤Press and hold
c
for a further 2 seconds while placing the handset in the charging cradle.
Table of contents
Other BinTec IP Phone manuals


