manuals.online logo
Brands
  1. Home
  2. •
  3. Brands
  4. •
  5. Biohort
  6. •
  7. Garden House
  8. •
  9. Biohort Ground screw foundation User manual

Biohort Ground screw foundation User manual

1
Aufbauanleitung „Erdschrauben-Fundament“
Assembly manual “Ground screw foundation“
Instruction de montage “Fondation à visser“
Opbouwbeschrijving “Grondschroef-fundament“
Istruzioni per il montaggio “Fondazione con viti di ancoraggio a terra“
Instrucciones de montaje “Cimientos atornillados“
GB
FR
NL
DE
IT
ES
BIOHORT GmbH
www.biohort.com
Find din oversættelse ...
Hitta din översättning ...
Finn din oversettelse ...
Találja meg fordítását ...
Najděte svůj překlad ...
www.biohort.com/downloads
Poiščite vaš prevod na ...
2
Wichtige Punkte für den Aufbau!
Vorliegende Aufbauanleitung zeigt den Zusammenbau des „Erdschrauben-Fundaments“ für ein „HighLine®“ H3. Den Plan für
Ihre Fundamentgröße finden Sie ab Seite 5. Für einige Montageschritte benötigen Sie einen Helfer.
GB
FR
NL
IT
ES
Important details regarding assembly! This assembly manual shows the installation of the “Ground screw foundation“ for “HighLine®“ size
H3. You find the plan for your foundation size from page 5. For several assembly steps additional assistance of one person will be required.
Points importants lors du montage! “ Cette notice de montage décrit l´assemblage de „la fondation à visser pour un „HighLine®“ H3.
Vous trouverez le plan pour les dimensions de votre fondation à partir de la page 5. Pour certaines étapes, demandez l´aide d´une personne.
Belangrijke punten voor de montage! Deze montage instructies hebben betrekking op de opbouw van het grondschroef-fundament voor een
„Highline
®
“ H3. De plattegrond voor uw fundamentgrootte vindt u op pag. 5. Voor enkele montagestappen heeft u 1 persoon nodig om u te helpen.
Notas importantes para el montaje: en estas instrucciones se muestra el montaje de los cimientos atornillados de la caseta „HighLine®“ H3.
A partir de la página 5 encontrará el plano correspondiente al tamaño de sus cimientos. Es recomendable realizar algunos pasos del montaje
con la ayuda de otra persona.
Indicazioni importanti per il montaggio! Le seguenti istruzioni di montaggio mostrano l‘assemblaggio della fondazione con viti di ancoraggio a
terra per un „HighLine®“ dalla misura H3. A partire dalla pagina 5 trovate il prospetto per le misure della vostra fondazione. Per alcune fasi del
montaggio sarà necessario essere aiutati.
Wasserwaagen - Symbol:
Betreffendes Einbauteil mit der Wasserwaage ausrichten.
Checkliste für das Erdschrauben-Fundament:
Beschaffenheit des Untergrundes (Tiefe: 50 cm): alle tragenden Bodenarten sind geeignet. Achten Sie darauf, dass
keine Rohre, Leitungen, Wurzelwerk und Betonsockel im Bohrbereich sind. Evtl. Probebohrungen durchführen!
Für die Montage werden ca. 50 cm Platz rund um das Fundament benötigt.
Symbol of spirit level: Align the respective parts by using the spirit level.
Symbole niveau à bulle: Lorsque ce symbole apparaît, vous devez ajuster l´élément à l´aide d´un niveau
à bulle.
Waterpas – symbool: Bij montagestappen waar dit symbool bijstaat is het noodzakelijk het betreffende
onderdeel waterpas in te bouwen.
Símbolo del nivel de agua: indica que la pieza correspondiente debe nivelarse con el nivel de agua.
Simbolo della livella a bolla: Allineare la parte interessata avvalendosi di una livella a bolla.
Checklist for the ground screw foundation: Condition of the underground (depth: 50 cm): all supporting ground types are appropriate.
Make sure there are no pipes, cables, rooting system and concrete base in the area you drill! Perhaps conduct a test drill.
For the assembly you need about 50 cm space around the foundation.
Liste de contrôle pour la fondation à visser: Nature du sol (profondeur 50 cm) : tous les sols porteurs sont appropriés. Assurez-vous
qu‘aucun tuyau, cable, racine ou socle en béton ne soient présents lors du forage. Testez le forage au préalable! Le montage nécessite
50 cm d‘espace autour de la fondation.
Checklijst voor het grondschroef-fundament: Aard van de ondergrond (diepte 50 cm) : alle dragende bodemsoorten zijn geschikt. Let
erop dat geen buizen, leidingen, wortels en/of beton-delen in de weg zitten. Eventueel proefboringen uitvoeren!
Voor de montage dient rondom het fundament 50 cm vrij te zijn.
Lista de verificación de los cimientos atornillados: Calidad del subsuelo (profundidad: 50 cm): todos los tipos de suelo portantes son
aptos. Compruebe que no haya tuberías, cables, raíces ni zócalos de hormigón en la zona de perforación. Si es necesario, practique per-
foraciones de prueba. Para el montaje hace falta un espacio de aproximadamente 50 cm alrededor de los cimientos.
Lista di controllo per la fondazione con viti di ancoraggio a terra: Natura della superficie (profondità 50 cm): sono adatti tutti i tipi
di suolo fruttifero.Fare attenzione che non vi siano tubi, fili, radici e basi in cemento nella foratura. Effettuare una prova di perforazi-
one. Per il montaggio sono necessari circa 50 cm di spazio intorno alla fondazione.
GB
FR
NL
IT
ES
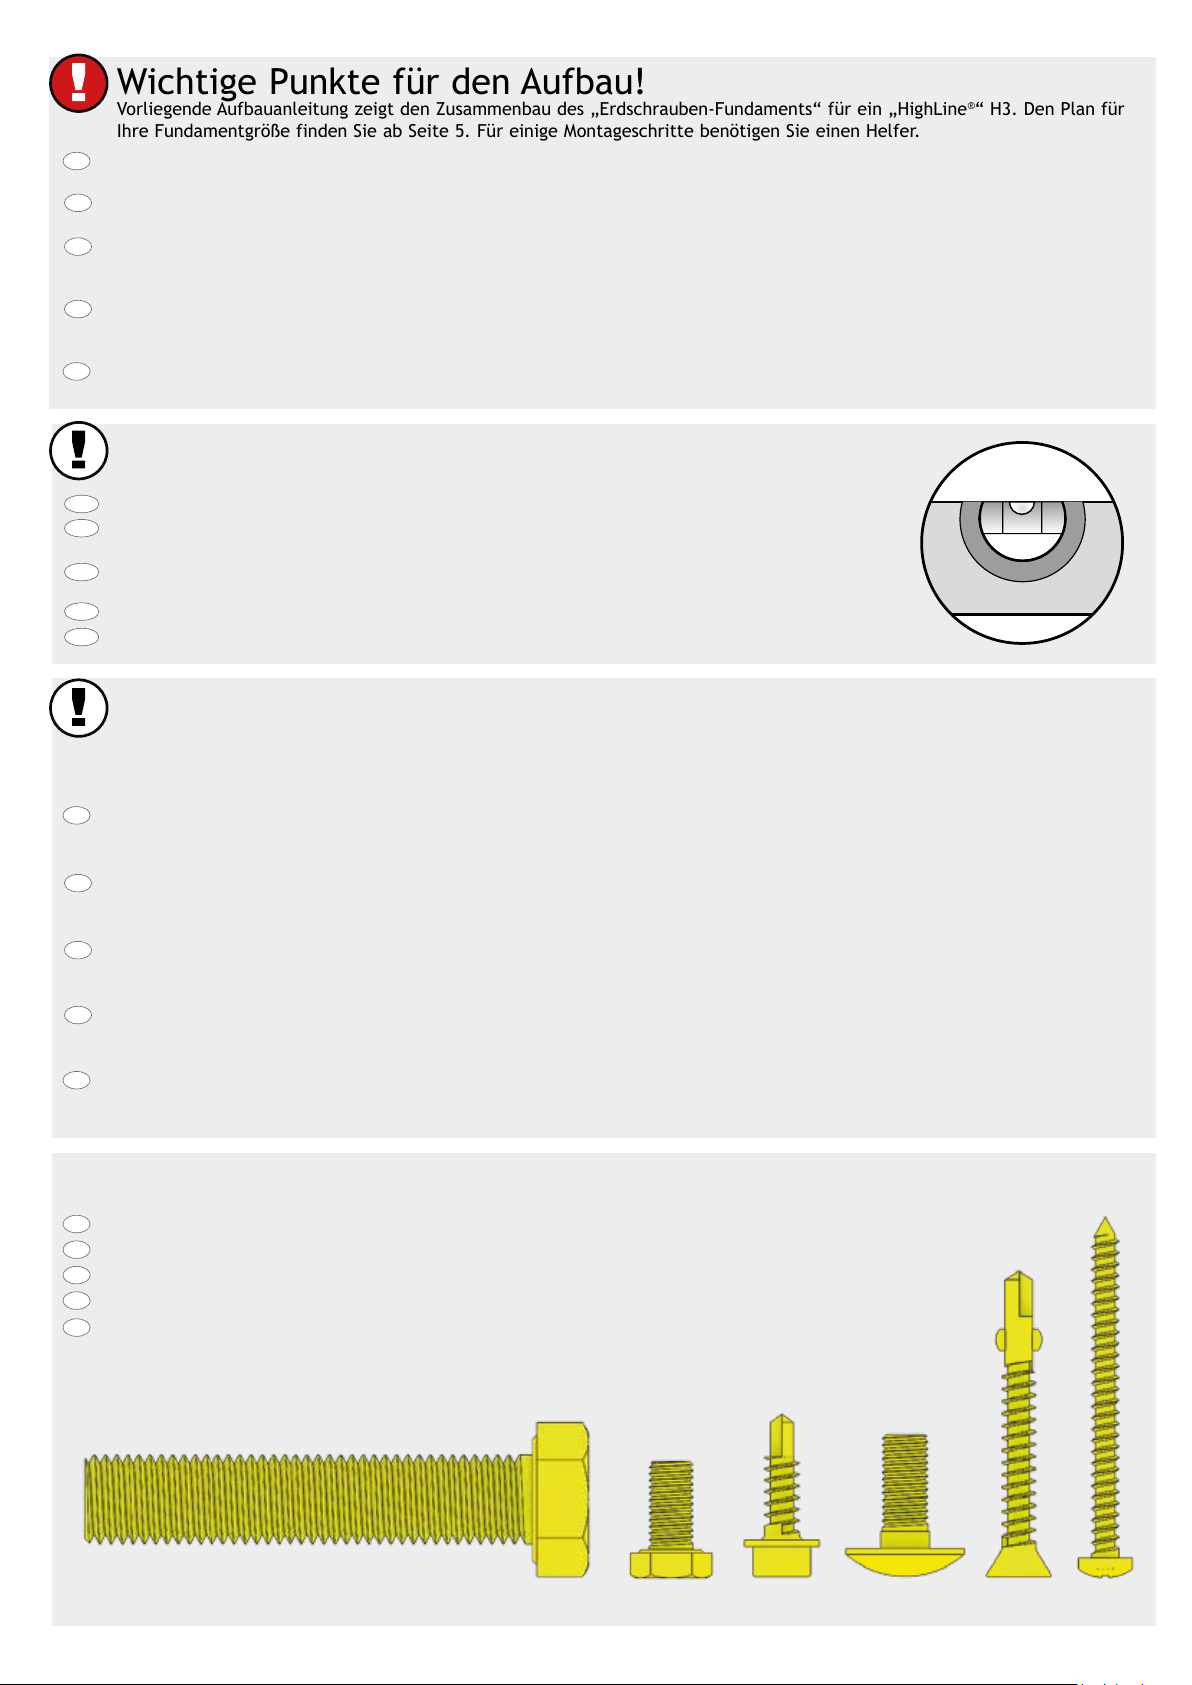
Maßstabsgetreue Abbildungen der zu verwendenden Schrauben:
M 1:1
Scale drawing 1:1 of the screws in use.
Reproduction selon l´échelle 1:1 des vis.
Afbeelding : schaal 1:1 (ware grootte).
Reproducción a escala 1:1 de los tornillos que hay que utilizar para el montaje.
Riproduzione in scala 1:1 delle viti da utilizzare.
GB
FR
NL
IT
ES
M16 x 80
GB
FR
NL
IT
ES
M8 x 20M8 x 16 6,3 x 22 5,5 x 50 4,8 x 60
3
Verwenden Sie bei der Montage Arbeitshandschuhe!
Wear working gloves!
Portez des gants de travail!
Handschoenen gebruiken!
GB
FR
NL
Utilice guantes de trabajo para el montaje!
Utilizzare durante il montaggio guanti da lavoro!
ES
IT
Folgendes Werkzeug wird benötigt:
Volgend gereedschap heeft u nodig: Necesitará las herramientas siguientes:
Following tools are needed:
Attrezzi necessari:
Outils supplémentaires requis :
• Schaufel
• Steinbohrer mit 40 mm
Durchmesser und min.
450 mm Arbeitslänge
• Akkuschrauber
• Schlagbohrmaschine SDS-Max
• Wasserwaage
• Gabelschlüssel SW 24 und 13
• Schop
• Steenboor Ø 40 mm
Minstens 450 mm
spiraallengte
• Accuboormachine
• Slagboormachine SDS-Max
• Waterpas
• Steeksleutel SW 24 en 13
• Shovel
• Rock drill with 40 mm diameter and at
least 450 mm working length
• Cordless screwdriver
• Hammer drill SDS-Max
• Spirit level
• Open end spanner SW 24 and 13
• Pala
• Barrena para piedra con un
diámetro de 40 mm y una longitud de trabajo
mínima de 450 mm
• Atornillador con batería
• Taladro con percutor SDS-Max
• Nivel de agua
• Llaves de boca SW 24 y 13
• Pelle
• Perceuse à percussion avec un
foret de 40 mm de diamètre et
min 450 mm de longueur de travail
• Visseuse sans fil
• Perceuse à percussion SDS-Max
• Niveau à bulle
• Clé de 24 et 13
• Pala
• Punta trapano con diametro di
40 mm e una lunghezza minima
di 450 mm
• Avvitatore elettrico
• Trapano a percussione sds-max
• Vivella a bolla
• Chiave fissa SW 24 e 13
Paket - „Europa“ 1 / Geräteschrank 90, 150
Profil- und Erdschraubenpaket · Profile and ground screw package · carton de profils et vis de fondation ·
profiel- en grondschroefpakket · paquete de perfiles y tornillos · Pacco con profili e viti di ancoraggio a terra
L
F J
E
K
D1
U
A CB D
M16x80
G
GBDE FR
NL ITES
„Europa“ 1 / “Equipment locker“ 90, 150; „Europa“ 1 / „Armoire à outils“ 90 & 150
M
4
Paket Nr. 2
Profilpaket · profile package · carton de profils · profielpakket · pacco profili · kit de perfiles
Paket
Plattenpaket · panel package · carton de plaques · platenpakket · paquete de tornillos ·
pacco lamiere
Paket Nr. 1
Erdschraubenpaket · ground screw package · carton de vis de fondation · grondschroefpakket ·
paquete de láminas · pacco viti di ancoraggio a terra
L
E F J
D1
K
H I
U
A C GB D
M16x80
2
1
M
5
The red marked ground screws on the drilling plans have to be placed in the middle of the (chosen) door area.
L’adaptateur marqué en rouge sur le plan de perçage doit toujours être placé au milieu de la (ou des) porte.
De op het boorplan rood gemarkeerde grondschroef dient altijd in het midden van de deur (of deuren) gezet te worden.
Los tornillos de tierra marcados en rojo en los planos de perforación deben colocarse siempre en el centro de la zona de la puerta que ha elegido.
Le viti di ancoraggio a terra marcate in rosso sui piani di perforazione sono da mettere in posizione centrale della porta.
Paket
Plattenpaket · panel package · carton de plaques · platenpakket · paquete de tornillos ·
pacco lamiere
Die auf den Bohrplänen rot markierten Erdschrauben
sind immer mittig im (gewählten) Türbereich zu setzen!
ACHTUNG: wenn eine Zusatztür verbaut wird, wird auch mittig unter der
Zusatztür eine weitere Erdschraube benötigt!
Attention: if you install an extra door, then you need to centre an additional ground screw below the extra door.
Attention : si vous devez installer une porte supplémentaire, un adaptateur doit aussi être placé au milieu de la porte.
Let op: wanneer u een extra deur in de berging inbouwt, dient u onder deze deur ook een grondschroef te bevestigen.
Atención: si utiliza una puerta suplementaria, es posible que necesite colocar otro tornillo de tierra centrado debajo de esa puerta.
Attenzione: Nel caso di montare una porta supplementare è necessario mettere una vite di ancoraggio a terra anche in posizione centrale di
questa porta supplementare.
GB
GB
FR
FR
NL
NL
ES
ES
IT
IT
1065
2130
690
2700
1200
690
1410
2000
1200
705
Geräteschrank
Equipment locker
Armoire à outils
790
690
1300
1200
Fundament - Bohrpläne
Foundation - drilling plans ·Fondation - plan de perçage · Fundament – boorplan · Cimientos - Planos de perforación
· Fondazione - piani di perforazione
90 150
230
~
~
~
~
~
~
6
1065
2130
690
2700
1200
1410
705
1410
705
2000
2000
Europa
690
1410
2000
1200
705
1
2
2A
~
~
~
~
~
~
7
2130
1065
2130
2700
710
2700
710
2130
1410
705
2000
710 710
2700
3
4
~
~
~
~
8
1410
705
950
2850
2000
3400
950
1065
2130
2850
2700
713
1425
2137
3400
4A
5, 6 5
6
~
~
~
~
9
2850
1425
2850
3400
713
2137
3400
1425
AvantGarde®
1630
1630
815
815
2200
2200
7
M
~
~
~
~
10
815
1630
2430
810 810
2200
3000
2430
810
810 810
810
2430
3000
3000
L
XL
~
~
~ ~
11
2420
810
3230
1215
2430
1615
810
3000
810
3800
XXL
~
~
12
HighLine®
1230
2430
810
615
3000
1800
810
815
1630
2430
810 810
2200
3000
H1
H2
~
~
~
13
2430
2030
1015
810 810
2600
3000
2430
810
810 810
810
2430
3000
3000
H3
H4
~
~
~
~
14
2430
710
2120
2830
1415
810
3000
3400
810
H5
~
~
15
1.
Die Pläne für Ihr Fundament finden Sie auf den Seiten 5-14.
The drawings for your foundation can be found on pages 5-14.
Vous trouverez les plans pour votre fondation sur les pages 5 à 14.
De tekening voor uw fundament vindt u op de volgende pagina´s 5-14.
Encontrará los planos de los cimientos en las páginas 5-14.
Le piante per la vostra fondazione le trovate nelle pagine 5-14.
GB
FR
NL
IT
ES
10 cm min.
4 cm
max.
17 cm
~
16
2.
2.
1.
min.
450 mm
17
Europa
1: 4x
2: 5x
2A: 6x
3: 7x
Europa
4: 7x
4A: 7x
5: 8x
6: 8x
7: 11x
HighLine®
H1: 7x
H2: 7x
H3: 7x
H4: 9x
H5: 11x
AvantGarde®
M: 6x
L: 7x
XL: 9x
XXL: 12x
Geräteschrank
Equipment Locker
Armoire à outils
90: 4x
150: 4x
230: 6x
1x 1x 1x
2.
2.
1.
A
J K L
M16x80
1.
3.
18
Europa
1: 4x
2: 5x
2A: 6x
3: 7x
Europa
4: 7x
4A: 7x
5: 8x
6: 8x
7: 11x
HighLine®
H1: 7x
H2: 7x
H3: 7x
H4: 9x
H5: 11x
AvantGarde®
M: 6x
L: 7x
XL: 9x
XXL: 12x
Geräteschrank
Equipment Locker
Armoire à outils
90: 4x
150: 4x
230: 6x
Europa
1: 8x
2: 10x
2A: 12x
3: 14x
Europa
4: 14x
4A: 14x
5: 16x
6: 16x
7: 22x
HighLine®
H1: 14x
H2: 14x
H3: 14x
H4: 18x
H5: 22x
AvantGarde®
M: 12x
L: 14x
XL: 18x
XXL: 24x
Geräteschrank
Equipment Locker
Armoire à outils
90: 8x
150: 8x
230: 12x
4.
M8 x 16
D1
2.
1.
B
19
Europa
1: 4x
2: 5x
2A: 6x
3: 7x
Europa
4: 7x
4A: 7x
5: 8x
6: 8x
7: 11x
HighLine®
H1: 7x
H2: 7x
H3: 7x
H4: 9x
H5: 11x
AvantGarde®
M: 6x
L: 7x
XL: 9x
XXL: 12x
Geräteschrank
Equipment Locker
Armoire à outils
90: 4x
150: 4x
230: 6x
5.
2.
1.
C
Kontermutter festziehen!
Tighten the locking nut!
Serrer le contre-écrou!
20
Europa
1: 2x (780mm)
2: 4x (1500mm)
2A: 2x (780mm)
3: 2x (1500mm)
Europa
4: 4x (2220mm)
4A: 2x (1500mm)
5: 2x (2220mm)
6: 2x (2220mm)
7: 4x (2940mm)
HighLine®
H1: 2x (1320mm)
H2: 2x (1720mm)
H3: 2x (2120mm)
H4: 4x (2520mm)
H5: 2x (2520mm)
AvantGarde®
M: 4x (1720mm)
L: 2x (1720mm)
XL: 4x (2520mm)
XXL: 2x (2520mm)
Geräteschrank
Equipment Locker
Armoire à outils
90: 2x (780mm)
150: 2x (780mm)
230: 2x (780mm)
Europa
1: 2x (1500mm)
2: 0x
2A: 2x (2220mm)
3: 2x (2220mm)
Europa
4: 0x
4A: 2x (2940mm)
5: 2x (2940mm)
6: 2x (2940mm)
7: 0x
HighLine®
H1: 2x (2520mm)
H2: 2x (2520mm)
H3: 2x (2520mm)
H4: 0x
H5: 2x (2920mm)
AvantGarde®
M: 0x
L: 2x (2520mm)
XL: 0x
XXL: 2x (3220mm)
Geräteschrank
Equipment Locker
Armoire à outils
90: 2x (880mm)
150: 2x (1500mm)
230: 2x (2200mm)
Europa
1: 1x (614mm)
2: 1x (1334mm)
2A: 1x (614mm)
3: 2x (1334mm)
Europa
4: 2x (2054mm)
4A: 2x (1334mm)
5: 3x (2054mm)
6: 3x (2054mm)
7: 3x (2774mm)
HighLine®
H1: 2x (1154mm)
H2: 2x (1554mm)
H3: 2x (1954mm)
H4: 2x (2354mm)
H5: 2x (2754mm)
AvantGarde®
M: 1x (1554mm)
L: 2x (1554mm)
XL: 2x (2354mm)
XXL: 2x (3154mm)
Geräteschrank
Equipment Locker
Armoire à outils
90: 0x
150: 1x (614mm)
230: 1x (614mm)
4x
E
E
E
F
6.
2.
1.
D1
4,8x60

Other Biohort Garden House manuals

Biohort HighLine User manual

Biohort

Biohort HighLine User manual

Biohort NEO 1C User manual

Biohort

Biohort NEO 1C User manual

Biohort Europa User manual

Biohort

Biohort Europa User manual

Biohort FloraBoard User manual

Biohort

Biohort FloraBoard User manual

Biohort GS 90 User manual

Biohort

Biohort GS 90 User manual

Biohort Europa User manual

Biohort

Biohort Europa User manual

Biohort SmartBase PLUS NEO User manual

Biohort

Biohort SmartBase PLUS NEO User manual

Biohort AvantGarde XXL User manual

Biohort

Biohort AvantGarde XXL User manual

Biohort NEO User manual

Biohort

Biohort NEO User manual

Biohort HighLine HS User manual

Biohort

Biohort HighLine HS User manual

Biohort AvantGarde User manual

Biohort

Biohort AvantGarde User manual

Biohort AvantGarde XL User manual

Biohort

Biohort AvantGarde XL User manual

Biohort AvantGarde User manual

Biohort

Biohort AvantGarde User manual

Biohort HighLine User manual

Biohort

Biohort HighLine User manual

Popular Garden House manuals by other brands

total sheds Pent Summer Shed 14x6ft Assembly manual

total sheds

total sheds Pent Summer Shed 14x6ft Assembly manual

Grosfillex ABRI DECO H20A Assembly instructions

Grosfillex

Grosfillex ABRI DECO H20A Assembly instructions

Naterial Kipo Axess Assembly instructions

Naterial

Naterial Kipo Axess Assembly instructions

Holz-Blech AIDA 40 manual

Holz-Blech

Holz-Blech AIDA 40 manual

Outdoor living today CB128-METAL Assembly manual

Outdoor living today

Outdoor living today CB128-METAL Assembly manual

USP DuraMax 10 Ft x 8 Ft WoodBridge owner's manual

USP

USP DuraMax 10 Ft x 8 Ft WoodBridge owner's manual

Lemeks Palmako Roger FRE70-5656 manual

Lemeks

Lemeks Palmako Roger FRE70-5656 manual

Select GASPARD Assembly manual

Select

Select GASPARD Assembly manual

Palmako Lara 6.0 installation manual

Palmako

Palmako Lara 6.0 installation manual

Dunster House H4-1818ASH installation manual

Dunster House

Dunster House H4-1818ASH installation manual

Arrow Storage Products CLP104CC Owner's manual & assembly guide

Arrow Storage Products

Arrow Storage Products CLP104CC Owner's manual & assembly guide

Dunster House AVON PVC E10-2525APVC-45 installation manual

Dunster House

Dunster House AVON PVC E10-2525APVC-45 installation manual

GUIDESSIMO S7774 Assembly instructions

GUIDESSIMO

GUIDESSIMO S7774 Assembly instructions

Mercia Garden Products 01OVLPA1010DDFW-V1 manual

Mercia Garden Products

Mercia Garden Products 01OVLPA1010DDFW-V1 manual

Mercia Garden Products 01OVLPA0604SDFW-V1 General instructions

Mercia Garden Products

Mercia Garden Products 01OVLPA0604SDFW-V1 General instructions

Gazebo penguin FLORENCE 41218MR-GP-12 instruction manual

Gazebo penguin

Gazebo penguin FLORENCE 41218MR-GP-12 instruction manual

megiw4garden HA28001-3163162336-20-0000-21 manual

megiw4garden

megiw4garden HA28001-3163162336-20-0000-21 manual

WOODTEX CA2977 Assembly instructions

WOODTEX

WOODTEX CA2977 Assembly instructions

manuals.online logo
manuals.online logoBrands
  • About & Mission
  • Contact us
  • Privacy Policy
  • Terms and Conditions

Copyright 2025 Manuals.Online. All Rights Reserved.