manuals.online logo
Brands
  1. Home
  2. •
  3. Brands
  4. •
  5. Biohort
  6. •
  7. Garden House
  8. •
  9. Biohort HighLine User manual

Biohort HighLine User manual

QUALITY FROM AUSTRIA
AUFBAUANLEITUNG
Seitendach für Gerätehaus „HighLine®“
GB
ES
FR
IT
NL
DK
Assembly manual side canopy for garden shed “Highline®“
Notice de montage de l’auvent pour l’abri de jardin “Highline®“
Opbouwbeschrijving Zijdak berging “Highline®“
Instrucciones de montaje Techo lateral para el modelo “Highline®“
Istruzioni di montaggio per tetto laterale della Casetta portattrezzi “Highline®“
Monteringsvejledning Sidetag til Redskabsrum “Highline®“
For further languages please go to: www.biohort.com/downloads
www.biohort.com
QUALITY FROM AUSTRIA
2
WICHTIGE PUNKTE
FÜR DEN AUFBAU!
VORLIEGENDE AUFBAUANLEITUNG ZEIGT DEN ZUSAMMENBAU VOM
SEITENDACH „HIGHLINE“ GRÖSSE „H3“; SIE GILT SINNGEMÄSS AUCH FÜR DIE GRÖSSE „H2“,
H4“ UND „H5“. FÜR EINIGE MONTAGESCHRITTE BENÖTIGEN SIE 1 BIS 2 HELFER.
Important details regarding assembly! The available assembly manual shows the installation of the side canopy for “HighLine” size
“H3”; it is also valid for size “H2”, “H4” and “H5”. For several assembly steps additional assistance of 1 or 2 people will be required.
Points importants lors du montage! Cette notice de montage décrit l´assemblage de l´auvent „HighLine“ taille « H3 »; celle-ci est
aussi valable pour la taille « H2 », « H4 » et « H5 ». Pour certaines étapes, demandez l´aide d´une ou deux personnes.
Deze opbouwbeschrijving toont de opbouw van het zijdak Highline , grootte H3Voor enkele montage stappen heeft u 1 of 2
extra mensen nodig.
Notas importantes para el montaje: Estas instrucciones de montaje muestran el montaje del techo lateral „HighLine“ tamaño
„H3“. También son válidas para el tamaño H2, H4 y H5. Es recomendable realizar el montaje entre dos o tres personas.
Indicazioni importanti per il montaggio! Le istruzioni di montaggio in oggetto mostrano il montaggio della tettoia “HighLine” misura
“H3”; per analogia sono valide anche per la misura “H2”, “H4”, “H5” . Per alcune fasi di assemblaggio vi serviranno 1 - 2 aiutanti.
Vigtige punkter ved samling! Denne montagevejledning viser sammenbygning af sideoverdækning „HighLine“ størrelse „H3“.
;gælder også for størrelse “H2”, “H4” og “H5”. Ved flere punkter af opsætningen er yderligere hjælp påkrævet af 1 eller 2 personer.
Wear working gloves! Please use a suitable underlay to avoid scratches!
Portez des gants de travail! Pour éviter les rayures, utilisez les supports appropriés!
Handschoenen gebruiken! Om krassen te voorkomen raden wij u aan er iets onder te leggen!
Utilice unos guantes de trabajo. Por favor, coloque en el suelo una base protectora adecuada para evitar posibles arañazos.
Utilizzare guanti da lavoro. Utilizzare una base adatta per evitare graffi!
Brug arbejdshandsker! Benyt venligst et passende underlag for at undgå skrammer!
VERWENDEN SIE BEI DER MONTAGE ARBEITSHANDSCHUHE!
UM KRATZER ZU VERMEIDEN, VERWENDEN SIE BITTE GEEIGNETE UNTERLAGEN!
GB
ES
FR
IT
NL
DK
Handling of damaged parts: Do not install damaged parts! If you note damages, they must be reported to us in advance,
including suitable pictures. The parts are considered accepted by the installation.
Manipulation des pièces endommagées: N‘installez pas de pièces endommagées ! Si vous découvrez des dommages, vous
devez nous en informer à l‘avance, en nous envoyant des photos significatives. Après le montage, les pièces sont considérées
comme acceptées.
Omgaan met beschadigde onderdelen: Monteer géén beschadigde onderdelen! Als u schade ontdekt, moet dit vooraf aan
ons worden gemeld, inclusief duidelijke foto‘s. Als u de beschadigde onderdelen toch monteert, dan heeft u hiermee het
product ‘”geaccepteerd”.
Manejo de partes dañadas: Por favor, NO instale partes dañadas, Si descubre algún daño, debe informarnos con antelación,
incluyendo fotos claras de los daños. Las piezas se consideran aceptadas si se realiza su la instalación.
Gestione di parti danneggiate: Non installare parti danneggiate! Se si rivela un danno, questo deve essere segnalato in anticipo
per mail con materiale fotografico a supporto del reclamo. Se si procede all´installazione delle parti danneggiate, Biohort si
riserva il diritto di respingere il reclamo.
Håndtering af beskadigede dele: Brug ikke beskadigede dele! Hvis du opdager nogen skade, skal dette rapporteres til os på
forhånd, herunder meningsfulde billeder. Dele betragtes som accepteret gennem installationen.
UMGANG MIT BESCHÄDIGTEN TEILEN
Verbauen Sie keine beschädigten Teile! Falls Sie Beschädigungen feststellen, müssen diese vorab inkl.
aussagekräftiger Bilder an uns gemeldet werden. Durch den Verbau gelten die Teile als akzeptiert.
GB
ES
FR
IT
NL
DK
GB
ES
FR
IT
NL
DK
GB
ES
FR
IT
NL
DK
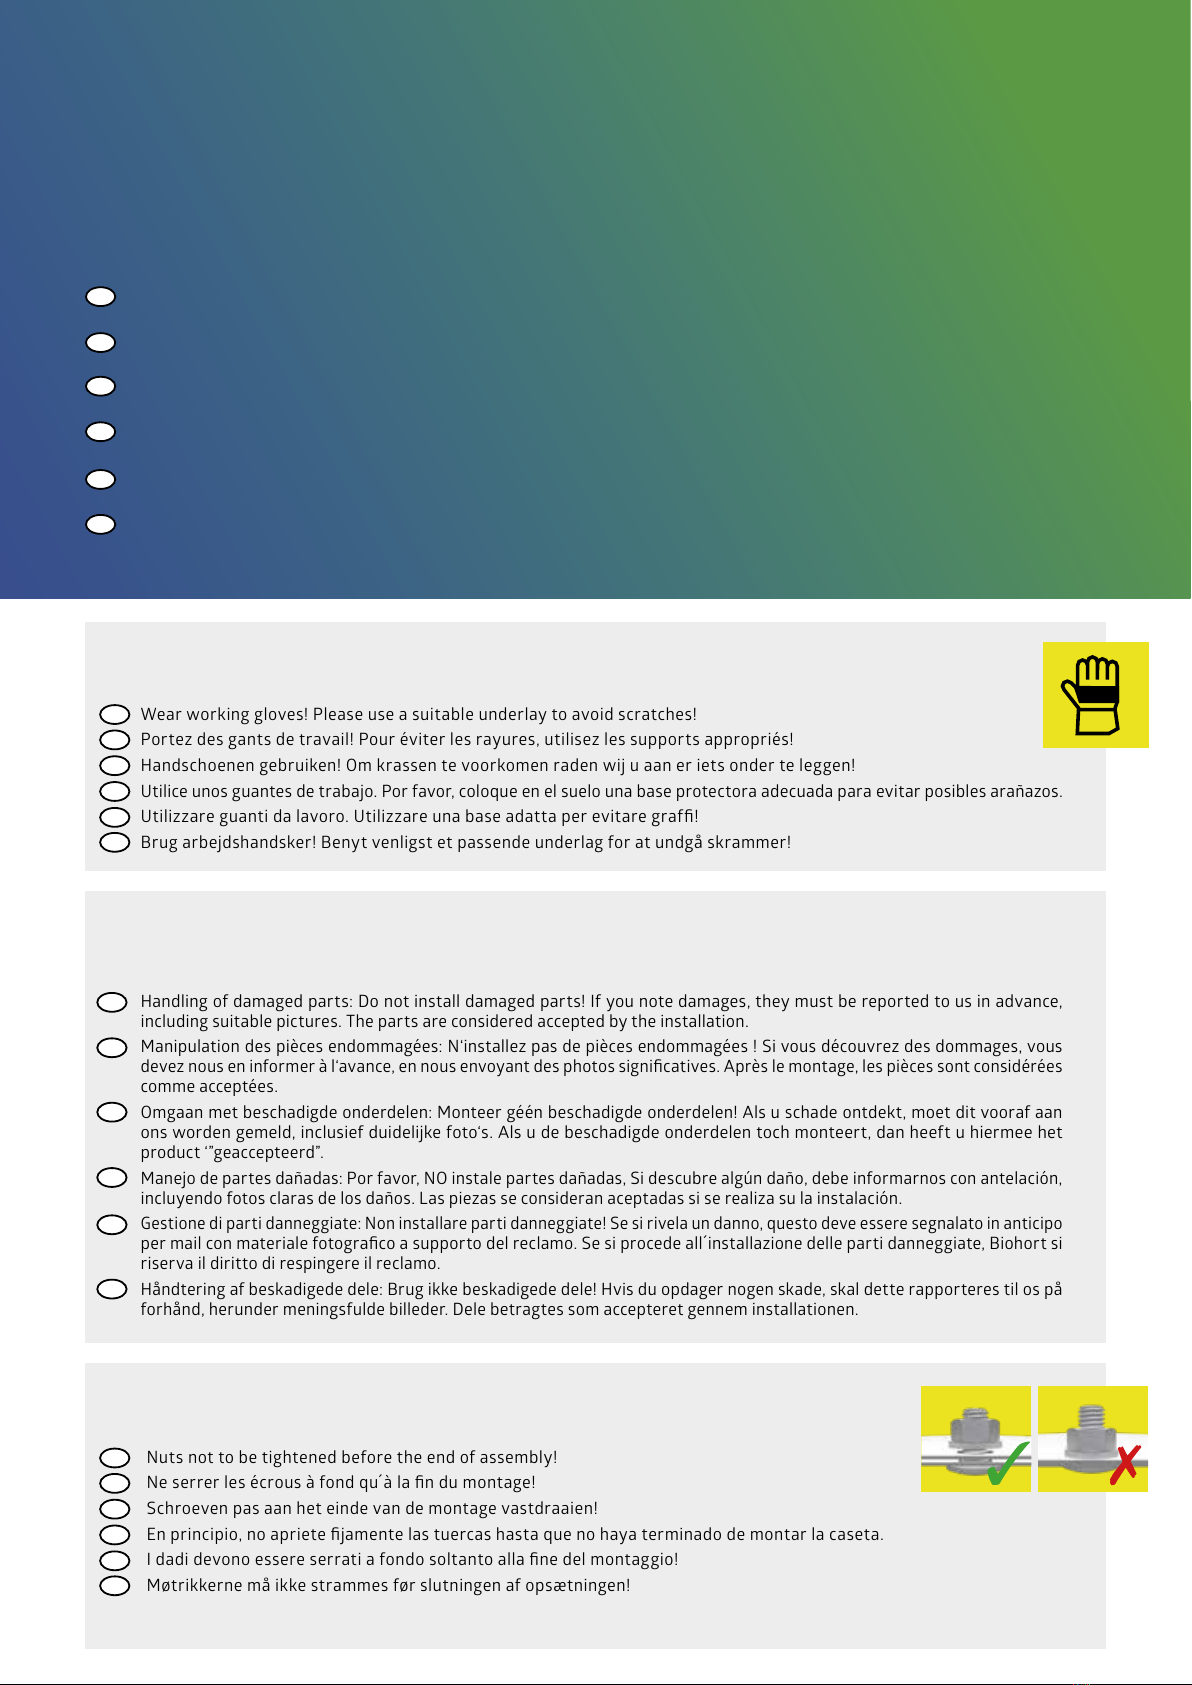
Nuts not to be tightened before the end of assembly!
Ne serrer les écrous à fond qu´à la fin du montage!
Schroeven pas aan het einde van de montage vastdraaien!
En principio, no apriete fijamente las tuercas hasta que no haya terminado de montar la caseta.
I dadi devono essere serrati a fondo soltanto alla fine del montaggio!
Møtrikkerne må ikke strammes før slutningen af opsætningen!
SCHRAUBVERBINDUNGEN GRUNDSÄTZLICH
ERST AM ENDE DER MONTAGE FESTZIEHEN!
3
Keep all supplied small parts or packaging materials away from small children during assembly. Components have sharp
edges or protrude, pay attention to them during assembly and during daily use.
Gardez toutes les petites pièces ou les matériaux d‘emballage fournis hors de portée des enfants pendant le montage. Les
pièces d´assemblage peuvent être tranchantes, faites-y attention lors de l‘assemblage et de l‘utilisation quotidienne.
Houd alle kleine onderdelen of verpakkingsmaterialen die worden mee geleverd uit de buurt van kleine kinderen tijdens de
montage. Onderdelen hebben scherpe randen of steken uit, let op bij de montage en bij het dagelijks gebruik.
Mantenga todas las piezas pequeñas o materiales de embalaje suministrados lejos de los niños durante el montaje. Los
componentes tienen bordes afilados o salientes, preste atención a ellos durante el montaje y durante el uso diario.
Tenere tutte le piccole parti o i materiali d‘imballaggio forniti lontano dalla portata dei bambini durante il montaggio. I compo-
nenti hanno spigoli vivi o sporgenti, prestare attenzione ad essi durante il montaggio e durante l‘uso quotidiano.
Hold alle leverede smådele og emballage utilgængeligt for børn under montagen.Komponenter har skarpe kanter eller stikker
ud, vær opmærksom på dem under montering og under daglig brug.
HALTEN SIE WÄHREND DES ZUSAMMENBAUS ALLE MITGELIEFERTEN KLEINTEILE
ODER VERPACKUNGSMATERIALIEN FERN VON KLEINKINDERN. Bauteile weisen scharfe Kanten auf
oder stehen vor, achten Sie während der Montage und bei der täglichen Nutzung darauf.
GB
ES
FR
IT
NL
DK
Please make sure the product is anchored in a storm-proof manner! Do not assembly in windy condition!
Veillez à ce que le sol soit ancré de manière à résister aux tempêtes! Ne pas procéder au montage dans des conditions venteuses !
Zorg voor een stormbestendige bodem verankering! Niet opbouwen in winderige omstandigheden!
Asegúrese de que el suelo cuente con un anclaje a prueba de tormentas. ¡No se instalen en condiciones de viento!
Assicuratevi che il pavimento sia ancorato a prova di tempesta e chiudete! Non montare in condizioni di vento!
Vær opmærksom på at produktet forankres stormsikkert samt! Bør ikke monteres ved kraftig vind!
The parts that need to be assembled are coloured in yellow in the respective construction step!
Les pièces à monter sont colorées en jaune au cours des étapes de montage respectives!
De te monteren onderdelen zijn in de betreffende bouwstappen geel gekleurd!
Las piezas a montar son de color amarillo en los pasos de montaje correspondientes!
Le parti da assemblare sono colorate in giallo nelle rispettive fasi di costruzione!
De dele som skal monteres er markeret med gult!
Parts coloured in orange need to be disassembled in the respective construction step!
Les pièces de couleur orange doivent être démontées au cours des étapes de montage correspondantes!
Oranje gekleurde onderdelen moeten in de desbetreffende bouwstappen los geschroefd worden!
Las piezas de color naranja deben desmontarse en los pasos de montaje correspondientes.
Le parti di colore arancione devono essere smontate nelle rispettive fasi di assemblaggio!
De dele som skal demonteres er markeret med orange!
ACHTEN SIE AUF EINE STURMSICHERE BODENVERANKERUNG!
NICHT BEI WIND AUFBAUEN!
DIE ZU MONTIERENDEN TEILE SIND IN DEN JEWEILIGEN AUFBAUSCHRITTEN GELB
EINGEFÄRBT!
ORANGE EINGEFÄRBTE TEILE SIND IN DEN JEWEILIGEN AUFBAUSCHRITTEN ZU
DEMONTIEREN!
GB
GB
GB
ES
ES
ES
FR
FR
FR
IT
IT
IT
NL
NL
NL
DK
DK
DK
ACHTUNG | ATTENTION | ATTENTION | ATTENTIE | ATENCIÓN | ATTENZIONE | OBS.
Die Verankerung ist wichtig, denken Sie an Sturmböen!
Do not forget to anchor the shed against gale force wind!
L´ancrage est important, pensez aux rafales de vent!
Verankering niet vergeten!
El anclaje es muy importante. Piense por ejemplo en rachas fuertes de viento.
L‘ancoraggio della casetta è importante - pericolo in caso di raffiche di vento!
Glem ikke at forankre skuret mod vinde af stormstyrke
GB
ES
FR
IT
NL
DK
4
WASSERWAAGEN - SYMBOL: Betreffendes Einbauteil mit der Wasserwaage ausrichten.
HAUS - SYMBOL:
Betreffendes Bauteil wurde vom Gerätehaus abgebaut und wird wieder beim Aufbau des Seitendaches benötigt.
Symbol of spirit level: Align the respective parts by using the spirit level.
Symbole niveau à bulle: Lorsque ce symbole apparaît, vous devez ajuster l´élément à l´aide d´un niveau à bulle.
Waterpas – symbool: Bij montagestappen waar dit symbool bijstaat is het noodzakelijk het
betreffende onderdeel waterpas in te bouwen.
Símbolo del nivelador: Indica que se debe ajustar y centrar la pieza con la ayuda de un nivelador.
Simbolo di livella a bolla d‘aria: Allineare il componente in questione con l‘ausilio di una livella a bolla d’aria.
Symbol for vaterpas: Juster de respektive dele ved hjælp af vaterpas.
House – symbol: The corresponding part has been dissembled from the garden shed and will be needed again
for assembly of the side canopy.
Symbole abri: Ces éléments de construction de l’abri doivent être démontés et seront à nouveau nécessaires
pour le montage de l’auvent.
Berging-symbool: Desbetreffend onderdeel moet bij de berging worden weggehaald en bij de opbouw van het
zijdak weer worden bevestigd.
Caseta- Símbolo: El componente relevante fue desmantelado por la caseta y se necesita nuevamente para la
construcción del techo lateral
Casetta – Simbolo: L’elemento in questione è stato smontato dalla Casetta portattrezzi ed è necesario per il
montaggio del tetto laterale.
Hus – Symbol: Den angivne komponent er demonteret af skuret og er nødvendig igen for konstruktionen af
Sidetaget.
Scale drawing 1:1 of the screws in use
Reproduction selon l´échelle 1:1.
Afbeelding : schaal 1:1 (ware grootte)
Reproducción a escala 1:1 de los tornillos que se utilizan para el montaje.
Immagine in scala delle viti da utilizzare!
Skala tegning af skruer er 1:1
MASSSTABSGETREUE ABBILDUNGEN DER ZUVERWENDENDEN SCHRAUBEN: M 1:1
GB
ES
FR
IT
NL
DK
GB
GB
ES
ES
FR
FR
IT
IT
NL
NL
DK
DK
Care and maintenance: Remove suntan lotion or any othercreams with water and rinse aid! Do not use abrasive cleaning agents!
Keep the roof free of leaves! Check the gutter!• Touch-up scratches immediately with the paint provided.
Entretien et maintenance: Nettoyez uniquement avec de l´eau les crèmes solaires et autres crèmes (pas de nettoyant chimique).
Ne pas utiliser de produits nettoyant abrasifs! Débarrassez vous régulièrement des feuilles mortes sur le toit! Contrôlez l‘éva-
cuation de la gauttière! Corrigez immédiatement les rayures avec la laque jointe!
Onderhoud: Zonnebrandolie/melk en andere cremes met water en glansmiddel verwijderen. Gebruik geen schuurmiddelen!
Regelmatig bladeren van dak verwijderen! Dakgootuitloop controleren.• Krassen direct met de meegeleverde lak behandelen.
Cuidado y mantenimiento: Evite dejar huellas o restos de cremas solares sobre la chapa. Limpie la caseta siempre con agua y jabón.
No utilice ningún producto para fregar. En general, evite siempre cualquier producto químico para limpiar la caseta. Mantenga
el tejado libre de hojas secas. Controle el desagüe del canalón. Repare los arañazos lo antes posible con el barniz que se incluye.
Manutenzione: Rimuovere crema solare e altre creme con acqua e brillantante! Non utilizzare detergenti contenenti sostanze
aggressive! Mantenere il tetto libero da foglie! Controllare la grondaia! Ritoccare immediatamente eventuali graffi con la vernice
fornita nella confezione!
Pleje og vedligeholdelse: Fjern solcreme eller andre typer af creme med vand og rensemiddel! Brug ikke aggressive rengørings-
midler! Hold taget fri for blade! Kontroller rendestenen! Ved skrammer, brug straks malingen som er stillet til rådighed!
PFLEGE UND WARTUNG
Sonnenmilch und andere Cremen mit Wasser und Seife entfernen. Keine scheuernden Reinigungsmittelverwenden! Laub vom Dach
regelmäßig entfernen! Dachrinnenauslauf kontrollieren! Tiefe Kratzer sofort mit beiliegendem Lack ausbessern!
GB
ES
FR
IT
NL
DK
M5 x 16 M8 x 16
M8 x 90
6,3 x 38
4,8 x 13
8 x 60
M5 x 10
M8 x 20
5
Do not forget to anchor the shed against gale force wind! For the side canopy, we exclusively
recommend a concrete or point foundation.
L´ancrage est important, pensez aux rafales de vent! Avec l’auvent, seules les fondations en
béton ou par point sont recommandées.
Verankering niet vergeten! Voor het zijdak wordt een beton- of puntfundering aanbevolen
El anclaje es muy importante. Piense por ejemplo en rachas fuertes de viento. Para el techo lateral solo se reco-
mienda una base de hormigón.
L‘ancoraggio della casetta è importante - pericolo in caso di raffiche di vento! per il tetto laterale consigliamo
unicamente il basamento in calcestruzzo ossia il basamento puntiforme
Glem ikke at forankre skuret mod vinde af stormstyrke. Ved montage af Sidetag, anbefales et støbt punktfunda-
ment i beton.
MAINTENANCE TIP: Check and clean the leaf trap and the underlying parts of the gutter at regular intervals - this will
contribute to the longevity of your Biohort product.
CONSEIL DE MAINTENANCE : Vérifiez et nettoyez le filtre à feuilles mortes et les parties sous-jacentes de la gouttière à
intervalles réguliers - cela contribuera à la longévité de votre produit Biohort.
Controleer en reinig de delen van de dakgoot met regelmatige tussenpozen (verwijder de bladeren en ander vuil)- dit
draagt bij aan de lange levensduur van uw Biohort product.
CONSEJO DE MANTENIMIENTO: Revise y limpie el colector de hojas y las partes subyacentes del canalón a intervalos
regulares - esto contribuirá a la longevidad de su producto Biohort.
CONSIGLIO PER LA MANUTENZIONE: Controllare e pulire il fermafoglie e le parti sottostanti della grondaia a intervalli
regolari - questo contribuirà alla longevità del vostro prodotto Biohort.
VEDLIGEHOLDELSES TIP: Kontroller og rengør løvfælden og de underliggende dele af tagrenden med jævne mellemrum
- det vil bidrage til levetiden på dit Biohort produkt.
ACHTUNG ATTENTION | ATTENTION | ATTENTIE | ATENCIÓN | ATTENZIONE | OBS.
Die Verankerung ist wichtig, denken Sie an Sturmböen! Beim Seitendach ist ausschließlich ein Beton- bzw. Punktfundament zu
empfehlen.
WARTUNGSTIPP!
Kontrollieren und reinigen Sie in regelmäßigen Abständen den Laubfang und die darunterliegenden Teile der Dachrinne - so
tragen Sie zur Langlebigkeit Ihres Biohort Produktes bei.
GB
GB
ES
ES
FR
FR
IT
IT
NL
NL
DK
DK
Tighten screws only hand-tight!
Serrer les vis à la main seulement !
Draai de schroeven alleen handvast aan!
Apretar los tornillos sólo con la mano!
Stringere le viti solo a mano!
Skruer spændes kun løst!
Tighten screws with nut driver!
Serrez les vis à l'aide d'une clé à molette !
Draai de schroeven vast met dopsleutel!
Apretar los tornillos con una llave de vaso!
Stringere le viti con la chiave a tubo!
Skruer fastspændes med sekskant nøglen!
SCHRAUBEN NUR HANDFESTANZIEHEN!
GB
GB
ES
ES
FR
FR
IT
IT
NL
NL
DK
DK
6
1STANDARDPAKET
3DACHPAKET
2GRÖSSENABHÄNGIGES PAKET
Standard package · Colis standard · Standaardpakket · Paquete estándar · Pacchetto standard · Standard pakke
Roof package· Carton du toit· Dakpakket · Paquete de cubierta · Pacco del tetto · Tagpakke
size-related package · Colis dépendant de la taille · Grootte afhankelijk pakket · Tamaño varía según el paquete ·
Pacchetto dipendente dalle dimensioni · størrelse afhængig pakke
SA SB
SH
SN
SS
SC
SI
SO
ST
Z
T
S
W
2 1
X Y
SD
SK
SP
D1
SE
SL
SQ
SF
SM
SR
SG SJ SV
7
2.
1.
AJ AA AB
Demontage Bauteile
Dismantling part -Démonter le ressort à gaz
AJ
AJ
AA
AB
8
H2: 2x
H3: 2x
H4: 2x
H5: 2x
H2: 8x
H3: 8x
H4: 8x
H5: 8x
SP D1
1.
M5 x 10
2.
Schrauben demontieren!
GB
FR
Please disassemble the screws!
Démonter les vis!
SP
1.
9
H2: 1x
H3: 1x
H4: 1x
H5: 1x
H2: 4x
H3: 6x
H4: 6x
H5: 8x
H2: 8x
H3: 10x
H4: 12x
H5: 14x
SK D1
2.
M5 x 10
D1
M5 s=1,2 - 1,6 mm
Alle in diesem Aufbauschritt verwendeten Schrauben festziehen!
Tighten all screws needed in this work step!
1,2 - 1,6
0,3 - 1,1
10
H2: 1x
H3: 1x
H4: 1x
H5: 1x
H2: 1x
H3: 1x
H4: 1x
H5: 1x
H2: 1x
H3: 1x
H4: 1x
H5: 1x
D1 D1SL
3.
TIPP! Bei Verwendung der Rückwand für das Seitendach sollte der
Wasserablauf an der Vorderseite montiert werden! (Option 2)
Dichtung exakt aufkleben!
A AB B
OPTION 1
OPTION 2
GB
GB
NL
NL
IT
IT
FR
FR
ES
ES
DK
DK
TIP! When using the back wall for the side canopy, the water drain can be mounted at the front! (option 2)
TIP !Si vous installez la paroi arrière pour l’auvent, la descente d´eaux doit être montée à l'avant ! (option 2)
TIP! Bij het gebruik van de rugwand bij het zijdak raden wij aan de regenafvoer aan de voorzijde te monteren! ( optie2)
¡CONSEJO! Cuando se utiliza el panel trasero para el techo lateral, el drenaje de agua debe ser montado en la parte delantera! (opción 2)
CONSIGLIO! Quando si utilizza la parete posteriore per il tetto laterale, lo scarico per il drenaggio dell'acqua deve essere montato nella parte anteriore! (Opzione 2)
TIP! Ved anvendelse af bagvæg til sidetaget, skal vandafløb installeres i front! (Mulighed 2)
Glue on the seal exactly!
Coller le joint avec précision !
Dichting precies kleven!
Pegue el sello exactamente.
Mettete la guarnizione con precisione!
Forseglingen limes omhyggeligt!
BA
BA
11
H2: 1x
H3: 1x
H4: 1x
H5: 1x
H2: 1x
H3: 1x
H4: 1x
H5: 1x
H2: 6x
H3: 6x
H4: 6x
H5: 6x
H2: 4x
H3: 4x
H4: 4x
H5: 4x
M8 x 20
M8 x 12
M8 x 12
M8 x 12
D1
D1
SN SO
4.
SO
SN
M8 x 20
12
Alle in diesem Aufbauschritt verwendeten Schrauben festziehen!
Tighten all screws needed in this work step!
D1
H2: 2x (1720 mm)
H3: 2x (2120 mm)
H4: 2x (1720 mm)
2x ( 800 mm)
H5: 2x (2120 mm)
2x ( 800 mm)
H2: 8x
H3: 10x
H4: 12x
H5: 14x
H2: 1x
H3: 1x
H4: 1x
H5: 1x
M5 x 16
5.
SS ST
13
H2: 2x
H3: 2x
H4: 2x
H5: 2x
H2: 8x
H3: 8x
H4: 8x
H5: 8x
H2: 2x
H3: 2x
H4: 2x
H5: 2x
H2: 2x
H3: 2x
H4: 2x
H5: 2x
SC
D1
D1
6.
M5 x 16
Oberseite / top side
D1
M5 s=1,2 - 1,6 mm
Alle in diesem Aufbauschritt verwendeten Schrauben festziehen!
Tighten all screws needed in this work step!
1,2 - 1,6
0,3 - 1,1
14
H2: 2x
H3: 2x
H4: 2x
H5: 2x
H2: 2x
H3: 2x
H4: 2x
H5: 2x
H2: 2x
H3: 2x
H4: 2x
H5: 2x
H2: 12x
H3: 12x
H4: 12x
H5: 12x
SF
7.
2x
SQ
SG
D1
Place all screws in a straight position and tighten well.
Ajustez toutes les vis dans l’axe et serrez à fond.
Alle schroeven recht indraaien en ze vervolgens goed vastdraaien
Coloque todos los tornillos en posición recta y luego apriételos bien.
Impostare tutte le viti diritte e quindi serrare saldamente.
Placer alle skruer i en lige række og fastspænd.
GB
FR
NL
IT
ES
DK
Alle Schrauben gerade ansetzen und anschließend gut festziehen.
6,3 x 38
TIPP: Verwenden Sie einen Akkuschrauber - Steckschlüsseleinsatz im Lieferumfang.
TIP: use a cordless screwdriver – sockets are included in the delivery content.
SQ
6 cm
Richtung der Bohrungen!
15
ca. 7 cm
2.
H2: 1x
H3: 1x
H4: 1x
H5: 1x
H2: 1x
H3: 1x
H4: 1x
H5: 1x
H2: 2x
H3: 2x
H4: 2x
H5: 2x
H2: 8x
H3: 8x
H4: 8x
H5: 8x
H2: 4x
H3: 4x
H4: 4x
H5: 4x
H2: 30x
H3: 30x
H4: 30x
H5: 30x
SB
8.
M5 x 16
M5 x 10
D1
D1 D1
SM
M5 s=1,2 - 1,6 mm
2x
SA
1.
1,2 - 1,6
0,3 - 1,1
16
H2: 8x
H3: 8x
H4: 8x
H5: 8x
H2: 4x
H3: 4x
H4: 4x
H5: 4x
D1
9.
M5 x 16
M5 x 10
D1
1. 2.
17
H2: 1x
H3: 1x
H4: 1x
H5: 1x
H2: 16x
H3: 18x
H4: 20x
H5: 22x
H2: 8x
H3: 8x
H4: 8x
H5: 8x
H2: 4x
H3: 4x
H4: 4x
H5: 4x
SH D1 D1
D1
10.
M5 x 16
M5 x 10
1. 2.
M5 s=1,2 - 1,6 mm
1,2 - 1,6
0,3 - 1,1
18
2.
1.
Rechtwinkelig einrichten
rectangular adjusted
ajuster en forme rectangulaire
rechthoekig instellen
ajustar en forma rectangular
mettere in forma rettangolare
indstil vinkelret
GB
FR
NL
IT
ES
DK
Kontermutter festziehen!
Tighten the locking nut!
Serrer le contre-écrou!
Wasserwaagen - Symbol:
Betreffendes Einbauteil mit der Wasserwaage ausrichten.
Symbol of spirit level: Align the respective parts by using the spirit level.
Symbole niveau à bulle: Lorsque ce symbole apparaît, vous devez ajuster l´élément à l´aide d´un niveau à bulle.
Waterpas – symbool: Bij montagestappen waar dit symbool bijstaat is het noodzakelijk het betreffende onderdeel waterpas in te bouwen.
Símbolo del nivelador: Indica que se debe ajustar y centrar la pieza con la ayuda de un nivelador.
Simbolo di livella a bolla d‘aria: Allineare il componente in questione con l‘ausilio di una livella a bolla d’aria.
Symbol for vaterpas: Juster de respektive dele ved hjælp af vaterpas.
DK
GB
FR
NL
IT
ES
19
Kontermutter festziehen!
Tighten the locking nut!
Serrer le contre-écrou!
2x
H2: 2x
H3: 2x
H4: 2x
H5: 2x
H2: 6x
H3: 6x
H4: 6x
H5: 6x
H2: 6x
H3: 6x
H4: 6x
H5: 6x
11.
D1
D1
SD
M5 x 16
M5 s=0,3 - 1,1 mm
Alle in diesem Aufbauschritt verwendeten Schrauben festziehen!
Tighten all screws needed in this work step!
1,2 - 1,6
0,3 - 1,1
20
H2: 2x
H3: 2x
H4: 2x
H5: 2x
H2: 2x
H3: 2x
H4: 2x
H5: 2x
H2: 12x
H3: 12x
H4: 12x
H5: 12x
H2: 4x
H3: 4x
H4: 4x
H5: 4x
S T D1
D1
M8 x 16
M8 x 90
2x
12.
ca. 2 cm
S
T

Other manuals for HighLine

3

Other Biohort Garden House manuals

Biohort AvantGarde User manual

Biohort

Biohort AvantGarde User manual

Biohort NEO User manual

Biohort

Biohort NEO User manual

Biohort FloraBoard User manual

Biohort

Biohort FloraBoard User manual

Biohort SmartBase PLUS NEO User manual

Biohort

Biohort SmartBase PLUS NEO User manual

Biohort NEO 1C User manual

Biohort

Biohort NEO 1C User manual

Biohort HighLine HS User manual

Biohort

Biohort HighLine HS User manual

Biohort HighLine User manual

Biohort

Biohort HighLine User manual

Biohort AvantGarde XL User manual

Biohort

Biohort AvantGarde XL User manual

Biohort Ground screw foundation User manual

Biohort

Biohort Ground screw foundation User manual

Biohort Europa User manual

Biohort

Biohort Europa User manual

Biohort AvantGarde User manual

Biohort

Biohort AvantGarde User manual

Biohort Europa User manual

Biohort

Biohort Europa User manual

Biohort GS 90 User manual

Biohort

Biohort GS 90 User manual

Biohort AvantGarde XXL User manual

Biohort

Biohort AvantGarde XXL User manual

Popular Garden House manuals by other brands

Outdoor Life Products KS3830 Assembly instructions

Outdoor Life Products

Outdoor Life Products KS3830 Assembly instructions

USP DURAMAX Apex Pro 15.5 x 8 Owner's manual/ instructions for assembly

USP

USP DURAMAX Apex Pro 15.5 x 8 Owner's manual/ instructions for assembly

Palmako Marseille 15 Assembly, installation and maintenance manual

Palmako

Palmako Marseille 15 Assembly, installation and maintenance manual

OLT Studio Garden Shed STU128-FJ-Metal Assembly manual

OLT

OLT Studio Garden Shed STU128-FJ-Metal Assembly manual

Feider Machines FAJ700A owner's manual

Feider Machines

Feider Machines FAJ700A owner's manual

Sunjoy A102014100 Assembly instruction

Sunjoy

Sunjoy A102014100 Assembly instruction

Palmako PAP34-3434-1 instruction manual

Palmako

Palmako PAP34-3434-1 instruction manual

Palmako ELC16-1827 Assembly, installation and maintenance manual

Palmako

Palmako ELC16-1827 Assembly, installation and maintenance manual

Mercia Garden Products 01SHPWOR1210DDOW-V2 General instructions

Mercia Garden Products

Mercia Garden Products 01SHPWOR1210DDOW-V2 General instructions

Forest garden ODA64DDFP Assembly instructions

Forest garden

Forest garden ODA64DDFP Assembly instructions

Holz-Blech Lubec Assembly instructions

Holz-Blech

Holz-Blech Lubec Assembly instructions

Décor et Jardin 68655S000 Assembly Notice

Décor et Jardin

Décor et Jardin 68655S000 Assembly Notice

Palmako FRK44-3857-1 installation manual

Palmako

Palmako FRK44-3857-1 installation manual

Little Cottage Star Barn manual

Little Cottage

Little Cottage Star Barn manual

total sheds Pent Summer Shed 14x6ft Assembly manual

total sheds

total sheds Pent Summer Shed 14x6ft Assembly manual

Lifetime 6426 Assembly instructions

Lifetime

Lifetime 6426 Assembly instructions

OLT 6x6 Maximizer Storage Shed Assembly manual

OLT

OLT 6x6 Maximizer Storage Shed Assembly manual

Dunster House AVON E10-2525A-28 installation manual

Dunster House

Dunster House AVON E10-2525A-28 installation manual

manuals.online logo
manuals.online logoBrands
  • About & Mission
  • Contact us
  • Privacy Policy
  • Terms and Conditions

Copyright 2025 Manuals.Online. All Rights Reserved.