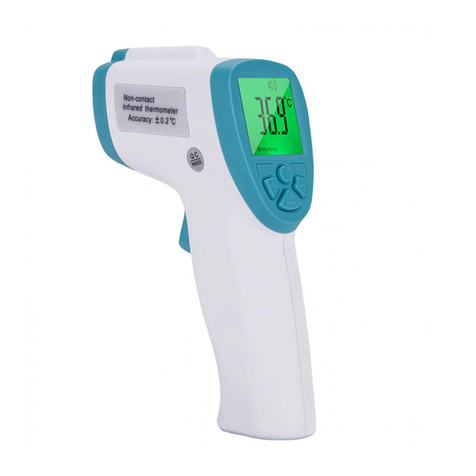
BIOS Diagnostics 33302 User manual

Forehead Thermometer
Thermomètre frontal
3 sec. measurement
Mesure en 3 secondes
Fever alarm
Signal de fièvre
Illuminated display
Écran lumineux
12 Memories
12 Mémoires
Signal Tone
Signal sonore
Celsius - Fahrenheit
3 sec.

Forehead Thermometer
Instruction Manual
Thermomètre frontal
Mode d’emploi
seconds
secondes
Realtime Technology
Technologie en temps réel

Forehead Thermometer
Instruction Manual
Please read these instructions carefully before using
the instrument and keep them in a safe place.
The Bios Diagnostics Forehead Thermometer is a high quality
product incorporating the latest technology and tested in
accordance with international standards. With its unique
technology, the Bios Diagnostics Forehead Thermometer can
provide a stable, heat-interference-free reading with each
measurement. The instrument performs a self-test every time
it is switched on to always guarantee the specified accuracy of
measurements.
The use of the Bios Diagnostics Forehead Thermometer allows
a simple and quick measurement of the temple temperature.
Please keep in mind that, like any skin temperature, the
temperature at the temporal area might differ from the core
body temperature (e.g. obtained by a rectal probe), which is
due to a basic physiologic effect called vasoconstriction. Since
vasoconstriction can occur in the early stages of fever, resulting
in a cool skin effect, the recorded temperature using a forehead
thermometer may be suspiciously low.
Skin temperature of babies reacts very quickly on ambient
temperature. Therefore do not take a measurement while
or after nursing; skin temperature may be lower than core
temperature.
If the measurement result is not consistent with the
patient's finding, always recheck the result by another core
body temperature measurement, e.g. use an IR – eardrum
thermometer or a rectal pen-type thermometer.

Table of Contents
1. The Advantages of your Forehead Thermometer
2. Important Safety Instructions
3. Product Description
4. How the Forehead Thermometer Measures
Body Temperature
5. Control Displays and Symbols
6. Directions for Use
7. Changing from Fahrenheit to Celsius and vice-versa
8. Error Messages
9. How to Recall 12 Readings in Memory Mode
10. Cleaning and Storage
11. Replacing the Battery
12. Guarantee
13. Technical Specifications

1. The Advantages of your Forehead Thermometer
Measurement in 3 seconds
The innovative infrared technology allows measurement of body
temperature in only 3 seconds.
Accurate and reliable
Due to the unique probe assembly construction, the advanced
infrared sensor and the complete calibration process, this unit
can offer a temperature measurement comparable to one taken
from the oral site with a regular digital thermometer.
Gentle and Easy to Use
• Probecoversarenotrequired,whichmakesthe
thermometer simple and easy to use.
• Thethermometercanbeusedwithoutinterferencetodaily
lifestyle. A measurement can be taken even while a child is
sleeping.
• Thethermometerislessthreateningtoachildthana
rectal thermometer and more pleasant to use than an oral
thermometer.
Auto-Display Memory
The last reading is automatically displayed for 3 seconds when
the unit is switched ON.
Multiple Reading Recalls
Users will be able to recall the last 12 readings when entering
the recall mode, enabling efficient tracking of temperature
variations.
Safe and Hygienic
• Noriskofbrokenglassormercuryingestion.
• Completelysafeforuseonchildren.
Fever Alarm
10 short beeps alert the patient that he/she may have fever.
1

2. Important Safety Instructions
• Neverusethethermometerforpurposesotherthanthose
it has been intended for. Please follow the general safety
precautions when using on children.
• Never immerse the thermometer into water or other
liquids (not waterproof). For cleaning, please follow
the instructions in the «Cleaning and Storage»
section.
• Keeptheinstrumentawayfromdirectexposuretothe
sun and keep it in a dust-free, dry area at the temperature
between16°Cto40°C(60.8°Fto104°F).
• Donotusethethermometeriftherearesignsofdamageon
the measuring tip or on the instrument itself. If damaged,
do not attempt to repair the instrument.
• Thisthermometerconsistsofhigh-qualityprecisionparts.Do
not drop the instrument! Protect it from severe impact and
shock. Do not twist the instrument and the measuring probe!
WARNING:
• Use of this thermometer is not intended as a
substitute for consultation with your physician.
• Thermometerisnotwaterproof!PleaseNEVER
immerse into liquids.
3. Product Description
(1) Probe
(2) START button
(3) LCD Display
(4) O/I Button
(5) Battery Cover
2
2
1
3
5
4

4. How the Thermometer Measures Body Temperature
The thermometer measures infrared energy radiated from the
skin of the temporal area and surrounding tissue. This energy
is collected through the lens and converted to a temperature
value. The measured reading obtained 1 cm above the tail of the
eyebrow can ensure the most accurate temperature.
5. Control Displays and Symbols
3
LCD Display Display Meaning Description
All segments
displayed
Press the O/I button
to turn on the unit, all
segments will be shown
for 2 seconds.
Memory The last reading will be
shown on the display
automatically for 3
seconds.
Ready The unit is ready for
measurement,the°C
or °F icon will keep
flashing.
Measurement
complete
The reading will be
shownontheLCD
displaywiththe°Cor°F
icon flashing, the unit is
ready again for the next
measurement.
Low battery
indication
When the unit is turned
on, the battery icon will
keep flashing to remind
the user to replace the
battery.

4
6. Directions for Use
1. PresstheO/Ibutton.TheLCDisactivated
to show all segments for 2 seconds.
2. The last measurement reading will be
shown on the display automatically for 3
seconds with the «M» icon.
3. Whenthe°Cor°Ficonisflashing,abeep
sound is heard and the thermometer is
ready for measurement.
4. Placetheprobeapproximately1cm
above the center of the eyebrow, making
sure that hair has been swept back from
this area. Press the start button. Move
the thermometer steadily across to 1 cm
above the tail of the eyebrow.
5. Press the START button. Release it,
when you hear a beep sound. This is the
reminding signal that confirms the end of
measurement. 10 short beeps will sound
when the temperature is higher than
37.5°C(99.5°F)inordertoalertthe
patient that he/she may have fever.
6. Remove the thermometer from the
skin.TheLCDdisplaysthemeasured
temperature.
To avoid an inaccurate measurement:
• SwitchonthethermometerbypressingtheO/Ibutton.
• Afteronebeepisheard(andthetemperaturescaleicon
is flashing), place the probe 1 cm above the tail of the
eyebrow. Make sure the opening of probe is contacted
closely with the skin.
• PresstheSTARTbuttonfor1secondandkeeptheprobeat
the temple until the thermometer generates a long beep to
identify the completion of the measurement.
IMPORTANT:
• Patientsshouldstayinaplacewithstableroom
temperature for at least 30 minutes.

• Donottakeameasurementwhileorimmediatelyafter
nursing a baby.
• Donotusetheforeheadthermometerinhighhumidity
environments.
• Patientsshouldnotdrink,eat,orexercisebefore/while
taking the measurement.
• Beforeplacingthethermometerprobeontothemeasure-
ment area, remove dirt, hair, or sweat.
• Donotmovethemeasurementdevicebeforehearingthe
termination beep.
• Useanalcoholswabtocarefullycleantheprobeandwait
for 15 minutes before taking a measurement on another
patient.
• Alwaystakethetemperatureinthesamelocation,sincethe
temperature readings may vary from different locations.
• Inthefollowingsituationsitisrecommendedthatthree
temperatures in the same location be taken and the highest
one taken as the reading:
1) New born infants in the first 100 days.
2) Childrenunderthreeyearsofagewithacompromised
immune system and for whom the presence or absence
of fever is critical.
3) When the user is learning how to use the thermometer
for the first time until he/she has familiarized himself/
herself with the instrument and obtains consistent
readings.
The thermometer has been clinically tested and proven to
be safe and accurate when used in accordance with its
operating instruction manual.
7. Changing from Fahrenheit to Celsius and vice-versa
The thermometer can display temperature measurements in
eitherFahrenheitorCelsius.Toswitchthedisplaybetween°C
and °F, simply turn OFF the unit, press and hold the START
buttonfor5secondsuntil«---»andtheflashing°Cor°Ficonis
shownontheLCD.Switchthemeasurementscalebetween°C
and °F by pressing the START button again. When the measure-
ment scale has been chosen, wait for 5 seconds and the unit
will enter the ready for measuring mode automatically.
5

8. Error Messages
6
Display /
Problem
Display Meaning Possible cause and
fault remedy
Measured
temperature is
too high
Displays «H» when
measured temperature
ishigherthan42.2°C
(108.0°F).
Measured
temperature is
too low
Displays «L» when
measured temperature
islowerthan34.0°C
(93.2°F).
Ambient
temperature is
too high
Displays «H» in
conjunction with the
«▲» when ambient
temperature is higher
than40.0°Cor104.0°F.
Ambient
temperature is
too low
Display «L» in
conjunction with the
«▼» when ambient
temperature is lower
than16.0°Cor60.8°F.
Error function
display
When system has
malfunctioned.
Blank display Please check if the
battery has been loaded
correctly. Also check
polarity (<+> and <->) of
batteries.
Dead battery
indication
If the dead battery
icon is the only symbol
shown on the display,
the battery should be
replaced immediately.
(See Section 11).

9. How to Recall 12 Readings in Memory Mode
The thermometer can recall the last 12 readings. To recall please
follow the sequence below.
Display Display Meaning Description
Recall Mode Press the START button to
enter Recall Mode when
power is off.The memory
icon «M» flashes.
Reading 1 (the last
reading)
Press and release the
START button to recall the
last reading.
Reading 2 (the
second latest
reading)
Press and release the
START button to recall the
second latest reading.
Reading 12 (the last
reading)
Press and release
the START button
consecutively to recall
readings in succession, up
to the last 12 readings.
Pressing and releasing the START button after the last 12
readings have been recalled will resume the above sequence
from reading 1.
10. Cleaning and Storage
Use an alcohol swab or cotton
tissue moistened with alcohol (70%
Isopropyl) to clean the thermometer
casing and the measuring probe.
Ensure that no liquid enters the
interior of the thermometer.
Never use abrasive cleaning
agents, thinners or benzene for
cleaning and never immerse the
instrument in water or other
cleaning liquids.
7

TakecarenottoscratchthesurfaceoftheLCD.
Remove the battery from the instrument if it is not required
for extended periods of time in order to avoid damage to the
thermometer resulting from a leaking battery.
11. Replacing the Battery
This thermometer is supplied with one lithium battery, type
CR2032.ReplacewithanewCR2032batterywhentheflashing
batterysymbolappearsontheLCDdisplay.
To remove the battery, insert the tip of a screwdriver into the
slot as indicated to lever it out of the battery cell.
8

12. Guarantee
The Forehead Thermometer is guaranteed to be free from
defects in material and workmanship for the life of the
original owner. The guarantee does not apply if the defect
or malfunction is a result of user abuse, misuse, alteration,
modification or damages in transit. Within one year of purchase
date, return the defective product to the place of purchase with
proof of purchase. After one year, the guarantee service is
provided by Thermor Ltd. Send the defective or malfunctioning
unit, freight and insurance prepaid, with a $5.00 cheque for
return shipping and original sales receipt to:
Thermor Ltd.
16975LeslieStreet
Newmarket, ON
L3Y9A1
www.thermor-ins.com
1-866-536-2289
9

10
Please observe the applicable disposal regulations.
13. Technical Specifications
According to the Medical Product User Act a biennial technical
inspection is recommended for professional users.
Type: Forehead Thermometer 33302
Measuring 34.0°Cto42.2°C(93.2°Fto108.0°F)
Resolution: 0.1°C/°F
Accuracy: Laboratory:±0.2°C,36.0°C~39.0°C
(±0.4°F,96.8°F~102.2°F)
(AmbientTemperature:16°Cto40°C,
60.8°Fto104°F)
Display: Liquid Cristal Display,4digitsplus
special icons
Acoustic: a. The unit is turned ON and ready for the
measurement: 1 short «bip» sound.
b.Completethemeasurement:1long
beep sound.
c. System error or malfunction: 3 short
«bips» sounds.
Memory: a. Auto-Display the last measured
temperature when switched on.
b. 12 readings recall in the Memory Mode.
Illuminated
Display: a.Thedisplaywillbelightedfor4seconds
when the unit is turned ON.
b. The display will be lighted again for 5
seconds when the measurement has
been completed.
Operating
temperature:
16°Cto40°C(60.8°Fto104°F)
Storage/transport
temperature:
-20°Cto+50°C(-4°Fto122°F)
Automatic
Switch-off:
Approx. 1 minute after last measurement
has been taken.
Battery: CR2032BATTERY(x1)-atleast1000
measurements
Dimensions: 122.36mm(L)x42.2mm(W)x43.11mm(H)
Weight: 48g(withbattery),45g(w/obattery)
Standards: ComplieswithASTME-1965-98
requirements
Table of contents
Other BIOS Diagnostics Thermometer manuals
BIOS Diagnostics
BIOS Diagnostics PrecisionTemp1 240DI User manual

BIOS Diagnostics
BIOS Diagnostics 192DC User manual
BIOS Diagnostics
BIOS Diagnostics 100DC User manual
BIOS Diagnostics
BIOS Diagnostics 127DU User manual
BIOS Diagnostics
BIOS Diagnostics 240DI User manual
BIOS Diagnostics
BIOS Diagnostics 194DI User manual
BIOS Diagnostics
BIOS Diagnostics 282DI User manual

BIOS Diagnostics
BIOS Diagnostics BD802 User manual

BIOS Diagnostics
BIOS Diagnostics 120DC User manual
BIOS Diagnostics
BIOS Diagnostics TH4620 User manual
