BIOSURFIT spinit S40 User manual

English
User Manual
spinit® S40
spinit® E40

TABLE OF CONTENTS
Safety Informaon, Precauons and Limitaons 1
spinit® system 2
Introducon 3
About this User Manual 3
Unpacking the spinit® instrument 3
spinit® system descripon 4
The spinit® system 4
Descripon of the spinit® instrument 4
Descripon of the spinit® discs 5
How the spinit® instrument works 6
Internal process control 7
External process control 7
Geng Started 8
Installing your instrument 8
Connecng power supply 8
Connecng addional equipment 8
How to turn ON the instrument 9
How to turn o the instrument 9
How to operate the instrument 9
Sound Signals 10
Conguraon 11
The spinit® menus 11
Home Menu 11
spinit® sengs 11
Data 11
Language 12
HL7 Status 12
About 12
Quality Control 13
Running Controls 13
QC—Pass or failed 13
Paent and Control results 13
View, print and export paent control results 14
Advanced Sengs 14
Data 14
ID Sengs 15
Operator ID 15
Paent ID 15

TABLE OF CONTENTS
Assay Opons 17
Date / Time 18
Change Password 18
Congure Printer 18
Network Sengs 19
HL7 Conguraon 19
Erase Data 19
Soware Update 20
Device maintenance 20
Quality Controls tesng 21
Handling and tesng controls 21
Why control tesng 21
Choosing control material 21
Frequency of control tesng 22
Tesng Procedure 23
Operang Precauons 23
Preparing for sample analysis 23
Prepare for tesng > paent samples 24
Prepare for tesng > quality Control material 26
Info Codes and Troubleshoong 30
Service Informaon 30
Informaon codes for spinit® E40 and S40 31
Addional codes for spinit® S40 33
Maintenance and Warranty 34
Maintenance 34
Cleaning the exterior 34
Servicing 34
Warranty 34
Soware Update 34
Disposal and recycling of the instrument 34
Technical Specicaons 35
Instrument Specicaons 35
Addional equipment 36
Symbols and abbreviaons 37

Safety Informaon, Precauons and Limitaons
WARNING: For safe and proper use, read all operang instrucons in this User Manual
before using the spinit® instrument.
Please read all the following precauons and limitaons carefully:
• Please read and carefully follow the test specic informaon given in the Instrucons for Use
of all spinit® discs.
• Only spinit® discs and spinit® strips are to be used. Do not insert standard CDs or DVDs into
the spinit® instrument.
• Place the spinit® instrument in a well-venlated environment, allowing at least 20 cm of free
space at each side of the instrument.
• Do not spill any liquids or drop any objects onto or into the spinit® instrument. The spinit®
instrument should not be near or in contact with water.
• Spillage of potenally infecous material should be wiped o immediately with absorbent
paper ssue and the contaminated areas swabbed with a standard disinfectant or 70% ethyl
alcohol. Materials used to clean spills, including gloves, should be disposed of as bio-
hazardous waste.
• If the instrument is used in a manner not specied by the manufacturer, the protecon pro-
vided by the instrument may be impaired.
• The screen representaons shown in this User Manual are for illustrave purposes only. The
screens do not necessarily show valid data or represent your spinit® instrument version.
spinit® User Manual 1

spinit® System
Intended Use
spinit® is for in vitro diagnosc use only, consisng of an instrument and discs targeng specic
treatment monitoring condions. The system is used by healthcare professionals in a variety of
healthcare sengs, and exclusively with spinit® discs and recommended controls.
Conformity to the IVD direcve
The spinit® instrument meets all provisions in the European direcve 98/79/EC on In Vitro Diag-
nosc Medical Devices and is CE marked accordingly.
Safety standards
The spinit® instrument has been tested and found to be in conformity with IEC 61010-2-101:2018
(Parcular requirements for in vitro diagnosc (IVD) medical equipment).
EMC standards
The spinit® instrument has been tested and found to be in conformity with EMC IVD instrument
standard EN 61326-2-6:2013 (In vitro diagnosc (IVD) medical equipment).
Rua 25 de Abril nº66,
2050-317 Azambuja, Portugal
ISO13485 cered company
2 spinit® User Manual

INTRODUCTION
About this User Manual
This User Manual will guide you through installaon, operaon and maintenance of your spinit®
instrument. The User Manual also explains how the instrument works, describes the quality assur-
ance system and assists you in troubleshoong.
For analyzing paent samples or controls, please also read the test specic informaon given in
the Instrucons for Use found in the spinit® test kit. The Quick Guide highlights the main steps of
the test procedures and contains informaon on proper quality control rounes.
We recommend that you become familiar with the user instrucons before you start operang the
spinit® instrument.
Unpacking the spinit® instrument
When unpacking, check the components for signs of shipping damage.
Each spinit® package includes:
• 1 spinit® instrument
• 1 Power Supply Unit
• 1 Power Supply Cable
• 1 Barcode Scanner and respecve user manual
• 1 spinit® User Manual
If the package is found incomplete, please report missing items or shipping damage to your local
supplier. We recommend keeping the shipping box if shipping of the device is needed.
spinit® User Manual | Introducon 3
4 spinit® User Manual | spinit® system descripon
Do not open or close the tray manually.
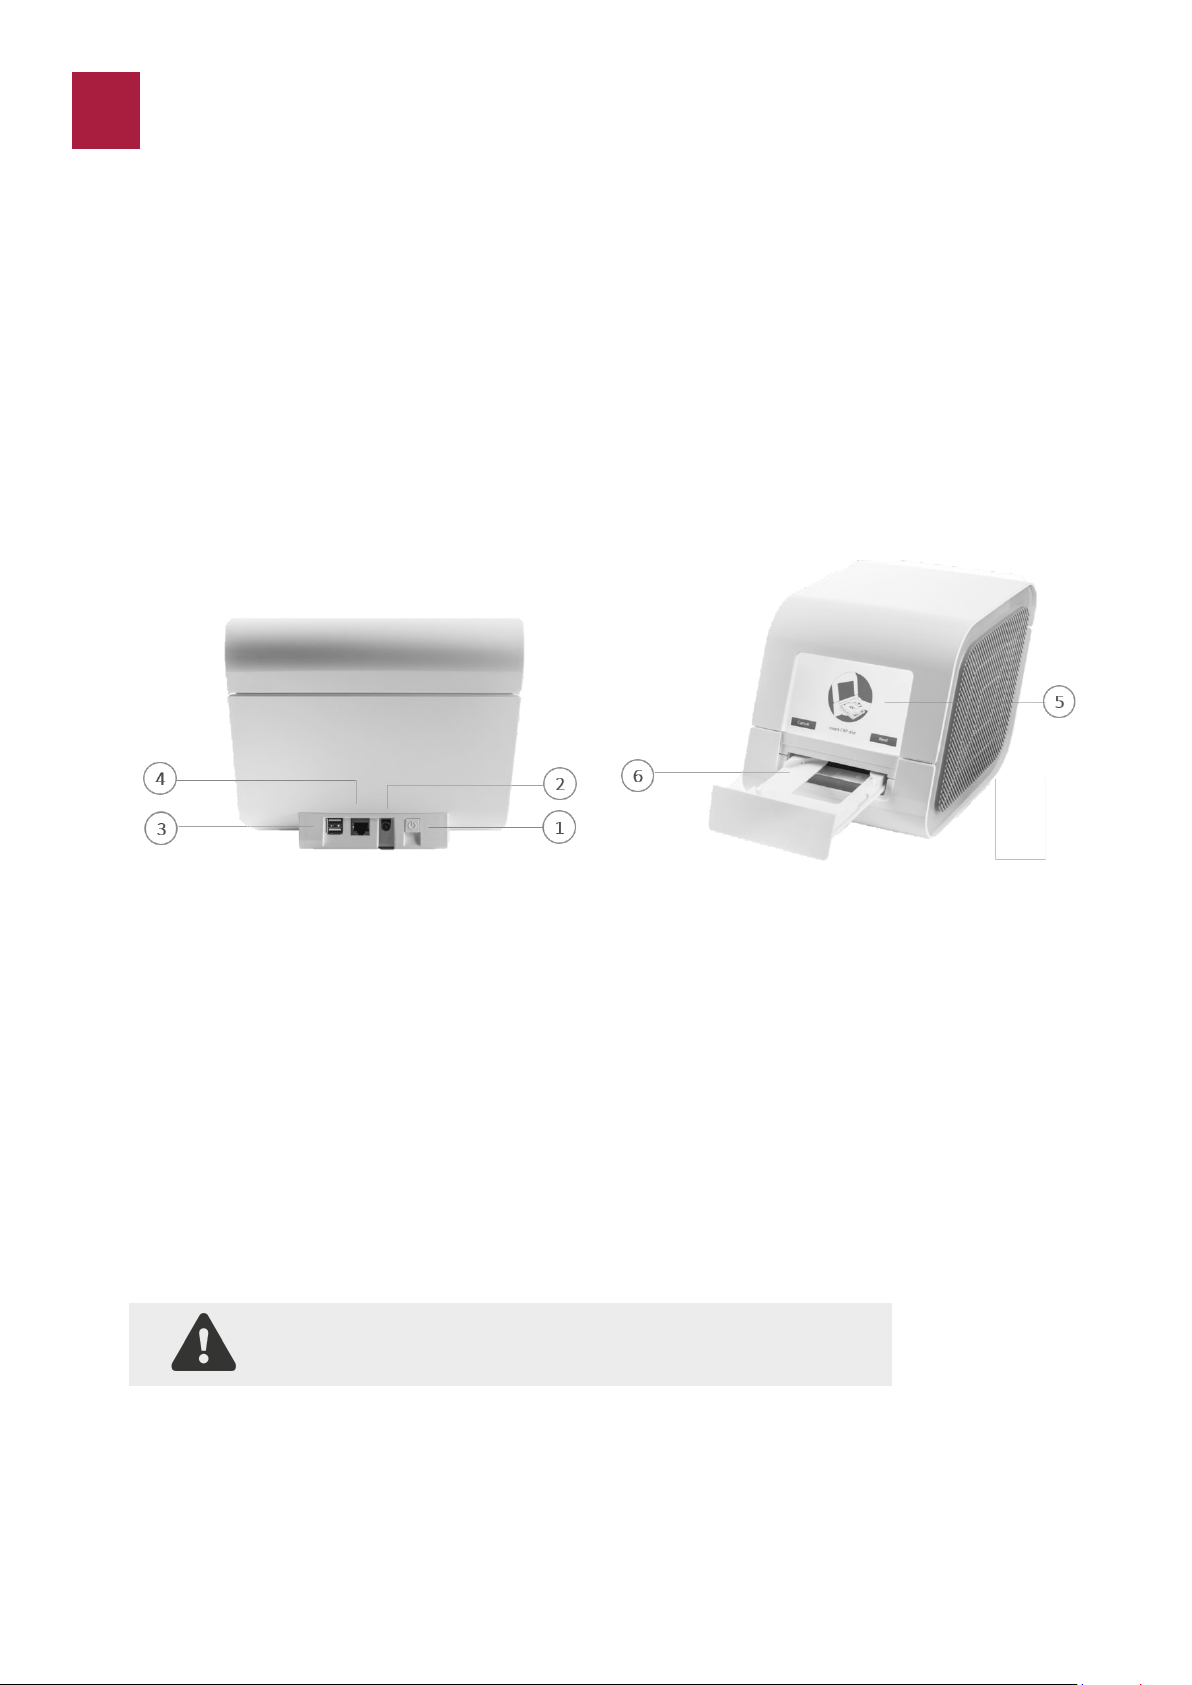
Descripon of the spinit® instrument
Figure 1.
1. Power ON buon
2. Connecon to power supply;
3. Two (2) USB ports: to connect an external printer, a barcode reader or a USB pen drive. The
USB pen drive can be used to export data and upload soware updates;
4. RJ-45 connector to Ethernet cable (LAN port is considered as in house SELV): connecvity
opon to remote Laboratory or Hospital Informaon System (LIS/HIS);
5. Touch screen - spinit® instrument user interface operated by touching virtual buons on a
colored touchscreen;
6. Tray: The tray protects the instrument and the disc from dust, light and humidity while per-
forming an assay and when the instrument is not in use;
The spinit® instrument is a stand-alone, small benchtop medical device with a user friendly interacve
touchscreen and an automac tray designed to accommodate any spinit® disc. Figure 1 shows the
main exterior parts of the spinit® instrument.
The spinit® System
The spinit® system includes the spinit® instrument, spinit® discs, spinit® controls and spinit® strips.
All components were designed and developed to be used exclusively.
spinit® SYSTEM DESCRIPTION

Figure 2.
Test disc: spinit® strip:
1. Sample well 5. Sampling area (collecon chamber)
2. Internal Quality Control 6. Handling area
3. Blister with buer or reagent 7. Breaking Line
4. QR Code
* similar for spinit® CRP and spinit® BC**;
** only available for spinit® S40 version.
spinit® User Manual | spinit® system descripon 5
Descripon of the spinit® discs
The spinit® disc is unique for each analyte to be measured and integrates test specic reagent
composions and volumes. The spinit® discs have a unique color for each test and are separately
packed in foil pouches to protect the reagents and plasc devices from light, dirt and humidity. A
single disc contains all necessary reagents for one test and is ready to use. For paent sample or
control collecon, a spinit® strip is used. The disc cannot be re-used.
Figure 2 illustrates spinit® HbA1c* disc and spinit® strip funconal parts.

How the spinit® instrument works
The spinit® instrument is a stand-alone, small benchtop in vitro medical device intended to deliver
a diagnosc plaorm designed to work with the spinit® discs.
The spinit® plaorm is based on a proprietary technology designed to oer rapid results from a
single drop of blood, providing fast, safe and eecve clinical monitoring and improved paent
care. The instrument is designed to be a universal, mul-assay instrument plaorm capable of
accommodang dierent tests developed to address the most urgent needs in the clinic. The
barcode on the disc prompts the instrument to conduct the appropriate program.
Two versions of the spinit® instrument are currently CE marked.
The spinit® S40 is the complete version of the spinit® instrument and is designed to include all ana-
lycal modules enabling the customer to run all three types of spinit® tests currently available on
the market, the spinit® CRP (measures C-Reacve Protein levels in whole blood), spinit® HbA1c
(measures glycated haemoglobin A1c concentraon in whole blood and BC (measures total white
blood cell count and 5-part dierenal).
The spinit® E40 is the Essenal version of the spinit® instrument and only reads spinit® CRP and
spinit® HbA1c discs.
Both spinit® S40’s and E40´s analycal modules are comprised of a spectrophotometer. The spec-
trophotometer is made up of two light eming diodes (LEDs), two photodiodes that funcon as
detectors and an electronic circuit board that processes the LEDs independently. Emied light is
reected inside the disc and passes through a detecon chamber. Transmiance of light through
the opcal path is measured and will vary depending on the reacon occurring inside the cham-
ber. The transmission of light through the blood sample in the detecon chamber is measured and
is correlated to the concentraon of the specic analyte. The instrument accepts several types of
spinit® discs. The analycal process is fully automated and the completed test results are shown
on the screen. In addion, only the S40 integrates a microscopy module for image acquision and
a precise angular disc posioning module. The microscopy module is composed of the following
components: illuminaon stage, miniaturized microscope with auto-focus capability and a digital
camera.
Moreover the soware version must include the following features: remote control of disc angular
posion and auto-focusing funcon, digital image treatment (illuminaon correcons, background
correcon, etc.), object detecon within a image (segmentaon) and WBC feature analysis and
classicaon.
The barcode on the pouch label prompts the instrument to conduct the appropriate test.
The instrument is delivered to the user pre-calibrated. If the instrument detects a malfuncon, the
test will be interrupted with a display of the informaon code and the paent results will not be
reported. The user must refer to the spinit® User Manual to understand the cause of the infor-
maon code.
6 spinit® User Manual | spinit® system descripon

spinit® User Manual | spinit® system descripon 7
Internal process control
The instrument self-test
A self-test is performed during start-up of the instrument to ensure that the instrument is oper-
ang according to established specicaons. The self-test validates:
• Hardware and soware integrity
The fail-safe mechanisms
The spinit® instrument is designed to be maintenance free by the user and it performs mulple
funconal and operaonal tests to guarantee proper performance. A Hardware Mainte-
nance procedure is performed on a periodic and automac basis.
External process control
Paent ID
The spinit® paent ID funcon will, if enabled, allow 100 000 number of paents to be entered.
The Paent ID will be stored with each paent test result in the results panel.
Operator ID
The spinit® operator funcon will, if congured, allow the operators to insert their idencaon
before tesng.
The operator ID will be stored with each test result in the results panel.
Quality Control
For manufacturer recommendaons see Frequency of control tesng page 21.
Calibraon
The spinit® instrument has been manufactured to deliver reliable and accurate results. During
manufacturing, the instruments are calibrated against a reference system. This procedure has
been established to ensure that all instruments operate within idencal tolerance limits.
Each spinit® test has its own lot specic calibraon data coded on the barcode of the disc pouch
label. The instrument veries that the spinit® test is valid by reading the unique QR code printed
on each disc to conrm the correct calibraon. A plug-and-play barcode reader is provided to this
eect.

Installing your instrument
Place the spinit® instrument on a dry, clean, vibraon-free and horizontal surface. Only use parts
approved by biosurt. The use of non-approved parts may result in malfuncon of the instrument
and may render the warranty null and void.
Make sure it is in a well-venlated environment, allowing at least 20 cm of free space at each side
of the instrument.
Acclimate the instrument to ambient operang temperature (15-30°C).
The instrument might be impaired by:
• Condensing humidity and water
• Heat and large temperature variaons
• Direct sunlight
• Vibraons (e.g. from centrifuges and dishwashers)
• Movement of the instrument during processing of a Test
Connecng power supply
Connect the power supply cable to the power supply unit (Figure 3).
Insert the plug from the power supply cable into the power socket in the back of the instrument.
Connect the instrument to grounded power outlets only.
Always use the correct supply voltage. The power supply voltage must match the informaon
quoted in the secon Technical specicaons, page 35.
1. Power ON buon.
2. Power input for power supply connecon.
Connecng addional equipment
Oponal equipment not provided with your spinit® instrument are:
• Printer – for oponal print out of test results.
For addional informaon regarding the barcode reader, printer, and connecon to HIS or LIS
systems, please contact your local spinit® instrument supplier.
Connecng the equipment should be done while the instrument is powered o.
Figure 3.
8 spinit® User Manual | Geng Started
GETTING STARTED

spinit® User Manual | Geng started 9
How to turn ON the instrument
1. Turn on the instrument on the back by pressing the
ON buon (Figure 3) .
An automac start-up procedure will be iniated.
Please wait unl stabilizaon period is complete
2. The instrument is ready for use when the stabilizing
is complete and the Start buon becomes available.
3. On the Home menu the user may directly start an as-
say, a quality control check, watch the training videos
or move into other opons through the Sengs
Icon .
How to turn OFF the instrument
Turn o the instrument by going into the Sengs icon and select Shutdown buon. The in-
strument should be powered o at the end of the day.
Please note:
• When the power is turned o, a closing down procedure is iniated.
• The instrument can be powered o, or the power supply disconnected, without loss of
stored results.
• The instrument cannot be turned o if the tray is open.
How to operate the instrument
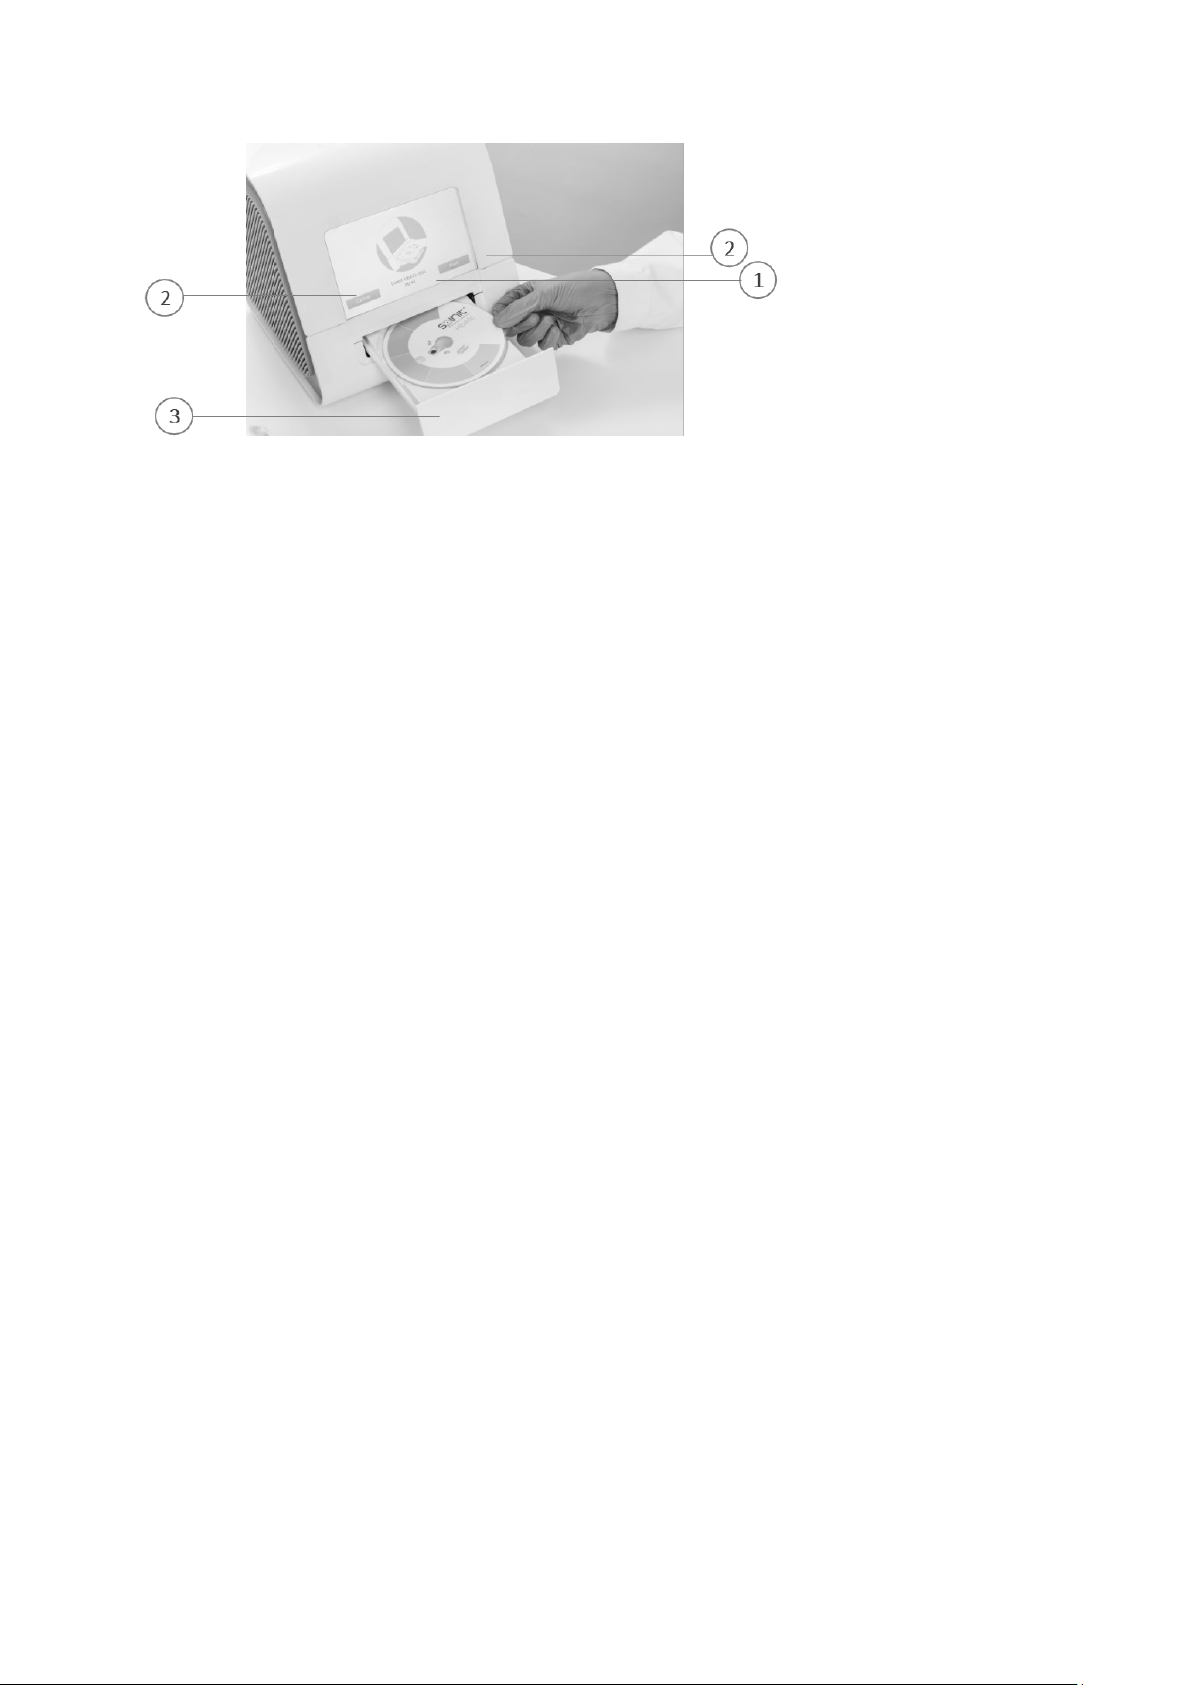
The instrument is easily operated using the touch buons that appear on the screen. When a
buon is touched, its funcon will be acvated. Text messages that appear on the screen will help
guide you through the tesng procedure (Figure 4).
The other main operave part of the spinit® instrument is the disc tray. It is designed to receive
the disc in one orientaon only, with label facing up. The tray opens and closes automacally. To
automacally open the tray, click the Next buon aer reading the barcode; When a new disc is
placed in the tray, click the Next buon to automacally close the tray; closing the tray will iniate
the analysis. To discard the disc, you will need to click Eject. The tray protects the instrument from
dust, dirt, light and humidity during processing and when the instrument is not in use.
• The tray opens and closes automacally. Do not open or close the tray manually.
• Use the ngerps (with or without gloves) only on the touchscreen. Only a light touch is
required, applying too much pressure may damage the touchscreen surface.
• Do not use pens or other sharp instruments, may damage the touchscreen surface.
10 spinit® User Manual | Geng started
Figure 4.
1. Text message
2. Touch buons
3. Tray with a ready to use disc
Sound signals
A short beep indicates compleon of an analysis.
The major instrument conguraon opons are available through the Sengs or Advanced sengs
menu.
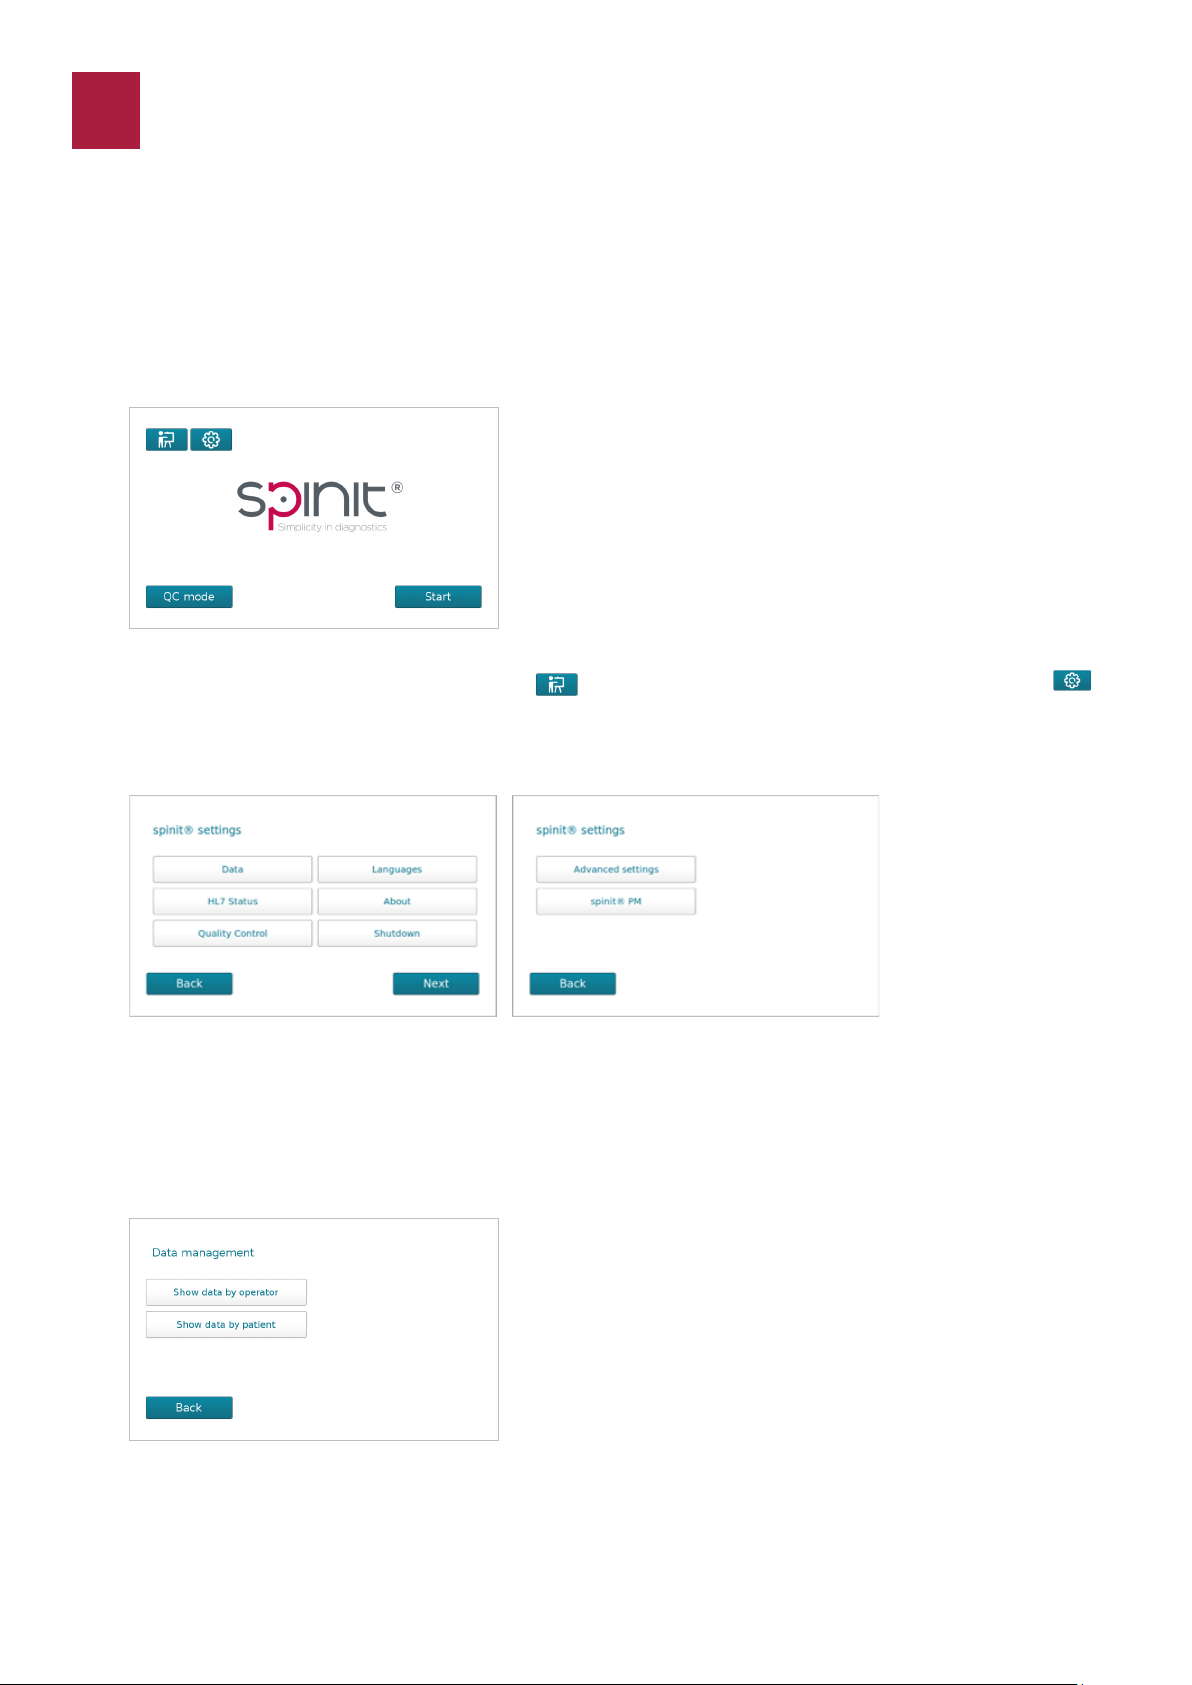
Home Menu
spinit® sengs
Data
On the Home menu the user may directly start a test selecng Start, a quality control check by click-
ing QC Mode, watch the Training videos or move into other opons through the Sengs icon
spinit® User Manual | Conguraon 11
The spinit® menus
Dierent conguraons are available in the spinit® sengs menu, namely retrieval of past results,
language selecon, HL7 connecon status, access to spinit® soware versions, performance of quali-
ty control measurements, and denion of addional opons on Advanced Sengs menu.
The user can view past results by clicking Data on the spinit® sengs menu.
Results can be sorted on the Results panel by operator or paent and exported to a USB pen drive.
CONFIGURATION
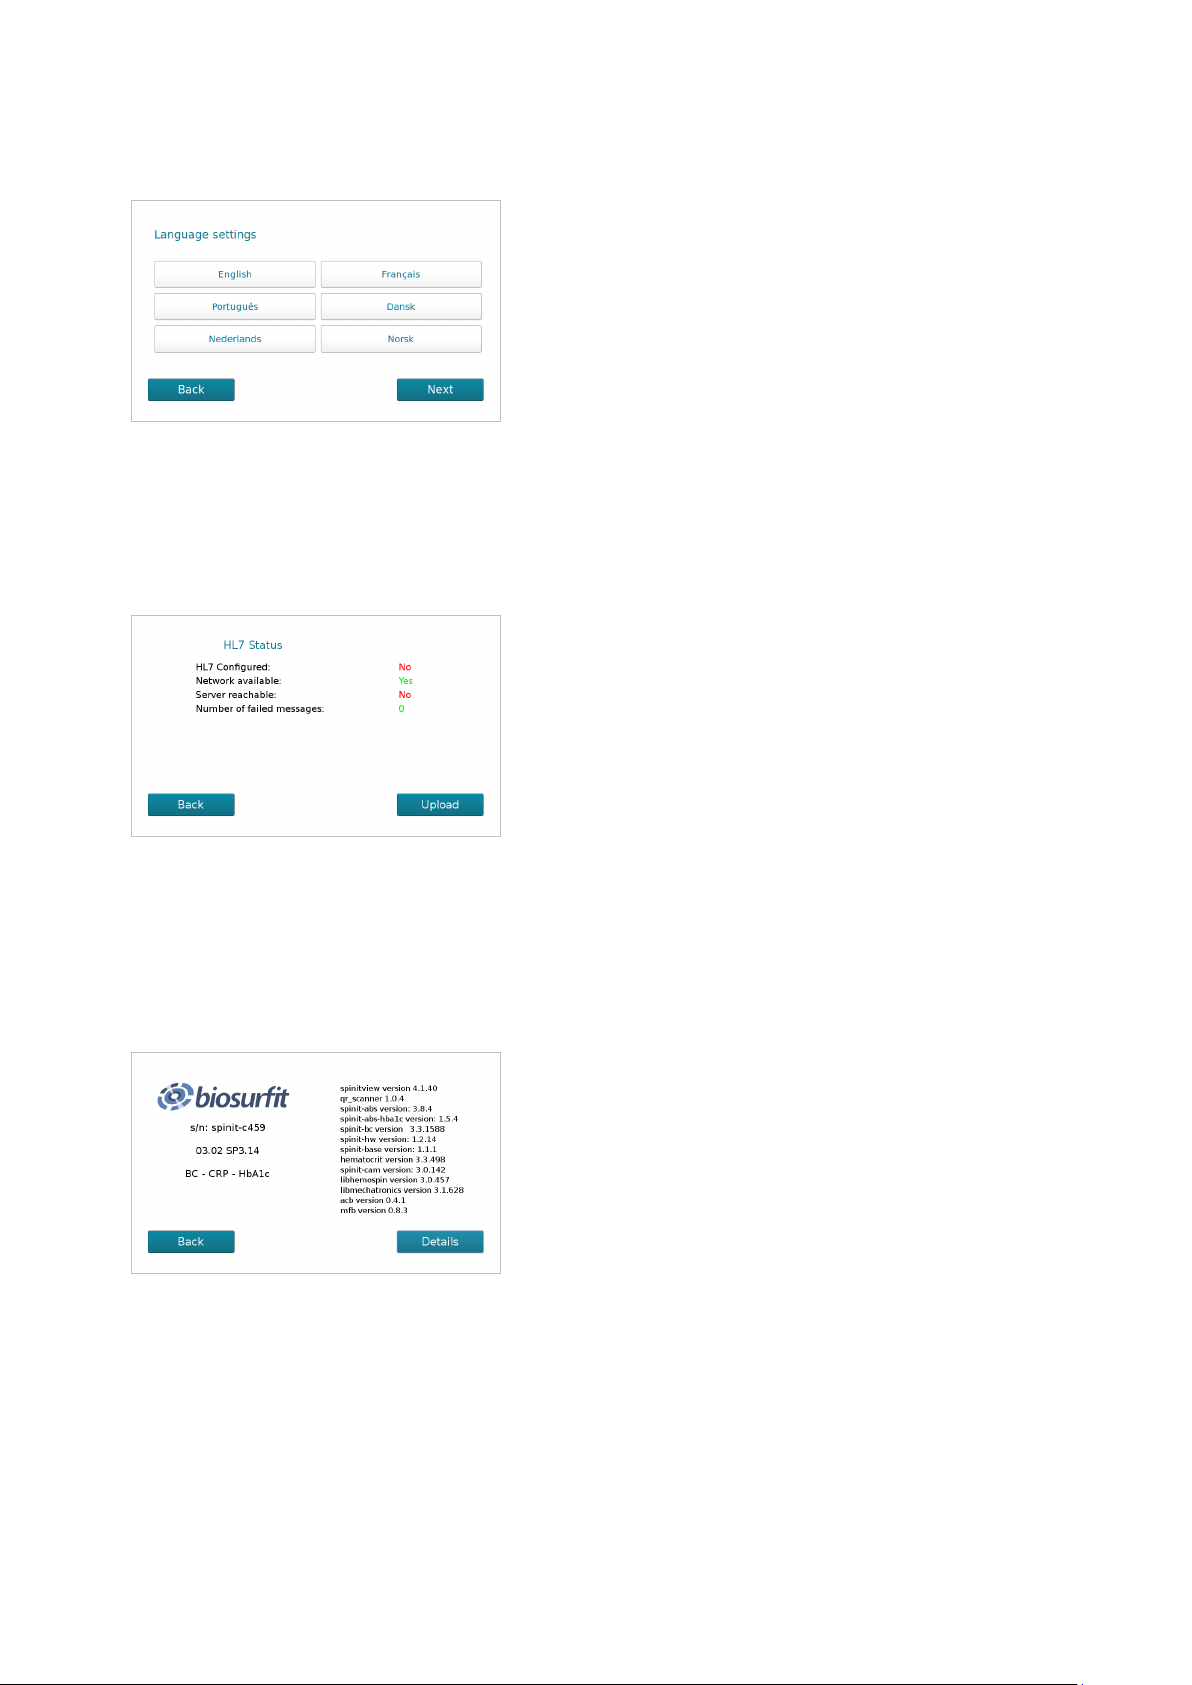
Language
English is the default language, other languages are available and may be selected in the rst panel
of spinit® sengs. Select the menu Languages, click on the preferred language and it will be set for
all menus and instrucons.
HL7 Status
To verify the status of HL7, the user must click on HL7 Status buon. It will provide informaon
regarding: network connecvity, HL7 conguraon status of the device, and the number of HL7
messages that the system was unable to send to the LIS/HIS. Addionally, the user has the opon
to manually resend these messages by pressing the Upload buon.
About
On the About buon, it is possible to have detailed informaon regarding your spinit® instrument
soware versions.
12 spinit® User Manual | Conguraon
The spinit® menus
spinit® User Manual | Conguraon 13
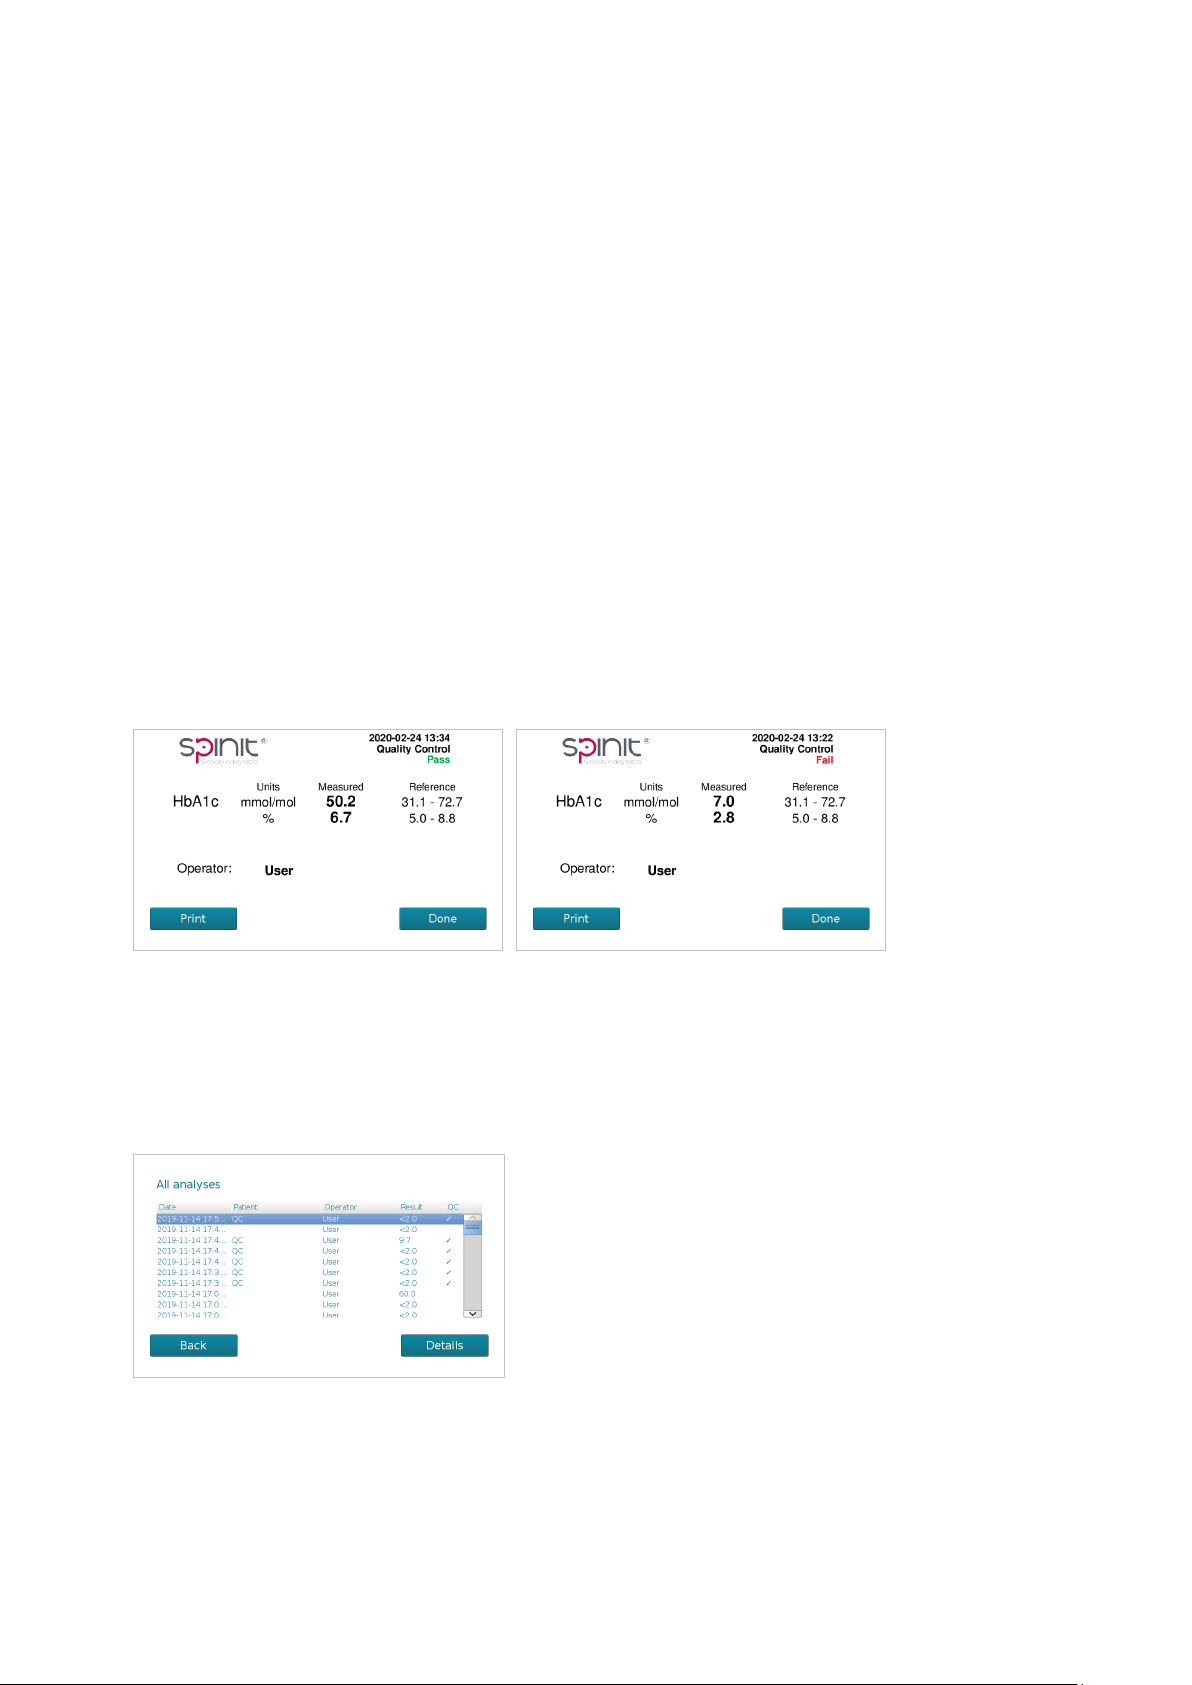
Quality Control
When running controls, the QC mode must be selected at Home menu, and an operator must be cre-
ated previously. Each spinit® disc contains mulple integrated quality control vericaon steps to
ensure reliability of the tests. If the user chooses to perform addional Quality Control checks, bio-
surt recommends tesng spinit® quality control kits with the acceptable ranges previously estab-
lished for the spinit® system.
Running Controls
To run a control, press the buon QC mode on the Home menu and proceed with instrucons on
screen.
spinit® control kits are available for roune quality control tesng. These control kits contain control
materials with established acceptable ranges for spinit® instrument.
Results are then shown in the standard format with the indicaon of Quality control. The user may
later view, print or transfer informaon on all previously run QC controls.
To go back the previous menu, press Done.
QC Pass or Failed
The result of the control is checked against the acceptable ranges for the corresponding lot number.
If the result is within the acceptable ranges, the informaon Pass is displayed on the screen.
If the result is not within the acceptable ranges specied for the spinit® control kit, the informaon
Fail is displayed on the screen.
Paent and Control results
The paent and control results are stored in the memory of the spinit® instrument. Paent results
and control results are saved in separate records. The following parameters are listed for each run:
Date and me, paent ID, operator ID, Result and QC result.
The spinit® menus

14 spinit® User Manual | Conguraon
View, print and export paent and control results
To view or print a specic analysis, select the analysis and press Details. The results can be trans-
ferred to a USB pen drive. For privacy maers, exported data encrypts paent and operator infor-
maon.
Advanced Sengs
The Advanced Sengs are managed by the System Admin.
Advanced sengs include the level of authencaon required for each test (operator ID, paent ID,
measurement ID), user management (create and delete new users) and erase data.
Data
On the menu Data , the system Admin has the possibility to dene if results can be sorted without a
password. To export data, connect the USB pen drive and press Export to USB. Aer exporng the
data, disconnect the UBS pen drive. The complete data set is exported as comma-separated value
(.csv) le for each test type. These les can be processed with any spreadsheet program that can
import csv les. For addional informaon please contact your local supplier. The exported data will
show all the informaon regarding paent and operator ID. For addional informaon, contact your
local supplier.
The spinit® menus
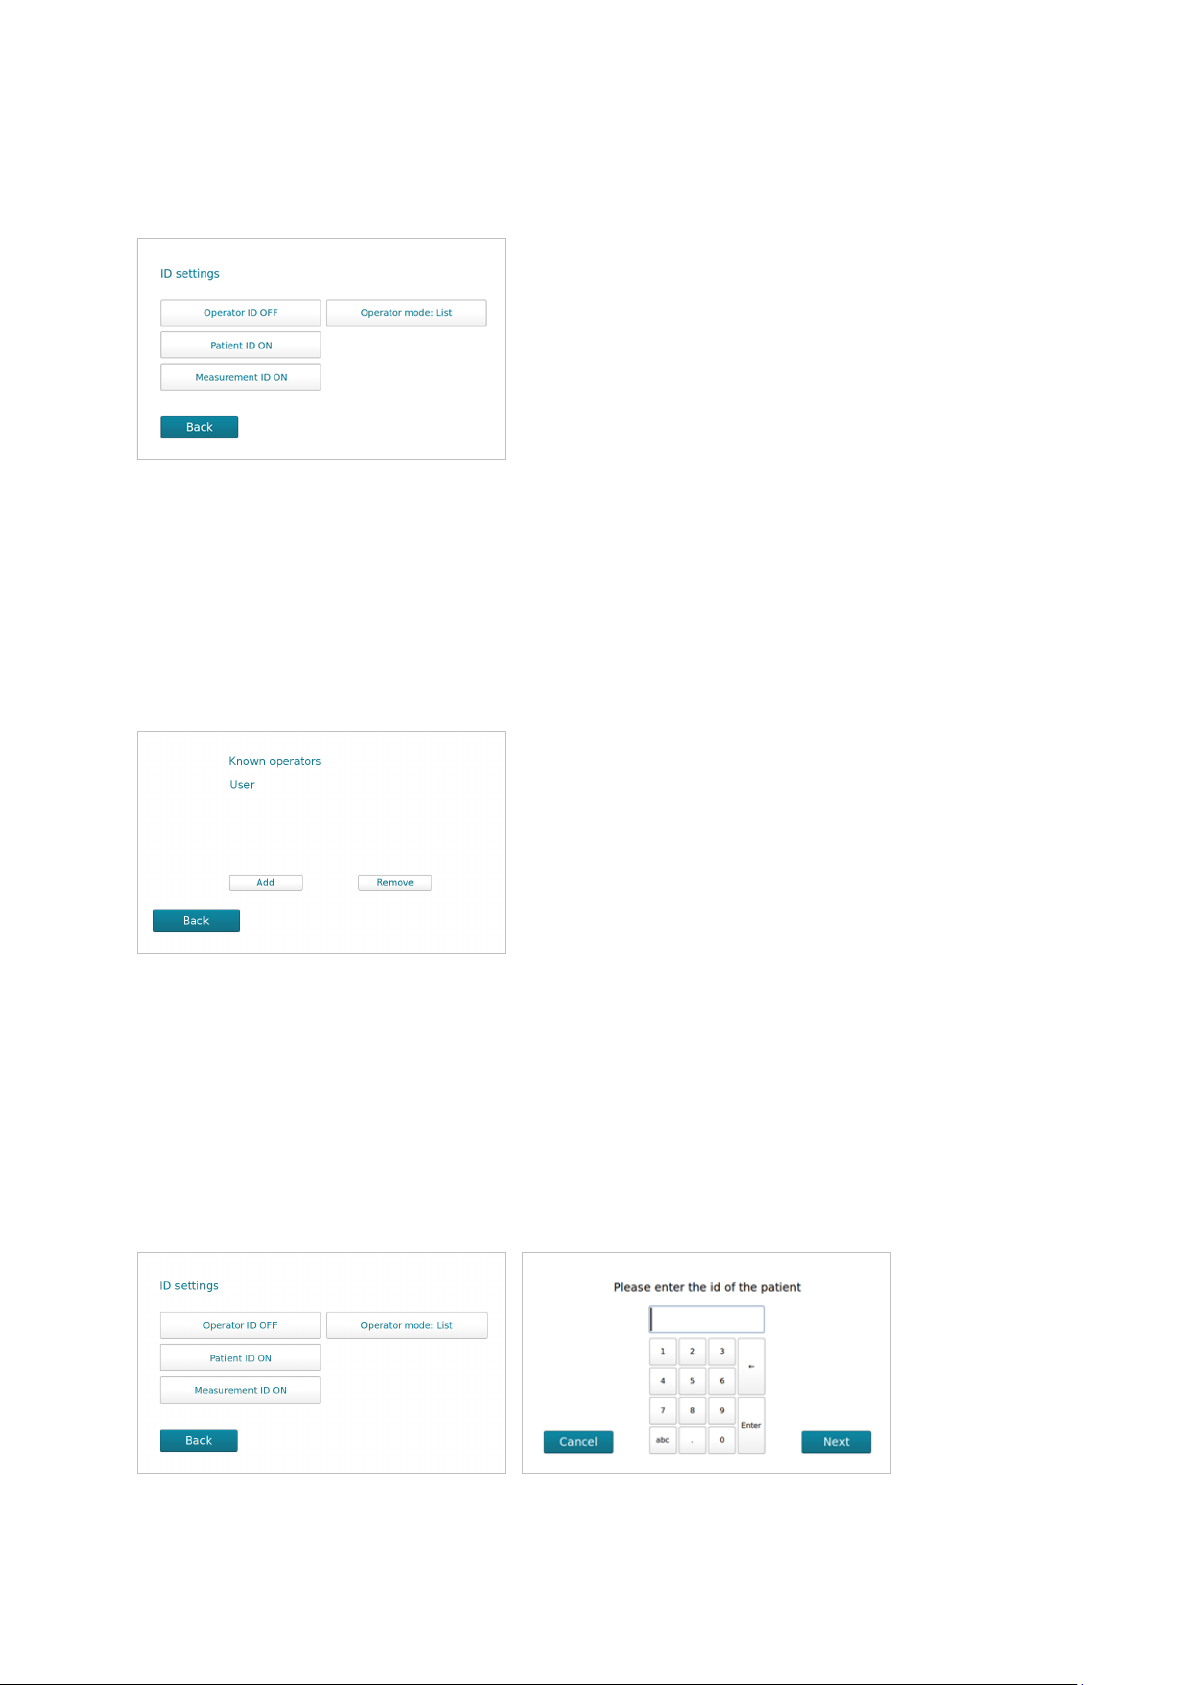
ID Sengs
On the ID Sengs menu the system Admin can setup: Operator ID, Paent ID, Measurement ID
and Operator mode. All these inputs are oponal, and can be enabled or disabled.
Operator ID
If enabled, the operator’s idencaon (ID) is required before processing a spinit® test.
The operator ID will be displayed with the result and stored along with the other specic data for
this run (see Paent and control results records, page 13).
To add an Operator, select Operators on the Advanced sengs menu. Press Add to enter leers /
numbers or scan with your ID. Press Enter to conrm and select Back to go to previous menu.
Paent ID
If this funcon is enabled, the paent ID must be entered for each paent sample to be analyzed.
Use leers / numbers or scan barcode to add paent ID and press Enter to conrm.
The Paent ID will be stored in the memory and displayed along with the other specic data for
this run (See paent and control results, page 13).
spinit® User Manual | Conguraon 15
The spinit® menus

spinit® User Manual | Conguraon 17
The spinit® menus
Assay Opons
The spinit® instrument allows the user to dene assay opons for each spinit® test.
On Advanced Sengs menu, the user shall press the
buon Assay Opons and choose the desired test.
The default factory units for spinit® CRP test are µg/ml.
The user may dene other units for the assay. Aer se-
lecng the units, click Apply. All test results will be calcu-
lated and shown in the selected units. This seng may be
changed anyme. The results stored in the instrument
will be shown in the selected units.
Concerning the spinit® HbA1c test, the default assay op-
on for the determinaon of glycated hemoglobin A1c
(HbA1c) is both units mmol/mol (IFCC units) and % (DCCT
units). The user may choose to add the esmated average
glucose (eAG) determinaon. eAG units may be mmol/L
or mg/dL. This feature shall be set before performing a
spinit® HbA1c test.

Date/Time
The correct date and me should be set as all paent and control results will be displayed with the
respecve date and me of the assay. On the Advanced Sengs menu, by selecng Date/Time is
possible to adjust date/me and save the new denions.
Change Password
The Advanced Sengs menu is protected by a password owned by the System Admin. The default
factory password is 0000. To change the password, on the Advanced Sengs menu press the
buon Change Password, type a new password and click Next.
Congure printer
The user shall connect the printer while the spinit® instrument is turned o. To congure the
printer, go to the Advanced Sengs menu and select Congure printer. A list of all connected
printers will be shown. Select the desired printer and press Set to conclude printer conguraon.
The printer is ready to use. Before the conguraon, the user must switch on the printer to the
instrument while the instrument is sll powered o.
The spinit® menus
18 spinit® User Manual | Conguraon
This manual suits for next models
1
Table of contents


