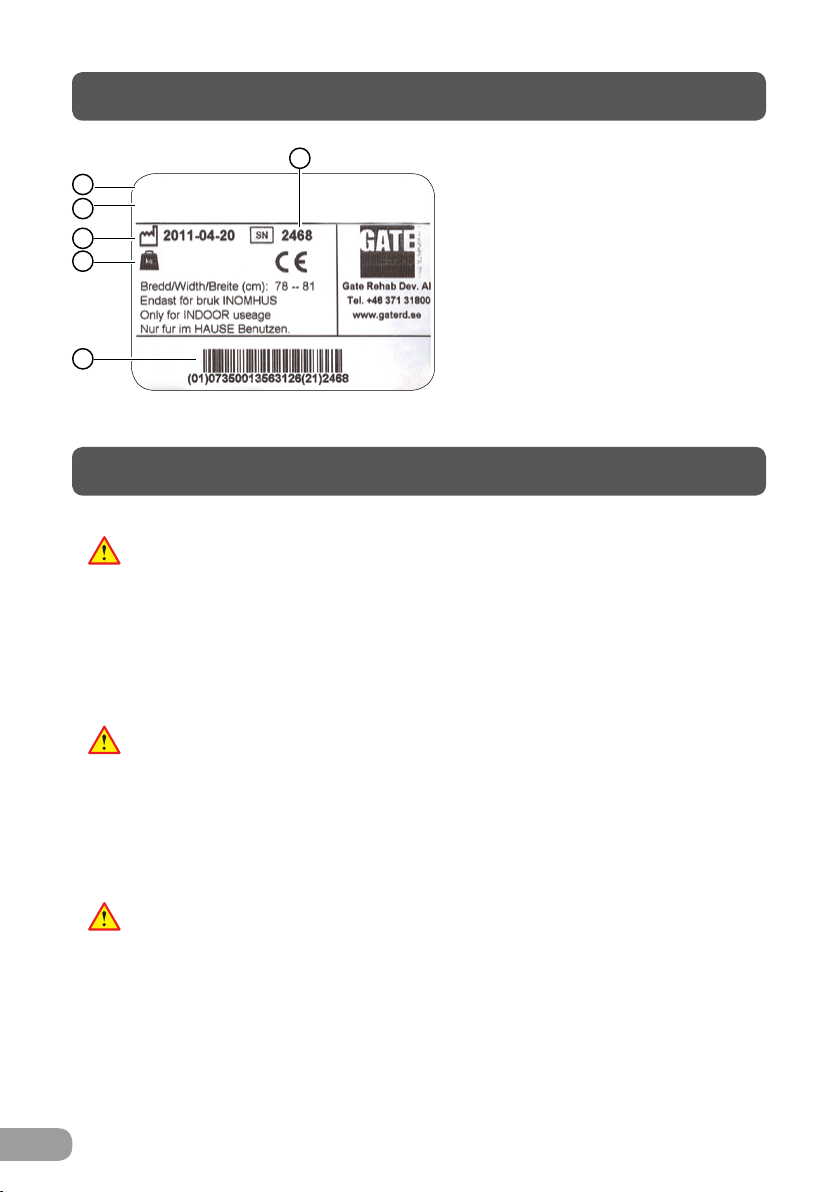
Gate Mover Aqua 53-301 User manual

1
Operating instructions
Mover Aqua
Transfer platform
Mover 53-301

2
General information
Thank you for purchasing this transfer platform from GATE.
Please read these operating instructions carefully and contact us if you have any
questions about the use or maintenance of the "Mover – Transfer Platform".
Foreword
Please read the full instructions before using the product. It is important to under-
stand the information in the operating instructions so the product can be correctly
used and maintained.
Keep the operating instructions with the product so they can be used as a reference
whenever necessary. Ensure that everyone who uses the product receives regular
training in how to use the product.
The product may not be modified without the producer's permission.
The product is CE marked according to MDD 93/42/EEC.
This product has been tested according to SS EN ISO 12182:2012. (Cushions have
been fire tested according to SS EN ISO 597-1/-2).
Servicing and support
The product must always be checked before use. We also recommend a general
overhaul once a year.
Also see the section entitled "Care and maintenance".
Manufacturer:
GATE Rehab Development AB
Box 2
S-333 03 Reftele
Tel. 0371-318 00

3
The Mover – Transfer Platform is a mobile transfer platform with a safe working load
of 180 kg. The product is intended for indoor use on flat surfaces for moving care
recipients and residents at hospitals, nursing homes or in home healthcare.
The product is only intended to be used for care recipients who are able to stand
up without assistance or who can stand with minimal assistance.
The product is not intended for long periods of sitting or moving.
The product is intended for moving a care recipient to/from a chair, bed, wheelchair
or toilet. In this context, "care recipient" means the person being moved.
The Mover Aqua model is also constructed in such a way that it can be used in the
shower.
References to directions in this document (left/right, forwards/backwards) are
always based on the carer's pushing position/facing the care recipient.
The expected lifespan of the product is at least 10 years if regular maintenance is
carried out and any broken parts are replaced as necessary. Contact the distributor
if any part needs to be replaced.
The unique serial number is displayed on a sticker located on the inside of the
frame at the bottom/left.
This product is designed to be safely used by one carer. There may be circum-
stances involving a care recipient who must be moved that make it necessary for
two carers to carry out the move. Each professional carer is individually responsible
at all times for assessing whether the product is suitable for use and whether a
move/transfer needs to be carried out by one or two carers.
Intended use
Expected lifespan
Identication of the product
Policy on the number of persons required for moving a care recipient

4
ID labelling
Safety instructions
1. Uttag för batterikontakt
2. Uttag för stickpropp
(OBS! För att IP-klassning ska gälla så ska
stickpropp ALLTID vara ansluten till styrbox)
3. Uttag för fjärrkontroll
4. Uttag för ställdon - höj/sänk
5. Uttag för ställdon - breddning (Endast
Bure Double)
OBS! Var noga med att kontakter ansluts
till rätt uttag eftersom detta annars kan
skada ställdon.
Kopplingsschema Styrbox Laddning Batteri
Laddning av batteri
Laddning av batteri ska ske då gåbordet inte
används. (Batteriet kan aldrig överladdas.)
Laddning görs genom att stickpropp ansluts
till eluttag.
Innan första användningen så
bör batteriet laddas 24 timmar..
2
3
4
1
5
Skötsel • • •
Generell skötselinstruktion Åtgärd
• Torka av gåbord och armstödsplattor vid behov – använd tvållösning
• Produkten ska ALLTID kännas stabil
Om gåbordet lutar eller har missljud – tillkalla servicepersonal.
• Byt ut trasiga delar omedelbart – skall göras av kunnig personal
• För gåbord med elställdon – använd ALDRIG gåbordet under laddning.
• Kontrollera att styrrör (g) är åtdragna i överstativ (3).
Övriga instruktioner • • •
5
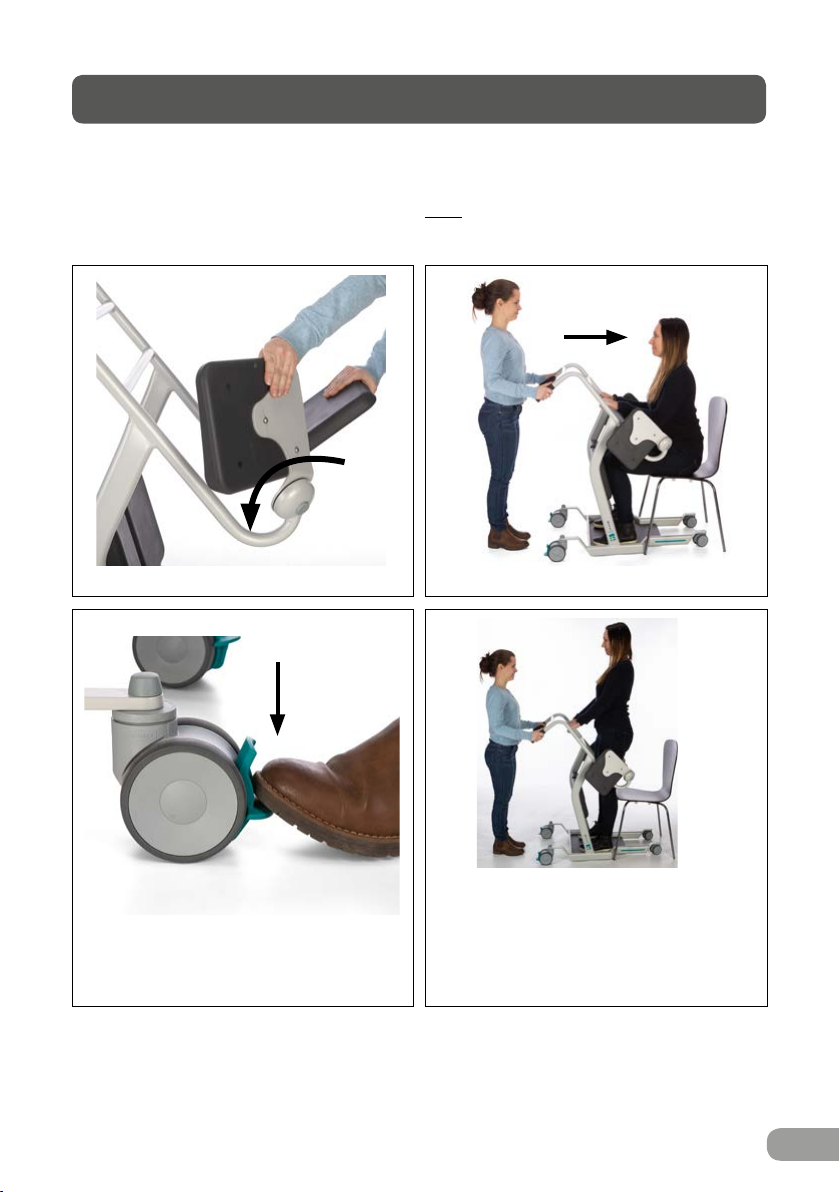
• Do not move a loaded product over obstacles that the castors cannot easily
get over (thick carpet edges, thresholds, etc.).
• Mover Aqua can also be used in a shower. Repair any paint damage as soon
as possible to avoid a shorter lifespan due to corrosion.
• Do not allow the Mover Aqua to stand in direct sunlight since dark surfaces
can become extremely hot.
• This product is only intended for moving care recipients. No other use is
permitted.
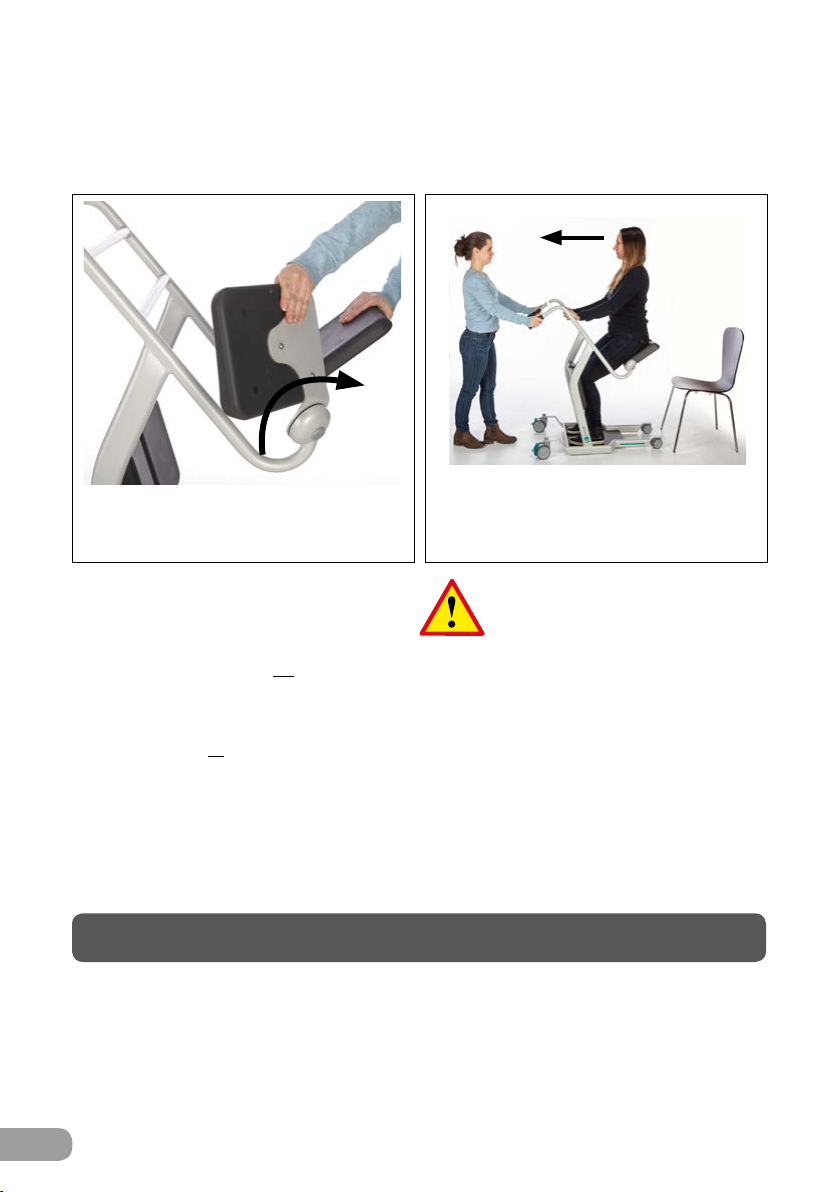
• This product has been constructed and tested to safely move/transfer care
recipients with a body weight of up to 180 kg.
• Always carry out recommended daily maintenance before using the product.
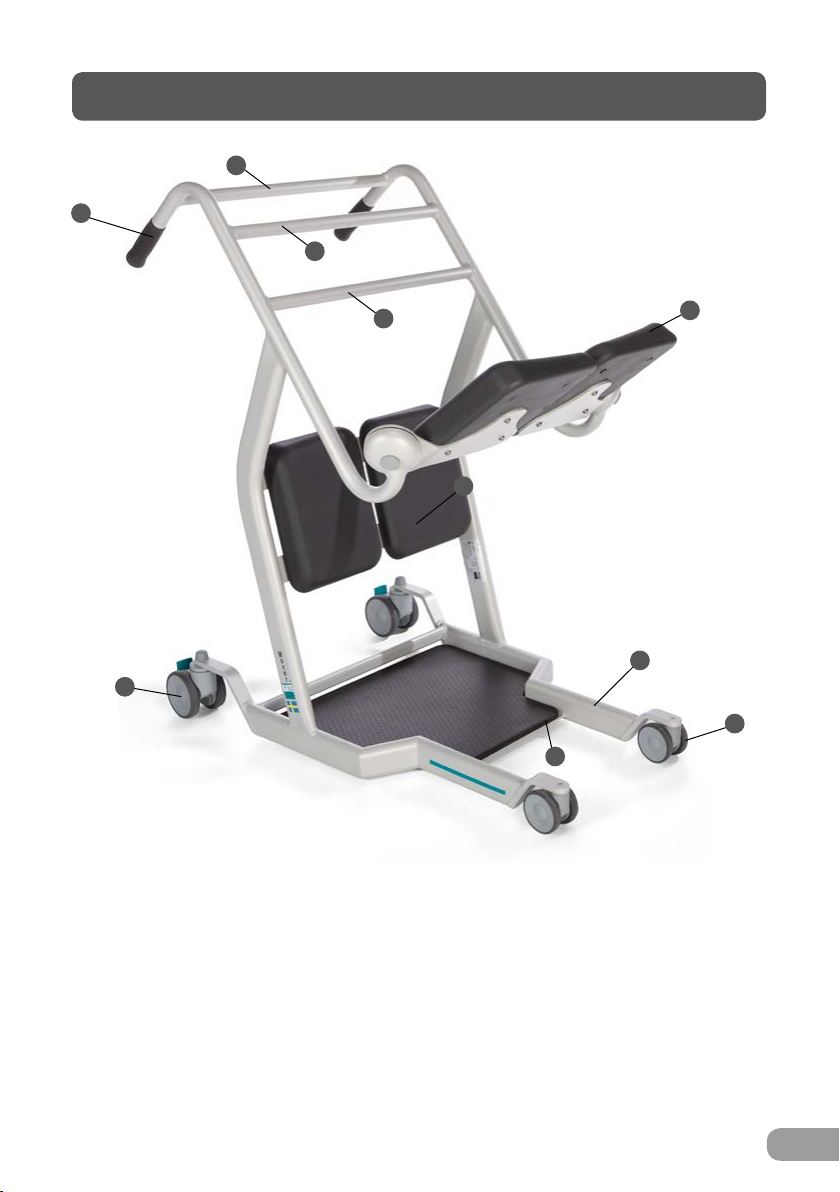
• Always move the product using the handlebars.
• Before using the product, a clinical assessment must be carried out as to
whether the care recipient can be moved using this product and, if so, wheth-
er the move/transfer should be carried out by one or two carers.
1. Article number
2. Product name
3. Date of manufacture
4. Maximum user
weight
5. Serial number
6. EAN code
53-301
Mover Aqua
180 Kg
5
3
4
1
6
2

5
Product description
1) Handlebars/handles for manoeuvring
2a) Upper crossbar/handle
2b) Middle crossbar/handle
2c) Lower crossbar/handle
3) Hinged half-seats/seat cushions
4) Shin support
5) Leg
6) Front castors with no brake
7) Step
8) Rear castors with full brake
3
8
1
4
5
6
2c
2b
2a
7

6
How to use the "Mover"
1) Hold the half-seat
by the handle in the
upper corner.
2) Turn the half-seat
either away from
the moving area
or to a position
underneath the
care recipient
Turn the cushions
Pull and release the brakes on the rear castors
1) Lock the brakes 2) Release the brakes

7
How to use the "Mover"
How to carry out a move/transfer.
1. The steps shown below are for a transfer from one chair/wheelchair/bed/toilet
to another, but it is done in the same way regardless of whether the movement/transfer is
carried out from a chair, bed, wheelchair or toilet.
1) Fold up the two half-seats. 2) Manoeuvre up to the care recipient.
4) Place the Mover so the care
recipient can easily place his or her
feet on the step and his or her knees/
shins against the shin support. Let
the care recipient take hold of the
crossbars/handles however he or
she wishes.
3) Lock the brakes

8
3. When moving to a toilet:
• When the care recipient is in position, the rear castor brakes are applied and the care
recipient stands up
• Remove the care recipient's clothing if necessary then fold up the half-seats so the
care recipient can sit on the toilet him or herself. The product can now act as a support
frame to make it easier for the care recipient during the toilet visit.
2. To carry out a transfer to a chair/wheelchair/bed/toilet, you carry out the above
steps in reverse order.
Please note: The care
recipient should be seated
during movement.
6) Ask the care recipient to sit down.
Release the brakes and
move the care recipient.
5) Fold down the two half-seats.
How to carry out a move/transfer, continued
Cleaning
The product must be regularly cleaned/disinfected – after every use if necessary
or at least once a day.
Clean the product by wiping with a damp cloth moistened with warm water and
disinfectant detergent. Dry thoroughly to effectively disinfect all surfaces.
Do not use chlorine, phenols, pentanols or other strong detergents that could
damage the surface/dry out the cushions or cause premature cracking.

9
Care and maintenance
Preventive maintenance schedule
Action/Checks Before each use Annual overhaul
Carry out a general
inspection
-test the product's
functions. Check that there
are no broken or cracked
parts. Check that the
product feels stable.
X X
Check that the half-seats
can be folded up/down. X
Check that the rear castors
can be rotated and that the
brakes can be applied.
X
Check that
the step is fixed. X X
Check that the castors are
securely fixed to the frame. X
Inspect exposed parts
for cracks or sharp edges
(these may become
unhygienic or injure the
care recipient)
X
Check that there are no
loose bolted joints. X
Repair any damage to the
paint to prevent surface
corrosion – this applies
particularly to Mover Aqua.
Paint for touching up can
be ordered from the dis-
tributor.
X
If the product, when checked, has faulty/broken parts, it must not be used until the faulty
parts have been replaced.

10
Technical Specications
Pos. No. Art. number Description
1 53-341 End screw M10, Ø30 mm
2 53-342 Screw, Knee support plate (x4)
3 53-344 Rubber handle, L=92 mm (x2)
4 53-311 Step Aqua
5 53-336 Screw, Seat plate (x3)
6 53-337 Screw, step (x4)
7 53-338 Washer, seat plate (x3)
8 53-339 Locknut, M10
9 53-340 Washer M10
10 53-312 Double castor with no brake Ø75 mm
11 57-096 Double castor with full brake "diameter" 100mm (Aqua)
12 53-343-L Bracket, seat plate left
13 53-343-R Bracket, seat plate right
14, 15 57-394 Seat/Knee support PUR (Aqua)
16 53-334 Washer/Knee support plate (x4)
17 53-330 Cap/Screw. grey
18 53-331 Washer
Recycling/Scrapping
When the product can no longer be used, it should be recycled in accordance
with the law/regulations for waste management in each country. All electrical parts
including batteries must be removed and recycled as electrical components.
(Consult your local recycling facility for more information on how
the various materials in the product (metal, plastic, electronics) must be recycled).

11
Technical specications
2
4
6
2
18
1
16
98
7
13
12
15
14
3
5
10
11
17

12
960 mm
800 mm
620 mm
1070 mm
940 mm
Product weight = 28 kg
380 mm
635 mm
2019-05-28, 2
Dimensions
WE DO BETTER.
Would you like to know more?
Contact us at: Tel: +46 371 31800
Gate Rehab Development AB
Industrigatan 2 | SE-333 75 Reftele
Table of contents
Other Gate Medical Equipment manuals

Gate
Gate Bure Standard EL 56-312T User manual

Gate
Gate Bure Rise & Go DB 56-309 User manual

Gate
Gate Bure Rise & Go 56-316 User manual

Gate
Gate Amfibi Double HighBack 56-275 User manual

Gate
Gate Bure Standard EL 56-312T User manual

Gate
Gate Bure Ortho GAS, 56-318 User manual

Gate
Gate Bure Standard User manual

Gate
Gate Bure Standard GAS 56-311 User manual

Gate
Gate Bure Ortho 56-317T User manual

Gate
Gate Bure Double 2.0 56-303 User manual