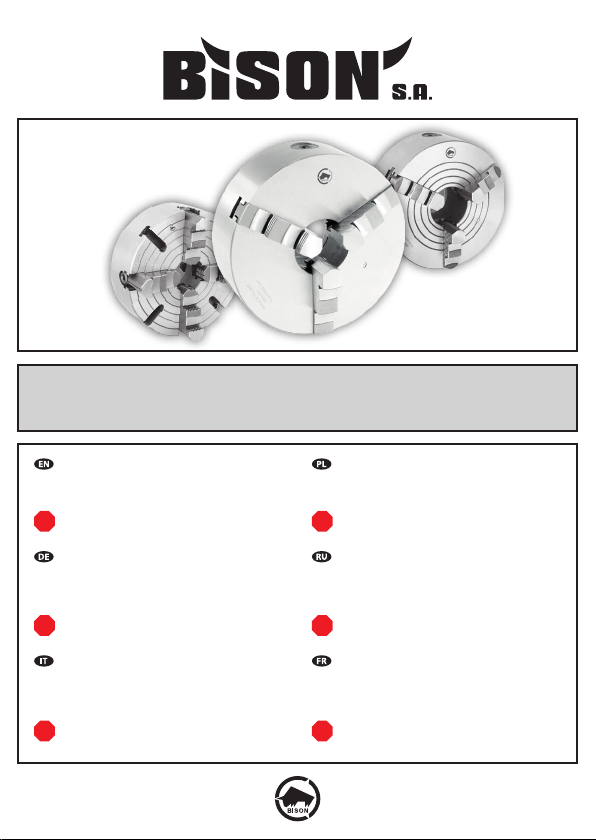
Bison 32 Series User manual

3105 ▪32** ▪3264 ▪3265 ▪35** ▪3564 ▪3565 ▪36** ▪ 37**
38** ▪3864 ▪3865 ▪43** ▪4505 ▪4705 ▪4605 ▪4805
INSTRUCTION MANUAL [Page 5]
The manual covers tting, operation and maintenance
of hand-operated lathe chucks.
NOTE: Carefully read the instructions before
attempting to use the Workholding Chucks!
BEDIENUNGSANWEISUNG [Seite 33]
Vorliegende Bedienungsanleitung umfasst Montage, Betrieb
und Wartung oben genannter Drehmaschinenspannfutter
mit Handeinspannung.
ANMERKUNG: Vor der Arbeit lesen Sie bitte
aufmerksam die Bedienungsanleitung!
MANUALE DI ISTRUZIONI [PAGINA 61]
Il presente manuale illustra il montaggio, il
funzionamento e la manutenzione dei mandrini
autocentranti a comando manuale.
NOTA: Leggere attentamente le istruzioni prima di
cercare di utilizzare i mandrini di bloccaggio!
[Strona 19]
Instrukcja obejmuje montaż, eksploatację i konserwację
uchwytów tokarskich z mocowaniem ręcznym.
Инструкция включает в себя монтаж, эксплуатацию
и консервацию токарных патронов с ручным
креплением.
]
Ce manuel décrit la pose, le fonctionnement et la
maintenance des mandrins de tour à xation et
commande manuelle.
REMARQUE : Lisez attentivement les instructions
avant d’utiliser les mandrins de serrage!
!
!
! !
MADE IN POLAND
!
!


1
Self-centering scroll chucks
Uchwyty samocentrujące spiralne
Planspiralfutter
Самоцетрирующие спиральные птароны
Mandrini autocentranti a guida semplice
Mandrins à serrage concentrique
3105 32** 35** 36** 37** 38**
3204 3504 3504-P 3604 3704 3804
3205 3505 3505-P 3605 3705 3805
3214 3514 3514-P 3614 3714 3806
3215 3515 3515-P 3615 3715 3807
3234 3534 3534-P 3634 3734
3235 3535 3535-P 3635 3735
3244 3544 3544-P 3644 3744
3245 3545 3545-P 3645 3745
3274 3574 3574-P 3674 3774
3275 3575 3575-P 3675 3775
Self-centering chucks with ne adjustment
Uchwyty samocentrujące spiralne z regulowanym osadzeniem
Planspiralfutter mit radialer Feineinstellung
Самоцентрирующие патроны с точной регулировкой
Mandrini autocentranti con regolazione di precisione
Mandrins à réglage n radial
3264 3265 3564 3565 3864 3865
Self-centering and individually adjustable scroll chucks
Uchwyty samocentrujące spiralne z niezależnym nastawieniem szczęk
Wescott-Futter
Патроны спиральные самоцентрирующие и с независимым перемещением кулачков
Iandrini autocentranti a guida semplice e regolabili singolarmente
Mandrins à serrage concentrique et réglables individuellement
4505 4605 4705 4805

2
Independent Chucks
Uchwyty z niezależnym nastawieniem szczęk
Planscheiben
Патроны с независимым перемещением кулачков
Piattaforme
Plateaux
43**
4306 4307
4304 4305 4314 4315
4334 4335 4344 4345
Warranty and Complaint Conditions
General Warranty and Complaint Conditions for products of the BISON S.A. are available at www.store.
bison-chuck.com.
Warunki Gwarancji i Reklamacji
Obowiązujące Ogólne Warunki Gwarancji i Reklamacji na wyroby Spółki BISON S.A. znajdują się na
stronie www.store.bison-chuck.com
Garantien- und Reklamationsbedingungen
Allgemeine Garantien- und Reklamationsbedingungen für Produkte des BISON S.A. sind an www.store.
bison-chuck.com verfügbar.
Общие Условия Гарантии и Жалобы,
Общие Условия Гарантии и Жалобы на продукцию компании BISON S. A. приведены на сайте www.
store.bison-chuck.com
Condizioni di garanzia e di reclamo
Le Condizioni generali di garanzia e di reclamo riguardo i prodotti di Bison S.A. sono disponibili al www.
store.bison-chuck.com
Les Conditions de garantie et de réclamation
Les conditions générales de garantie et de réclamation pour les produits de la société BISON S.A. sont
disponibles sur www.store.bison-chuck.com

3
Dear Customer,
On behalf of BISON S.A. we would like to thank you
for choosing our product!
We believe that the use of our products will meet
your highest expectation.
Our staff will provide you with any technical
information and assistance as well as help you
choose the optimal products, spare parts, or
accessories from the wide range of BISON S.A.
products all tailored for your specic needs.
The product you have purchased is covered with a
warranty, which is part of the service we provide to
our valued customers. Please take time to carefully
familiarize yourself with the included warranty
conditions.
Kind Regards,
BISON S.A.
Sehr geehrter Kunde,
im Namen von BISON S.A. bedanken wir uns für den
von Ihnen getätigten Kauf!
Wir hoffen, dass die Nutzung unserer Produkte Sie
zufrieden stellt und Ihnen viel Freude bringen wird.
Unsere Mitarbeiter stehen Ihnen jederzeit mit allen
technischen Informationen zu unseren Produkten
zur Verfügung und beraten Sie gerne hinsichtlich
der Auswahl von passenden Ersatzteilen und
geeignetem Zubehör.
Im Rahmen unserer Serviceleistungen gewähren
wir auf das von Ihnen erworbene Produkt eine
Garantie. Wir bitten Sie daher, die beigefügten
Garantiebedingungen aufmerksam zu lesen.
Mit freundlichen Grüßen,
BISON S.A.
Szanowny Kliencie,
W imieniu BISON S.A. pragniemy podziękować
za dokonane zakupy. Mamy nadzieję,
że użytkowanie naszych wyrobów przyniesie
Państwu zadowolenie i wiele satysfakcji.
Nasi pracownicy udzielą Państwu wszelkich
informacji technicznych i będą służyli pomocą
w doborze oprzyrządowania produkowanego przez
rmę BISON S.A.
Zakupiony przez Państwa wyrób jest objęty
gwarancją, będącą jednym z elementów serwisu
świadczonego naszym drogim Klientom.
Z poważaniem,
BISON S.A.
Уважаемые Клиенты,
От имени BISON S.A. хотим поблагодарить
за покупку наших продуктов. Надеемся, что
пользование ними даст Вам удовольствие и много
удовлетворений.
Наши сотрудники дадут Вам всякие нужные
технические справки а также окажут помощь
при выборе оснастки, производимой фирмой
BISON S.А.
Мы предоставляем гарантию на приобретенный
Вами продукт, которая является одной из частей
сервисного обслуживания наших дорогих
Клиентов.
С уважением,
BISON S.A.

4
Gentile Cliente,
BISON SA la ringrazia per avere scelto un nostro
prodotto!
Siamo convinti che l’utilizzo dei nostri prodotti
soddisferà ogni aspettativa, anche le più alte.
Il nostro personale saprà fornirle tutte le
informazioni tecniche e l’assistenza di cui avrà
bisogno, e la afancherà nella scelta del prodotto,
dei ricambi e degli accessori più indicati all’interno
dell’ampia gamma di prodotti BISON SA, tutti
realizzati su misura in base alle sue speciche
esigenze.
II prodotto che ha acquistato è coperto da
garanzia, un servizio standard che offriamo a tutti
i nostri stimati Clienti. La preghiamo di leggere con
attenzione le condizioni della garanzia allegate.
Cordiali saluti,
BISON S.A.
Cher client,
Au nom de BISON S.A., nous tenons à vous
remercier d’avoir choisi notre produit !
Nous sommes certains que l’utilisation de nos
produits répondra à vos plus grandes attentes.
Notre personnel vous fournira toutes les
informations et l’aide technique nécessaires, et
vous aidera à choisir les produits, pièces détachées
et accessoires optimaux dans la large gamme de
produits BISON S.A., tous conçus sur mesure pour
vos besoins spéciques.
Le produit que vous avez acheté est couvert
par une garantie ; elle fait partie du service que
nous fournissons à nos clients estimés. Merci de
prendre le temps de bien vous familiariser avec les
conditions de garantie incluses.
Bien cordialement,
BISON S.A.

ENGLISH
5
1. WORK SAFETY CONDITIONS
2. TECHNICAL DATA
2.1 Application
2.2 Chuck design
2.3 Installation
2.4 Removing chucks from the spindle nose
2.5 Adapter plates
2.6 Gripping ranges
2.7 Operation
2.8 Clamping force
2.9 Admissible speeds
2.10 Admissible weight of the workpieces
2.11 Permissible centering accuracy values
3. INCLUDED IN CARTON
4. LIST OF SPARE PARTS
CONTENTS
6
6
6
6
7
9
9
11
12
13
13
14
16
17
18
PAGE

ENGLISH
6
1. Work safety conditions
1. Each person using the chuck should read this
manual prior to attempting to work and follow
it completely.
2. In case of abnormal chuck operation or
damage, stop the work immediately and notify
the supervising staff.
3. Repairs and overhauls of the chuck may only
be performed by suitably qualied personnel.
4. Modication of wrenches delivered by
BISON S.A. together with chuck or usage of
other wrenches voids the warranty.
5. Use of wrenches which do not correctly match
the square seat in the scroll chuck pinion, or
screw head in independent chucks voids the
warranty.
6. Usage of square seat in the pinion of scroll-
chuck or the screw head in the independent
chuck for removing the chuck from the spindle
of the machine tool voids the warranty.
7. With the exception of the safety condition
above, operators should follow local Industrial
Health & Safety Regulations.
2. technical data
2.1 Application
Lathe chucks are designed for holding the workpiece on lathes or grinding machines. They can also be used as an
accessory from indexing units or other xing devices.
1- Body
2- Scroll plate
3- Pinion
4- Stud bolt
5- Cover plate
6- Adapter plate
7- Jaw
8- Grease nipple
9- Body sleeve
10 - Jaw guide
11 - Sleeve bearing
12 - Locking half ring
13 - Operating screw
14 - Holder
15 - Master jaw
35**
3564
3565
37**
38**
3864
3865
3105
32**
36**
2.2 Chuck design
Fig. 1 Fig. 2
6
11 12
7
5
1
9
10
3
42
8
6
32**-800

ENGLISH
7
43** 4505
4605
4705
4805
NOTE: (Fig. 4) Screw 13 may only be used for moving the jaws independently to one another.
Rotating the pinion 3with wrench results in a movement of jaws 7by the same stroke.
!
2.3 Installation
After removing the chuck from the carton, carefully
check to ensure all parts are included in the carton
(see page 15) ensuring that no parts are missing.
Remove the protective coating from all surfaces
except the surfaces of the guides in the jaws
and the body. The chuck seat and jaw gripping
surfaces should be cleaned very carefully.
Installation of the chuck with direct mounting
on the spindle nose
The directions apply to chucks with mounting seats
according to DIN 55026, DIN 55027, DIN 55029,
ISO 702, ANSI B.5.9 and type L (long taper). The
chuck should be mounted on the spindle nose.
(Accuracy conditions are presented in Fig. 4 and
Table 1.) In case of chucks with 7:24 taper tighten
the nut provided at the spindle nose.
Fig. 5
Chuck
Type Indication
Chuck size
80
85
100
110
140
160 200 250 315
350 400 500 630 800 915
1000 1250
35** a, b 0,003 0,005
32** 0,003 0,005 -
43** a0,003 0,005 0,01
b0,003 0,005
Table 1
Fig. 3 Fig. 4
1
713
14
7
13
1
3
5
15
a
b

ENGLISH
8
Installation of the chuck with plain back
mounting
The chuck with plain back mounting is mounted
on the spindle nose by use of an adapter. These
chucks are primarily intended for threaded spindle
nose. Connection dimensions of adapters are given
in Fig. 9-13 and Tables 2-3.
type 3564, 3565, 3864 and 3865 (Fig. 6)
Mount the chuck on the adapter 1
and lightly tighten all the screws 3connecting
the chuck and adapter. In order to obtain the
desired chuck setting accuracy, grip a workpiece
in the jaws engaging their full face and x securely.
Tighten the adjusting screws 2to a light contact
with the adapter.
Place a dial indicator on workpiece about 60
mm from the jaws and rotate the chuck with the
workpiece to determine maximum and minimum
points and locations of nearest adjusting screws.
Rotate the chuck to the adjusting screw nearest to
the point of the indicator maximum read-out.
Rotate to the opposite located adjusting screw and
unscrew it by the half of the TIR error.
Rotate to the previous location and screw in the
opposite adjusting screw.
Repeat these steps until required accuracy is
reached and all the adjusting screws are equally
tightened.
Having completed the adjustment tighten the
screws connecting chuck and adapter. Use ground
bar stock for setting to obtain maximum accuracy.
3264 and 3265 (Fig. 7)
Mount the chuck on the adapter 1and tighten
all screws 2connecting the chuck with the
backplate. Slightly loosen screws 5connecting
the chuck body and driver 3.
In order to obtain the required accuracy of the
chuck, grip a workpiece in the jaws (engaging their
full face) and x securely.
Tighten the taper adjusting screws 4to slight
contact with the adapter 3. Place a dial indicator
on workpiece about 60 mm from the jaws and
rotate the chuck to determine maximum and
minimum points and locations of nearest adjusting
screws.
Rotate the chuck to the adjusting screw nearest to
the point of the indicator maximum read-out.
Rotate to the opposite located adjusting screws and
unscrew them by the 1/3 of the TIR error. Rotate
to the previous location and screw in the opposite
adjusting screw.
If the location of indicator maximum read-out is
between two adjusting screws, the chuck should
be rotated to the opposite located adjusting screws
which should be unscrewed by half of the TIR error,
and then screw in the opposite adjustment screw.
Repeat these steps until the required accuracy
is reached and all adjusting screws are equally
tightened. Having completed the adjustment
tighten the screws connect the chuck and the
adapter.
Fig. 6 Fig. 7
1
3
212
3
4 5

ENGLISH
9
2.4 Removing chucks from the spindle nose
From threaded spindle nose
Before removing the chuck from the spindle it is
necessary to:
■Screw the bolt 1into the threaded hole
provided in the adapter
■Support the bolt 1with soft metal or wooden
block A
■Turn on the lowest reverse operating speed and
loosen the adapter on its thread
■Unscrew the chuck by hand
When dismantling the chuck, put a wooden
protecting board under the chuck body B.
NOTE: Chuck should not be loosened by any
sort of direct hit on the jaws.
NOTE: When removing chucks larger then
Ø400mm diameter an eye-bolt should be
screwed into the chuck body and a suitable
hoist/crane should be used for removing the
chuck from the machine tool.
From the tapered spindle noses
When removing the chuck it is necessary to:
■Secure the spindle against rotation
■Unscrew the xing element
■Remove the chuck from the spindle nose
When removing the chuck, put a wooden protecting
board under the chuck body.
2.5 Adapter plates
Centering surfaces of the adapters should be
positioned against the chuck body with the
smallest possible clearance. The maximum runout
of „A” and „B” adapter surfaces (Fig. 8, 10, 12 and
13) for chucks within diameters range is:
Chuck Dia. Ø80 – Ø160 = 0,003 mm
Chuck Dia. Ø200 – Ø800 = 0,005 mm
NOTE: After having mounted the chucks with
diameter over 400mm on the adapter, you
have to remove the transport eyebolt from the
chuck body before using the chuck.
Adapters for scroll chucks Ø80-630
Table 2
Chuck size D1D2d1d2hmin cNumber
of holes
80 56 67 6,4 10,4 6,2 2,5
3
100 70 83 8,4 13,5 8,3 2,5
110 80 95 8,4 13,5 8,3 3,5
125 95 108 8,4 13,5 8,3 3,5
140 105 120 8,4 13,5 8,3 3,5
160 125 140 10,5 16,5 10,3 3,5
6
200 160 176 10,5 16,5 10,3 3,5
250 200 224 13,0 19,0 12,3 4,5
315 260 286 17,0 25,0 16,5 4,5
400 330 362 17,0 25,0 16,5 4,5
500 420 458 17,0 25,0 16,5 4,5
630 545 586 17,0 25,0 16,5 6,5
!
!
!
Fig. 9
1
A
AB
D2
D1
c
h
d1
D
0,2
d2
Fig. 8

ENGLISH
10
Adapters for scroll chucks Ø800
Adapters for independent chucks
Table 3
Chuck size D1D2dNumber
of holes
100 79,38 54,00 M8
4
125 69,85 54,00 M8
160 82,55 69,85 M10
200 110,00 82,60 M10
250 150,00 104,80 M12
315 175,00 133,40 M16
350 175,00 133,40 M16
400 200,00 171,40 M16
500 270,00 235,00 M20
630 270,00 235,00 M20
800 380,00 330,20 M24
915 370,00 330,00 M24
8
1000 370,00 330,00 M24
1250 550,00 500,00 M24
A
0,272
62
M6
85
4
A
D1
d
D2 0,2
Ø100 ÷ Ø1250 mm chuck
Fig. 13
Fig. 11
Example of chuck mounting on the spindle nose with 1:4 taper,
A1 version, taper size = 20.
Fig. 10
Example of chuck mounting on the threaded spindle nose.
Fig. 12
Ø85 mm chuck
A
B
M24
450
368,3 0,2
20
368,3
450

ENGLISH
11
2.6 Gripping ranges
Gripping ranges for self-centering scroll chucks (Fig. 14, Table 4)
Chuck size D 80 100 110 125 140 160 200 250 315 400 500 630 800 1000
3- and 4-jaw scroll chucks
Solid jaws
d15 20 27 32 40 42 55 76 103 136 190 252 320 460
d12-27 3-33 3-33 3-50 3-50 3-64 4-90 5-118 10-131 10-180 20-235 30-335 150-482 -
d222-46 25-56 25-56 34-74 34-74 42-100 52-135 62-174 78-200 85-252 120-335 160-465 282-614 -
d345-69 56-87 56-87 72-115 72-115 94-154 120-202 145-256 172-299 210-380 245-476 325-630 448-780 -
d425-50 32-62 32-62 39-83 39-83 50-107 60-145 77-188 90-215 103-272 140-357 180-487 302-634 -
d548-71 62-83 62-83 80-125 80-125 98-160 130-200 160-250 190-315 230-400 276-500 345-630 468-800 -
2-piece jaws
d1- - - 3-50 - 3-64 4-90 5-118 10-131 10-180 20-235 30-335 150-482 250-600
d2- - - 34-76 - 42-97 50-130 58-165 65-182 72-228 120-410 140-590 252-736 350-1080
d3- - - 75-118 - 88-146 105-190 125-235 145-265 165-329 200-485 210-665 328-812 430-1150
d4- - - 52-96 - 62-121 72-156 86-197 103-226 127-294 110-400 120-570 240-724 425-1070
d5- - - 95-125 - 115-160 133-200 160-250 190-315 230-400 190-500 200-630 316-800 500-1150
6-jaw scroll chucks
Solid jaws
d- - - 35 - 42 55 76 103 136 190 252 - -
d1- - - 6-43 - 8-64 8-90 12-118 12-131 15-202 30-235 40-335 - -
d2- - - 34-68 - 47-100 55-135 68-174 82-200 95-280 132-335 175-467 - -
d3- - - 74-100 - 98-154 121-202 150-256 178-299 213-400 270-474 340-630 - -
d4- - - 42-78 - 52-107 64-145 82-188 95-215 140-308 152-361 192-487 - -
d5- - - 83-120 - 102-160 132-200 165-250 192-315 232-400 291-500 358-630 - -
2-piece jaws
d1- - - 6-43 - 8-64 8-90 12-118 12-131 15-202 30-235 40-335 - -
d2- - - 33-70 - 45-97 52-130 68-174 68-182 73-252 135-413 150-585 - -
d3- - - 76-119 - 92-146 109-190 150-256 150-265 169-353 210-489 220-661 - -
d4- - - 50-87 - 67-121 74-156 82-188 108-226 132-296 121-402 132-555 - -
d5- - - 94-125 - 118-160 134-200 164-250 153-315 236-400 197-478 210-630 - -
Table 4
Fig. 14
Gripping ranges for independent chucks and self-centering individually adjustable scroll-chucks
(Fig. 15, Table 5)
Fig. 15

ENGLISH
12
Chuck size D 85 100 125 150 160 200 250 315 350 400 500 630 800 915 1000 1250
d1 min 3 3 8 8 8 10 10 15 15 20 45 50 50 80 250 250
d2 max 85 100 125 150 160 200 250 315 350 400 500 630 800 915 1000 1250
d25 25 26 42 42 45 60 75 75 95 120 155 195 190 190 190
Table 5
2.7 Operation
General directions
1. For scroll chucks it is recommended to grip
workpieces by selecting jaw faces which are
the closest match to the size of the workpiece.
2. With a 4-jaw independent chucks it is
recommended to grip by using jaw types
which locate screws to give the best possible
jaw positioning for the workpiece.
3. When assembling 2-piece reversible jaws: To
reduce the “play” at the tenon and slot joint
of the jaws, take the top jaws off the chuck and
then clamp jaws together using screws.
4. The workpiece being gripped should align to
jaw faces as much as possible.
5. Longer workpieces should be machined with
an appropriate steady.
6. If the jaw movement appears stiff or more
difcult than usual; disassemble to investigate
the problem, remedy the fault and rebuild the
jaws.
7. DO NOT use any form of hammering force for
xing the jaws!
8. DO NOT use any extension pipe to lengthen the
xing wrench to exert more force!
Maintenance procedure
It is recommended, at least once a week, to remove
the jaws from the chuck body; clean the working
surfaces (guides, teeth, and threads in the case of
independently set jaws) and lubricate them with
grease according to Table 6.
In the case of heavy operating conditions of scroll
chucks it is recommended to lubricate them with
machine oil type „16” through the lubricating
nipple located on the chuck body face, every 8
hours.
NOTE: DO NOT clean the chuck with
compressed air as it is extremely dangerous
and can send fragments into eyes and skin at
high speed.
Table 6
Item Grease brand Lubrication area
1GLEITMO - 805
Jaw and body guides, jaw teeth, scroll,
body hub, feed screws for the chucks with
independent jaw setting
2Machine grease 2 Toothing of scroll and toothed wheel
An inspection should be performed at least every
6 months and any minor reduction of the jaw
gripping force should be taken into consideration.
At least once a year the chuck should be removed
from the spindle and disassembled. Thoroughly
clean and inspect all parts. Replace all worn out
and damaged parts. Lubricate all working surfaces
according to directions contained in Table 6 and
reassemble the chuck.
In case of a shortage of grease (item 1, Table 6)
or equivalent, it is permitted to lubricate all the
working surfaces with the machine grease type 2.
NOTE: Jaws and guides in the scroll-chuck
bodies are marked with sequential numbers.
When assembling the chuck, jaws must be
screwed into the guides marked with the
same number.
Example: Jaw no. 1 must be inserted in the
guide no. 1.
!
!

ENGLISH
13
Chuck size 80 100
110
125
140 160 200 250 315 400 500 630 800 1000
Wrench torque
(Nm) 35 50 75 120 160 180 200 280 360 460 500 500
Total jaw force
(daN) 1000 1700 2400 3100
2400*
3700
2900*
4600
3600*
5500
4400*
6500
4900* 7200 8000 9000 11500
Table 7
* relates to type 3105 chucks
2.8 Clamping force
Jaw clamping force
Clamping forces in Table 7 are with the jaws lubricated according to the directions contained under item 2.7.
2.9 Admissible revolutions
Admissible revolutions of the chuck depend on many factors, such as cutting parameters, weight of the workpiece
and its balance or type of machining (interrupted or continuous turning) etc.
The max. speeds as indicated in the table below should not cause a decrease of the clamping force to the half
of its initial value. When machining in the stable conditions (machining material, tools, working conditions), the
clamping force may be reduced by up to 67% of its initial value.
This relate to the chuck equipped with standard jaws, that do not protrude beyond the outer diameter of the chuck
and the unbalance condition of the ‘chuck-machining workpiece’ is maintained (not exceeding 20gmm/kg). The
chuck and jaws must be in good condition. Otherwise, refer to the calculations as indicated in the PN-M-60650.
Admissible revolutions for self-centering scroll chucks (Table 8)
Table 8
Chuck
type
Chuck size D (mm)
80 85 100 125 160 200 250 315 400 500 630 710 800 915 1000 1250 1300 1400 1500 1600 1800 2000
nmax (rpm) steel body
35**
356*
37**
7000 7000 6300 5500 4600 4000 3500 2800 2000 1300 1000 800 800 700 600 500 470 440 400 380 340 300
38**
386* - - - 3800 3200 2800 2400 1900 1400 900 700 - 560 500 400 350 - - - - - -
nmax (rpm) cast iron body
3105
32**
36**
5000 4500 4500 400 3600 3000 2500 2000 1600 1000 800 650 600 400 400 300 270 250 230 220 190 170
38** - - - - - 2000 1500 1200 800 600 500 - 400 - - - - - - - - -
n - admissible revolutions

ENGLISH
14
2.10 Admissible weight of the workpieces
Admissible chuck load based on the weight of the gripped workpieces depends on many factors; such as
machining parameters, particularly the way of clamping the workpieces in the chuck.
The admissible weights of workpieces should be considered as reference data only. The variety of chucking and
machining methods makes the accuracy of such values impossible.
During machining a lot of special conditions occur for which the data has to be corrected by an experienced
operator. However, it should be possible for the user who has the approximate data to determine safe and suitable
working conditions.
Admissible weight of the workpieces for self-centering scroll chucks
To simplify the approach to this problem without including the effects of cutting/turning forces and inertia forces
of spinning workpieces onto chuck load; the following guide should help to determine the maximum weights of
the workpieces loading the chuck.
Admissible revolutions for independent chucks (Table 9)
Chuck size
80 85 100 125 140 160 200 250 315 400 500 630 710 800 915 1000 1250 1300 1400 1500 1600 1800 2000
nmax (rpm) steel body
7640 7190 6120 4890 4370 3820 3060 2450 1940 1530 1220 970 860 760 670 610 490 470 440 400 380 340 300
nmax (rpm) cast iron body
- - - - - - 1800 1500 1200 860 690 550 480 430 380 340 280 270 250 230 220 190 170
Table 9
Admissible revolutions for self-centering and individually adjustable scroll chucks (Table 10)
Chuck type Chuck size
200 250 315 400 500 630 800 1000 1250
nmax (rpm) cast iron body
4505 2500 2000 1500 1000 700 540 420 280 210
4605 2000 1800 1200 800 600 480 360 240 170
nmax (rpm) steel body
4705 3000 2500 2000 1500 1000 750 600 380 -
4805 2500 200 170 1300 800 660 520 330 -
Table 10
n - admissible revolutions

ENGLISH
15
Fig. 16
Chuck size (mm) 80
85
100
110
125
140 160 200 250 315
350 400 500 630 800 915 1000 1250
I1,2 d 1,5 d 1 d 0,5 d
Weight (kg) 0,6 1 2 3 6 10 20 40 90 150 400 500 600 700
Table 11
I - max. length of the workpiece projection outside the jaws
d - diameter of the workpiece being clamped in the jaws
Chuck size (mm) 80
85
100
110
125
140 160 200 250 315
350 400 500 630 800 915 1000 1250
z4 x h
Weight (kg) 1,5 2,5 4 7 15 25 40 70 130 240 400 550 700 850
Table 12
z - max. length of the workpiece projection outside the jaws
h - height of jaw step
Chuck size (mm) 80
85
100
110
125
140 160 200 250 315
350 400 500 630 800 915 1000 1250
Weight (kg) 40 60 100 150 250 500 1000 2500 4000 6000 8000 9000 11000 12500
Table 13
a) With the workpiece unsupported in outside jaws and with all the teeth of the jaws in mesh with the scroll
plate, see Table 11 and Fig. 16
b) With the workpiece unsupported in inside jaws and with all the teeth of the jaws in mesh with the scroll plate,
see Table 12
c) With the workpiece supported by revolving center or clamped in two chucks, see Table 13
Admissible weight of the workpieces for independent chucks
The following method cases of clamping workpieces are acceptable:
D85 100 125 160 200 250 315 400 500 630 800 915 1000 1250
z4 x h
Weight (kg) 1,5 2,5 4 7 15 25 40 70 130 140 400 550 700 850
Table 14
z - max. length of the workpiece projection outside the jaws
h - height of the jaw step
a) With the workpiece unsupported in the jaws and with all the teeth of the jaws in mesh with the scroll pla-
te, see Table 14

ENGLISH
16
Chuck size (mm) 85 100 125 160 200 250 315 400 500 630 800 915 1000 1250
Weight (kg) 15 50 150 250 600 1000 1500 3000 4500 6500 8500 9500 11500 13000
Table 15
b) With the workpiece supported by the revolving center or clamped in two chucks, see Table 15
2.11 Permissible centering accuracy values
Fig. 17
32** - 36**
Chuck size D 80
85
100
110
125
140 160 200 250 315 400 500 630 800 1000
l40 40 60 60 80 80 120 120 160 160 160 160
d6
10 10 18 18 30 30 53 53 75 75 160 250
- 14 25 30 40 53 75 100 100 125 200 315
14 18 30 40 53 75 100 125 125 160 - 400
d740 40 50 50 80 80 125 125 200 200 325 500
d860 75 100 135 162 200 252 282 282 325 400 630
d935 50 62 88 96 150 210 250 300 400 400 500
d10
solid jaws 63 80 100 100 160 160 250 250 400 400 400 -
d10
2-piece jaws - - 120 150 185 225 300 350 400 400 400 630
k0,030 0,030 0,040 0,050 0,060 0,100 0,150
m0,025 0,035 0,045 0,055 0,065 0,100 0,150
n0,015 0,020 0,025 0,030 0,030 0,050 0,060
s0,020 0,030 0,040 0,050 0,060 0,100 0,150
Table 16
3274
Chuck size D 80
85
l40
d6
10
14
d740
d860
d935
d10 80
k0,04
m0,075
n0,04
Table 16

ENGLISH
17
35** - 37**
Chuck size D 80 100 125 160 200 250 315 400 500 630 800 1000
l40 40 60 60 80 80 120 120 160 160 160 160
d6
10 10 18 18 30 30 53 53 75 75 160 250
- 14 25 30 40 53 75 100 100 125 200 315
14 18 30 40 53 75 100 125 125 160 250 400
d740 40 50 50 80 80 125 125 200 200 325 500
d860 75 100 135 162 200 252 282 282 325 500 630
d935 50 62 88 96 150 210 250 300 400 400 500
d10
solid jaws 63 80 100 100 160 160 250 250 400 400 400 500
d10
2-piece jaws - - 120 150 185 225 300 350 400 400 400 630
k
s
Premium 0,010 0,015 0,020 0,025 0,030 0,050 0,070 - -
Standard 0,020 0,030 0,040 0,050 0,060 0,100 0,100 0,150 0,150
mPremium 0,013 0,018 0,023 0,028 0,033 0,055 0,075 - -
Standard 0,025 0,035 0,045 0,055 0,065 0,100 0,100 0,150 0,150
nPremium 0,008 0,010 0,013 0,015 0,015 0,030 0,050 - -
Standard 0,015 0,020 0,025 0,030 0,030 0,050 0,050 0,060 0,060
Table 17
3. included in carton
3105 3204 3205 3604 3605 3704 3705 3804 3805
3214 3215 3614 3615 3714 3715 3806 3807
3234 3235 3634 3635 3734 3735
3244 3245 3644 3645 3744 3745
3274 3275 3674 3675 3774 3775
3504 3505
3514 3515
3534 3535
3544 3545
3574 3575
3504-I 3505-I
3514-I 3515-I
3534-I 3535-I
3544-I 3545-I
3574-I 3575-I
Chuck ●●●●●●●●●
Hard outside solid jaws (sets) ●●●●
Hard inside solid jaws (sets) ●●●●
Hard 2-piece reversible jaws (sets) ●●●●
Soft 2-piece jaws (set) ●
Mounting screws ●●●●●●●●●
Wrench ●●●●●●●●●
Instruction manual ●●●●●●●●●
Quality certicate ●●●●●●●●●
Table 18

ENGLISH
18
NOTE: When ordering spare parts for the
chuck being used, be sure to specify chuck
serial number, year of manufacture, part
number, product name and quantity needed.
List of spare parts for self-centering scroll
chucks
Part name No. of pcs per chuck
2-jaw 3-jaw 4-jaw 6-jaw
Scroll plate 1 1 1 1
Pinion 2 3 2 3
Stud-bolt 2 3 2 -
Wrench 1 1 1 1
Hard inside solid jaw - 3 4 6
Hard outside solid jaw - 3 4 6
Master jaw 2 3 4 6
Hard top jaw - 3 4 6
Soft top jaw 2 3 4 6
Soft solid jaw - 3 4 6
Sleeve bearing* - 3 4 6
Locking half ring** - 3 4 6
Hard 2-piece jaw - 3 4 6
Soft 2-piece jaw 2 3 4 6
List of spare parts for independent chucks
Part name No. of pcs per chuck
Operating screw 4
Holder 4
Solid jaw 4
Master jaw 4
Hard top jaw 4
Wrench 1
List of spare parts for self-centering and
individually adjusted scroll chucks
Part name No. of pcs per chuck
4505, 4705 4605, 4805
Operating screw 3 4
Scroll plate 1 1
Solid jaw 3 4
Master jaw 3 4
Wrench 1 1
4. list of sPare Parts
* for Ø80 chuck 1 pcs of each only
** for chuck 35**, 37**, 38** type
!
Table 21
Table 22
Table 23
3264 3265 3564 3565 3864 3865
Chuck ●●●●●●
Hard outside solid jaws (sets) ●●●
Hard inside solid jaws (sets) ●●●
Hard 2-piece reversible jaws (sets) ●●●
Mounting screws ●●●●●●
Wrench ●●●●●●
Instruction manual ●●●●●●
Quality certicate ●●●●●●
Table 19
4505 4605 4705 4805
Chuck ●●●●
Hard solid jaws (sets) ●●●●
Hard master jaws (sets) ●●●●
Mounting screws ●●●●
Wrench ●●●●
Instruction manual ●●●●
Quality certicate ●●●●
Table 20
This manual suits for next models
60
Table of contents
Languages:
Other Bison Industrial Equipment manuals
Popular Industrial Equipment manuals by other brands

Laguna Tools
Laguna Tools MCNC Creator Pro I-24P manual

Festo
Festo MPS 8049013 Circuit diagrams

Rittal
Rittal WS 540 Assembly and operating instructions

schmersal
schmersal AZM300Z-ST-SD2P-T Operation instructions

Filtrific
Filtrific S64D Installation

PCB Piezotronics
PCB Piezotronics ICP TLD393M112 Installation and operating manual