Black & Decker BAPUV150 User manual

INSTRUCTION MANUAL
Thank you for choosing BLACK+DECKER!
PLEASE READ BEFORE RETURNING THIS PRODUCT FOR
ANY REASON.
If you have a question or experience a problem with your BLACK+DECKER
purchase, go to www.blackanddecker.com/instantanswers
If you can’t find the answer or do not have access to the Internet, call
844-299-0879 from 10:30 a.m. to 6:30 p.m. EST Mon. - Fri. to speak with an
agent. Please have the catalog number available when you call.
SAVE THIS MANUAL FOR FUTURE REFERENCE.
CATALOG NUMBER
BAPUV150
AIR PURIFIER with UV Technology

Page 2
Thank you for purchasing our
BLACK+DECKER product. This
easy-to-use manual will guide
you to get the best use of your air
purifier.
Remember to record the model and
serial numbers. They are on a label
on the rear of the unit.
Staple your receipt to your manual.
You will need it to obtain warranty service.
Model number
Serial number
Date of purchase
PRODUCT REGISTRATION
CONTENTS
SAFETY INFORMATION
Important Safety Instructions..........................................................................................................................................3-4
Electrical Requirements.......................................................................................................................................................... 5
SET UP & USE
Parts & Features ......................................................................................................................................................................... 7
Operating Instructions ........................................................................................................................................................8-11
Cleaning & Maintenance .................................................................................................................................................12-15
TROUBLESHOOTING & WARRANTY
Troubleshooting...................................................................................................................................................................16-17
Limited Warranty ......................................................................................................................................................................18

Page 3
SAFETY INFORMATION
1. READ ALL INSTRUCTIONS BEFORE USE
2. Only use the air purifier as described in this manual.
3. To avoid fire or shock hazard, plug the appliance directly into a 120V AC
electrical outlet.
4. Remove all packaging material, including the plastic wrap over the filter,
before use.
5. If the cord or its plug is damaged, the manufacturer must replace it. Do
not attempt to use a substitute adapter as it could result in hazard and/
or injury. Contact customer service for further assistance.
6. Check the household voltage to ensure it matches the appliance’s rated
specification.
7. Do not let cord touch any hot surface and make sure that it does not
hang over a table edge or counter.
8. Place air purifier on a firm, flat, level surface.
9. Do not use this product on wet surfaces. This air purifier is not intended
for use in bathrooms, laundry areas and similar indoor locations. Never
locate the air purifier where it may fall into a bathtub or other water
container.
10. Avoid exposure to direct sunlight.
WARNING
When using electrical appliances, basic safety precautions
should be followed, including the following:
DANGER
DANGER - Immediate hazards
that WILL result in severe
personal injury or death
WARNING
WARNING - Hazards or unsafe
practices that COULD result in
severe personal injury or death
CAUTION
CAUTION - Hazards or unsafe
practices that COULD result in
minor personal injury
IMPORTANT SAFETY INSTRUCTIONS

Page 4
11. Close supervision is necessary when any appliance is used by or near
children.
12. To reduce the risk of electric shock, do not remove screws. Do not
attempt to repair or replace parts except for filters. If the servicing
instructions of an air cleaner require access to parts that could result
in a risk of electric shock, the servicing instructions shall be preceded
by the signal word “WARNING’ and the following or the equivalent:
‘RISK OF ELECTRIC SHOCK - These servicing instructions are for use
by qualified personnel only. To reduce the risk of electric shock, do
not perform any servicing other than that contained in the operating
instructions unless you are qualified to do so.”
13. Unplug the appliance before cleaning it. Wipe it with a soft cloth.
14. Unplug the air purifier before removing the filter.
15. Do not immerse the appliance or the power cord in water or other
liquids.
16. Do not use any detergents, glass or household cleaner, furniture polish,
gasoline, paint thinner or other solvent to clean any part of the air
purifier.
17. If liquid spills on the unit, it can cause serious damage. Switch it o and
unplug immediately.
18. Do not block, cover or obstruct the air vents. Do not place anything on
top of the unit.
19. Do not run the cord under carpeting. Do not cover the cord with throw
rugs, runners, or similar coverings. Do not route cord under furniture or
appliances. Arrange the cord away from trac areas and so that people
cannot trip over it.
To reduce the risk of fire or electric shock, DO NOT use this air purifier
with any solid-state speed control devices.
20. Do not use the air purifier outdoors.
21. Do not run the unit without the filters in place.
READ AND SAVE THESE
INSTRUCTIONS
HOUSEHOLD USE ONLY
SAFETY INFORMATION

Page 5
ELECTRICAL REQUIREMENTS
This appliance has a polarized plug (one blade is wider than the other). To reduce the
risk of electric shock, this plug is intended to fit into a polarized outlet only one way.
If the plug does not fit into the outlet, reverse the plug. If it still does not fit, contact a
qualified electrician.
WARNING: Do not attempt to modify the plug in any way. If the plug does not
fit fully in the outlet, reverse the plug. If it still does not fit, contact a
qualified electrician to install the proper outlet.
Double insulated appliances are constructed throughout with two separate
layers of electrical insulation or one single layer of reinforced insulation
between the user and the appliance’s electrical system. Products built with this
insulation system are not intended to be grounded. As a result, this appliance is
equipped with a two-prong plug which permits it to be used without concern for
maintaining ground connection.
NOTE: Double insulation does not take the place of the normal safety
precautions when operating this appliance. The secondary insulation
system is for protection against injury resulting from a possible failure of
the primary insulation within the product.
CAUTION: When servicing use only identical replacement parts. Repair or
replace damaged cords.
SAFETY INFORMATION

Page 6
POWER CORD SUPPLY
1. If the power supply cord is too short, do not use an extension cord. Have a
qualified electrician or serviceman install an outlet near the appliance.
a. The marked electrical rating of the extension cord must be equal
to or greater than the electrical rating of the appliance. The longer
cord should be arranged so that it will not drape over the counter
top or table top where it can be pulled on by children or tripped over
unintentionally.
NOTE: Neither BLACK+DECKER nor the dealer can accept any liability for damage to
the product or personal injury resulting from failure to observe the electrical
connection procedures.
WARNING: RISK OF FIRE
It is important that the plug fits tightly into the wall outlet. If the plug does not fit
securely and appears to be loose, it should not be used. Have a licensed electrician
replace the receptacle.
WARNING:
This appliance is not intended for use by persons (including children) who have
reduced physical, sensory or mental capabilities, or lack of experience and
knowledge, unless they have been given supervision or instruction concerning the
use of the appliance by a person responsible for their safety. Children should be
supervised to ensure that they do not play with the appliance.
This appliance can be used by children aged from 8 years and above and persons
with reduced physical, sensory or mental capabilities or lack of experience or
knowledge if they have been given supervision or instruction concerning the
safe use of the appliance and they understand the hazards involved. Children
shall not play with the appliance. Cleaning and user maintenance shall not be
performed by children without supervision.
OPERATING CONDITIONS
The air purifier should be operated between a temperature range of
64°F (18°C)-140°F (60°C) and a relative humidity under 90%.
NOTE: If the unit is used outside of these operating conditions, its performance may
be aected.
SAFETY INFORMATION

Page 7
PARTS & FEATURES
SET UP & USE
Air outlet
Air quality indicator
Air quality
Sensor
Handle
Back cover
Power cord
hole
Air inlet (two sides)

Page 8
SET UP & USE
OPERATING INSTRUCTIONS
Before using the air purifier for the first time, remove all packaging material, including
the plastic bag the filter is wrapped in.
NOTE: Refer to CLEANING AND MAINTENANCE section of this manual for
information on how to access and install the filter.
Place the air purifier on a firm, level surface, making sure nothing is obstructing the
airflow on any side of the air purifier.
Plug the power cord into a 120V AC electrical outlet. The POWER light will
illuminate in red. Touch POWER to turn ON the air purifier. It will illuminate blue and
the air purification speed will default to AUTO mode.
WARNING: Do not run the unit without the filters in place.
CONTROL PANEL
Function
Mode Timer
Power
Reset
Speed
A

Page 9
SET UP & USE
In AUTO mode, the fan speed is automatically set according to the air quality in the
room.
FAN Speed. There are four fan speeds under the SPEED setting, LOW, MEDIUM, HIGH
and MAX settings. To change the speed from AUTO mode, touch the speed button
continuously to scroll through LOW MEDIUM and HIGH settings. The fourth
fan speed MAX can be chosen when all three icons are lit up.
To shut o the unit at any time, touch and hold the POWER button until all indicator
lights go OFF. The red power button will be illuminated. Unplug the air purifier.
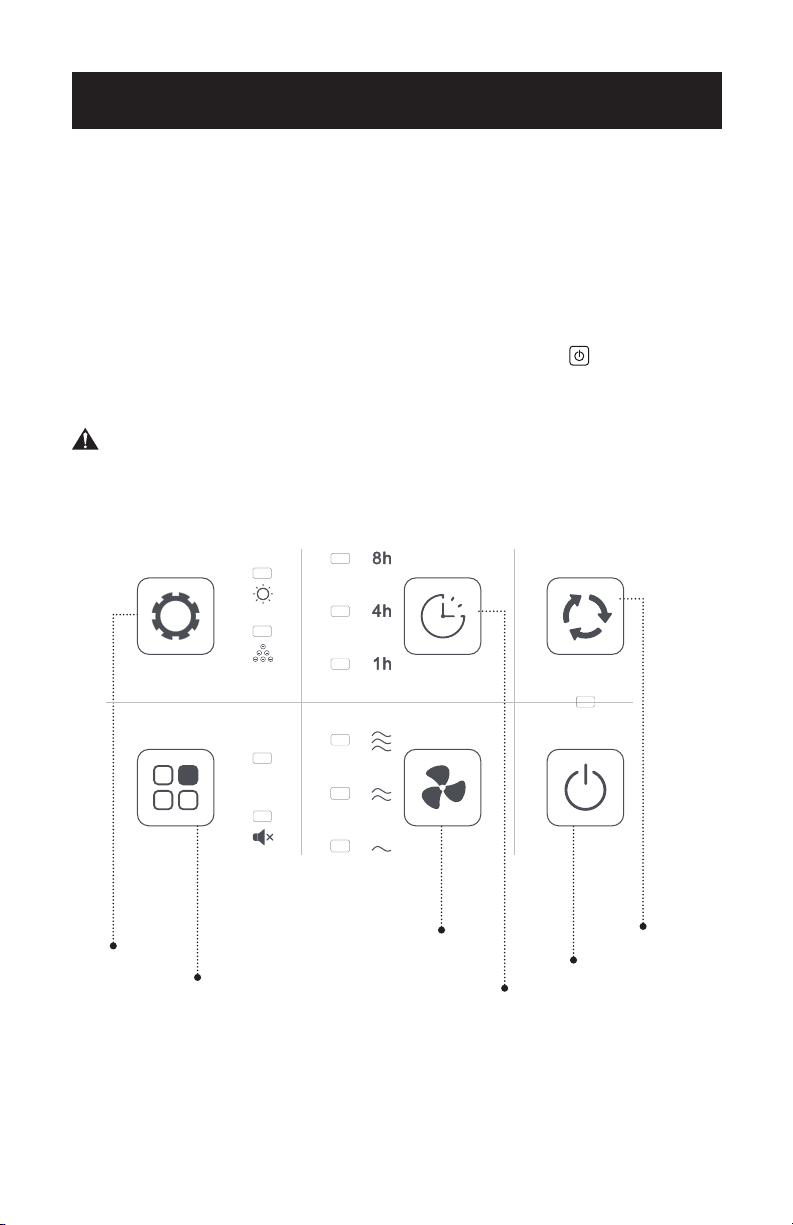
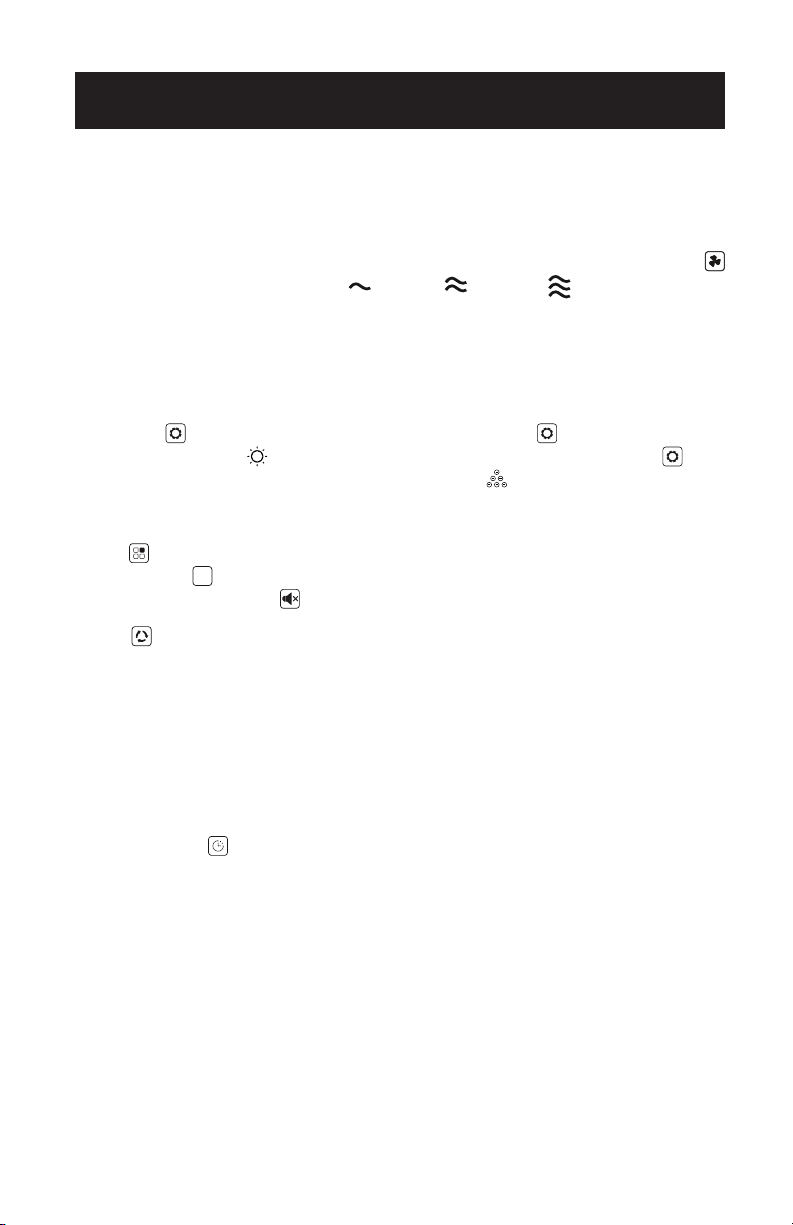
Control Panel
FUNCTION :There are two options on this setting. 1: Press button to activate
ultraviolet light sensor which kills a variety of bacteria and viruses. 2: Press
button if you would like to activate the Anion function . Anion function creates
negative ions which attaches to dust and allergens and removes them from the air. UV
and Anion functions can be activated and in-use at the same time.
MODE :Press the MODE button to illuminate the AUTO or SILENT option.
In AUTO mode A, the fan speed is automatically set according to the air quality in
the room. In SILENT mode , the fan will operate on the lowest fan setting.
RESET :After installing replacement filters, reset the machine by holding down
button for 5 seconds. This button can also be pressed to turn the air quality indicator
on and o.
Sleep Mode
Sleep mode is activated automatically when there is insucient light. The icons will
be dimmed and will run on the lowest fan speed to ensure a comfortable sleeping
environment.
Timer Function
Touch the TIMER to scroll through the number of hours (1H, 4H or 8H) to select the
number of hours for the air purifier to shut o. The corresponding number light goes
on. To stop the air purifier before the set time has elapsed, touch the POWER button
until the standby light goes on. None of the numbers will be illuminated.
Air Quality Indicator
Air quality indicator will adjust based on the air quality in the environment.
Blue 0-50 Excellent
Green 50-100 Good
Purple 100-150 Normal
Red 150- Poor

Page 10
SET UP & USE
Filter Replacement Light
WARNING: Unplug unit before replacing filters.
After 1600 hours of use, the indicator located in between the RESET and
POWER button will be flashing. Replace the HEPA filter and Activated Carbon
Filter. After the filters have been replaced, touch the RESET button for 5 seconds to
reset. The REPLACE FILTER indicator light will turn o and the other control panel
lights will illuminate.
NOTE: Refer to CLEANING AND MAINTENANCE section of this manual for
information about how to access and install the filter.
To shut OFF the unit at any time, touch POWER and it will illuminate red with
other indicator lights o. Unplug the unit.
WARNING: Do not run the unit without the filters in place.
Using the Remote Control:
Air purifier can be operated using the remote control.
1. To turn the unit on, press the POWER Button.
2. To operate fan speed low, medium or high, press the FAN SPEED button.
Continue to press until the appropriate speed is highlighted on the unit.
3. Press SILENT mode if you would like the fan speed on lowest option.
4. Press AUTO Aif you would like the fan speed to automatically set according to
the air quality in the room.
5. Press TIMER if you would like to choose 1, 4 or 8 hour option.
6. Press UV Lamp if you would like the UV Sensor activated.
7. Press Anion Function if you would like it activated.
8. Press RESET after you replace the filters. Hold for 5 seconds.

SET UP & USE
Page 11
BATTERY INFORMATION
WARNING:KEEP OUT OF REACH OF CHILDREN. Swallowing may lead to
serious injury or death. Severe burns can occur within 2 hours of ingestion.
Immediately see a doctor. Keep in original package until ready to use. Dispose of
used batteries immediately. Risk of injury due to fire, explosion or leakage. Do not
disassemble, charge, crush or expose to fire or high temperatures.
Keep lithium coin batteries out of the reach of small children; coin cell batteries can
be accidentally ingested. If ingested, these batteries may leak harmful contents
causing chemical burns, perforation of soft tissue, and in severe cases may cause
death. Lithium coin batteries must be removed immediately if swallowed. Seek
medical attention immediately. If you or your doctor suspects that a battery has
been ingested for assistance in the US call the NATIONAL BATTERY INGESTION
HOTLINE any time at 1-800-498-8666: in Canada call 416-813-5900.
WARNING:Do not dispose of batteries in fire. Batteries may explode or leak.
WARNING:Remove the battery if the remote is not used for a long period of
time.
WARNING:Danger of explosion if battery is incorrectly replaced. When replacing
battery, replace it with the same or equivalent type CR2032. Observe correct
polarity (+ and –) when replacing batteries. Do not store or carry batteries so that
metal objects can contact exposed battery terminals.
DANGER:DO NOT INGEST BATTERY; CHEMICAL BURN HAZARD. This product
contains a coin/button cell battery. If the coin/button cell battery is swallowed, it
can cause severe internal burns in just 2 hours and can lead to death.
Keep new and used batteries away from children. If the battery compartment does
not close securely, stop using the product and keep it away from children. If you
think batteries might have been swallowed or placed inside any part of the body,
seek immediate medical attention.
BATTERY INSTALLATION
1. Press down on the battery compartment cover and slide it out.
2. Insert 2 “AAA” batteries (not included) making sure that the positive terminals are
facing the proper way.
3. Replace the cover.
NOTE: Use size “AAA” alkaline batteries. Do not use rechargeable batteries.
Remote Control
Battery
Battery Cover

Page 12
CLEANING AND MAINTENANCE
WARNING: Be sure to unplug from the electrical supply source before cleaning
appliance or changing the filter.
Do not use liquids to clean the air purifier.
Do not attempt to disassemble the air purifier for cleaning.
• Wipe the exterior of the air purifier with a soft, dry cloth. Make sure the particle
sensor does not become clogged with dust.
• If necessary, wipe only the exterior housing with a damp cloth, then immediately
dry it.
Cleaning the Air Quality Sensor
1. Use a soft brush to clean the inlet/outlet of the air quality sensor.
2. Remove the protective cover of the air quality sensor.
3. Clean the air quality sensor lightly with wet cotton swabs,
then dry with dry cotton swabs.
4. In order to get maximum performance, clean the air quality sensor every two
months.
Pre-lter: Clean every two months. To clean, remove from unit. Use a soft brush and
soap and water to remove particles. Insert back into unit when completely dry.
Filter should click into place. Pre-lter has a lifespan of 20yrs.
HEPA Filter and Active Carbon Filter: Change lters at the same time, after 1600
hours of use or once a year.
Photo-catalyst lter: Change every three years. Use a dry cloth or vacuum cleaner to
remove the dust particles.
UV Bulb: UV Bulb should be changed after 1.5 years or 15,000 hours of use.
SET UP & USE

Page 13
To Install UV Bulb
WARNING: Make sure unit in turned off and unplugged before installing UV bulb.
SET UP & USE
a) Insert the end of UV lamp into the holdera) Loosen the screws
b) Fix the UV lamp with the coverb) Remove the UV lamp cover
The UV lamp must be replaced after working
10,000 hours.
c)Take the UV lamp out of the holder c) Fasten the screw
Disassembly Assembly

Page 14
SET UP & USE
FILTER INSTALLATION
Your air purifier comes with a 4 stage (Pre-Filter, True HEPA H13 Filter, Activated
Carbon Filter, Photocatalyst Filter) Filtration system.
To access the filters:
1. Remove the front panel by pulling the top outwards with both hands.
2. If using for the first time, carefully remove each filter and their packaging, and
remove tape from UV lamp from unit.
To reinsert filters:
1. Replace with new filters in sequence as listed ending with the pre-filter. Ensure
the tabs are facing forward when re-inserting back into the unit.
2. The pre-filter can be vacuumed or cleaned with a soft brush. Re-insert the pre-
filter by inserting the bottom into the slots first and gently snapping the 2 tabs
into place on top.
3. Reattach the front panel by aligning the bottom edge first and gently pushing
the top into the original position.
The FILTER REPLACEMENT indicator light will be flashing red after 1600 hours
of use. The HEPA and CARBON filters should be replaced at the same time. You
may need to replace them sooner if you are using the air purifier in an
environment with poor air quality. If you notice that the filters do not appear
visibly clean, or air purification seems to have decreased, the filters should be
replaced.
WARNING: Do not run the unit without the filters in place.
Photoresistance Photo-catalyst filter
Activated carbon filter
True HEPA filter
Pre-filter
The front panel
UV tube

Page 15
REPLACEMENT FILTER
NOTE: After replacing the filters, touch and hold the reset button for 5 seconds
to reset. The REPLACE FILTER indicator light will turn o and the other
control panel lights will illuminate.
STORAGE
If you are not going to use the air purifier for a long time, make sure it is clean
and dry. Wrap the filter in plastic. Store in a cool dry place.
Use Replacement Filter Model AF3 to purchase a set of
replacement filters containing 1 HEPA and 1 Carbon Filter, which
should be replaced at the same time. It is recommended that you check
with the retailer where you purchased your air purifier, or online retailers.
You can also contact the BLACK+DECKER Customer Satisfaction
Center at 844-299-0879 or service@equitybrands.com.
SET UP & USE

Page 16
TROUBLESHOOTING & WARRANTY
SPECIFICATIONS
• Voltage: 120V, 60Hz
• Unit Dimensions (W x D x H): 15.8” x 7.4” x 24.6”
• Net Weight: Approx. 18.9 lbs
TROUBLE POSSIBLE CAUSE POSSIBLE REMEDY
Appliance does not
turn on
Appliance is not plugged in Check that the appliance is properly
plugged into a working outlet
The Air Purifier is not
operating
There may be a connection
problem
Check that the appliance is properly
plugged into a working outlet
The appliance may be in
standby mode
Touch the POWER button
Something is obstructing the
fan
Remove the packing material
including the plastic bags the filters
are packed in. Make sure nothing is
obstructing the airflow around the air
purifier
The air purification is
poor
There is not enough clearance
around the air purifier
Make sure nothing is obstructing the
airflow around the air purifier
Air Purifier is set at a low
speed setting
Set at a higher speed setting
The filters may need to be
replaced
Replace Filters
The air purifier is being used
in a larger room than it is
intended for
Move the air purifier to a smaller room
Air purifier is noisy
Something may be
obstructing the fan or an
object may be inside the air
purifier
Remove any foreign objects from the
air purifier
The plastic packaging may not
have been removed from the
filter
Remove the plastic packaging from
the filters
The REPLACE
FILTER light is
still illuminated after
replacing the filter
The filters were not installed
correctly or the filters were not
reset by touching and holding
the button for 5 seconds
Make sure the filters were installed
properly with the plastic bags
removed.
Air quality indicator on
AUTO mode is always
red
There is a source of pollution
near the air purifier such as
someone is smoking
After operating the air purifier for
a period of time, the air quality
indicator will turn blue when the air
quality improves
The sensor may be clogged
with dust or other debris
Wipe the sensor and make sure there
is no dust or debris obstructing it
Troubleshoot your problem by using the chart below. If the air purier still does not
work properly, contact BLACK+DECKER customer service center or the nearest
authorized service center.
WARNING: Users must never troubleshoot internal components.

Page 17
TROUBLESHOOTING & WARRANTY
BEFORE YOU CALL FOR SERVICE
IF THE APPLIANCE FAILS TO OPERATE:
A) Check to make sure that the humidifier is plugged in securely. If it is not,
remove the plug from the outlet, wait 10 seconds and plug it in again securely.
B) Check for a blown circuit fuse or a tripped main circuit breaker. If these seem
to be operating properly, test the outlet with another appliance.
IF NONE OF THE ABOVE SOLVES THE PROBLEM, CONTACT A QUALIFIED
TECHNICIAN.
WARNING: USER SHOULD NOT TRY TO ADJUST OR REPAIR THIS
APPLIANCE THERE ARE NO USER SERVICEABLE PARTS INSIDE.
IMPORTANT
DO NOT RETURN THIS PRODUCT TO THE STORE
If you have a problem with this product, please contact the
BLACK+DECKER Customer Satisfaction Center at
844-299-0879 or service@equitybrands.com
DATED PROOF OF PURCHASE, MODEL # AND SERIAL #
REQUIRED FOR WARRANTY SERVICE

Page 18
TROUBLESHOOTING & WARRANTY
LIMITED WARRANTY
Any repair, replacement, or warranty service,
and all questions about this product should
be directed to W Appliance at 844-299-0879
from the USA or Puerto Rico.
W Appliance warrants to the original purchaser that
the product will be free from defects in material,
parts and workmanship for the period designated for
this product. The warranty commences the day the
product is purchased and covers up to a period of 1
year (12 months) for labor/1 year (12 months) for parts
(manufacturing defects only).
W Appliance agrees that it will, at its option,
replace the defective product with either a new
or remanufactured unit equivalent to your original
purchase during the warranty period.
Exclusions: This warranty does not apply to the
below:
1. If the appearance or exterior of
the product has been damaged or
defaced, altered or modified in design or
construction.
2. If the product original serial number
has been altered or removed or cannot
be readily determined.
3. If there is damaged due to power line
surge, user damage to the AC power
cord or connection to improper voltage
source.
4. If damage is due to general misuse,
accidents or acts of God.
5. If repair attempts are done by
unauthorized service agents, use of
parts other than genuine parts or parts
obtained from persons other than
authorized service companies.
6. On units that have been transferred
from the original owner.
7. On products that have been purchased
as refurbished, like new, second-hand, in
a “As-Is” or “Final Sale” terms.
8. To products used in a commercial or
rental setting.
9. To products used in settings other than
ordinary household use or used other
than in accordance with the provided
instructions.
10. To damages for service calls for
improper installations.
11. Transportation and shipping costs
associated with the replacement of the
unit.
12. Service calls to instruct you how to use
your product.
13. Service calls to repair or replace the
house fuse, reset the circuit breaker or
correct the wiring in the house.
REPAIR OR REPLACEMENT AS PROVIDED UNDER
THIS WARRANTY IS THE EXCLUSIVE REMEDY OF
THE CUSTOMER; W Appliance. SHALL NOT BE
LIABLE FOR ANY INCIDENTAL OR CONSEQUENTIAL
DAMAGES FOR BREACH OF ANY EXPRESS OR
IMPLIED WARRANTY ON THIS PRODUCT, EXCEPT
TO THE EXTENT PROHIBITED BY APPLICABLE LAW.
ANY IMPLIED WARRANTY OF MERCHANTABILITY
OF FITNESS FOR A PARTICULAR PURPOSE ON THIS
PRODUCT IS LIMITED TO THE DURATION OF THE
WARRANTY.
Some states do not allow the exclusion or limitations
of incidental or consequential damages, or limitations
on how long the warranty lasts. In these cases the
above exclusions or limitations may not apply to you.
This warranty gives you specific legal rights and you
may also have other rights which vary from state to
state.
Obtaining Service: To obtain service, product
literature, supplies or accessories please call
844-299-0879 to create a ticket for exchange/repair.
Please make sure to provide the date of purchase,
model number and a brief description of the problem.
Our customer service representative
will contact you or send detailed return instructions.
W Appliance does not warrant that the appliance will work
properly in all environmental conditions, and makes no warranty
and representation, either implied or expressed, with respect
to the quality, performance, merchantability, or fitness for a
particular purpose other than the purpose identified within this
user’s manual. W Appliance has made every eort to ensure
that this user’s manual is accurate and disclaims liability for any
inaccuracies or omissions that may have occurred. Information in
this user’s manual is subject to change without notice and does
not represent a commitment on the part of W Appliance. W
Appliance reserves the right to make improvements to this user’s
manual and/or to the products described in this user’s manual
at any time without notice. If you find information in this manual
that is incorrect, misleading, or incomplete, please contact us at
844-299-0879.
W Appliance Co.
1356 Broadway
New York, NY 10018

Page 19

Page 20Page 20
BLACK & DECKER, BLACK+DECKER, the BLACK & DECKER and
BLACK+DECKER logos and product names and the orange and black color
scheme are trademarks of The Black & Decker Corporation, used under license.
All rights reserved.
Product in this box may differ slightly from that pictured. Does not affect
function. Not all accessories shown in photography are included in this
package.
Imported by W Appliance, Inc., 1356 Broadway, New York, NY 10018
June 2021 Printed in China
This device complies with part 15 of the FCC rules. Operation is subject to the
following two conditions: 1) This device may not cause harmful interference, and 2)
This device must accept any interference received, including interference that may
cause undesired operation. This equipment has been tested and found to comply
with the limits for a Class B digital device, pursuant to Part 15 of the FCC rules. These
limits are designed to provide reasonable protection against harmful interference
in a residential installation. This equipment generates, uses and can radiate radio
frequency energy and, if not installed and used in accordance with the instructions,
may cause harmful interference to radio communications. However, there is no
guarantee that the interference will not occur in a particular installation. If this
equipment does cause harmful interference to radio or television reception, which
can be determined by turning the equipment off and on, the user is encouraged
to try to correct the interference by one or more of the following measures: a)
Reorient or relocate the receiving antenna. b) Increase the separation between the
equipment and the receiver. c) Connect the equipment into an outlet different from
that which the receiver is connected. d) Consult the dealer or an experienced radio/
TV technician for help.
Table of contents
Other Black & Decker Air Cleaner manuals

Black & Decker
Black & Decker HEPAFreshBXAP148 Quick reference guide

Black & Decker
Black & Decker BXAP350E User manual

Black & Decker
Black & Decker BAPT01 User manual

Black & Decker
Black & Decker BXEH60002GB User manual

Black & Decker
Black & Decker BXEH60001GB User manual

Black & Decker
Black & Decker BAPUV250 User manual

Black & Decker
Black & Decker BAPUV350 User manual

Black & Decker
Black & Decker HEPAFresh BXAP250 Quick reference guide

Black & Decker
Black & Decker BXFD52006GB User manual

Black & Decker
Black & Decker HEPAFresh BXAP041 Quick reference guide