BLACK DECKER 190657 User manual

INSTRUCTION MANUAL
MANUEL D’INSTRUCTIONS
MANUAL DE INSTRUCCIONES
Please read before returning this product for anyreason.
Àlire avant de retourner ce produit pour quelque raison que cesoit.
Por favor, lea antes de devolver este producto por cualquier razón.
Electric Backpack Sprayer
190657

2
CONTENTS
IMPORTANT SAFETY INSTRUCTIONS .............................................................................................................................................................................................3
CHEMICAL USE SAFETY .................................................................................................................................................................................................................3
SPRAYER SAFETY ...........................................................................................................................................................................................................................3
Additional Safety Information ............................................................................................................................................................................................... 4
THE RBRC® SEAL ............................................................................................................................................................................................................................4
ASSEMBLY .....................................................................................................................................................................................................................................4
Package Contents ....................................................................................................................................................................................................................... 4
Nozzle Functionality and Uses ............................................................................................................................................................................................... 5
Assembling the Sprayer ............................................................................................................................................................................................................ 5
Attaching a Nozzle ..................................................................................................................................................................................................................... 5
Attaching the Harness ............................................................................................................................................................................................................... 5
OPERATION ....................................................................................................................................................................................................................................6
BATTERIES AND CHARGERS ...........................................................................................................................................................................................................6
Important Safety Instructions for All Battery Chargers ............................................................................................................................................... 6
Important Safety Instructions for All Battery Packs ...................................................................................................................................................... 7
Battery Tool Use and Care ........................................................................................................................................................................................................ 7
Service .............................................................................................................................................................................................................................................. 8
Battery Indicators ........................................................................................................................................................................................................................ 8
Charging the Battery .................................................................................................................................................................................................................. 8
Filling the Sprayer ........................................................................................................................................................................................................................ 9
Installing the Battery ................................................................................................................................................................................................................10
Removing the Battery ..............................................................................................................................................................................................................10
Battery Life Indicator ................................................................................................................................................................................................................10
Spraying ........................................................................................................................................................................................................................................10
CLEANING ....................................................................................................................................................................................................................................11
Battery Pack Cleaning ............................................................................................................................................................................................................11
Charger Cleaning Instructions ............................................................................................................................................................................................11
STORAGE ......................................................................................................................................................................................................................................12
TRANSPORTATION .......................................................................................................................................................................................................................12
MAINTENANCE ............................................................................................................................................................................................................................12
Repairs ............................................................................................................................................................................................................................................12
Shut-Off Assembly Maintenance .......................................................................................................................................................................................12
Nozzle Maintenance ................................................................................................................................................................................................................12
Cap and Strainer Basket Maintenance ............................................................................................................................................................................12
In-Tank Filter Maintenance ....................................................................................................................................................................................................13
BATTERY AND CHARGER TWO-YEAR LIMITEDWARRANTY .........................................................................................................................................................13
SPRAYER TWO YEAR LIMITED WARRANTY ..................................................................................................................................................................................14

3
IMPORTANT SAFETY
INSTRUCTIONS
DEFINITIONS
DANGER: Indicates a hazardous situation that, if not
avoided, will result in death or serious injury.
WARNING: Indicates a hazardous situation that, if
not avoided, could result in death or serious injury.
CAUTION: Indicates a hazardous situation that, if
not avoided, could result in minor or moderate injury.
NOTICE: Indicates information considered
important, but not hazard-related (e.g. messages
relating to property damage).
CHEMICAL USE SAFETY
DANGER: RISK OF DEATH, SEVERE PERSONAL INJURY,
AND/OR PROPERTY DAMAGE FROM IMPROPER
CHEMICAL USE OR MIXTURE.
• Never use flammable or combustible chemicals
in this sprayer. Spraying flammable or
combustible chemicals can create combustible
fumes that could be ignited, causing an
explosion.
• Use only chemicals indicated for spraying
applications. Some chemicals may create a
toxic or other hazardous atmosphere when
sprayed.
• Always refer to chemical manufacturer’s
instructions and/or the chemical Safety
Data Sheet (SDS) for proper mixture and safe
application.
SPRAYER SAFETY
WARNING: RISK OF PERSONAL INJURY AND/OR
PROPERTY DAMAGE DUE TO CHEMICAL EXPOSURE.
• Read and understand the entire instruction
manual before using this sprayer.
• Follow all instructions and precautions in the
instruction manual when using this sprayer.
• Read and follow all instructions and
precautions on chemical manufacturer’s label
of chemicals used in this sprayer.
• Use the appropriate Personal Protective
Equipment (PPE) as recommended by the
chemical manufacturer and/or refer to the
chemical Safety Data Sheet (SDS) of the chemical
being used. This includes at least goggles,
gloves, and protective clothing. Failure to use
appropriate PPE could result in chemical exposure
through skin contact, eye contact, inhalation, or
other means.
• After initial assembly, extended storage, or any
possibly damaging event, such as a fall, always
inspect the sprayer for damage, and test it with
plain water to check for proper function. Ensure
all connections are secure and leak free, and
the hose is free from damage, prior to using the
sprayer with chemical.
• Always inspect the hose and all connections
before each use. A damaged hose or loose
connections could result in an uncontrolled
high pressure discharge of chemical.
• Do not spray near open flame, hot surfaces,
or anything that could vaporize the spray.
Doing so could create a dangerous chemical
atmosphere.
• Never use caustics, bleach, acids, hot water, or
pressure producing chemicals in this sprayer.
• Keep the sprayer and all chemicals out of the
reach of children and pets.
• Only spray when the air is calm (no wind or air
movement) to prevent chemical spray from
drifting onto non-targeted surfaces.
• Always release pressure when the sprayer is not in
use and before removing the pump from the tank.
• Never store chemicals in the sprayer.
• Store or dispose of any unused chemicals as
instructed by the chemical manufacturer due to
the potential for environmental damage from a
spill or leak, and/or refer to the disposal criteria
referenced in the SDS.
• Clean and rinse the sprayer after each use
to avoid unintended chemical exposure
and prevent contamination of subsequent
applications.
• Store the sprayer in a warm, dry, dust-free
location out of direct sunlight.
WARNING: RISK OF PERSONAL INJURY AND/OR
PROPERTY DAMAGE DUE TO RUPTURE AND/OR
UNCONTROLLED HIGH PRESSURE DISCHARGE OF
LIQUID CHEMICAL.
• Never modify or alter the sprayer from original
condition. Never heat or alter the hose, hose
nut, or barb. Doing so could weaken the
components and/or connections.
• Use only replacement parts from original
manufacturer. Other replacement parts are not
compatible with this sprayer.
• Never pressurize the sprayer with any device
other than the pump supplied by the original
manufacturer. Use of an air compressor or
other non-standard device to pressurize the
tank could exceed the safe working pressure of
the sprayer.

4
• Do not lift, carry, or pull the sprayer by the
hose, shut-off valve, or wand extension. Doing
so could weaken the components and/or
connections. Carry by the handle or harness
only, making sure the connections are properly
secured before lifting.
• To reduce the risk of electrical shock, do not
put the sprayer in water or other liquid. Do not
place or store the sprayer where it can fall or be
pulled into a tub or sink.
Additional Safety Information
WARNING: Never modify the sprayer or any part of
it. Damage or personal injury could result.
SAVE THESE INSTRUCTIONS
FOR FUTURE USE
THE RBRC® SEAL
Please take your spent battery packs
to an authorized BLACK+DECKER
service center or to your local retailer
for recycling. In some areas, it is illegal
to place spent battery packs in the trash. You may also
contact your local recycling center for information
on where to drop o the spent battery pack. Do not
place in curbside recycling. For more information visit
www.call2recycle.org. or call the toll free number in
the RBRC® Seal. RBRC® is a registered trademark of Call
2 Recycle, Inc.
ASSEMBLY
WARNING: RISK OF PERSONAL INJURY AND/OR
PROPERTY DAMAGE DUE TO CHEMICAL EXPOSURE.
After initial assembly, always inspect the sprayer for
damage, and test it with plain water to check for
proper function. Ensure all connections are secure
and leak free, and the hose is free from damage, prior
to using the sprayer with chemicals.
WARNING: Only use attachments recommended or
sold by the manufacturer.
Package Contents
F
E
G
AB C D
H
I
L
J
K
A Sprayer B Shut-o
Assembly
C Wand
D Dry-Touch
Adapter
E Adjustable
Cone Nozzle
F Red and
Yellow Fan
Nozzles
G Foaming
Nozzle
H Cap Nut I Flat Seal
J Battery K Battery
Charger
L Harness

5
Nozzle Functionality and Uses
Foaming Nozzle
• Spot spraying in or around ower
beds, trees, and shrubs.
• Edging along fences, driveways, and
walkways.
• Killing brush such as poison ivy, poison
oak, kudzu, and wild blackberry.
• Preparing garden beds for planting of
ornamentals and vegetables.
Red High-Volume Nozzle
• Replacing lawns. Kills lawn and weeds
before planting a new lawn.
• Preparing large areas for planting of
ornamental and vegetable gardens.
Adjustable Cone Nozzle
• Spot spraying in ower beds,
walkways, driveways, and patios,
around trees and shrubs.
• Edging along fences, driveways, and
walkways.
• Killing brush such as poison ivy, poison
oak, kudzu, and wild blackberry.
Yellow Low-Volume Nozzle
• Precision spraying in conned areas
such as gardens and ower beds.
Assembling the Sprayer
1. Install the wand (C) onto the shut-o assembly
(B) and tighten the nut (1) on the wand (C) to
secure together.
2. (Optional) Use the Dry-Touch adapter for a no
contact, chemical free adjustment.
C
DE
B
3. Attach the shut-o assembly to the sprayer body.
Attaching a Nozzle
Attach your selected nozzle (E – G) onto the end of the
wand (C) using a at washer (I) and tighten securely
using the cap nut (H).
C I
C I G
E
H
Attaching the Harness
1. For each side, remove the small plastic clips (1) from
the two shoulder strap loops and thread each loop
through the slots at the top of the handle.
2. Replace the clips (1) through the loops and pull the
strap securing the two shoulder straps in place.
1
L

6
3. For the lower straps, remove the strap from the
top portion of the buckles (2) and place around
the foot stand (3), starting from underneath.
4. Loop the strap through the rst section of
the buckle (2). Then loop the strap through
the other section of the buckle (2) to tighten.
Adjust the shoulder pads and strap lengths for a
comfortable t.
2
3
OPERATION
WARNING: RISK OF PERSONAL INJURY DUE TO
CHEMICAL EXPOSURE. Use the appropriate Personal
Protective Equipment (PPE) as recommended by the
chemical manufacturer and/or refer to the chemical
Safety Data Sheet (SDS) of the chemical being used.
This includes at least goggles, gloves, and protective
clothing.
WARNING: To reduce the risk of serious personal
injury, turn unit OFF and remove the battery pack
before making any adjustments or removing/
installing attachments or accessories. An accidental
start-up can cause injury.
BATTERIES AND CHARGERS
The battery pack is not fully charged out of the carton.
Before using the battery pack and charger, read the
safety instructions below and then follow charging
procedures outlined. When ordering replacement
battery packs, be sure to include the catalog number
and voltage.
Important Safety Instructions for All Battery Chargers
WARNING: Read all safety warnings, instructions,
and cautionary markings for the battery pack,
charger, and product. Failure to follow the warnings
and instructions may result in electric shock, fire, and/
or serious injury.
• DO NOT attempt to charge the battery
pack with any chargers other than a
BLACK+DECKER charger. BLACK+DECKER
chargers and battery packs are specifically
designed to work together.
• These chargers are not intended for any
uses other than charging BLACK+DECKER
rechargeable battery packs. Charging
other types of battery packs may cause them
to overheat and burst, resulting in personal
injury, property damage, fire, electric shock, or
electrocution.
• Do not expose the charger to rain or snow.
• Do not allow water or any liquid to enter
the charger.
• Pull by the plug rather than the cord when
disconnecting the charger. This will reduce
the risk of damage to the electric plug and cord.
• Make sure that the cord is located so that
it will not be stepped on, tripped over, or
otherwise subjected to damage or stress.
• Do not use an extension cord unless it
is absolutely necessary. Use of improper
extension cord could result in risk of fire, electric
shock, or electrocution.
• When operating a charger outdoors,
always provide a dry location and use an
extension cord suitable for outdoor use.
Use of a cord suitable for outdoor use reduces the
risk of electric shock.
• An extension cord must have adequate
wire size (AWG or American Wire Gauge)
for safety. The smaller the gauge number of the
wire, the heavier the cord and thus the greater
its capacity. An undersized cord will cause a
drop in line voltage resulting in loss of power
and overheating. The following table shows the
correct size to use depending on total length
of all extension cords plugged together, and
nameplate ampere rating. If in doubt, use the
next heavier gauge.
Minimum Gauge for Cord Sets
Volts Total Length of Cord in Feet (meters)
120V 25 (7.6) 50 (15.2) 100 (30.5) 150 (45.7)
Ampere Rating
American Wire Gauge
More
Than
Not
More
Than
0 6 18 16 16 14
6 10 18 16 14 12
10 12 16 16 14 12
12 16 14 12 Not Recommended
• Do not place any object on top of the
charger. Place the charger in a position away
from any heat source.
• Do not operate the charger with a
damaged cord or plug–have them replaced
immediately.

7
ENGLISH
• Do not operate the charger if it has
received a sharp blow, been dropped, or
otherwise damaged in any way. Take it to
an authorized service center.
• Do not disassemble the charger; take
it to an authorized service center when
service or repair is required. Incorrect
reassembly may result in a risk of electric shock,
electrocution, or fire.
• The charger is designed to operate on
standard 120V household electrical
power. Do not attempt to use it on any other
voltage.
• Foreign materials of a conductive nature,
such as, but not limited to, grinding dust,
metal chips, steel wool, aluminum foil, or
any buildup of metallic particles should
be kept away from the charger cavities.
• Always unplug the charger from the
power supply when there is no battery
pack in the cavity.
Important Safety Instructions for All Battery Packs
WARNING: Read all safety warnings, instructions,
and cautionary markings for the battery pack,
charger, and product. Failure to follow the warnings
and instructions may result in electric shock, fore,
and/or serious injury.
• Do not charge or use the battery pack
in explosive atmospheres, such as in the
presence of flammable liquids, gases or
dust. Inserting or removing the battery pack
from the charger may ignite the dust or fumes.
• NEVER force the battery pack into the
charger. DO NOT modify the battery pack
in any way to t into a non-compatible
charger as battery pack may rupture
causing serious personal injury.
• Charge the battery packs only in
BLACK+DECKER chargers.
• DO NOT splash or immerse in water or other
liquids.
• DO NOT allow water or any liquid to enter
battery pack.
• Do not store or use the tool and battery
pack in locations where the temperature
may reach or exceed 104 °F (40 °C) (such
as outside sheds or metal buildings in
summer). For best life store battery packs in a
cool, dry location.
NOTE: Do not store the battery packs in
a tool with the trigger switch locked on.
Never tape the trigger switch in the ON
position.
• Do not incinerate the battery pack even
if it is severely damaged or is completely
worn out. The battery pack can explode in
a fire. Toxic fumes and materials are created
when lithium-ion battery packs are burned.
• If battery contents come into contact with
the skin, immediately wash area with
mild soap and water. If battery liquid gets
into the eye, rinse water over the open eye for
15 minutes or until irritation ceases. If medical
attention is needed, the battery electrolyte
is composed of a mixture of liquid organic
carbonates and lithium salts.
• Contents of opened battery cells may
cause respiratory irritation. Provide fresh
air. If symptoms persist, seek medical attention.
• Battery liquid may be flammable if
exposed to spark or flame.
• Never attempt to open the battery pack
for any reason. If the battery pack case is
cracked or damaged, do not insert into
the charger. Do not crush, drop or damage the
battery pack. Do not use a battery pack or charger
that has received a sharp blow, been dropped, run
over or damaged in any way (e.g., pierced with a
nail, hit with a hammer, stepped on).
• Damaged battery packs should be returned to
the service center for recycling.
Battery Tool Use and Care
• Recharge only with the charger specified
by the manufacturer. A charger that is suitable
for one type of battery pack may create a risk of
fire when used with another battery pack.
• Use power tools only with specifically
designated battery packs. Use of any other
battery packs may create a risk of injury and fire.
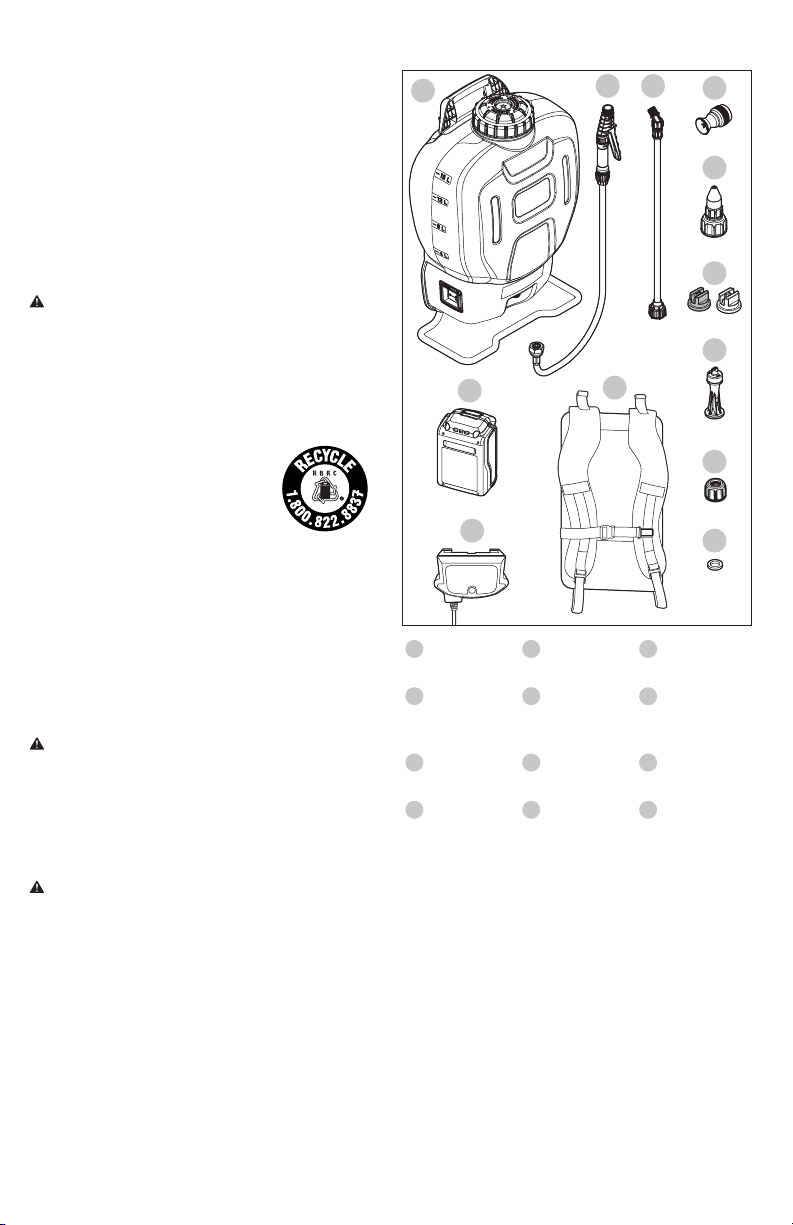
• This sprayer is provided with Black + Decker
battery pack LBRX2020 and Charger LCS1620.
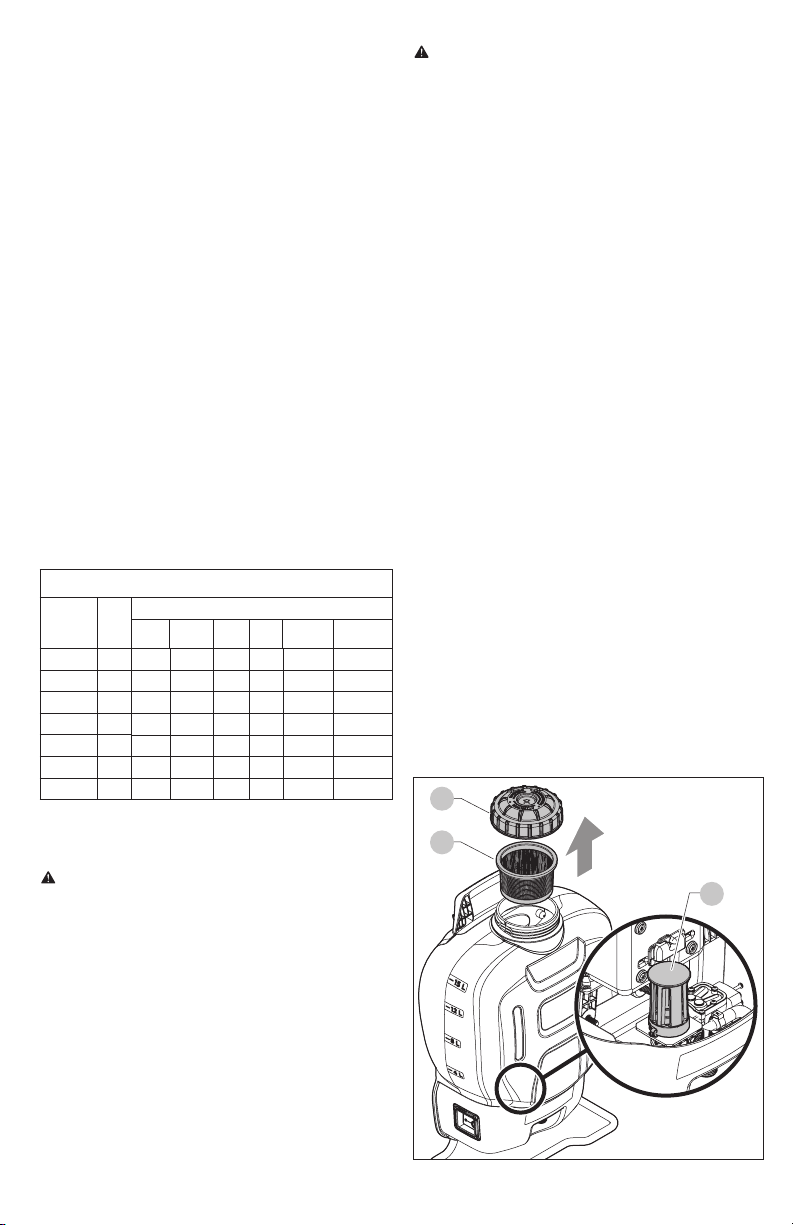
Compatible battery packs and chargers*
20V
Max**
Li-Ion
Battery
Packs
LBXR20, LBXR20BT***, LBXR2020,
LBXR2520, LB2X3020, LB2X4020
Chargers
LCS20, L2AFC, L2AFCBST, LCS201,
LCS1620, L2AFC, L2AFCBST, LCS200,
BDCA202
*Battery packs listed are compatible with each other and
the sprayer.
**Maximum initial battery voltage (measured without a
workload) is 20 volts. Nominal voltage is 18.
***BT - Bluetooth®
NOTE: The Bluetooth® word mark and logos are registered
trademarks owned by the Bluetooth®, SIG, Inc. and any
use of such marks by Black + Decker is under license. Other
trademarks and trade names are those of their respective
owners.

8
ENGLISH
WARNING: Use of any other battery packs may
create a risk of injury and fire.
• When battery pack is not in use, keep it
away from other metal objects, like paper
clips, coins, keys, nails, screws or other
small metal objects, that can make a
connection from one terminal to another.
Shorting the battery terminals together may
cause burns or a fire.
• Under abusive conditions, liquid may be
ejected from the battery; avoid contact.
If contact accidentally occurs, flush with
water. If liquid contacts eyes, additionally
seek medical help. Liquid ejected from the
battery may cause irritation or burns.
• Do not use a battery pack or tool that is
damaged or modified. Damaged or modified
batteries may exhibit unpredictable behavior
resulting in fire, explosion or risk of injury.
• Do not expose a battery pack or tool to
fire or excessive temperature. Exposure to
fire or temperature above 265 °F (130 °C) may
cause explosion.
• Follow all charging instructions and
do not charge the battery pack or tool
outside the temperature range specified
in the instructions. Charging improperly or at
temperatures outside the specified range may
damage the battery and increase the risk of fire.
Service
• Have your power tool serviced by a
qualified repair person using only
identical replacement parts. This will ensure
that the safety of the power tool is maintained.
• Never service damaged battery packs.
Service of battery packs should only be
performed by the manufacturer or authorized
service providers.
Battery Indicators
Charging
Fully Charged
Hot/Cold Pack Delay
Bad Battery
Charging the Battery
WARNING: Do not charge the battery pack in
extreme temperatures. It is recommended to charge
the battery pack in ambient temperatures between
32 and 104⁰F (0 and 40⁰C).
To charge the battery:
1. Plug the charger into an appropriate outlet.
2. Insert and fully seat the battery pack. The green
charging light will continuously blink while
charging.
3. Charging is complete when the green light
remains continuously ON. You can leave the
battery pack in the charger or remove it.
NOTE: The charger will not charge a faulty battery
pack, which may be indicated by the light staying
OFF or the red light rapidly blinking. Take the charger
and battery pack to an authorized service center if the
light stays OFF or the red light rapidly blinks.
NOTE: Refer to the label near the charging light on
the charger for blink patterns.
Hot/Cold Pack Delay
When the charger detects a battery pack that is too
hot or too cold, it automatically starts a hot/cold pack
delay. This delay suspends charging until the battery
pack has reached an appropriate temperature. The
charger then automatically switches to the pack
charging mode, ensuring maximum battery pack life.
A cold battery pack may charge at a slower rate than a
warm battery pack. The hot/cold pack delay is indicated
by the red light continuously ashing a short ON
followed by a longer ON (see charger for blink pattern).
Once the battery pack has reached an appropriate
temperature, the charger resumes charging.

9
ENGLISH
Electronic Protection System
Li-Ion tools are designed with an Electronic Protection
System that protects the battery pack against
overloading, overheating, or deep discharge.
Important Charging Notes
The charger and battery pack may become warm to
the touch while charging. This is normal and does
not indicate a problem. To facilitate the cooling of the
battery pack after use, avoid placing the charger or
battery pack in a warm environment such as in a metal
shed or an uninsulated trailer.
If the battery pack does not charge properly:
• Check operation of the receptacle by
plugging in a lamp or other appliance.
• Check to see if the receptacle is connected
to a light switch which turns power OFF
when you turn o the lights.
• If charging problems persist, take the
product, battery pack, and charger to your
local service center.
You may charge a partially-used pack at any time with
no adverse eect on the battery pack.
BLACK+DECKER Battery and Charger Systems
Chargers/Charge Time** (Hours) (0% to 100% Charge)
20V MAX*
Batteries
Watt
Hours
20V MAX* Chargers
LCS200 LCS1620 LCS201 L2AFC L2AFCBST BDCAC202B
LBX20 26 6.5 3.25 1.3 0.65 0.65 0.65
LBXR20 30 7.5 3.75 1.5 0.75 0.75 0.75
LBXR20BT 30 7.5 3.75 1.5 0.75 0.75 0.75
LBXR2020 40 10 5 2 1 1 1
LBXR2520 50 12.5 6.25 2.5 1.25 1.25 1.25
LB2X3020 60 15 7.5 3 1.5 1.5 1.5
LB2X4020 80 20 10 4 2 2 2
**All charge times are approximate. Actual charge time may vary.
Filling the Sprayer
DANGER: RISK OF DEATH, SEVERE PERSONAL INJURY,
AND/OR PROPERTY DAMAGE FROM IMPROPER
CHEMICAL USE OR MIXTURE.
• Never use flammable or combustible chemicals in
this sprayer. Spraying flammable or combustible
chemicals can create combustible fumes that
could be ignited, causing an explosion.
• Use only chemicals indicated for spraying
applications. Some chemicals may create a toxic
or other hazardous atmosphere when sprayed.
• Always refer to chemical manufacturer’s
instructions and/or the chemical Safety
Data Sheet (SDS) for proper mixture and safe
application.
WARNING: Inspect the sprayer, hose, shut-off, wand,
and all connections for damage before each use.
A damaged or loose hose connection can result in
unintended exposure to the pressurized chemicals,
resulting in serious injury or property damage.
Before you Begin
Test the sprayer with plain water before use with
chemicals, prior to initial use, and after prolonged storage.
Place the sprayer on a stable surface and ensure it is OFF.
Remove the battery from the battery compartment.
See Removing the Battery.
Filling Procedure
1. Unscrew the cap (1) and place it on a clean
surface where it will not collect dirt, dust, grass
clippings, or other debris.
2. Remove the strainer basket (2) and remove any
debris. Place the strainer basket (2) on a clean
surface where it will not collect dirt, dust, grass
clippings, or other debris.
3. Inspect the tank interior for debris, and clean as
needed.
4. Check to make sure the in-tank lter (3) is in
place, the mesh is intact, and it is not clogged
with debris. See In-Tank Filter Maintenance.
5. Follow the chemical manufacturer’s instructions
for preparing the chemical. Fill the sprayer by
pouring liquid into the top opening and through
the strainer basket, to the desired volume,
according to the volume graduation markings on
the side of the tank.
6. Clean up any spilled, splashed, or overowed
liquid on the sprayer.
7. Insert the battery according to the instructions in
Installing the Battery.
1
2
3

10
ENGLISH
Installing the Battery
WARNING: RISK OF FIRE, BURNS, OR ELECTRICAL
SHOCK. To reduce risk of battery fire or bursts, use only
Black+Decker batteries that are in good condition
and have not been damaged. Do not use batteries
that are wet or have been damaged.
WARNING: Prevent unintentional starting. Ensure
the switch is in the OFF-position before connecting
battery pack, picking up or carrying the sprayer.
Carrying the sprayer with your finger on the switch or
energizing the sprayer which has the switch on invites
accidents.
CAUTION: RISK OF UNINTENDED SPRAYING. Ensure
the sprayer is OFF and that the shut-off lever is
released before inserting the battery. The sprayer will
spray when the battery is inserted if the sprayer is ON
and the shut-off lever is depressed.
1. Ensure the sprayer is on a stable surface and
turned OFF.
2. Open the battery compartment by pushing down
on the door latch (1) located at the top of the
door, and swing the door open and downward.
3. Align the battery (J) with the rails inside the
battery compartment and slide it into the
compartment until the battery (J) is rmly seated
and locating clip is engaged. Ensure it does not
disengage.
4. Close the door and ensure that the door latch (1)
is engaged.
J
1
Removing the Battery
1. Ensure the sprayer is on a stable surface and
turned OFF.
2. Open the battery compartment by pushing
down on the door latch (1) located at the top
of the door, and swing the door open and
downward.
3. Press the battery release button and lift the
battery (J) until it releases.
4. Remove the battery (J) from the compartment.
5. Close the door and ensure that the door latch (1)
is engaged.
Battery Life Indicator
1. When the battery is installed, you can check the
battery life. This feature is active whether the
device is turned ON or OFF.
2. Press and hold the battery button (2) to
illuminate indication lights.
3. Four green lights indicate 100%; three green
lights indicate 75%, two green lights indicate
50%, one green light indicates 25%, and one red
light indicates battery must be charged.
Spraying
WARNING: RISK OF PERSONAL INJURY AND/OR
PROPERTY DAMAGE DUE TO UNINTENDED SPRAYING
OF CHEMICALS. Ensure the shut-off trigger is released
before starting to pressurize the sprayer. The sprayer
will spray when pressurizing, if the shut-off trigger is
depressed.
NOTICE: RISK OF PROPERTY DAMAGE. Only spray
when the air is calm (no wind or air movement) to
prevent chemical spray from drifting onto non-
targeted surfaces.
1. Press the Power button (1) to turn the sprayer ON.
If the sprayer has not been used recently, you may
hear a low, audible hum. This indicates the pump
has turned on and is building pressure in the hose.
NOTE: If the sprayer was used recently, and still has
pressure in the hose, the pump may not turn on until
the shut-off lever (4) is squeezed.
2. Aim the wand in the desired direction of
spraying and squeeze the shut-o lever (4).
3. For continuous spraying, squeeze the shut-o
lever (4) and rotate the lock toward the lever (3)
to hold the shut-o lever (4) in the depressed
position.
4. Unlock, if needed, and release the shut-o lever
(4) to stop spraying.
5. To turn OFF the sprayer, press the Power button
(1).
6. Always remove any chemicals, and clean the
sprayer when nished. See the Cleaning and
Storage sections of this manual.

11
ENGLISH
1
2
3
4
CLEANING
WARNING: Always release pressure from the sprayer
prior to cleaning. Disassembly of a sprayer that is still
pressurized may result in the high-speed ejection of
components.
WARNING: RISK OF PERSONAL INJURY DUE TO
CHEMICAL EXPOSURE. Use the appropriate Personal
Protective Equipment (PPE) as recommended by the
chemical manufacturer and/or refer to the chemical
Safety Data Sheet (SDS) of the chemical being used.
This includes at least goggles, gloves, and protective
clothing.
WARNING: RISK OF DAMAGE TO INTERNAL
COMPONENTS. Failure to properly rinse out the
sprayer may allow chemical residue build-up that
can clog or damage the filters, pump, shut-off,
wand, and nozzle. Chemical residue build-up can
also contaminate subsequent applications. Leaving
chemical liquids in the sprayer when not in use can
lead to premature sprayer wear. Never store the
sprayer with chemicals in any part of the sprayer.
1. Ensure the sprayer is OFF and remove the battery
per the Removing the Battery section.
2. Remove the cap (1) and empty any extra
chemical from the tank into a suitable container
for later use or dispose according to the chemical
manufacturer’s instructions.
3. Use clean water to thoroughly rinse and empty
the tank until all chemicals and residues are
removed.
4. Add approximately 1 quart (1 liter) of clean water
to the tank.
5. Insert the battery per the Installing the Battery
instructions and press the Power button (2) to
turn the sprayer ON.
6. Spray water through the pump, hose, shut-o,
wand, and nozzle for at least 30 seconds to rinse
them out. Failure to rinse out these components
may allow chemical residue build-up that can
clog or damage the components. After heavy
use, rinsing the nozzles may not be enough to
remove residue. The nozzles may need to be
cleaned with a small brush.
7. Empty out any remaining water from the tank
then continue to spray until water no longer
comes out of the nozzle. This indicates that most
of the water in the system has been removed.
8. Press the Power button (2) to turn the sprayer
OFF and remove the battery.
9. Squeeze the shut-o lever (B) to release any
remaining pressure in the hose.
10. Allow the sprayer to dry. This is best done by
removing the cap (1) and strainer basket (3) and
hanging the sprayer upside down to let it drain.
11. Once the sprayer is dried, turn the sprayer
upright and reinstall the strainer basket (3) and
cap (1) to prevent debris from entering the tank.
1
3
B
2
Battery Pack Cleaning
Remove dirt and grease from the exterior of the
battery using a cloth or soft non-metallic brush. Do not
use water or any cleaning solutions.
Charger Cleaning Instructions
WARNING: Shock hazard. Disconnect the charger
from the AC outlet before cleaning. Dirt and grease
may be removed from the exterior of the charger using
a cloth or soft non-metallic brush. Do not use water or
any cleaning solutions.

12
STORAGE
Store the sprayer and battery indoors in a warm, dry
location out of direct sunlight and away from any
sources of moisture or intense heat. Do not store the
sprayer where freezing temperatures (below 32°F/0°C)
will occur. Allowing water to freeze inside the sprayer
may cause damage to the pump, seals, shut-o, or
other components, and void the sprayer warranty.
TRANSPORTATION
WARNING: Fire hazard. Do not store, carry, or
transport the battery pack so that metal objects can
contact exposed battery terminals. For example, do
not place the battery pack in aprons, pockets, tool
boxes, product kit boxes, drawers, etc., with loose
nails, screws, keys, coins, hand tools, etc.
When transporting individual battery packs, make
sure that the battery terminals are protected and well
insulated from materials that could contact them
and cause a short circuit.
NOTE: Li-ion battery packs should not be put in
checked baggage on airplanes and must be properly
protected from short circuits if they are in carryon
baggage.
MAINTENANCE
WARNING: To reduce the risk of serious personal
injury, turn unit OFF and remove the battery pack
before making any adjustments or removing/
installing attachments or accessories. An accidental
start-up can cause injury.
WARNING: RISK OF PERSONAL INJURY AND/OR
PROPERTY DAMAGE DUE TO CHEMICAL EXPOSURE.
Always ensure that all chemicals have been removed
from the sprayer and the sprayer has been cleaned
prior to performing any maintenance.
WARNING: Disconnect the battery pack from the
sprayer before making any adjustments, changing
accessories, or storing sprayer. Such preventative
measures reduces the risk of starting the sprayer
accidentally.
WARNING: RISK OF PERSONAL INJURY. Always
release pressure from the sprayer prior to performing
any maintenance. Disassembly of a sprayer that is
still pressurized may result in the high-speed ejection
of components. Ensure the sprayer is OFF and squeeze
the shut-off lever until all pressure is released.
Repairs
The charger and battery pack are not serviceable.
There are no serviceable parts inside the charger or
battery pack.
WARNING: To assure product SAFETY and
RELIABILITY, repairs, maintenance and adjustment
(including brush inspection and replacement, when
applicable) should be performed by a BLACK+DECKER
factory service center or a BLACK+DECKER authorized
service center. Always use identical replacement parts.
Shut-O Assembly Maintenance
WARNING: Prior to performing maintenance,
always depressurize the sprayer by turning the sprayer
OFF and squeezing the shut-off lever to spray until
liquid flow stops.
1. Unscrew the handle (1) from the shut-o
assembly (2).
2. Remove the lter (3).
3. Clean any debris from inside the handle, shut-o
assembly, or the lter by rinsing with cool, clean
water.
4. Reassemble the components as shown and
tighten all connections securely.
31 2
Nozzle Maintenance
WARNING: Prior to performing maintenance,
always depressurize sprayer by ensuring the sprayer
is OFF and then squeezing the shut-off lever to spray
until liquid flow stops.
• If a nozzle clogs, remove and disassemble
the nozzle assembly.
• Clean the openings of any obstructions or
residue. Do not use sharp tools that could
scratch or damage the nozzles as spray
pattern could be aected.
Cap and Strainer Basket Maintenance
• Check the check valve (2) on the cap (1) and
the strainer basket gasket (3) on the strainer
basket (4) to ensure they do not show signs
of wear and are operating properly.
• Replace them as required.

13
1
4
3
2
In-Tank Filter Maintenance
CAUTION: RISK OF DAMAGE TO INTERNAL
COMPONENTS. Do not operate the sprayer without
the in-tank filter properly installed. Doing so could
allow debris to enter the pump and cause clogging or
damage to the pump.
1. Ensure the sprayer is OFF and remove the battery
per the Removing the Battery instructions.
2. Remove the cap and strainer basket. Rinse with
clean water to remove any debris.
3. Place the strainer basket and cap on a clean
surface where they will not collect dirt, dust,
grass clippings, or other debris.
4. Pour any liquid from the tank into an
appropriate container for later use or proper
dispose according to chemical manufacturer’s
instructions.
5. Rinse and empty the tank to remove any dirt,
debris, or residue.
6. Reach into the tank and carefully grasp the in-
tank lter (1) located at the bottom of the tank.
7. Turn the in-tank lter approximately 1/8 of a turn
counterclockwise until it stops turning and pull
up to remove it from the tank.
8. Clean the in-tank lter carefully rinsing from
the inside to the outside. Be sure not to tear or
damage the mesh. Any damage to the mesh
may allow debris to enter the pump and cause
clogging or damage to the pump.
NOTE: If the in-tank filter is damaged or too dirty to
permit cleaning, replace with a new in-tank filter.
9. To re-install the in-tank lter, gently set it back
over the lter base in the bottom of the tank, and
slowly turn the lter until the locking tabs on the
lter base align with the grooves in the lter. The
in-tank lter will drop downward approximately
1/8 in. when this happens.
10. Push down on the in-tank lter until it stops,
approximately another 1/4 in., then turn the
in-tank lter approximately 1/8 turn clockwise
until it stops.
1
BATTERY AND CHARGER TWOYEAR
LIMITED WARRANTY
Black & Decker (U.S.) Inc. warranties the battery
and charger to be free from defects in material or
workmanship for a period of two (2) years following
the date of purchase, provided that the product is
used in a home environment. This limited warranty
does not cover failures due to abuse, accidental
damage or when repairs have been made or
attempted by anyone other than BLACK+DECKER and
its Authorized Service Centers. A defective battery
pack and charger meeting the warranty conditions set
forth herein will be replaced or repaired at no charge
in either of two ways:
The rst, which will result in exchanges only, is to
return the battery pack or charger to the retailer from
whom it was purchased (provided that the store is a
participating retailer). Returns should be made within
the time period of the retailer’s policy for exchanges.
Proof of purchase may be required. Please check with
the retailer for its specic return policy regarding time
limits for returns or exchanges.
The second option is to take or send the battery
pack or charger (prepaid) to a BLACK+DECKER
owned or authorized Service Center for repair or
replacement at BLACK+DECKER’s option. Proof of
purchase may be required. BLACK+DECKER owned
and authorized service centers are listed online at
www.blackanddecker.com. This warranty does not
apply to the sprayer or sprayer accessories. This
warranty gives you specic legal rights and you may
have other rights which vary from state to state or
province to province. Should you have any questions,
contact the manager of your nearest BLACK+DECKER
Service Center. This product is not intended for
commercial use, and accordingly, such commercial
use of this product will void this warranty. All other
guarantees, express or implied, are hereby disclaimed.

14
ENGLISH
SPRAYER TWO YEAR LIMITED WARRANTY
The Fountainhead Group, Inc. warrants that this
sprayer (excluding battery and charger) will be free
from defects in material and workmanship for a period
of two years from the date of shipment by us.
We make no other express warranties, and all implied
warranties, including tness and merchantability,
are limited to two years from the date of shipment
by us. Within the warranty period, we will repair or
replace any part found to be defective upon our
examination but will not pay shipping cost or other
expenses. To obtain warranty service, contact us at:
The Fountainhead Group, Inc., c/o Customer Service,
23 Garden Street, New York Mills, New York 13417,
or call prepaid, (800) 311-9903 or (315) 736-0037.
Merchandise may not be returned without prior
permission and must be returned to us prepaid.
This warranty service is an exclusive remedy and we
are not responsible for any consequential or incidental
damages or injury to person(s) or property.
This warranty shall not apply to any product which
has been subject to misuse, negligence or accident,
or been damaged in shipment, or misapplied, or
which has been modied or repaired by unauthorized
persons. This warranty only applies to products owned
by persons purchasing directly from us or from our
approved distributors and merchandisers. The right is
reserved to incorporate subsequent design or parts
changes after publication and without reissue of
descriptive literature or catalogs.
NOTE: Limitations on duration of implied warranty
and/or consequential damages might not apply to
you if your state does not permit them. This warranty
gives you specific legal rights in addition to rights you
may have under state law.
Manufactured under license by:
The Fountainhead Group, Inc.
23 Garden Street
New York Mills, NY 13417 U.S.A.
Fax: (315) 768-4220
Email: [email protected]
www.TheFountainheadGroup.com

15
ENGLISH
TROUBLESHOOTING GUIDE
BE SURE TO FOLLOW SAFETY RULES AND INSTRUCTIONS
For assistance with your product, visit our website at www.BlackandDecker.com for a list of service centers, or
call BLACK+DECKER at 1-800-544-6986.
PROBLEM POSSIBLE CAUSE SOLUTION
The sprayer does not turn ON (no
audible hum of the pump).
Ensure the battery is correctly
installed.
Install the battery correctly. See
Installing the Battery.
Ensure the battery is charged. Charge the battery. See Charging
the Battery.
The battery may be damaged or
may have overheated. Visually
inspect the battery for damage.
Replace the battery if it is
damaged or not working. If the
battery overheated, allow the
battery to cool.
The hose is pressurized. The pump
turned OFF automatically.
Squeeze the shut-o lever to see
if the sprayer starts and the pump
turns ON.
The sprayer turns on (pump head
hums) but it will not spray.
There is no liquid in the tank. Add liquid to the tank. See Filling
the Sprayer.
The shut-o lever is clogged. Clean the shut-o lever. See Shut-
off Assembly Maintenance.
The nozzle is clogged. Clean the nozzle. See Nozzle
Maintenance.
The pump is not primed. Allow at least 30 seconds for the
pump to prime.
The sprayer turns ON but only
sprays at low pressure.
The shut-o lever is clogged. Clean the shut-o lever. See
Shut-off Assembly Maintenance.
The nozzle is clogged. Clean the nozzle. See Nozzle
Maintenance.
The pump is not primed. Allow at least 30 seconds for the
pump to prime.
The pump does not fully prime. The liquid level in the tank is low. Add liquid to the tank. See Filling
the Sprayer.
The pump was run dry (without
liquid) before the tank was relled.
Ensure the sprayer is OFF and
squeeze the shut-o lever until all
pressure is relieved.
There is chemical residue or build-
up in the tank and/or pump due to
improper or inadequate cleaning.
Clean the sprayer. See Cleaning. If
necessary, repeat with warm water
and a mild detergent mixture.
Allow the mixture to stay in the
pump for up to 1 hour prior to rins-
ing. Replace the pump if necessary.
The in-tank lter is improperly
installed, missing, or damaged,
allowing debris to enter the pump.
Clean the sprayer. See Cleaning. If
necessary, repeat with warm water
and a mild detergent mixture.
Allow the mixture to stay in the
pump for up to 1 hour prior to rins-
ing. Replace the pump if necessary.

16
ENGLISH
PROBLEM POSSIBLE CAUSE SOLUTION
The hose leaks at the tank
connection.
The hose is cracked, swollen, or
faulty.
Replace the shut-o assembly.
The connection is damaged.
The hose leaks at the shut-o
assembly.
The hose is cracked, swollen, or
faulty.
Replace the shut-o assembly.
The connection is damaged.
The nozzle drips when the shut-o
lever is released.
There is dirt or debris in the shut-
o lever.
Clean the shut-o assembly.
There is a damaged O-ring or seal
in the shut-o assembly.
Replace the shut-o assembly.
The nozzle tip leaks. The at seal is missing. Install the at seal behind the
nozzle tip. See Assembly.
The at seal is damaged. Replace the at seal.
The spray pattern is poor. The nozzle is partially clogged. Clean the nozzle. See Cleaning.
The nozzle is damaged. Replace the nozzle.
The unit shuts o abruptly. The battery pack has reached its
maximum thermal limit.
Allow the battery pack to cool
down.
The battery is out of charge. To
maximize the life of the battery,
it is designed to shuto abruptly
when the charge is depleted.
Place the battery on the charger
and allow it to charge.
The battery pack does not charge. The battery pack is not inserted in
the charger.
Insert the battery pack into the
charger until the LED illuminates.
The charger is not plugged in. Plug the charger into a working
outlet.
The surrounding air temperature is
too hot or too cold.
Move the battery pack to a sur-
rounding air temperature of above
40°F (4.5°C) or below 104°F (40°C).
SAVE THIS MANUAL FOR FUTURE USE.

MANUEL D’INSTRUCTIONS
À lire avant de retourner ce produit pour quelque raison que ce soit..
Pulvérisateur à dos électrique
190657
SAVE THIS MANUAL FOR FUTURE USE.

18
CONTENU
CONSIGNES DE SÉCURITÉ IMPORTANTES ....................................................................................................................................................................................19
SÉCURITÉ RELATIVE AUX SUBSTANCES CHIMIQUES ....................................................................................................................................................................19
UTILISATION SÉCURITAIRE DU PULVÉRISATEUR ..........................................................................................................................................................................19
Consignes de sécurité supplémentaires ...........................................................................................................................................................................20
LE SCEAU RBRC® ..........................................................................................................................................................................................................................20
ASSEMBLAGE ...............................................................................................................................................................................................................................20
Contenu du paquet ..................................................................................................................................................................................................................20
Fonctions et utilisations des buses .....................................................................................................................................................................................21
Assemblage du pulvérisateur ...............................................................................................................................................................................................21
Fixation de la buse ....................................................................................................................................................................................................................21
Fixation du harnais ...................................................................................................................................................................................................................21
FONCTIONNEMENT ......................................................................................................................................................................................................................22
BATTERIES ET CHARGEURS ..........................................................................................................................................................................................................22
Directives de sécurité importantes pour tous les chargeurs de batteries ..........................................................................................................22
Directives de sécurité importantes pour tous les blocs-batteries ..........................................................................................................................23
Mode d’emploi et entretien de l’outil de batterie ..........................................................................................................................................................23
Réparation ....................................................................................................................................................................................................................................24
Voyants de la batterie ..............................................................................................................................................................................................................24
Chargement de la batterie ....................................................................................................................................................................................................24
Remplissage du pulvérisateur ..............................................................................................................................................................................................25
Installation de la batterie .......................................................................................................................................................................................................26
Retrait de la batterie .................................................................................................................................................................................................................26
Voyant de charge de la batterie ..........................................................................................................................................................................................26
Pulvérisation ................................................................................................................................................................................................................................26
NETTOYAGE ..................................................................................................................................................................................................................................27
Nettoyage du bloc-batterie ..................................................................................................................................................................................................28
Directives de nettoyage du chargeur ...............................................................................................................................................................................28
ENTREPOSAGE .............................................................................................................................................................................................................................28
TRANSPORT .................................................................................................................................................................................................................................28
ENTRETIEN ...................................................................................................................................................................................................................................28
Réparations ..................................................................................................................................................................................................................................28
Entretien de l’assemblage d’arrêt ........................................................................................................................................................................................28
Entretien de la buse ..................................................................................................................................................................................................................29
Entretien du capuchon et du panier-filtre .......................................................................................................................................................................29
Entretien du filtre intérieur du réservoir ............................................................................................................................................................................29
GARANTIE LIMITÉE DE DEUX ANS DE LA BATTERIE ET DU CHARGEUR ........................................................................................................................................30
GARANTIE LIMITÉE DE DEUX ANS DU PULVÉRISATEUR ...............................................................................................................................................................30

19
CONSIGNES DE SÉCURITÉ
IMPORTANTES
DÉFINITIONS
DANGER : Indique une situation dangereuse qui, si elle
n’est pas évitée, causera la mort ou des blessures graves.
AVERTISSEMENT : Indique une situation
potentiellement dangereuse qui entraînera la mort
ou des blessures graves si elle n’est pas évitée.
ATTENTION : Indique une situation potentiellement
dangereuse qui entraînera la mort ou des blessures
graves si elle n’est pas évitée.
AVIS : Indique des renseignements importants à
prendre en considération, sans rapport avec un
danger (p. ex. messages liés à des dégâts matériels).
SÉCURITÉRELATIVEAUXSUBSTANCESCHIMIQUES
DANGER : RISQUE DE DÉCÈS, DE BLESSURES
PERSONNELLES GRAVES ET DE DOMMAGES MATÉRIELS
DÉCOULANT DE L’UTILISATION D’UNE SUBSTANCE
CHIMIQUE OU D’UN MÉLANGE INAPPROPRIÉ.
• Ne jamais utiliser des substances inflammables
ou combustibles chimiques dans ce
pulvérisateur. Pulvériser des substances
chimiques combustibles ou inflammables peut
créer des vapeurs combustibles qui pourraient
s’enflammer et créer une explosion.
• Utiliser seulement des substances chimiques
conçues pour la pulvérisation. Certaines
substances chimiques peuvent créer une
atmosphère toxique ou d’autres atmosphères
dangereuses lorsqu’elles sont pulvérisées.
• Pour un mélange approprié et une application
sécuritaire, toujours respecter les directives du
fabricant concernant les substances chimiques
et la fiche signalétique relative aux substances
chimiques.
UTILISATIONSÉCURITAIREDU PULVÉRISATEUR
AVERTISSEMENT : RISQUE DE BLESSURES
PERSONNELLES ET DE DOMMAGES MATÉRIELS
DÉCOULANT D’UNE EXPOSITION À UNE SUBSTANCE
CHIMIQUE.
• Lire et comprendre tout le manuel d’instructions
avant d’utiliser ce pulvérisateur.
• Suivre toutes les directives et les précautions de
ce manuel d’instructions lors de l’utilisation de
ce pulvérisateur.
• Lire et suivre toutes les instructions et
précautions sur l’étiquette du fabricant des
substances chimiques qui seront utilisées dans
ce pulvérisateur.
• Utiliser l’équipement de protection individuelle
(EPI) approprié comme recommandé par
le fabricant de la substance chimique ou
consulter la fiche signalétique de la substance
chimique utilisée. L’EPI comprend au moins des
lunettes de sécurité, des gants et des vêtements
de protection. Ne pas utiliser l’EPI approprié
pourrait entraîner une exposition à la substance
chimique par contact avec la peau, avec les yeux,
l’inhalation ou autres.
• Après l’assemblage initial, le rangement à long
terme ou tout autre événement possiblement
dommageable comme une chute, inspecter
toujours le pulvérisateur pour y détecter tout
dommage et effectuer un test avec de l’eau pure
afin de vérifier qu’il fonctionne normalement.
Avant d’utiliser le pulvérisateur avec une substance
chimique, s’assurer que toutes les connexions sont
bien serrées et qu’il n’y a pas de fuite, également
que le flexible n’est pas endommagé.
• Toujours inspecter le flexible et toutes ses
connexions avant chaque utilisation. Un
flexible endommagé ou qui n’est pas bien fixé
pourrait entraîner une décharge à pression
élevée non contrôlée de la substance chimique.
• Ne pas pulvériser près d’une flamme nue,
une surface chaude ou toute autre chose qui
pourrait créer une vapeur avec la substance
pulvérisée. Cela pourrait créer une atmosphère
chimique dangereuse.
• Ne jamais utiliser d’agent caustique, eau de javel,
acides, eau chaude ou de substances chimiques
produisant de la pression dans ce pulvérisateur.
• Garder le pulvérisateur et toute substance
chimique hors de la portée des enfants ou des
animaux de compagnie.
• N’utiliser le pulvérisateur que par temps calme
(aucun vent ou mouvement de l’air) afin
d’empêcher la substance chimique pulvérisée
d’atterrir sur des surfaces non ciblées.
• Toujours relâcher la pression lorsque le
pulvérisateur n’est pas utilisé et avant d’enlever
la pompe du réservoir.
• Ne jamais entreposer des substances chimiques
dans le pulvérisateur.
• Entreposer ou éliminer les substances
chimiques non utilisées selon les directives du
fabricant de la substance chimique en raison
des dommages possibles à l’environnement
s’il advenait un déversement ou une fuite, ou
consulter les critères de mise au rebut indiqués
sur la fiche signalétique.
• Nettoyer et rincer le pulvérisateur après chaque
utilisation pour éviter une exposition non
prévue à une substance chimique et éviter la
contamination lors d’applications suivantes.
• Entreposer le pulvérisateur dans un endroit
chaud, sec et sans poussière, à l’écart de la
lumière directe du soleil.

20
AVERTISSEMENT : RISQUE DE BLESSURE
PERSONNELLE ET DE DOMMAGES MATÉRIELS
DÉCOULANT D’UN BRIS OU D’UNE DÉCHARGE DE
LIQUIDES CHIMIQUES À PRESSION ÉLEVÉE INCONTRÔLÉE.
• Ne jamais modifier le pulvérisateur par rapport
à sa condition d’origine. Ne jamais chauffer
ou modifier le flexible, l’écrou du flexible ou
la barbelure. Ne pas respecter cette consigne
pourrait entraîner l’affaiblissement des
composants et/ou des connexions.
• Utiliser seulement les pièces de rechange du
fabricant. Les autres pièces de rechange ne sont
pas compatibles avec ce pulvérisateur.
• Ne jamais pressuriser le pulvérisateur avec
un autre dispositif que la pompe fournie
par le fabricant d’origine. L’utilisation
d’un compresseur à air ou autre dispositif
non standard pour pressuriser le réservoir
pourrait dépasser la pression sécuritaire de
fonctionnement du pulvérisateur.
• Ne pas soulever, transporter ou tirer le
pulvérisateur par le flexible, le robinet d’arrêt ou
l’extension de la lance. Ne pas respecter cette
consigne pourrait entraîner l’affaiblissement
des composants et/ou des connexions.
Transporter seulement par la poignée ou le
harnais en s’assurant que les connexions sont
solidement fixées avant de le soulever.
• Afin de réduire les risques de décharges
électriques, ne pas mettre pulvérisateur dans
l’eau ou autre liquide. Ne pas mettre ni ranger
l’pulvérisateur à un endroit où il peut tomber ou
être entraîné dans une baignoire ou un évier.
Consignes de sécurité supplémentaires
AVERTISSEMENT : Ne jamais modifier le
pulvérisateur ou une de ses pièces. Il pourrait en
découler des dommages ou des blessures personnelles.
CONSERVERCESDIRECTIVES
POURUNEUTILISATIONFUTURE
LE SCEAU RBRC®
Veuillez retourner votre bloc-batterie
usagé dans un centre de réparation
autorisé BLACK+DECKER ou chez votre
revendeur local aux ns de recyclage.
Dans certaines régions, il est illégal de mettre les
batteries usagées aux rebuts. Vous pouvez également
communiquer avec votre centre de recyclage local
pour obtenir des renseignements au sujet de l’endroit
où vous pouvez apporter votre bloc-batterie usagé. Ne
pas le mettre au bac de recyclage au bord de la route.
Pour obtenir de plus amples informations, visiter le
https://www.appelarecycler.ca/ ou appeler au numéro
sans frais qui se trouve sur le sceau RBRC®. RBRC® est
une marque déposée d’Appel à Recycler, Inc.
ASSEMBLAGE
AVERTISSEMENT : RISQUE DE BLESSURES
PERSONNELLES ET DE DOMMAGES MATÉRIELS
DÉCOULANT D’UNE EXPOSITION À UNE SUBSTANCE
CHIMIQUE. Après l’assemblage initial, toujours
inspecter le pulvérisateur pour détecter tout
dommage et effectuer un test avec de l’eau pure
pour vérifier qu’il fonctionne adéquatement. Avant
d’utiliser le pulvérisateur avec une substance
chimique, s’assurer que toutes les connexions sont
bien serrées et qu’il n’y a pas de fuite, également que le
flexible n’est pas endommagé
AVERTISSEMENT : Utiliser seulement les accessoires
recommandés par le fabricant ou vendus par celui-ci.
Contenu du paquet
F
E
G
AB C D
H
I
L
J
K
A Pulvérisateur B Assemblage
d’arrêt
C Lance
D Adaptateur
Dry-Touch
E Buse à jet
conique
ajustable
F Buse à jet
éventail
rouge et
jaune
G Buse à
mousse
H Écrous
borgnes
I Joint plat
J Batterie K Chargeur de
batterie
L Harnais
Table of contents
Languages:
Other BLACK DECKER Paint Sprayer manuals
Popular Paint Sprayer manuals by other brands

Campbell Hausfeld
Campbell Hausfeld DH3200 user manual

Toro
Toro 41394 Operator's manual

Goizper Group
Goizper Group MATABI evolution 10 LT Original instructions

DETE
DETE GGM 25 Translation of original instruction manual

DeVilbiss
DeVilbiss GFG HD Technical bulletin

CAMION
CAMION Ice Master H Series owner's manual