Black Ridge RF901AG User manual

1 2
WARRANTY
This product is guaranteed against defects for a period of 12 months from date of
purchase. This warranty is provided by Super Cheap Auto Pty Ltd ACN 085 395
124 (Supercheap Auto) of 751 Gympie Rd Lawnton QLD 4501 Ph (07) 3482 7500.
Supercheap Auto will offer a repair, replacement product or store credit if the product
is assessed as being defective during the warranty period.
To claim under this warranty, take this product to the Front Service Desk of your nearest
Supercheap Auto store. For store locations, visit www.supercheapauto.com.au (AUS)
or www.supercheapauto.co.nz (NZ). You will need your receipt or proof of purchase.
Additional information may be requested of you to process your claim. Should you not
be able to provide proof of purchase with a receipt or a bank statement, identification
showing your name, address and signature may be required to process your claim.
This product may need to be sent to the manufacturer to assess the defect before
determining any claim. Faults or defects caused by product modification, misuse and
abuse, normal wear and tear or failure to follow user instructions are not covered under
this warranty.
Our goods come with guarantees that cannot be excluded under the Australian
Consumer Law. You are entitled to a replacement or refund for a major failure and
for compensation for any other reasonably foreseeable loss or damage. You are also
entitled to have the goods repaired or replaced if the goods fail to be of acceptable
quality and the failure does not amount to a major failure.
Any expenses incurred relating to the return of this product to store will normally have
to be paid by you. For more information contact your nearest Supercheap Auto store.
The benefits to the consumer given by this warranty are in addition to other rights and
remedies of the Australian Consumer Law in relation to the goods and services to
which this warranty relates.
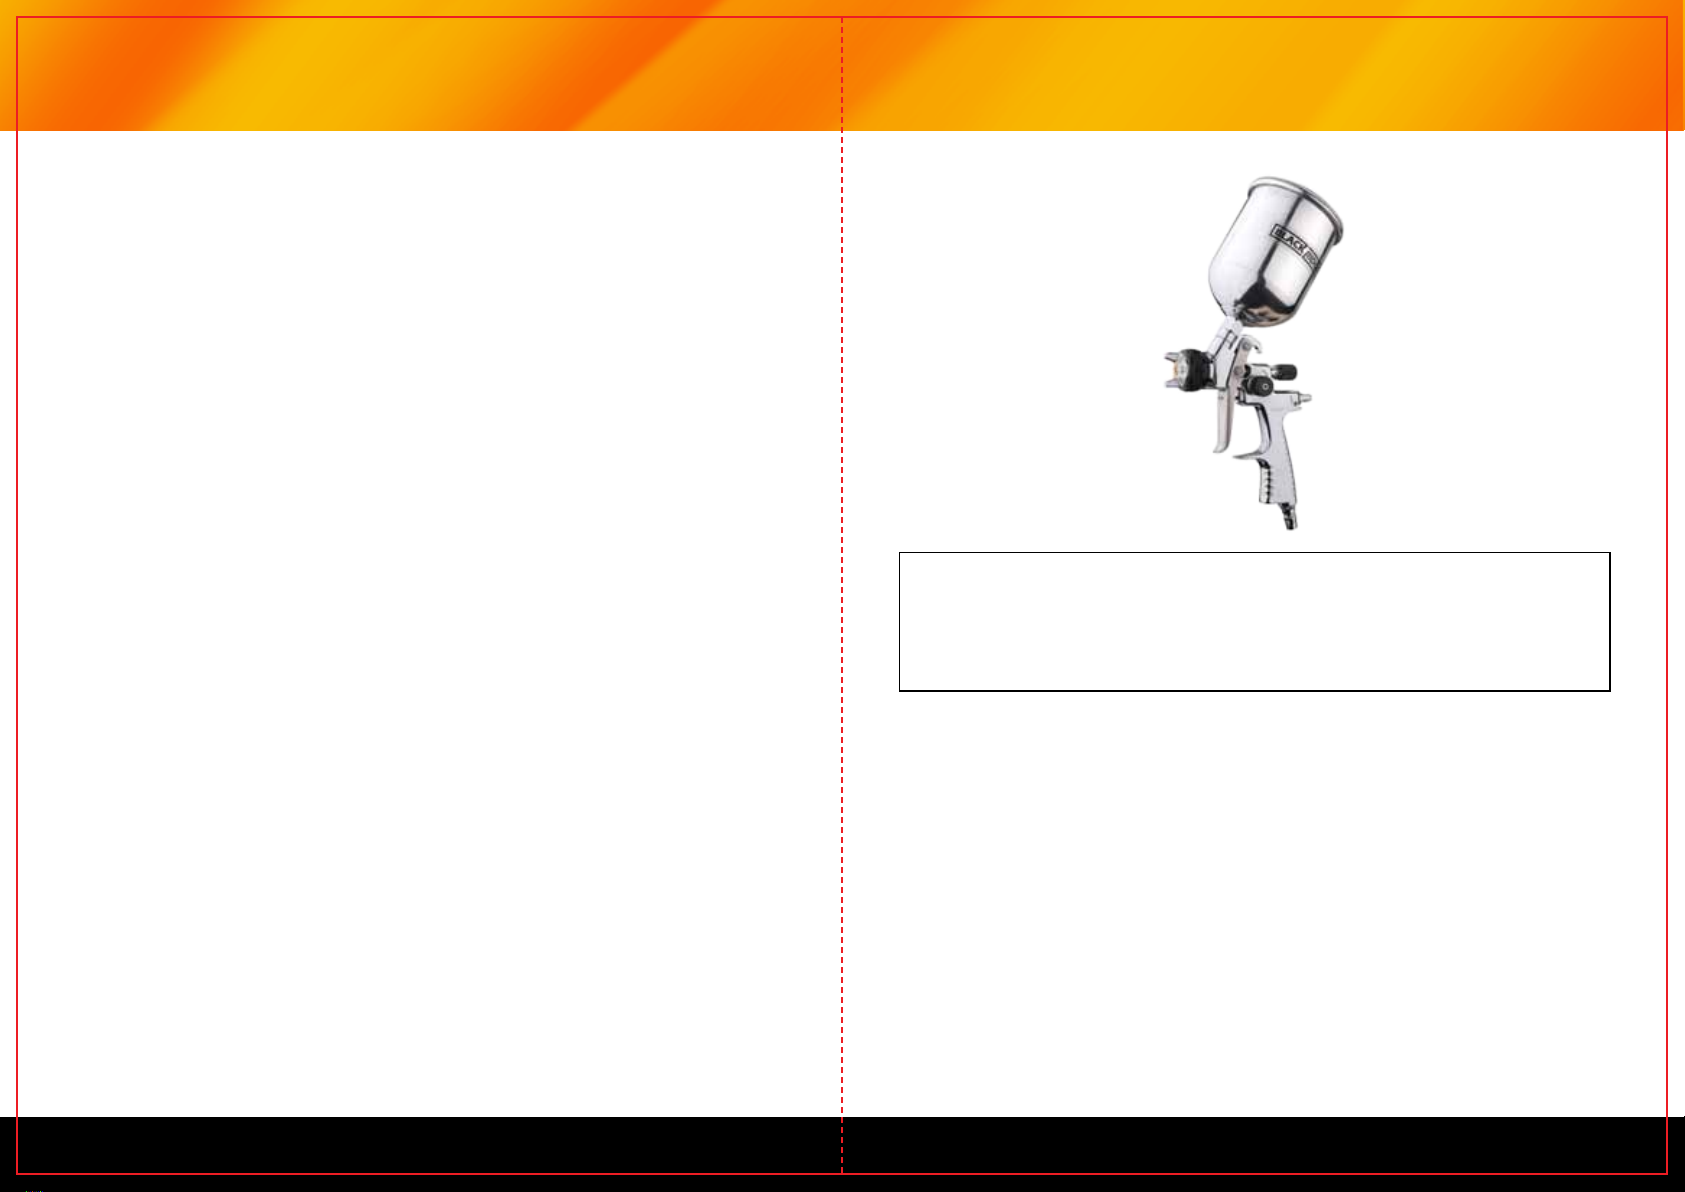
Model: RF901AG
Type of feed: Gravity
Material Fluid Nozzle Diameter: 1.4mm
Max Operating Pressure: 40 PSI (2.7 BAR)
Minimum Air Consumption: 100 LPM
Fluid Delivery: 0.13-0.18 LPM
Painting Fan: 160mm - 200mm
Cup Size: 600ml
Air Inlet: 1/4”
Accessory: Wrench brush

3 4
• Attach the cup to the spray gun. Make sure the lid is securely tightened and the
vent tube is secured.
When filling or refilling the material, disconnect your gun from the air
supply to avoid accidental spillage or spraying.
for best results you should incorporate an
air regulator with filter).
• Connect the air source hose to the gun. Make sure the air pressure does not
exceed 40 PSI (2.7 BAR).
• Pull the trigger slowly and move the spray gun in parallel strokes to the object
being painted. Keep the appropriate distance of 6” – 12” between the gun and
the spraying area. This may differ slightly depending on the flow adjustment and
the material being sprayed.
• Release the trigger after each forward movement; pull the trigger again on the
return movement.
• When using a vertical pattern, move the spray gun in a horizontal motion; with
a horizontal pattern move the spray gun in a vertical motion. A round pattern
requires a greater distance from the object being painted.
3 4
• Fluid and solvents can be highly flammable or combustible:
- Use in a well ventilated spray booth.
- Avoid any ignition sources such as smoking, open flames, electrical hazard, etc.
• Never use halogenated hydrocarbon solvents (1.1.1thrichlorine, ethyl chloride,
etc.) which can chemically react with aluminum and zinc parts and cause an
explosion.
- Be sure that all fluids and solvents used are chemically compatible with
aluminum and zinc parts.
• To reduce the risk of static sparking, grounding continuity to the spray
equipment and object being sprayed must be maintained.
• Never point the gun in the direction of a human body.
• Never exceed the maximum safe working pressure of the equipment.
• Always release air and fluid pressure before cleaning, disassembling or servicing.
• For emergency stop and prevention of unintended operation, a ball valve
installation near the gun to stop the air supply is recommended.
• Toxic vapours produced by spraying certain materials can create intoxication
and serious damage to health.
- Use the gun in well-ventilated areas.
- Always wear protective eyewear, gloves, respirator, etc. to prevent the toxic
vapour, solvents and paint from coming into contact with your eyes or skin.
• Noise level mentioned in main specifications was measured at 1m behind the
tip of the gun, 1.6m high from floor.
- Wear earplugs if required.
• Never modify this product for any application.
• Never spray foods or dangerous chemicals through the spray gun.
Preparation before operating:
• Check and replace any damaged or worn parts.
• Make sure the nozzle and air trigger are free to operate correctly.
• Pour paint into the paint cup.

3 45 6
Air enters between the
fluid nozzle and tapered
seat of the gun body.
Remove the fluid nozzle
and clean the seat.
Replace if damaged.
Ring or Fluttering Air enters near the
needle sealing nut.
Tighten the needle
sealing nut.
Air enters between
material passage
connector and cup.
Assemble and tighten
the relative parts again
after cleaning.
Crescent
Paint build up on air
nozzle partially clogs
horn holes. Air
pressure from each horn
is different.
Remove obstructions
from horn holes. Do not
use metal objects to
clean horn holes.
Inclined
Paint build up on the
periphery of the fluid
nozzle hole or centre
hole of air nozzle
damaged.
Remove obstructions or
replace if necessary.
Loose fluid nozzle. Remove fluid nozzle,
clean and replace.
Paint viscosity too low. Add paint to increase
viscosity.
Split
Fluid output too high. Adjust the fluid
adjustment knob or
pattern
adjustment knob.
Paint viscosity too high. Add thinner to reduce
viscosity.
Heavy
Fluid output too low. Adjust the spray
adjustment valve to
allow more fluid output.
• When finished, release the trigger and disconnect from the air source. The
cup and spray gun may still hold air pressure; fire the spray gun toward scrap
material until all of the pressure is extended. Open the vent before removing
the lid to make sure there is no remaining pressure.
• Turn off air and coating materials to the gun and release pressure by triggering
the gun before disassembling, cleaning or servicing.
• Be careful when disassembling the spray gun it contains sharp parts.
• If unsure, please take the spray gun to a qualified technician for repair.
• Pour remaining paint into another container and then clean the paint
passages and air nozzle. Spray a small amount of thinner to clean paint
passages, incomplete cleaning will cause adverse pattern shape and
particles. Always clean spray guns thoroughly, immediately after use. If using
two-component paint, ensure the gun is cleaned thoroughly, immediately after use.
• Clean other sections with a brush soaked with thinner and waste cloth.
• Clean paint passage fully before disassembly.
• Remove fluid nozzle after removing fluid needle set or while keeping fluid
needle pulled in order to protect seat section.
• While keeping fluid needle packing set by hand, then tighten gradually by
spanner.
- Adjust packing set while pulling trigger and watching movement of fluid
needle set since too much tightening will slow down movement of fluid needle
and re
3 47 8
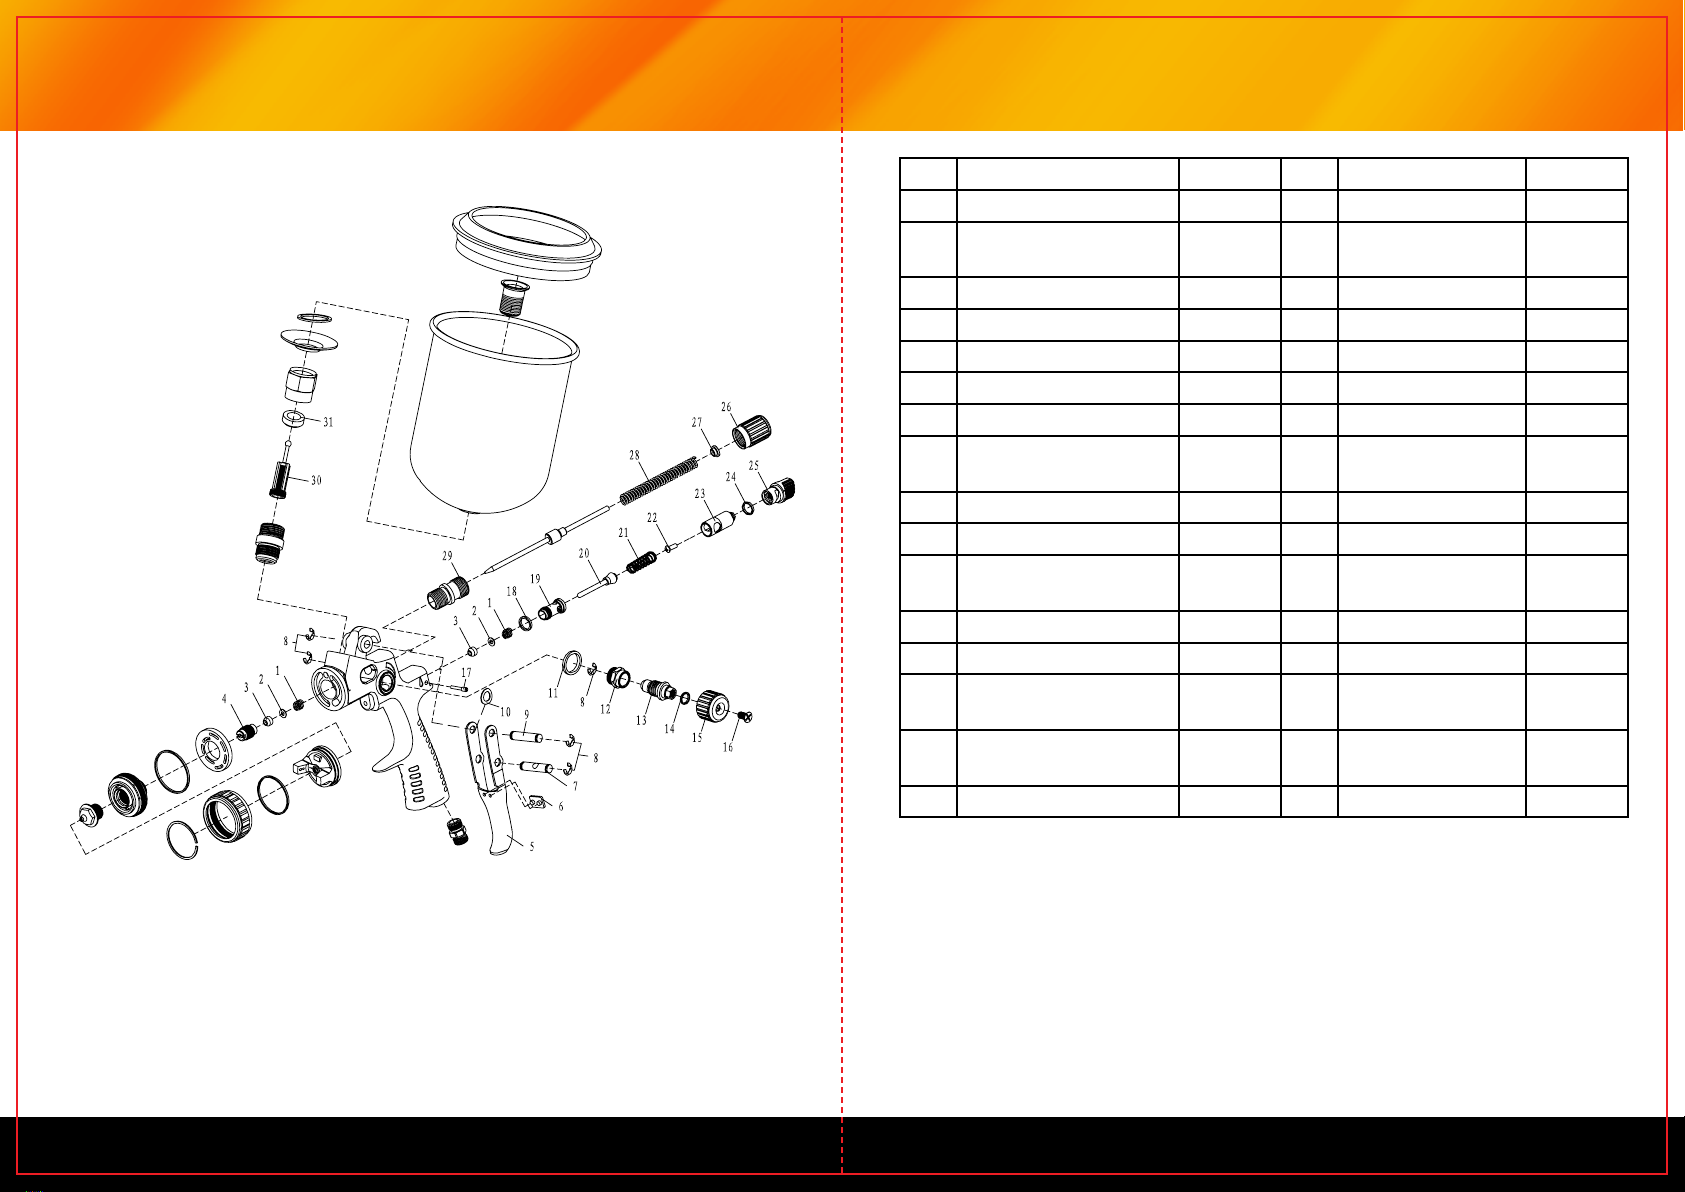
1 Needle Sealing Spring 2 17 Staid Bolt 1
2 Needle Sealing Spring
Gasket
2 18 Seal Ring 1
3 Rubber Sleeve 2 19 Air Valve Body 1
4 Sealing Screw 1 20 Air Valve Stem 1
5 Trigger 1 21 Air Valve Spring 1
6 Elastic Packing 1 22 Bolt M4x8 1
7 Flexible Pin 1 23 Airflow Adj. Seat 1
8 Opening Stopper 4 5 24 Airflow Adj.
Sealing Gasket
1
9 Trigger Pin 1 25 Airflow Adj. Knob 1
10 Backing Ring 1 26 Needle Adj. Knob 1
11 Pattern Adj. Seat
Gasket
1 27 Needle Spring
Seat
1
12 Pattern Adj. Seat 1 28 Needle Adj. Spring 1
13 Pattern Adj. Stem 1 29 Needle Adj. Seat 1
14 Pattern Adj. Seat
Gasket
1 30 Filter 1
15 Pattern Adj. Knob 1 31 Cup Sealing
Gasket
1
16 Bolt M4x8 1
NOTE:
When spray painting consider the size of the job and the size of your air
compressor being used. When spray painting large jobs like a fence or car, a Belt
Drive Air compressor is recommended. Always refer to the duty cycle of your air
compressor before spray painting.
Table of contents
Other Black Ridge Paint Sprayer manuals


Popular Paint Sprayer manuals by other brands


Sunex
Sunex 9002B Operating instructions, warning information, parts breakdown

Krautzberger
Krautzberger KS 5 operating instructions

KISANKRAFT
KISANKRAFT KK-KPS-204 Operation manual

WAGNER
WAGNER CONTROL PRO 250 M owner's manual

WAGNER
WAGNER ProjectPro 117 owner's manual

Valex
Valex 1373102 Instruction manual and safety instructions


