Blankom A-QAMOS-4CI Application guide

Professional Headend Solutions
Device manual
A-QAMOS-4CI
Part No: 5102.81
SAT-TV Transmodulator
DVB-S/ -S2 (8x QPSK/ 8PSK) →4x CI →DVB-C (8x QAM)

2
A-QAMOS-4CI
Part No: 5102.81
SAT-TV Transmodulator
DVB-S/ -S2 (8x QPSK/ 8PSK) → 4x CI →DVB-C (8x QAM)
ALINE
Contents
1. Safety and operating instructions ................................................................................................................... 3
2. Device variants .......................................................................................................................................... 3
3. Software options ........................................................................................................................................ 3
4. General ...................................................................................................................................................... 3
5. Functional description ............................................................................................................................... 3
6. Explanation of the operating elements ...................................................................................................... 4
6.1 Front view ................................................................................................................................. 4
6.2 Meaning of the status LED’s .................................................................................................... 4
6.3 Rear view .................................................................................................................................. 4
6.4 Meaning of the LED’s on rear .................................................................................................. 5
6.4.1 LED’s at the satellite ports ..................................................................................... 5
6.4.2 Status LED at the output coupler .......................................................................... 5
6.4.3 LED’s at the 10/ 100 Mbit control port ................................................................... 5
7. Adjusting by web server ............................................................................................................................ 6
7.1 Network connection to the computer ...................................................................................... 6
7.2 Initial installation using the wizard ........................................................................................... 7
7.3 Setting of individual parameters .............................................................................................. 9
7.3.1 Menu “Overview“ .................................................................................................. 10
7.3.2 Menu “SAT selection“ ...........................................................................................11
7.3.3 Menu “CI setup“ ................................................................................................... 13
7.3.4 Menu “Transponders“ ...........................................................................................15
7.3.5 Menu “Adjustment“ ............................................................................................... 16
7.3.6 Menu “Language“ ................................................................................................ 17
7.3.7 Menu “Service“ ..................................................................................................... 18
7.3.8 Menu “Setup“ ........................................................................................................18
7.3.9 Menu “Level“ ........................................................................................................ 24
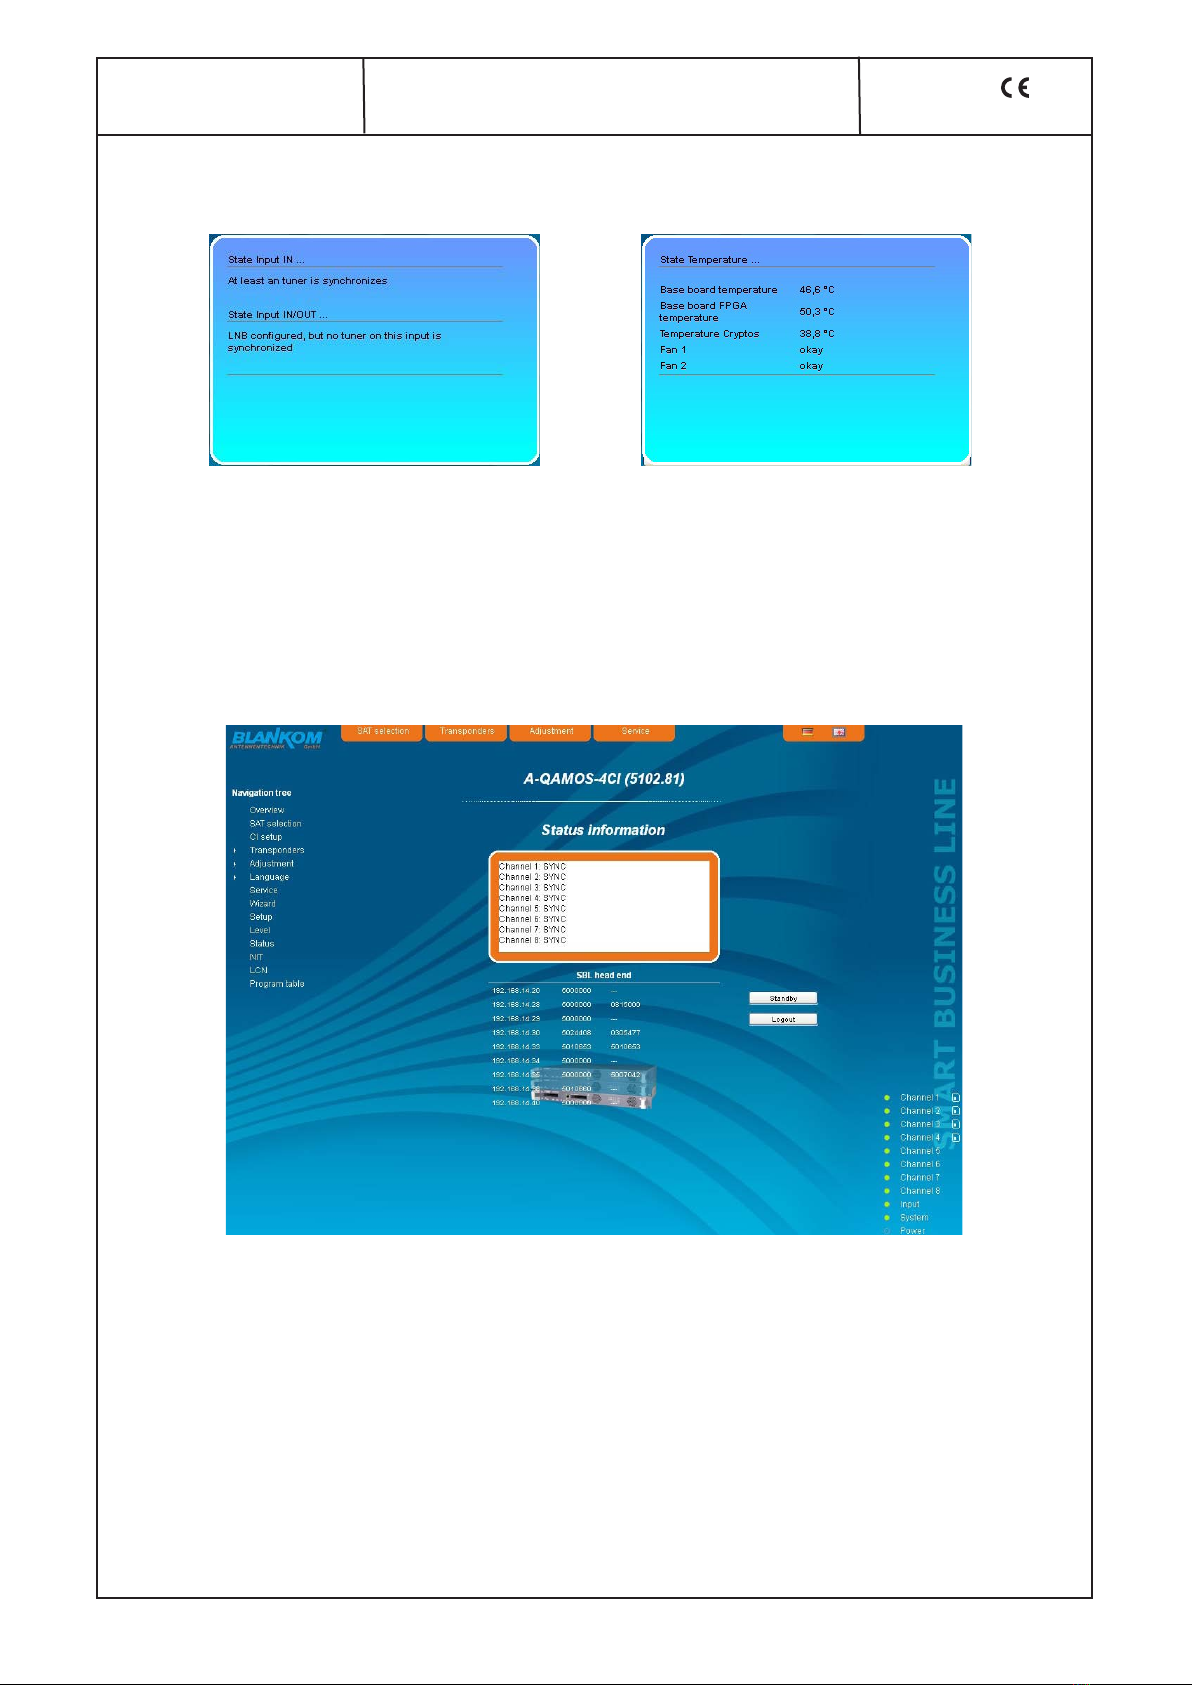
7.3.10 Menu “Status“ .................................................................................................... 24
7.3.11 Menu “NIT“ ......................................................................................................... 25
7.3.11.1 Automatic NIT processing ............................................................... 25
7.3.11.2 Manual NIT processing .................................................................... 26
7.3.12 Menu “LCN“ ....................................................................................................... 27
7.3.13 Menu “Program table“ ....................................................................................... 27
8. Factory settings ....................................................................................................................................... 28
9. Conversion tool to produce a compliant TS file for A-QAMOS-4CI ........................................................ 29
9.1 Functional scope ................................................................................................................... 29
9.2 Installation requirements ....................................................................................................... 29
9.3 Installation and integration of the conversion tool on a Windows (XP) system .................... 29
9.4 Error prevention ..................................................................................................................... 31
9.5 Glossary - parameter declaration [min. … max. range] ........................................................ 31
10. Block diagram ....................................................................................................................................... 32
11. Application example .............................................................................................................................. 32
12. Technical data ........................................................................................................................................ 33
13. Glossary ................................................................................................................................................. 33
14. Bibliography .......................................................................................................................................... 34
15. Notes on the device software ................................................................................................................ 35
16. Document history .................................................................................................................................. 35
Declaration of Conformity ...................................................................................................................... 36

3
A-QAMOS-4CI
Part No: 5102.81
SAT-TV Transmodulator
DVB-S/ -S2 (8x QPSK/ 8PSK) → 4x CI →DVB-C (8x QAM)
A
LINE
1. Safety and operating instructions
When assembling, starting-up and adjusting the devices, it is necessary to consider the system specific references in
the instruction manual.
The devices may only be installed and started up by authorized technical personnel.
When assembling the devices into the receiving points, the adherence of the EMC regulations is to be ensured.
The assembly and wiring have to be done without voltage.
With all work the defaults of the DIN EN 50083 have to be considered. It is especially important to follow
DIN EN 60728-11[2].
If installed in mounting cabinets a adequate heat circulation must be guaranteed. The mounting in closed cabinets with-
out air sufficient flow is not allowed.
The devices come under protection classification I. It is absolutely necessary, therefore, to insert the mains plug into a
socket with protective contact.
2. Device variants
A-QAMOS-4CI 5102.81 DVB-S/ -S2 (8x QPSK/ 8PSK) → 4x CI → DVB-C (8x QAM)
3. Softwareoptionen
CKB 205 5100.55 activation advanced NIT processing
CKB 214 5100.64 activation media player/ SD card
4. General
The SAT-TV Transmodulator A-QAMOS-4CI is a device of the head end system A-LINE, which is conceived as a complete system
for big and middle sized networks.
The A-QAMOS-4CI converts digital satellite signals into QAM signals to transmit it in cable networks. In this case, up to 8 QAM
channels from the available satellite IF signals are generated, which are attached via two inputs. Two Common Interface slots enab-
les the use of up to 4 CA modules for the reception of scrambled satellite signals/ programms. In particular, the internal processing
allows the output of DVB signals in full HD resolution.
5. Functional description
The satellite IF signal is fed through 2 inputs or a loop-through input by means of a switching matrix to 8 DVB-S/ S2 input parts
and their QPSK/ 8PSK demodulators. The resulting 8 transport streams are fed a high-performance FPGA. The transport stream
processing or filtering, the QAM modulation and the freely adjustable up-converting in the cable network range (45 ... 862 MHz)
take place in the FPGA. Two Common Interface slots enables the use of 4 CA modules, which are cascadable, for the reception of
scrambled satellite signals/ programms.
The eightfold modulator is adjacent channel compatible. A highly-clocked digital to analogue converter (DAC) is responsible for the
spectrally pure output of the cable signal. After amplification and sum level adjustment, the cable signal is coupled through a direc-
tional coupler to the output jacks.
WEEE-Reg.-Nr. DE 50389067

4
A-QAMOS-4CI
Part No: 5102.81
SAT-TV Transmodulator
DVB-S/ -S2 (8x QPSK/ 8PSK) → 4x CI →DVB-C (8x QAM)
ALINE
6. Explanation of the operating elements
6.1 Front view
6.2 Meaning of the status LED‘s
Designation Colour Status Meaning of display
POWER green permanently on device is on
amber permanently on device is in standby
off device is off, operating voltage is not applied
SYSTEM green permanently on device is ready for work
flashing software update is running
amber permanently on temperature is high, fan is activated
flashing temperature is critical, the device will no longer work or is forced to shut down
off device is not ready for work
CH 1 ... CH 8 green permanently on channel operates without error
amber permanently on error warnings, depending on signal:
- input and/ or output without sync
- input sync, but in bad quality (eg. mosaic effect in the TV picture)
flashing hardware is faulty
off channel is off
6.3 Rear view
CI slot 2
Status LED “POWER“
Status LED‘s channel 1, 3, 5, 7
Status LED‘s channel 2, 4, 6, 8
Status LED “SYSTEM“
CI slot1
CAS port
(for future use)
POWER LED LED Control port Status LED “LOOP“ Reset-
(redundancy) “Input 1“ “Input 2/ incl. LED‘s at the outp. coupler button
Output“
Ground Fan SAT IF input coupler Output coupler
terminal “Input 1“ “Input 2/ Output“ “Input“ “Output“

5
A-QAMOS-4CI
Part No: 5102.81
SAT-TV Transmodulator
DVB-S/ -S2 (8x QPSK/ 8PSK) → 4x CI →DVB-C (8x QAM)
A
LINE
6.4 Meaning of the LED‘s on rear
6.4.1 LED’s at the satellite ports
Colour Status Meaning of display
green permanently on satellite signal port has been configured as input, works properly
amber permanently on satellite signal port has been configured as output (only port “IN/ OUT“)
flashing LNB overcurrent (e.g. by short circuit) and/ or LNB overheated, port is disabled
temporarily.
off no tuner is locked on this input or port is deactivated (only port “IN/ OUT“).
6.4.2 Status LED at the output coupler
Designation Colour Status Meaning of display
LOOP green permanently on loop active, i.e. nominal level range 62 ... 82 dBµV
off no loop, i.e. nominal level range 74 ... 94 dBµV
6.4.3 LED‘s at the 10/ 100 Mbit control port
Designation, colour Status Meaning of display
Connect LED, yellow permanently on network cable is connected
off no cable connection
Data LED, green flashing data is exchanged
off no data exchange

6
A-QAMOS-4CI
Part No: 5102.81
SAT-TV Transmodulator
DVB-S/ -S2 (8x QPSK/ 8PSK) → 4x CI →DVB-C (8x QAM)
ALINE
7. Adjusting by web server
7.1 Network connection to the computer
System requirements:
- PC/ laptop with 10/ 100 Mbit Ethernet interface
- Internet browser (e.g. Windows Internet Explorer), which accept JAVA script.
Setup the connection:
The A-QAMOS-4CI has to connected to PC network using an Ethernet cable. The IP address of the device is 192.168.1.100 on delive-
ry. If several A-LINE-SBL devices should be controlled or adjusted via an Ethernet switch, each device must first be converted indivi-
dually to its provided IP address within the network. To that the address of the network port on the PC (temporary) must be adapted to
the IP address of the A-LINE-SBL device (subnet mask: 255.255.255.0, IP address: 192.168.1.XXX, where XXX is not the same as the
corresponding value of the A-LINE-SBL device IP address). After the network configuration of the device(s) the IP address of the con-
trol PC is converted to the provided IP address and the devices can be accessed through the browser with their new IP addresses.
First appears the login window, if the password and user testing were activated on the setup page (see chapter 7.3.8):
After successful registration or successful connection establishment without password (default setting) the start page of the device,
the menu “Overview“ (see chapter 7.3.1), appears.

7
A-QAMOS-4CI
Part No: 5102.81
SAT-TV Transmodulator
DVB-S/ -S2 (8x QPSK/ 8PSK) → 4x CI →DVB-C (8x QAM)
A
LINE
7.2 Initial installation using the wizard
The easiest way to set the A-QAMOS-4CI is to use the wizard. By pressing the “Wizard“ menu in the navigation tree you get to the
home page of the wizard. As with any other browser page at the top right hand it can also change the language.
First choose the configuration of the system. If the system is equipped with LNB and multiswitch, so you can select the number of
feeds on the left. If the system is operated with a Quattro LNB, so you choose from the right side, which satellite level contact with the
corresponding input jack. By pressing the “OK“ button, the corresponding data are loaded and you will be forwarded to the selection
of the channel or transponder.
In the left column, all available channels are loaded according to the selected satellite from the database. The listing is in alphabetical
order, the start of the list can be selected under the list by selecting the first letter. Alternatively, you can also enter a string (e.g. “HD“)
in the text box next to the letter sequence. In this case all the channels are listed that contain that search string in their names.

8
A-QAMOS-4CI
Part No: 5102.81
SAT-TV Transmodulator
DVB-S/ -S2 (8x QPSK/ 8PSK) → 4x CI →DVB-C (8x QAM)
ALINE
You select the output channel in the selection box right before the transmitter or transponder selection is made. The selection begins
with channel S 21 and D 306 (306.00 MHz). But the channels of the entire frequency range of 45 ... 862 MHz can be chosen freely in
the selected channel spacing (see chapter 7.3.8). From the channel list on the left you can select by double click the desired program,
and thus the entire transponder (which contains this program), which is then transmitted in that output channel. After the selection all
channels in this package will be listed in the middle list box. In the upper part the television programs are listed and in the lower part
the radio programs. In the upper right list box status information will appear for the selected transponder. In the right list box below
there is the list of already selected transponder to the output channel in which they are to be transmitted.
In this way, now up to 8 transponders per A-QAMOS-4CI can be selected to be transferred. First, as the output channel the next hig-
her channel to the last selected program package is offered. But for each packet the output channel can be chosen freely in the total
frequency range. If an incorrect selection is made, it can be removed by double-clicking the unwanted selected transponder in the
right field .

9
A-QAMOS-4CI
Part No: 5102.81
SAT-TV Transmodulator
DVB-S/ -S2 (8x QPSK/ 8PSK) → 4x CI →DVB-C (8x QAM)
A
LINE
Clicking on the “OK“ button, the selection is accepted and set in A-QAMOS-4CI. The browser will be redirected to the home page (see
chapter 7.3.1).
By a reopening of the wizards left in the navigation tree you can always do a complete reinitialization of the device. The changes will
be accepted and set only by pressing the “OK“ button. Additional or specific settings can be made by using the adjustment menus.
7.3 Settings of individual parameters
Using the web site, you can set certain parameters of the device or perform configurations on the device or the user interface. The
various setting menus can be selected in the navigation tree on the left side. The setting is supported by an online help. Hovering the
parameters by the mouse in the lower part of the site an orange colored text box appears with explanations for each parameter. By
setting in the “Setup“ menu (see chapter 7.3.8) it may be selected that the help appears in the status bar of your browser. If appropri-
ate setting changes in the browser options are necessary.
In addition, in the lower part of the navigation tree status information for the device is displayed. By changing the setup menu, the
status information can also be moved to the right (see also chapter 7.3.8). All 8 channels are listed individually. A green LED symbol
before the “channel ...“ means that both input and output are synchronized and that the channel operates without error. An orange
colored symbol indicates that an error has occurred in that channel. An overview of the status of various parameters of the channel is
obtained by clicking the corresponding channel. In the browser interface, a status overview appears.

10
A-QAMOS-4CI
Part No: 5102.81
SAT-TV Transmodulator
DVB-S/ -S2 (8x QPSK/ 8PSK) → 4x CI →DVB-C (8x QAM)
ALINE
A transparent LED symbol means that the channel is not programmed and set, or the RF output is turned off. Furthermore, we obtain
the same way status information about the inputs and about the system parameters. In this case too an orange colored LED symbol
displays an error state during which a green LED symbol displays error-free working condition. The detailed status information is
available by clicking the name field.
The last displayed point indicates the connection status between the network interface and the device. Green means that the connec-
tion is established. A transparent LED light indicates that there is no connection or the connection is failed.
Settings with the selection box or input fields are taken over by pressing the “send“ button and stored permanently, and the
A-QAMOS-4CI is set on these values after a restart too. Settings with the check box are usually performed immediately but not stored
in memory, so they would be lost on a possible restart of the device. To save these settings the “send“ button must be pressed.
In all menus, the language selection is possible between German and English top right.
7.3.1 Menu ”Overview”
This page provides a status overview of the 8 channels. If a channel is working without errors, “SYNC“ is displayed. If errors occur you
will see an “Error“ display. If the RF power is switched off there is no display value behind the respective channel.
In addition, below the status window the head end display is visible. There all A-LINE-SBL and SBL devices are listed, which are in the
same network and which have been associated to the head end in the setup menu (see 7.3.8). This is significant because functions
over all devices such as the NIT processing between devices of the A-QAMOS and QAMOS product group can be extended to all
components of the head end. The individual components of a head end are listed with their IP address, which is also provided with
a link to this address, so you can switch easily to the next device. If no head end was configured, a “Search“ button appears, which
forwards to the setup menu and scans the network for other A-LINE-SBL and SBL devices. Then all available devices are listed and
can be selected and added to the head end.
By clicking the “Logout“ button the user logs out of the device and the login window appears. By pressing the “Standby“ button the
device is switched to standby, which is displayed by an amber POWER LED on the device. The “Standby“ button will be replaced by
an “ON“ button, and by pressing this the device will be switched back on.

11
A-QAMOS-4CI
Part No: 5102.81
SAT-TV Transmodulator
DVB-S/ -S2 (8x QPSK/ 8PSK) → 4x CI →DVB-C (8x QAM)
A
LINE
7.3.2 Menu ”SAT selection”
In this menu you can make the choice of the satellites and the input configuration of the device. In the left part of the user interface
there is the configuration menu of the input part.
The setting screen is divided into two sections “LNB Control“ and “Program tables for“, for the two satellite jacks 1 (IN) and 2 (IN/
OUT). The parameters of both sections can be adjusted separately with the “send“ button below and then transferred.
If the second sat jack (IN/ OUT) is configured as a loop-through output, or not used, then the input configuration parameters of the
LNB control and program table are grayed out and not adjustable.
selection of sat jack 1 (IN) and 2 (IN/ OUT)
Mode 1selection: not used, input, output
LNB control selection: on, off (remote supply off completely),
unicable
DiSEqC selection: on, off
Satellite 2selection: A, B, C, D
Tonburst selection: off, A, B
22 kHz selection: on, off
Voltage selection: 13 V, 18 V
1only for sat jack 2 (IN/ OUT) adjustable
2only adjustable, if DiSEqC is on
Satellite selection: Astra 19,2° East, Eutelsat 13° East,
Eurobird 9° East
Band selection: Low, High
Polarization selection: vertical, horizontal
In the selection field “LNB control“ the item “unicable“ is available for both satellite ports. Thus, it is possible that before the respective
satellite input a unicable module can be switched on then the transponder selection can be made according to the receiving equip-
ment installed there. So it is possible, to assign up to 8 satellites levels (one or more satellites) to the unicable module. From this
assigned levels the required transponders can then be selected and assigned.

12
A-QAMOS-4CI
Part No: 5102.81
SAT-TV Transmodulator
DVB-S/ -S2 (8x QPSK/ 8PSK) → 4x CI →DVB-C (8x QAM)
ALINE
If the point “unicable“ is selected for one or both satellite ports, the input mask is
expanded by the unicable settings. If only one satellite port is set to unicable, the
settings for the other port is disabled and grayed out. For an active unicable port
the other settings are inactive and grayed out.
First for a maximum of 8 satellite accesses the input of the corresponding LNB
oscillator frequency and a freely selectable name for each satellite level is done. This
name is then found in the “Adjustment“ menu (see also section 7.3.5) again, because
in the case of unicable use, you have to enter the corresponding satellite level in the
downlink frequency input field, that is identified by this name. Next, for the up to 8
resulting user bands the intermediate frequency must be entered, on which the uni-
cable module converts the respective satellite transponder. These values, which are
given in the documents of the unicable module, have to enter, then confirm by pres-
sing the “send“ button. The trouble-free functionality was tested using the SUS 4481 F
unicable module of the company Spaun. For stable operation, we recommend using
a separate power supply for these modules. Trouble-free operation can not be gua-
ranteed when using other unicable assemblies.
If unicable is not used on an input port, in the right part of the GUI a table of available transponders, which is updated according to
the selected satellite, band and polarization, appears. The transponders are listed by name, downlink frequency, sat-socket assign-
ment and contained programs. This is based on an internal database with the current assignments of the satellite transponder positi-
ons Astra 19.2° East, Eutelsat 13° East and Eurobird 9° East.
If the transponder allocations should change, you can customize this table and even edit. By double-clicking the relevant transponder
number you entry into the edit menu and can change the data accordingly.
Existing entries can be changed or new ones are attached. By clicking the appropriate box the program list of the transponder can be
deleted and changed or additions can be stored into the database permanently. If the box “Save entries“ is not clicked, the changes
will remain only as long as the user interface is open. With the next start of the user interface the changes are lost. In this simple way,
the program data is kept up to date.

13
A-QAMOS-4CI
Part No: 5102.81
SAT-TV Transmodulator
DVB-S/ -S2 (8x QPSK/ 8PSK) → 4x CI →DVB-C (8x QAM)
A
LINE
7.3.3 Menu ”CI setup”
In this menu there is the configuration of the Common Interfaces of the device. The A-QAMOS-4CI has 2 double-CI slots for a maxi-
mum of 4 CA modules. The modules can be cascaded, i.e. a transport stream can be routed through one up to a maximum of every
4 modules for decryption of services. For this reason, initially there is the decryption configuration, i.e. it determines which transport
stream is passed through that module. In principle, set the transponder with the services to be decrypted on the channels 1...4, since
only these can be routed by the CA modules. First you select the pathway of transport streams of the 4 channels. The first selection
point is, channel 1 to be passed through module 1, ..., channel 4 to be passed through module 4. Next, you can route channel 1
through module 1 and than through module 2, channel 3 through module 3 and channel 4 through module 4 and channel 2 through
no module. Correspondingly are the other possibilities. For better illustration of the signal path it is displayed on the right side of the
select box graphically. Did you choose the right setting, so this is to confirm by pressing the “Send“ button that you can perform all
other settings for each module.
After the selection above one can make the multi-decryption settings for each signal path through one or more CA modules, if neces-
sary. For this purpose the “Multidec“ button is to press and leads to the following menu:

14
A-QAMOS-4CI
Part No: 5102.81
SAT-TV Transmodulator
DVB-S/ -S2 (8x QPSK/ 8PSK) → 4x CI →DVB-C (8x QAM)
ALINE
In this menu all services of the adjusted transponder and their CA status are listed. If you want to make adjustments or changes first
the “Refresh“ button must be activated to get the current transponder allocation. The services are selectable for decryption. For
each of this selected services one can determine, what streams or PID‘s are to be decrypted. That‘s important because the maximum
number of the decryptable PID‘s is limited and this limit has a different size per CA module.
In the selection boxes “MPEG 1/ 2 Audio Streams“ respective “Subtitling Streams“ all, no or individual streams are selectable. If one
wants to select more than one stream, but not all, the selection field ”all“ in the box is to be selected and in the column “PID block list“
all PID‘s have to be entered, that shall not be decrypted. 1
In the column “PID block list“ all PID‘s are listed, that shall not be decrypted. The PID‘s can be given in decimal or hexadecimal format
and have to be separated by a semicolon. The maximum number of PID‘s is 10. 2If “Settings all equal“ is clicked, only one service for
PID selection is offered and the taken settings are automatically transferred to all other services to be decrypted.
By clicking the “Test“ button the CA module will be initialized and all services, which are saved in the CA-service-list, will be tested for
the current decryption status. After the end of the test the result of the test appears on right side, where a green check mark means,
that the test was successful. On the other hand a red cross means that the test was not successful and the requirements for this ser-
vice must be corrected, e.g. too much PID‘s were selected.
1“Other Audio Streams“ includes all AC3-, DTS- and AAC-Streams. “Private Streams“ selects all streams which are not captured by the other selection
fields.
2Particularly PID‘s can be given here, which are active only at times and no authorisation for decryption is available for them.
The default is that the table editing (SDT, PMT, EIT) is performed. Thereby the CA descriptor 0x09 will be replaced in the PMT through
the user-defined descriptor 0xFE. If this descriptor is already used by the service provider, in the “Setup“ menu and then “GUI set-
tings“ (see section 7.3.8), the field “Tag selection (for decoded pid)“ must be enabled. Thus, the option “DVB tag (decoded TS)“ also
appears in multidecryption menu at each service. At this point, a user-defined descriptor from the range of 0x00 to 0xFF will be selec-
ted. It should be noted that this descriptor is not already used in the service.
After returning from the multidecryption menu each of the 4 CA modules can be configured. Per slot is shown here that the module is
initialized, if there is readiness for work and which type of module it is.
Individual CA modules must be initialized before setting the CA services. For this purpose the box “Reset slot“ is clicked.
The mode of the CA-PMT update will be adjusted on the next line. You can select between CA-PMT list and CA-PMT entry, where the
latter is not supported by all CAM‘s.
Some CA modules require the resource “Date & Time“ for initializing. For all other modules this setting should be disabled.
Click the button above right to get into the CA menu. There, the menus implemented in the CA module are offered the user. The
menus can be selected individually or sequentially accessed in order to make necessary adjustments or to retrieve information to the
CA module.
It should be noted that when changes in the channel (e.g. transponder switching, CA module change or removal) are done, the full
menu has be passed through to update the internal tables. For this purpose, as described above, first the necessary changes in the
signal path are to determine and then call the multidecryption menu for the affected channels. First there must be called again the
channel list by pressing the the “Refresh“ button, and then the appropriate stream selection must be made. This is also necessary if a
module has been removed and a free transponder is to be transmitted in this channel. Finally, in the “CI setup“ the change is to con-
firm by pressing the “Send“ button that this is also taken internally.

15
A-QAMOS-4CI
Part No: 5102.81
SAT-TV Transmodulator
DVB-S/ -S2 (8x QPSK/ 8PSK) → 4x CI →DVB-C (8x QAM)
A
LINE
7.3.4 Menu ”Transponders”
In this menu, the transponder selection, and so the program selection too, is done for all output channels. The user interface is divi-
ded into three tables. To the left there is the list of the selectable satellite transponders. This list results automatically from the selected
satellite setting (see chapter 7.3.2). The transponders are listed with their name, the downlink and the input allocation. In the middle
there is the current transponder allocation of the 8 channels, where on left side there is the selected satellite transponder and on right
side there is the corresponding output channel. Outside right next to the output channel there are two selectors: with the first the RF
signal of the respective channel is turned on or off, with the second you can select one of the 8 channels for setting. In the right table,
the television and radio programs, that are transmitted on the selected channel, are listed with their name and service ID.
To make changes, you must first select the desired channel. This is done either by clicking the appropriate selector outside right next
to the output channel in the middle of the channel list or by clicking “Channel“ in the navigation tree on the left side, which is listed as
a point of the menu “Transponders“.
If you want to change the input settings, one marked the first desired transponder with a single click in the left table. By pressing the
button “>“ left next to the input transponder in the middle of this overview, the transponder is adopted into the channel. At the same
time the channel assignments associated with the service ID and filter check box is listed in the right table. With this box you can
select which channels of the transponder are transmitted and which are filtered out of the package. To transmit a program, it must be
selected in that box. If you want to change the output channel, so you click the select box in this channel and selects the desired out-
put channel. On double assignments within these 8 channels is called attention to this automatically. Clicking the “Send“ button, the
settings are taken and stored.

16
A-QAMOS-4CI
Part No: 5102.81
SAT-TV Transmodulator
DVB-S/ -S2 (8x QPSK/ 8PSK) → 4x CI →DVB-C (8x QAM)
ALINE
7.3.5 Menu ”Adjustment”
In this menu, the settings of the device are made. Each channel can be adjusted individually according to individual requirements.
The channel selection may be either left in the navigation tree or above the set-up tables.
The following parameters are adjustable:
Input input parameters of the channel
Transponder name of the transponder, editable
Input selection of the satellite input: IN, IN/ OUT, player
Downlink 1input in MHz, if unicable is used, selecton of
the satellite level additionally (see chapter 7.3.2)
Symbol rate 1input in kSps
1not adjustable, if input is “player“
Output output parameters of the channel
Frequency input selection: channel, frequency 2
Output frequency selection from channel table/ input in kHz 2
Output level offset display of the level offset 3
QAM constellation selection: 16, 32, 64, 128, 256 QAM
Symbol rate input in kSps
RF signal selection: on, off
Spectrum position selection: normal, inverted
Mode selection: Transcoder, Test signal, Test level
QAM standard DVB-C/ ITU-T J.83 Annex A (fixed)
2If selected at the frequency input “channel“, so you can select the output frequency in the
pre-selected channel spacing (see chapter 7.3.8). If, however, at the frequency input “fre-
quency“, then the output frequency is selectable in kHz steps.
3Adjustment of the offset of each channel to the basic level, see chapter 7.3.8
Transport stream processing
SDT processing selection: on, off
Original network ID adjustment range: 0...65535
Original transport stream ID adjustment range: 0...65535
NIT processing selection: on, off
Network name name of the network (max. 30 characters)
Network ID adjustment range: 0...65535

17
A-QAMOS-4CI
Part No: 5102.81
SAT-TV Transmodulator
DVB-S/ -S2 (8x QPSK/ 8PSK) → 4x CI →DVB-C (8x QAM)
A
LINE
CAT processing selection: on, on with CA filter, off
CA system ID adjustment range: 0...65535
Operator ID adjustment range: 0...65535
LCN processing selection: on, off
Standard SD selection: IEC 62216, NorDig (V1)
If the LCN processing was turned on, you can switch to LCN editor by pressing the “Editor“ button to make the necessary adjust-
ments (see chapter 7.3.12).
In the table “Program filter“, the program filter function of the channel can be executed. If the program filter is turned off, all programs
of the received transponder can be transmitted. At the left of the overview all programs with the associated service ID are listed. To
the right is one check box to tag the program. In the right part of the overview there is the selector of the filter activation at the top. In
the second box “Filter mode“, you choose whether the selected channels are blocked or allowed to pass. In the box “Information of
other transponders“, it may be selected if additional information about SDT data from other transponders, which are transferred in the
data stream under the “Other“, are filtered out or are transmitted. Possible EPG information from other transponders, which can also
be transferred under the “Other“ in the data stream, are always transmitted with. With the first of the 4 buttons right below the current
program list can be loaded, the other 3 are used to simplify the selection of the program list
7.3.6 Menu ”Language”
In this menu, the selection of the user interface language is executed. You can choose between German and English. The transition
can be made either to the left in the navigation tree in the subtree of the point “language“ or top right of the language selection box.

18
A-QAMOS-4CI
Part No: 5102.81
SAT-TV Transmodulator
DVB-S/ -S2 (8x QPSK/ 8PSK) → 4x CI →DVB-C (8x QAM)
ALINE
7.3.7 Menu ”Service”
In this menu you will find all information about the service for the A-QAMOS-4CI in particular the BLANKOM service hotline and the
service email address. In addition, the implemented operating instructions may be downloaded or viewed as PDF. If there is an in-
ternet connection the BLANKOM homepage can be started, offering the latest software release or descriptions. Finally, the currently
installed software release is displayed.
7.3.8 Menu ”Setup”
In this menu, various administrative and system settings are made.

19
A-QAMOS-4CI
Part No: 5102.81
SAT-TV Transmodulator
DVB-S/ -S2 (8x QPSK/ 8PSK) → 4x CI →DVB-C (8x QAM)
A
LINE
Specifically, the following can be configured:
GUI settings
Help information within the status line of the browser
By default, the online help is displayed in an orange text box at the bottom of the
page. If you click this option, the help texts are displayed in the status bar of your
browser. Depending on your browser sometimes such use has to be allowed in
the browser settings.
Display all system files
The default is, that the system files can be subjected to upload or download as
a package under “Backup“ in the submenu “System administration“. By clicking
this box, the system files are listed individually and can be individually subjected
to an up or download.
Display top line register
By default, the registers are shown in the upper part of the user interface, to move
more quickly to the most frequently used menus. By removing the box marking
the registers are hidden.
Display start page
The default is to start with the menu selection by the command buttons after eve-
ry restart of the user interface (see chapter 7.1), where you can select the desired
setup menu. If this item is disabled, this page will be skipped and you reach in-
stantly the “Overview“.
Display status on right
By clicking the box, the status of the channels or the system is shifted to the right
of the user interface.
Optimization for low-speed data connectivity
By clicking the box the data volume of the browser pages is greatly reduced.
So it is possible to adjust the device, if there is only a low-speed connectivity
(GSM). The restictions are: there are no wizard and no program respective trans-
ponder lists. Furthermore, the size of all pictures is reduced.
Output frequency raster
With this selection box you can set the output channel spacing, which is pre-set
for adjustment of the QAM channels. To choose there are the standard B/G ra-
ster, the standard G raster (continuous 8 MHz) and the channel spacing of the
cable company Kabel-Deutschland-Gesellschaft (KDG).
Fan mode
This selection field you can specify whether the internal fans of the device are
be operated in accordance with the implemented control or whether they perma-
nently are on.
Tag selection (for decoded pid)
By click there is the possibility that in the PMT processing the CA descriptor is
replaced by a self-selected user-defined descriptor of the range 0x00 .. 0xFF. The
default value is 0xFE (see Section 7.3.3)
Activate user and keyword check
This selection is only available if you are logged in as administrator. If the box is
disabled, the log-in is skipped after each GUI reboot. Otherwise, user login and
password are required (see chapter 7.1).
SBL head end
All A-LINE-SBL and SBL devices, which are located in the same network, are
listed. By pressing the “Search“ button the list is updated. All marked devices
belong to the head end are displayed on the “Overview“ page.

20
A-QAMOS-4CI
Part No: 5102.81
SAT-TV Transmodulator
DVB-S/ -S2 (8x QPSK/ 8PSK) → 4x CI →DVB-C (8x QAM)
ALINE
Oscillator frequency of LNB
Low input of the Lo-frequency for receiving of the low
band (in MHz)
High input of the Lo-frequency for receiving of the
high band (in MHz)
Changeover frequency input of the frequency for point of entry from
(Downlink) the low into the high band (in MHz)
System administration
The default is displaying of the shortened list of files (top).
Backup
Here the system files can be loaded or saved as a package (except Logbook and
Status). Thus, it is possible, for example to copy the system files from an
A-QAMOS-4CI to another. If under “GUI setup“ “Display all system files“ is selec-
ted, the system files can also be loaded or saved separately (see figure below).
Moreover, additional system files can be added (e.g. other satellite assignments).
Software Update
By clicking the “Load“ button, the internal software components can always be
brought up to date.
Pressing the button “View logbook“ leads to an overview, in which all the processes have been documented since the start of the GUI.
Each operation is listed by date, time and description. If operations have been executed, the logged on user, who initiated the action,
is saved too. By pressing of the “Erase“ button all entries are deleted, when you are logged in as administrator.
System
Location In this field a name for the A-QAMOS-4CI is be
made to identify the device easily. This name
appears on the top right of the website under the
language selection box and is provided via
SNMP with the question of the field: Iso(1)org(3).
dod(6).internet(1).mgmt(2).mib.2(1).system(1).
sysLocation(6).
Logout restart the user interface
Default delete the settings and reset to default values
(including IP address), available only if you have
logged in as administrator
Reboot restart of the A-QAMOS-4CI
Table of contents
Other Blankom Modulator manuals

Blankom
Blankom 5105.82 User manual

Blankom
Blankom HDC 7016 Instruction Manual

Blankom
Blankom AMA 299 Application guide

Blankom
Blankom AMB 307 User manual

Blankom
Blankom PALIOS-IPM2 User manual

Blankom
Blankom VMA 191 User manual

Blankom
Blankom VMB 195 User manual

Blankom
Blankom STR 821 User manual

Blankom
Blankom ATB 19 series User manual

Blankom
Blankom SAT-TV User manual

Blankom
Blankom PALIOS-IPM4 5105.10 User manual

Blankom
Blankom QAMOS-CT Application guide

Blankom
Blankom A-PALIOS-IPM4 User manual

Blankom
Blankom HDC 5016 User manual

Blankom
Blankom A-PALIOS-IPM4CI 5113.81 User manual

Blankom
Blankom HDC 6012 User manual

Blankom
Blankom HDC 6008CI User manual

Blankom
Blankom HDC 5016 User manual