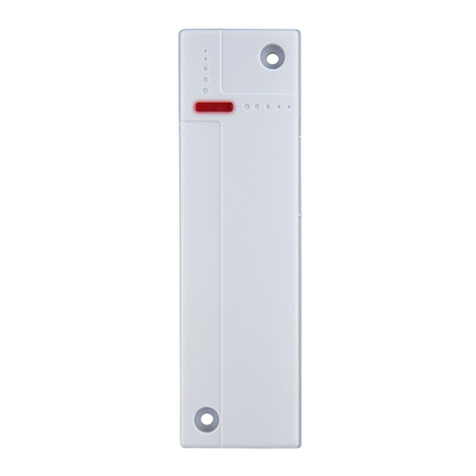
manuals.online logo
Brands
  1. Home
  2. •
  3. Brands
  4. •
  5. Blaupunkt
  6. •
  7. Security Sensor
  8. •
  9. Blaupunkt DC-S2 User manual

Blaupunkt DC-S2 User manual

DC-S2

ENGLISH
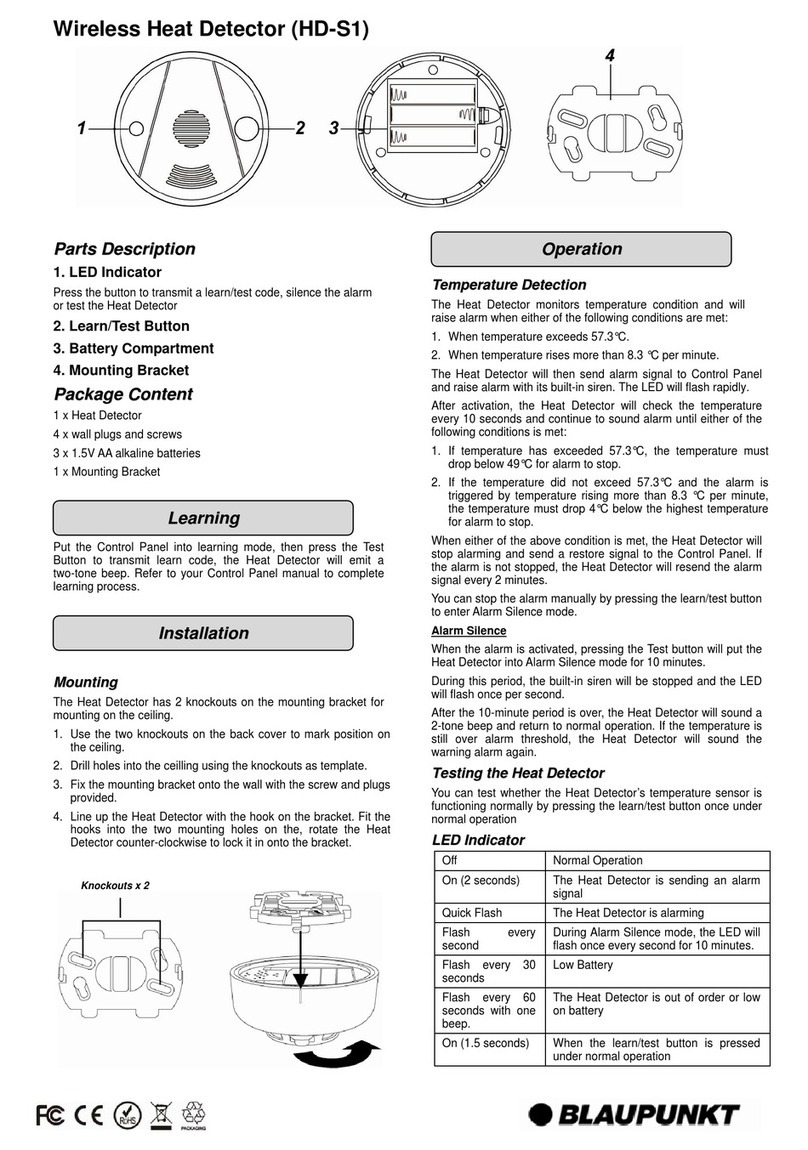
Door / Window Detector
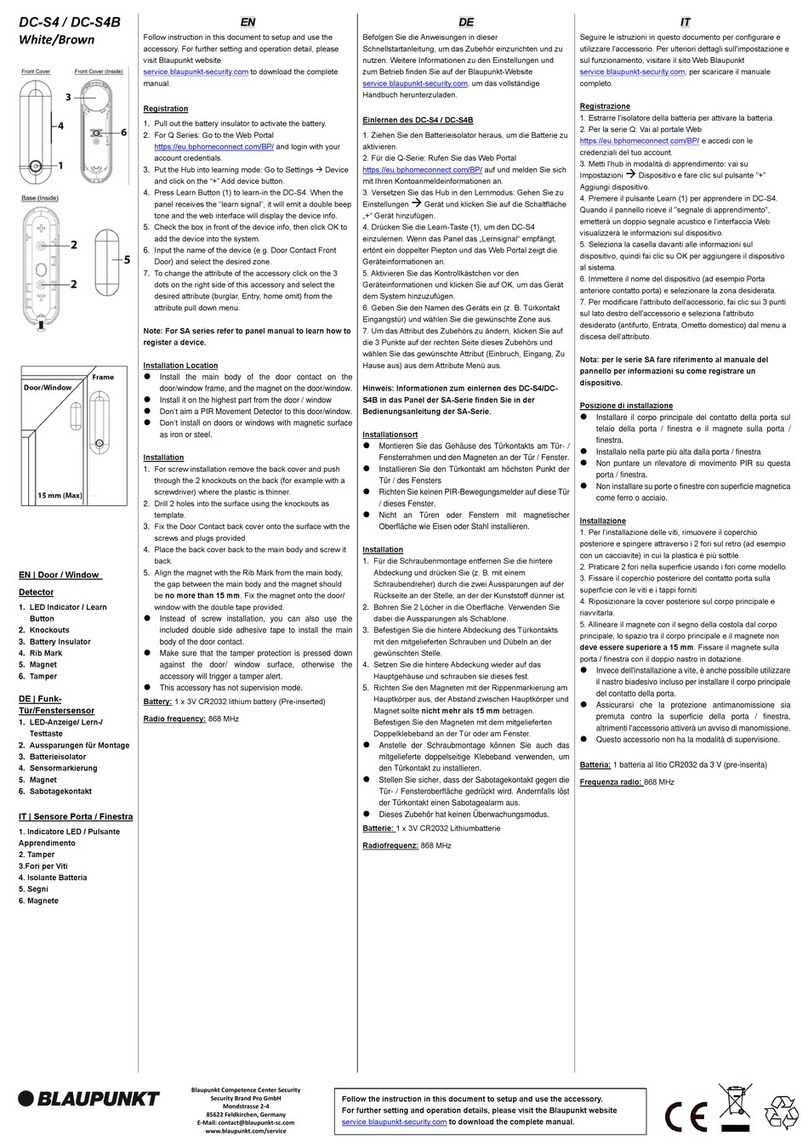
Follow instruction in this document to
setup and use the accessory, refer to
illustration on the right for detail. For
further setting or operation information,
please visit Blaupunkt website
http://www.blaupunkt.com to download
the complete manual.
Getting Started
1. Pull out the battery insulator to
activate battery. (Figure 1)
2. Put the Control Panel into learning
mode.
3. Press Learn Button in front to learn
sensor (Figure 2).
4. Refer to Control Panel manual to
complete learning process.
Mounting Location
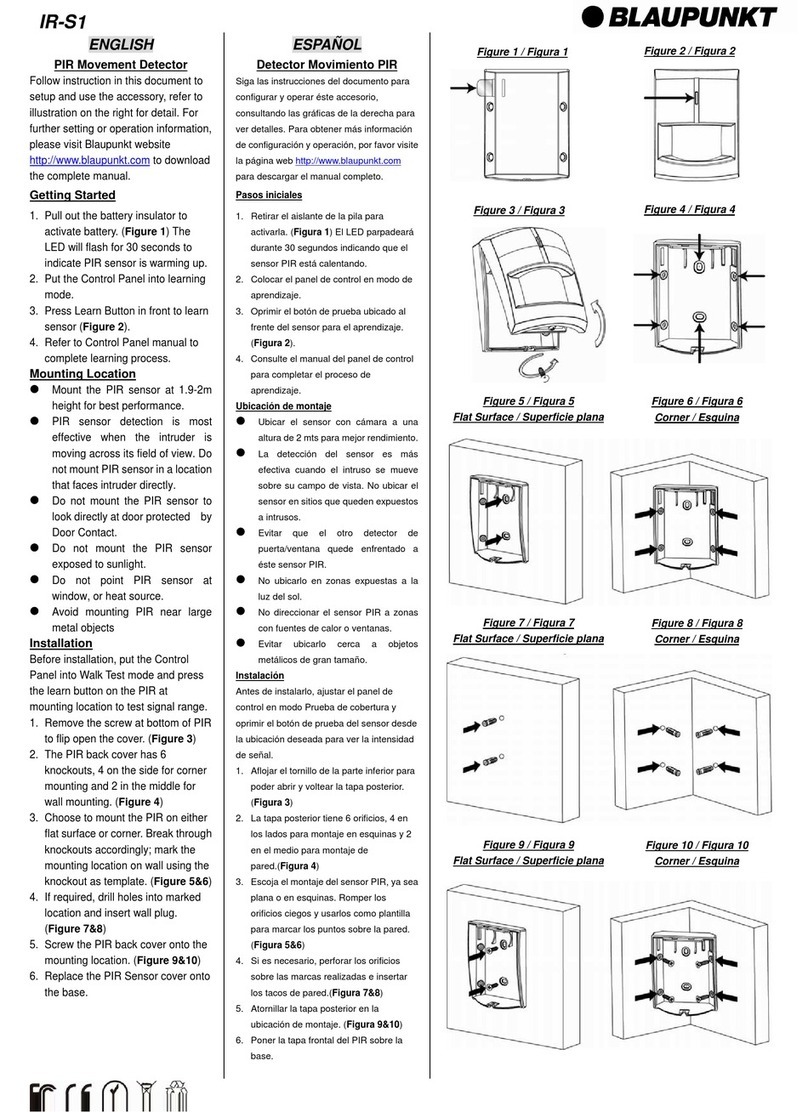
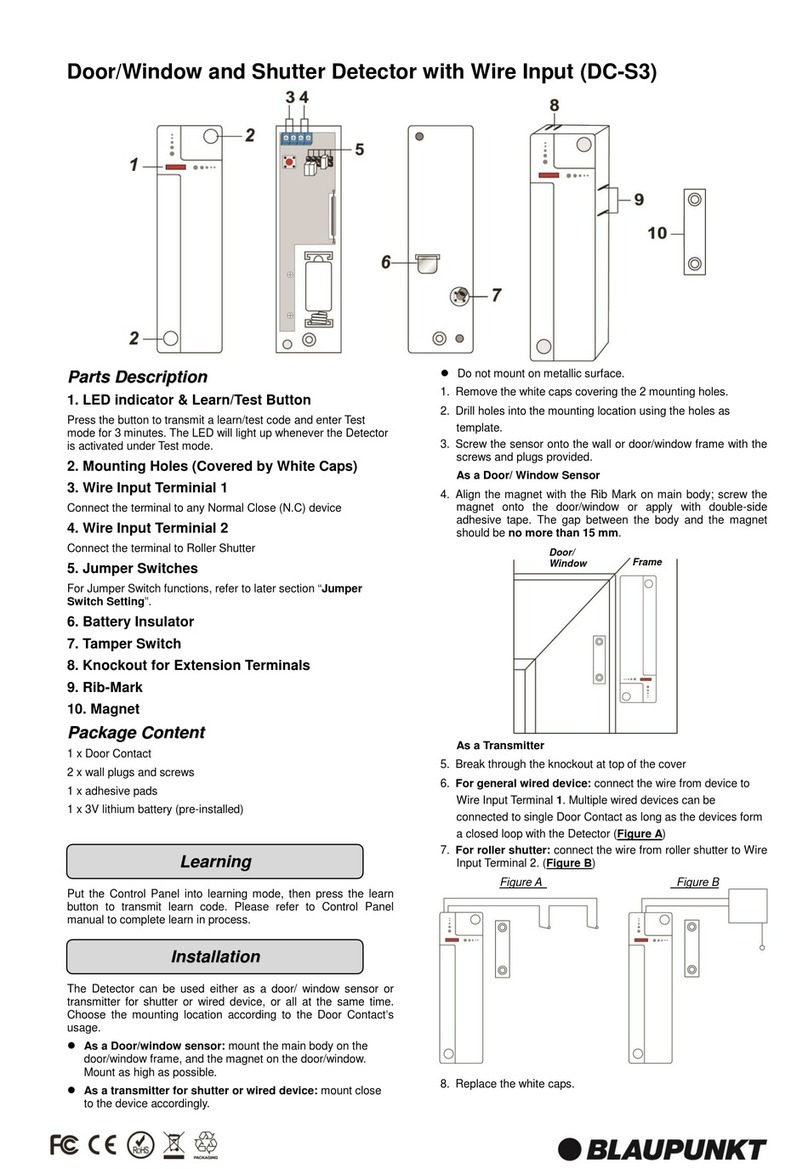
Mount the main body of the
detector on the door/window
frame, and the magnet on the
door.window.
Mount as high as possible
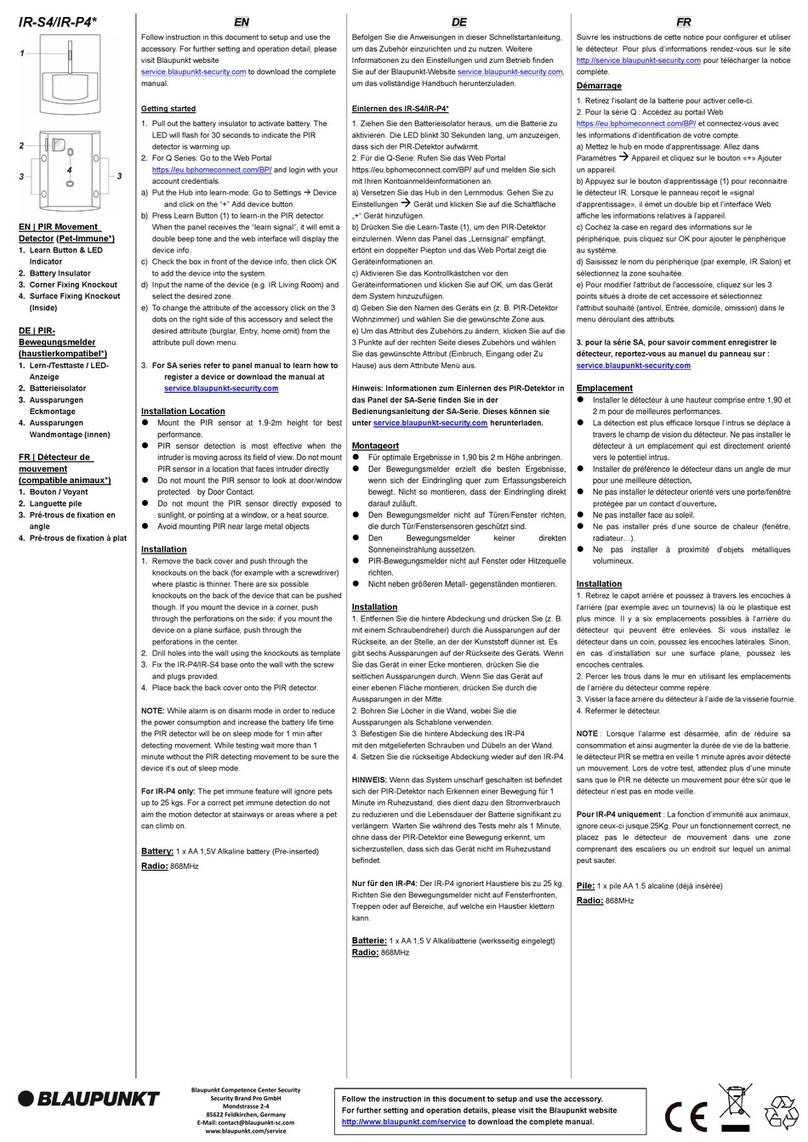
Do not aim a PIR Movement
Detector at this door/window.
Do not mount on metallic surface.
Installation
Before installation, put the Control
Panel into Walk Test mode and press
the learn button on the detector at
mounting location to test signal range
Screw Mounting:
1. Remove the screw at bottom of
detector main body to flip open the
cover. (Figure 3)
2. The back cover has 2 knockouts for
mounting. (Figure 4)
3. Break through the knockouts; mark
the mounting location on door/
window frame using the knockout
as template. (Figure 5)
4. If required, drill holes into marked
location and insert wall plug.
(Figure 6)
5. Screw the back cover onto the
mounting location. (Figure 7)
6. Replace the front cover onto the
base. (Figure 8)
7. Screw the magnet onto the door,
the magnet must be aligned with
the rib marks on the main body.
(Figure 9&10) The gap between
the main body and the magnet
should be no more than 15 mm.
Adhesive Mounting
You can also use the double side
adhisive tape included in the package
to mount the detector and magnet.
ESPAÑOL
Detector puerta / ventana
Siga las instrucciones del documento
para configurar y operar éste
accesorio, consultando las gráficas de
la derecha para ver detalles. Para
obtener más información de
configuración y operación, por favor
visite la página web
http://www.blaupunkt.com para
descargar el manual completo.
Pasos iniciales
1. Retirar el aislante de la pila para
activarla. (Figura 1)
2. Colocar el panel de control en
modo de aprendizaje.
3. Oprimir el botón de prueba ubicado
al frente del sensor (Figura 2).
4. Consulte el manual del panel de
control para completar el proceso
de aprendizaje.
Ubicación de montaje
Ubicar la parte principal del
detector sobre el marco de la
puerta/ventana y el imán sobre la
puerta/ventana.
Ubicarlo lo más alto posible.
Evitar que el otro detector PIR de
movimiento quede enfrentado a
ésta puerta/ventana.
No ubicar éste detector sobre
superficies metálicas.
Instalación
Antes de instalarlo, ajustar el panel de
control en modo Prueba de cobertura y
oprimir el botón de prueba del detector
en la ubicación de montaje para
verificar la intensidad de señal.
Montaje con tornillos:
1. Aflojar el tornillo de la parte inferior
para poder abrir y voltear la tapa
posterior. (Figure 3)
2. La tapa posterior tiene 2 orificios
ciegos para hacer el
montaje.(Figure 4)
3. Romper los orificios ciegos y
usarlos como plantilla para marcar
los puntos sobre el marco de la
puerta/ventana. (Figura 5)
4. Si es necesario, perforar los
orificios de montaje sobre las
marcas realizadas e insertar los
tacos de pared.(Figura 6)
5. Atornillar la tapa posterior al marco
de la puerta/ventana. (Figura 7)
6. Poner la tapa frontal sobre la
base.(Figure 8)
7. Atornillar el imán sobre la
puerta/ventana; el imán debe estar
alineado a las marquillas del
detector. (Figure 9&10) La
distancia máxima entre ambos de
ser 15 mm.
Puede usar también la cinta
adhesiva para el montaje.
Figure 1 / Figura 1
Figure 5 / Figura 5
Figure 2 / Figura 2
Figure 6 / Figura 6
Figure 3 / Figura 3 Figure 4 / Figura 4
Figure 7 / Figura 7 Figure 8 / Figura 8
Figure 9 / Figura 9 Figure 10 / Figura 10
DC-S2

FRANCAIS
Contact d’ouverture de
porte/fenêtre
Suivre les instructions de cette notice
pour enregistrer et utiliser le détecteur ;
pour plus de détails, voir les images
sur la droite.
Enregistrement
1. Retirer la languette de protection
pour activer la pile. (Figure 1)
2. Mettre la centrale en mode
Enregistrement.
3. Appuyer sur le bouton
d’enregistrement. (Figure 2)
4. Se référer à la notice de la centrale
pour finir l’enregistrement.
Emplacement
Installer le détecteur sur le cadre
fixe de la porte/fenêtre et l’aimant
sur la porte/fenêtre.
Installer le plus haut possible.
Ne pas installer un détecteur de
mouvement à cette porte/fenêtre.
Ne pas installer sur des surfaces
métalliques.
Installation
Avant installation, mettre la centrale en
mode Test et appuyer sur le bouton
d’enregistrement du détecteur, une fois
à son emplacement, pour tester la
portée du signal.
Installation à vis :
1. Dévisser la vis du bas pour ouvrir le
détecteur. (Figure 3)
2. La face arrière a 2 pré-trous de
fixation. (Figure 4)
3. Percer les pré-trous ; marquer
l‘emplacement sur le cadre de
porte/fenêtre en utilisant les
pré-trous comme repère. (Figure 5)
4. Si nécessaire, percer des trous à
l’emplacement marqué et insérer
des chevilles. (Figure 6)
5. Visser la face arrière sur le mur à
l’emplacement prévu. (Figure 7)
6. Refermer le détecteur. (Figure 8)
7. Visser l’aimant tout en l’alignant
avec le repère sur le détecteur.
(Figures 9&10) L’écart entre
l’aimant et le détecteur ne doit pas
dépasser 15 mm.
Installation avec la bande
adhésive
Il est possible d’utiliser la bande
adhésive double face pour fixer
l’aimant et le détecteur mais nous vous
recommandons de le visser.
PORTUGUÊS
Porta / Janela Detector
Siga as instruções neste documento
para instalação e uso do acessório.
Para mais configuração e detalhes de
operação, por favor visite o site
Blaupunkt http://www.blaupunkt.com
para baixar o manual completo.
Começando
1. Retire o isolador da bateria para
ativar bateria. (Figura 1)
2. Coloque el panel de control en el
modo de aprendizaje.
3. Imprensa Saiba Button em frente
ao saber do sensor (Figura 2).
4. Consulte o manual do painel de
controle para concluir o processo
de aprendizagem.
Local de Montagem
Monte o corpo principal do
detector na moldura da porta /
janela, eo ímã na porta / janela.
Montagem o mais alto possível
Não aponte um Movimento
Detector PIR neste porta / janela.
Não monte na superfície metálica.
Instalação
Antes da instalação, colocar o Painel
de Controle no modo Walk Test e
pressione o botão de programação no
detector no local de montagem para
testar o alcance do sinal
Parafuso de montagem:
1. Remova o parafuso na parte
inferior do corpo principal detector
de virar abra a tampa. (Figura 3)
2. A tampa traseira tem 2 aberturas
para a montagem. (Figura 4)
3. Romper os nocautes; marcar o
local de montagem na moldura da
porta / janela usando o nocaute
como modelo. (Figura 5)
4. Se necessário, fazer furos em local
marcado e inserir ficha de parede.
(Figura 6)
5. Parafuso da tampa de volta para o
local de montagem. (Figura 7)
6. Recoloque a tampa frontal na base.
(Figura 8)
7. Aperte o íman para a porta, o ímã
deve estar alinhado com as marcas
das costelas no corpo principal.
(Figura 9 e 10) A diferença entre o
corpo principal eo íman deve ser
não mais do que 15 mm.
Montagem Adesiva
Você também pode usar a fita adesiva
dupla face incluído no pacote para
montar o detector e ímã.



Figure 1 / Figura 1
Figure 5 / Figura 5
Figure 2 / Figura 2
Figure 6 / Figura 6
Figure 3 / Figura 3 Figure 4 / Figura 4
Figure 7 / Figura 7 Figure 8 / Figura 8
Figure 9 / Figura 9 Figure 10 / Figura 10

Other Blaupunkt Security Sensor manuals

Blaupunkt DC-S3 User manual

Blaupunkt

Blaupunkt DC-S3 User manual

Blaupunkt IR-S1 User manual

Blaupunkt

Blaupunkt IR-S1 User manual

Blaupunkt HD-S1 User manual

Blaupunkt

Blaupunkt HD-S1 User manual

Blaupunkt CO-S1 User manual

Blaupunkt

Blaupunkt CO-S1 User manual

Blaupunkt DC-S3 User manual

Blaupunkt

Blaupunkt DC-S3 User manual

Blaupunkt WS-S1 User manual

Blaupunkt

Blaupunkt WS-S1 User manual

Blaupunkt ISD-WD1 User manual

Blaupunkt

Blaupunkt ISD-WD1 User manual

Blaupunkt HD-S1 User manual

Blaupunkt

Blaupunkt HD-S1 User manual

Blaupunkt IR-S4 User manual

Blaupunkt

Blaupunkt IR-S4 User manual

Blaupunkt SD-S1 User manual

Blaupunkt

Blaupunkt SD-S1 User manual

Blaupunkt DC-S4 User manual

Blaupunkt

Blaupunkt DC-S4 User manual

Blaupunkt IR-S1L User manual

Blaupunkt

Blaupunkt IR-S1L User manual

Popular Security Sensor manuals by other brands

Watchguard ALE-PIRB instruction manual

Watchguard

Watchguard ALE-PIRB instruction manual

Paradox Magellan MG-PMD1P instructions

Paradox

Paradox Magellan MG-PMD1P instructions

Contro l4 C4-KNX-BW180 Series user guide

Contro l4

Contro l4 C4-KNX-BW180 Series user guide

Emerson Net Safety JB Series Reference manual

Emerson

Emerson Net Safety JB Series Reference manual

SENSIT Technologies ULTRA-TRAC APL instruction manual

SENSIT Technologies

SENSIT Technologies ULTRA-TRAC APL instruction manual

Pilz PSEN cs1.1n operating instructions

Pilz

Pilz PSEN cs1.1n operating instructions

Optex HX-80NRAM installation instructions

Optex

Optex HX-80NRAM installation instructions

Durite 0-870-58 Product installation manual

Durite

Durite 0-870-58 Product installation manual

Vega VEGASON 61 operating instructions

Vega

Vega VEGASON 61 operating instructions

uAvionix skySensor TSO User and installation guide

uAvionix

uAvionix skySensor TSO User and installation guide

Bosch ISC-SM-90 quick start guide

Bosch

Bosch ISC-SM-90 quick start guide

Eldes EWC1 user manual

Eldes

Eldes EWC1 user manual

Crowcon Cardinal M07231 instruction manual

Crowcon

Crowcon Cardinal M07231 instruction manual

Azbil AUD300C1000 Series User manaul

Azbil

Azbil AUD300C1000 Series User manaul

Potter Amseco EBP-401 Wiring diagram

Potter

Potter Amseco EBP-401 Wiring diagram

Safety Technology International STI-34701 manual

Safety Technology International

Safety Technology International STI-34701 manual

IntelliCam IR-904 user guide

IntelliCam

IntelliCam IR-904 user guide

Goobay 71363 user manual

Goobay

Goobay 71363 user manual

manuals.online logo
manuals.online logoBrands
  • About & Mission
  • Contact us
  • Privacy Policy
  • Terms and Conditions

Copyright 2025 Manuals.Online. All Rights Reserved.