BLOCKsignalling ASP2-NS User manual

AUTOMATIC LED SIGNAL CONTROLLER ASP2-NS
(for COMMON-ANODE SIGNALS)
Controlling multi-aspect signals on model railways has never been easier
Detects trains passing signals using its in-built infra-red sensor
Fades leds in and out to simulate incandescent bulbs
Very simple to connect up to signals
No soldering required, all components are ready wired-up
No programming required (but you can adjust all settings if you wish)
For use with common-anode led signals (not signals that use bulbs)
Operates from 12V DC

Page 2 of 13
BLOCKsignalling www.blocksignalling.co.uk
We love model railways with light signals. You can operate them from toggle
switches when you only have a couple of aspects to operate, but when it comes
signals with more aspects the wiring can become complex.
We were keen to provide a solution that would add some simple automation to 2-, 3-
or 4-aspect signals, without the need for soldering, programming or making any
additional connections.
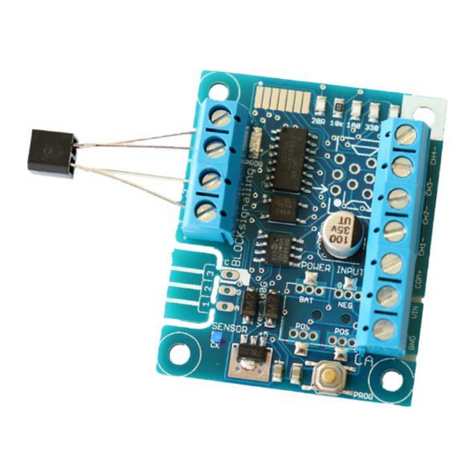
The power feed connects to two terminals, with up to 5 wires from the signal
connecting to the remaining terminals (the Vin terminal has two wires connected, the
12V DC positive wire and the signal common positive).
The module reduces the supply voltage down to a safe level to feed the
signals. External resistors are not required, as these are built into the module.
Simply drill an 8mm hole through the baseboard between the sleepers and insert the
sensor from below (the sensor only needs a 2mm gap to see between the sleepers
so there should be no problems with N gauge).
Invisible infra-red light is projected upwards and any trains passing overhead will
trigger the circuit and will operate the signal automatically. You can test this by
waving your hand over the sensor, and the signal should operate.
BLOCK
signalling
Invisible Infra-Red Light
Notes:
1. The signal common positive wire shares a terminals with one of the power supply wires.
2. The signal common wire is often black.
3. Resistors are built in to the module, and so external resistors are not required.
4. Most common wiring colours are shown.
Example Wiring for 2-aspect
Common-Anode Signal
GREEN WIRE (GREEN LED -)
BLOCKsignalling
ASP2-NS
SIGNAL
POWER SUPPLY
Standard version:
16mm
RED WIRE (RED LED -)
BLACK WIRE (LEDS +)
RED
GREEN

Page 3 of 13
BLOCKsignalling www.blocksignalling.co.uk
Connecting Up
The module has six terminals.
GND Negative feed from the DC supply.
Vin Positive feed from the 12V DC supply.
It is also the connection for the signal common positive wire.
CH1 This is the negative feed to the RED aspect
CH2 This is the negative feed to the YELLOW aspect (for 3- and 4-aspect
signals)
CH3 This is the negative feed to the GREEN aspect
CH4 This is the negative feed to the SECOND YELLOW aspect (for 4-aspect
signals)
Resistors are built into the module, so no external resistors are necessary. If you
already have resistors wired in, then they can be left in place if you wish, although
the led brightness may be slightly diminished.
Power Supply
The controller is designed for use with a 12V DC plug-top type power supply.
The current consumption is less than 0.01A (10mA), and many modules can be
operated from a power supply rated at 0.5A to 1A.
If connected to auxiliary terminals on the back of a train controller the module may
operate unpredictably and could be damaged. These outputs are often unsuitable
as they are designated as a fairly basic power outputs for accessories such as points
motors and may not be smooth or stable.
If a DC power supply is connected with incorrect polarity no damage will occur, but
the module will not operate.

Page 4 of 13
BLOCKsignalling www.blocksignalling.co.uk
Operation
With the power switched on, the red led on the PCB should flicker rapidly and the
signal should show clear (green).
If a train now passes over the sensor, or you wave your hand close to the sensor,
the signal will switch to danger (red).
The PCB led now flickers at a slower rate, and this indicates that the module is now
looking for the end of the train to clear the sensor. Gaps between carriages of up to
4 seconds are ignored (see the programming section below if you want to adjust
this).
Once it is determined the train has completely cleared the sensor, there is a final
short delay (also programmable if you wish) before module switches back to clear.
With 3- and 4-aspect signals the intermediate states of yellow and double yellow will
be shown. The timings for these states are also adjustable if required.
Programming
The module will operate the signal straight out of the packet.
The default program is to operate a 4-aspect signal, so if you connect a signal with
fewer aspects it will be necessary to reprogram the module.
Programming is performed holding down the Push Button when switching on the
power and counting the number of flashes of the led on the module. Full
programming details are given later in this document.
BLOCK
signalling
Programming
Push-button
Programming
LED
+12V
GND

Page 5 of 13
BLOCKsignalling www.blocksignalling.co.uk
Program 2 (2-Aspect Signalling)
This program simulates the operation of a two aspect signal, which is normally
showing green. The module searches for a train, and if one is detected in front of the
sensor, the signal immediately switches to red.
Whilst the sensor is covered, the signal stays at red. As the train passes over the
sensor, any gaps between the rolling stock which are shorter that the release time
programmed are ignored.
Once the train has cleared the sensor, and the release time expires, then the "red
time" timer starts. When this expires, the signal turns back to green and starts
looking for trains again.
The "release time" can be adjusted if slow moving trains cause the signal to
prematurely switch back to green before the train has cleared the sensor.
The "red time" can be adjusted to a realistic duration for a train to clear the section of
track protected by the signal.
BLOCK
signalling
Invisible Infra-Red Light
Notes:
1. The signal common positive wire shares a terminals with one of the power supply wires.
2. The signal common wire is often black.
3. Resistors are built in to the module, and so external resistors are not required.
4. Most common wiring colours are shown.
Example Wiring for 2-aspect
Common-Anode Signal
GREEN WIRE (GREEN LED -)
BLOCKsignalling
ASP2-NS
SIGNAL
POWER SUPPLY
Standard version:
16mm
RED WIRE (RED LED -)
BLACK WIRE (LEDS +)
RED
GREEN

Page 6 of 13
BLOCKsignalling www.blocksignalling.co.uk
Program 3 (3-Aspect Signalling)
This program simulates the operation of a three aspect signal, which is normally
showing green. The module searches for a train, and if one is detected in front of the
sensor, the signal immediately switches to red.
Whilst the sensor is covered, the signal stays at red. As the train passes over the
sensor, any gaps between the rolling stock which are shorter that the release time
programmed are ignored.
Once the train has cleared the sensor, and the release time expires, then the "red
time" timer starts. When this expires, the signal switches to yellow and the "yellow
timer" starts.
When this expires, the signal switches back to green and starts looking for trains
again.
The "release time" can be adjusted if slow moving trains cause the signal to
prematurely switch back to green before the train has cleared the sensor.
The "red time" can be adjusted to a realistic duration for a train to clear the section of
track protected by the signal.
The "yellow time" can be adjusted to a realistic duration for the scale.
BLOCK
signalling
Invisible Infra-Red Light
Notes:
1. The signal common positive wire shares a terminals with one of the power supply wires.
2. The signal common wire is often black.
3. Resistors are built in to the module, and so external resistors are not required.
4. Most common wiring colours are shown.
Example Wiring for 3-aspect
Common-Anode Signal
GREEN WIRE (GREEN LED -)
YELLOW WIRE (YELLOW LED -)
BLOCKsignalling
ASP2-NS
SIGNAL
POWER SUPPLY
Standard version:
16mm
RED WIRE (RED LED -)
BLACK WIRE (LEDS +)
RED
GREEN
YELLOW

Page 7 of 13
BLOCKsignalling www.blocksignalling.co.uk
Program 4 (4-Aspect Signalling)
This program simulates the operation of a four aspect signal, which is normally
showing green. The module searches for a train, and if one is detected in front of the
sensor, the signal immediately switches to red.
Whilst the sensor is covered, the signal stays at red. As the train passes over the
sensor, any gaps between the rolling stock which are shorter that the release time
programmed are ignored.
Once the train has cleared the sensor, and the release time expires, then the "red
time" timer starts. When this expires, the signal switches to yellow and the "yellow
timer" starts.
When this expires, the signal switches to double amber and the "double yellow timer"
starts. When this expires, the signal switches back to green and starts looking for
trains again.
The "release time" can be adjusted if slow moving trains cause the signal to
prematurely switch back to green before the train has cleared the sensor.
The "red time" can be adjusted to a realistic duration for a train to clear the section of
track protected by the signal.
The "yellow time" and "double yellow time" can be adjusted to a realistic duration for
the scale.

Page 8 of 13
BLOCKsignalling www.blocksignalling.co.uk
Changing the Timing of each Phase
The individual time for each of the phases can be adjusted to suit (as supplied they
are set to 1 second each, which is ideal for initial testing). Once you are happy with
the operation of the train detection, you will probably want to change these to more
realistic values.
To change the Red Time:
Switch off the power for 5 seconds. Press the push button on the PCB, and switch
the power back on.
The red led on the PCB flashes at 1 second intervals. When 3 flashes have been
seen, the button is released to store the first value. At this point the led comes on for
five seconds to confirm the value is stored.
The led then starts flashing again, and this time the button needs to be pressed to
store the second value (the time you want the red led to be lit, for example 10
flashes for 10 seconds).
When the button is released, the led flashes 10 times rapidly, and the module starts
operating.
To change the Yellow Time:
Switch off the power for 5 seconds. Press the push button on the PCB, and switch
the power back on.
The red led on the PCB flashes at 1 second intervals. When 4 flashes have been
seen, the button is released to store the first value. At this point the led comes on for
five seconds to confirm the value is stored.
The led then starts flashing again, and this time the button needs to be pressed to
store the second value (the time you want the yellow led to be lit, for example 10
flashes for 10 seconds).
When the button is released, the led flashes 10 times rapidly, and the module starts
operating.
To change the Double-Yellow Time:
Switch off the power for 5 seconds. Press the push button on the PCB, and switch
the power back on.
The red led on the PCB flashes at 1 second intervals. When 5 flashes have been
seen, the button is released to store the first value. At this point the led comes on for
five seconds to confirm the value is stored.
The led then starts flashing again, and this time the button needs to be pressed to
store the second value (the time you want both yellow leds to be lit, for example 10
flashes for 10 seconds).
When the button is released, the led flashes 10 times rapidly, and the module starts
operating.

Page 9 of 13
BLOCKsignalling www.blocksignalling.co.uk
Other Programming Options
There are a number of parameters which can be adjusted if you wish to alter the
operation of the module.
Release Time
This is the time that the infra-red sensor must be continuously unobstructed for the
module to confirm the train has passed. This allows for gaps between the carriages
of variable reflectivity of the underside of the train.
The default setting is 2 seconds. A value of between 1 and 255 seconds is possible.
Lamp Fade-Down Rate
This is the rate at lamp (leds) dim down.
The default setting is 3 which represents the appearance of a filament lamp. If the
effect of an led aspect is required, then set this to 9.
Lamp Fade-Up Rate
This is the rate at lamp (leds) brighten when switched on.
The default setting is 4 which represents the appearance of a filament lamp. If the
effect of an led aspect is required, then set this to 9.
Maximum Led Brightness
The leds are normally set to operate at full brightness, with this set to 7.
This value can be reduced if the leds appear brighter than required.
Gap Between Phases
This variable set the gap between each aspect switching, to represent the operation
of relay interlock.
The default value is 2. This variable can be set from 1 to 9.

Page 10 of 13
BLOCKsignalling www.blocksignalling.co.uk
Program Flow Diagram
As mentioned above, there are a number of memory locations which can
programmed with different values to change the operation of the module.
Before starting, it is a good idea to write down the memory locations and the values
you are going to set them to.
Programming is performed by holding down the Push Button when switching on the
power. The red led on the PCB flashes at 1 second intervals.
When the required number of flashes is seen for the memory you want to change,
the button is released to select the memory. At this point the led comes on for five
seconds to confirm.
The led then starts flashing again, and this time the button needs to be pressed to
store the value you want the memory to be set to.
After pressing the button, the led flashes 10 times rapidly, and the module starts
operating.
Repeat the process for the any other changes you want to make.
If you make a mistake selecting the memory location or setting the value, you may
want to perform a factory reset to return the module to its default settings.
The following diagram shows all the available settings.
Factory Reset
Resetting back to factory settings will allow the module to restart with known settings
and is useful if there may have been a mistake made in programming.
To reset the module back to factory settings, switch off the power to the module and
hold down the Push Button. Apply the power and continue holding the push button
until 1 flash of the led is seen. At this point, release the button. You will see a long
flash of five seconds.
The led will begin flashing again. When you have seen 1 flash, press the button.
You will see a long flash of five seconds and then 10 rapid flashes.
The reset procedure is then complete and the module will restart with factory
settings.
If you make a mistake programming, simply repeat the process.
Note: following factory reset, the module will operate using the default program for a
4-aspect signal.

Page 11 of 13
BLOCKsignalling www.blocksignalling.co.uk
Any signals show in diagrams and photos are only to illustrate connections and are
not included with the module.

Page 12 of 13
BLOCKsignalling www.blocksignalling.co.uk
Troubleshooting
When the power supply is connected and switched on, the red led on the module
should light for 1 second, then flicker at a fast rate. This flickering indicates that the
module is looking for a train in front of the sensor.
At the same time, the green aspect of the connected signal should light.
If an object is brought close to the sensor, the red led on the module extinguishes
(as an object has been detected) and the green aspect of the connected signal
should extinguish and the red aspect should light.
The red led on the module then flashes at 1 second intervals (seven times is the
default consisting of 5 seconds for the red to be shown and 2 seconds for the
release time) and the red aspect of the signal should extinguish and the next aspect
should light. Depending on the number of aspects of the attached signal this will be
yellow (for 4- and 3- aspect signals) or green for 2-aspect signals.
For 4- and 3- aspect signals, the led on the module will continue to flash at 1 second
intervals (five times is the default) and then the yellow aspect of the signal should
extinguish and the next aspect should light. Depending on the number of aspects of
the attached signal this will be double-yellow (for 4-aspect signals) or green for 3-
aspect signals.
For 4-aspect signals, the process repeats again until finally green is shown.
During the above process, the module can still be triggered by another train, and if
one is detected, the module will immediately switch the signal to red.
Notes
1. If a 2-aspect signal is connected, and there is a gap of several seconds
between the red led extinguishing and the green led lighting, then the module
may be programmed for 3- or 4-aspect signals.
2. Similarly, 3-aspect signal is connected, the yellow led is lit for longer than
expected before the green led lights, then the module may be programmed for
4-aspect signals (the yellow led stays lit during the phase when double-yellow
would be shown on the 4-aspect signal).
3. If the module led does not light when the power is applied, then it may be a
power supply problem. Check the power supply connections are secure and
the correct polarity has been observed.
4. If the green signal led does not illuminate after the module led starts flickering,
check the signals are common-anode. Common-cathode signals will not
operate with this module. If in doubt, check with the supplier of your signals.

Page 13 of 13
BLOCKsignalling www.blocksignalling.co.uk
5. If the signal aspects do not light as expected, wire each output in turn to the
green output (with the other aspects not connected) to confirm that all the
aspects of the signal work when separately connected to the green channel.
If none of the aspects work when connected to the green channel it is likely
your signals are common-cathode signals which will not operate with this
module. If in doubt, check with the supplier of your signals.
6. If when the module is powered, the signal shows green, then immediately
switches to red, check there is not an obstruction in front of the sensor (such
as a tunnel roof).
Other BLOCKsignalling Controllers manuals
Popular Controllers manuals by other brands

ABB
ABB TZIDC-110 operating instructions

ZSK
ZSK T8 FUNCTIONS
Emerson
Emerson Bettis SCE300 Installation, operation and maintenance manual

GeoVision
GeoVision GV-Control Center System V2 user manual
King gates
King gates Star B plus Installation and use instructions and warnings

Cardinal
Cardinal CLiC HC-198 installation manual
Brocade Communications Systems
Brocade Communications Systems Mobility RFS6000 System reference guide
Johnson Controls
Johnson Controls M100C Series Installation Sheets Manual
Hit Productsc
Hit Productsc Rain Pro operating manual
Sevcon
Sevcon Dragon8 Applications Reference Manual
Blizzard Lighting
Blizzard Lighting PROKONTROL MH user manual
Fluidwell
Fluidwell D030-P Series user manual
