Blu INOX QRI-0030 User manual

INOX wall-mount shower
rough-in valve kit
Installation Guide
2021-11
1 866 907 0122 blubathworks.com
QRI-0001
Pages 4-8
QRI-0030
QRI-0910
Pages 9-15
QRI-0103 x2
Page 16

2021-11
1 866907 0122 blubathworks.com
11
Attention —Before Installation
If you are installing this product in a new construction or remodel, please make sure you are following all local plumbing and building codes.
please read these instructions carefully before you begin.
- Make sure the system is clear of any impurities.
- In presence of hard water (>12°F) a water softener is advised.
Operation Conditions
- Tapware is manufactured following the EN817 norms.
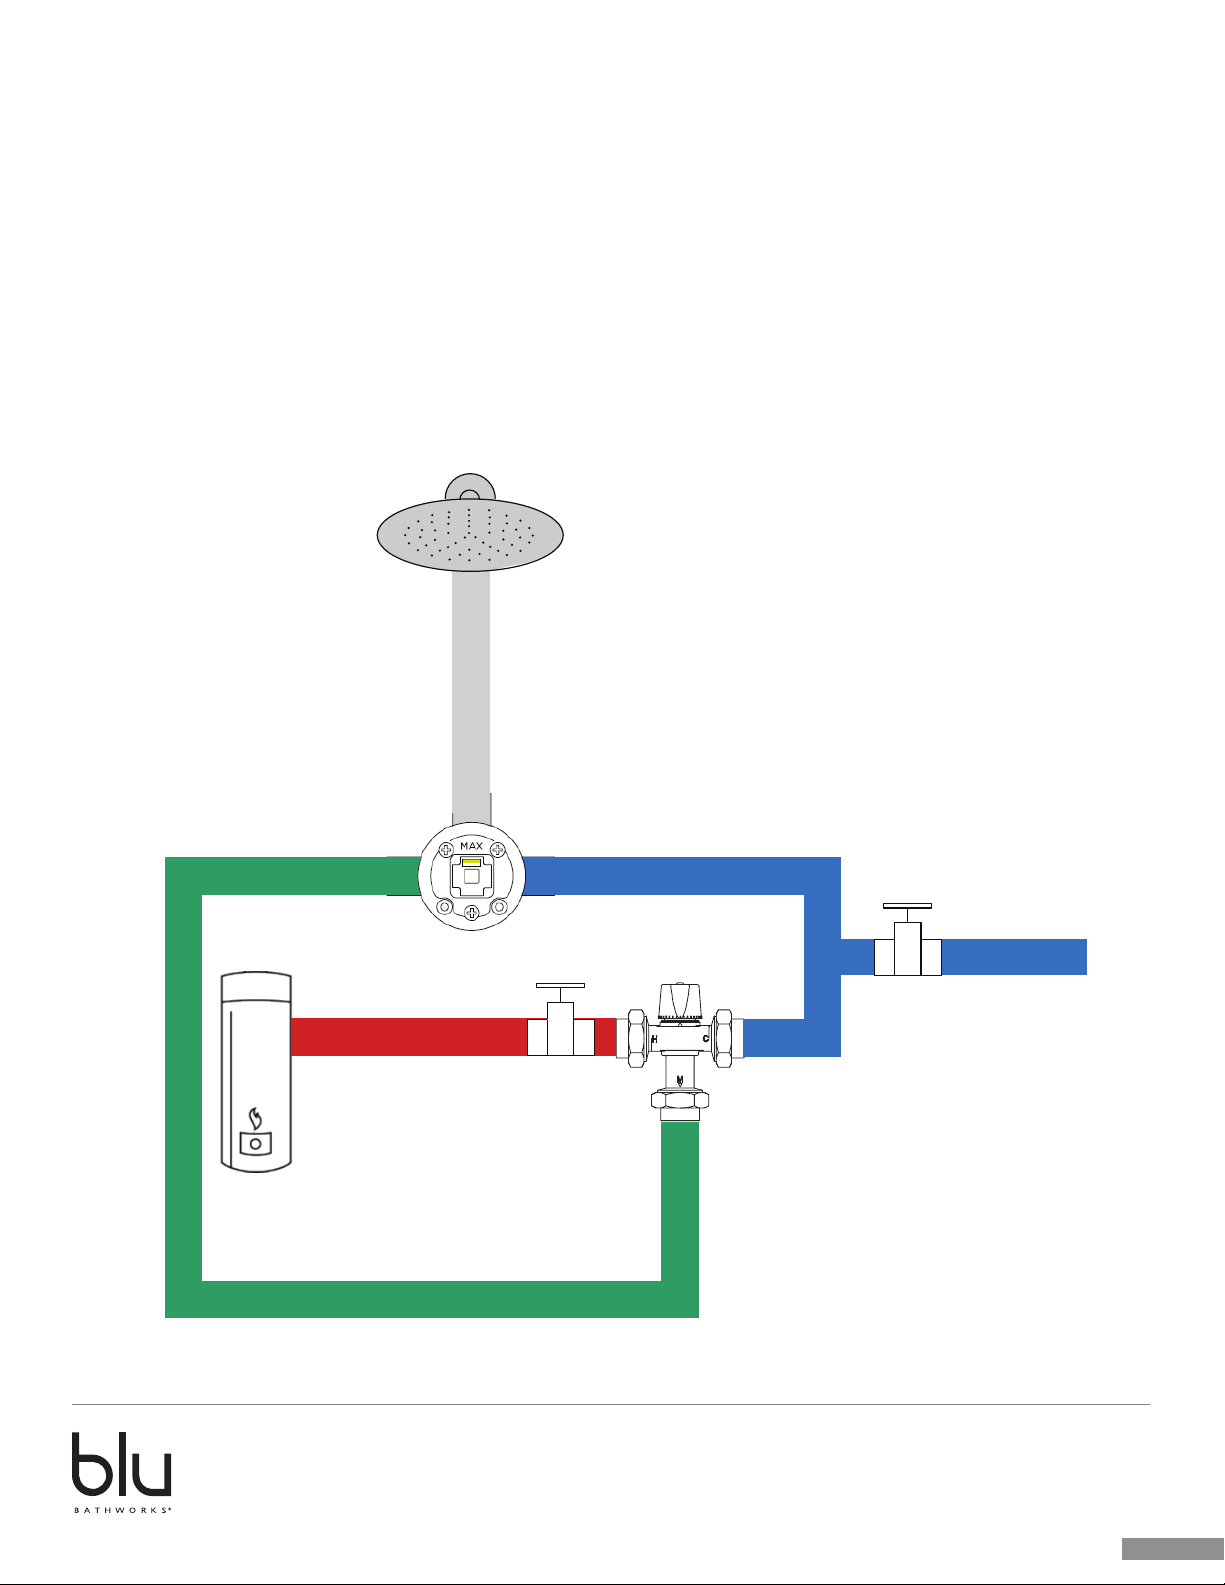
- Heaters allowed upstream: pressure accumulators, instant boilers.
- The installation with low pressure hot water accumulators is not permitted (open circuits).
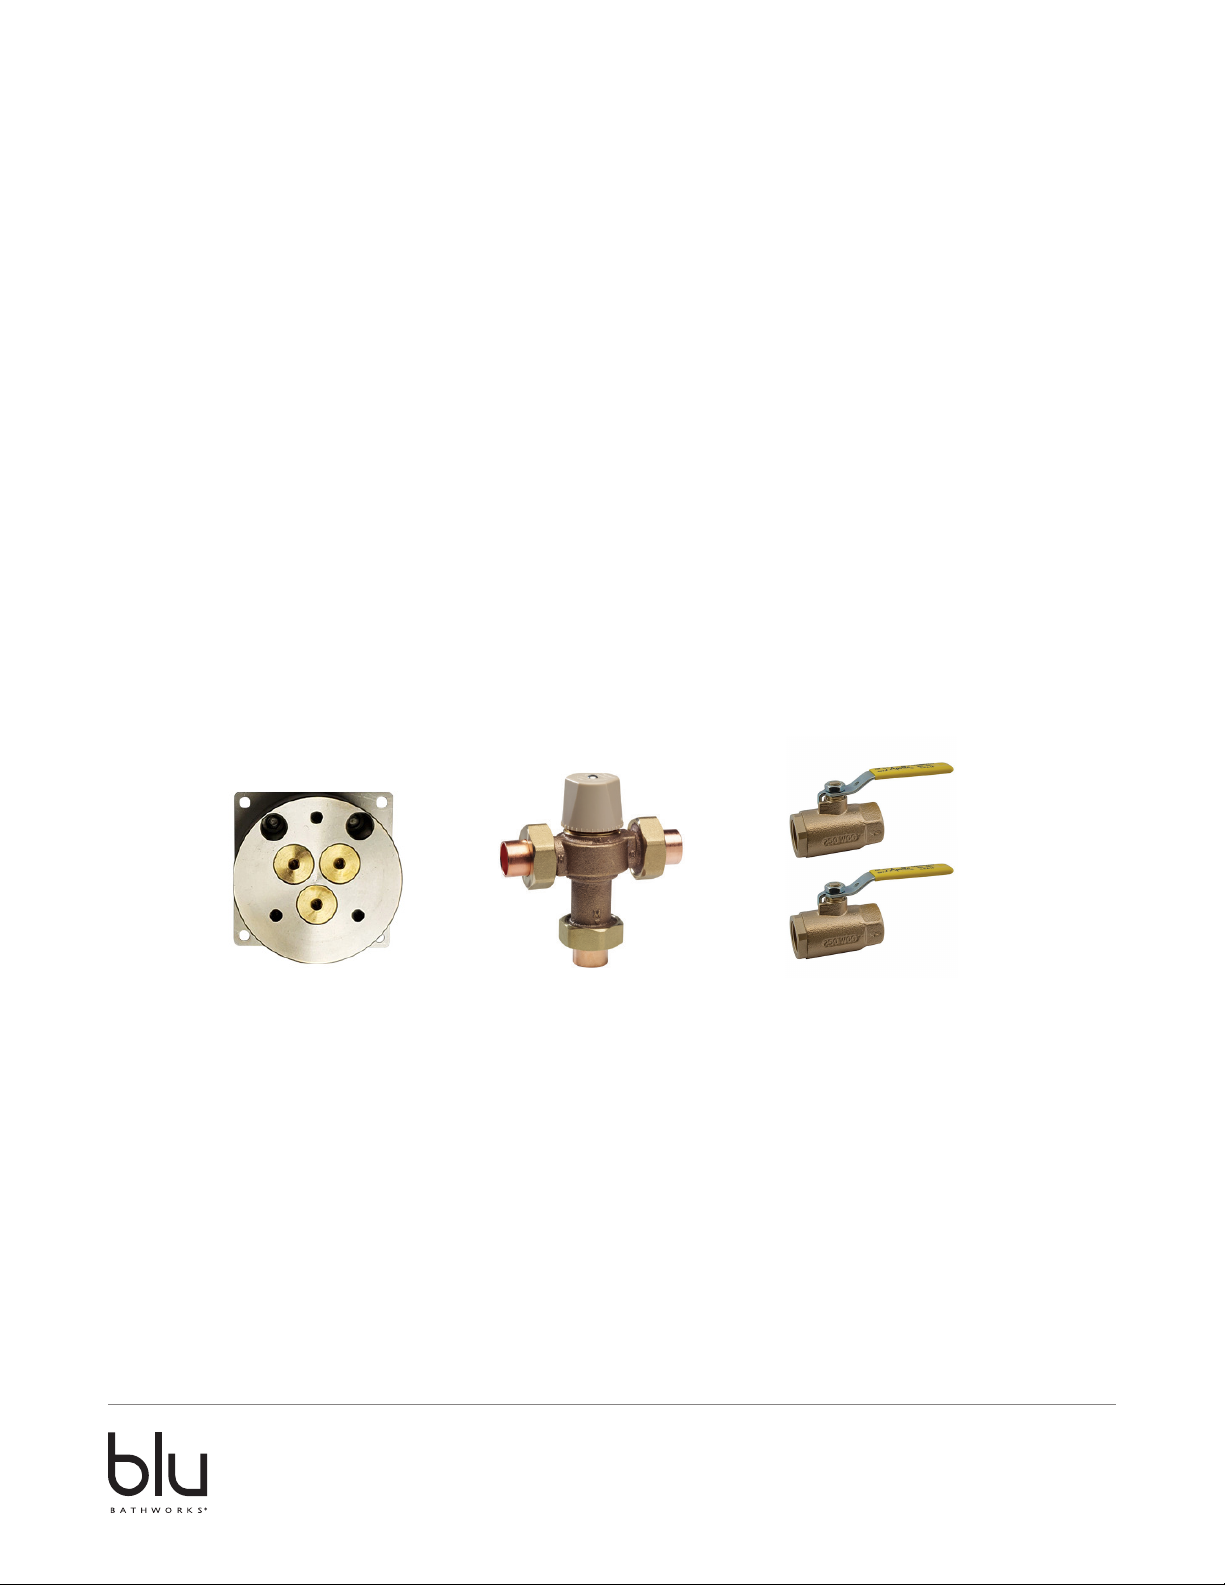
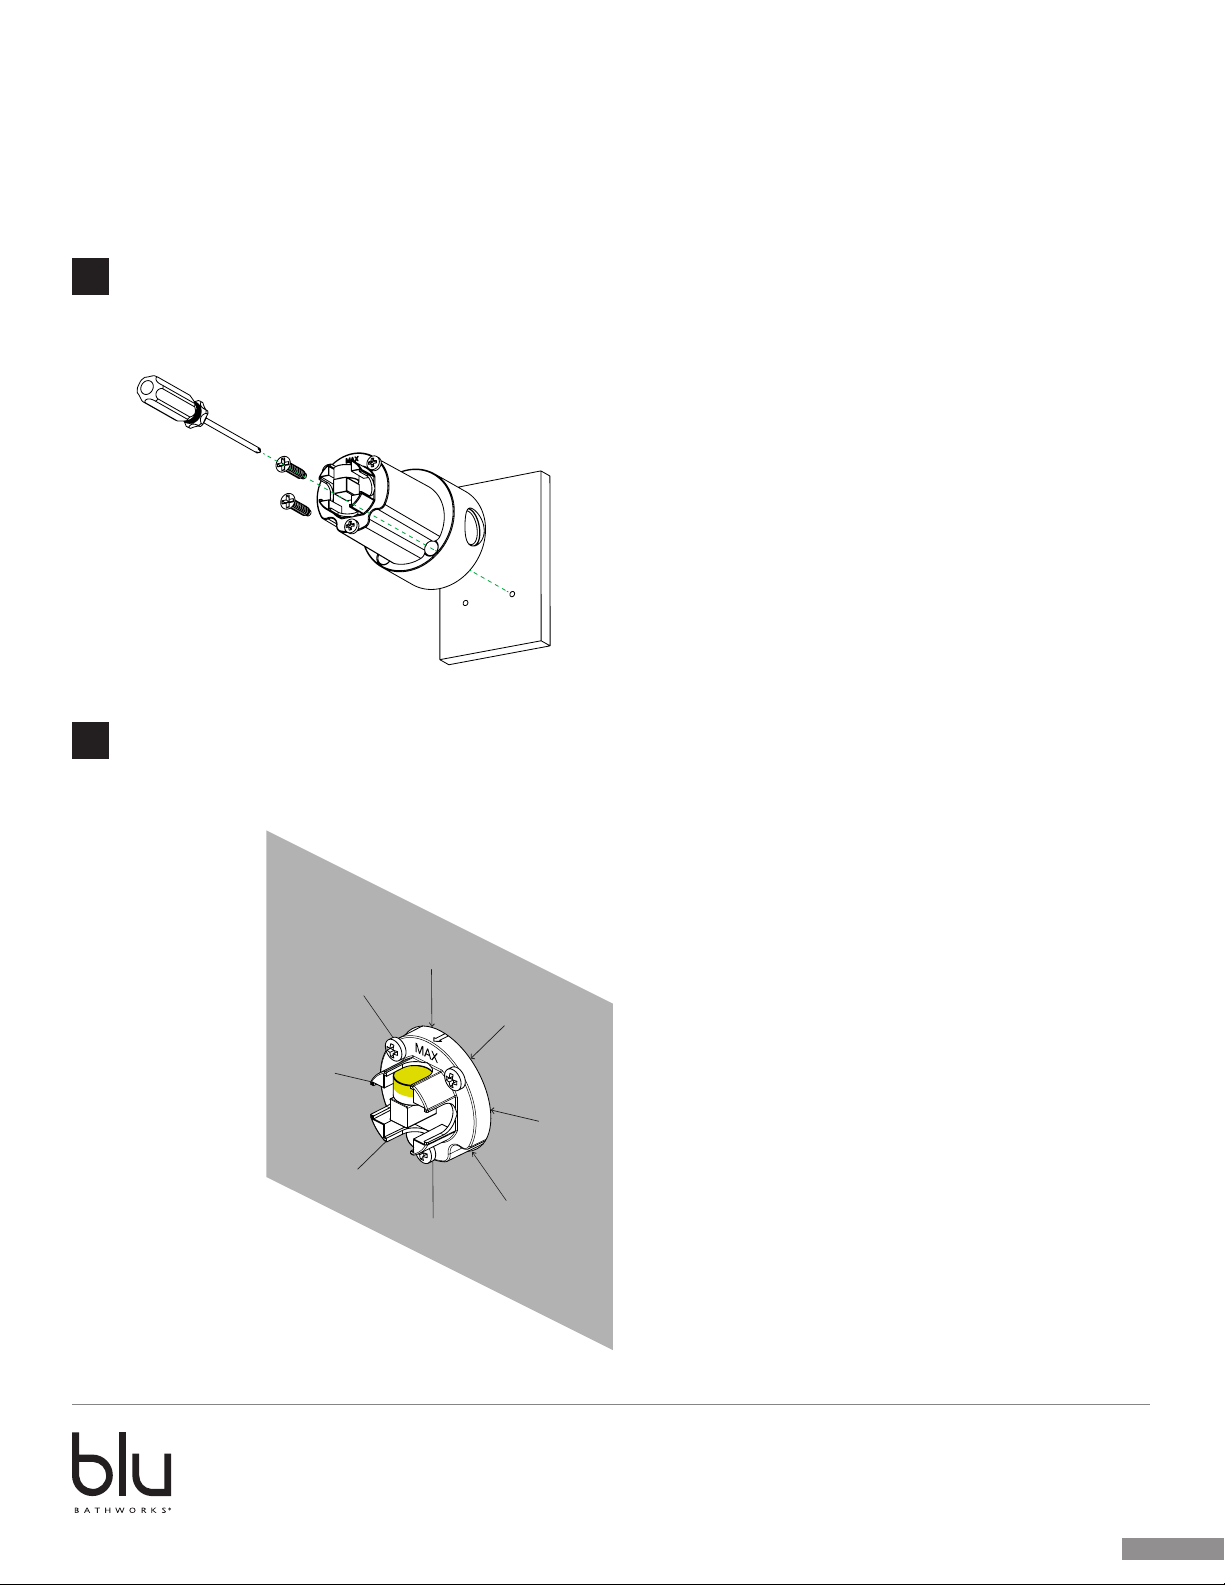
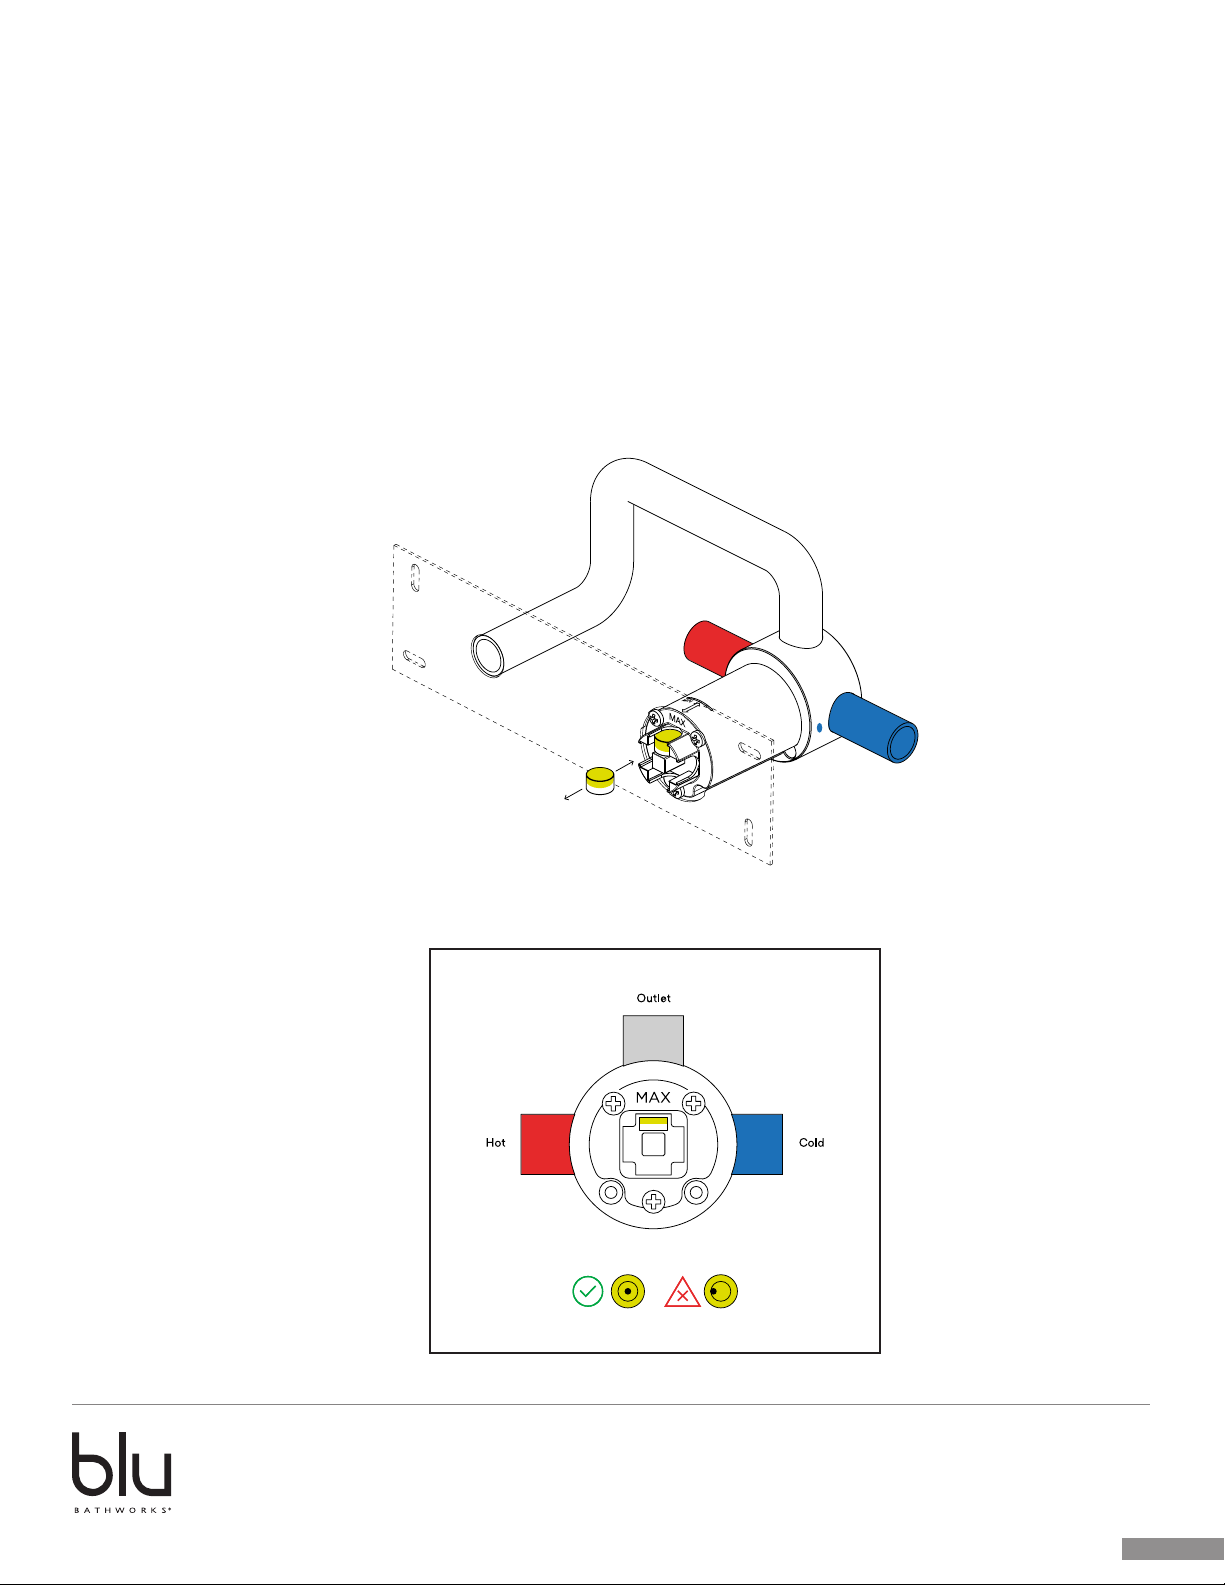
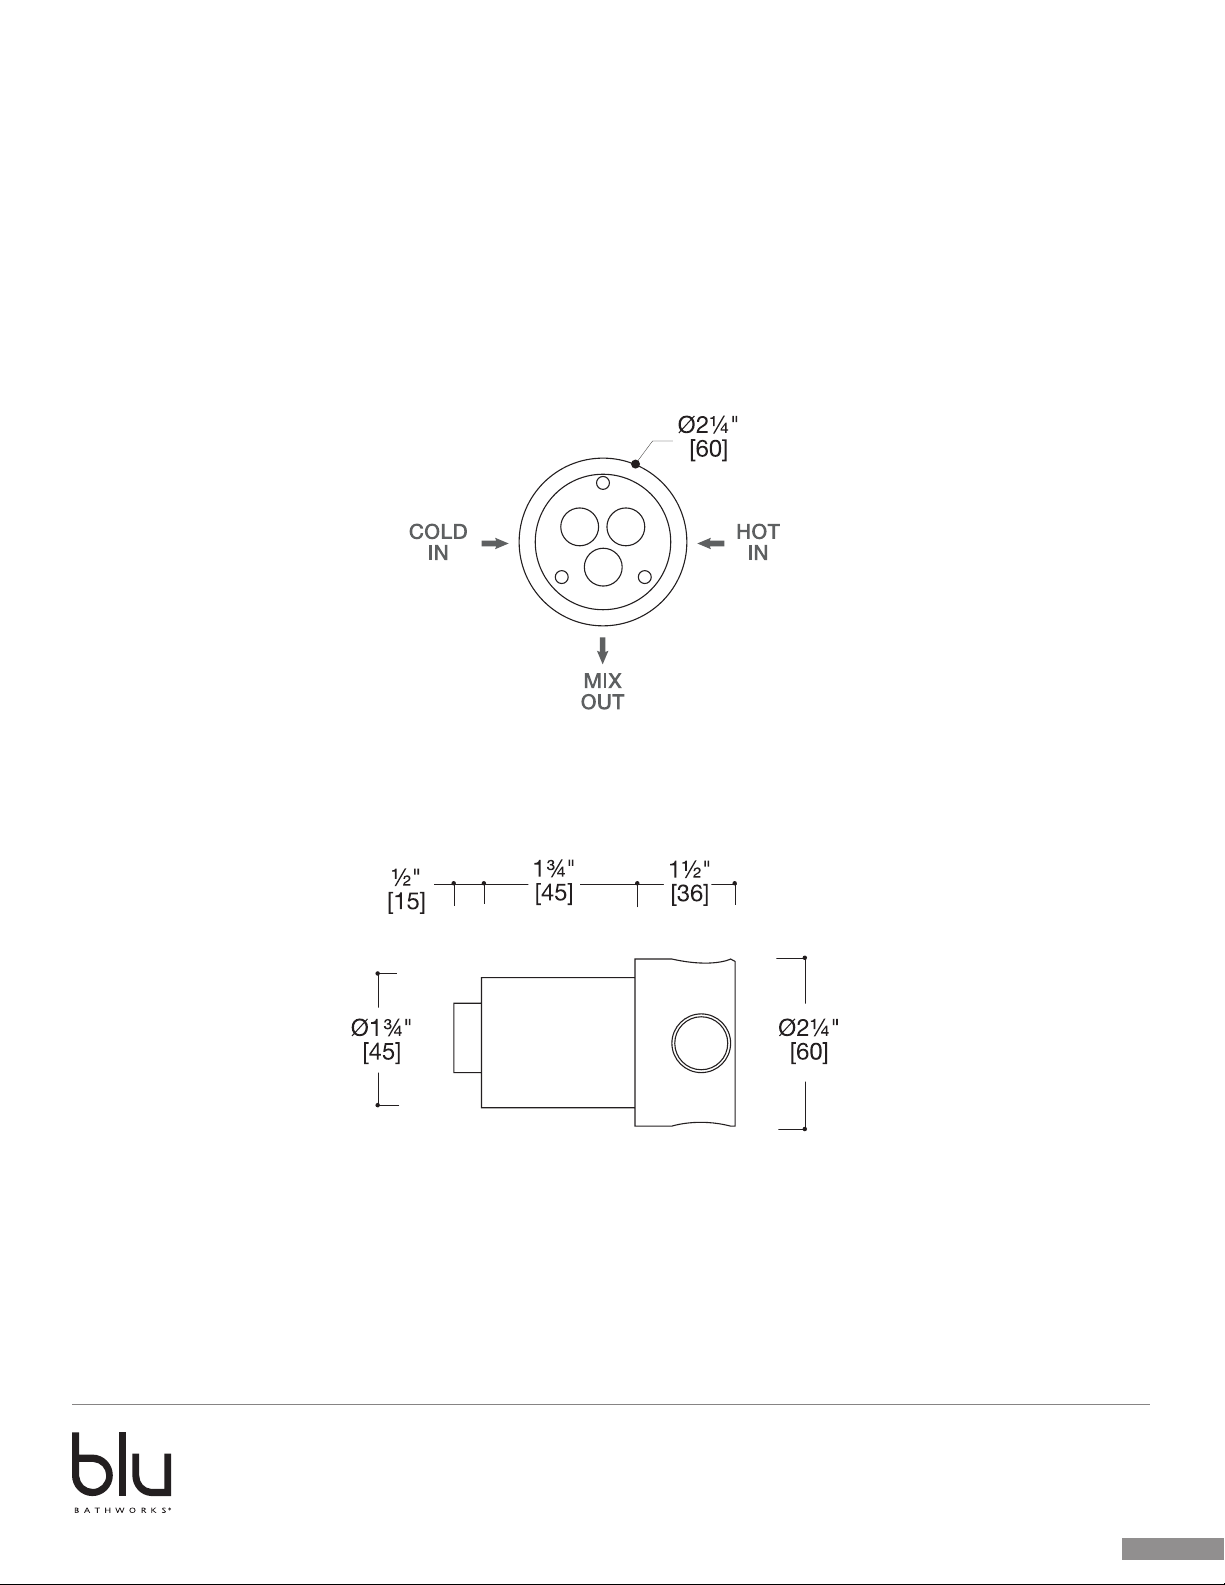
- Left connection. Hot water - Female NPT 3/8. (1/2” and 9”16 for some countries)
- Right connection. Cold water - Male NPT 3/8. (1/2” and 9”16 for some countries)
- System pressure: Min./Max. 7 PSI/145 PSI.
- Recommended operating radius: 15 PSI - 72 PSI.
- For higher pressures (>72 PSI) a reducer is advised.
- Avoid pressure unbalance higher than 1:2 between hot and cold water supply.
- Recommended water supply temperature: Cold 10-15° C / 50-59° F. Hot 60-65° C / 140-149° F.
Technical Details
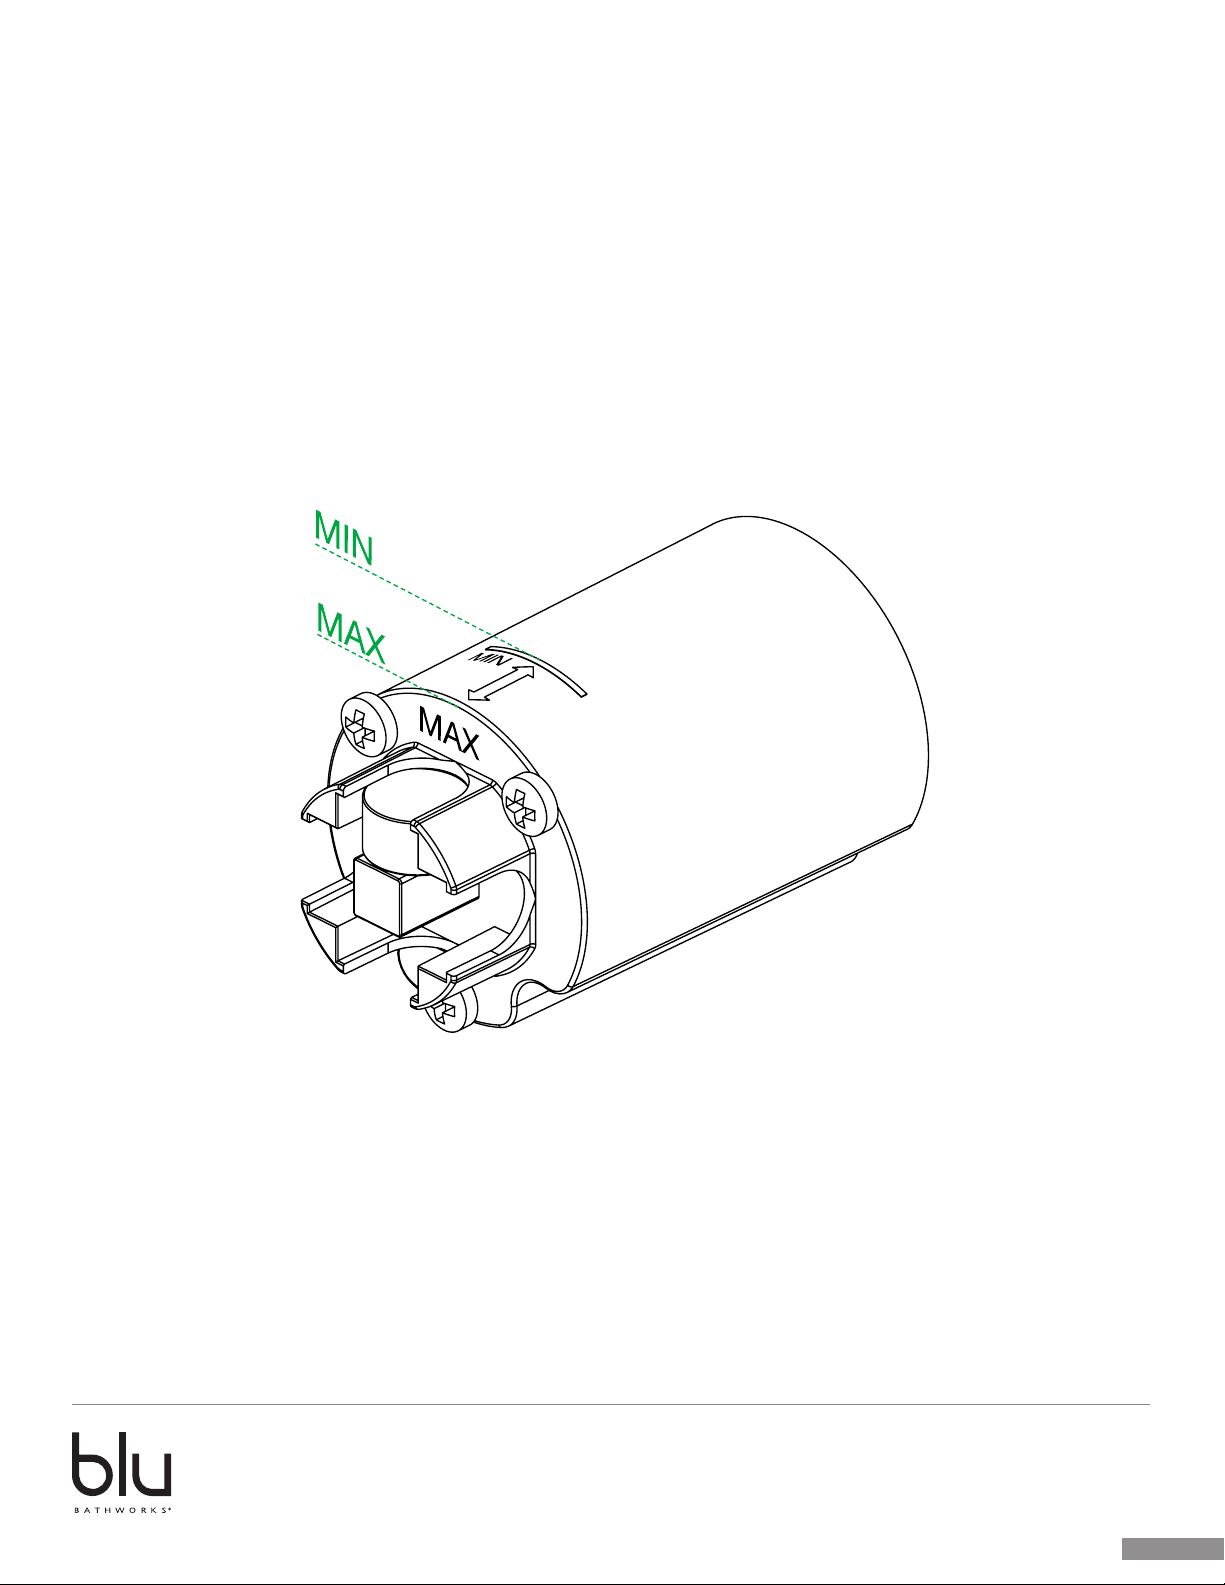
Minimum Pressure: 15 PSI
Maximum Pressure: 145 PSI
Recommended Pressure: 29 - 72 PSI
Maximum Water Temperature: 80° C / 176° F
Maximum Recommended Water Temperature: 65˚ C / 149˚ F
the temperature.
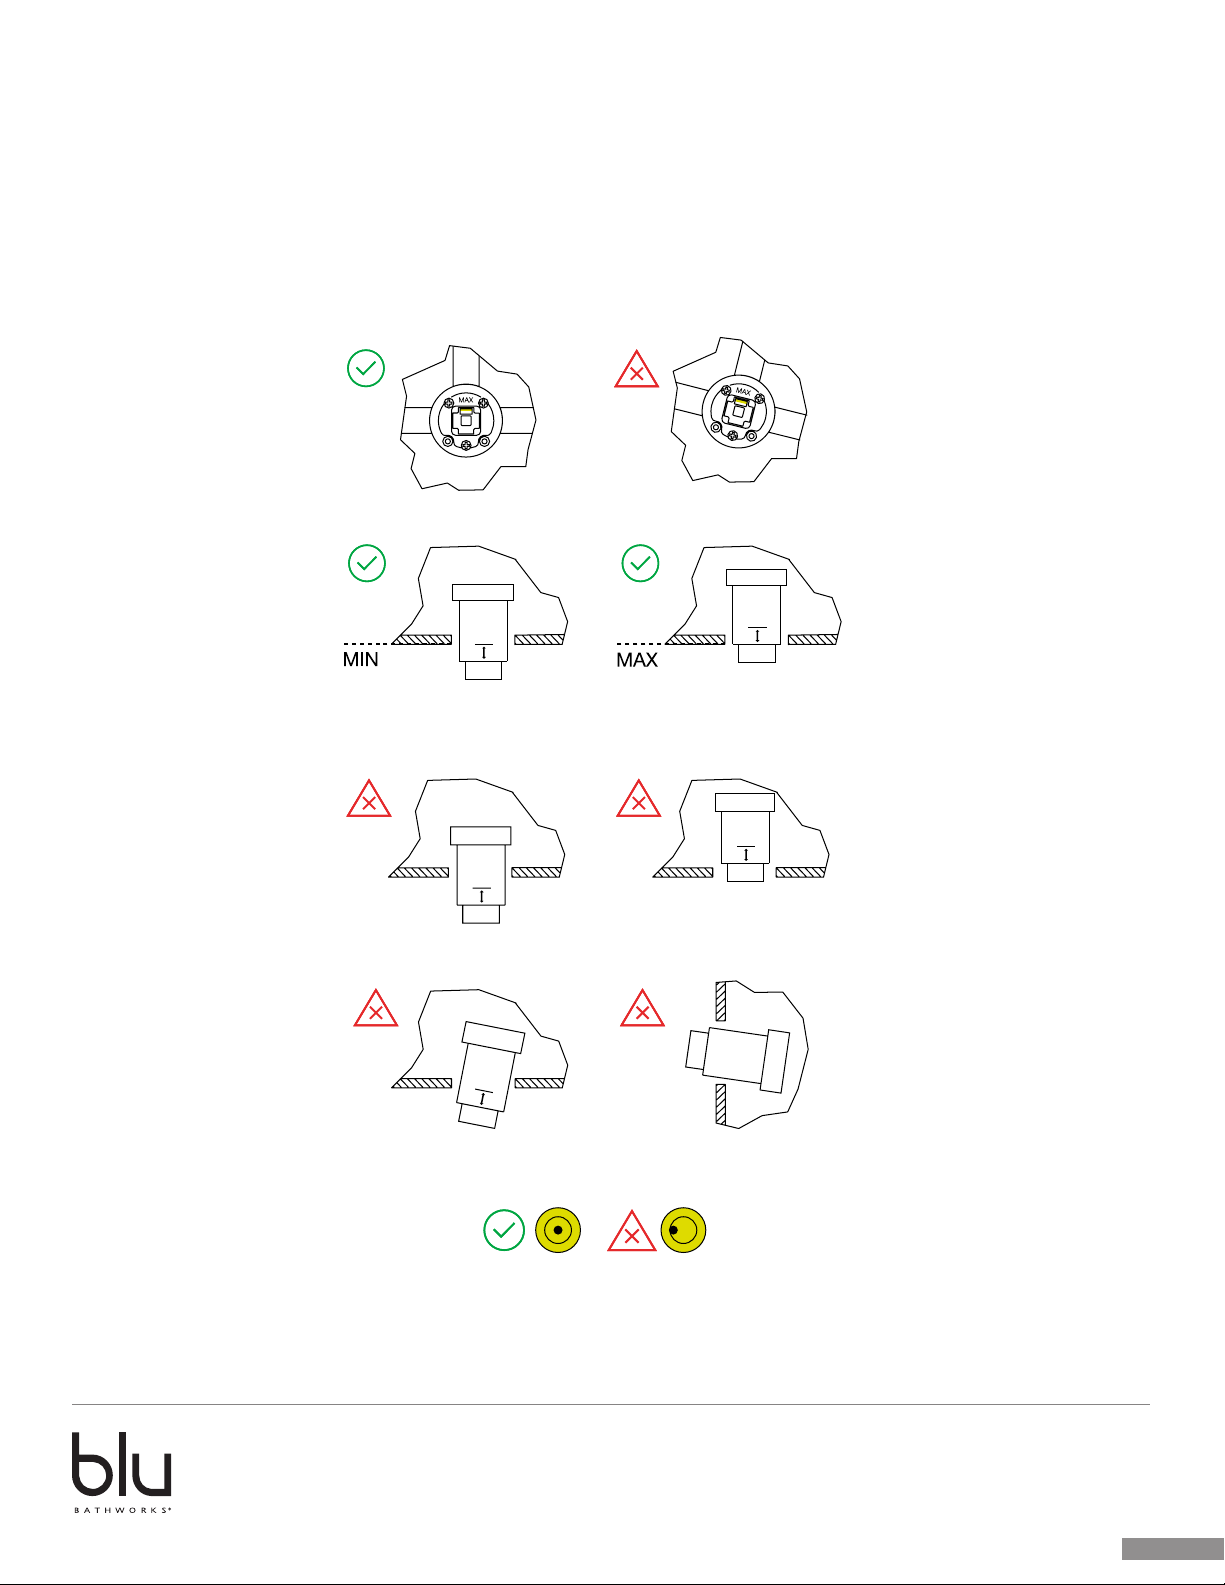
Installation Requirements
1. To ensure this product is installed properly, you must read and follow these guidelines.
2. The owner/user of the product must keep this information for future reference.
3. Consult local building codes to make sure the installation complies with standards.
4. Remove the unit from its packaging. Before disposing of it, inspect the unit to make sure its in good shape. Should inspection reveal any
installed. Blu Bathworks’ responsibility for shipping damages ceases upon delivery of the product in good order to the carrier.
All complaints regarding damage due to transport must be made directly to the carrier.
5. Place the unit in the bathroom before you start working. Conserve all nuts and bolts.
6. To protect the unit during installation, we recommend that you lay a piece of cardboard on the bottom.
7.
8. Verify that all dimensions on the plan are the same as the ones of the unit.
9. All installations must conform to local and national plumbing, build
10. Inspect this product to assure you have all parts required for proper installation.

2021-11
1 866 907 0122 blubathworks.com
2
Cleaners for Fittings and Accessories
To avoid damaging the surface and working components of the ttings, certain precautions must be taken
in terms of usage and subsequent cleaning as many cleaning agents contain acids for general cleaning and
removing calcium deposits. When caring for your ttings and accessories, please note the following:
- Only apply cleaners which are expressly intended for the use
- Never use any cleaner containing hydrochloric acid, formic acid or acetic acid on or near the tting, as they can
cause considerable damage even with just one application
- Do not use cleaners containing phosphoric acid
- Do not use cleaners containing chlorine bleach solutions
- Never mix or combine cleaning agents
- Abrasive cleaners and unsuitable scouring agents such as scouring pads.
Installation Notes
Important! Install this product according to the installation guide. Our products must be installed by certied professionals only and
according to our installation guide as well as federal, provincial / state and local building codes and regulations.
Technical Support Assistance
If further assistance is required, please contact:
Product Support at 1.866.907.0122 (09:00 – 17:00hrs PST) or email [email protected]
North America
Blu Bathworks Inc.
7388 Hedley Avenue, Burnaby, BC Canada V5E 2P9
T +1.604.299.0122 F +1.604.299.0125
Please refer to blubathworks.com for warranty, terms & conditions under warranty & procedure for warranty service.
Before connection, ush water through
pipe-work to remove all debris etc. to
prevent damage to the valve mechanism.
Then ensure water supplies have been isolated.
WARNING

2021-11
1 866 907 0122 blubathworks.com
3
outlet one
cold water in
cold water inlet
mixed hot water inlet
hot water from water tank
1
2
3
3
Component Diagram
for QRI-0030 rough-in valve kit
1. QRI-0001: single handle hydroprogressive wall rough-in valve
2. QRI-0910: thermostatic mixing valve
3. QRI-0103 x 2 qty: shut os with integral check valve

2021-11
1 866 907 0122 blubathworks.com
4
Attention: Min/Max depth in wall
QRI-0001 rough-in valve

2021-11
1 866 907 0122 blubathworks.com
5
Attention: Placement in wall
QRI-0001 rough-in valve

2021-11
1 866 907 0122 blubathworks.com
6
Position
!Application on plasterboard or counterframe
!Finish the coating close to the edge of the plastic protective cover
QRI-0001 rough-in valve

2021-11
1 866 907 0122 blubathworks.com
7
Installation: wall-mount single handle with spout conguration
VALVE.02, MODO, STERO SERIES
Universal Position
QRI-0001 rough-in valve

2021-11
1 866 907 0122 blubathworks.com
8
QRI-0001

2021-11
1 866 907 0122 blubathworks.com
9
QRI-0910 Thermostatic Mixing Valve
Attention — Before Installation
FAILURE TO COMPLY WITH PROPER INSTALLATION AND MAINTENANCE INSTRUCTIONS COULD
CONTRIBUTE TO THE VALVE FAILURE, RESULTING IN INJURY AND/OR DEATH. TO ENSURE THE
ACCURATE AND RELIABLE OPERATION OF THIS PRODUCT, IT IS ESSENTIAL TO:
• Properly design the system to minimize pressure and temperature variations.
• This valve is not factory preset and can be adjusted to deliver scalding temperatures. Check outlet
temperature to ensure it does not exceed 105°F (41°C). Make sure temperature limit stop is properly re-
set to maximum 105°F (41°C) following valve maintenance or repair. Tampering with limit stop in any way
may result in scalding temperature causing serious bodily harm and/or death.
Warning
Need for Periodic Inspection and Yearly Maintenance:
Periodic inspection and yearly maintenance by a licensed contractor is required. Corrosive water
conditions and/or unauthorized adjustments or repair could render the valve ineective for service
intended. Regular checking and cleaning of the valve’s internal components and check stops helps
assure maximum life and proper product function. Frequency of cleaning and inspection depends upon
local water conditions.
You are required to consult the local building and plumbing codes prior to installation. If the information in
this manual is not consistent with local building or plumbing codes, the local codes should be followed.
Inquire with governing authorities for additional local requirements.

2021-11
1 866 907 0122 blubathworks.com
10
QRI-0910 Thermostatic Mixing Valve
Installation
Valve should be installed and adjusted by a licensed contractor in accordance with local codes and
ordinances. Further, this valve should be installed in a location where it is accessible for cleaning, service
or adjustment.
1. Close both the hot and cold water shutoff valves upstream nearest to the intended installation.
2. Bleed the remaining water from the system.
3. Connect the water supply to valve as shown in Figure 1 (page 11). Supply piping must be flushed
clean before making connections to the valve.
4. Valve can be installed in any position. The inlet hot supply is to be connected to the “H” side of the
valve, the cold supply side to the “C” side and the mixed water outlet to the “M” side.
5. Make sure union nuts are placed over tailpieces prior to soldering threading to pipe or using w/press.
6. For valves with Quick-Connect tailpieces refer to “Quick-Connect Installation” instructions (page 13)
NOTICE:
To prevent damage to valve from excessive heat during soldering, remove unions and gaskets
from valve body prior to soldering.
7. After soldering, ush piping and install valve using lter washer on hot and cold water inlet and
ber washer on the mixed water outlet.
8. Start-up: Open cold water supply, then hot water supply. Inspect for leaks.
Important:
9. Adjust temperature to desired setting (refer to Figure 3 - page 12). Recommend a maximum
temperature of 105°F (41°C) for shower and bathing xtures.
*The wetted surface of this product contacted by consumable water contains less than 0.25% of lead by weight.
WARNING
For valves with CPVC or PEX end connections, do not exceed the tubing manufacturers pressure and
temperature ratings. Refer to the tubing manufacturers product specications for that information.

2021-11
1 866 907 0122 blubathworks.com
11
QRI-0910 Thermostatic Mixing Valve

2021-11
1 866 907 0122 blubathworks.com
12
QRI-0910 Thermostatic Mixing Valve
1. Let water flow for at least two minutes to allow supply temperature to stabilize.
2. Calibrate the mixed water outlet temperature by placing a thermometer in the mixed water stream.
3. To adjust the setting of the valve, loosen locking cap screw with hex wrench (refer to Figure 3)
Cap must be lifted 1/4” to adjust temperature. To increase the temperature, turn counterclockwise.
To decrease temperature turn clockwise.
4. Lower handle and tighten screw.
5. Check outlet temperature.

2021-11
1 866 907 0122 blubathworks.com
13
QRI-0910 Thermostatic Mixing Valve
QUICK CONNECT INSTALLATION

2021-11
1 866 907 0122 blubathworks.com
14
QRI-0910 Thermostatic Mixing Valve

2021-11
1 866 907 0122 blubathworks.com
15
QRI-0910

2021-11
1 866 907 0122 blubathworks.com
16
QRI-0103 Shut-O Valve
1. Body
2. Retainer
3. Ball
4. Check valve insert
5. Stem
6. Gland nut
7. Lever and grip
8. Lever nut
9. O-ring
10. Seat (2)
12. Stem packing
13. Stem bearing

2021-11
1 866 907 0122 blubathworks.com
17
1. QRI-0001 x2 qty: single handle hydroprogressive wall rough-in valve
2. QRI-0910: thermostatic mixing valve
3. QRI-0103 x 2 qty: shut os with integral check valve
cold water in
outlet one
outlet two
cold water inletmixed hot water inlet
hot water from water tank
TWO OUTLET
11
2
3
3
Shower Conguration Examples

2021-11
1 866 907 0122 blubathworks.com
18
2
3
1. QRI-0001 x3 qty: single handle hydroprogressive wall rough-in valve
2. QRI-0910: thermostatic mixing valve
3. QRI-0103 x 2 qty: shut os with integral check valve
mixed hot water inlet cold water inlet cold water in
hot water from water tank
outlet one
outlet two
outlet three
THREE OUTLET
111
2
3
3

2021-11
1 866 907 0122 blubathworks.com
19
1. QRI-0001 x4 qty: single handle hydroprogressive wall rough-in valve
2. QRI-0910: thermostatic mixing valve
3. QRI-0103 x 2 qty: shut os with integral check valve
cold water in
hot water from water tank
cold water inletmixed hot water inlet
outlet one
outlet two
outlet three
outlet four
FOUR OUTLET
3
3
111
2
1
Table of contents
Other Blu Bathroom Fixture manuals
Popular Bathroom Fixture manuals by other brands

Kinedo
Kinedo K500 manual

Hans Grohe
Hans Grohe AXOR Montreux 16515 1 Series Installation/User Instructions/Warranty

Englefield
Englefield MILANO Square installation instructions

AmazonBasics
AmazonBasics B07FHBYWPY Welcome guide

noken
noken ROUND 100238453-N200000044 manual

GoodHome
GoodHome cavally 3663602690832 manual

Gessi
Gessi RETTANGOLO 26691 manual

American Standard
American Standard PASSAGE A8010T-RHO installation instructions

Bradley
Bradley S19-310SBFW Installation

Kohler
Kohler URBANITY 25717T-9 installation instructions

KEUCO
KEUCO Royal Lumos 14307 171351 Instructions for use

Korpinen
Korpinen Gaius Sense 21273102-00 installation guide