Blue Ox BX2654 User manual

BX2654
2015-16 Ford Focus Sedan
2015-16 Ford Focus Hatchback (No RS)
Installation Instructions
405-0490 Rev C Page 1 of 9 9/17/15
Please visit www.blueox.com for the latest version of these installation instructions.
Reference your vehicle owner’s
manual for manufacturer’s towing
specications.
Serial Number
If the front of your vehicle looks different than
this, please contact us at (402)385-3051.
!
Failure to read and follow these instructions
could result in separation of the towed vehicle
from the tow bar, causing property damage,
loss of towed vehicle, personal injury or death.
WARNING
Bolt Size Grade 5 Grade 8
1/4” 10 14
5/16” 19 29
3/8” 33 47
7/16” 54 78
1/2” 78 119
5/8” 154 230
3/4” 257 380
Bolt Torque Specications
Torque in Foot-Pounds for Inch Bolts
Bolt Torque Specications
Torque in Foot-Pounds for Metric Bolts
Bolt Size Grade 8.8 Grade 10.9
6MM 6 8
8MM 16 22
10MM 31 40
12MM 54 70
14MM 89 117
16MM 161 230
18MM 222 318
Attachment Tab Height: 13-1/2”
Attachment Tab Width: 21-1/2”
Please read BOTH these Installation Instructions and the General Instructions prior to
installing or operating this equipment.
1. Blue Ox®towing products and accessories are
intended to be installed by Blue Ox® Dealers
who are familiar with our products and have the
equipment and knowledge necessary to do “t
work”. If needed, Blue Ox®Dealers can be found
at www.blueox.com or by contacting our Technical
Service Department at (402) 385-3051.
2. Many Blue Ox®baseplates are designed to
use existing holes and hardware to mount the
baseplate to the towed vehicle. Even though bolts
are there, do not assume they are adequate for
baseplate mounting. Always use the hardware
supplied in the hardware kit and existing hardware
as specied in the installation instructions.

BX2654
2015-16 Ford Focus Sedan
2015-16 Ford Focus Hatchback (No RS)
Installation Instructions
405-0490 Rev C Page 2 of 9 9/17/15
Instruction Notes: The fascia, horns and windshield washer uid reservoir are removed and
reinstalled for the baseplate installation. Some drilling and trimming is required.
Place all components that are removed on a at, sturdy surface. All items will be reinstalled unless
otherwise noted after the baseplate is installed.
The dimensional variations between otherwise identical vehicles can be considerable. While the
baseplate was designed for easy installation, it may be necessary to tailor the baseplate slightly to
compensate for vehicle manufacturer’s tolerances.
The BX8869 Tail Light Wiring Kit is recommended for this vehicle.
Drill a hole according to the tail
light wiring kit instructions.
NOTICE
• Handling of some cosmetic parts when installing this product may require the use of protective
covers, rags, specialty tools, etc. to prevent damage.
• When using power drills be aware of the dangers of torque and drill bit length.
• When using a reciprocating saw be aware of objects behind the cutting surface.
• Use a good quality paint to spray cut edges of frame to prevent rusting.
• Be sure that ALL electrical connections are plugged in and accessories are functioning properly
before reinstalling the fascia.
• The baseplate is computer tested to your vehicle’s GVWR, exceeding this weight will void the
manufacturer’s warranty.
• Be sure to use a sufcient amount of Loctite®Red on all bolt threads before tightening. Tighten all
bolts according to the torque chart provided.
• Dealer or installer be certain the user receives these instruction sheets.
• If the baseplate is in an accident, it must be replaced. DO NOT use it again! An accident can
cause unseen damage and using it again could result in more damage or serious injury. DO NOT
use the baseplate if it is damaged or missing parts.
Baseplates with Serial #’s lower than 00045 will not t the ST Hatchback models due to a
convenience link modication

BX2654
2015-16 Ford Focus Sedan
2015-16 Ford Focus Hatchback (No RS)
Installation Instructions
405-0490 Rev C Page 3 of 9 9/17/15
RESERVOIR
BREAKAWAY
SWITCH
6 PIN
CONNECTOR
VEHICLE HORN
USED TO RELOCATE
USED TO MOUNT
WINDSHIELD WASHER
10
714
5
6
13 1
2
3
8
11
12
16
4
15
CONNECTOR
4 PIN
9
Item No. Part No. Description Qty.
1.................................61-5208 .............................3/8” Nut Plate w/ 14” Wire .............................................10
2.................................61-7457 .............................BX2654 Baseplate...........................................................1
3.................................62-3468 .............................Attachment Tab Assembly with Hole ...............................2
4.................................101-5822 ...........................4 Way Connector Adapter ...............................................2
5.................................102-7056 ...........................Breakaway Bracket .........................................................1
6.................................201-0050 ...........................1/4”-20 x 3/4” Hex Head Bolt, Grade 5, ZP .....................2
7.................................201-0071 ...........................1/4”-20 x 1” Hex Head Bolt, Grade 5, ZP ........................1
8.................................201-0192 ...........................#10-32 1/2” Round Slotted Head Screw..........................2
9.................................201-0440 ...........................3/8”-16 x 1-1/2” Hex Head Bolt, Grade 5, ZP ................10
10...............................201-0654 ...........................#10-16 x 1” Self Drilling Screw, ZP..................................1
11 ...............................201-0979 ...........................#12-14 x 1” Self Drilling Screw, ZP..................................2
12...............................202-0047 ...........................#10-32 Hex Nut ...............................................................2
13...............................202-0102 ...........................1/4”-20 Hex Nylon Insert Lock Nut, ZP............................3
14...............................203-0001 ...........................1/4” Flat Washer, ZP........................................................2
15...............................203-0010 ...........................3/8” Lock Washer, ZP ....................................................10
16...............................203-0054 ...........................#10 Lock Washer, ZP ......................................................2
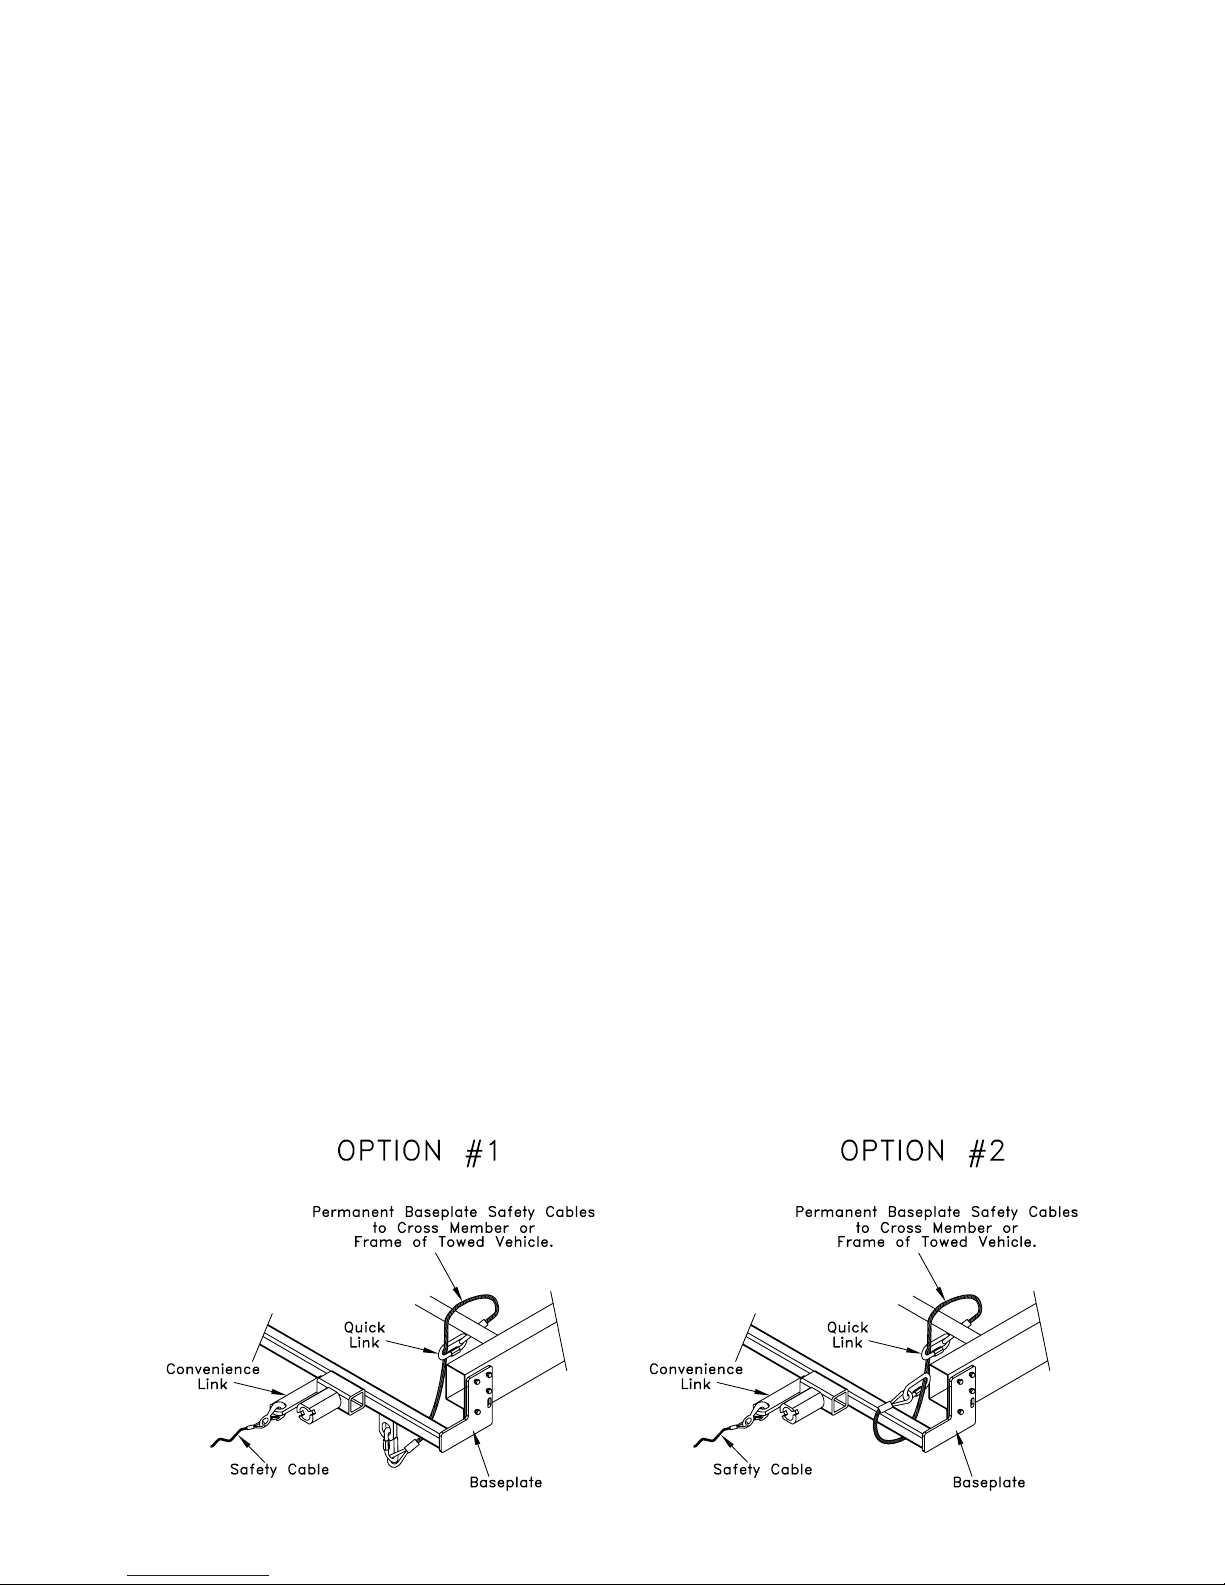
17...............................226-0046(not shown) ........Class III Safety Cables ....................................................2
18...............................229-0359(not shown) ........3/8” Quicklink, ZP ............................................................2
19...............................290-0437(not shown) ........Black Cap Plug Receiver.................................................2
Tools Required
Large Vise Grip
Flat Screwdriver
Utility Knife
Torque Wrench
Drill
Reciprocating Saw
Loctite®RED
3/8” Drill Bit
1-1/4” Hole Saw
8MM Socket
10MM Socket
7/16” Socket
7/16” Wrench
9/16” Socket
9/16” Wrench
T30 Torx
Important:
Use only genuine factory replacement parts on your baseplate. Do NOT substitute homemade or non-typical parts. If a bolt is lost or in need of
replacement, for your safety and the preservation of your baseplate, be sure to use a replacement bolt of the same grade (In most cases it will be Grade
5, please reference the parts list above). Replacement parts may be ordered through your nearest Blue Ox® Dealer or Distributor. Failing to follow and/
or altering these installation instructions in either installation or required equipment will void the manufacturer’s warranty. Towing behind a non-motorized
vehicle will void the warranty.

BX2654
2015-16 Ford Focus Sedan
2015-16 Ford Focus Hatchback (No RS)
Installation Instructions
405-0490 Rev C Page 4 of 9 9/17/15
1. Using a T30 Torx, remove the two (2)
screws from the headlight, disconnect
and set aside. Do this on both sides of the
vehicle.
2. Using a T30 Torx, remove the ve (5)
screws from the top edge of the fascia
(white). Remove the two (2) push pins
from the outer edges (gray).
3. On the back side of the fascia, unhook the
hood release cable from the latch (white)
and unsnap the cable from the clips
(gray).
4. Using a T30 Torx, remove the two (2)
screws from the edge of the wheel well
(white). Also remove the push pin from the
fascia/fender joint (gray). Do this on both
sides of the vehicle.

BX2654
2015-16 Ford Focus Sedan
2015-16 Ford Focus Hatchback (No RS)
Installation Instructions
405-0490 Rev C Page 5 of 9 9/17/15
5. Remove the six (6) push pins from the
underside of the fascia. There are two (2)
in front of each wheel and two (2) in the
middle.
6. Release the clips underneath where
the headlights were, pull the corners
of the fascia away from the vehicle
disconnecting any electrical connections
and set the fascia aside.
7. On the driver side, using an 8MM socket,
remove the screw from the wheel well
brace (white). Once the screw is removed,
bend the webbing downward far enough
for baseplate clearance (inset).
Using a 10MM socket, remove the screw
from the DS horn (gray) and set the horn
aside.
8. On the passenger side, using a 10MM
socket, remove the two (2) screws from
the washer reservoir. Disconnect all
electrical connections. Remove and plug
all uid lines.

BX2654
2015-16 Ford Focus Sedan
2015-16 Ford Focus Hatchback (No RS)
Installation Instructions
405-0490 Rev C Page 6 of 9 9/17/15
9. Using a 10MM socket, remove the screw
from the PS horn and set the horn aside.
10. Trim off the washer reservoir tab on the
passenger side as shown for baseplate
clearance.
11. Disconnect the wire loom from on top of
the frame. Using the existing hole as a
guide, drill the hole out with the 1-1/4” hole
saw bit for nut plate installation. Do this on
both sides of the vehicle.
12. Trim the plastic shielding just ush or
a little past as shown for baseplate
clearance. Do this on both sides of the
vehicle.

BX2654
2015-16 Ford Focus Sedan
2015-16 Ford Focus Hatchback (No RS)
Installation Instructions
405-0490 Rev C Page 7 of 9 9/17/15
13. Hold the baseplate up to the vehicle and trim the plastic intake to allow the baseplate to be
installed onto the frame.
ST Models Only: The 2nd & 3rd n from the bottom will need to be notched approximately
1/2” x 3-1/4” for baseplate clearance. Also notch the outer louver frame as shown to allow the
baseplate to sit back onto the frame. Do this on both sides of the vehicle.
14. Align the holes in the side plate to the existing
holes in the frame and loosely install the 3/8”
hardware (white).
Using a 3/8” drill bit, drill the bottom holes in the
baseplate thru the frame (gray). Install the 3/8”
hardware and fully tighten the bolts.
Once the bottom bolts are fully tightened, go
back and fully tighten bolts in the side plate
bolts (white).
Do this on both sides of the vehicle.
** Use Loctite®Red on all bolt threads and tighten all bolts to the
appropriate torque.
15. Attach the permanent baseplate safety
cables to the provided convenience link on
the baseplate. The photo above shows the
recommended installation of the cables to
frame of vehicle. Additional options may
interfere with suggested mounting; in this case,
secure the cables to a solid piece of the frame
as described in the instructions included with
the permanent baseplate safety cables. Be
sure the safety cables do not rub against any
hoses or moving parts. Do this on BOTH sides
of the vehicle.
ST Models

BX2654
2015-16 Ford Focus Sedan
2015-16 Ford Focus Hatchback (No RS)
Installation Instructions
405-0490 Rev C Page 8 of 9 9/17/15
16. Reinstall the washer reservoir using
the bracket on the baseplate and new
hardware. Reinstall the horn to the lower
existing hole (white).
17. Bend back the webbing and reinstall the
wheel well brace. Install the horn to the
webbing’s existing hole (white).
18. Optional Breakaway (Baseplates with Serial# lower than 00045) : Install the bracket to the
existing hole in the crossmember (inset) with a 1/4” bolt and lock nut. Install the breakaway to
the bracket with the supplied 1/4” hardware (Left).
Optional Breakaway (Baseplates with Serial# higher than 00045) : Install the bracket to the
bottom the the cross tube with a #10 screw at the desired location. Install the breakaway to the
bracket with the supplied 1/4” hardware (Left).

BX2654
2015-16 Ford Focus Sedan
2015-16 Ford Focus Hatchback (No RS)
Installation Instructions
405-0490 Rev C Page 9 of 9 9/17/15
19. Hold the fascia as close to its original
position, mark and trim the fascia around
the convenience links and attachment
tabs. Reinstall the fascia.
© 2015 Blue Ox
One Mill Road, Industrial Park
Pender, Nebraska 68047
Phone: (402) 385-3051
Fax: (402) 385-3360
www.blueox.com
CUSTOMER SERVICE COMMITMENT
Blue Ox® is committed to providing you with exceptional customer care throughout your lifetime
with our products. Our team is here to assist you with any questions you may have regarding the
performance of your product. Simply call (402) 385-3051 and you can speak with our technical
service team.
Additionally, please visit our website to see which rallies our Destination America team will be
attending. For a nominal fee, our service technician will service your towing system to ensure it’s in
proper working condition. Also, as a commitment to our customers, should you visit our factory, you
can stay at our full service Blue Ox® campground at no charge along with enjoying a factory tour.
Again, thank you for being our customer and for the condence you have shown in the performance
of our products. It is because of customers like you we enjoy the success we have today.

5/11/15
Permanent Baseplate Safety Cable Installation
Permanent baseplate safety cables are strongly recommended when towing a vehicle with a tow bar.
The principle function of the permanent baseplate safety cables is to prevent the towed vehicle from
breaking loose in the event the connection between the frame of the towed vehicle and the baseplate
fails or becomes disconnected. The cables must be connected from the baseplate to the frame rail
or cross member of the vehicle’s frame. The illustrations below show the possible arrangements
recommended by Blue Ox®. Each permanent baseplate safety cable must have an adequate weight
rating for the towing system. The weight rating of the two (2) cables together will not qualify.
Do not mount the permanent baseplate safety cables against wires, hoses or brake lines.
These permanent baseplate safety cables should remain installed as long as the baseplate is
installed on the vehicle. Permanent baseplate safety cables are to be used in conjunction with,
and NOT a replacement for legally required safety cables attaching the towed vehicle to the towing
vehicle.
Notice To Baseplate Installer
1. It is YOUR responsibility to watch for:
• Oil cooler and air conditioner lines
• Electrical wires and hoses
• Missing parts or attaching points on the frame
** If the baseplate is improperly installed and is against a wire or hose, it could cause uid leaks or
electrical shorts some time after the actual baseplate installation.
General Information
1. Ensure that your product(s) are registered online at www.blueox.com. It is crucial to register your product(s)
so that you may be alerted of product offerings, updates, upgrades, maintenance and safety bulletins, and/
or recalls.
2. It is the owner’s responsibility to inspect all towing equipment for cracked welds, missing or worn
parts and loose bolts before each towing trip. Be sure to use Loctite®Red on all bolts and tighten to the
recommended specications.
3. It is the owner’s responsibility to hook up all towing equipment per manufacturer’s instructions/
recommendations.
4. Remove the attachment tabs when not in use (if applicable).
Table of contents
Other Blue Ox Other manuals

Blue Ox
Blue Ox BX1119 User manual

Blue Ox
Blue Ox BX1975 Service manual

Blue Ox
Blue Ox BX3763 User manual

Blue Ox
Blue Ox BX3612 User manual

Blue Ox
Blue Ox BX2635 User manual

Blue Ox
Blue Ox BX1508 User manual

Blue Ox
Blue Ox BX2164 User manual

Blue Ox
Blue Ox AMBASSADOR BX7302 User manual

Blue Ox
Blue Ox BX1625 User manual