Bluebird Pidion BM-300 User manual

1
BM-300
Before use, always read ‘warning and safety information’ thoroughly and
always obey them.
Please note that this manual may be different according to the
conditions such as the software version or mobile phone business
partner, and changed without notice.
The configuration and color of the manual may differ from the actual.
2
PIDION is protected by copyright laws registered worldwide by Bluebirdsoft Inc., a global
brand which presents the reliable, representative, and high tech images, as a leading brand
of future mobile fields.
This manual is protected by copyright laws.
This manual has been prepared sincerely by BluebirdSoft Inc., but may be different to the real due to edit error,
information omission, and etc. But in no event shall we be liable for any problems occurred due to this.
The program provided with this product is copyrighted and its reproduction, deletion, movement, and etc. is
prohibited without the permission of the manufacturer.
Some function of this product may lead to some problems in the operation according to the available
conditions, usable program, peripheral equipments, and etc.
This wireless equipment has the possibility of radio interference and no service permitted in connection with
human health and security.
Registered Trademark
User’s Instruction
This equipment has been tested and found to comply with the limits for a Class B
digital device. It can be used in any other places besides in a residential installation,
provided with reasonable protection against harmful interference.
Class B
(A home information and
communication equipment)
User’s Instruction
Type

3
• Do not use PDA at PDA restricted area and Potentially Explosive Area.
• If PDA or battery contacted to the water, do not heat or dry the battery in an oven or micro wave.
• If PDA or battery contacted to the water or liquid, the phone’s label color changes.
(This time, it can’t be repaired free of charge and be attention to use the PDA.)
• All batteries can cause property damages, injury, or burns if a conductive material such as jewelry, keys or beaded chains touches
exposed terminals. To protect against such unwanted touch, exercise care in handling any charged battery.
• In particular when placing the battery in very hot or cold area for long, it can cause the reduction of capacity or life.
• Use only the designated and supplied batteries and adapters. They can’t be used for other purposes, excepts for our company’s
terminal.
• If not used the battery for long, always store the charged battery at a room temperature.
• Though charged sufficiently, the battery life changes due to its own feature.
• Do not use any other type of battery in your equipment. Otherwise, it can cause the reduction of life in battery or PDA itself as well
as the risk of explosion.
• Do not watch DMB during driving (bicycles, automobiles, auto bicycles, and etc.), walking, climbing the mountain, and etc.
• If DMB receiving antenna touches exposed conductive areas such as power receptacle and etc., it can cause an electric shock.
• If touched with antenna, it can cause human injury. Keep the child away from the antenna.
• If a failure occurred, never revise, disassemble, or repair the product. Please contact the service center of our company.
• If you are allergic to exposed paints, stop using the PDA and consult a doctor.
• Do not apply the PDA with paint or dyes. Otherwise, it can cause damage in the appearance or screen or abnormal operation of
the product.
• Make sure to protect DMB antenna, headphone, or earphone not caught or tight by other materials.
• If used for long at hot/high humidity environments, it can cause a fault.
• There can be Not serviceable area. Always check for terrestrial DMB reception area.
• Terrestrial DMB broadcasting may be deteriorated in picture quality irrespective of reception.
• With poor reception of broadcasting, point up the antenna and then change the direction to find the optimum conditions.
• If you folded the antenna in a different direction, it can cause a breakdown.
• If touched PDA with sharp objects such as pins, nails, ball pens, and etc. instead of the stylus, the screen may get scratched.
• Avoid vibration and shock. If not used, turn off the power and store it at a safe place.
• Connect the adapter firmly. If smoke, smell, noise, and etc. occurred in the product, immediately power off the product and
disconnect the adapter. In thunder or lightning, always disconnect the adapter.
• This wireless equipment has the possibility of radio wave interference so no service permitted in connection with human safety.
Safety Information For your safety, please read the guidelines below carefully before you use the product .

4
Product Components
[Body] [Stylus] [Ear phone]
[USB cable] [Adapter] [Standard
Battery]
[User’s Manual, CD]
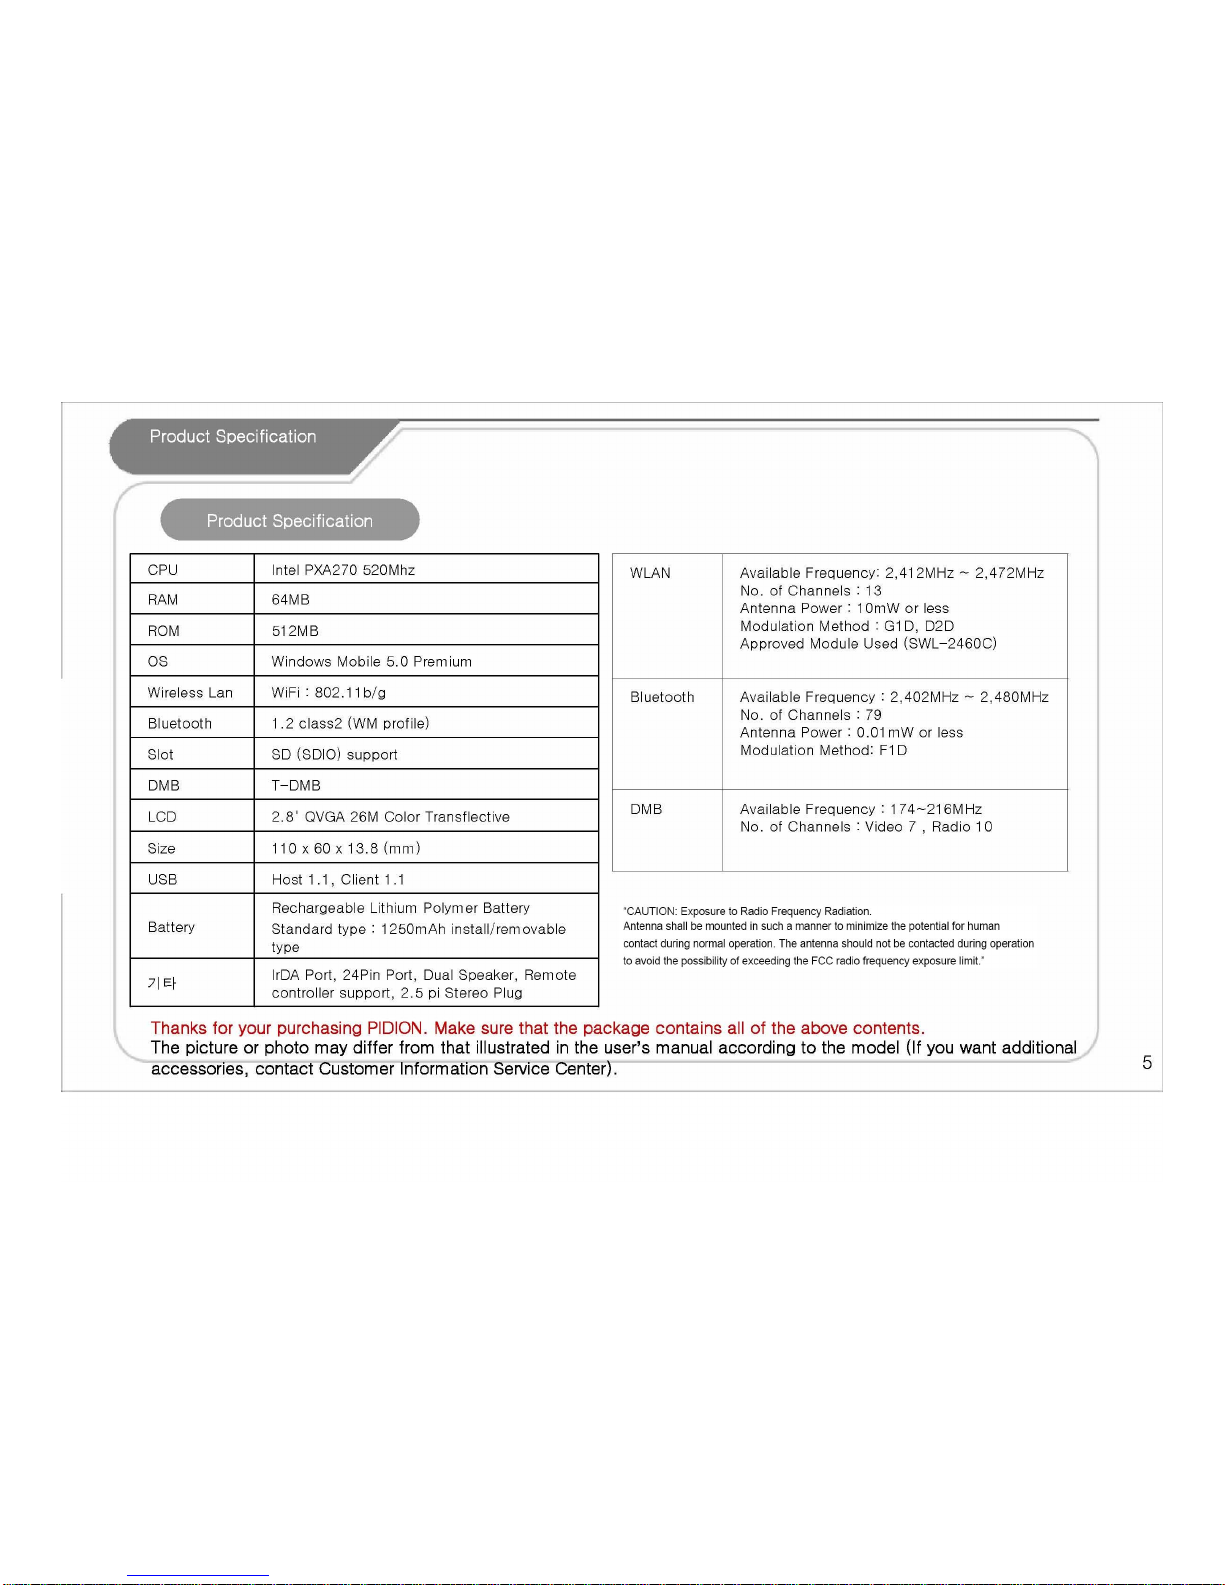
Product Information
Thanks for your purchasing PIDION. Make sure that the package contains all of the above contents.
The picture or photo may differ from that illustrated in the user’s manual according to the model (If you want
additional accessories, contact Customer Information Service Center).

6
Each Part Name and Button
Product Information
[Wireless Indicator
LED]
[Battery Indicator
LED]
[Job] [Received
Letter Box]
[Omni-
directional
Function Key]
[Calend
ar]
[Media Player]
[Speaker]
[Speaker]
[IrDA Port]
[24 pin terminal]
[DMB Antenna] [SD Card Slot]
[2.5 pi Earphone
Jack]
[Hand strap]
[Power
Button]
[DMB
Button]
[HOLD]
[Battery Cover]
[Reset
Button]
[LCD]

7
Product Information
[Mic]
[HOLD]
[3.5 pi earphone jack]
[Send
Button]
[Previous Button]
[M
Button]
[Next Button]
[Play/Stop Button]
If you have no remote controller provided with the shipment of product, it may be impossible to operate. Always use only the remote
controller provided with the product.
If installed or removed at the body by force, it can cause a failure to the equipment.
[Vol. +- Button]
Using Remote Controller
Hold
Volume DOWN
Volume UP
Media player operation
Next music of media
player
Play/pause of media
player
Previous music of media
player
Short – Memo
Long – Vocal recording
General Control
Hold
Vol. -
Vol. +
M
Next channel Next
Screen Toggle Play/Pau
se
Previous channel Previous
Short – Memo
Long – Vocal
recording
Send
DMB Control Button
Name
Used for listening to the
music, watching video or
DMB, and etc. Vocal
recording enabled through
microphone and hands free
through Internet Telephone.
Operable only in the approved
program. HOLD button
separated from the that of
body. HOLD function enabled
only in the Remote Controller.

8
Product Information
Battery Installation and Removing
[Battery
Installation]
[Removing the
Battery]
1. If pushing the center of
battery cover slightly, the
cover removes.
2. Using the stylus,
remove the battery from
the right groove.
1. Slip the battery into the
battery compartment top
edge first.
2. Insert the Battery Cover.
Always charge the battery only using the supplied adapter.
It can be charged with 24 pin(The Standard specified by the Ministry of Information and Communication) charger for general mobile
phones. (It may be discharged gradually after full charging due to the nature of the standard charger).
SD Memory Card
• Frequent insertion/removal of
memory or excessive force can
cause a failure on the equipment.
• If removed the card and turned off
the power while using the memory
card, it can cause a data loss or
mis-operation of memory card and
PDA.
• Always backup the important data
at PC. Otherwise, the manufacturer
assumes no liability for data loss.
• If the memory card removed well,
do not remove the card forcedly and
contact the AS center. If necessary,
you can replace it with the applicable
product or refund it.
Battery
Installation Grip
Insertion Area
After the metal
terminal of memory
faced toward the
bottom of rear, push
to the end. If slightly
pressed the end of
memory visible at SD
Slot, it removes.

9
Product Information
Conditions by Battery Charging and LED Color < Battery
Precautions >
Normal :
12hours
Watching DMB : 4
hours
Max. Usable Time
2 hours
When charged with
adaptor
2 and a half hours When charged with PC
• Battery is consumables and its usable time may
be reduced over times.
• Battery can cause a heat according to the
conditions.
• If battery’s life reduced more than the half of the
first use, please change with new battery.
(Guaranteed period; 6 months).
• Battery’s life may differ according to the
brightness of LCD, temperature, used time of
battery, and etc.
• Bluetooth, if remained for long at the area where
no wireless internet available, its usable time may
be reduced rapidly due to enormous consumption
of battery.
(Bluetooth, always set the function to off if not
used wireless internet)
• After a completion of charging, you can leave
the battery installed at the charger. It can’t cause
damage to the product.
• If the lamp not illuminated at the body while
charging, it can be occurred due to misconnection
of cables. Remove and then reconnect the cable.
• If disconnected the battery while using, it can
cause the initialization of PDA and a data loss.
• With a low battery, it may cause hard reset.
If the product not fully charged, a warning message appears with a beep.
The charging time of user’s manual varies according to the conditions. Besides, new batteries are shipped with partly charged. Always use the fully
charged battery.
< LED while battery charging >
< Charging and Usable Time >
< Wireless Indicator LED >
Green Orange Charging Lamp
Charging
Completed
While Charging
Orange Blue Blue Wireless
lamp
DMB Bluetooth Wireless

10
Basic
Information
1. Press the power button of PDA.
2. Window mobile logo screen appears on the LCD.
3. Perform stylus point setup and setting as guided in
PDA.
4. After a completion of setup, Today screen appears.
Startup Using the Stylus
As the stylus to be attached at the hand strip or
case, it can be used to run the program on the
touch screen or enter the data directly.
Tab
Touch the screen once with the stylus to open
items or select options.
Drag
Hold the stylus on the screen and drag across the
screen to select text and images. Drag in a list to
select multiple items.
The same function as in field select on the desktop.
Tab and Hold
Tap and hold the stylus on an item to see a list of
actions available for that item. If tap and hold the
item, a pop-up menu appears. The same function
as in the Right Click of mouse on the desktop.
In Point Setup, press a cross-hair object exactly, or it appears repeatedly.
It can cause a scratch or a failure on the LCD screen.
Do not use sharp objects such as pin, nail, and etc. instead of the stylus with soft tip.
Other Bluebird Cell Phone manuals


