DOD FS300 User manual

User Manual

1
Safety Precautions
Product
Do not disassemble, repair, modify your camera or power related
accessories. For warranty service, please contact DOD Tech
Support.
Do not adjust or operate camera while driving.
Avoid exposing your camera to extended periods of humidity
and/or heat.
Prolonged exposure may reduce the product’s lifespan.
Do not spray water or cleaning agents directly onto the camera.
Fluids may cause fire, electric shocks, or malfunctions.
Avoid installing camera where it may obstruct the driver’s view or
airbag deployment.
Car Power Adaptor
Use ONLY the DOD power adapter supplied with your unit.
Other power adapters may create a safety hazard or damage the
unit.

2
Do not use damaged power adapters or cords. If damaged, please
disconnect the power adapter and contact DOD Tech Support for
assistance.
Do not pull, insert, or bend the power cable using excessive force.
Do not operate or handle the power cable with wet hands.
In specified cars, the power may be constantly supplied to the
device even the engine is turned off. This may drain the vehicle
battery. The optional DOD DP4 kit equipped with low-voltage
protection and is designed to prevent battery drain and reserve the
minimum voltage required for cranking.
Battery
Keep the device away from heaters or other hot objects.
Store the camera at lower temperatures to reduce the rate of
self-discharge and preserves the initial energy stored in the battery.
The battery in the device self-discharges naturally over time
whether the battery is used or not.
Charge the dash camera for 5 minutes with the supplied DOD
power cord if you are unable to turn on the camera.

3
Others
Firmware Update
See the support section on DOD Tech’s website for any available
firmware updates and instructions.
Download newest firmware from DOD Tech website and read
contained patch notes carefully.
Copy only the “.BIN” file to the root of the SD card.
Insert the SD card into the dashcam and plug power back in.
The dashcam will take 30 sec to 1 min to reboot, please do NOT
cut off power.
Note:
Please ensure stable power during firmware update, otherwise
may result in update failure or malfunction.
When update completes, system will show option to format SD
card. Please ensure to format SD card by computer / dashcam
to prevent update repeatedly.

4
Once reboot, please make sure the SD card is formatted correctly.
If fail to do so, the dash cam will enter update procedure every time
until the SD card is formatted or “.BIN” file removed.
About SD Card
Test the Micro SD memory card regularly as the memory card is a
consumable item, and needs to be replaced periodically.
Reformat the memory card in the camera menu every two weeks to
extend usable lifetime. This should only be done AFTER desired
files have been saved elsewhere, such as portable hard drive.
Formatting the memory card will clear all files, including RO files.
DOD is NOT responsible for any malfunctions caused from the use
of disingenuous, modified, or unauthorized parts and accessories.
DOD does NOT guarantee the recording of accidents which may
produce excessive force of impact causing the device to
malfunction and fault.
The working temperature of this product is
-20°C~65°C(-4°F~149°F). Please ensure the device is stored
within the temperature range; or the device may be damaged and

5
or malfunction, which these circumstances are not covered by
warranty.
DOD is NOT responsible for the loss of any recorded video during
operation due to unexpected factors or force majeure when
driving.
The video recordings filmed by this Dash Cam are intended for
personal use ONLY.
Suggested to use Class 10 and MLC flash memory cards.
DOD Tech recommend NOT to use Sandisk branded or TLC flash
memory cards.
Note:
64GB or greater capacity cards may show “SD Card Error” when
first insert into dash cam. Please use formatting function in
system menu to format SD card prior to usage to ensure proper
functionalities.
When formatting via computer, 64GB or greater requires
formation program to transform original exFAT format to FAT32
to properly function in dash cam.
Not all cards are compatible.

6
Function Keys
Power Button ON/OFF【 】
Display Switch【2CH】
Display layout for 2-CH models
while recording.
2CH Slot
Connecting rear camera
cable
DS5V Power Port【 】
For use with the supplied DOD
Car Power Adaptor.
Reset Button【RESET】
Use a small pin to press the
button to force the device to
reboot.
Operation Status LED
Flashing red: Unit is powered
on and recording.
Steady pink: Unit is powered
on and charging but not
recording.
Steady green: Not charging

7
Arrow Keys【
/
】
Press Arrow Keys to select
desired option in Menu Mode.
Press Arrow Keys to forward or
backward video in Playback
Mode.
Press
to capture current
image screenshot in Recording
Mode.
Press
to enter Playback
Mode in Recording Mode.
SOS Emergency File
Menu【 】
Press to access menu.
Press this button to exit Menu
Mode.
Press long on this button to
enter HUD mode, and press
long again to leave it.
Lock /OK【OK】
Press this button to lock
current video in Recording
Mode.
Press this button to confirm
slected option in Menu Mode.
8
Instructions
Start With SD Card.
To use with SD card, please format the microSD card in the camera
menu to ensure correct format before initial use.
To save recorded videos stably, DOD Tech recommends
formatting your SD card every two weeks from in the camera
Estimated Recording Length (Dual 1080p Full HD form)
Storage/Quality Recording length
16GB
120 minutes (2 hours)
32GB
250 minutes (4.2 hours)
64GB
505 minutes (8.4 hours)
128GB
995 minutes (16.6 hours)
*Video recording length may vary depending on environmental
conditions.
9
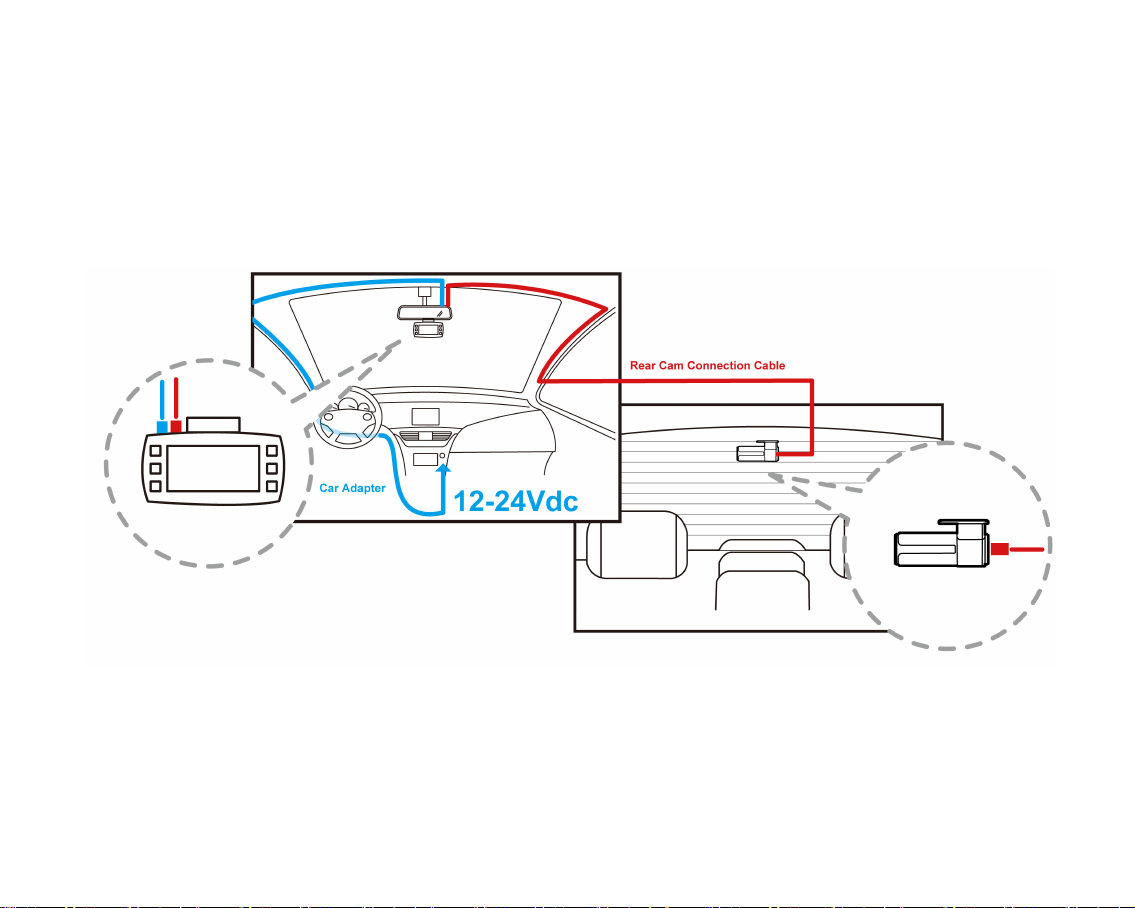
Installing and Wiring
1080p+1080p Dual Camera
Installation and wiring for front camera, please refer to blue
part in the chart.
Clean inside & outside of the windshield
Table of contents
Other DOD Dashcam manuals


