Blueview LED NEON FLEX User manual

1
LED NEON FLEX
ND5-20
1.Neon with 5050 SMD
2.Colors in W/R/G/B/Y/O available
3.Adopt high quality components and special circuit design for reliable performance
4.Unique extrusion process and electronic design can be bended in vertical way
5.5m max run in single feed and 10m max run in double feed without brightness drop
6.Flexible and cuttable every 62.5mm for various application
7.Extrusion modeling, IP68 with excellent weather resistance
Landscape lighting, facade lighting, steps, bridges, yards, roads, etc.
by clips
5050 24V 3Years
IP68
Features
Application
Installation
156°

2
LED NEON FLEX
ND5-20
Sectional view and size
Light Surface
Bending Diameter: mm[inch]
Light Surface
Specication
224
332
129
1305
290
925
600-605
587-589.5
620-625
2000-25000
520-525
465-470
Model No. Light
Color
82 15
15
15
15
15
15
156°
--
--
--
--
--
80+W
R
G
B
Y
O
20
57
14
22
8
24
Luminous Flux
(lm/m)
Efcacy
(lm/W)
Voltage
(V DC)
Beam
Angle Ra Power
(W/m)
Color Temperature/
Wavelength(K/nm)
ND5-20
Other Parameters
Model No.
ND5-20
LED Quantity
(pcs/m)
Min Cuttable
Length(mm)
Max Run
Single Feed
(m)
-20~+60℃-20~+70℃
Product Size
L*W*h(mm)
96 5 62.5
Working
Temperature
Storage
Temperature
5000X20X18
NOTE:
1. Test environment temperature : 25±2°C.
2. Luminous flux & power tolerance within ±10%.
3. The white color is tested at 6500k.
4. The color light are tested with the corresponding color LEDs.
5. Different color temperature will make luminous flux different.
6. The actual data of each single product may differ from the typical values. The data is subject to change without notice.
Note: The max run of ND5-20 is 5m in single feed and 10m in double feed.

3
LED NEON FLEX
ND5-20
Prole Drawings
Unit:mm
Single Feed
Double Feed
Working Length vs. Recommended Power Supply
Model No.
ND5-20
Working Length
(m)
1
5
0.64
3.2
24
24
25
100
15.36
76.8
Single Feed
Single Feed
Rated Current
(A)
Rated Voltage
(DC V)
Rated Power
(W)
Power Supply
Mode
Recommended
Power Supply(W)
NOTE: Please ask the sales for detail drawing.

4
LED NEON FLEX
ND5-20
AVERAGE BEAM ANGLE(50%):156.1°
C0 /180,199.8°
Unit:cd
C90/270,112.4°
Luminous Intensity Distribution Diagram
Flux Out: 588.1lm
Height Eavg,Emax Beam Angle:112.01° Diameter
Average Illumination
NOTE: the above two gures are tested with white LED and surface of ND5-20 at 6500k, please ask the sales for other data.
5
LED NEON FLEX
ND5-20
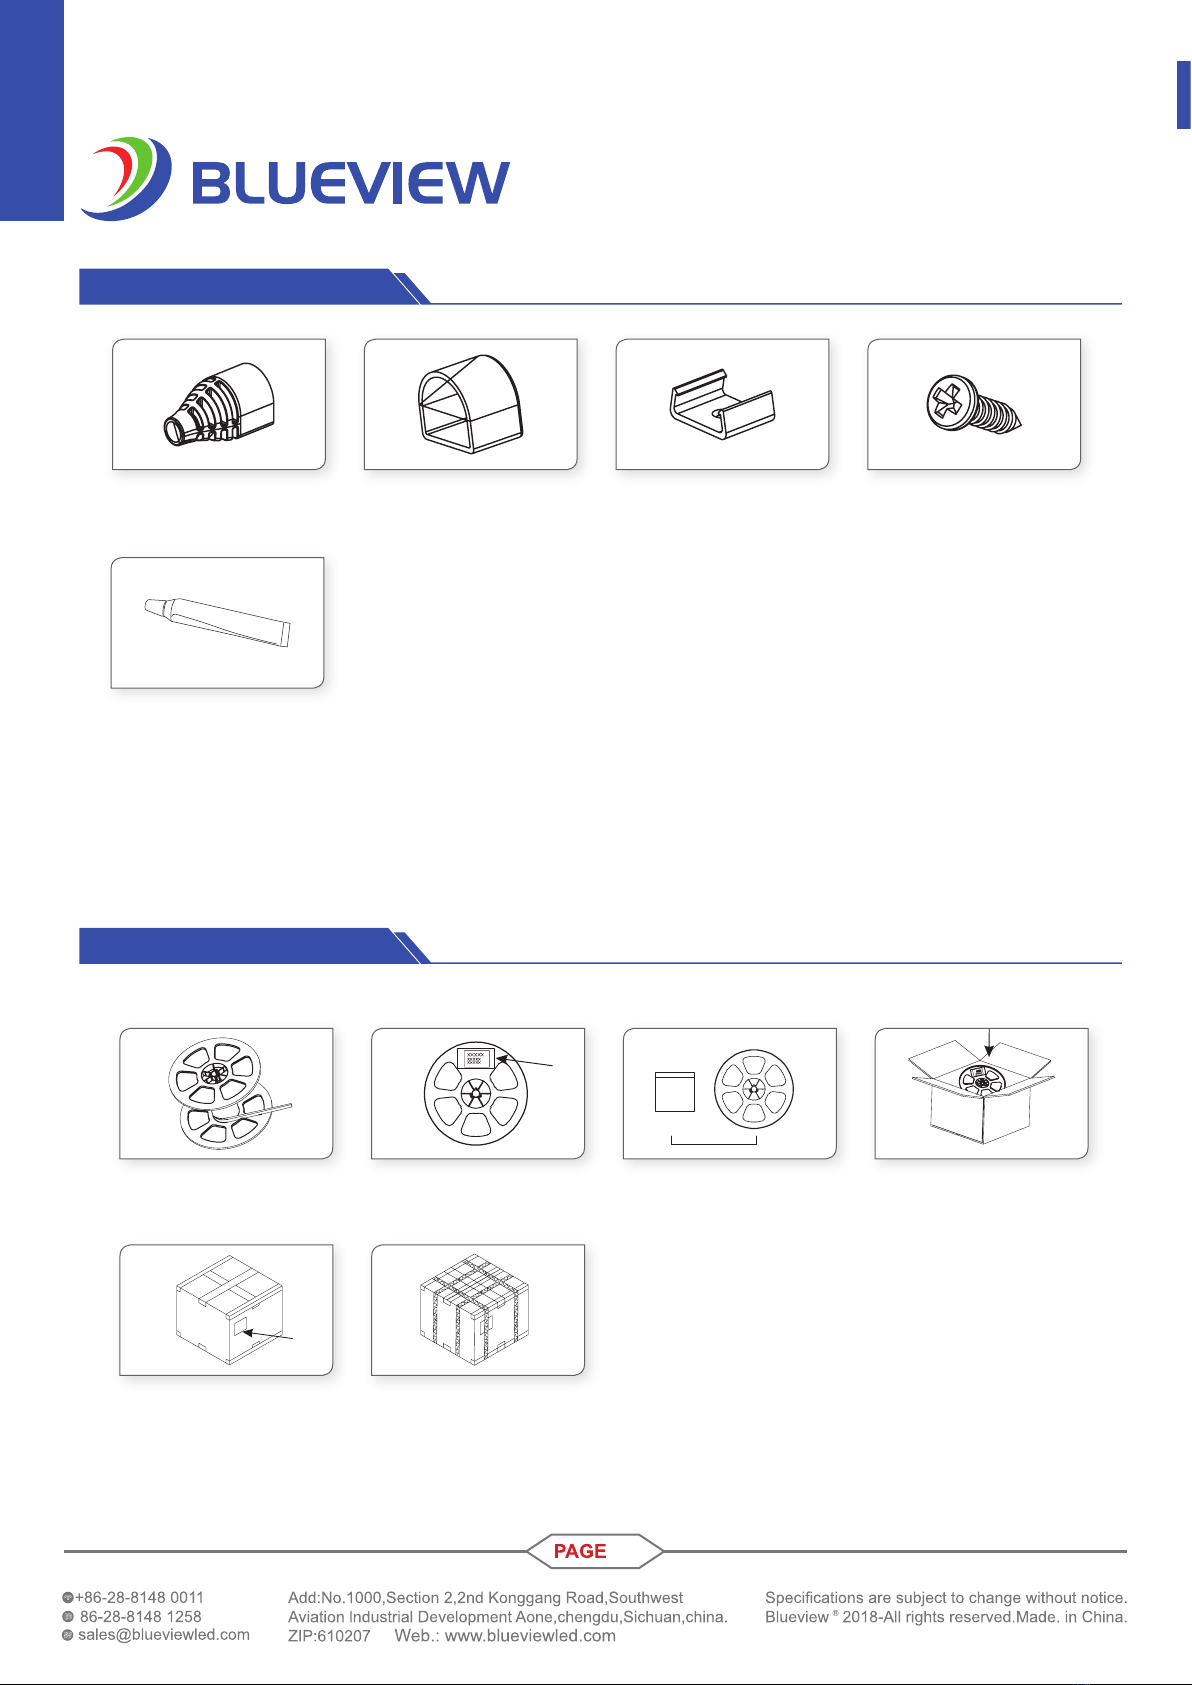
Product accessories
End exit(FREE)
Quantity(5/10m):2/4pcs
End cap (FREE)
Quantity(5/10m):2/4pcs
Plastic clip(FREE)
Quantity(5/10m):10/20pcs
Screw(FREE)
Quantity(5/10m):10/20pcs
Silicone glue (OPTIONAL)
Quantity(5/10m):1pcs
Packaging Information
all accessories can be provided according to customer requirements.
Note:
Roll the product on the reel
and tie it with PE lm.
Put the reel and accessory
bag together into carton box.
Seal and label the box. Use packing belt to pack. Add
edge protectors if necessary.
Label the reel. Fitting each reel with
corresponding accessory bag.

6
LED NEON FLEX
ND5-20
Note:
1. Each 1 piece(5m or 10m) for a reel and every 10 reels or 4reels packed in a carton box.
2. The above quantity and weight are only for the illustrated packaging method. There will be differences in the quantity and weight with other
packaging methods.
Packaging information
Model No.
ND5-20
5000X18X15
10000X18X15
390X390X325
390X390X325
5
10
10
4
15.75(1±10%)
12.60(1±10%)
20.05(1±10%)
18.50(1±10%)
Product Size
(mm)
Carton Size
(mm) Meter/Reel Reel/Carton Net Weight(kg) Gross Weight(kg)
Installation
Tools
Cutter Electric batch Hairbrush
Installation steps
Details of installation operation at input end
Weld the wire to the PCB
board
First put waterproof glue
inside of the plug, then push
into the tape light
Wipe off the excess glue and
wait for the glue to solidify.

7
LED NEON FLEX
ND5-20
Details of installation operation at the end part
First put some glue inside of
the plug, then push into the
tape light
Wipe off the excess glue and
wait for the glue to solidify.
Screw the plastic clip to the
installation position.
Then slowly press the tape
light into the plastic clip
The tape light is atly and
rmly stuck on the plastic clip
3. Operation details of plastic clip installation.
At welding part, note the positive and negative poles of lines and board and the
corresponding colors on the board; positive to positive and negative to negative
Each connection point must use 10g silica gel, and treat waterproof and
insulation well;
The screw of installation card must perpendicular to installation surface and be
fastened, as shown in the right.
Note:
8
LED NEON FLEX
ND5-20
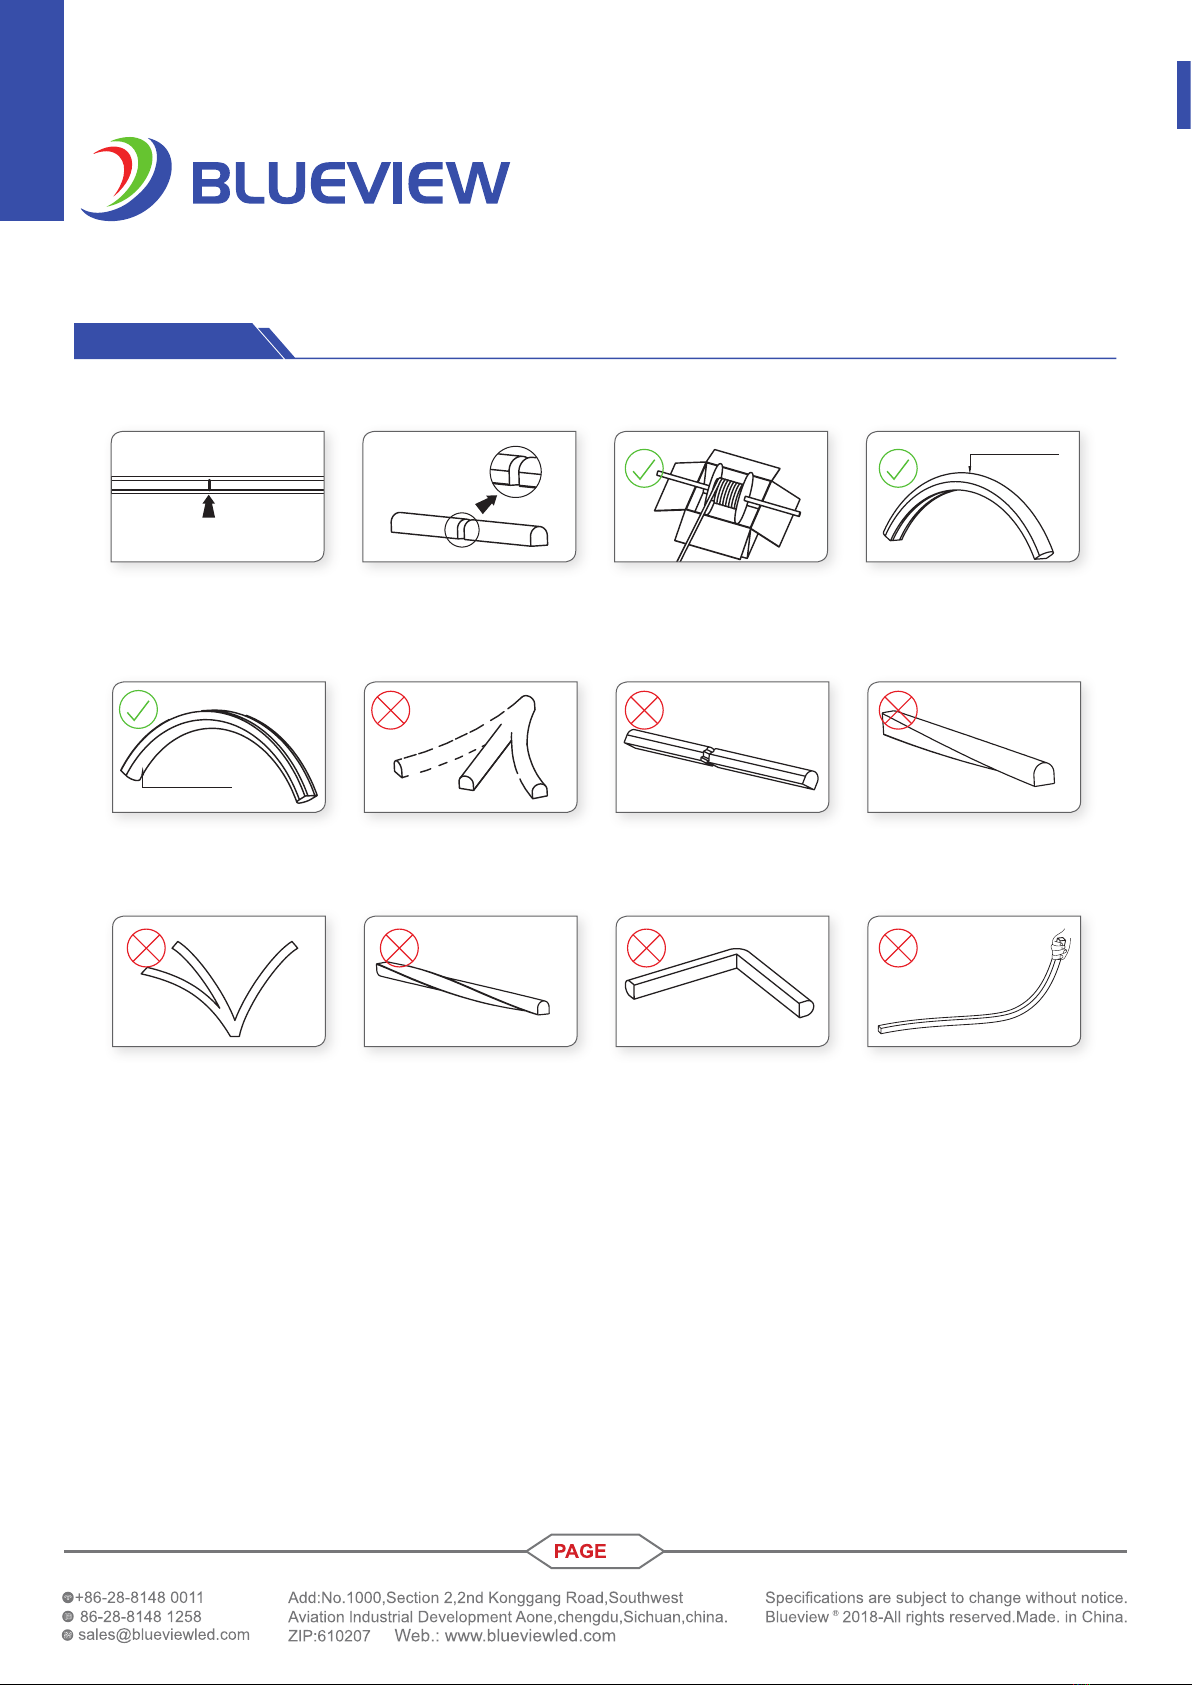
1. cutting marks are on the PCB and can be found at the bottom of the product
2. The above diagram only shows the correct or wrong way of operation. The product should be based on the actual product.
Note:
Attentions
Cuttable mark Neat and smooth cut Insert a stick on the reel
and place it on the packing
box,and rotate the reel to get
the product
use in convex direction
use in concave direction Do not make irregular cuts.Do not bend left and right Do not twist the product
Do not bend many times,for it
can damage electronic lines
Do not use on wringing(twist) Do not bend at right angles Do not throw or pull when
taking products
Light Surface
Light Surface

9
LED NEON FLEX
ND5-20
Before installation, check that the product parameters are consistent with the requirements (Seeing product specicationsor product labels)
Load voltage, current, power and power supply should be matched with the product.
Follow the instructions of wiring diagram (rst connect the load and then the power supply) to avoid short circuit.
Make sure the correct connection of positive and negative poles between led module and power supply. Otherwise, the light will not be on.
Make sure the power cord rmly screwed into the terminal and it should not be pulled out by hands.
The terminal should have insulation,waterproof and anti-corrosive treatment.
Common Faults and Troubleshoot
Statements and Recycling
Attentions before installation
Warning
Do not disassemble or retrot the light. Do not touch the surface of the
light with a sharp object.
Do not do live-line working during installation,especially for high voltage
product.
Do not use any organic chemical solvents.
Use neutral glass adhesive to x this product and it needs to be dried 4
hours in the open environment after operation.
Treat the ends and the circuit connection points that are not connected
to the main line with insulation,waterproof, and anti-corrosion in the
installation.
Use 18AWG (0.75mm² cross-sectional area) or thicker core wire to avoid
adverse consequences caused by overheating, if the power cable need
to lengthen.
Make sure the input voltage meets the requirements and lines are
connected correctly before lighting on.
This product is for signage, and do not use as general lighting.
Series connection within the max run.
The length of the power cable between the power supply and the led
strip should not exceed 2 meters.Otherwise, large circuit loss will lead to
inconsistent brightness.
Installation, maintenance and repair should be operated by a qualified
technician.
Quick Guide
Problems
All LEDs can
not light on.
LEDs can not
light on partly.
Brightness of
LED
is inconsistent
tor insufcient.
LED icker.
Automatic power protection
from the open or short
circuit in output of the power
supply. Fix the short circuit problem.
Correctly connection
Check the power supply
system to x it.
Replace with more powerful power
Make sure the working voltage of
the product within ±5% of standard
voltage, or keep balance by circuit
power consumption.
Reduce the quantities of the product in
series connection to meet requirement.
Power on
Wrong connection of power
supply.
Some switching mode power
supplies are not powered.
Power supply line error.
Mistaken wire connection of
some of products
Power overloaded.
Connection point fault. Remove bad connection point.
Replace a new power supply.
Please follow the instructions
Power supply circuit
excessive consumption.
Excessive quantities in series
connection of the product
Switching power supply failure.
Wrong Installation or use of
products
Reasons
No electric supply.
Solutions
Repair should be operated by a qualied technician, if the external circuit or main line of this product is damaged.
The parameters given in this manual are typical values and for reference only.
All illustrations and drawings in this manual are for reference.
This product is subject to change without notice.
Statements:
LED lighting products belongs to electronic products, please do recycling treatment according to the relevant WEEE directives.
Recycling:
This manual suits for next models
1
Table of contents
Other Blueview Lighting Equipment manuals


