Blueview YD8 Series User manual

Version:1.0
YD 8 1.0
01 04
04
05
02
03
Features Installation Reference
Prole Drawing
Connection Diagram
Optical & Electrical Parameters
Other Parameters
Adopt Nichia 3030 SMD LED.
Secondary optical lens with 160° beam angle
High efcacy up to 116lm/W
SA-01 connector, no distinguish female or male, easier for installation
Aluminum PCB for better heat dissipation
Specication: 3 LEDs/ 270mm, 4 LEDs/ 360mm, 7 LEDs/630mm
Testing temperature: 25±2
The above data is typical values. The actual data of each single product may differ from
the typical values.The data is subject to change without notice.
Luminous ux is tested when lighting on single color.
Different color temperature will make luminous ux different
SA2-01 connectorSA2-01 connector
Note:
Note:
The scheme use single-side light box and the surface material is 3mm white acrylic
plate. The illumination refers to average illumination while the surface is uniform.
The test sample is YD8-7.
The above data is only for reference.
YD8-3
YD8-3
YD8-4
YD8-4
YD8-7
YD8-7
YD8-3 270mm 90mm 3
YD8-4
YD8-7
360mm
630mm
Standard Series Connection : 8PCS
Power Supply
90mm
90mm
4
7
Model No.
Model No.
Model No. Size “L” Size “P” LED Quantity/pc
Color Temperature (K)
Standard Series Connection
6000-7000 6000-7000 6000-7000
8 PCS
160° 160° 160°
158 210 370
-25~+60℃
-25~+70℃
-25~+60℃-25~+60℃
-25~+70℃-25~+70℃
82 82 82
IP60
50 66 116
24 24 24
3.2 3.2 3.2
IP60 IP60
8 PCS 8 PCS
Beam Angle
Working Temperature
Luminous Flux (lm/pcs)
Storage Temperature
Ra
IP Grade
Efcacy (lm/W)
Voltage ( V DC)
Power (W/pcs)
LED Arrangement
6
Scheme1 Scheme2 Scheme3 Scheme4 Scheme5
Test Item
15
7
2520-3860
Height of Lightbox(cm)
Center Spacing(cm)
Density(pcs/m²)
Illumination(Lux)2520-3680 1820-2670 1780-2580 1700-2510
7
13
7
8
17
6
9
17
6
10
17
6
06
0807
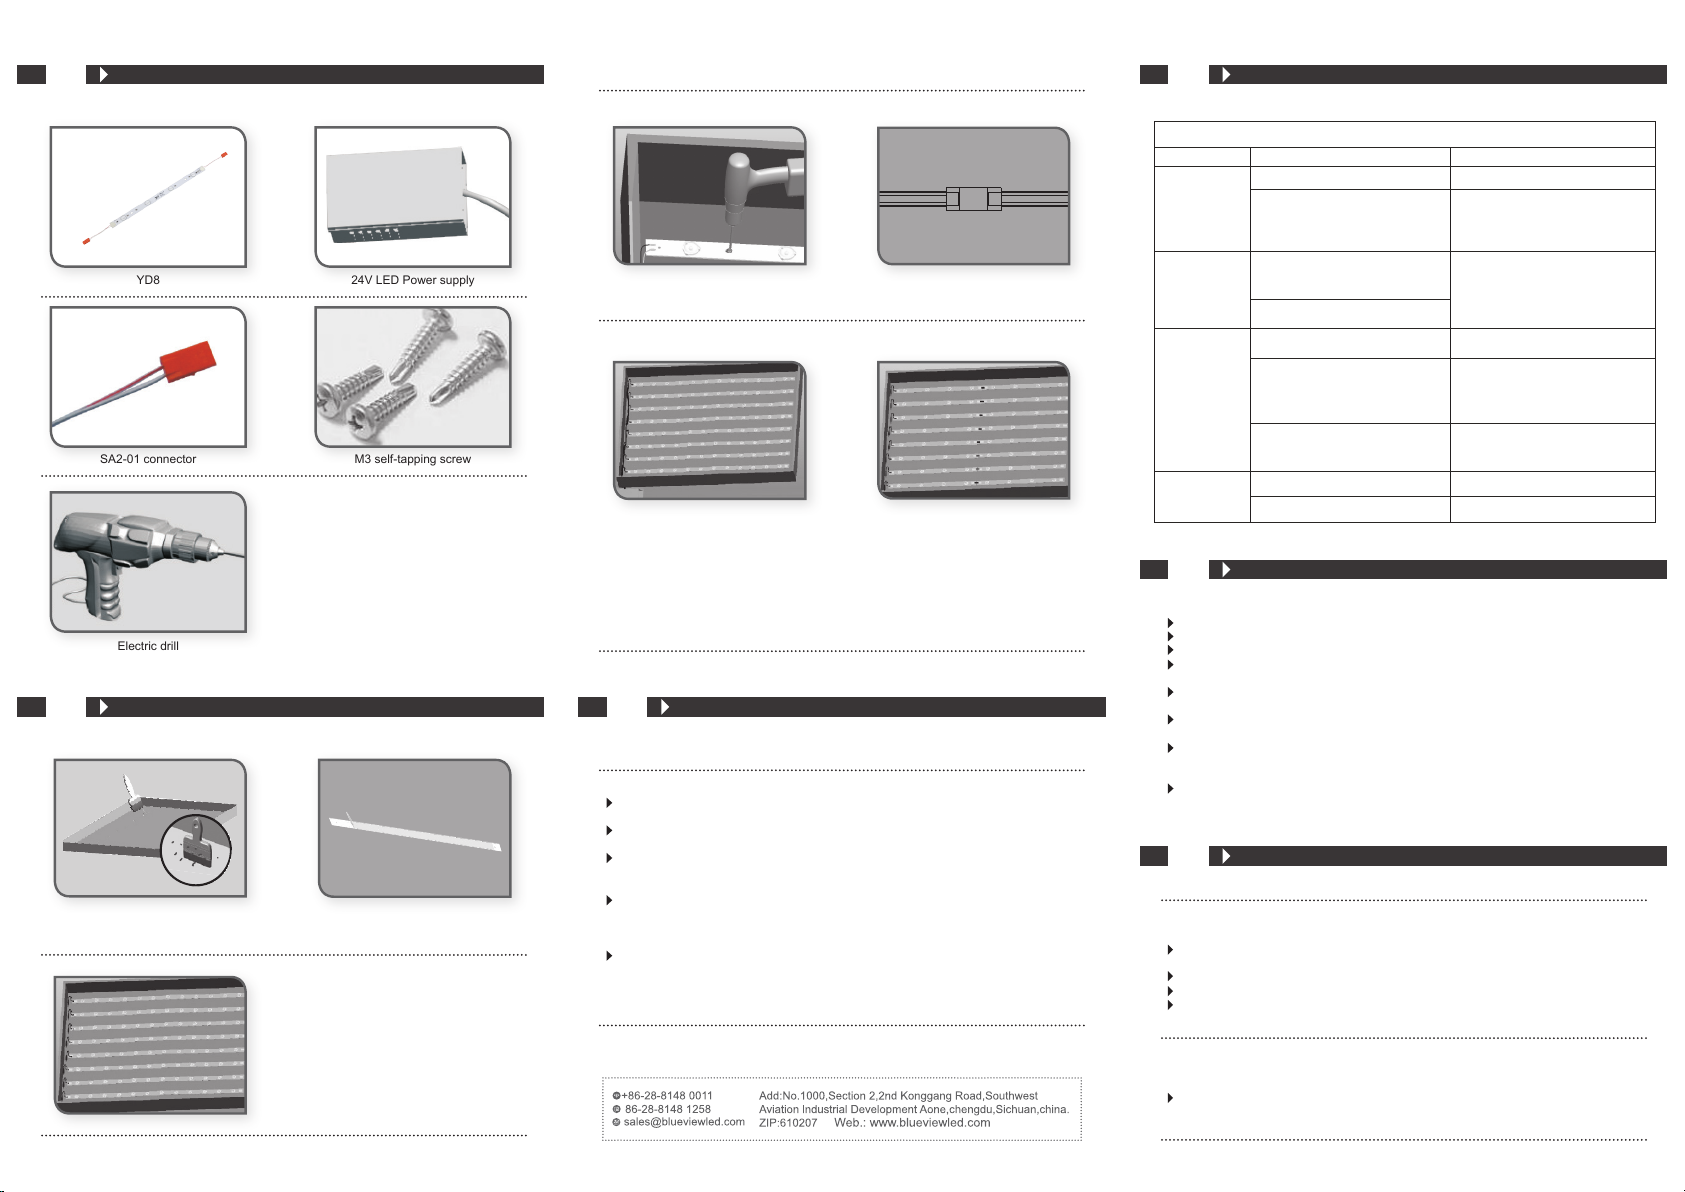
Accessories & Tools
Attentions
Installation Steps
YD8 24V LED Power supply
SA2-01 connector M3 self-tapping screw
Electric drill
Clean the mounting surface. Peel off the release paper backside
the rigid bar.
Distribute the rigid bars in the light
box according to proper spacing. Be
careful not to damage lens, LEDs
and electronic components of the
rigid bar.
Screw to x the bar.
If the bar need to be jointed, please
arrange it as the picture shows.
Note: Do not excess the standard
series connection.
Connect the SA2-01 connector.
Connect the main line of rigid bar to
the 24V power supply.
Note: Treat the wire end with
insulation,waterproof, and anti-
corrosion arrangement as it cannot
pull out by hands.
Load voltage, current, power and power supply should be matched with the product.
Follow the instructions of wiring diagram to avoid short circuit.
The main line connected to the rigid bar should be thicker to prevent inconsistent
brightness due to excessive line loss.
Make sure the power cord rmly screwed into the terminal as it can not be pulled out
by hands, and the terminal should have insulation,waterproof and anti-corrosive
treatment.
Use standard output voltage: DC24V. The power supply line with safety
certification(with short circuit protection, over-voltage protection and over-current
protection, the output voltage adjustment rate of switching power supply is±%5 )
should retain a load margin greater than 15% .
Do not remove or modify LED, and do not touch or scratch the LED with sharp objects.
Do not do live-line working during installation.
Do not use any chemical solvents.
Treat the ends and the circuit connection points that are not connected to the main line
with insulation,waterproof, and anti-corrosion in the installation.
Use thicker core wire to avoid adverse consequences caused by overheating if the
power cable need to lengthen.
Make sure the input voltage meets the requirements and lines are connected correctly
before lighting on.
This product is used inside of the light box or signage, and do not use it directly in
outdoor and semi-outdoor situation.
Installation and maintenance must be done by professionals.
The length of the power cable between the power supply and the Product should not
exceed 2 meters. Otherwise, large circuit loss will lead to inconsistent brightness.
09 Common Faults and Troubleshoot
Quick Guide
Problems
All LEDs can
not light on.
LEDs can not
light on partly.
Brightness of
LED
is inconsistent
tor insufcient.
LED icker.
Automatic power protection
from the open or short circuit in
output of the power supply.
Fix the short circuit problem.
Check the power supply system to
x it.
Replace with more powerful power
Make sure working voltage of the
product within ±5% of standard
voltage, or keep balance by circuit
power consumption.
Reduce the quantities of the
product in series connection to
meet requirement.
Supply electricity.
Some switching mode power
supplies are not powered.
Power supply line error.
Power overloaded.
Connection point fault. Remove bad connection point.
Replace a new power supply.
Power supply circuit
excessive consumption.
Excessive quantities in series
connection of the product.
Switching power supply failure.
Reasons
No electric supply.
Solutions
10 Warning
11 Statements and Recycling
Repair should be operated by a qualied technician, if the external circuit or main line of
this product is damaged.
The parameters given in this manual are typical values and for reference only.
All illustrations and drawings in this manual are for reference.
This product is subject to change without notice.
LED lighting products belongs to electronic products, please do recycling treatment
according to the relevant WEEE directives.
Statements:
Recycling:
This manual suits for next models
3
Other Blueview Lighting Equipment manuals

Blueview
Blueview ZNSR4-10M User manual

Blueview
Blueview MZ18 User manual

Blueview
Blueview LED SILICONE NEON FLEX User manual

Blueview
Blueview LED NEON FLEX User manual

Blueview
Blueview FWTU-2835T-112-24 User manual

Blueview
Blueview NDF1005 User manual

Blueview
Blueview TN-5050A-120-24-RGB+5050W User manual
Popular Lighting Equipment manuals by other brands


Knog
Knog Blinder ROAD user manual

Cooper Lighting
Cooper Lighting Halo L650 brochure

Viabizzuno
Viabizzuno Vb Series Installing instructions

WE-EF
WE-EF VLR100 LED Series Installation and maintenance instructions

Whelen Engineering Company
Whelen Engineering Company T-103 installation guide

Vivosun
Vivosun AeroZesh user manual