BN Thermic PROTIM-7 User manual

Thank you for purchasing a BNThermic product. Manufactured to a high standard, this product will, if used according
to these instructions and properly maintained, give you years of trouble free performance. Please ensure instructions
remain with your customer for their reference.
1. SAFETY INSTRUCTIONS
1.1 ELECTRICAL SAFETY
WARNING! It is the responsibility of the owner and the operator to read, understand and comply with the
following:
You must check all electrical products, before use, to ensure that they are safe. You must inspect power
cables, plugs, sockets and any other connectors for wear or damage. You must ensure that the risk of electric
shock is minimised by the installation of appropriate safety devices. A Residual Current Circuit Breaker
(RCCB) should be incorporated in the main distribution board. If in any doubt consult a qualified electrician.
You must also read and understand the following instructions concerning electrical safety.
▪The Health & Safety at Work Act 1974 makes owners of electrical appliances responsible for the safe
condition of those appliances and the safety of the appliance operators. If in any doubt about electrical safety,
contact a qualified electrician.
▪Installation should always be carried out by a qualified electrician or a competent person in accordance with
current electrical regulation.
▪Ensure that the insulation of all the cables on the appliance is undamaged and safe, before connecting it to
the power supply.
▪Ensure that the cables are always protected against short circuit and overload.
▪Regularly inspect the power supply cables and plugs etc. for wear or damage and check all connections to
ensure that none are loose.
▪Important: Ensure that the voltage marked on the appliance matches
the power supply to be used and that a correctly rated fuse is fitted.
▪DO NOT use worn or damaged cables, plugs or connectors.
Immediately have any faulty item repaired or replaced by a qualified
electrician.
▪The unit should be protected by a suitably rated isolator and fuse.
▪This Timer is only suitable for indoor or outdoor use where the timer is
protected from water.
1.2 GENERAL SAFETY INSTRUCTIONS
✓Remove all packaging and store it away from children.
✓Familiarise yourself with the applications and limitations of the timer.
XDO NOT use in areas where hazardous gasses or dusts may be
present.
XDO NOT disassemble the timer for any reason there are no user
serviceable parts inside.
XDO NOT use this timer to perform a task for which it has not been
designed.
2. INTRODUCTION & SPECIFICATION
The PROTIM-7 timer has up to 4 ON and 4 OFF easy-set programme periods per day, 28 ON/28 OFF programmes
per week and offers an easy way of controlling one or many heaters either directly or through the use of an additional
contactor.
Volt Free Contacts
This unit can be user set so the contacts are volt free this allows the timer to be used with our MC1 Halogen Control
panel, TS-5 Halogen soft start controller or either of our Hard Case Thermostats.
INSTRUCTIONSFOR:-
7 DAY TIMER
Model:- PROTIM-7
REGISTER: PLEASE REGISTER THIS PRODUCT ONLINE TO ACTIVATE
YOUR GUARANTEE AT www.bnthermic.co.uk
IMPORTANT: PLEASE READ THESE INSTRUCTIONS, NOTE THE SAFE OPERATIONAL
REQUIREMENTS, WARNINGS, AND CAUTIONS. USE THIS PRODUCT CORRECTLY, AND WITH CARE
FOR THE PURPOSE FOR WHICH IT IS INTENDED. FAILURE TO DO SO MAY CAUSE DAMAGE AND/OR
PERSONAL INJURYAND WILLINVALIDATETHEWARRANTY.

Specification
Model
PROTIM-7
Input Supply
220-240V 50Hz ac
Maximum Output Power - Resistive
3000W
Maximum Output Power - Halogen
Use Contactor
Dimensions (W x D x H)
115 x 90 x 58mm Deep
Max Terminal Capacity
2.5mm²
Max Terminal Torque
0.5 Nm max
Operating Temperature
-20ºC to 40ºC
Programs –One of the following
(User Settable)
4 ON/OFF Settings per Day for 7 Days
4 ON/OFF Settings Repeat every Day
4 ON/OFF Settings 5 Week Days + 4
ON/OFF Settings 2 Weekend Days
Weight
0.4kg
3. INSTALLATION
ISOLATE MAINS SUPPLY BEFORE COMMENCING ANY INSTALLATION WORK.
Do NOT use power tools to undo or do up terminal screws or front cover screws.
Carefully remove the four screws which secure the front panel of the controller, taking care not to damage the earth
wire attached to the back of the box. The front panel & earth cable can be disconnected from the back box whilst
wall-fixing is carried out but must be replaced before refitting the front panel.
4. ELECTRICAL CONNECTIONS.
Please make sure you have read the Safety instructions and that you are
a suitably qualified electrician and the mains supply is fully isolated before
continuing.
Wiring
This timer MUST be earthed.
The terminals are marked as follows:-
LLive supply N Neutral supply E Earth Supply
S in Live Input for volt free output (If volt free is not required, fit a link
wire between Land S in.)
S out Switch live output.
The front cover should be replaced ensuring, the earth wire is securely
connected to the back of the box.
Note: This device needs to be left to charge for a minimum of 15 minutes
once powered up, before it will operate
.
5. BATTERY.
The time switch has a factory fitted rechargeable battery to give clock operation and programme memory back up
during loss of mains supply. Before programming for the first time, connect the unit to the mains for at least 15
minutes prior to pressing the Rst button and
programming the unit. If the display is not visible or very
faint, charge for 4 hours prior to pressing Rst and
programming
6. RESET.
The time switch must be reset before programming for
the first time, or after mains power has been
disconnected for more than 5 days, and following a 4
hour period of charging.
Press Rst using a pointed object, eg: a pencil.
The display will show all the segments, and then clear to
show:-
Use the Adv/ovr button to change
between on and off for the automatic
summer time adjustment and
proceed to section 7 (Picture shows
auto summer ON).
3

7. SETTING THE CLOCK.
A) Press and hold down the Time
button for 3 seconds. The word hold
will show on the screen. After 3
seconds, the screen will show a
year. Use the Adv/ovr or Boost
buttons to change the year to the
correct year. Press Time to set the
year, and then the month will show
and flash.
B) Use the Adv/ovr or boost
button to adjust the month to the
correct month.
Press Time to set the month,
and then the day will show and
flash.
C) Use the Adv/ovr or boost button
to adjust the day to the correct day.
Press Time to set the day, and then
the Hours will show and flash.
D) Use the Adv/ovr or boost
button to adjust the hour to the
correct hour (24 hour format).
Press Time to set the hour, and
then the clock will show and
flash the minutes.
E) Use the Adv/ovr or boost button to adjust the minutes to the correct minutes.
Press Time to exit the Time and date entry mode.
The display should now show the correct time and day of the week. If the day of the week is
wrong you need to check the settings for the Year, Month and Day
Note: during time/date setting, when the Adv/ovr or Boost buttons are held down, the setting
under adjustment will advance or decrease more rapidly
8. MODIFYING THE DATE AND TIME OF DAY.
Normally the only change required will be to the time of day minutes, in which case press and
hold Time for 3 seconds, during which hold will show on the display. After 3 seconds the display
will show the Year:
Press Time repeatedly until the minutes are shown and flash. Use Adv/ovr or Boost to change
the minutes to the correct value. Press Time to return to operating mode.
Other changes can be made the same way, but the Time button must be pressed to return to
operating mode after any changes. There is no automatic exit from Time/date entry mode.
9. PROGRAMMING ON / OFF TIMES.
Timer has 4 independent on/off periods available for programming each day. There is a choice
of programming options, including 7 days the same (24 hours), 5 + 2 days (where the weekdays
are the same, and the two weekend days are the same), and 7 individual days.
Press and hold the Prg button for 3 seconds.
Whilst holding, the word Hold should show on the display.
After 3 seconds, the mode screen will show.
Use Adv/ovr or Boost to change the day grouping mode.
This will step through the following options:
1) 24hr –Mo Tu We Th Fr Sa Su
2) 5 day –Mo Tu We Th Fr followed automatically in programming by 2 day –Sa Su.
3) Individual day –Mo followed automatically in programming by each of the other days.
Once the desired day grouping is selected, press Prg to move onto programming on/off times.
The display will show PROG 1, with dashes for the hours and minutes.
Example shown is for 5 + 2 programme.
Use Adv/ovr or Boost to set the hour for the first on period.
Press Prg to change to setting the minutes.
Use Adv/ovr or Boost to set the minutes.
Press Prg to change to programme 1 off time.
Press Prg to scroll through programme 2 on, programme 2 off, programme 3 on, programme
3 off, programme 4 on and programme 4 off, adding in times as required.
If times are not required, just leave the dashes in place, and scroll past that programme.
After programme 4 has been entered, the day will index to the next day to be programmed, or in
the case of 5 + 2 it will change to Sa Su. Programme the on/off times as before.
After the last off time for programme 4 has been set, press Prg to exit programme mode.

At any stage in programming, if the Prg button is pressed and held for 3 seconds, the timer will return to operating mode.
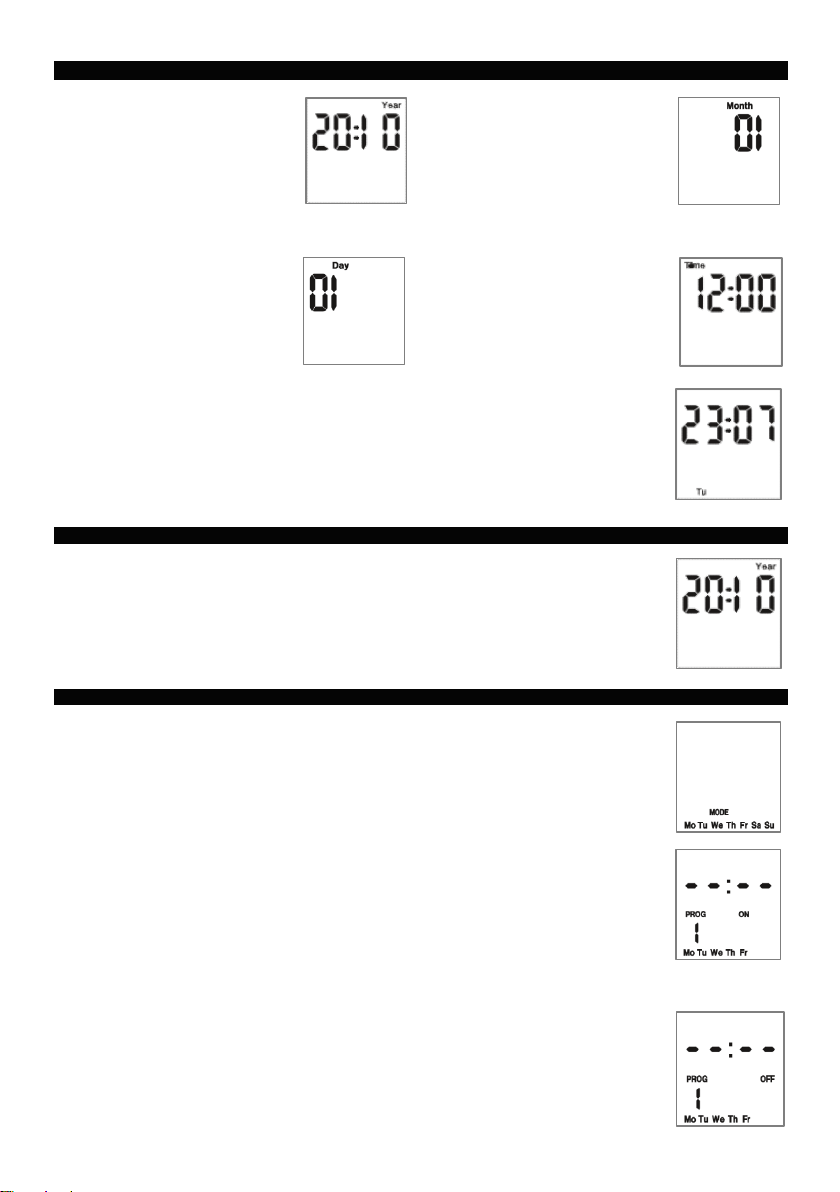
The display will now show:-
Where the day and time are correct, but the on/off indicator may not reflect the current
programme accurately, in which case press the Adv button to correct the indicator.
In the same way as for individual programmes, days or groups of days can be omitted either
by leaving dashes in all the locations for on/off times for that day or group of days.
Alternatively, leaving the programme entry mode before filling in all the on/off times will leave
the remaining times blank. The only way to re-enter a blank time is to reset the unit.
10. PROGRAMMING ACROSS MIDNIGHT.
Enter the required programme on time. Enter the programme off time as 00:00
Enter the first programme on time for the next day as 00:00
Enter the required programme off time.
Note: For 24 hour the on period for programme 1 must start 00:00.
11. MODIFYING OR ADDING PROGRAMMES.
Press Prg and hold for 3 seconds. Whilst holding, the word hold will appear on the display.
After 3 seconds the display will show the programming mode screen. This will be in the mode in which it was last
programmed for instance if it was programmed in 5 + 2, then it will show Mo Tu We Th Fr.
Either accept this, press Prg, and review the times programmed for this mode by pressing Prg or press Adv/ovr or
Boost to change the mode, and then press Prg to review the times. In this case, either to Sa Su, or to 7 day or to
individual days.
Note: If the unit was programmed as a 5 + 2 then changing the mode to any other mode other than Sa Su may
blank any previous programming.
The same applies for changing from any other mode, changing from the mode it was last programmed in may
blank the previous programme.
Review times and adjust as necessary as described in section 9.
12. ADVANCE / OVERRIDE PROGRAMME IN RUN MODE.
In operating mode Adv/ovr advances the programme to the next change. If the output is off, it will change the
output to on, display will show “ON + ADVANCE” until the next programmed off time.
If the output is on, it will change the output to off, display will show “OFF + ADVANCE” until the next programmed
on time.
A second push of the Adv/ovr button selects a permanently on mode, display will show “ON + OVERRIDE” where
the output is on, irrespective of the programming.
A third push of the Adv/ovr button selects a permanently off mode, display will show “OFF + OVERRIDE” where
the output is off, irrespective of the programming.
A fourth push of the Adv/ovr button returns the unit to operating mode, where the output will conform to the
programming settings. Display will show either “ON” or “OFF” depending on your program settings.
13. USING BOOST BUTTON.
One press of the boost button will provide 1 hour boost, after which the output will turn off irrespective of how your
program is set. Timer will not turn on automatically until the next programmed “ON” time.
Two presses will give 2 hours boost, after which the output will turn off irrespective of how your program is set. Timer
will not turn on automatically until the next programmed “ON” time.
Three presses will cancel any boost time remaining and turn the output off irrespective of how your program is set.
Timer will not turn on automatically until the next programmed “ON” time.
NOTE: It is our policy to continually improve products and as such we reserve the right to alter data, specifications
and component parts without prior notice.
REGISTER:
Activate your warranty by registering online at
www.bnthermic.co.uk and retain this installation data for future reference
IMPORTANT: No liability is accepted for incorrect use of this product.
WARRANTY: Your BN Thermic product is guaranteed for one year from
date of purchase. We will repair or replace at our discretion any part found to
be defective. We cannot assume any consequential liability. This guarantee
in no way prejudices your rights under common law and is offered as an
addition to consumer liability rights. P
ROTIMINS
-v02-1
This product conformsto EU Directive 2002/96/EC.
This appliancebearsthesymbolofthecrossed waste bin.Thisindicates that,atthe endofitsusefullife, itmustnot
be disposedofas domesticwaste,but mustbe taken toacollectioncentreforwaste electricalandelectronic
equipment.Itis theuser's responsibilitytodisposeofthisappliancethroughthe appropriate channels. Failuretodo
somayincur penalties establishedbylaws governingwastedisposal.
BN ThermicLtd,
34 StephensonWay, Three Bridges,
Crawley,RH101TN
Tel: +44(0) 1293 547361
Email:sales@bnthermic.co.uk
Web:www.bnthermic.co.uk
Table of contents
Other BN Thermic Timer manuals