BOMANN WA 5715 User manual

H
HH
H
OUSEHOLD
OUSEHOLDOUSEHOLD
OUSEHOLD
-
--
-
W
WW
W
ASHING
ASHING ASHING
ASHING
M
MM
M
ACHINE
ACHINEACHINE
ACHINE
WA
WAWA
WA
5715
57155715
5715
/
//
/
WA
WAWA
WA
5834
58345834
5834
Instruction Manual
Instruction ManualInstruction Manual
Instruction Manual

2
Contents
ContentsContents
Contents
Introduction.............................................................................................................Page 3
General Notes…………………………………………………………..………….…….Page 3
Special safety Information for this Unit…………………………….…………………..Page 4
Unpacking the Appliance………………...……………………….…….………..…..…Page 6
Appliance Equipment……..……………….………………...…………….……..……..Page 6
Installation…………….……...…………….………...………………………...………...Page 7
Startup / Operation………...................……...………………………..…..…….……Page 10
Starting a Wash Program.………………..………………...…………….……………Page 15
Cleaning and Maintenance.....…………………………...……..………………...…..Page 20
Troubleshooting……………………….………..………………………………......….Page 23
Technical Data……………...…………………………..……………..……..…………Page 24
Disposal….………………………..………………..….……………………..……..…..Page 26

3
Introduction
IntroductionIntroduction
Introduction
Thank you for choosing our product. We hope you will enjoy using the appliance.
Symbols in these Instructions for Use
Symbols in these Instructions for UseSymbols in these Instructions for Use
Symbols in these Instructions for Use
Important information for your safety is specially marked. It is essential to comply with
these instructions in order to avoid accidents and prevent damage to the machine:
WARNING:
WARNING:WARNING:
WARNING:
This warns you of dangers to your health and indicates possible injury risks.
CAUTION:
CAUTION:CAUTION:
CAUTION:
This refers to possible hazards to the machine or other objects.
NOTE
NOTENOTE
NOTE:
::
: This highlights tips and information.
General Notes
General NotesGeneral Notes
General Notes
Read the operating instructions
carefully before putting the appliance into operation and
keep the instructions including the warranty and the receipt. If you give this device to
other people, please also pass on the operating instructions.
NOTE
NOTENOTE
NOTE:
::
:
The illustrations in this instruction
manual can deviate from the original appliance.
•
The appliance is designed exclusively for private use and for the envisaged pu
pose. This appliance is not fit for commercial use.
•
The appliance is only to be used as described in the user manual. Do not u
appliance for any other purpose. Any other use is not intended and can result in
damages or personal injuries.
•Do not use it outdoors. Keep it
away from sources of heat, direct sunlight
•Do not operate the appliance without
withoutwithout
without supervision.
•
When not in use, for cleaning, user maintenance works or with disruption, switch off
the appliance and disconnect the plug (pull the plug itself, not the lead) or turn off
the fuse.
Thank you for choosing our product. We hope you will enjoy using the appliance.
Important information for your safety is specially marked. It is essential to comply with
these instructions in order to avoid accidents and prevent damage to the machine:
This warns you of dangers to your health and indicates possible injury risks.
carefully before putting the appliance into operation and
keep the instructions including the warranty and the receipt. If you give this device to
manual can deviate from the original appliance.
The appliance is designed exclusively for private use and for the envisaged pu
r-
The appliance is only to be used as described in the user manual. Do not u
se the
appliance for any other purpose. Any other use is not intended and can result in
away from sources of heat, direct sunlight
, humidity.
When not in use, for cleaning, user maintenance works or with disruption, switch off
the appliance and disconnect the plug (pull the plug itself, not the lead) or turn off

4
•
The appliance and if possible the mains lead have to be checked regularly
of damage. If damage is found the appliance must not be used.
•
For safety reasons, alterations or modifications of the appliance are prohibited.
•
In order to ensure your children’s safety, please keep all packaging (plastic bags,
boxes, polystyrene etc.) out of their reach.
WARNING:
WARNING:WARNING:
WARNING:
Do not allow small children to play with the foil. There is a
danger of suffocation!
danger of suffocation!danger of suffocation!
danger of suffocation!
Special safety Information for this Unit
Special safety Information for this UnitSpecial safety Information for this Unit
Special safety Information for this Unit
WARNING: Hot surface! Danger of burns!
WARNING: Hot surface! Danger of burns!WARNING: Hot surface! Danger of burns!
WARNING: Hot surface! Danger of burns!
During operation the temperature of the bull’s-
eye may be
very hot.
•Before using the
transportation locking screws must be
removed, otherwise it may cause serious damages.
•The dry weight of laundry must not exceed
the max.
loading capacity.
Model WA 5715 with 6 kg; Model
WA 5834 with 8 kg.
•The
unit must be connected with a new set of hoses to
the water supply; old hose sets should not be reused.
•The maximum / lowest permitted water inlet
pressure is
1 MPa / 0.05 MPa.
•
Do not use any flammable/explosive cleaning agents
such as benzene in the appliance.
The appliance and if possible the mains lead have to be checked regularly
for signs
For safety reasons, alterations or modifications of the appliance are prohibited.
In order to ensure your children’s safety, please keep all packaging (plastic bags,
danger of suffocation!
danger of suffocation!danger of suffocation!
danger of suffocation!
Special safety Information for this Unit
Special safety Information for this UnitSpecial safety Information for this Unit
Special safety Information for this Unit
WARNING: Hot surface! Danger of burns!
WARNING: Hot surface! Danger of burns!WARNING: Hot surface! Danger of burns!
WARNING: Hot surface! Danger of burns!
eye may be
transportation locking screws must be
removed, otherwise it may cause serious damages.
the max.
Model WA 5715 with 6 kg; Model
unit must be connected with a new set of hoses to
the water supply; old hose sets should not be reused.
pressure is
Do not use any flammable/explosive cleaning agents

5
•In the appliance bottom are located ventilation openings
(depending on model). These may not be blocked e.g.
by carpet. Pay attention to free circulation of air.
•If the unit is used in the bathroom, unplug the power
cord after using as the proximity of water presents a
danger. This even applies when the unit is switched off.
•This appliance can be used by children
children children
children aged from 8
years and above and persons with reduced physical,
sensory or mental capabilities or lack of experience and
knowledge if they have been given supervision or in-
struction concerning use of the
use of theuse of the
use of the appliance
applianceappliance
appliance in a safe way
and understand the hazards involved.
•Children
ChildrenChildren
Children shall not play with the appliance.
•Children
ChildrenChildren
Children younger than 3 years should be kept away,
unless they are constantly supervised.
•Cleaning and user maintenance
user maintenanceuser maintenance
user maintenance shall not be made by
children
childrenchildren
children unless they are older 8 years and supervised.
•The appliance must be cleaned regularly. Follow the
instructions in the chapter "Cleaning and Maintenance".
•Do not try to repair the appliance on your own. Always
contact an authorized technician. To avoid the expo-

6
sure to danger, always have faulty cable be replaced
only by the manufacturer, by our customer service or by
qu
alified person and with a cable of the same type. Do
not use the device if the device or plug is damaged.
Unpacking the Appliance
Unpacking the ApplianceUnpacking the Appliance
Unpacking the Appliance
•Remove the appliance from its packaging.
•
Remove all packaging material, such as foils, filler and cardboard packaging.
•To
prevent hazards, check the appliance for any transport damage.
•
In case of damage, do not put the appliance into operation. Contact your distributor.
NOTE
NOTENOTE
NOTE:
::
:
Production residue or dust may have collected on the appliance. We recommend clea
ing the appliance according to chapter “Cleaning and Maintenance”.
Appliance
Appliance Appliance
Appliance Equipment
EquipmentEquipment
Equipment
Overview of the
Overview of the Overview of the
Overview of the appliance
applianceappliance
appliance
1 Appliance door
2 Detergent drawer
3 Control panel
4 Water drain hose
5 Power plug
6 Cover panel
of drain pump
Delivery scope
Delivery scopeDelivery scope
Delivery scope
(depending on model)
(depending on model)(depending on model)
(depending on model)
Inlet hose (WA 5715),
inlet hose safety system (WA 5834),
transport locking screw
covers
sure to danger, always have faulty cable be replaced
only by the manufacturer, by our customer service or by
alified person and with a cable of the same type. Do
not use the device if the device or plug is damaged.
Remove all packaging material, such as foils, filler and cardboard packaging.
prevent hazards, check the appliance for any transport damage.
In case of damage, do not put the appliance into operation. Contact your distributor.
Production residue or dust may have collected on the appliance. We recommend clea
n-
of drain pump
transport locking screw

7
Installation
InstallationInstallation
Installation
WARNING:
WARNING:WARNING:
WARNING:
The unit must not be connected to the mains during installing. Otherwise there is
ger to life
ger to lifeger to life
ger to life or electric shock
electric shock electric shock
electric shock hazard
hazardhazard
hazard!
CAUTION:
CAUTION:CAUTION:
CAUTION:
For a correct operation
the appliance must be connected properly. The specifications
for water supply and drain as well as the electrical connection must fulfill the required
criteria.
Remove the transport locking screws
Remove the transport locking screwsRemove the transport locking screws
Remove the transport locking screws
CAUTION:
CAUTION:CAUTION:
CAUTION:
•Before using, all transport locking screws
must be removed from the
back.
Otherwise it may cause serious damages.
•
Keep the transport locking screws for later use / transport. Never transport the
appliance without properly attached transportation safety!
•
Loosen the screws from the appliance back
with a wrench
and remove them.
•Plug the holes of transport locking screws with the supplied covers
.
Installation location
Installation locationInstallation location
Installation location
•The site should be located near the water inlet and outlet, as
well as near a properly
grounded power socket.
•
Good ventilation around the appliance is required, in order to dissipate the heat
properly. Sufficient clearance must be created for this purpose.
•The clearance to the front must be created so, that the applia
nce door can open
without being impeded.
•Make sure that the floor on which the appliance is installed, is
even,
and clean.
The unit must not be connected to the mains during installing. Otherwise there is
da
dada
dan-
n-n-
n-
the appliance must be connected properly. The specifications
for water supply and drain as well as the electrical connection must fulfill the required
must be removed from the
appliance
Keep the transport locking screws for later use / transport. Never transport the
with a wrench
.
well as near a properly
Good ventilation around the appliance is required, in order to dissipate the heat
nce door can open
even,
heat-resistant

8
•
Take care of a solid and horizontal position of the appliance. If the appliance is not
horizontally leveled, adjust
the feet accordingly (see “Adjust the feet”).
•Power cord and water hoses may not kinked or squashed.
•The wall socket must be freely accessible.
•Avoid the installation:
Avoid the installation:Avoid the installation:
Avoid the installation:
-
near heaters, next to a stove, direct sunlight or any other heat sources;
-at locations w
ith high humidity (e.g. outdoors), as metal parts would be su
ceptible to corrosion under such circumstances;
-
in rooms where the temperature could drop below freezing. Do not expose
the appliance any weather.
-near volatile or flammable materials (e.g. gas,
fuel, alcohol, paint, etc.).
Adjust the feet
Adjust the feetAdjust the feet
Adjust the feet
Loosen the locknuts with a wrench.
Turn to the right to let down the unit;
turn to the left to lift up
Tighten the lock nuts with the wrench when the
appliance
leveled. The feet must have solid ground contact.
Check with a spirit level if the appliance is leveled horizontally. If the appliance is not in
balance, the feet must be adjusted again.
CAUTION
CAUTIONCAUTION
CAUTION:
::
:
•Looseness locknuts can cause vibration and noise.
•The feet must never be
removed. Do not restrict the floor clearance through ca
pets, strips of wood or similar. Danger of heat accumulation!
Danger of heat accumulation!Danger of heat accumulation!
Danger of heat accumulation!
Water connection
Water connectionWater connection
Water connection
CAUTION:
CAUTION:CAUTION:
CAUTION:
•
The Installation of the water supply must conform to the local laws and regulations.
•The appliance is not
notnot
not suitable for hot water supply.
•
Use the new supplied hose set to connect the appliance to the water supply. Do not
reuse old or used connection sets.
Take care of a solid and horizontal position of the appliance. If the appliance is not
the feet accordingly (see “Adjust the feet”).
near heaters, next to a stove, direct sunlight or any other heat sources;
ith high humidity (e.g. outdoors), as metal parts would be su
s-
in rooms where the temperature could drop below freezing. Do not expose
fuel, alcohol, paint, etc.).
turn to the left to lift up
the unit.
appliance
is properly
Check with a spirit level if the appliance is leveled horizontally. If the appliance is not in
removed. Do not restrict the floor clearance through ca
r-
The Installation of the water supply must conform to the local laws and regulations.
Use the new supplied hose set to connect the appliance to the water supply. Do not

9
CAUTION:
CAUTION:CAUTION:
CAUTION:
•
If the water pipe is new or long time not used, ensure before connecting to the
water system, that the water is clear and free from contamination.
Notes on inlet hose safety system (
Notes on inlet hose safety system (Notes on inlet hose safety system (
Notes on inlet hose safety system (
delivery scope depending on model
delivery scope depending on modeldelivery scope depending on model
delivery scope depending on model
The safety system consists of a double-walled inlet hose. It
guarantees to cut off the
water supply when leakage of the inner hose. Switching off the water supply leads over
an electronic contact.
If necessary, you can order an inlet hose safety system from your dealer or in our online
accessories shop, www.bomann.de
www.bomann.dewww.bomann.de
www.bomann.de
. To order, use the reference number found under
“Technical Data”.
Connect the water inlet hose (cold water connection)
Connect the water inlet hose (cold water connection)Connect the water inlet hose (cold water connection)
Connect the water inlet hose (cold water connection)
NOTE
NOTENOTE
NOTE:
::
:
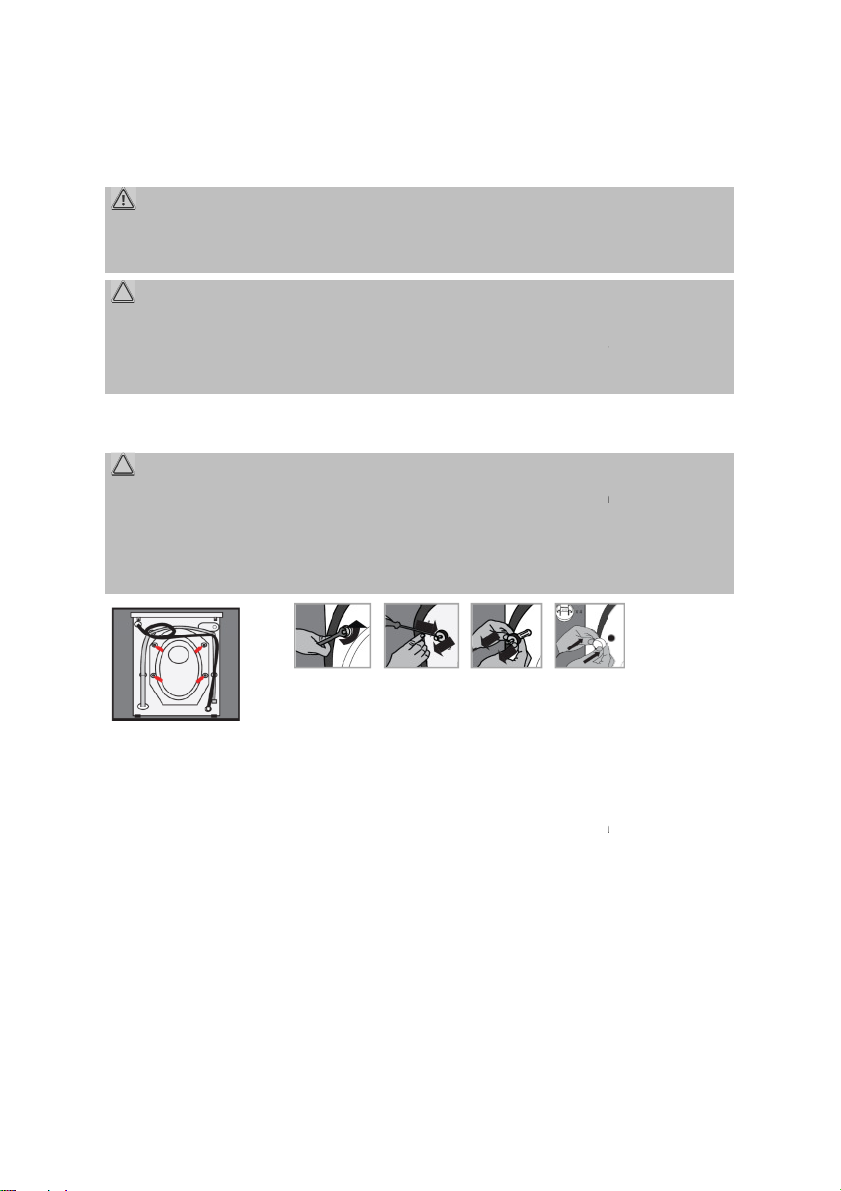
The water pressure must be between 0.05 MPa
and 1 MPa. With higher
a pressure regulator.
•
Connect the water inlet hose to a water thread with ¾“.
hose firmly in the direction of the screw thread; pay attention for a
tight fit.
•
Connect the other end of the inlet hose to the inlet valve on the
appliance back; pay attention for a tight fit too.
Connect the water drain hose
Connect the water drain hoseConnect the water drain hose
Connect the water drain hose
NOTE
NOTENOTE
NOTE:
::
:
The drain hose has a length of approx. 1.5 m
and can extend with a suitable hose and
connecting piece to a length of max. 4 m.
CAUTION:
CAUTION:CAUTION:
CAUTION:
In order to prevent
backflow of contaminated water, the free end of the hose must not
come under the water level of the drain.
•
Connect the drain hose to a drain pipe with a minimum diameter of 40 mm; altern
tively the drain hose can be fixed to a sink or directly to the
drainage.
If the water pipe is new or long time not used, ensure before connecting to the
delivery scope depending on model
delivery scope depending on modeldelivery scope depending on model
delivery scope depending on model
)
))
)
guarantees to cut off the
water supply when leakage of the inner hose. Switching off the water supply leads over
If necessary, you can order an inlet hose safety system from your dealer or in our online
. To order, use the reference number found under
and 1 MPa. With higher
pressure: use
Connect the water inlet hose to a water thread with ¾“.
Screw the
hose firmly in the direction of the screw thread; pay attention for a
Connect the other end of the inlet hose to the inlet valve on the
and can extend with a suitable hose and
backflow of contaminated water, the free end of the hose must not
Connect the drain hose to a drain pipe with a minimum diameter of 40 mm; altern
a-
drainage.

10
•Always make sure that the ho
se is not bent or
squeezed. Use
e.g. a hose holding bow (a) (not
supplied).
•
The hose must be installed at a height of min.
600 mm and max. 10
00 mm above
•Secure the hose securely
in order to
change in position and with it a water leakage.
Electrical connection
Electrical connectionElectrical connection
Electrical connection
WARNING:
WARNING:WARNING:
WARNING:
•
The installation to the mains supply must conform to the local standards and regul
tions.
•Improper connection may cause to an electric shock
electric shockelectric shock
electric shock!
•Do not use multiple sockets or extension cords.
•
It is not allowed to modify the plug provided with the appliance. If the plug does not
fit properly to the outlet, let install a proper outlet by an authorized specialist.
•The accessibility of the power plug must always be ensur
ed in order to disconnect
the device from the power supply in case of an emergency.
•
Ensure that your mains power corresponds with the specifications of the appliance.
The specifications are printed on the rating label.
•Connect the mains cable to a properl
y installed and earthed wall outlet.
Startup / Operation
Startup / OperationStartup / Operation
Startup / Operation
Prior using for the first t
Prior using for the first tPrior using for the first t
Prior using for the first time
imeime
ime
•Make sure that all transport securing devices has been removed.
•Remove the accessories and any material from the drum.
•Allow the appliance to wash
the first time without any laundry, with the addition of
some washing agent in the program “Cotton 60°C” (see "
Starting a wash program
se is not bent or
e.g. a hose holding bow (a) (not
The hose must be installed at a height of min.
00 mm above
the floor.
in order to
avoid a
The installation to the mains supply must conform to the local standards and regul
a-
It is not allowed to modify the plug provided with the appliance. If the plug does not
fit properly to the outlet, let install a proper outlet by an authorized specialist.
ed in order to disconnect
Ensure that your mains power corresponds with the specifications of the appliance.
y installed and earthed wall outlet.
the first time without any laundry, with the addition of
Starting a wash program
").

11
Preparation of c
Preparation of cPreparation of c
Preparation of clothes
lotheslothes
lothes
CAUTION
CAUTIONCAUTION
CAUTION
•Do not wash any items that are declared as non-
washable. Follow always the i
structions on the care label of your laundry.
•
Do not wash clothes soaked in petrol, thinners, alcohol or solvents.
•
Foreign objects (e.g. nails, coins) can cause damage to garments and components.
•Check the pockets of all garments on content and empty them
completely.
•
Sort your fabrics by color and the symbols contained on the care label. Separate
white and colored laundry. All new colored clothes should be washed separately.
•Turn buttons and embroidery inside.
•Close zippers, buttons and hooks before washin
g. Tie any loose straps and loops.
•Wash bras e.g.
in a pillowcase to prevent leakage of the steel bracket.
•
Particularly delicate fabrics such as curtains, crochet or small items (socks, han
kerchiefs, neckties, etc.) should be washed in a closed bag.
•Remove always all the hooks from curtains.
•
Washing large and heavy parts such as bath towels, jeans, lined jackets and the
like can cause the drum to run unbalanced. We recommend adding one or two
smaller parts; this especially helps with the spinning cycle.
•
The clothes which easily get fuzzed shall be washed separately; otherwise the other
articles can be stained with dust and thrum etc. Preferably, black
clothes and cotton
clothes shall be washed separately because they can easily get stained with the
thrums of other colors when being washed together.
•Clean away dusts, stains and pet hairs from the clothes.
•
For spot removing heavy soiling the laundry can be treated with a special prewash
spray. Follow the operating instructions of the product packaging.
Select proper detergent
Select proper detergentSelect proper detergent
Select proper detergent
CAUTION
CAUTIONCAUTION
CAUTION:
::
:
Always consider the dosage and storage recommendations on the sales packaging.
WAR
WARWAR
WARNING
NINGNING
NING:
::
:
Keep detergent and additives out of reach for children!
washable. Follow always the i
n-
Do not wash clothes soaked in petrol, thinners, alcohol or solvents.
Foreign objects (e.g. nails, coins) can cause damage to garments and components.
completely.
Sort your fabrics by color and the symbols contained on the care label. Separate
white and colored laundry. All new colored clothes should be washed separately.
g. Tie any loose straps and loops.
in a pillowcase to prevent leakage of the steel bracket.
Particularly delicate fabrics such as curtains, crochet or small items (socks, han
d-
Washing large and heavy parts such as bath towels, jeans, lined jackets and the
like can cause the drum to run unbalanced. We recommend adding one or two
The clothes which easily get fuzzed shall be washed separately; otherwise the other
clothes and cotton
clothes shall be washed separately because they can easily get stained with the
For spot removing heavy soiling the laundry can be treated with a special prewash
Always consider the dosage and storage recommendations on the sales packaging.

12
•Use only “slightly foaming”
detergent for washing machines according to type of
fabric (cotton, synthetics, lined or woolen products), color, washing temperature and
degree of soiling. Otherwise foaming can cause overflowing.
•Bleach is alkaline and can damage your clothing,
preferably does not use bleach.
•
Detergents often leave residue in the clothes, which can cause bad odor if not
rinsed properly.
•
Detergent cannot easily get dissolved completely if there is too much detergent or
water temperature is rather low. It can remai
n in clothes, pipes and washing m
chines to pollute the clothes.
•
Washing shall follow the weight of clothes, dirty degrees, local water hardness as
well as the recommendations from the detergent manufacturers. C
onsult the water
company if you are not clear of water hardness.
Detergent drawer
Detergent drawerDetergent drawer
Detergent drawer
CAUTION
CAUTIONCAUTION
CAUTION:
::
:
The dispenser is designed exclusively for the use of detergents for washing machines!
NOTE
NOTENOTE
NOTE:
::
:
•Always add the detergent just before starting the wash
cycle, otherwise it could get
damp and will not dissolve properly.
•At the end of the wash
cycle the detergent dispenser must be empty.
•Pull out the drawer and add the detergent.
IChamber of detergent for the pre-wash.
II Chamber of detergent for the main wash.
Chamber for washing additives (fabric softener). Do not
exceed the MAX marking.
•Close the drawer.
Foam detection
Foam detectionFoam detection
Foam detection
Excessive foaming occurs by using too much detergent. This affects the wash and rinse
cycle. The function automatically checks the
foaming; excessive foam will be removed.
detergent for washing machines according to type of
fabric (cotton, synthetics, lined or woolen products), color, washing temperature and
preferably does not use bleach.
Detergents often leave residue in the clothes, which can cause bad odor if not
Detergent cannot easily get dissolved completely if there is too much detergent or
n in clothes, pipes and washing m
a-
Washing shall follow the weight of clothes, dirty degrees, local water hardness as
onsult the water
The dispenser is designed exclusively for the use of detergents for washing machines!
cycle, otherwise it could get
cycle the detergent dispenser must be empty.
Chamber for washing additives (fabric softener). Do not
Excessive foaming occurs by using too much detergent. This affects the wash and rinse
foaming; excessive foam will be removed.

13
Fill in the laundry
Fill in the laundryFill in the laundry
Fill in the laundry
•Unravel the clothes before putting them into the machine.
•Each load should correspond t
o the nominal capacity of the appliance
overload the appliance.
Different strengths, sizes and types of laundry can affect
the actual loading capacity. It is advisable to load the appliance
just that a normal
circulation during washing is possible.
•Close the door. Make sure that no laundries
are caught between the door
Control panel
Control panelControl panel
Control panel
1
11
1START/PAUSE
START/PAUSESTART/PAUSE
START/PAUSE
button
buttonbutton
button
Button to start/pause the selected or running program. The points in the display b
tween hour and minute indicates the status.
Flashing: Operation lighting continuously: Pause/Standby
2
22
2
TEMP button
TEMP buttonTEMP button
TEMP button
Temperature selection
Temperature selectionTemperature selection
Temperature selection
By repeatedly pressing the button, you can select the
wash temperature.
shows the selection.
NOTE
NOTENOTE
NOTE:
::
:
•If no temperature is selected the water temperature is cold.
•Consider that the selection is depending on program.
Suppressing the acoustic signal
Suppressing the acoustic signalSuppressing the acoustic signal
Suppressing the acoustic signal
Press the TEMP
button for a few seconds to stop the beep upon button press
beep sounds. Press the button to reactivate the beep upon
button presses
beep again.
o the nominal capacity of the appliance
. Do not
Different strengths, sizes and types of laundry can affect
just that a normal
are caught between the door
and seal.
Button to start/pause the selected or running program. The points in the display b
e-
wash temperature.
The display
button for a few seconds to stop the beep upon button press
es. A
button presses
. You’ll hear a

14
3
33
3
SCHLEUDERZAHL
SCHLEUDERZAHLSCHLEUDERZAHL
SCHLEUDERZAHL
button
buttonbutton
button
Spin speed selection
Spin speed selectionSpin speed selection
Spin speed selection
By repeatedly pressing the button, you
select the speed for the spin cycle. The display
shows the selection.
NOTE
NOTENOTE
NOTE:
::
:
•In the setting [0] spin stop, there is no spinning.
•Consider that the selection is depending on program.
Saving favorite program
Saving favorite programSaving favorite program
Saving favorite program
You can
save the selected settings (program, temperature and spin speed) as a favorite
program. Press after selection the button SCHLEUDERZAHL for a few seconds. Your
favorite program will be saved under "My program" (program selector switch).
NOTE
NOTENOTE
NOTE:
::
:
The progr
am remains stored until you change it with the same procedure.
4
44
4
ZEITVORWAHL
ZEITVORWAHLZEITVORWAHL
ZEITVORWAHL
(start delay) button
(start delay) button(start delay) button
(start delay) button
By repeatedly pressing the button, you can delay
the program start by 1
display shows the selection.
Choose the wanted program and press the START/PAUSE
button.
The operation will start automatically after the selected lead time has elapsed.
NOTE
NOTENOTE
NOTE:
::
:
You can change or delete the setting at any time.
Press the button repeatedly until the
display indicates [0h] in order to cancel the setting.
5
55
5
Activation of safety child lock
Activation of safety child lockActivation of safety child lock
Activation of safety child lock
Press the buttons ZEITVORWAHL und SCHLEUDERZAHL
at the same time
seconds. A beep sounds. The display shows the activation.
All buttons, except the
EIN/AUS button, as well as the program selector switch are locked. Press the buttons
again for a few seconds to deactivate the safety child lock. A beep sounds
6
66
6
EIN/AUS (on/off) button
EIN/AUS (on/off) buttonEIN/AUS (on/off) button
EIN/AUS (on/off) button
Button to switch on/off the power supply.
select the speed for the spin cycle. The display
save the selected settings (program, temperature and spin speed) as a favorite
program. Press after selection the button SCHLEUDERZAHL for a few seconds. Your
favorite program will be saved under "My program" (program selector switch).
am remains stored until you change it with the same procedure.
the program start by 1
- 24 hours. The
Choose the wanted program and press the START/PAUSE
The operation will start automatically after the selected lead time has elapsed.
Press the button repeatedly until the
at the same time
for a few
All buttons, except the
EIN/AUS button, as well as the program selector switch are locked. Press the buttons
again for a few seconds to deactivate the safety child lock. A beep sounds
again.

15
7
77
7
Program selector switch
Program selector switchProgram selector switch
Program selector switch
By turning the switch clockwise or counterclockwise, you select a wash program.
find the
program details in the “Wash program table” or under “Selecting a wash pr
gram”.
8
88
8
LED
LEDLED
LED-
--
-Display
DisplayDisplay
Display
- After the program has started the remaining washing
time is displayed as [x:xx]
hours and minutes.
- The start delay
time is indicated, if set. The program starts after [xx] hours.
- If the child lock is activated, the symbol is displayed.
- Once a program is started and thus the door lock is activated, the
symbol
displayed. When the wash cycle is completed, the door will be
unlocked
symbol goes off.
- The end of the program is displayed with [END].
- Error codes are displayed in case of failure.
Starting a Wash Program
Starting a Wash ProgramStarting a Wash Program
Starting a Wash Program
Wash program table
Wash program tableWash program table
Wash program table
NOTE
NOTENOTE
NOTE:
::
:
The shown values
are approximate and recommendations under standard conditions
and therefore not binding. The consumption data can vary
depending on water pre
sure, water hardness, water inlet
temperature, ambient temperature, type and quantity,
as well as power supply and selected additional options from the specified values.
By turning the switch clockwise or counterclockwise, you select a wash program.
You’ll
program details in the “Wash program table” or under “Selecting a wash pr
o-
time is displayed as [x:xx]
time is indicated, if set. The program starts after [xx] hours.
symbol
is
unlocked
and the
are approximate and recommendations under standard conditions
depending on water pre
s-
temperature, ambient temperature, type and quantity,
as well as power supply and selected additional options from the specified values.

16
max.
max.
max.
max. r
r
r
rp
p
p
pm
m
m
m
WA
WA
WA
WA
5834
5834
5834
5834
1400
1400
1400
1400
1200
1400
1400
1400
0
600
600
1400
800
1400
1400
Place your preferred program settings, see "Saving favorite program"
WA
WA
WA
WA
5715
5715
5715
5715
1400
1400
1400
1400
1200
1400
1400
1400
0
600
600
1400
1200
1400
1400
T
T
T
Ti
i
i
im
m
m
me
e
e
e
(
(
(
(H:
H:
H:
H:Min)
Min)
Min)
Min)
WA 583
WA 583
WA 583
WA 5834
4
4
4
1:45/1:53/1:53/
2:00/2:01/2:39
3:49
3:49
1:22
0:15/0:16/0:16/0:19
0:54/1:04/1:04/1:14
0:35
0:13
0:01
0:54/0:57/0:57/1:04
1:05/1:10/1:10
1:07/1:14/1:14/1:19
1:05/1:15/1:15/
1:17/1:34
1:12/1:20/1:20/1:27
1:20/1:30/1:30/
1:40/1:50/2:00
WA 5715
WA 5715
WA 5715
WA 5715
1:43/1:51/
1:51/
1:58/1:59/2:37
3:26
3:26
1:13
0:15/0:26/0:26/0:26
0:56/1:06/1:06/1:16
0:31
0:12
0:01
0:56/0:59/0:59/1:06
0:55/1:00/1:00
1:01/1:13/1:08/1:13
1:18/1:33/1:33/
1:33/1:43
1:04/1:12/1:12/1:19
1:09/1:19/1:19/
1:29/1:39/1:49
max.
max.
max.
max. kg
kg
kg
kg
WA
WA
WA
WA
5834
5834
5834
5834
8.0
8.0
8.0
8.0
2.0
2.0
8.0
8.0
---
2.0
2.5
8.0
4.0
4.0
8.0
WA
WA
WA
WA
5715
5715
5715
5715
6.0
6.0
6.0
6.0
2.0
2.0
6.0
6.0
---
2.0
2.5
6.0
3.0
3.0
6.0
selectable
selectable
selectable
selectable
temperature
temperature
temperature
temperature
°C
°C
°C
°C
cold-20-30-40
40
40
40-60-90
60
60
60
60
40
40
40
40
20
20
20
20
c
c
c
co
o
o
ol
l
l
ld
d
d
d-
-
-
-20-30-40
cold-20-30
30
30
30-40
---
---
---
cold-20-30-40
40
40
40
cold-20-30
30
30
30
cold-20-30-40
40
40
40
cold-20-30-4
4
4
40
0
0
0-60
cold-20-30-40
40
40
40
cold-20-30-40-60
60
60
60-90
Program
Program
Program
Program
Baumwolle Intensiv
Baumwolle 60°C*
Baumwolle 40°C*
Baumwolle 20°C
Express
ECO
Spülen+Schleudern
Schleudern
Abpumpen
Wolle
Feinwäsche
Mix
Pflegeleicht
Sport
Babykleidung
Mein Programm

17
*
* *
*
Standard program
Standard programStandard program
Standard program:
: :
: Cotton
CottonCotton
Cotton
60
6060
60°C
°C °C
°C /
//
/
Cotton
Cotton Cotton
Cotton 40°
40°40°
40°C
CC
C
With full and partial load, these are the standard wash programs to identify the infor
mation on the energy label. These programs are suitable to clean normally soiled lau
dry and of combined energy and water consumption most efficiently.
W
WW
Wash program
ash programash program
ash program
selection
selectionselection
selection
CAUTION
CAUTIONCAUTION
CAUTION:
::
:
Choose the right wash cycle according to the type, quantity and pollution. Always
sider the instructions on the care label of your laundry.
Program
ProgramProgram
Program
Explanation
ExplanationExplanation
Explanation
Mein Programm
(My Cycle)
When storing your favorite program, you
don’t need to set your preferred
wash settings with the next wash cycle again.
Baumwolle Intensiv
(Cotton intensive)
In order to improve the washing effect of your cotton textiles, the laundry is
washed in a long wash cycle with intense movements.
Baumwolle 60°C,
40°C, 20°C
(Cotton)
Select the wash cycle for your daily washing. The washing time is sufficien
ly long and intense. It is recommended to wash
the daily cotton articles such
as sheets, duvet covers, gowns, underwear, etc.
Express This
program is suitable for refreshment lightly soiled laun
energy savings.
ECO For a small amount of lightly
soiled cotton laundry. The wash temperature is
limited to 40°C and the washing time will be extended. This allows a good
washing efficiency and saves energy.
Spülen + Schleudern
(Rinse + Spin)
Separate rinse procedure with spin function.
Schleudern
(Spin)
Separate spin procedure. Soap or
rinse water shall be drained off
spinning. Do not add any detergent.
Abpumpen
(Drain)
The wash water is only drained off. There is
no spin cycle to conserve
delicates and fluffy fabrics.
Wolle
(Wool)
Wash cycle for wool, which is labeled
as "machine washable".
correct wash temperature and use suitable detergent.
Feinwäsche
(Delicate)
The wash cycle is most gentle and even suitable for silk
washable”. Use appropriate detergent.
Mix
The program is suitable for washing fabrics from blended fabrics, i
mixed with synthetic fibers.
With full and partial load, these are the standard wash programs to identify the infor
-
mation on the energy label. These programs are suitable to clean normally soiled lau
n-
Choose the right wash cycle according to the type, quantity and pollution. Always
con-
don’t need to set your preferred
In order to improve the washing effect of your cotton textiles, the laundry is
Select the wash cycle for your daily washing. The washing time is sufficien
t-
the daily cotton articles such
program is suitable for refreshment lightly soiled laun
dry with time and
soiled cotton laundry. The wash temperature is
limited to 40°C and the washing time will be extended. This allows a good
rinse water shall be drained off
before
no spin cycle to conserve
as "machine washable".
Consider the
labeled as “machine
The program is suitable for washing fabrics from blended fabrics, i
.e. cotton

18
Program
ProgramProgram
Program
Explanation
ExplanationExplanation
Explanation
Pflegeleicht
(Synthetic)
Select this cycle for delicate laundry. The wash cycle is shorter and milder
than for cotton. Recommended for Synthetic such as shirts, coats and
blended fabrics. Select Synthetics 40°C for curtains and lace. When wash-
ing knitwear use less detergent.
Sport Especially gentle for lightly soiled sportswear made of cotton, microfibers
and synthetics.
Kinderkleidung
(Baby Care)
Due to an additional rinse cycle, the program is suitable for baby laundry
and laundry of particularly sensitive persons; e.g. allergies.
Select the temperature corresponding to the textiles and pollution. Basically: the higher
the temperature, the higher the power consumption.
Temperatur
TemperaturTemperatur
Temperature
ee
e
Explanation
ExplanationExplanation
Explanation
90°C Heavily soiled pure white cotton or linen (e.g. tablecloths, sheets and towels).
60°C Moderately soiled colored cotton, linen and synthetic (e.g. shirts or underwear).
Slightly soiled whites (e.g. underwear).
40°C, 30°C,
20°C, cold
Normally soiled laundry (including synthetic and wool).
Capacity
CapacityCapacity
Capacity
Do not overload the appliance otherwise the laundry is not getting clean. Refer to the
information in the "Wash program table".
Starting a wash program
Starting a wash programStarting a wash program
Starting a wash program
•Connect the appliance to the power supply.
•The water supply must be opened up to the maximum pressure.
•Load your laundry and fill in the detergent.
•Close the appliance door.
•Select the required wash program, the temperature and the spin speed.
•Set the available options, if required.
•Press the START/PAUSE button to stat the operation.

19
Door lock
Door lockDoor lock
Door lock
WAR
WARWAR
WARNING
NINGNING
NING:
::
:
Never try to open the appliance door by force during the operation.
Once a wash program has started, the door cannot be opened. With p
ausing operation
the door also did not open
when the water temperature or the water fill level goes b
yond a certain level.
Program
ProgramProgram
Program
change
changechange
change
•Press the EIN/AUS button to cancel the program and to
switch off the
•Switch on the power by pressing the EIN/AUS button again.
•Select the desired program and
start the new operation via the START/PAUSE
button.
NOTE
NOTENOTE
NOTE:
::
:
If water has already taken, this will not drained off first.
End of program
End of programEnd of program
End of program
At the end of the
wash cycle will sound a series of beeps; then the unit goes into
standby mode. The door is unlocked and the door lock symbol in the display goes off.
[END] is displayed.
Switch off
Switch offSwitch off
Switch off
•Switch off the appliance by pressing the EIN/AUS button.
•Close the water supply!
•
Leave the appliance door slightly open until the next wash cycle to avoid odors.
•If the appliance is not in use for an extended period, d
isconnect the mains plug or
switch off or turn out the fuse.
Energy saving tips
Energy saving tipsEnergy saving tips
Energy saving tips
•If possible avoid the selection of high wash temperatures.
Modern detergents
achieve good washing results even at low temperatures.
ausing operation
when the water temperature or the water fill level goes b
e-
switch off the
power.
start the new operation via the START/PAUSE
wash cycle will sound a series of beeps; then the unit goes into
standby mode. The door is unlocked and the door lock symbol in the display goes off.
Leave the appliance door slightly open until the next wash cycle to avoid odors.
isconnect the mains plug or
Modern detergents

20
•Select t
he wash program depending on the type of laundry and the required degree
of washing.
•Take advantage of the maximum capacity of each wash program.
•Clean the filter regularly to avoid excessive washing and high
energy
•Ventilate the room well. The room temp
erature should not rise above +35°
Cleaning and Maintenance
Cleaning and MaintenanceCleaning and Maintenance
Cleaning and Maintenance
WARNING:
WARNING:WARNING:
WARNING:
•
Always switch off the appliance and disconnect the plug or turn off / unscrew the
fuse before cleaning and user maintenance.
•Allow the appliance to cool down sufficient before cleaning.
Scalding!
Scalding!Scalding!
Scalding!
•Do not use steam cleaners for cleaning the appliance; moist
ure could enter electr
cal components. Risk of electric shock!
Risk of electric shock!Risk of electric shock!
Risk of electric shock!
Hot steam could damage the plastic parts.
The appliance must be dry before restarting operation.
CAUTION:
CAUTION:CAUTION:
CAUTION:
•Do not use a wire brush or other sharp, abrasive items.
•Do not use any acidic or abrasive detergents.
NOTE
NOTENOTE
NOTE:
::
:
Dirty or clogged filter degrades the washing result
. Regularly check the filter
them if necessary.
Maintenance of the washing machine
Maintenance of the washing machineMaintenance of the washing machine
Maintenance of the washing machine
CAUTION:
CAUTION:CAUTION:
CAUTION:
•
Never use spray cleaners to clean the door panel, this may damage the
and electrical components.
•
Check after each wash the door seal and remove fiber residues, other materials
and foreign objects, otherwise it can lead to water leakage.
•
Clean the appliance outer surfaces and the door sealing thoroughly with a sof
damp cloth. Use only mild cleaning agent.
he wash program depending on the type of laundry and the required degree
energy
consumption.
erature should not rise above +35°
C.
Always switch off the appliance and disconnect the plug or turn off / unscrew the
Scalding!
Scalding!Scalding!
Scalding!
ure could enter electr
i-
Hot steam could damage the plastic parts.
. Regularly check the filter
and clean
Never use spray cleaners to clean the door panel, this may damage the
door lock
Check after each wash the door seal and remove fiber residues, other materials
Clean the appliance outer surfaces and the door sealing thoroughly with a sof
t,
This manual suits for next models
1
Table of contents
Other BOMANN Washer manuals

BOMANN
BOMANN WA 5722 User manual

BOMANN
BOMANN WA 5727 TL User manual

BOMANN
BOMANN WA 7192 User manual

BOMANN
BOMANN WA 5716 User manual

BOMANN
BOMANN MWA 948 CB User manual

BOMANN
BOMANN MWA 9481 CB User manual

BOMANN
BOMANN WA 5712 User manual

BOMANN
BOMANN HAUSHALTS User manual

BOMANN
BOMANN WA 7184 User manual

BOMANN
BOMANN WA 7170.1 User manual

BOMANN
BOMANN WA 5724 User manual

BOMANN
BOMANN WA 7193 User manual

BOMANN
BOMANN WA 5721 User manual

BOMANN
BOMANN WA 5729 User manual

BOMANN
BOMANN WA 5721.1 User manual

BOMANN
BOMANN WA 7194 User manual

BOMANN
BOMANN WA 7190 User manual

BOMANN
BOMANN WA 9312.1 User manual

BOMANN
BOMANN WA 7191 User manual

BOMANN
BOMANN WA 5612 User manual